AIPHONE GTMKBN GT Apartment Intercom System User Manual ENG GT DMB MKB 17 05 29 indd
AIPHONE CO.,LTD. GT Apartment Intercom System ENG GT DMB MKB 17 05 29 indd
UserManual.wiki
>
AIPHONE
>
GTMKBN User Manual
Users Manual
Navigation menu
Upload a User Manual
Namespaces
Wiki Guide
HTML
PDF
Info
Views
User Manual
Discussion / Help
Navigation
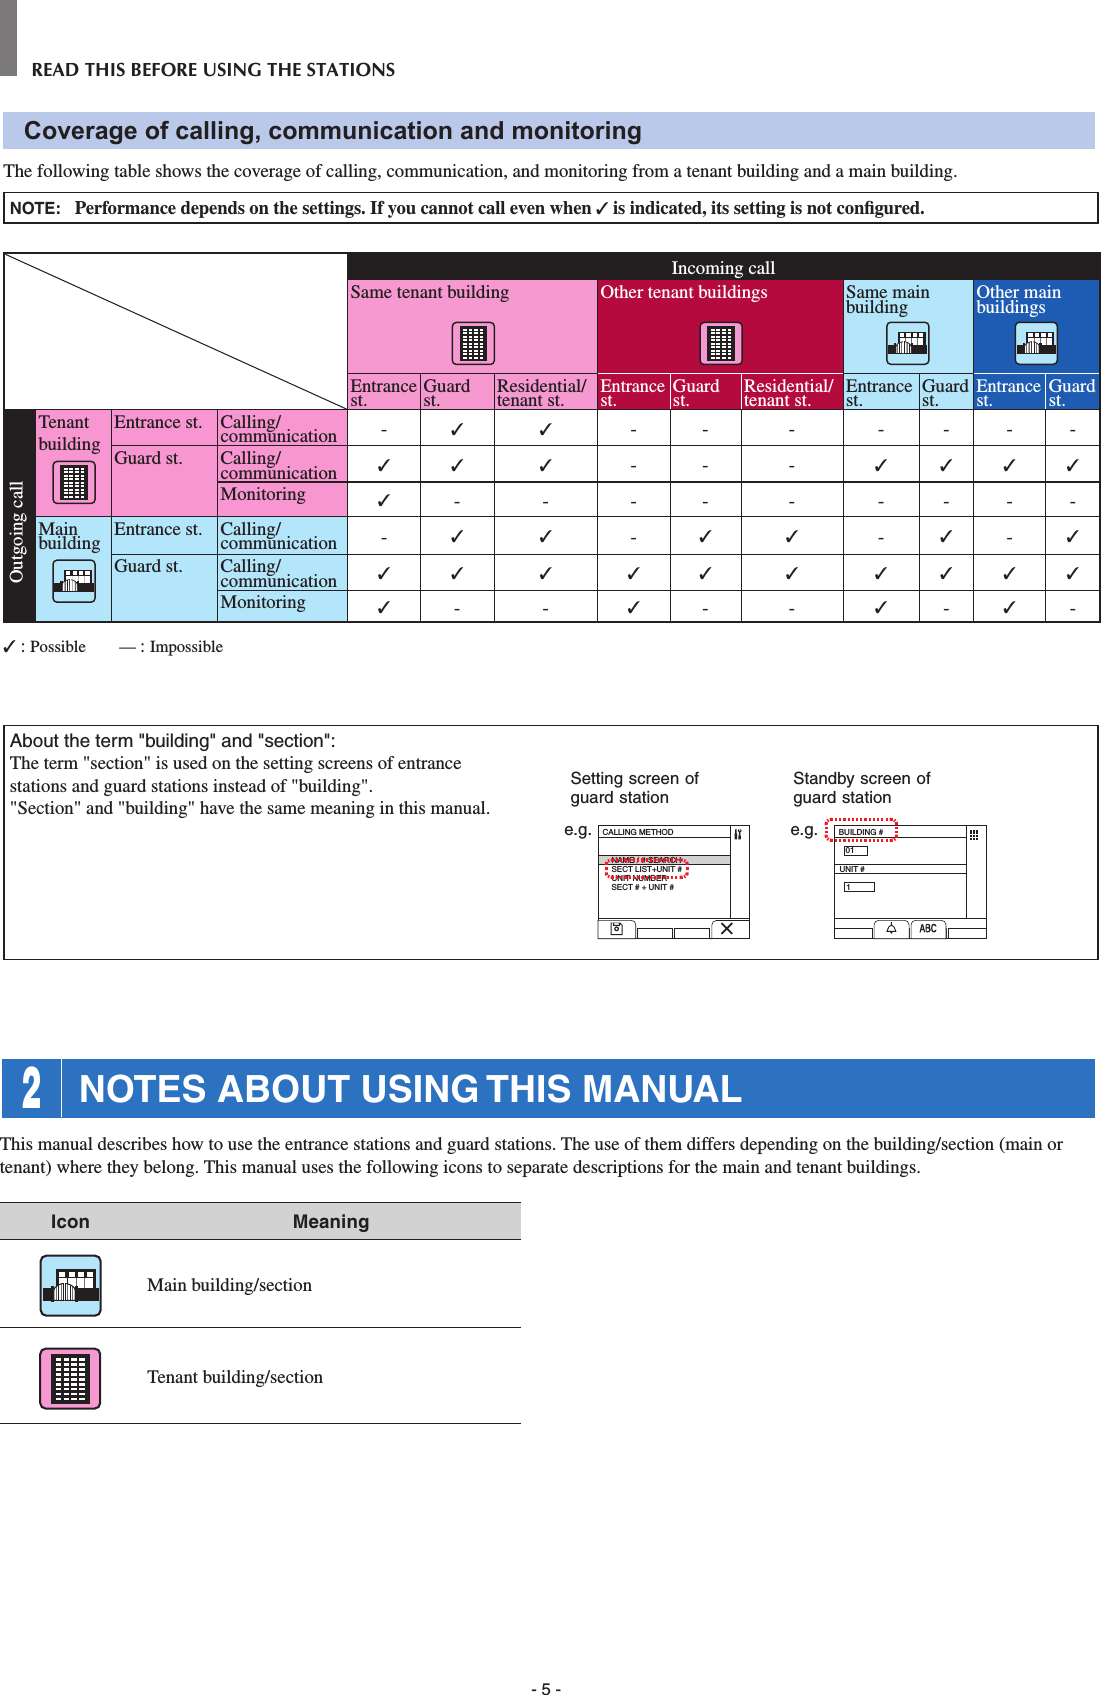
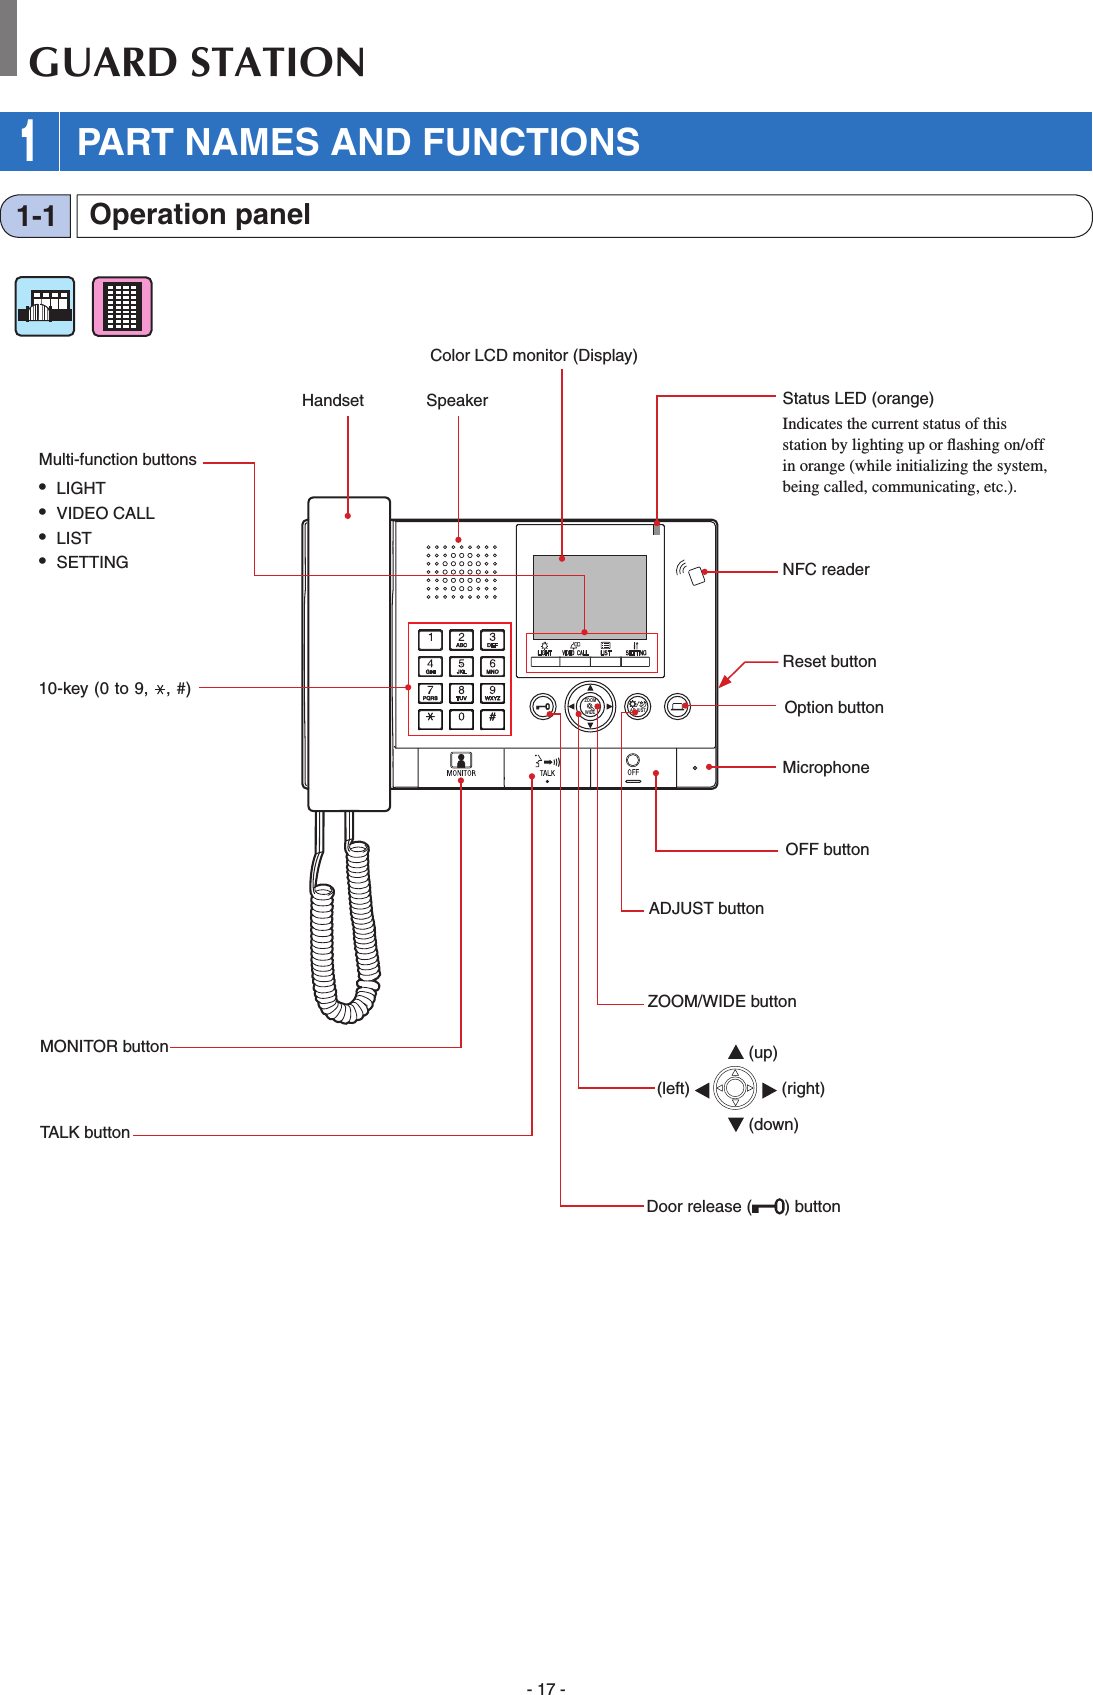
![- 6 -2BAC3EDF5KJL8UTV4HGI6NMO109YXWZ7RQPSCamera module GT-VBName scrolling module GT-NSB10 key module GT-10KCall switch moduleGT-SWBack search button (or move the cursor to the left)Cancel button (or back)Forward search button (or move the cursor to the right)Call button (or set and move forward)Display10-key (0 to 9, , #)Directory cardCall buttonAudio moduleGT-DB-VN (VIGIK and NFC capable)GT-DB-V (VIGIK capable)GT-DBCameraMicrophoneIN USE LED (orange)Call indicator (orange)Talk indicator (orange)Door release indicator (green)NFC readerSpeakerIlluminator LEDENTRANCE STATIONEntrance station (modular type)1-1[Combination examples]GT-DB(-V, -VN) + GT-DBPGT-SW + GF-4PGF-BPGT-SW + GF-4PGT-DB(-V, -VN) + GT-DBPGT-VB + GT-VPAudio only, Direct select type (8 stations)Audio only, 10 key typeAudio/video, Direct select type (8 stations)Audio/video, Direct select typeAudio/video, 10 key type2BAC3EDF5KJL8UTV4HGI6NMO109YXWZ7RQPSGT-DB(-V,-VN) + GT-DBPGT-VB + GT-VP GT-NSB +GT-NSP-LGT-10K + GF-10KPGT-SW + GF-4PGT-DB(-V, -VN) + GT-DBPGT-VB + GT-VP GT-NSB + GT-NSP-L2BAC3EDF5KJL8UTV4HGI6NMO109YXWZ7RQPSGT-DB(-V, -VN) + GT-DBPGT-NSB +GT-NSP-LGT-10K + GF-10KP 1 PART NAMES AND FUNCTIONS](https://usermanual.wiki/AIPHONE/GTMKBN/User-Guide-3437363-Page-6.png)
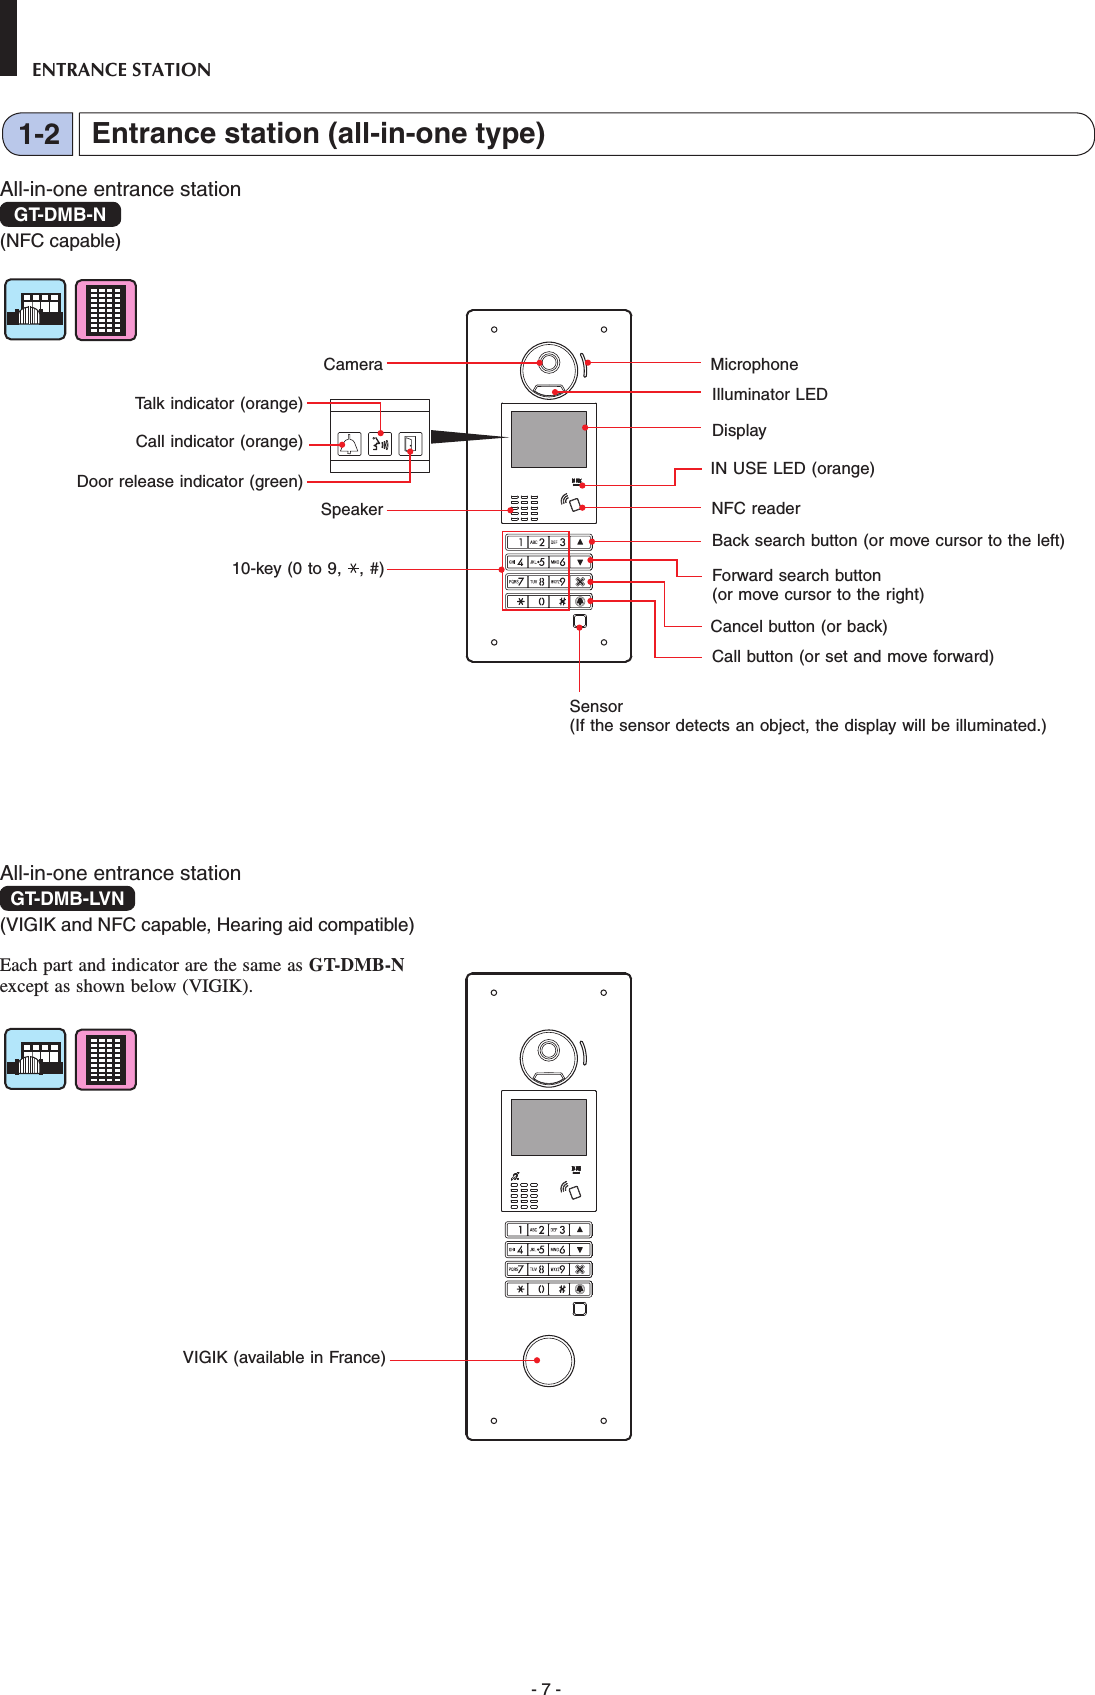
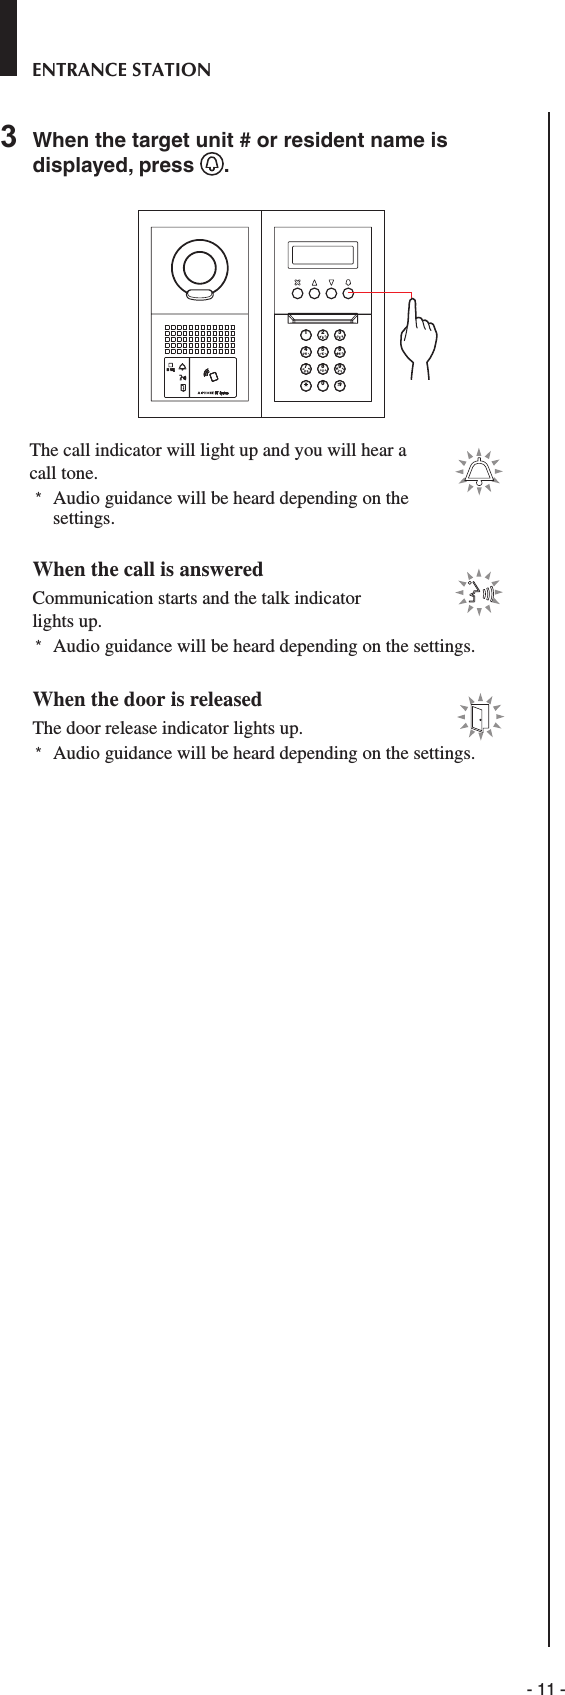
![- 10 -ENTRANCE STATIONCalling with the 10 key module ■ Searching for a unit by entering the unit #1 In standby mode, enter the numbers using [0] to [9] on the 10-key to display the target unit # and resident name.2BAC3EDF5KJL8UTV4HGI6NMO109YXWZ7RQPS 101SMITH2 When the target unit # and resident name is displayed, press .The call indicator will light up and you will hear a call tone. * Audio guidance will be heard depending on the settings.* If there is no relevant unit #, "NO ENTRY" is displayed.NO ENTRY* When the residential/tenant station that has been called is in use, the IN USE LED lights up to indicate that the residential/tenant station cannot be called. (In an expanded system, there may be a case that a residential/tenant station cannot be called even if the IN USE LED is off.)When the call is answeredCommunication starts and the talk indicator lights up. * Audio guidance will be heard depending on the settings.When the door is releasedThe door release indicator lights up. * Audio guidance will be heard depending on the settings.■ Searching for a unit by entering resident name2BAC3EDF5KJL8UTV4HGI6NMO109YXWZ7RQPS1 In standby mode, press on the 10-key.2 When "ENTER A LETTER" is displayed, enter a letter using the 10-key to display the target unit # and resident name.The number and resident name for the unit whose initial corresponds to the entered letter will be displayed.(e.g.) Enter "S". 101SMITH* Pressing or searches for the next unit # and resident name.* Depending on the settings, only the resident name may be displayed.* When the unit # is set to not be displayed, a letter can be entered without pressing .* If there is no relevant resident name, "NO ENTRY" is displayed.NO ENTRY: SNOTES: • Pressing or for approximately 2 seconds will display resident names in succession.• If both unit # 111 and 1111 exist, the resident name for unit 111 will be displayed when 1, 1, 1 is entered, and the resident name for unit 1111 will be displayed if 1 is entered one more time.• Stations can be set to display in order by unit #. (The order starts with the lowest digit from 0 to 9 and then the order goes by letter.) In cases where unit # such as A101, A201, A901, A1001, and B101 exist, the order starts with the lowest digit and goes in the order A101, A201, A901, B101, A1001.10-key](https://usermanual.wiki/AIPHONE/GTMKBN/User-Guide-3437363-Page-10.png)
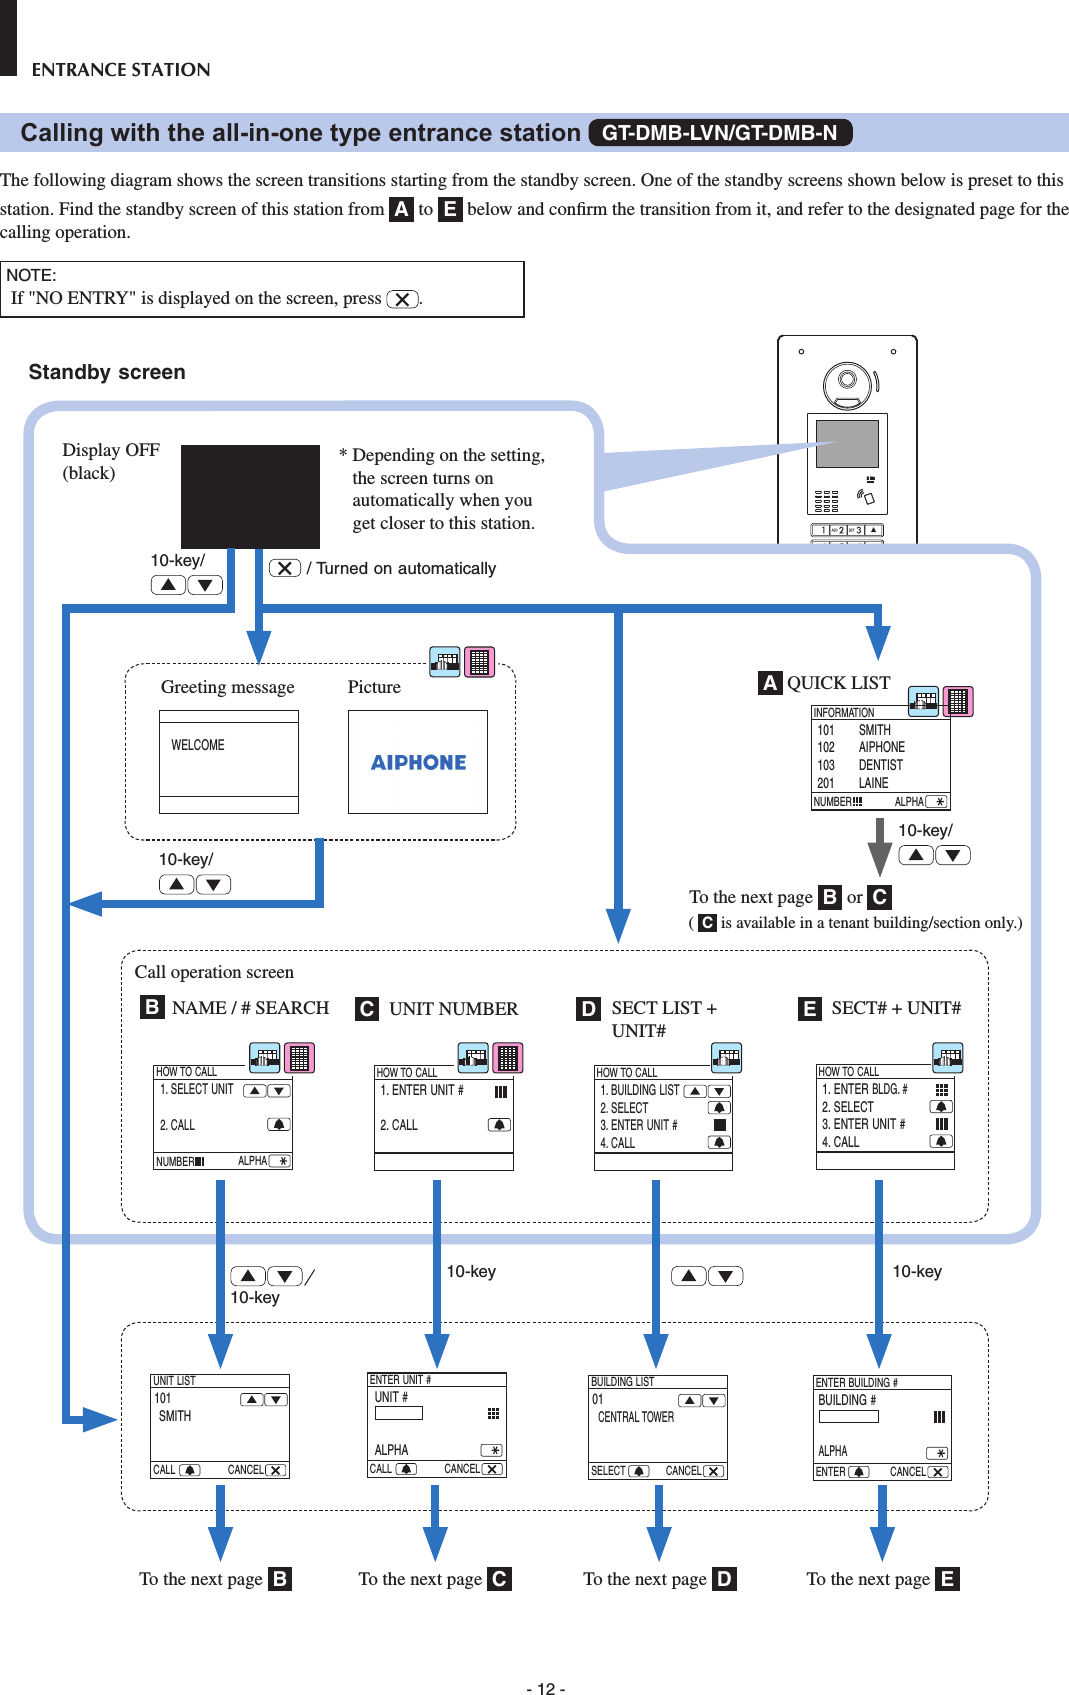
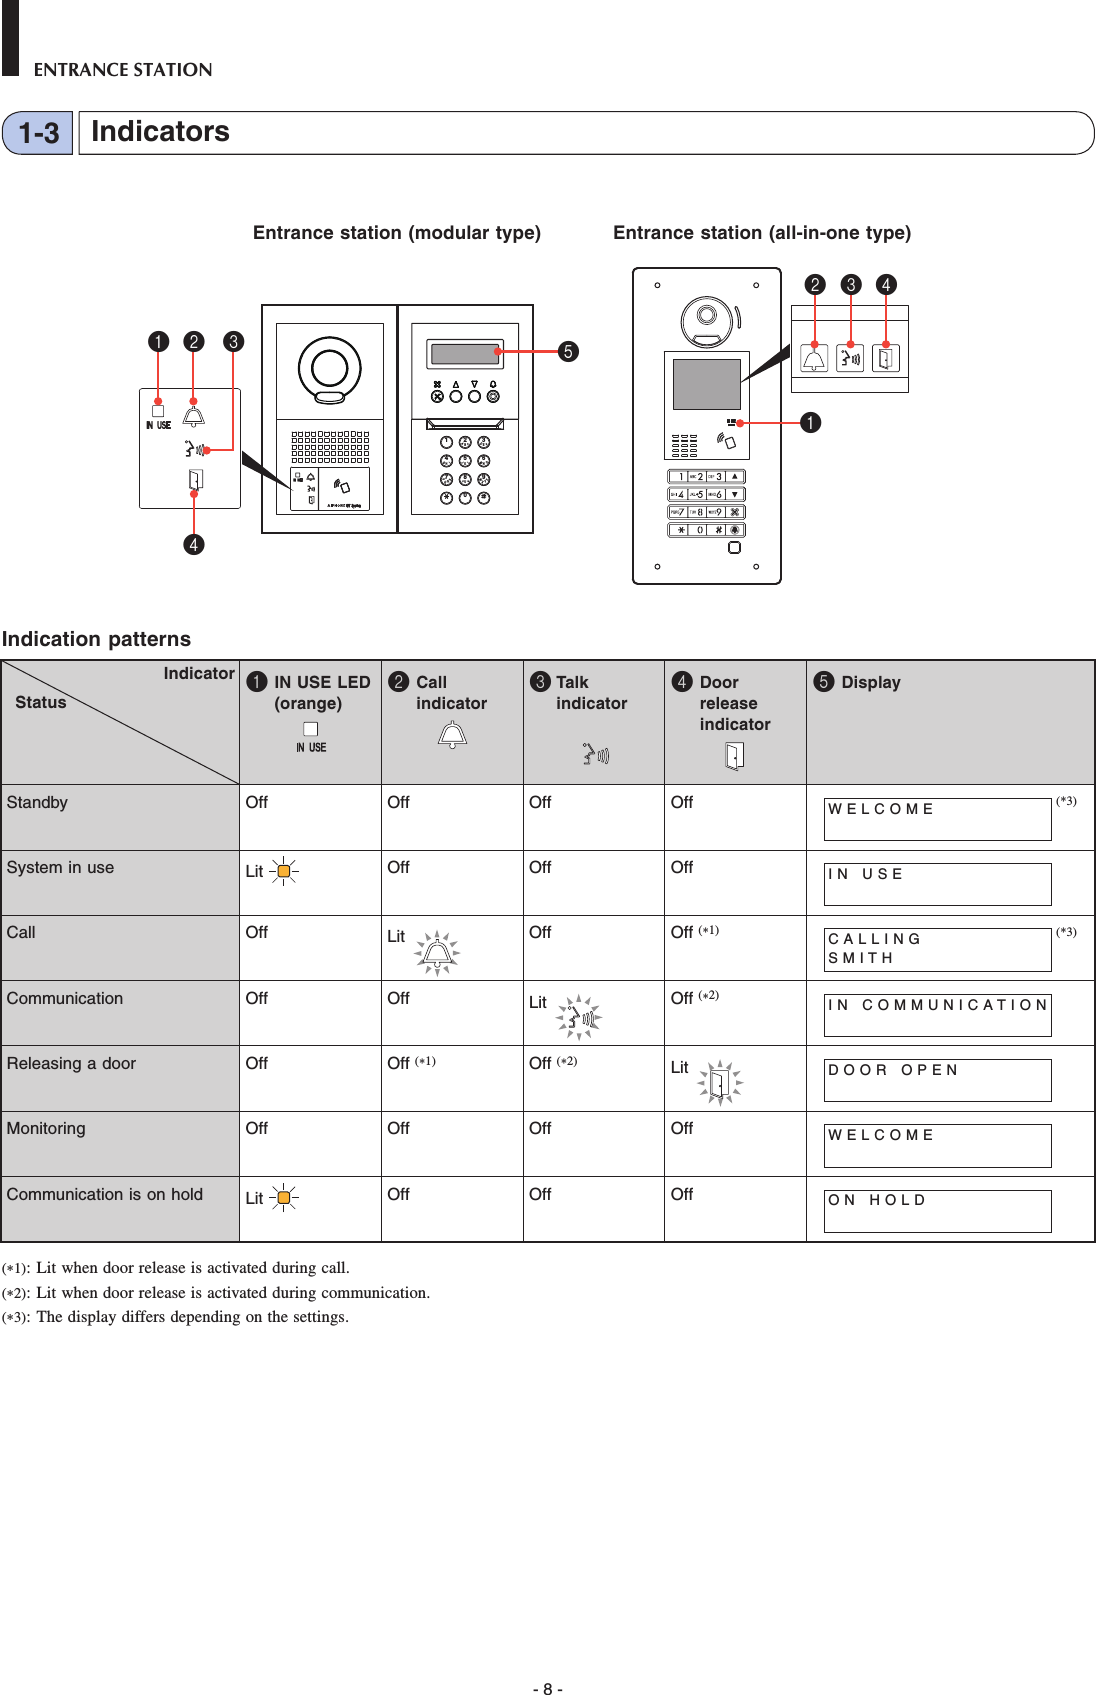
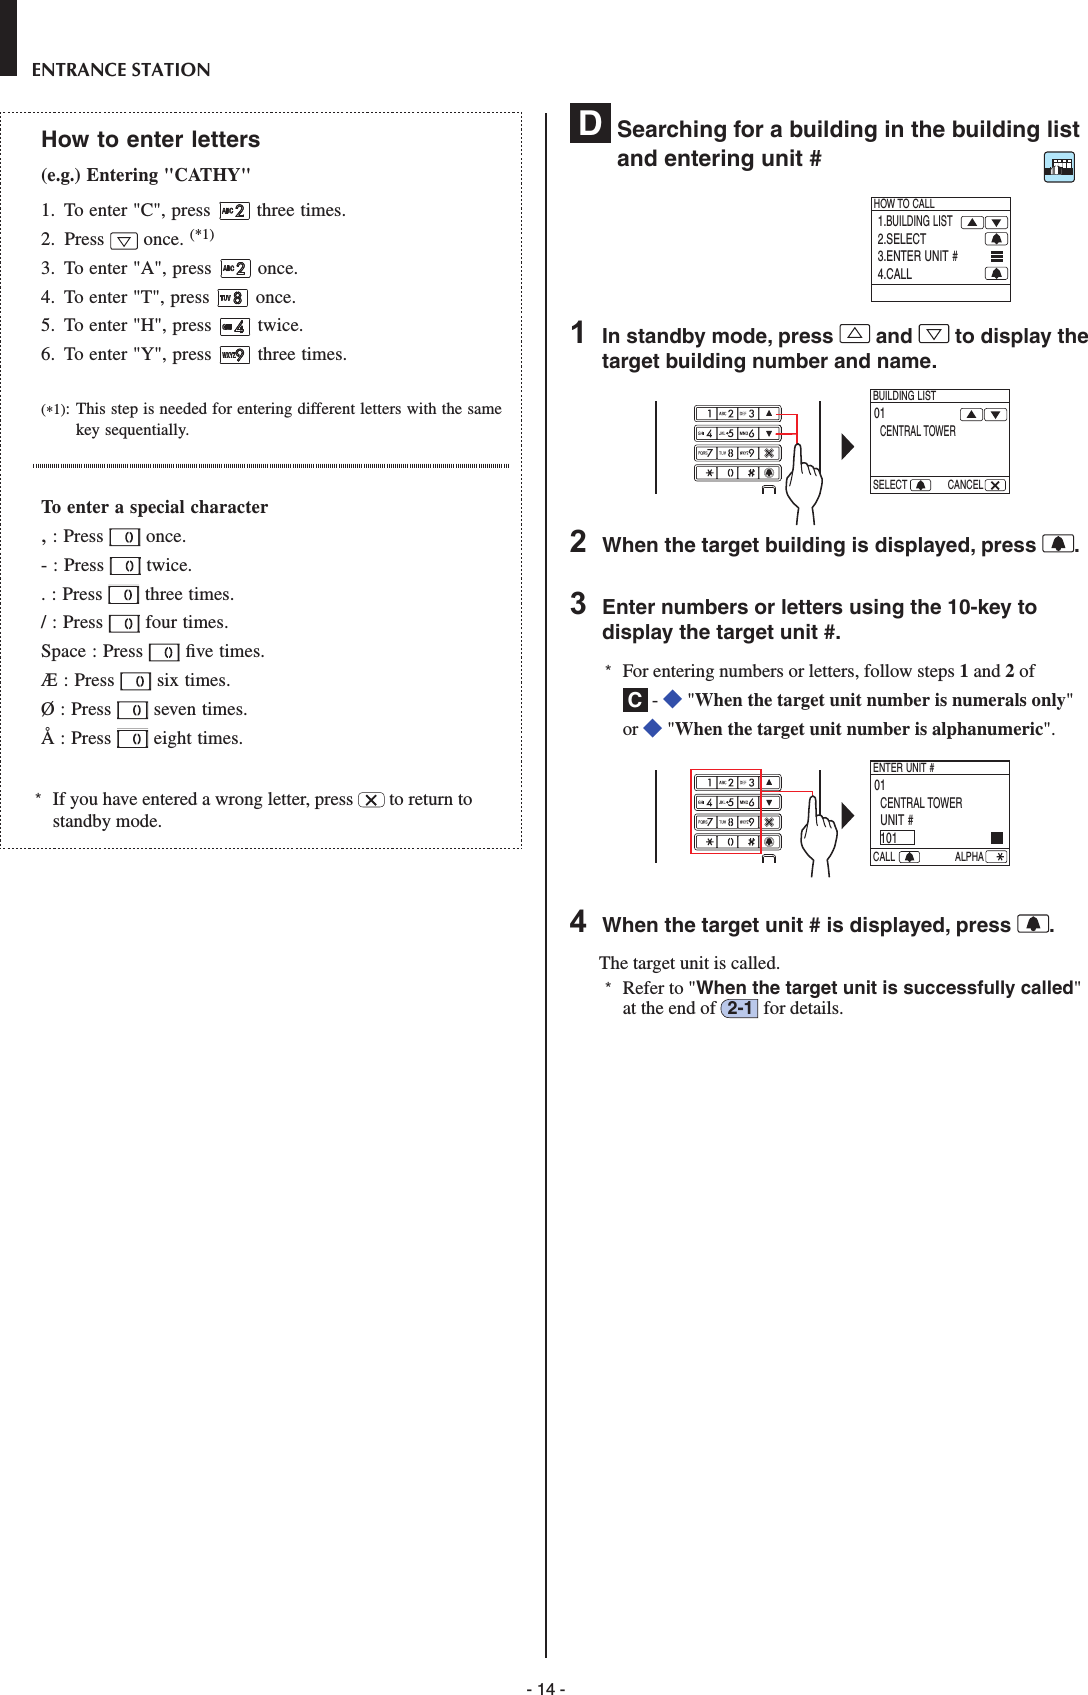
![- 13 -ENTRANCE STATIONA Confi rming the target unit in the quick list Unit # and resident names frequently called are preset to be displayed in the quick list.* Up to 4 units can be displayed.ALPHA 101 SMITH102 AIPHONE103 DENTIST201 LAINEINFORMATIONNUMBER1 In standby mode, press and to display the target unit, or 10-key to change the standby screen.The "UNIT LIST" screen B or "ENTER UNIT #" screen C is displayed. 2 Follow the operating procedure of either B or C depending on the displayed screen.* C is available in a tenant building/section only.B Searching for a unit in the unit list ALPHA 1. SELECT UNIT2. CALLHOW TO CALLNUMBER1 In standby mode, press and or 10-key to display the target unit # and resident name. 101SMITHUNIT LISTCALL CANCELThe 10-key can be used to enter unit #, or by pressing , then the 10-key can be used to enter letters (resident name). * Depending on the settings, only the resident name may be displayed.* The list is displayed in order of either unit # or resident name. * If you have entered a wrong number, press to return to standby mode.2 When the target unit is displayed, press .The target unit is called. * Refer to "When the target unit is successfully called" at the end of 2-1 for details. C Entering unit #NOTE: Entering unit # can only be performed on this screen. Entering resident name is not possible.1. ENTER UNIT #2. CALLHOW TO CALL When the target unit number is numerals only1 In standby mode, enter numbers using [0] to [9] on the 10-key to display the target unit #.* The 10-key can be used even after pressing or . UNIT #ALPHAENTER UNIT #CALL CANCEL* Depending on the system, only the resident name may be displayed.* If you have entered a wrong number, press to return to standby mode.2 When the target unit # is displayed, press .The target unit is called. * Refer to "When the target unit is successfully called" at the end of 2-1 for details. When the target unit number is alphanumeric1 In standby mode, press on the 10-key.* The 10-key can be used even after pressing or . UNIT #NUMBERALPHAENTER UNIT #CALL CANCEL2 Enter letters using the 10-key to display the target unit #.* Refer to the next page for how to enter letters.3 When the target unit # is displayed, press .The target unit is called. * Refer to "When the target unit is successfully called" at the end of 2-1 for details.Unit #Resident nameoror](https://usermanual.wiki/AIPHONE/GTMKBN/User-Guide-3437363-Page-13.png)

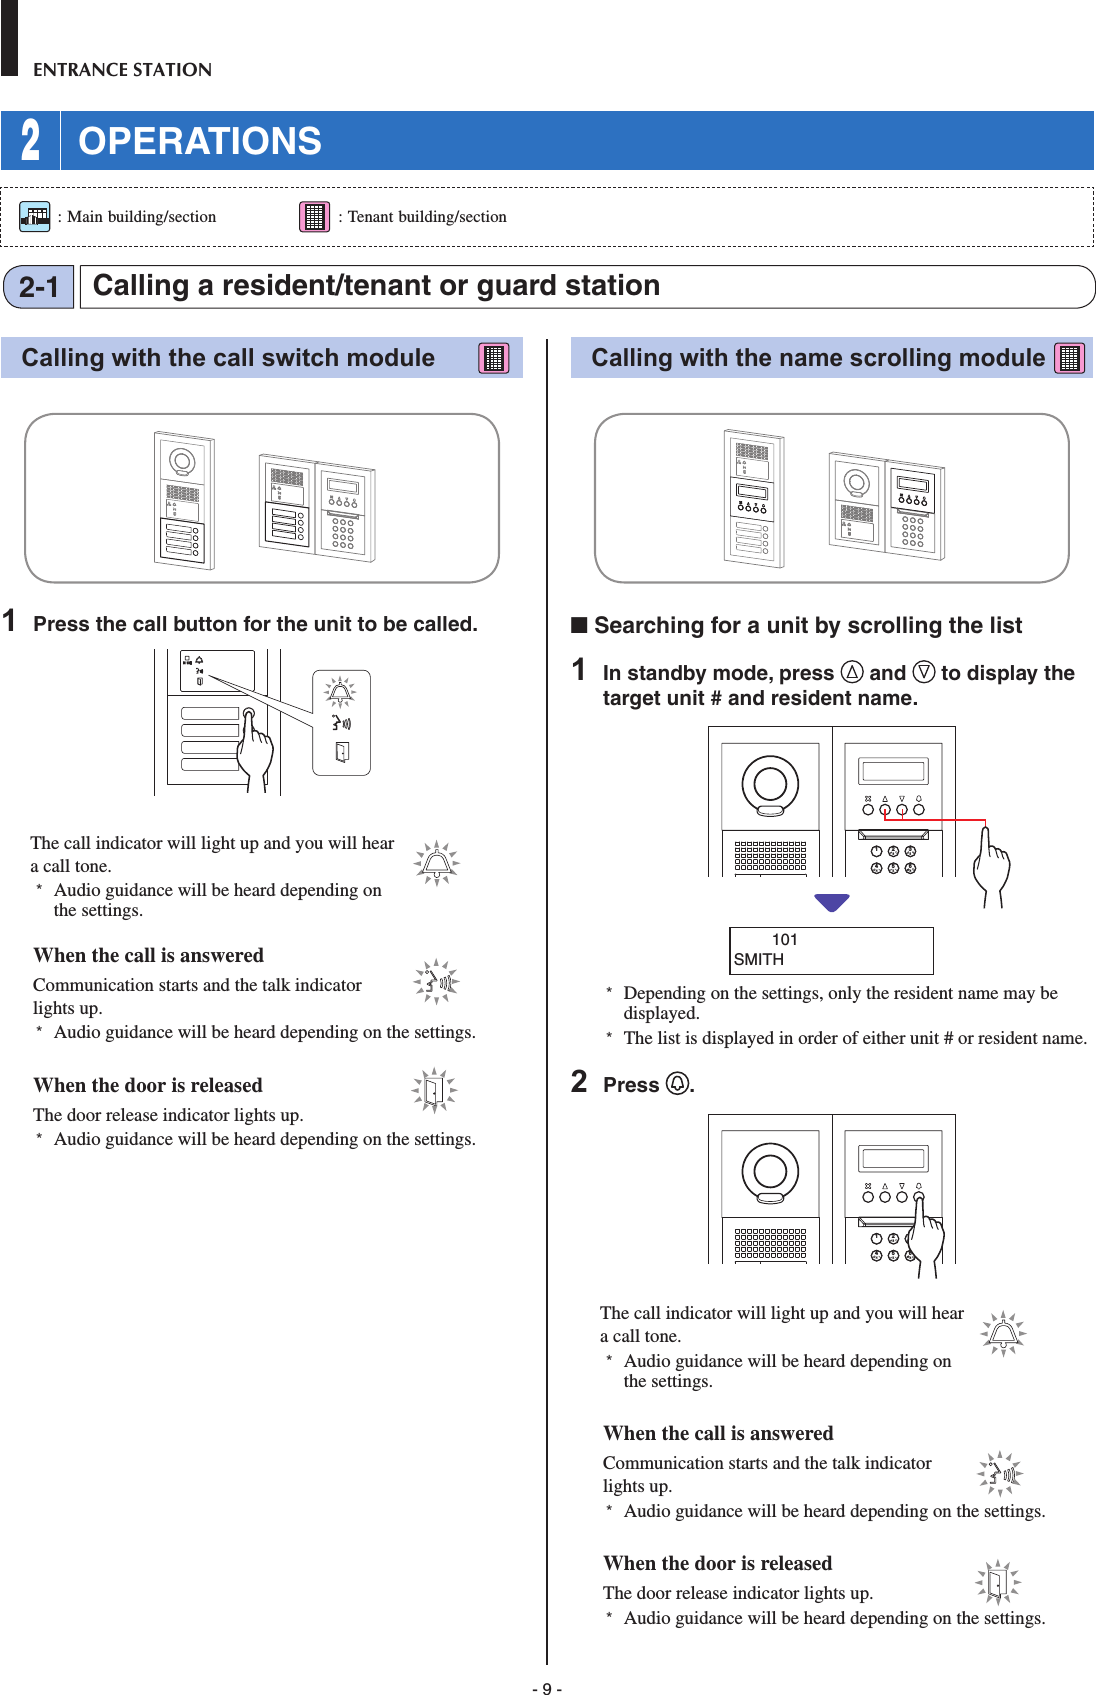
![- 16 -ENTRANCE STATIONDoor release2-2Other2-3■ Door release by using the access code* The access code is preset by the system installer or administrator.1 In standby mode, enter [#] and then the access code (4 to 6 digits) using [0] to [9] on the 10-key.2BAC3EDF5KJL8UTV4HGI6NMO109YXWZ7RQPS (e.g.)When the access code is "4567", enter "#", "4", "5", "6", "7".The door is released. • The door release indicator lights up. • Audio guidance will be heard depending on the settings.* If there is no relevant number, "DENIED" is displayed.* Door release is enabled even while the IN USE LED is lit.■ Door release by an NFC-compliant IC card, etc.A card incorporated with an NFC tag can be used to release a door. To use, the ID of the NFC tag must be registered as a door release code.1 Pass an NFC-compliant IC card over the NFC reader. * Put the card within 10 mm of the NFC reader. Otherwise, the code may not be read correctly.The door is released. • The door release indicator lights up. • Audio guidance will be heard depending on the settings.* Door release is enabled even while the IN USE LED is lit.NOTE: Do not overlap IC cards when passing them over the NFC reader. The code may not be read correctly.[Modular type] [All-in-one-type]NFC reader[Modular type] [All-in-one-type]* Calling from an entrance station is disabled while the IN USE LED is lit. Wait until the IN USE LED turns off. NOTE: For a multi building system with lift control, if you unlock from a room and terminate call at the same time, the entrance station may not unlock properly.](https://usermanual.wiki/AIPHONE/GTMKBN/User-Guide-3437363-Page-16.png)
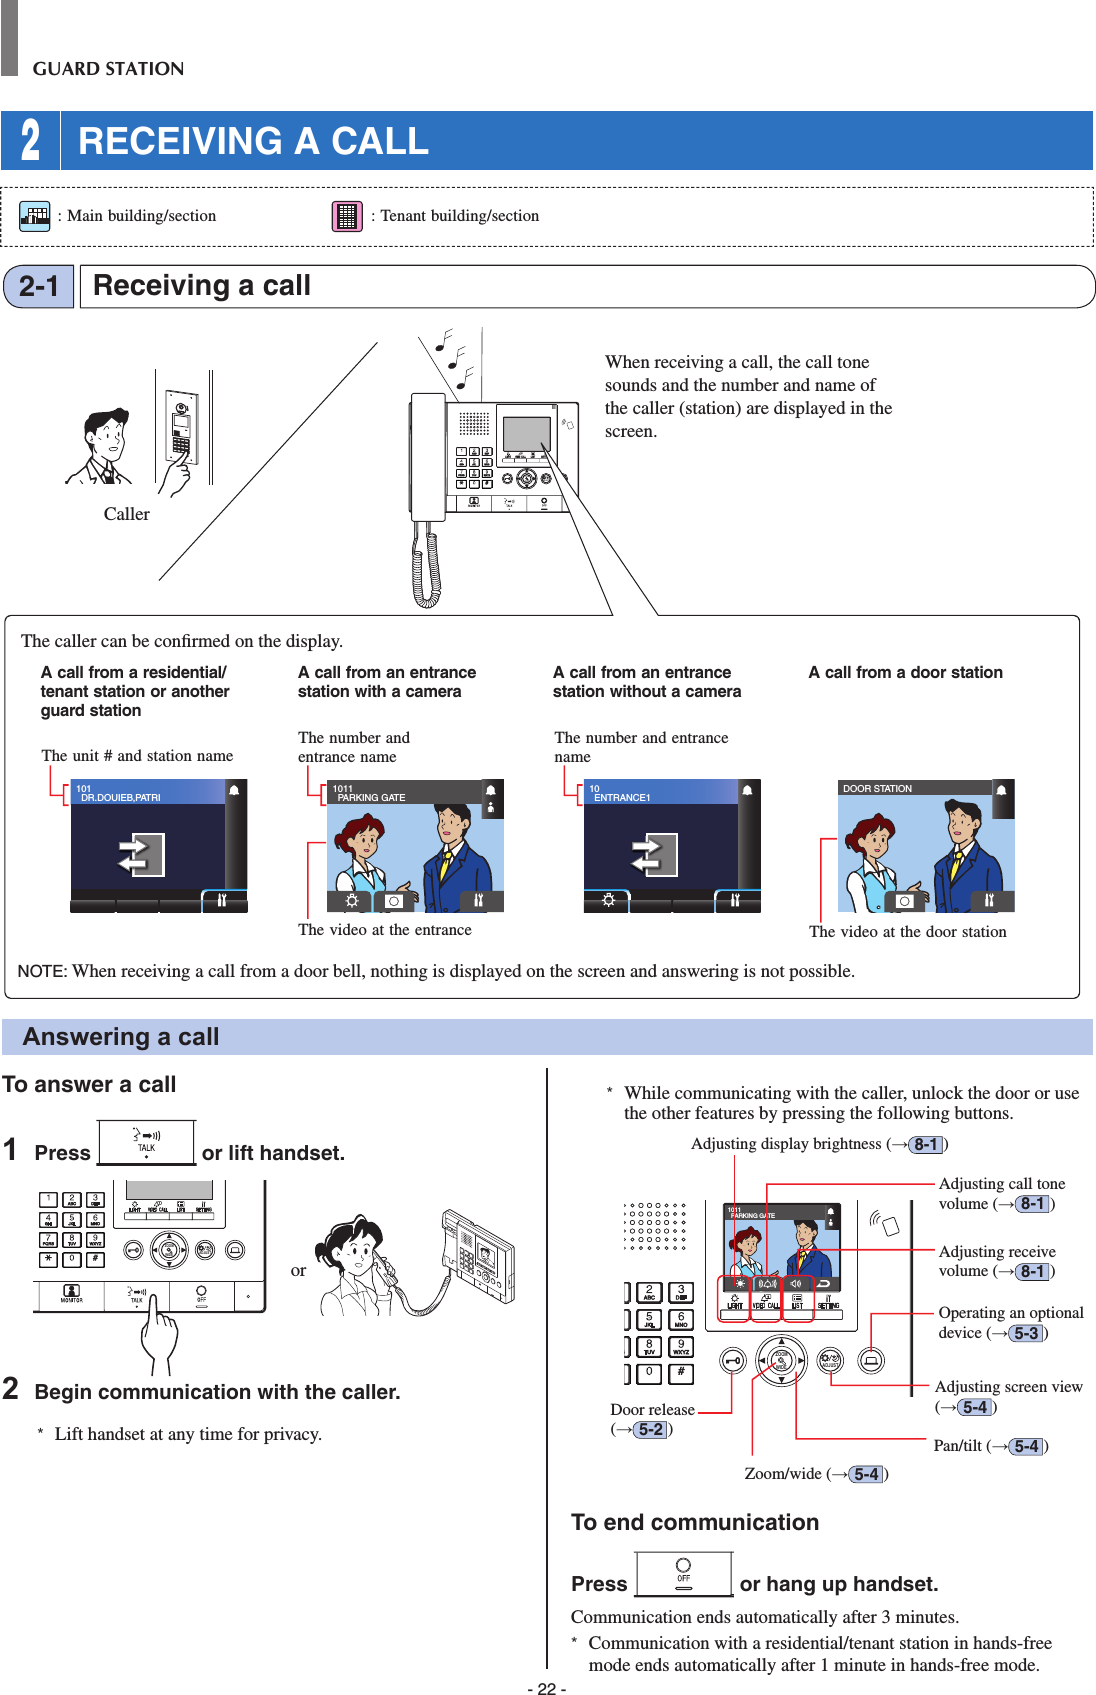
![- 24 -GUARD STATIONA Searching for a unit by number 1 In standby mode, enter numbers using [0] to [9] on the 10-key to display the target unit # and resident name.NUMBER SEARCH101102103104105SMITHAIPHONEDENTISTYOKOIYABE1 / 41* The list is displayed in order of unit #.* This station is not displayed.2 Select the target unit by pressing WIDEZOOM or WIDEZOOMWIDEZOOM.WIDE ADJUSTZOOM* Press WIDEZOOM or WIDEZOOM to turn the page of the list.3 Press ( ), or lift handset.When the call is answeredCommunication starts and " " is displayed. 4 To end communication, press or hang up handset.NOTES:• Communication will end automatically after approximately 3 minutes. Communication with a residential/tenant station in hands-free mode ends automatically after 1 minute in hands-free mode.• If both unit # 111 and 1111 exist, the resident name for unit 111 will be displayed when 1, 1, 1 is entered, and the resident name for unit 1111 will be displayed if 1 is entered one more time.• Stations can be set to be displayed in order by unit #. (The order starts with the lowest digit from 0 to 9 and then the order goes by letter.) In cases where unit # such as A101, A201, A901, A1001, and B101 exist, the order starts with the lowest digit and goes in the order A101, A201, A901, B101, A1001.Calling a unit (residential/tenant station) or guard station3-2Entered number(s)Unit # whose initial number matches the entered number are displayed in the list.Incoming callSame tenant building Other tenant buildings Main buildingEntrance st. Guard st. Residential/tenant st. Entrance st. Guard st. Residential/tenant st. Entrance st. Guard st.Tenant buildingGuard st. Calling/communication✓✓ ✓ -- - ✓✓✓ : Possible — : ImpossibleCoverage of calling from a guard station in a tenant buildingNOTE: Performance depends on the settings. If you cannot call even when ✓ is indicated, its setting is not confi gured.Outgoing call](https://usermanual.wiki/AIPHONE/GTMKBN/User-Guide-3437363-Page-24.png)
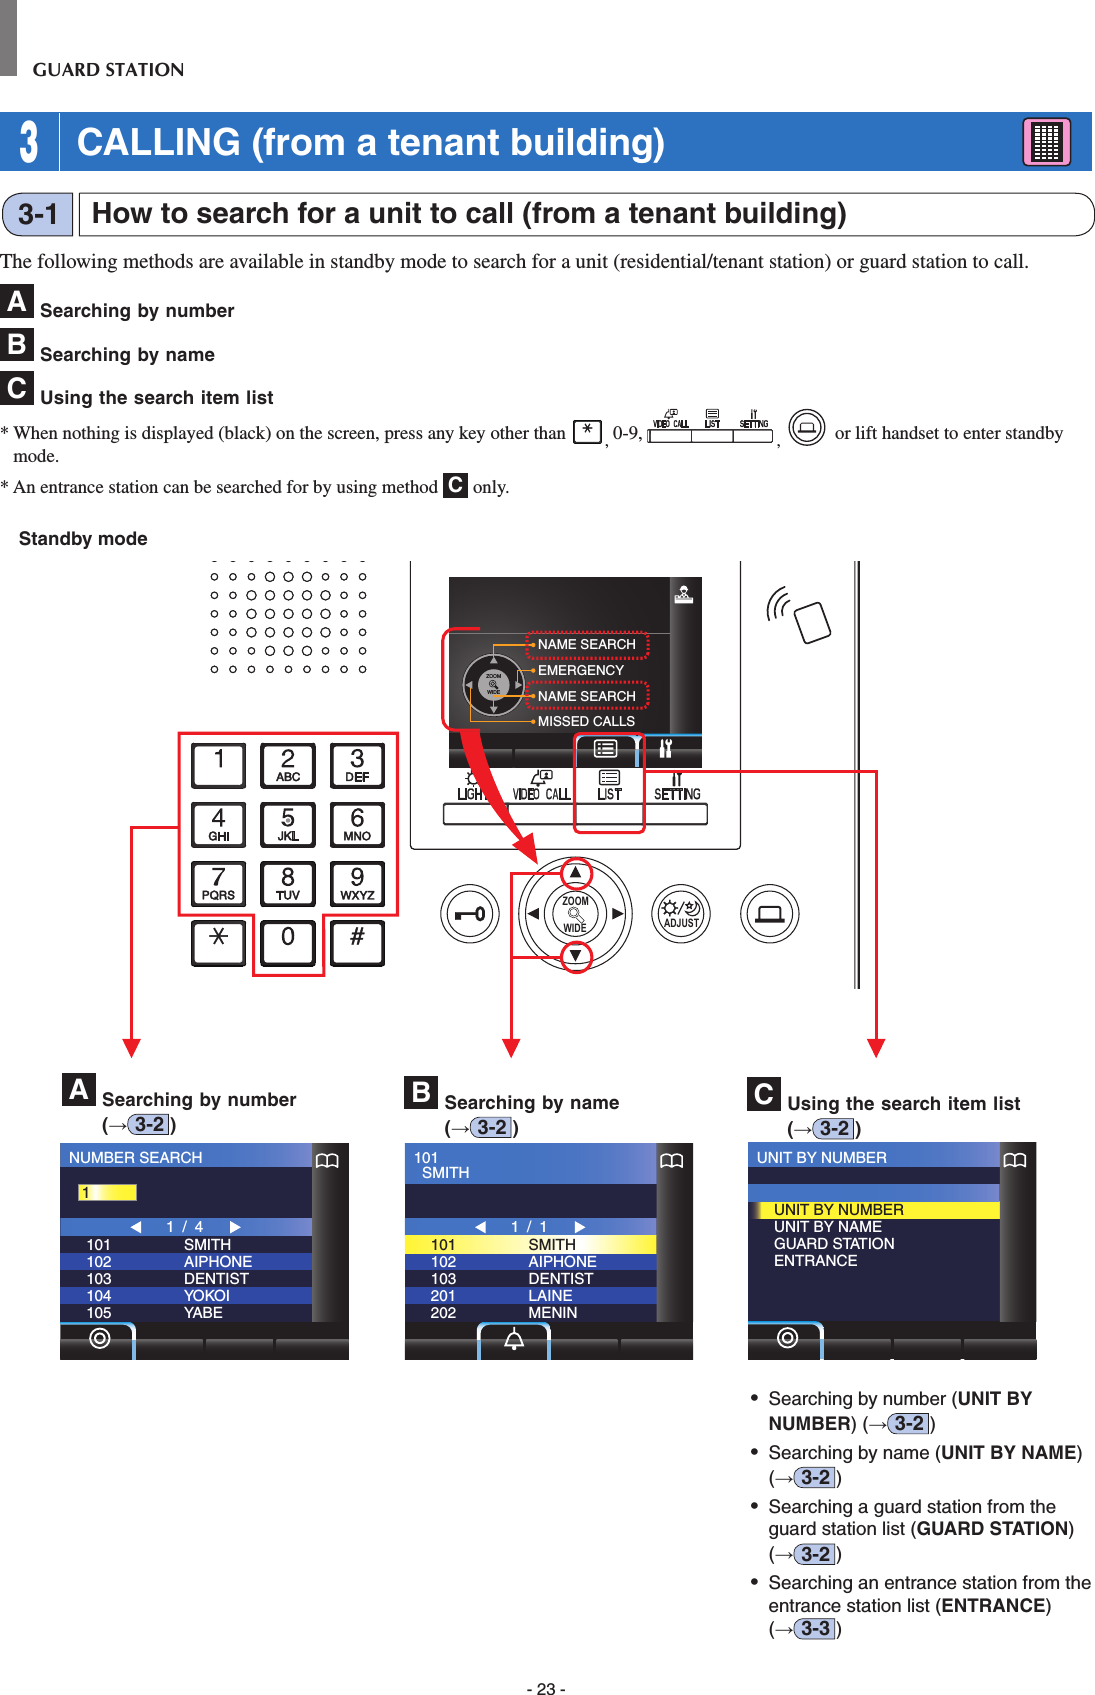
![- 26 -GUARD STATION Searching for a unit by unit #1 Select "UNIT BY NUMBER" by pressing WIDEZOOM or WIDEZOOMWIDEZOOM.WIDE ADJUSZOOMUNIT BY NUMBERUNIT BY NUMBERUNIT BY NAMEGUARD STATIONENTRANCE2 Press ( ) or WIDEZOOMWIDEZOOM.The "NUMBER SEARCH" screen is displayed.3 Enter numbers using [0] to [9] on the 10-key to display the target unit # and resident name.NUMBER SEARCH101102103104105SMITHAIPHONEDENTISTYOKOIYABE1 / 41* The list is displayed in order of unit #.* This station is not displayed.4 Select the target unit by pressing WIDEZOOM or WIDEZOOMWIDEZOOM.* Press WIDEZOOM or WIDEZOOM to turn the page of the list.5 Press ( ), or lift handset.When the call is answeredCommunication starts and " " is displayed. 6 To end communication, press or hang up handset.Entered unit #Unit # whose initial number matches the entered number are displayed in the list.C Searching for a unit by using the search item list Press ( ).The search item list is displayed.UNIT BY NUMBERUNIT BY NUMBERUNIT BY NAMEGUARD STATIONENTRANCE](https://usermanual.wiki/AIPHONE/GTMKBN/User-Guide-3437363-Page-26.png)
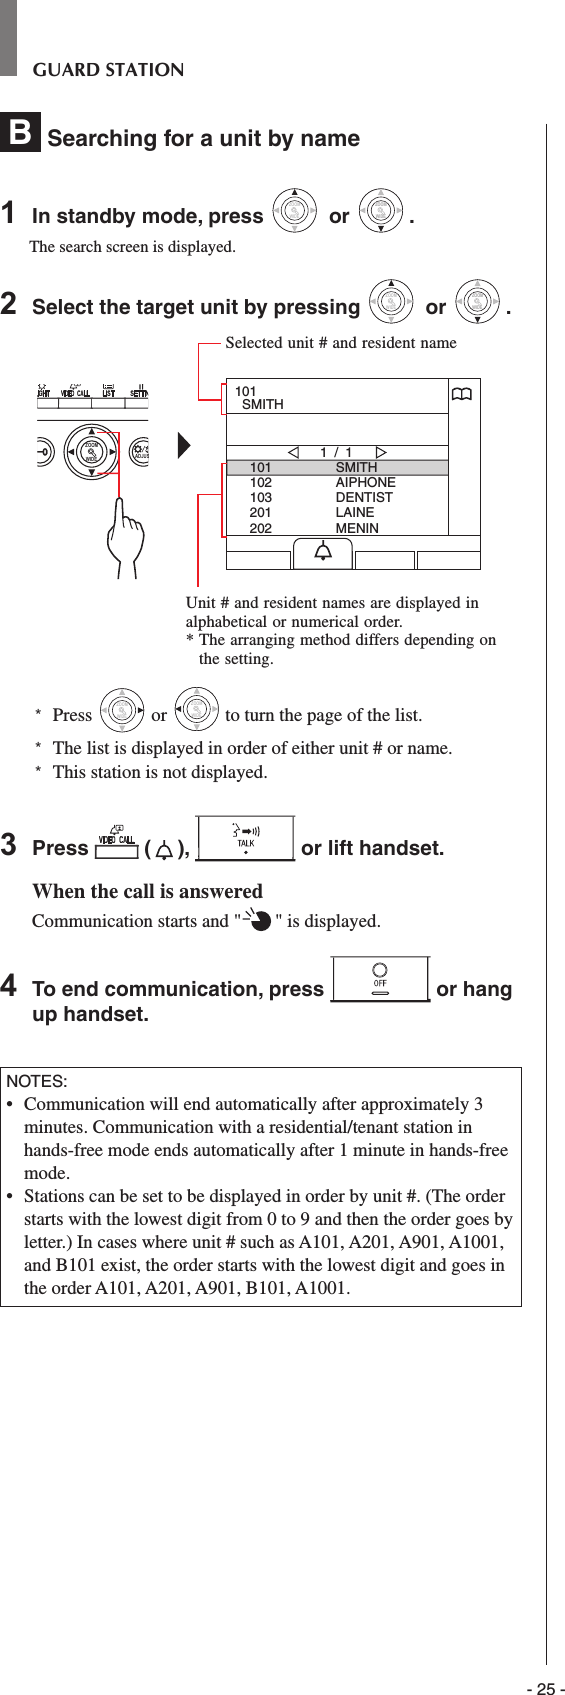
![- 27 -GUARD STATION Searching for a unit by resident name1 Select "UNIT BY NAME" by pressing WIDEZOOM or WIDEZOOMWIDEZOOM.WIDE ADJUSZOOMUNIT BY NAMEUNIT BY NUMBERUNIT BY NAMEGUARD STATIONENTRANCE2 Press ( ) or WIDEZOOMWIDEZOOM.The "NAME SEARCH" screen is displayed.3 Enter an alphabetical character using [0] to [9] on the 10-key to display the target resident name.NAME SEARCH102 AIPHONE1 /1A* The list is displayed in order of name.* This station is not displayed.4 Select the target unit by pressing WIDEZOOM or WIDEZOOMWIDEZOOM.WIDE ADJUSZOOM* Press WIDEZOOM or WIDEZOOM to turn the page of the list.5 Press ( ), or lift handset.When the call is answeredCommunication starts and " " is displayed. 6 To end communication, press or hang up handset.Entered characterThe unit # and resident names whose initial letter matches the entered letter are displayed in the list.(e.g.) When "A" is entered, 301A, 1003ABC, ABC, etc. are displayed in the list.* The arranging method differs depending on the setting.](https://usermanual.wiki/AIPHONE/GTMKBN/User-Guide-3437363-Page-27.png)
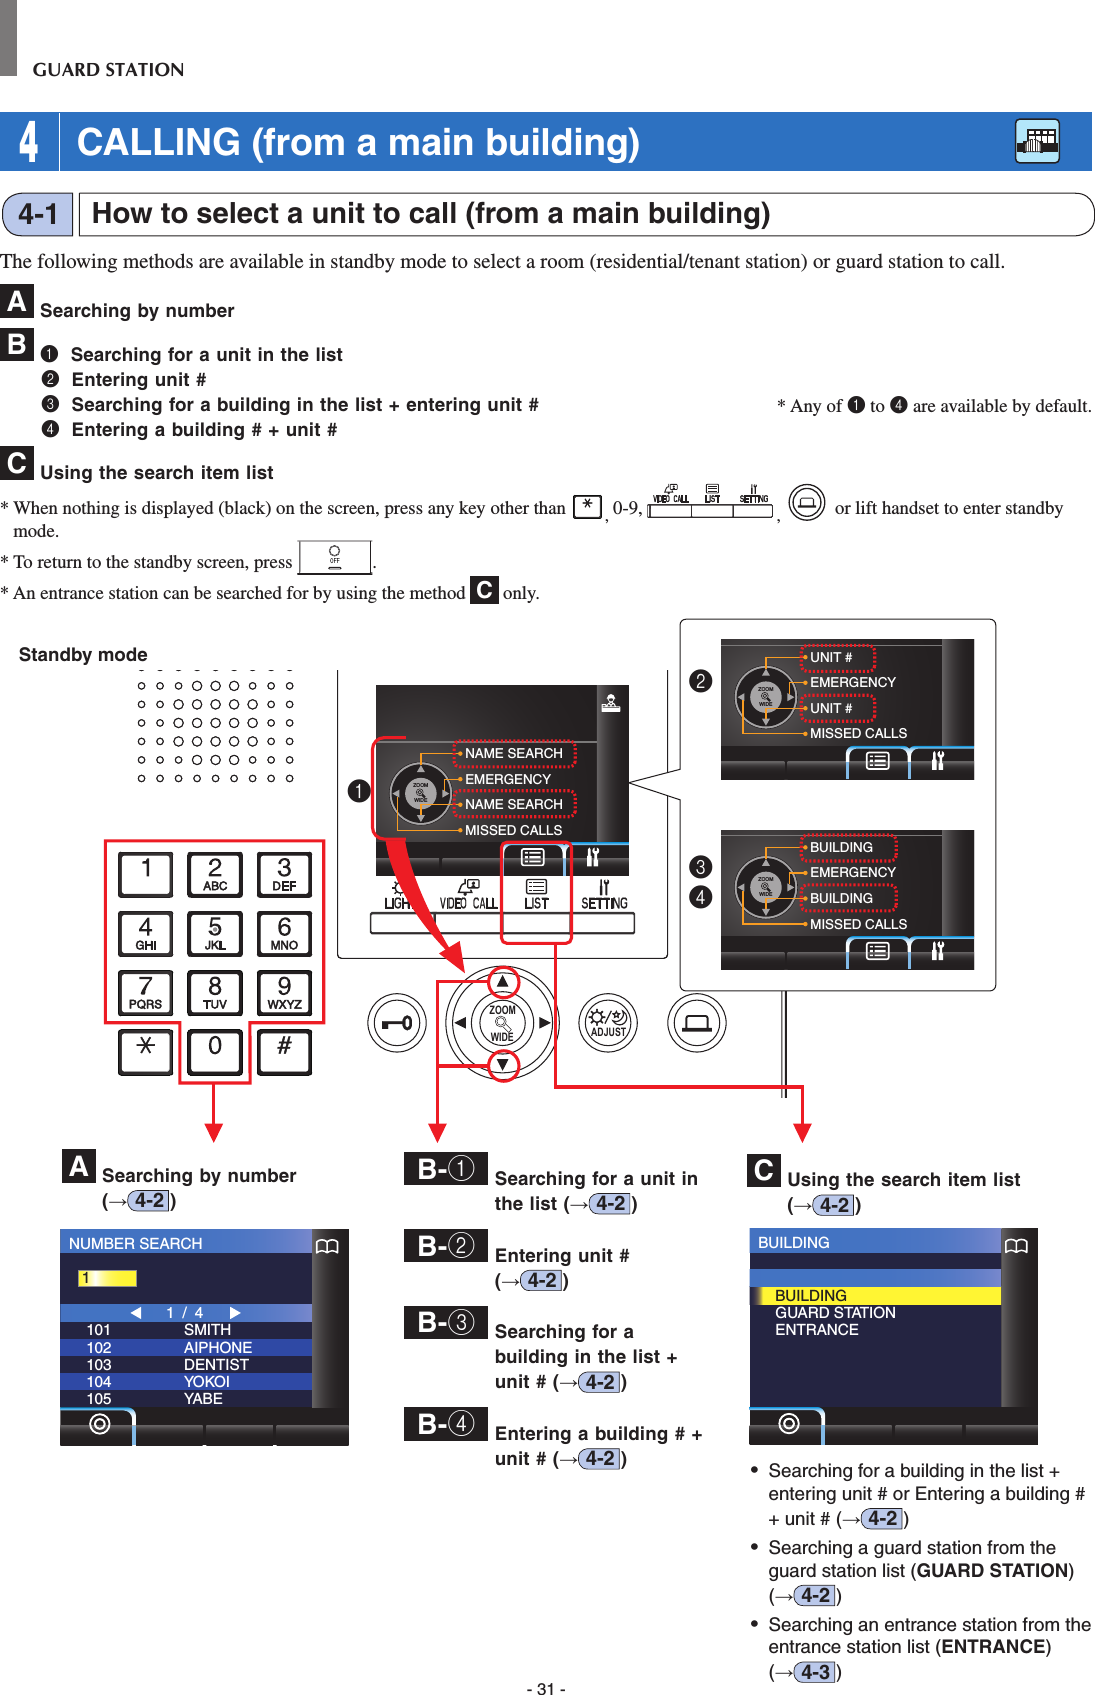
![- 32 -GUARD STATIONCoverage of calling from a guard station in a main buildingNOTE: Performance depends on the settings. If you cannot call even when ✓ is indicated, its setting is not confi gured.Incoming callTenant building Same main building Other main buildingsEntrance st. Guard st. Residential/tenant st. Entrance st. Guard st. Entrance st. Guard st.Main building Guard st. Calling/communication✓✓ ✓ ✓ ✓ ✓ ✓✓ : Possible Outgoing callA Searching for a unit by number 1 In standby mode, enter numbers using [0] to [9] on the 10-key to display the target unit # and name.NUMBER SEARCH101102103104105SMITHAIPHONEDENTISTYOKOIYABE1 / 41* The list is displayed in order of unit #.* This station is not displayed.2 Select the target unit by pressing WIDEZOOM or WIDEZOOMWIDEZOOM.WIDE ADJUSTZOOM* Press WIDEZOOM or WIDEZOOM to turn the page of the list.3 Press ( ), or lift handset.When the call is answeredCommunication starts and " " is displayed. 4 To end communication, press or hang up handset.NOTES:• Communication will end automatically after approximately 3 minutes. Communication with a residential/tenant station in hands-free mode ends automatically after 1 minute in hands-free mode. • If both unit # 111 and 1111 exist, the resident name for unit 111 will be displayed when 1, 1, 1 is entered, and the resident name for unit 1111 will be displayed if 1 is entered one more time.• Stations can be set to display in order by unit #. (The order starts with the lowest digit from 0 to 9 and then the order goes by letter.) In cases where unit # such as A101, A201, A901, A1001, and B101 exist, the order starts with the lowest digit and goes in the order A101, A201, A901, B101, A1001.Calling a room (residential/tenant station) or guard station4-2Entered number(s)Unit # whose initial number matches the entered number are displayed in the list.](https://usermanual.wiki/AIPHONE/GTMKBN/User-Guide-3437363-Page-32.png)
![- 33 -GUARD STATIONB-1 Searching for a unit in the list 1 In standby mode, press WIDEZOOM or WIDEZOOMWIDEZOOM.The unit list is displayed.2 Select the target unit, by pressing WIDEZOOM or WIDEZOOMWIDEZOOM.WIDE ADJUSZOOM101102103201202SMITHAIPHONEDENTISTLAINEMENIN1 / 1101 SMITH* Press WIDEZOOM or WIDEZOOM to turn the page of the list.* The list is displayed in order of either unit # or name.* This station is not displayed.3 Press ( ), or lift handset.When the call is answeredCommunication starts and " " is displayed. * Audio guidance will be heard depending on the settings.4 To end communication, press or hang up handset.NOTE: Communication will end automatically after approximately 3 minutes. Communication with a residential/tenant station in hands-free mode ends automatically after 1 minute in hands-free mode.B-2 Entering unit #1 In standby mode, press WIDEZOOM or WIDEZOOMWIDEZOOM."UNIT #" screen is displayed.2 [When the target unit number is numerals only] Enter the unit # using [0] to [9] on the 10-key.[When the target unit number is alphanumeric] 1 Press ( ).2 Enter the resident name using [0] to [9] on the 10-key.* How to enter letters (→P. 21).UNIT #103 Press ( ), or lift handset.When the call is answeredCommunication starts and " " is displayed. 4 To end communication, press or hang up handset.NOTES:• Communication will end automatically after approximately 3 minutes. Communication with a residential/tenant station in hands-free mode ends automatically after 1 minute in hands-free mode.• If both unit # 111 and 1111 exist, the resident name for unit 111 will be displayed when 1, 1, 1 is entered, and the resident name for unit 1111 will be displayed if 1 is entered one more time.• Stations can be set to display in order by unit #. (The order starts with the lowest digit from 0 to 9 and then the order goes by letter.) In cases where unit # such as A101, A201, A901, A1001, and B101 exist, the order starts with the lowest digit and goes in the order A101, A201, A901, B101, A1001.Selected unit # and nameUnit # and names are displayed in alphabetical or numerical order.* The arranging method differs depending on the setting.Entered number is displayed.](https://usermanual.wiki/AIPHONE/GTMKBN/User-Guide-3437363-Page-33.png)
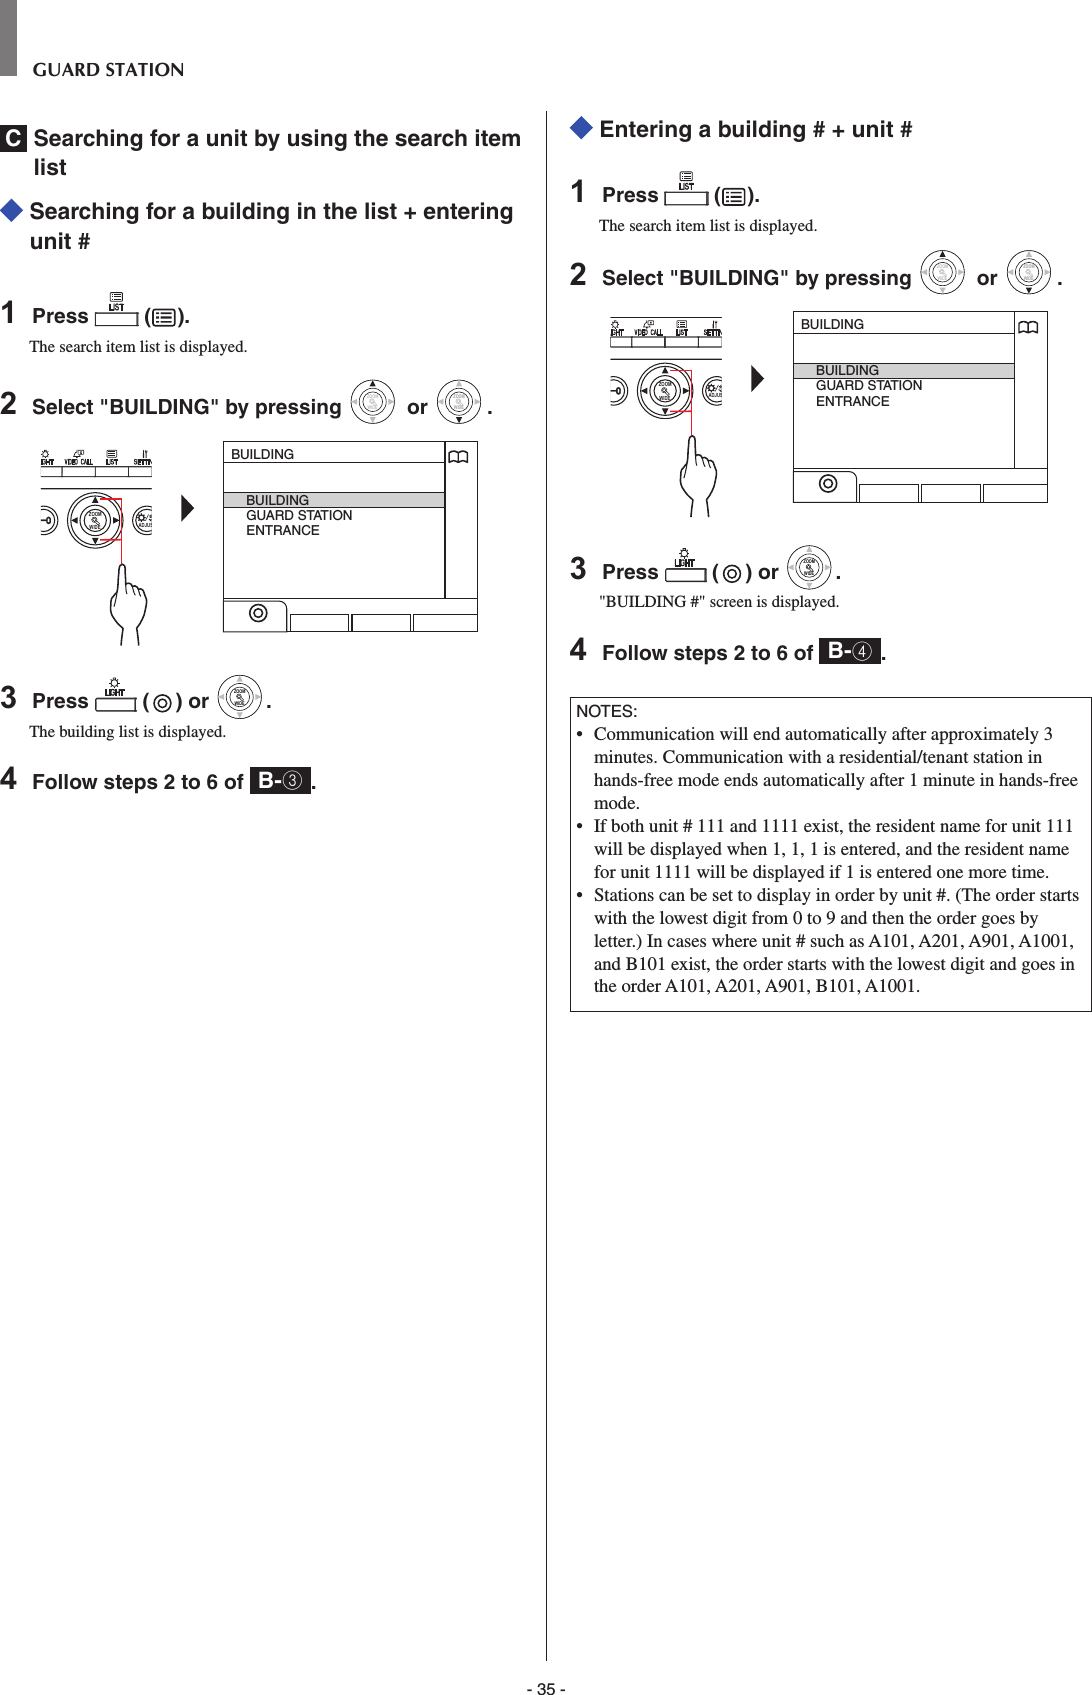
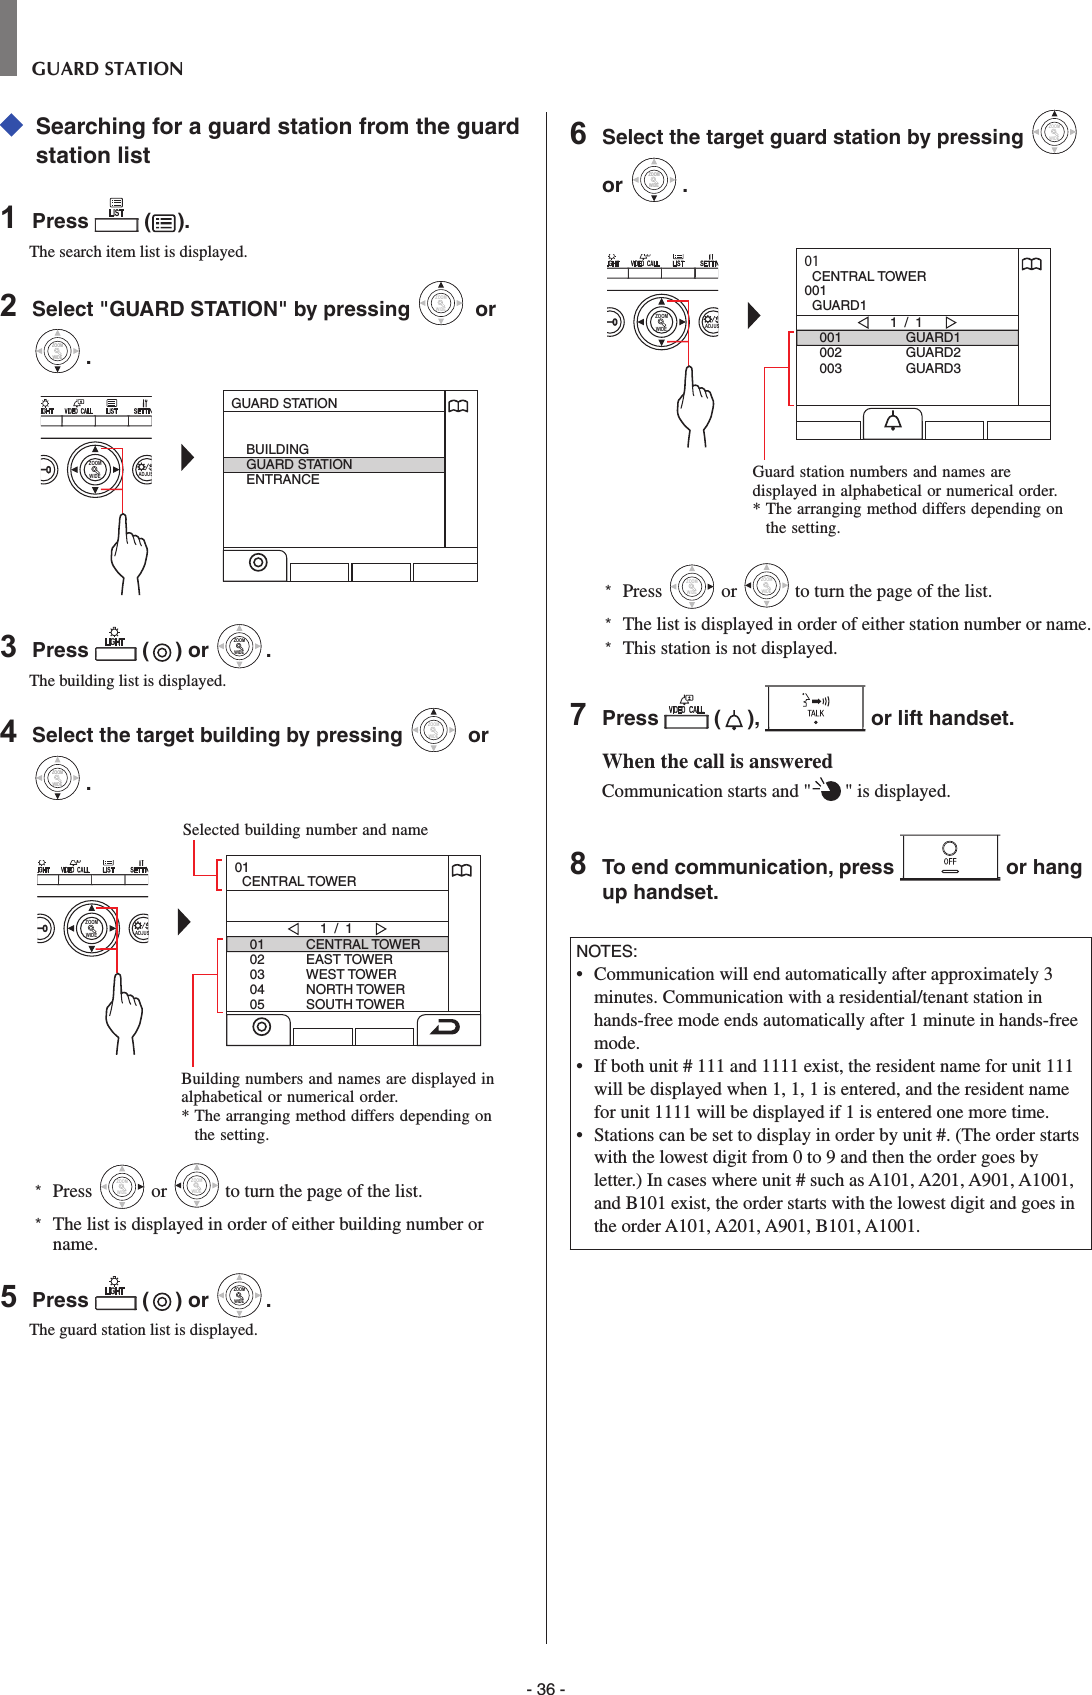
![- 34 -GUARD STATIONB-3 Searching for a building in the list + entering unit #1 In standby mode, press WIDEZOOM or WIDEZOOMWIDEZOOM.The building list is displayed.2 Select the target building by pressing WIDEZOOM or WIDEZOOMWIDEZOOM.WIDE ADJUSZOOM0102030405CENTRAL TOWEREAST TOWERWEST TOWERNORTH TOWERSOUTH TOWER1 / 101 CENTRAL TOWER* Press WIDEZOOM or WIDEZOOM to turn the page of the list.* The list is displayed in order of either building number or name.3 Press ( ) or WIDEZOOMWIDEZOOM."UNIT #" is displayed.4 [When the target unit number is numerals only] Enter the unit # using [0] to [9] on the 10-key.[When the target unit number is alphanumeric] 1 Press ( ).2 Enter the resident name using [0] to [9] on the 10-key.* How to enter letters (→P. 21).UNIT # 101 CENTRAL TOWER5 Press ( ), or lift handset.When the call is answeredCommunication starts and " " is displayed. 6 To end communication, press or hang up handset.B-4 Entering a building # + unit #1 In standby mode, press WIDEZOOM or WIDEZOOMWIDEZOOM."BUILDING #" screen is displayed.2 [When the target building number is numerals only] Enter the building number using [0] to [9] on the 10-key.[When the target building number is alphanumeric] 1 Press ( ).2 Enter the building name using [0] to [9] on the 10-key.* How to enter letters (→P. 21).BUILDING #03 Press ( ) or WIDEZOOMWIDEZOOM."UNIT #" is displayed.4 [When the target unit number is numerals only] Enter the unit # using [0] to [9] on the 10-key.[When the target unit number is alphanumeric] 1 Press ( ).2 Enter the resident name using [0] to [9] on the 10-key.* How to enter letters (→P. 21).BUILDING #01UNIT # 15 Press ( ), or lift handset.When the call is answeredCommunication starts and " " is displayed. 6 To end communication, press or hang up handset.Selected building number and nameBuilding numbers and names are displayed in alphabetical or numerical order.* The arranging method differs depending on the setting.Selected building is displayed.Entered number is displayed.Entered number is displayed.Entered number is displayed.](https://usermanual.wiki/AIPHONE/GTMKBN/User-Guide-3437363-Page-34.png)
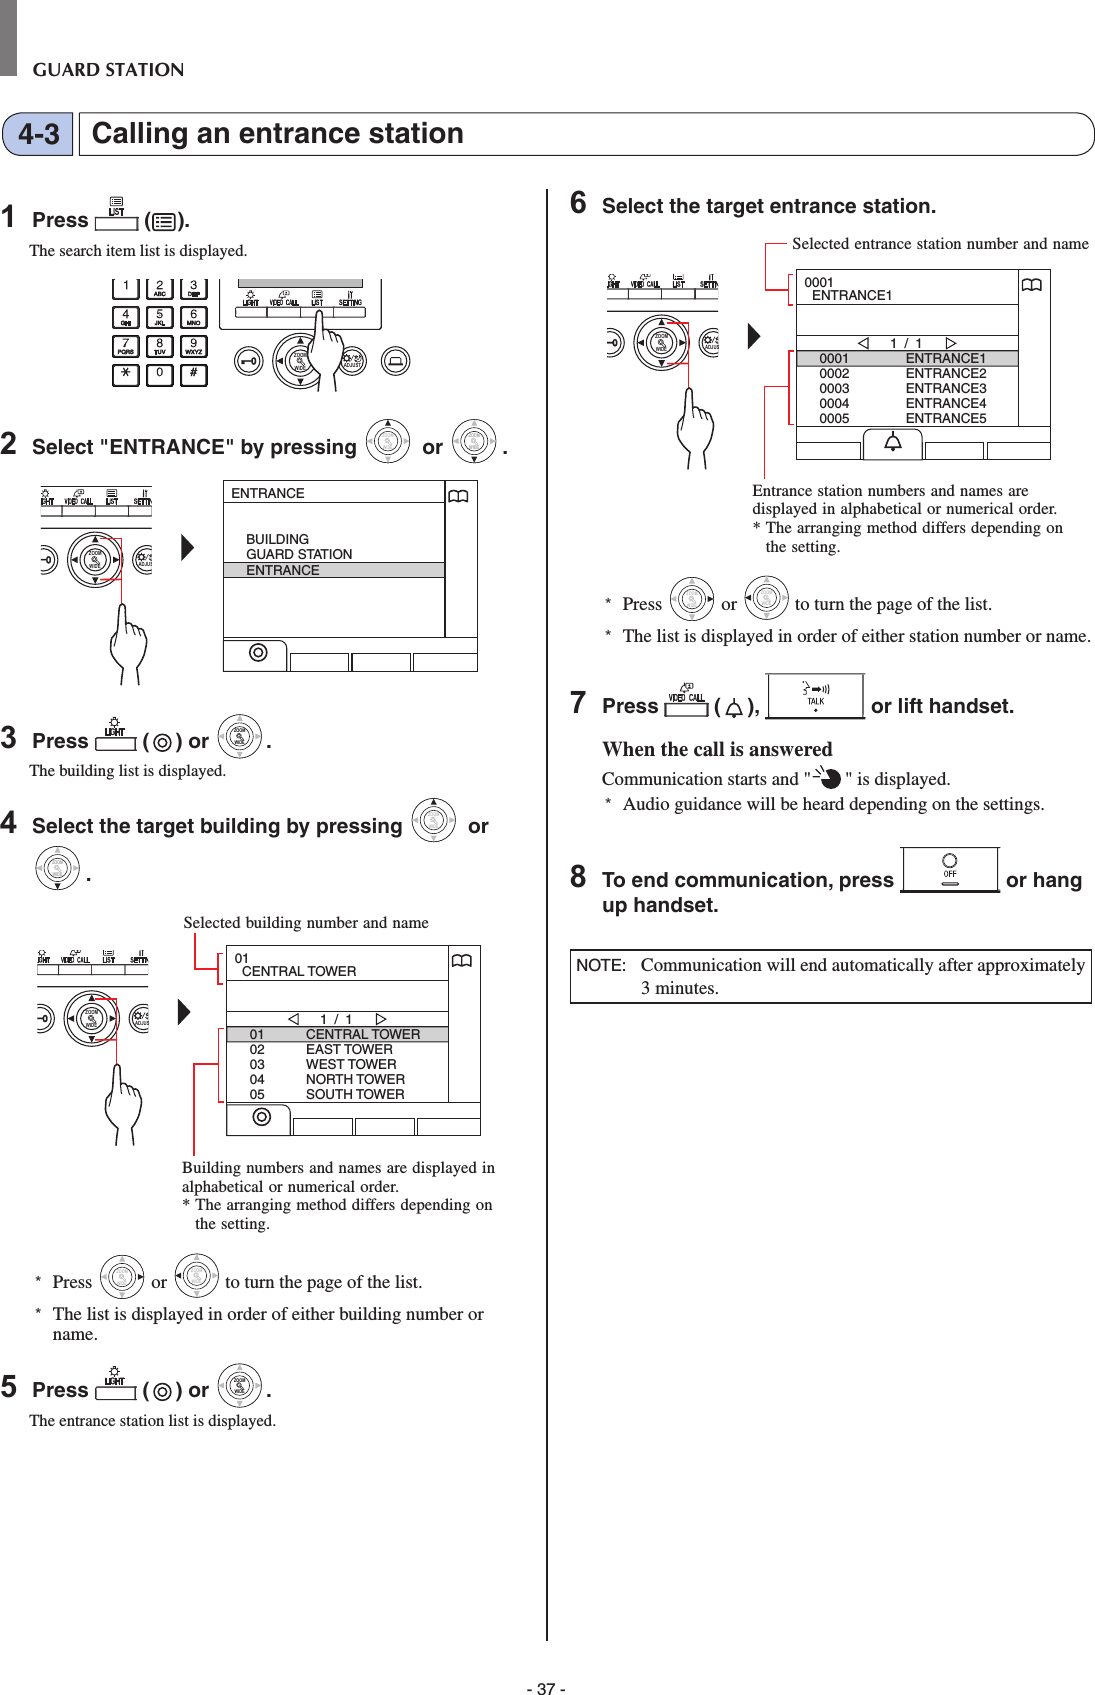
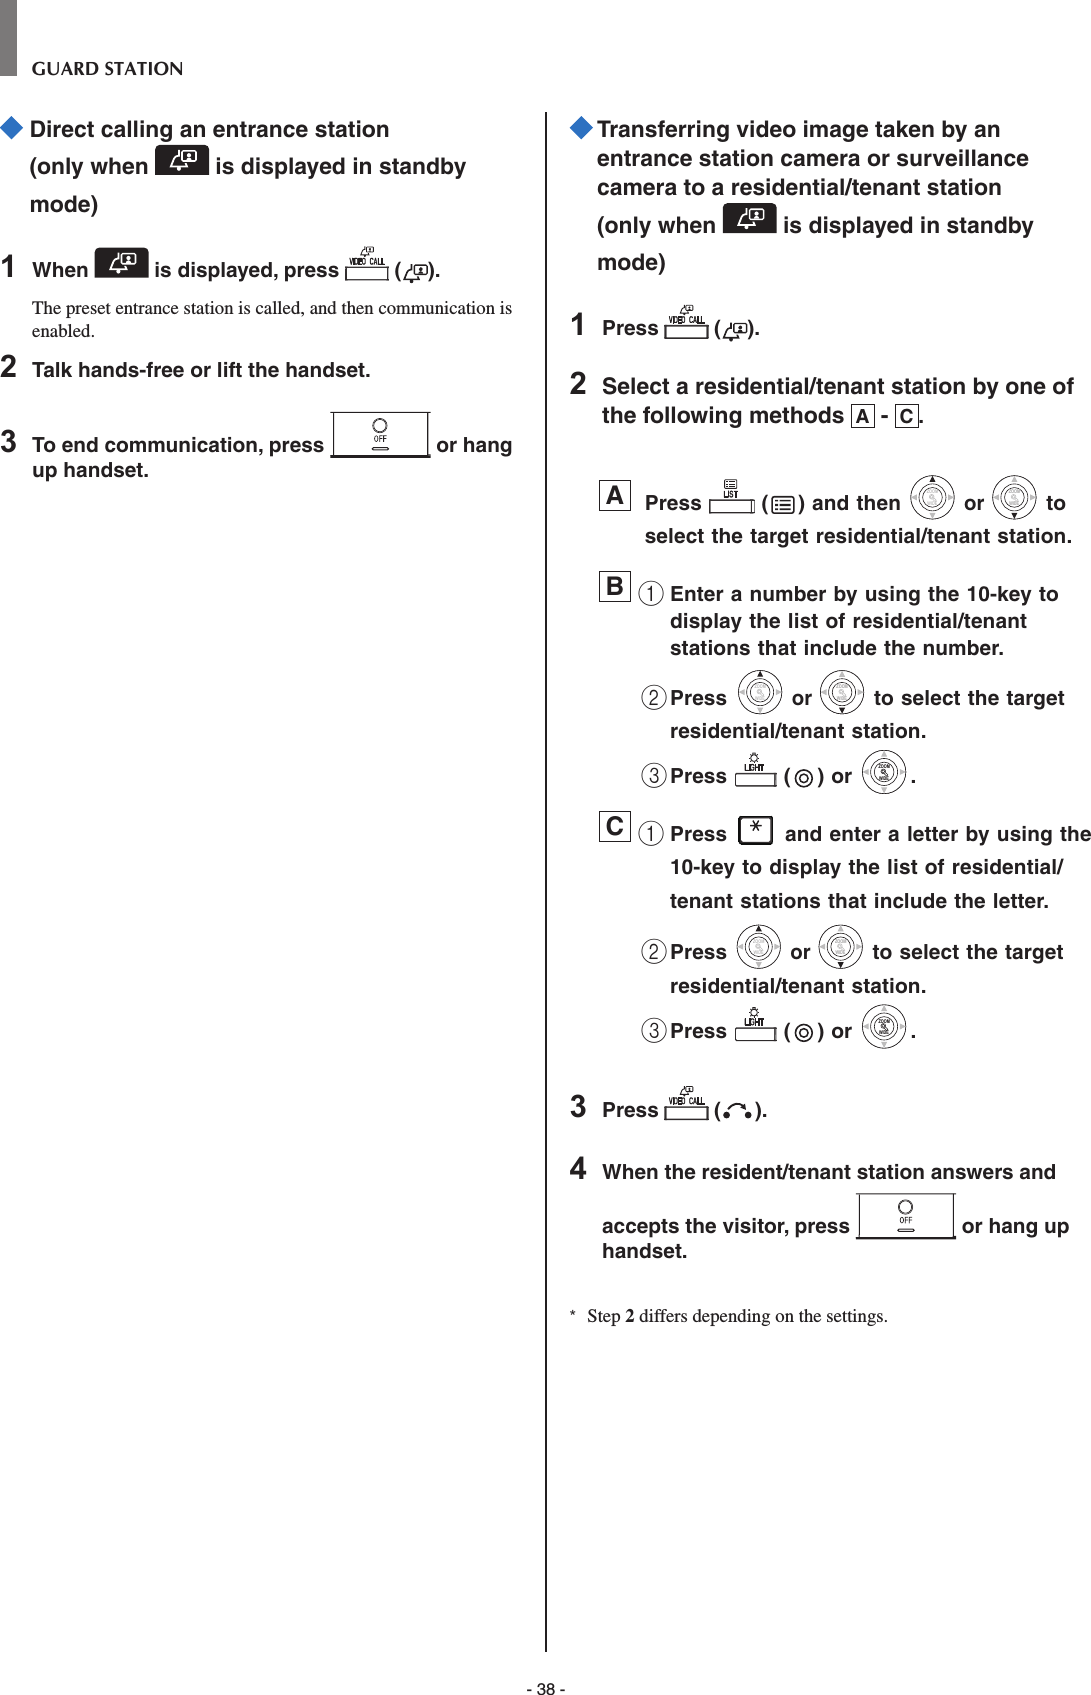
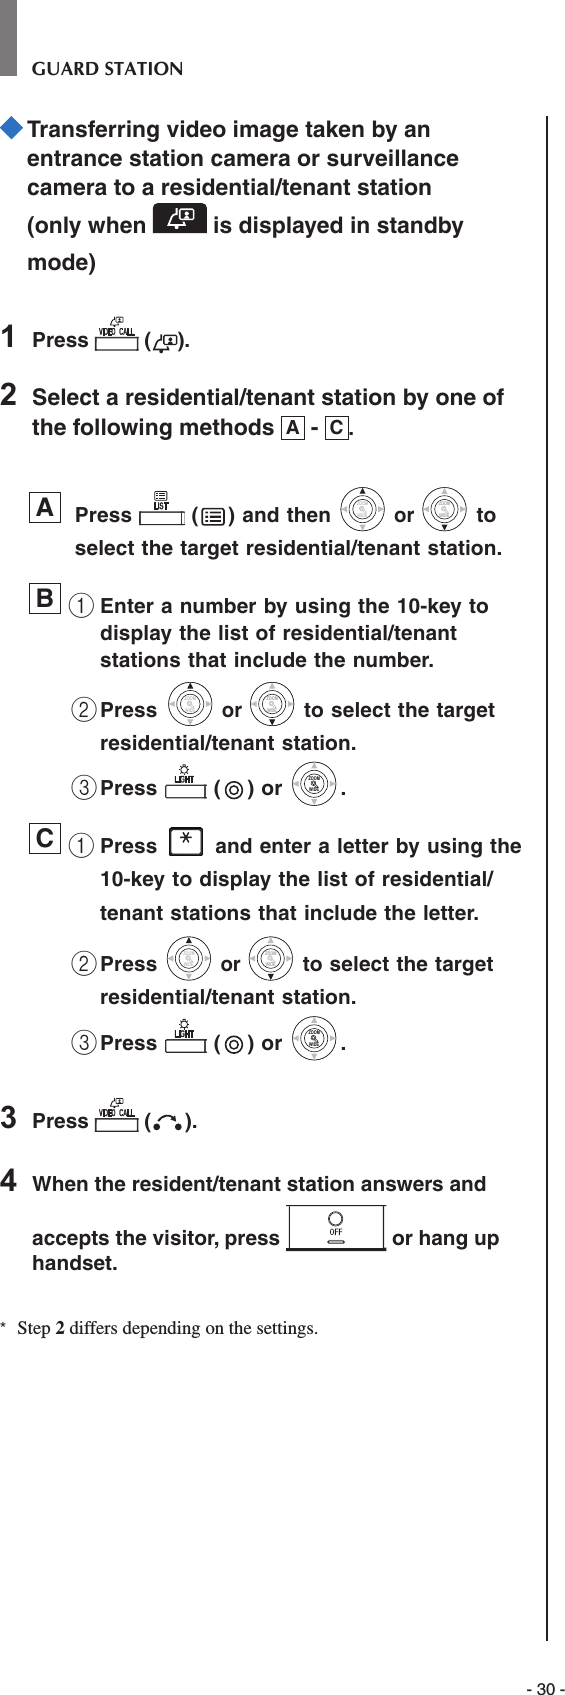
![- 39 -GUARD STATION 5 OPERATIONS DURING COMMUNICATIONA call from an entrance station can be transferred to a residential/tenant station via a guard station1 After the guard station is called from an entrance station, press or lift handset to answer the call.WIDEZOOM1011PARKING GATE2 Press ( ) or enter the unit # by using [0] to [9] on the 10-key.The list of residential/tenant stations is displayed.3 Select the target residential/tenant station, then press ( ).The call is transferred to the residential/tenant station.* "ON HOLD" is displayed on the entrance station and no sound is heard at the entrance station.4 When the residential/tenant station answers and accepts the visitor, press or hang up handset to establish communication between the entrance station and the residential/tenant station.* When there is no answer from the residential/tenant station, hang up handset and pick it up again, or press and then to communicate with the entrance station.* Step 2 differs depending on the settings.Reference: Reception mode (→8-2 )When there is a call from an entrance station to a residential/tenant station, it is fi rst transferred to the guard station, so a call tone sounds and the video at the entrance station is displayed on the guard station.1 While receiving a call or communicating with an entrance station, press .WIDE ADJUSTZOOMDoor release is activated at the entrance station. * Audio guidance will be heard depending on the settings.NOTES:• For an all-in-one type entrance station: The door lock is released for the preset time. If the preset release time is “0”, it can be released while the button is pressed and held. For a modular type entrance station: If the VR1 dial (inside the cover) is set to “M (Momentary)”, it can be released while the button is pressed and held.• Depending on the electric door release system that you use, door release may be active only while the door release button is pressed. CAUTION: Be sure to confi rm the visitor securely before releasing the door if the entrance station has no camera.The number and name of calling entrance station Door releaseTransferring a call 5-25-1](https://usermanual.wiki/AIPHONE/GTMKBN/User-Guide-3437363-Page-39.png)

![- 42 -GUARD STATIONAdjusting screen viewIf the video on the screen is diffi cult to see, you can adjust the screen view.1 Press ADJUST when the video is diffi cult to see.WIDE ADJUSTZOOMThe backlight or night sensitivity is automatically adjusted.* The discrimination between day and night is performed automatically by this station.* The adjustment result may vary depending on the setting. To restore the screen view before adjustmentPress ADJUST again.The icon is cleared and the screen view before adjustment is restored.NOTES:• Pressing ADJUST at night may make visitors' faces easier to see, but may also make moving objects more diffi cult to see. • The screen view adjusting function is not available for a video door station (JO-DV).<Day> <Night>[Before adjustment][After adjustment] [After adjustment][Before adjustment]](https://usermanual.wiki/AIPHONE/GTMKBN/User-Guide-3437363-Page-42.png)
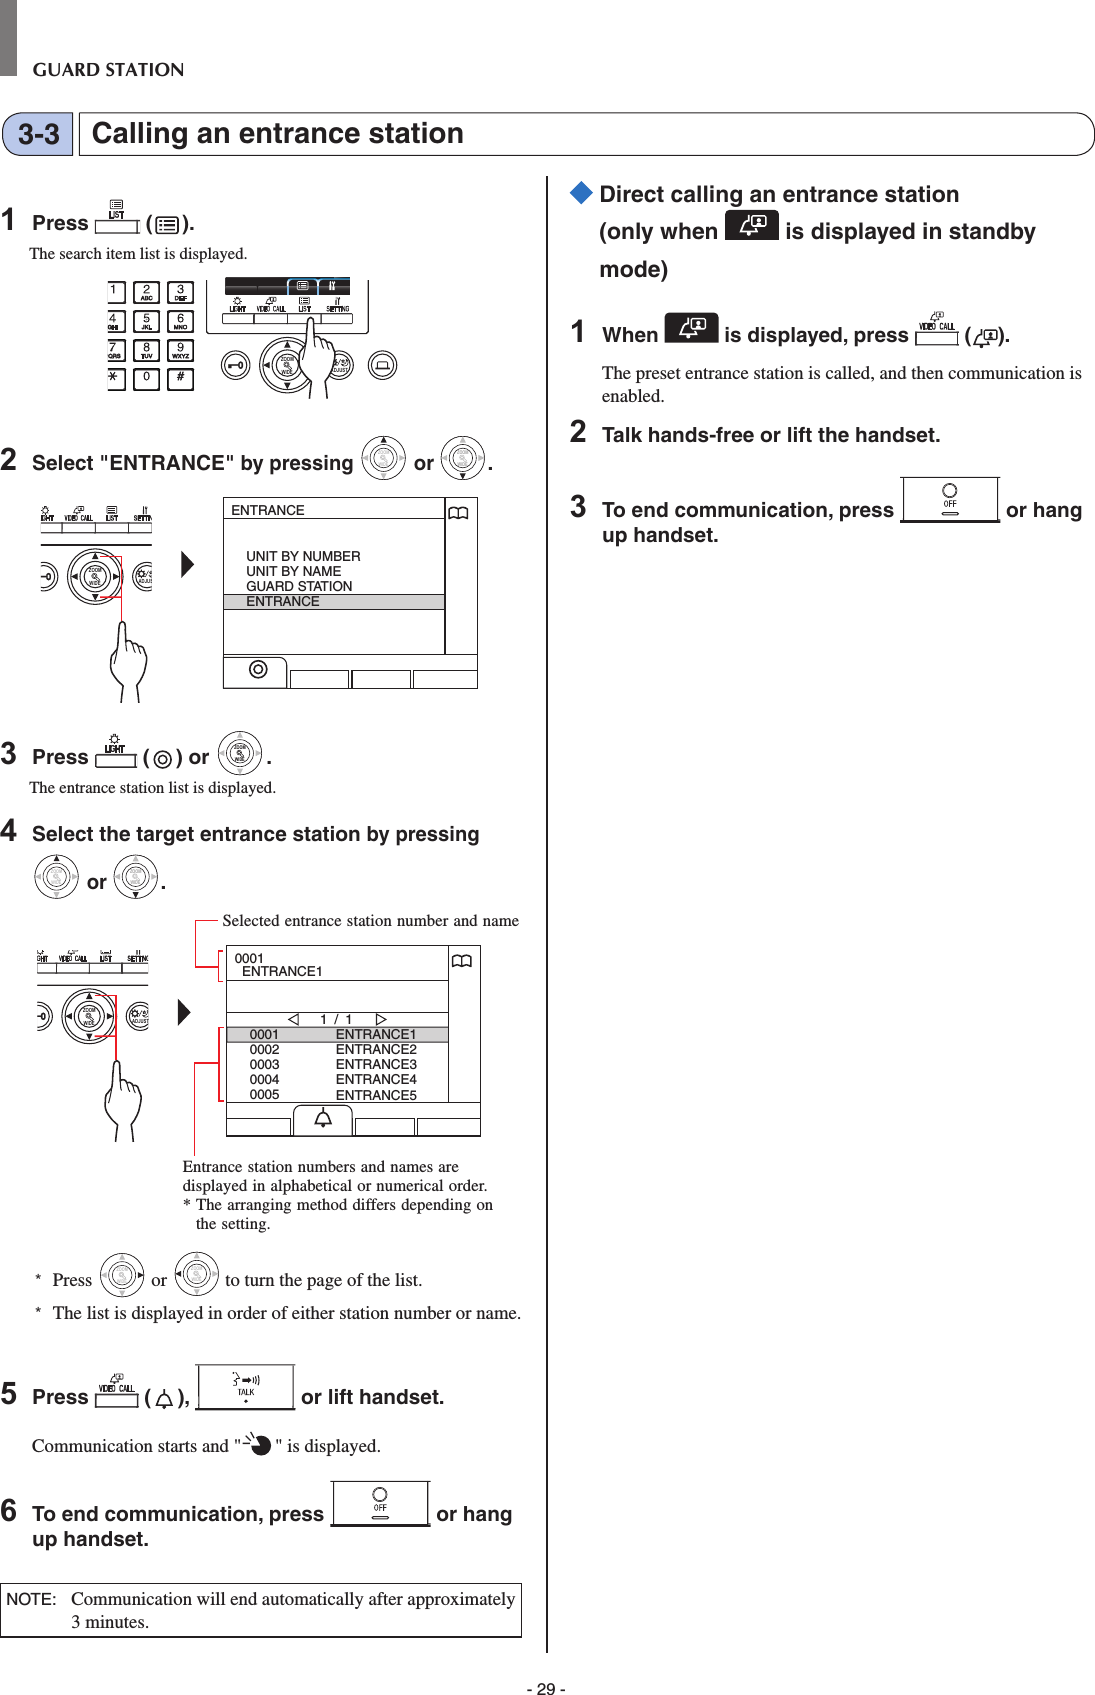
![- 43 -GUARD STATION 6 MONITORINGYou can monitor an entrance station or door station.* When monitoring an entrance station or door station with a camera, you can view the video at the station and hear the sound. * The monitoring function is not available for an entrance station or door station without a camera. Monitoring from a tenant building * For monitoring a door station, start from step 5.1 In standby mode, press ( ).WIDE ADJUSTZOOMThe search item list is displayed.2 Select "ENTRANCE" by pressing WIDEZOOM or WIDEZOOMWIDEZOOM.WIDE ADJUSZOOMENTRANCEUNIT BY NUMBERUNIT BY NAMEGUARD STATIONENTRANCE3 Press ( ) or WIDEZOOMWIDEZOOM.The entrance station list is displayed.4 Select the target entrance station by pressing WIDEZOOM or WIDEZOOMWIDEZOOM.WIDE ADJUSTZOOM00010002000300040005ENTRANCE1ENTRANCE2ENTRANCE3ENTRANCE4ENTRANCE51 / 10001 ENTRANCE1* Press WIDEZOOM or WIDEZOOM to turn the page of the list.* The list is displayed in order of either station number or name.5 Press .The sound at the station is heard, and the video is displayed on the screen.1011 PARKING GATE* While monitoring, you can switch zoom/wide, pan & tilt, and adjust the screen view. (→5-4 )6 [To communicate with the station]Press or lift handset.WIDE ADJUSTZOOM or Communication with the station starts and " " is displayed. * Until this step, the monitored stations cannot hear any sound from the guard station.7 To end monitoring or communication,Press or hang up handset.NOTES:• Monitoring ends automatically after about 30 seconds.• Only entrance stations that can be selected by the guard station can be monitored.• When no door station is installed, pressing has no effect on the display.Entrance station numbers and names are displayed in alphabetical or numerical order.* The arranging method differs depending on the setting.Selected entrance station number and nameSelected station number and name](https://usermanual.wiki/AIPHONE/GTMKBN/User-Guide-3437363-Page-43.png)
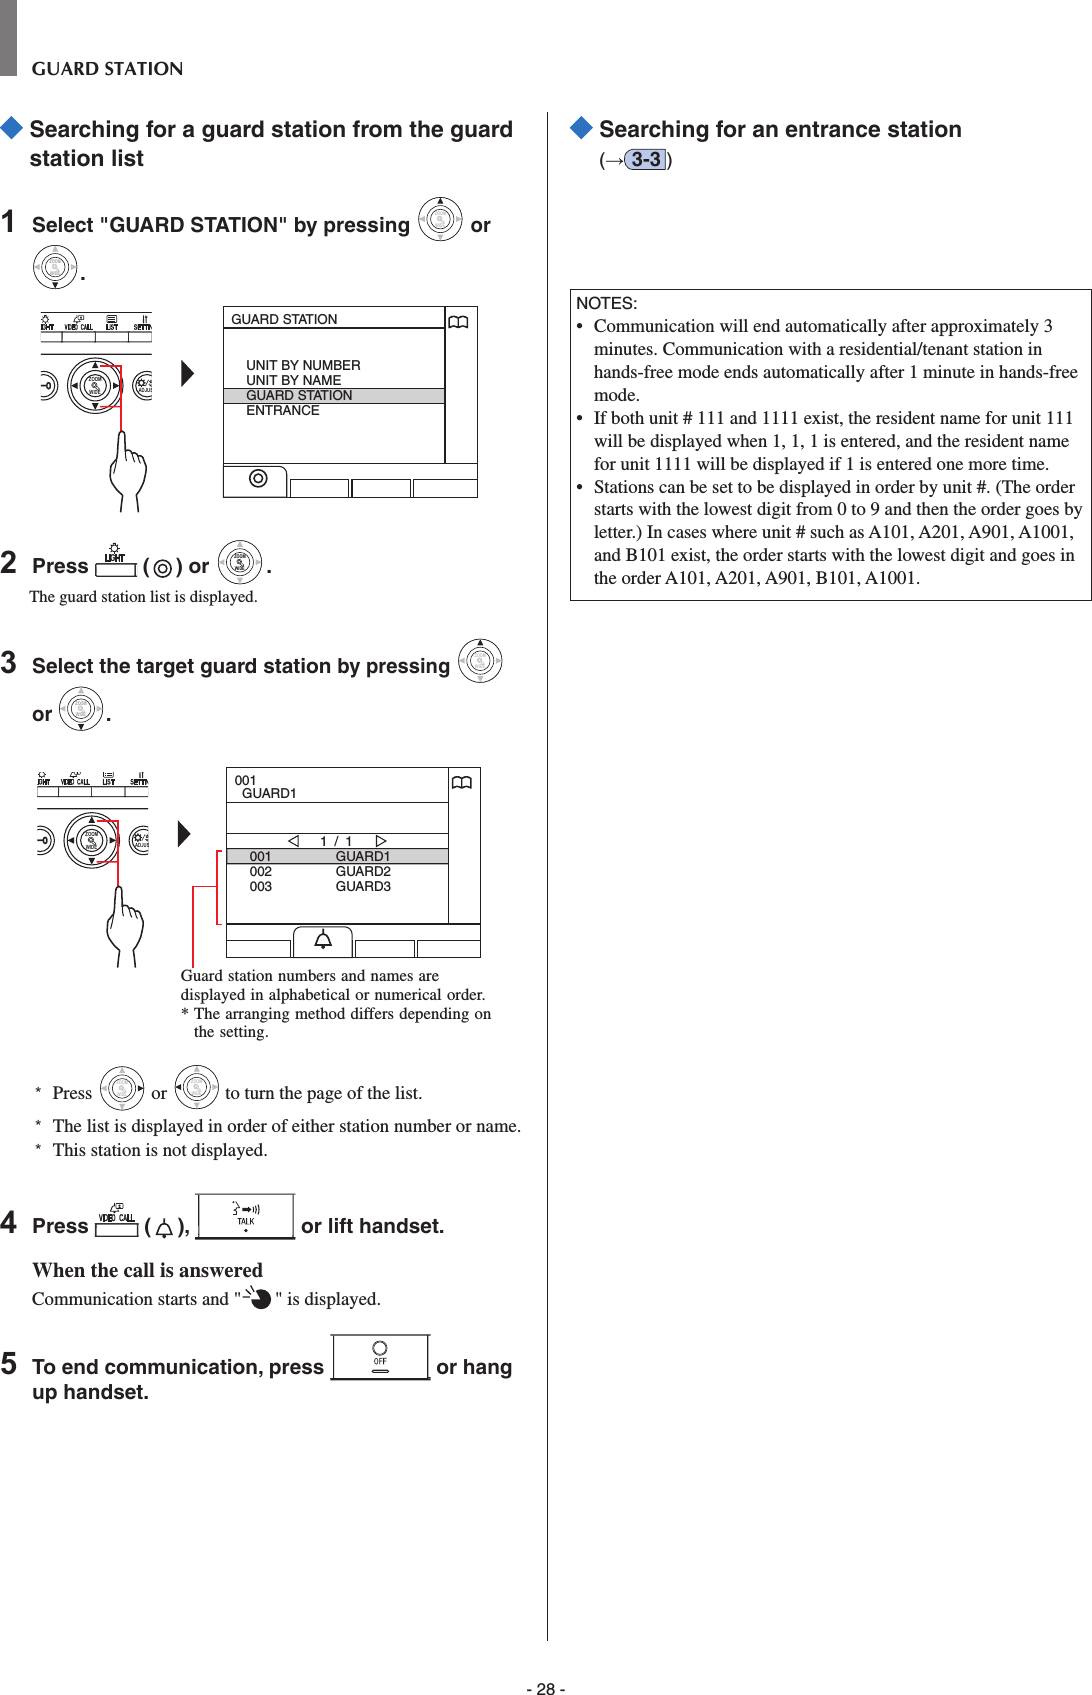
![- 44 -GUARD STATIONMonitoring from a main building * For monitoring a door station, start from step 7.1 In standby mode, press ( ).The search item list is displayed.WIDE ADJUSTZOOM2 Select "ENTRANCE" by pressing WIDEZOOM or WIDEZOOMWIDEZOOM.WIDE ADJUSZOOMENTRANCEBUILDINGGUARD STATIONENTRANCE3 Press ( ) or WIDEZOOMWIDEZOOM.The building list is displayed.4 Select the target building.WIDE ADJUSZOOM0102030405CENTRAL TOWEREAST TOWERWEST TOWERNORTH TOWERSOUTH TOWER1 / 101 CENTRAL TOWER* Press WIDEZOOM or WIDEZOOM to turn the page of the list.* The list is displayed in order of either building number or name.5 Press ( ) or WIDEZOOMWIDEZOOM.The entrance station list is displayed.6 Select the target entrance station.WIDE ADJUSZOOM00010002000300040005ENTRANCE1ENTRANCE2ENTRANCE3ENTRANCE4ENTRANCE51 / 10001 ENTRANCE1* Press WIDEZOOM or WIDEZOOM to turn the page of the list.* The list is displayed in order of either station number or name.7 Press .The sound at the station is heard, and the video is displayed on the screen.1011 PARKING GATE* While monitoring, you can switch zoom/wide, pan & tilt, and adjust the screen view. (→5-4 )8 [To communicate with the station]Press or lift handset.WIDE ADJUSTZOOM or Communication with the entrance station side starts and " " is displayed. * Until this step, the monitored stations cannot hear any sound from the guard station.9 To end monitoring or communication,Press or hang up handset.NOTES:• Monitoring ends automatically after about 30 seconds.• Only entrance stations that can be selected by the guard station can be monitored.• When no door station is installed, pressing has no effect on the display.Entrance station numbers and names are displayed in alphabetical or numerical order.* The arranging method differs depending on the setting.Selected entrance station number and nameSelected building number and nameBuilding numbers and names are displayed in alphabetical or numerical order.* The arranging method differs depending on the setting.Selected station number and name](https://usermanual.wiki/AIPHONE/GTMKBN/User-Guide-3437363-Page-44.png)

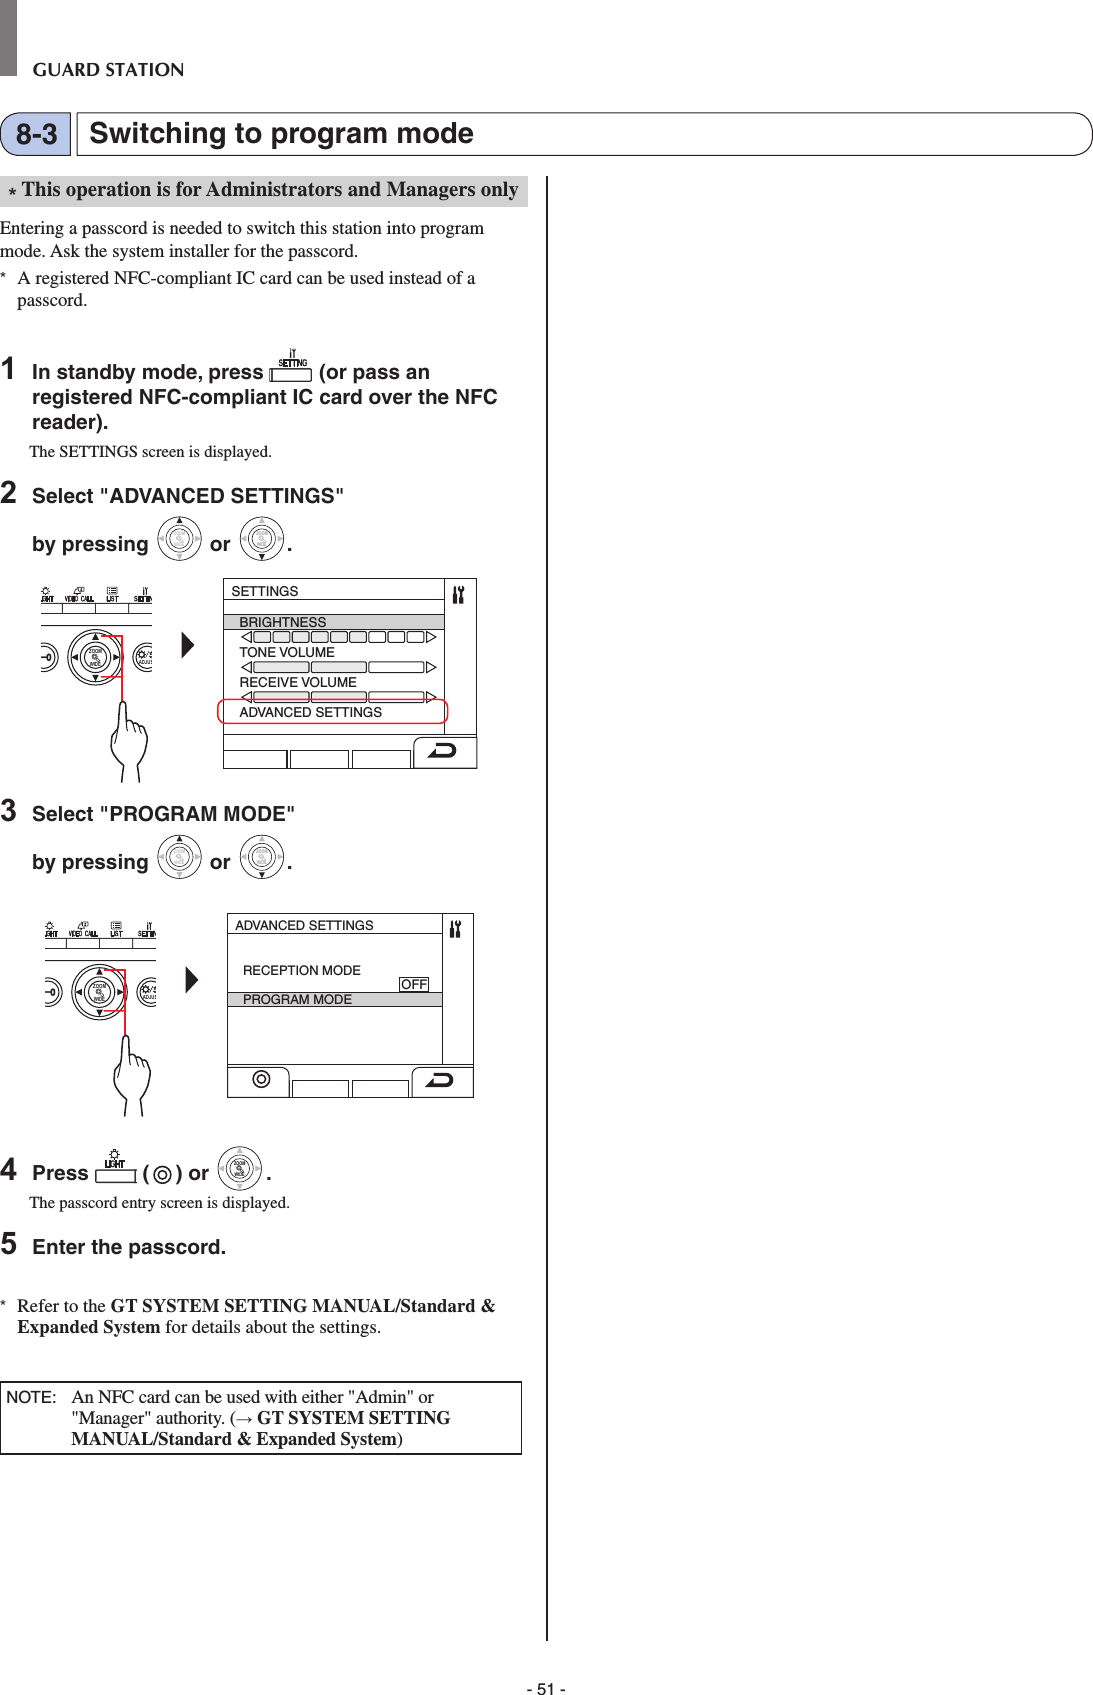
![- 50 -GUARD STATION* This section describes the reception mode and how to confi gure it. Refer to steps 2 to 3 of " 5-1 Transferring a call" for the operating procedure. What is reception mode?In reception mode, all of the calls from entrance stations to residential/tenant stations are fi rst transferred to guard stations. You can transfer the calls to residential/tenant stations after confi rming they are not unwanted calls to the target residents.[Normal mode]NOTES:• In a main building: Calls from an entrance station are transferred to all guard stations in the building. The call tone sounds on all guard stations at the same time. In a tenant building: Calls from an entrance station are transferred to all guard stations in the tenant building that are linked to the corresponding residential/tenant station. The call tone sounds on all guard stations at the same time.• A call to a residential/tenant station that is not linked to a guard station will result in a call to the residential/tenant station directly. Switching this station between normal mode and reception mode1 In standby mode, press .The SETTINGS screen is displayed.2 Select "ADVANCED SETTINGS" by pressing WIDEZOOM or WIDEZOOMWIDEZOOM.WIDE ADJUSZOOMSETTINGSBRIGHTNESSTONE VOLUMERECEIVE VOLUMEADVANCED SETTINGS3 Select "RECEPTION MODE" by pressing WIDEZOOM or WIDEZOOMWIDEZOOM.WIDE ADJUSZOOMADVANCED SETTINGSRECEPTION MODE OFFPROGRAM MODE4 Press ( ) or WIDEZOOMWIDEZOOM.5 Change reception mode to "ON" or "OFF" by pressing WIDEZOOM or WIDEZOOM.WIDE ADJUSZOOMADVANCED SETTINGSRECEPTION MODE OFFPROGRAM MODEON: Reception mode is active. OFF: Normal mode is active. 6 Press ( ) or WIDEZOOMWIDEZOOM.* When this station is in reception mode, the status LED will fl ash slowly. (→1-2 )To return to the previous screenPress ( ).Switching to reception mode8-2Residential/tenant stationResidential/tenant stationEntrance stationCallCall TransferEntrance station[Reception mode]Guard station (this station)Guard station (this station)](https://usermanual.wiki/AIPHONE/GTMKBN/User-Guide-3437363-Page-50.png)
![- 53 -[For guard station only]• The video image may distort when door release is activated. This is not a station malfunction.• If a zoom/wide, pan/tilt, door release operation or brightness adjustment is performed during communication with the entrance station, noise will be produced at the entrance station. This is not a malfunction.[General]• If there is a system malfunction, contact a qualifi ed technician for service.• Cleaning: Clean the units with a soft cloth dampened with a neutral household cleanser. Do not use any abrasive cleaner or cloth. CAUTION: Do not use chemicals such as thinner or benzine. In addition, do not use a scrub brush, sandpaper, etc. Otherwise the unit surface could be damaged or discolored. 1 TECHNICAL PRECAUTIONSFOR PROPER USE OF THIS STATION](https://usermanual.wiki/AIPHONE/GTMKBN/User-Guide-3437363-Page-53.png)

![- 57 -FOR PROPER USE OF THIS STATION 4 REGULATIONSFCCThis device complies with part 15 of the FCC Rules. Operation is subject to the following two conditions: (1) This device may not cause harmful interference, and (2) this device must accept any interference received, including interference that may cause undesired operation.Changes or modifi cations not expressly approved by the party responsible for compliance could void the user's authority to operate the equipment.NOTE: This equipment has been tested and found to comply with the limits for a Class B digital device, pursuant to part 15 of the FCC Rules. These limits are designed to provide reasonable protection against harmful interference in a residential installation. This equipment generates, uses and can radiate radio frequency energy and, if not installed and used in accordance with the instructions, may cause harmful interference to radio communications. However, there is no guarantee that interference will not occur in a particular installation. If this equipment does cause harmful interference to radio or television reception, which can be determined by turning the equipment off and on, the user is encouraged to try to correct the interference by one or more of the following measures:• Reorient or relocate the receiving antenna.• Increase the separation between the equipment and receiver.• Connect the equipment into an outlet on a circuit different from that to which the receiver is connected.• Consult the dealer or an experienced radio/TV technician for help.INDUSTRY CANADACAN ICES-3 (B)/NMB-3(B)This device complies with Industry Canada's licence-exempt RSSs. Operation is subject to the following two conditions: (1) This device may not cause interference; and (2) This device must accept any interference, including interference that may cause undesired operation of the device.REDHereby, Aiphone Co., Ltd. declares that the radio equipment type [GT-DB-VN, GT-DMB-N, GT-DMB-LVN, GT-MKB-N, GT-BCXB-N] is in compliance with Directive 2014/53/EU.The full text of the EU declaration of conformity is available at the following internet address: http://www.aiphone.net/GT-MKB-N: 13.56MHz / Max. 20.0 dBmGT-DMB-N: 13.56MHz / Max. 20.0 dBm GT-DMB-LVN: 13.56MHz / Max. 20.0 dBmGT-DB-VN: 13.56MHz / Max. 20.0 dBmGT-BCXB-N: 13.56MHz / Max. 20.0 dBmNCC電信法第48條低功率電波輻射性電機管理辦法第十二條經型式認證合格之低功率射頻電機,非經許可,公司、商號或使用者均不得擅自變更頻率、加大功率或變更原設計之特性及功能。第十四條低功率射頻電機之使用不得影響飛航安全及干擾合法通信;經發現有干擾現象時,應立即停用,並改善至無干擾時方得繼續使用。前項合法通信,指依電信法規定作業之無線電通信。低功率射頻電機須忍受合法通信或工業、科學及醫療用電波輻射性電機設備之干擾。WEEEThe object area of is the EU.](https://usermanual.wiki/AIPHONE/GTMKBN/User-Guide-3437363-Page-57.png)