ALPINE ELECTRONICS 9ZUA147 Car Navigation Unit User Manual X109D
Alpine Electronics Inc Car Navigation Unit X109D
UserManual.wiki
>
ALPINE ELECTRONICS
>
9ZUA147 User Manual
Users manual
Navigation menu
Upload a User Manual
Namespaces
Wiki Guide
HTML
PDF
Info
Views
User Manual
Discussion / Help
Navigation
![13-ENAbout Dual Screen Dual Screen allows you to display the Navigation and Audio/Visual screens simultaneously.*Touch [], or swipe to the left to switch to the Navigation menu screen. For details of navigation operations, refer to “Navigation System OM” in the website at http://www.alpine-usa.com.You can switch the left/right positions of the Audio/Visual screen and Navigation screen.Each time you touch , the positions of Audio/Visual screen and Navigation screen switch.• When is not displayed, touch [].Dual Screen Display PositionAudio full ScreenTo uc h [], or swipe to the left.To uc h [], or swipe to the right.To uc h [], or swipe to the left.To uc h [], or swipe to the right.Navigation full ScreenDual Screen](https://usermanual.wiki/ALPINE-ELECTRONICS/9ZUA147/User-Guide-2952471-Page-13.png)
![14-ENLocation of Controls (Favorite) buttonRecalls the Favorite screen.• Press and hold this button for at least 2 seconds to switch to the iData Link mode screen. (MUTE) buttonPress to activate/deactivate the mute mode. (AUDIO)/ (Voice Recognition mode) buttonDisplays the Audio/Visual screen. If the Audio/Visual screen is already displayed, changes the source.When a hands-free phone with Voice Recognition is connected, press and hold for at least 2 seconds to switch to the Voice Recognition mode. / (UP/DOWN) buttonPress to adjust the volume. RESET switchThe system of this unit is reset. (Eject) buttonEjects a disc. MENU/ (Power Off) buttonRecalls the Menu screen.Press and hold this button for at least 5 seconds to turn the power off. (NAV) buttonRecalls the navigation map screen.Press again to switch to Navigation menu screen.Press and hold this button for at least 2 seconds to change to Go Home route screen. (If Home is not set yet, it will change to the Home setting screen.)For details of navigation operations, refer to “Navigation System OM” in the website at http://www.alpine-usa.com. / buttonPress to seek up/down a station in radio mode or up/down a track, chapter, etc., in other audio/visual sources. Remote SensorPoint the remote control transmitter towards the remote sensor within a range of 2 meters.Turning Power On or OffSome of this unit’s functions cannot be performed while the vehicle is in motion. Be sure to stop your vehicle in a safe location and apply the parking brake, before attempting these operations.1Turn the ignition key to the ACC or ON position.The system turns on.• When turned on, the system displays the last screen that was displayed before the ignition key was turned off. For example, if the unit is in radio mode when ignition is turned off, it will remain in radio mode when ignition is turned back on.2Press and hold the MENU/ (Power Off) button for at least 5 seconds to turn the power off.• The unit can be turned on by pressing any button.• The unit is a precision device. Careful handling of the unit should provide you with years of trouble-free operation.Turning the System OnWith the Alpine system, when the ignition key is turned to ACC or ON, the opening screen will be automatically displayed.When the system is used for the first time, the language selection menu is displayed. Swipe the Language list screen vertically, then touch your choice from the list of 23 languages.• Some of this unit’s functions cannot be performed while the vehicle is in motion. Be sure to stop your vehicle in a safe location and apply the parking brake before attempting these operations.Getting Started Controllable with Remote ControlThis unit can be controlled with an optional Alpine remote control. For details, consult your Alpine dealer. Point the optional remote control transmitter at the remote control sensor.About the button descriptions used in this Owner’s ManualThe buttons found on the face of the unit are expressed in bold (e.g. MENU). The buttons found on the touch-screen display are shown in bold within brackets, [ ] (e.g. []).](https://usermanual.wiki/ALPINE-ELECTRONICS/9ZUA147/User-Guide-2952471-Page-14.png)
![16-ENTouch Screen OperationYou can operate the system by using the touch panel on the screen.• Be sure to touch the onscreen button lightly with the pad of your finger to avoid scratching the display.Touch operationTouch a button or list item on the screen lightly.• If you touch a button and there is no reaction, lift your finger.• Onscreen buttons that cannot be operated are dimmed.Swipe operationMove your finger lightly with a swipe. Drag & Drop operationTouch and hold the desired item, then drag it to its new location by moving your finger, then release your finger to place the item.• It is not possible to narrow the screen with two fingers (pinch in) or spread the screen (pinch out).Switching SourcesPress the (AUDIO) button to change the source.Switching sources using the (AUDIO) buttonDuring audio/visual playback, press the (AUDIO) button repeatedly to switch to the desired source.Radio USB/iPod*1 Factory Media (USB/iPod)*2 DVD*1, 3 Pandora*1 Bluetooth Pandora*1, 4 SiriusXM*1 or Factory SiriusXM*2 AUX *3, 5 Bluetooth Audio*1 or Factory Bluetooth Audio*2 Radio*1 When no USB flash drive/iPod/HDMI device/Smartphone/Bluetooth compatible device/SiriusXM Tuner is connected, this option is not available.*2 Not displayed when your car does not support the source or “Setting the Source Category” (page 47) is set to “Aftermarket.”*3 The name set for “HDMI Setup” (page 44), “Setting the Auxiliary (AUX) Name” (page 44), is displayed.*4 When Bluetooth Pandora is set to “Off ”, this option is not available. (page 44)*5 When AUX is set to “Off,” or when the iDataLink module (sold separately) is connected, this option is not available. (page 43)Switching Sources from the Menu screen1Press the MENU button. The menu screen is displayed.• You can also display the menu screen by touching [] on the lower part of the Audio source screen or by swiping upward.2Touch your desired source in the Audio source selecting area.• In the menu screen, you can change the Audio source directly or change the order in which sources change. For details, see “About the Menu Screen” (page 20).The Audio source selecting area](https://usermanual.wiki/ALPINE-ELECTRONICS/9ZUA147/User-Guide-2952471-Page-16.png)
![17-ENOperating the Function Button on the Audio/Video Main ScreenUsing the Function button on the Audio/Visual main screen.Tou ch [] to change to the Function mode.HD Radio™ main screen exampleSwipe to the right or left to change to the Function mode.To close the Function mode, touch [].• Depending on the Audio source, the Function mode displays from the beginning. About Basic Operation for List ScreenBasic operations on the Setup list screen and the Search list screen.How to display on the list screen differs depending on the selected item.Switches to the menu screen or the previous screen.Item select buttonCloses the window.Displays the next list page.• When the next selection item does not exist, the list item is not displayed.Lists items for selection • When there are more than five list items, the page can be changed by swiping vertically.Returns to the list screen of the page that you touched.• The list screens that can be displayed are up to the 2 previous pages. If you touch [], you can recall your desired page.Changes the page of the Item select button above. • “ ” indicates the total number of pages, “ ” indicates the location of the current page. List screen close button• Touch or swipe to the left on the search screen, etc. to close the list screen.Function mode](https://usermanual.wiki/ALPINE-ELECTRONICS/9ZUA147/User-Guide-2952471-Page-17.png)
![18-ENAbout the Shortcut Setup ScreenDisplaying the Sound Setup screen, or the Shortcut Setup screen of the Rear Seat Entertainment System screen. Tou ch [] or swipe downward in the Audio source screen.The Sound Setup screen or the Rear Seat Entertainment System Setup Screen is displayed.Sound Setup screen (Tone Adjustment mode) exampleYou can adjust the attention tone (Ding) before the voice navigation starts and Navi voice interrupt volume (Navi Voice).Volume: 0 - 35Button for Display Off *Displays the registered Bluetooth Device List screen.• See “Registering the Bluetooth Device” (page 29). Touch this or swipe upward to change to the currently playing source screen.Displays the Hands-free Device Primary/Secondary setting screen.• See “Hands-free Device Primary/Secondary Setting” (page 30).*Display Off mode- To cancel Display Off mode, touch the screen or press any button.- Display Off mode is canceled when the power or ACC is turned off.- When the gear lever is shifted to the reverse (R) position and the rear camera is connected, the rear camera image is displayed.- When a call is received on a Bluetooth-connected phone, the incoming call screen is displayed.Tone Adjustment modeBASS ENGINE SQ modeButton for changing the BASS ENGINE SQ mode screenBalance/Fader Image area*1• To reset to the initial settings (Balance: 0, Fader: 0), touch [].Rear Seat Entertainment Function screen switch button• When Setting the Rear Seat Entertainment is “Off,” you cannot change the screen. For details on Rear Seat Entertainment setting, see “Rear Seat Entertainment Setup” (page 48).Buttons for switching between Front/Rear when adjusting Bass/Treble*2Buttons for adjusting Bass Level/Treble Level*3, 4Buttons for adjusting Media Xpander *1, 3, 4Buttons for adjusting Subwoofer Level *1, 3, 5Button for changing the Tone Adjustment mode screen• If changing to the Tone Adjustment mode, BASS ENGINE SQ mode will be disabled.Buttons for adjusting the BASS ENGINE Level*4Buttons for selecting the BASS ENGINE type *4*1 You can perform a more detailed set up in “Sound Setup” (page 32).*2 You cannot switch when Front/Rear Sync in “Adjusting the Parametric Equalizer Curve (Dual HD EQ)” (page 33) is “On.”*3 When you switch to the BASS ENGINE SQ mode, the value you have set is ignored.*4 When the Defeat setting is “On,” you cannot perform the set up.*5 If the Subwoofer setting is “Off,” the setting cannot be changed. See “Turning Subwoofer ON/OFF” (page 32).Sound Setup Function](https://usermanual.wiki/ALPINE-ELECTRONICS/9ZUA147/User-Guide-2952471-Page-18.png)
![19-ENAdjusting Bass Level/Treble LevelBass Level and Treble Level can be set for each front seat and for each rear seat by touching [Front] or [Rear].Setting item:Bass / TrebleSetting contents:-14 to +14 (Initial setting: 0)• When the Sound Setup of the Shortcut Setup is selected to “BASS ENGINE SQ,” you cannot perform the set up.• Adjustment cannot be performed when Defeat is set to “On.”• The Bass adjusted setting value is interlinked with Band2 of Dual HD EQ, and the Treble adjusted setting value is interlinked with Band8.Setting the BASS ENGINE SQSetting the BASS ENGINE TypeCreating the ideal Bass impact for your musical taste using BASS ENGINE SQ.Setting contents:Standard (Initial setting) / Punch / Rich / Mid Bass / Low BassAdjusting the BASS ENGINE LevelYou can adjust the BASS ENGINE Level.Setting item:BASS ENGINE LevelSetting contents:0 to 6 (Initial setting: 3)• The BASS ENGINE Level 0 of the BASS ENGINE SQ is common to all the types.About setup when the external power amplifier is connectedIn order to optimize the BASS ENGINE SQ mode, we recommend the following procedure to set up the power amplifier.Use your favorite music to make the following amplifier adjustment.1) Set GAIN of the power amplifier to “MIN.”2) Set the Crossover Mode Sector switch to “OFF.”• If the switch has no “OFF” position, set as near as possible to full range.3) Set the BASS ENGINE Level to “03.”4) Play a song of the genre you frequently listen to, and adjust GAIN of the power amplifier.The Rear Seat Entertainment function independently routes different sources to the front and the rear of the car. For example, while listening to the radio or other audio sources in the front, HDMI can be enjoyed at the rear with optional rear monitors and headphones.Rear Seat Entertainment System Setup screenButton for changing to the Sound Setup screen.Visual source selection area that is displayed on the Rear monitor.*1, 2Touch the source icon displayed on the Rear monitor.Front: The image and sound of the same visual source as the unit are output.Off: Stops output to the Rear monitor.Illumination Color button*3The color coordination select button of the Rear monitor:White/Blue/Green/Amber/Red/Purple/Skyblue/Off(This function is depended on Over Head Monitor)Plasmacluster air volume adjustment button*4Whenever you touch the button, you can change the air volume.Off Low Mid High Off• While the plasmacluster is operating, the indicator is displayed on the Audio source screen.Remote SensorYou can set whether the sensor on Rear monitor receives remote control operation, or the unit receives it.*1 The visual source that can be output to the Rear monitor is “HDMI/DVD,” “iPod Video,” and “AUX.” When the unit plays back the visual source, you can only select the same visual source as the unit.*2 When selecting AUX and iPod video source selection, the “Setting the Additional AUX BOX” (page 49) is set to “On” and an optional external AUX distribution box is required.*3 When the Illumination Color in “Setting the Rear Seat Entertainment System” (page 48) is set to “Off,” the Illumination Color button is not displayed. *4 When the Plasmacluster in “Setting the Rear Seat Entertainment System” (page 48) is set to “Off,” the Plasmacluster air volume adjustment button is not displayed.• If the same visual source is being output to both the unit and the Rear monitor when an incoming/outgoing call is made, the visual/audio output to the Rear monitor is interrupted temporarily depending on the source.If different visual sources are being output to the unit and the Rear monitor, visual/audio output to the Rear monitor continues without interrupting playback.Standard: Mild low-end boost with mid-range focus for front-center staging.Punch: Mid-bass punched up with mid-range impact.Rich: Accented highs and mid-bass giving outstanding balance for all types of music.Mid Bass: Strong high frequency emphasis with mid-bass boost for more low-end attack.Low Bass: Strong, low-bass boost with extended highs for a very dynamic sound.Rear Seat Entertainment Function](https://usermanual.wiki/ALPINE-ELECTRONICS/9ZUA147/User-Guide-2952471-Page-19.png)
![20-ENAbout the Menu ScreenIn the menu screen, you can select the audio source and perform various setups or operations on the unit.Press the MENU button.The menu screen is displayed.• You can also display the menu screen by touching [] on the lower part of the Audio source screen or by swiping upward. Menu screen exampleDisplays the currently playing audio source.Displays the total number of the audio sources that can be selected. Also displays the current position, counting from the leftmost audio source. Touch or swipe downward to return to the Audio source screen.Audio source select areaTouch your desired source icon to change the audio source.• Swiping to the right or left in the Audio source select area, you can change one audio source at a time. Moreover, swiping to the right or left outside the Audio source select area (upper and lower sides), you can change pages of the Audio source select area. • The source icon displayed in the Audio source select area is the one checked on the Edit menu screen. For details on how to display/hide the source icon, see “Edit Menu” (page 20).Displays Preset No, and information of the Search mode, etc., located in the middle of the Audio source select area.• Touch the desired preset number or the Search mode to change the audio source directly.• The displayed information differs depending on the audio source. Some sources are not displayed.External Accessory Control buttonDisplayed when the optional External Accessory Control module is connected and “Setting the External Accessory Control” is set to “On” (page 49).• You can operate the external accessories from this unit. For details, see “External Accessory Control Operation” (page 95).Notification button*1Use to display the Facebook Notification List on the connected smartphone via this unit. (page 27)• When there is no Notification, “No Notifications.” will be displayed.Camera button*2Displays camera images. (page 89)Setup buttonDisplays the Setup screen. (page 28)Vehicle Info button*3Displays the iDataLink Info mode screen. (page 93)Phone button*4Displays the Phone menu screen. (page 78)*1 Displayed when Alpine TuneIt App is set to “USB (iPhone)” or “Bluetooth (Android),” and when a smartphone with Alpine TuneIt App installed is connected. (page 26)*2 Displayed when the Camera Select is set to “Front,” “Rear,” or “Other” (page 45). Also, when the unit is connected to the optional Multi Camera Interface module, the camera image set in “Setting a Default Camera” (page 47) is displayed.*3 Displayed only when the unit is connected to the iDataLink module.*4 Displayed when the Bluetooth is set to “On.” (page 29)In the Edit Menu screen, you can change the audio source order or set the display/hide settings.1Touch the desired source icon in the Menu screen for at least 2 seconds.A checkbox ( or ) is displayed on the upper left area of the source icon and switches to the edit mode.• The source icon displayed in the Edit Menu screen is displayed only when usable setup and conditions of each Audio source are fulfilled. For details on setup and conditions of each audio source, see “Switching Sources” (page 16).Changing the order of Audio sourceDrag and drop the source icon to the desired location.Hiding/Displaying Audio sourcePlace a check in the checkbox ( ) to display the Audio source icon. Uncheck the checkbox ( ) to hide it.• You cannot hide the icon of a source that is currently playing.2Tou ch [Done].The editing content is confirmed, and returns to the menu screen.• Editing here is reflected in the order of (AUDIO) button touching and change of the Audio source. (page 16)Edit MenuYou cannot operate the Edit Menu screen while driving.Your vehicle must be parked with the ignition key in the ACC or ON position. For details, see “To display the Setup Menu screen” in “Setup Operation” (page 28).](https://usermanual.wiki/ALPINE-ELECTRONICS/9ZUA147/User-Guide-2952471-Page-20.png)
![21-ENAbout the Indicator DisplayThe Indicator Bar at the top of the screen displays various types of information, like the current time.Lights up when connected to a Bluetooth compatible device. (Does not display when connection is set to OFF.): Bluetooth connection to audio device: Bluetooth connection to Hands Free PhoneBlinks while reconnecting.Indicates the battery level of the connected Bluetooth device*.This may not be displayed depending on the connected Bluetooth device. Whenever one battery level decreases, the alarm sounds.Indicates the signal strength level of the connected Bluetooth compatible device*.Displayed when Bluetooth setting is ON.Plasmacluster indicator Indicates the setting value (Low/Mid/High) selected in “Plasmacluster air volume adjustment.”The clock displayYou can switch between the 12 hour display and 24 hour display options.For details of navigation operations, refer to “Navigation System OM” in the website at http://www.alpine-usa.com.Bluetooth devices Name**When you connect two Hands-Free Phones, the information of the Bluetooth device set to Primary is displayed.Opening screen Customization You can set a BMP image that is stored on a USB flash drive as the opening screen.This setting requires the following image format, folder name and file name.Usable file format:-BMP image- Image size: 800 × 480 pixels (number of color bit: 24, 8, 4, 1 bit)- Compression format: non-compressed-Folder name*1: OPENINGFILE-File name*2: openingfile.bmp1Connect the USB flash drive to the USB extension cable.A message confirming the opening screen change is displayed.2Tou ch [OK].An update indicator “ (Loading)” is displayed, and update for the opening screen starts.3After the update is complete, the following message is displayed.*3“The logo has been updated successfully! Please remove Flash memory and press OK.”4After removing the USB flash drive, touch [OK].The opening screen setting is complete.*1 Be sure to save the folder to the first layer of the USB flash drive.*2 Only one BMP image can be set as the opening screen.*3 If “Customization failed,” is displayed, touch [OK] and then check that the folder name, file name and file format are correct.• Do not perform the following actions during the update.- Do not turn off the ACC to the car.- Do not unplug the USB flash drive.- Do not turn off or operate the unit.• To return the opening screen to its original image, you must Clear All Settings. Be careful of this operation, as your other settings are also initialized. For details, see “Initializing the System” (page 40).Battery Level Level 3 Level 2 Level 1 No BatteryIcon0123No Service](https://usermanual.wiki/ALPINE-ELECTRONICS/9ZUA147/User-Guide-2952471-Page-21.png)
![23-ENUsing the Favorite FunctionThis unit enables you to recall functions easily by registering frequently used items such as the Audio source, the navigation search function, etc. to the Favorite screen. You can recall any of these items easily.1Press the (Favorite) button.The Favorite screen is displayed.Favorite screen exampleChanges to the Edit screen used for registering items or changing names.Favorite registration itemSwipe to the left and right to change the pages. You can add up to 6 pages.Indicates the location of the currently displayed Favorite screen.Swipe to the left or right to change the pages. You can add up to 6 pages.2Touch your desired Favorite registered item.The desired item is displayed.• When making a phone call by choosing shortcut dialing, after the message of confirmation of outgoing phone calls is displayed, touch [Call]. For details, see “Calling by Favorite Function” (page 80).Editing the Favorite Screen1Tou ch [] (Edit).A checkbox is displayed on the upper left area of the registration icon and it changes to Edit mode.Setting item:Item registration / Item name change / Icon change / Layout change / Item deletion2After editing is complete, touch [] (Back).3After the caption for the confirmation is displayed, touch [OK].4Editing is complete and the screen switches to the Favorite screen.• If you touch [] (Cancel) while editing, the edits are reset and the screen returns to the previous Edit screen. 1Tou ch [ ] (Add).The items to be added (categories) are displayed.2Touch the desired item to be added (category).3Choose the desired item to be added.• You can add up to 54 items.• You cannot register an item more than once.Favorite FunctionYou cannot edit the Favorite screen while driving.Your vehicle must be parked with the ignition key in the ACC or ON position. For details, see “To display the Setup Menu screen” in “Setup Operation” (page 28).Registering Items](https://usermanual.wiki/ALPINE-ELECTRONICS/9ZUA147/User-Guide-2952471-Page-23.png)
![24-ENAudio/Visual[Radio]*1 / [USB/iPod] / [Factory Media (USB/iPod)]*2 / [HDMI/DVD] / [Pandora] / [Bluetooth Pandora] / [SiriusXM]*3 or [Factory SiriusXM]*2, 3 /[AUX]*4 / [Bluetooth Audio] or [Factory Bluetooth Audio]*2*1 You can choose the frequency from Preset 1 - 12, registered into each FM1/FM2/AM band of HD Radio™ or RBDS.*2 Not displayed when your car does not support the source or “Setting the Source Category” (page 47) is set to “Aftermarket.”*3 You can choose a channel registered to Presets 1 - 18.*4 For this unit:• Displayed when “AUX” is selected in “Setting the AUX Mode” (page 43).When “AUX” is selected, the source name set in “Setting the Auxiliary (AUX) Name” (page 44) is also displayed in the Favorite screen.• When the iDataLink module (sold separately) is connected, the Auxiliary (AUX) mode is not available.• You can also register directly by touching [] in the Audio source screen.However, if it is already registered, [] is not displayed.Navigation[Specific Place]:You can display places registered in Favorite and set your destination.[Quick Place Search]:Displays the address search keypad.[Help Nearby]:Displays the nearby search screen.[Place Categories]:Displays the selected Place Categories list.• For details of navigation operations, refer to “Navigation System OM” in the website at http://www.alpine-usa.com.Phone (Shortcut Dialing)*5You can register the user’s shortcut dialing stored in the Phone Book.• If multiple phone numbers are stored, select a number you want to register.• You can register directly by touching [] of the Contacts list. (page 78)• You can change the icon you registered. (page 24)*5 You can only select Phone when a mobile phone is connected.For details on how to register a mobile phone and downloading Phone Book, see “Bluetooth Operation” (page 78).1Touch the text area of the registered item.The Input User Name screen (Keypad) is displayed.2Input the name and touch [OK].• For details on how to input characters using the keypad, see “How to Input Characters and Numbers (Keypad)” (page 22).You can change the icons of Shortcut Dialing and Navigation category.The following example explains how to change the Shortcut Dialing icon. Perform the same procedure to change the Navigation category icon.1Touch the icon that you want to change.The icon list is displayed.2Touch the icon you want to change from the icon list.The icon is changed to the selected icon.Changing Item NamesChanging Icons (only the Shortcut Dialing and Navigation icons)](https://usermanual.wiki/ALPINE-ELECTRONICS/9ZUA147/User-Guide-2952471-Page-24.png)
![25-ENDrag and drop the item to the desired location.The item location is changed.• When you move to other pages, switch pages, or when you make a new page and move to another, drag to the end of the screen, and lift your finger after the page changes.When deleting a selected item1Touch the checkbox at the left of the item you want to delete and place a check ( ) in it.2Tou ch [ ] (Delete).The selected item will be deleted.When deleting all itemsTou ch [ ] (Delete All).All items are deleted.Changing the LayoutDeleting Items](https://usermanual.wiki/ALPINE-ELECTRONICS/9ZUA147/User-Guide-2952471-Page-25.png)
![26-ENThis unit’s sound tuning is programmable from a connected Smartphone. It is also possible to download specific parameters for certain vehicles from Alpine’s TuneIt database stored in the Cloud. Using the Alpine TuneIt App, customized parameters can also be uploaded for others to share and rate.Through this unit, it is also possible to receive and respond to information from Alpine’s Social Network Service (SNS) available through the connected Smartphone.The installed Alpine TuneIt App should be launched on the Smartphone before connection to the head unit.Alpine TuneIt App, is downloadable from Apple’s App Store; the Android user can download it from Google Play. For details, consult your Alpine dealer.Before these operations, set Alpine TuneIt App to USB (iPhone) or Bluetooth (Android) depending on the connected Smartphone. For details, see “Smartphone Apps Setup” (page 49).• The application program and related specifications and data may be deleted or terminated without notice.• Some Alpine TuneIt App functions may not be available if the Smartphone is not in a service area or receives no signal.Adjusting the sound via the SmartphoneAfter setting the above procedure, you can adjust the unit’s sound function on the Smartphone.1Make sure the unit is powered on.2Launch the Alpine TuneIt App on the Smartphone. Adjust the unit’s sound accordingly on the Smartphone.• The setting cannot be done on both the Smartphone and this unit at the same time. While the sound function of this unit is set via Smartphone, the sound function settings on the unit will be displayed as “This function not available. Please check the Alpine App connection or BASS ENGINE SQ in the settings.”.• In some situations, such as the unit is powered off or during a call, etc., sound setting cannot be done via the Smartphone.• This function may not be available depending on the paired Smartphone.• Please obey all local traffic laws while using this function.• When “Setting the External Audio Processor” (page 48) is “On,” this function is not available.Facebook Notification FunctionSome functions may be available in a future version of Alpine TuneIt App.• Depending on the paired Smartphone, the following functions may not be available even though the Alpine TuneIt App version is updated.Receiving NotificationWhen the smartphone connected to the unit receives new notifications from Facebook, the unit emits a notification sound or displays the notification screen. Set this up in the Alpine TuneIt App settings.Notification Incoming screen examplePoster’s picture and nameTouch here to switch to Facebook screen.Facebook screen is not displayed while driving.Read (Stop) buttonTouch to TTS (Text To Speech) play received notification (Depending on the status, operation may not be available). During TTS play mode, touch [Stop] to stop play.Like buttonFor “Like” operation. (Valid when Wall Posts or Comments is received)Notifications buttonTouch to switch to Notifications List screen.Close buttonClose the notification screen.Touch the desired button to operate.• A new received Notification prompt will last for 15 seconds. If there is no operation within 15 seconds, the unit will return to normal mode.• Touching current main screen will close the notification screen.• Volume adjustment during TTS play can be adjusted by pressing / (0-35). Settings will be reflected at the next TTS reproduction.• The TTS volume is output via the car’s front right and left speakers.• While you play a Notification by TTS during iPod video mode, the TTS volume is the same as the iPod video source. The adjusted TTS volume will be reflected on the iPod video source.• While you play a Notification by TTS during iPod video mode, the iPod VIDEO extension cable should be connected correctly. Otherwise, you will not be able to hear the TTS.Applying Alpine TuneIt App](https://usermanual.wiki/ALPINE-ELECTRONICS/9ZUA147/User-Guide-2952471-Page-26.png)
![27-ENDisplaying Facebook ScreenDuring Notification incoming or Notification List screen, you can switch to Facebook screen.Facebook screen exampleMessage contentPoster’s photoClose button: Close the Facebook screen.Touch the poster’s picture and name to switch to the Facebook screen.The detailed information of Notification is displayed.•Touch [] (Back) to return to Notifications List screen.• Depending on the status, contents of message and photo may not be displayed.• In some situations, such as the unit is powered off or during a call, etc., Notification of the Smartphone will not be prompted by this unit.• Facebook screen is not displayed while driving.Displaying Notification ListYou can view the received Notification from Facebook in the connected Smartphone via this unit.Notification List screen examplePoster’s Name and MessageMessages are not displayed while driving.Touch [Read All]/[Stop] to play/stop all Notifications.• You can switch to the Notification List screen from the Menu screen.•Touch [] to return to Current screen. • Depending on the status, some functions may not be available.• The displayable amount of the Notification list depends on the connected Smartphone.](https://usermanual.wiki/ALPINE-ELECTRONICS/9ZUA147/User-Guide-2952471-Page-27.png)
![28-ENSetup Operation1Press the MENU button.The Menu screen is displayed. • You can also display the menu screen, by touching [] on the lower part of the Audio source screen or by swiping upward.2Tou ch [Setup].The Setup main screen is displayed.3Touch the required setting icon on the upper part of the Setup main screen or swipe the list area vertically, then touch the setting item.Setting items:Wireless: See “Wireless (Bluetooth) Setup” (page 29).General: See “General Setup” (page 31).Source: See “Source Setup” (page 41).System: See “System Setup” (page 44).SetupTo display the Setup Menu screen:Your vehicle must be parked with the ignition key in the ACC or ON position. To do this, follow the procedures below.1 Bring your vehicle to a complete stop at a safe location. Engage the parking brake.2 Release the parking brake. (For safety, release the parking brake while depressing the foot brake pedal).3 Engage the parking brake again.• For automatic transmission vehicles, place the transmission lever in the Park position.Now, the locking system for the Setup operation has been released. Engaging the parking brake can reactivate the Setup Menu, as long as the car’s ignition has not been turned off. It is not necessary to repeat the above procedure (1 through 3) of “To display the Setup Menu screen.”Each time the ignition is turned OFF, perform the procedure of “To display the Setup Menu screen.”[Setup] button](https://usermanual.wiki/ALPINE-ELECTRONICS/9ZUA147/User-Guide-2952471-Page-28.png)
![29-EN[Wireless] is selected on the Setup main screen in step 3. See “Setup Operation” (page 28).Wireless Setup Menu screen<Setting items>*This setting is only available when “Bluetooth” is set to “On” ( ).1Select the desired item.2To switch the setting, touch [], [], [], [], or mark the checkboxes “Off”( ) or “On”( ).• If “ ” appears, there is a further hierarchy. Touch the desired item.3Tou ch [] to return to the main source screen.• To return to the previous List screen, touch [] or [] in the previous page. For details, see “About Basic Operation for List Screen” (page 17).Bluetooth Setup[Bluetooth] is selected on the Wireless Setup Menu screen in step 1. See “Wireless (Bluetooth) Setup” (page 29).You can register and set up Bluetooth compatible devices.Setting item:BluetoothSetting contents:Off / On (Initial setting)*Turn this setting “On” to automatically connect a registered Bluetooth device whenever this unit is turned ON. See “Registering the Bluetooth Device” if no device is registered.Make sure the “Bluetooth” setting is “On” ( ). See “Bluetooth Setup” (page 29).You can display the Bluetooth device name and device address of this unit.Setting item:Bluetooth InformationThe Bluetooth device is used when a connectable Bluetooth compatible device is searched and connected from this unit, or a new Bluetooth compatible device is registered.Setting item:Set Bluetooth Device1Tou ch [] (Search) of “No Device.”Wireless (Bluetooth) SetupBluetoothBluetooth Information*Set Bluetooth Device*Hands-free Device Priority*iPhone Auto Pairing*DevicePasscode ChangeDefault Phone Book FormatPhone SpeakerThe following steps 1 to 3 are common to each “Setting item” of Wireless Setup. See each section for details.Off: Bluetooth function is not used.On*: Select when you would like to pair your Bluetooth compatible phone with this unit.Displaying Bluetooth InformationRegistering the Bluetooth Device](https://usermanual.wiki/ALPINE-ELECTRONICS/9ZUA147/User-Guide-2952471-Page-29.png)
![30-EN2Tou ch [] (Audio), [ ] (Hands-free) or [] (Both) of the device you want to connect from the list.• You can register up to 5 Bluetooth compatible mobile phones.• You can connect three Bluetooth Devices; two exclusively for Hands-Free Phone and one exclusively for Bluetooth Audio.• When you register a Hands-Free Phone for the first time, Primary is set automatically. When you connect two Hands-Free Phones, select “Hands-free” or “Both.” You can then set the priority on the Primary/Secondary setting screen. For details, see “Hands-free Device Primary/Secondary Setting” (page 30).3When the device registration is complete, a message appears and the device returns to normal mode.• The Bluetooth registration process differs depending on the device version and SSP (Secure Simple Pairing). If a 4 or 6 character Passcode appears on this device, enter the Passcode using the Bluetooth compatible device.If a 6 character Passkey appears on this device, make sure the same passkey is displayed on the Bluetooth compatible device and touch “Yes.”• If all 5 devices have been registered, you cannot register a 6th device. To register another device, you need to delete one of the other 5 devices first.Setting the Bluetooth DeviceSelect one of 5 paired Bluetooth compatible devices that you previously registered.Tou ch [] (Audio) or [ ] (Hands free) of the device you want to connect from the Paired Device list.Deleting a Bluetooth Device from the listYou can delete the information of a previously connected Bluetooth compatible device.1Tou ch [ ] (Delete) of the Bluetooth compatible device to delete from the Paired Device list.2Tou ch [OK].•Touching [Cancel] will cancel the setting.Make sure the “Bluetooth” setting is “On” ( ). See “Bluetooth Setup” (page 29).When you connect two Hands-Free Phones, set the priority of the operation and the setting of incoming-outgoing calls.Setting item:Hands-free Device PrioritySetting contents:Primary / SecondaryTouch the checkbox for Primary/Secondary of the device names that are registered to the unit to set them.• When connected to two hands-free phones, operating restrictions apply to the hands-free phone registered to Secondary. For details, see “Hands-free Phone Control” (page 78).Make sure the “Bluetooth” setting is “On” ( ). See “Bluetooth Setup” (page 29).When an iPhone is connected via USB and it is not on the Registered Device list, it will be paired automatically.Setting item:iPhone Auto PairingSetting contents:On / Off (Initial setting)• This setting supports iPhones with iOS Ver.5.5 or later.• When more than 5 Bluetooth devices are registered, Auto Pairing does not start.Device Setup[Device] is selected on the Wireless Setup Menu screen in step 1. See “Wireless (Bluetooth) Setup” (page 29).You can make various settings for a Bluetooth compatible device.You can set the code for connecting with a Bluetooth compatible device. Setting item:Passcode Change1Enter a 4-digit passcode (old), and then touch [OK].• The initial number is 0000.• For details on how to input the numeric keypad, see “Numeric Keypad Input Operations” (page 74).2Enter a 4-digit passcode (new), and then touch [OK].Audio: Sets for use as an Audio device.Hands-free: Sets for use as a Hands Free Device. Both: Sets for use as both an Audio device and Hands Free Device.Hands-free Device Primary/Secondary SettingiPhone Auto Pairing SettingOn: Performs iPhone Auto Pairing setting.Off: Does not perform iPhone Auto Pairing setting.Setting the Passcode](https://usermanual.wiki/ALPINE-ELECTRONICS/9ZUA147/User-Guide-2952471-Page-30.png)
![31-EN3Enter the passcode that you entered in step 2 again, and then touch [OK].You can select the character code that is used when transferring the phone book or history from a mobile phone. If unreadable characters appear in the transferred data, select the correct character code.Setting item:Default Phone Book FormatSetting contents:Latin-1 / Latin-9 (Initial setting) / Russian / Chinese / Thai / Arabic / UTF-8 / UTF-16LE / UTF-16BEYou can select which speaker in the car will output the audio from the phone.Setting item:Phone Speaker Setting contents:All (Initial setting) / Front Left / Front Right / Front Left + Right• The setting cannot be adjusted during a phone call. Adjust the setting before placing a call.• This option is not available when “External Audio Processor” (page 48) is set to On.[General] is selected on the setup main screen in step 3. See “Setup Operation” (page 28).General Setup Menu screen<Setting item>*1 You can make this setting in the Sound Setup screen of the Shortcut Setup. For details, see “Sound Setup Function” (page 18).*2 You can also make the setting in the Bal./Fad. screen.For details on how to adjust, see “Setting the Balance/Fader/Rear Speaker/Subwoofer” (page 32).*3 This setting is only available when “Subwoofer” is set to “On” ( ).Changing the Character Code of the Phone BookLatin-1: ISO 8859-1Latin-9: ISO 8859-15Russian: ISO 8859-5Chinese: GB18030Thai: CP874Arabic: CP1256UTF-8UTF-16LEUTF-16BESelecting the Output SpeakerAll: The sound is output from all speakers in car.Front Left: The sound is only output from the front left speaker.Front Right: The sound is only output from the front right speaker.Front Left + Right:The sound is output from the front left and front right speakers.General SetupSoundBalance / Fader *1Rear Speaker*2Subwoofer*2Subwoofer Level*1, 2, 3, 5Subwoofer Phase*2, 3MX HD*1, 4, 5EQ Presets*4, 5Dual HD EQ*4, 5X-Over*5Time Correction (TCR)DefeatSource Volume SetupCaller LevelMicrophone LevelRing Tone LevelKey Sound FeedbackMute While Backing UpDefault Sound SettingsPicture QualityVideo*6Camera*7NavigationDisplay/KeyScreen/LightingScreen ColorText ScrollArtwork PositionGeneralLanguageFormatAboutDemo ModeVehicleInstallation Status](https://usermanual.wiki/ALPINE-ELECTRONICS/9ZUA147/User-Guide-2952471-Page-31.png)
![32-EN*4 When the Defeat setting is “On,” you cannot perform the set up.*5 When the Sound Setup of the Shortcut Setup is selected to ”BASS ENGINE SQ,” you cannot perform the set up.*6 “Video” can be selected while a video is playing.*7 The camera names are not displayed when Camera Select (page 45) is set to “Off.”1Select the desired item.2To switch the setting, touch [], [], [], [], or mark the checkboxes “Off” ( ) or “On” ( ).• If “ ” appears, there is a further hierarchy. Touch the desired item.3Tou ch [] to return to the main source screen.• To return to the previous List screen, touch [] or [] in the previous page. For details, see “About Basic Operation for List Screen” (page 17).Sound Setup[Sound] is selected on the General Setup Menu screen in step 1. See “General Setup” (page 31).You can set up items related to the sound quality.Set Balance/Fader/Rear Speaker/Subwoofer/Subwoofer Level/Subwoofer Phase in the Bal./Fad. screen.Setting item:Balance*1 / Fader*1 / Rear Speaker / Subwoofer*2 / Subwoofer Level*1, 2 / Subwoofer Phase*1*1 When selecting either of the above setting items, the Bal./Fad. screen is displayed.*2 When the Sound Setup of the Shortcut Setup is selected to “BASS ENGINE SQ,” you cannot perform the set up.Fad./Bal. screenEnables you to change to each setting screen.Balance/Fader Image areaSetting the Balance/FaderTouch the desired point within the image area. Or touch [] [] [] [].Balance:L15 to R15Fader:F15 to R15• To reset to the initial setting (Balance: 0, Fader: 0), touch [Center].Rear Speaker SettingYou can set the rear speaker output to “Off.”Setting item:Rear SpeakerSetting contents:On (Initial setting) / OffTurning Subwoofer ON/OFFIf an optional subwoofer is connected to the unit, make the following setting.Setting item:SubwooferSetting contents:On / Off (Initial setting)Adjusting the Subwoofer LevelYou can set the Subwoofer level when a Subwoofer is connected.Setting item:Subwoofer LevelSetting contents:0 to 15 (Initial setting: 0)• This setting is only available when “Subwoofer” is set to “On” ( ).Setting the Subwoofer PhaseThe subwoofer output phase is toggled Subwoofer Normal (0°) or Subwoofer Reverse (180°).Setting item:Subwoofer PhaseSetting contents:0° (Initial setting) / 180°• This setting is only available when “Subwoofer” is set to “On” ( ).The following steps 1 to 3 are common to each “Setting item” of General Setup. See each section for details.Setting the Balance/Fader/Rear Speaker/Subwoofer](https://usermanual.wiki/ALPINE-ELECTRONICS/9ZUA147/User-Guide-2952471-Page-32.png)
![33-ENMedia Xpander (MX HD) makes vocals or instruments sound distinct regardless of the music source. The HD-Radio Technology/SiriusXM, USB Flash drive and iPod/iPhone, will be able to reproduce the music clearly even in cars with a lot of road noise.Setting item:MX HD• When the Defeat setting is “On,” you cannot perform the set up.• When the Sound Setup of the Shortcut Setup is selected to “BASS ENGINE SQ,” you cannot perform the set up.• The MX HD setting can be performed only when a source is currently selected.Adjustable source (media) and setting valueHD-Radio™ (FM)/SiriusXM: Off (Initial setting) / Level1 / Level2 / Level3The medium to high frequencies become more clear, and produces well balanced sound in all the bands.Compressed Media/Factory Audio: Off (Initial setting) / Level1 / Level2 / Level3This corrects information that was omitted at the time of compression. This reproduces a well-balanced sound close to the original.HDMI/AUX: Off (Initial setting) / Compressed Media / Movie / MusicChoose the MX HD mode (Compressed Media, Movie, or Music) that corresponds to the media connected.(Movie)The dialog portion of the video is reproduced more clearly(Music)This disc contains a large quantity of data such as music clip. MX uses this data to reproduce the sound accurately.• The effectiveness increases as the MX HD setting value increases Level1 Level2 Level3.• You can set this for each source.• iPod/iPhone/USB Audio/Bluetooth Audio/Pandora/Bluetooth Pandora correspond to Compressed Media.• Factory Media (USB/iPod)/Factory SiriusXM/Factory Bluetooth Audio correspond to Factory Audio.10 typical equalizer settings are preset at the factory for a variety of musical source material.Setting item:EQ PresetsSetting contents:FLAT (Initial setting) / POP / ROCK / NEWS / JAZZ / ELECTRONIC / HIP HOP / EASY LISTENING / COUNTRY / CLASSICAL• Only one type can be set to ON.• When Equalizer Presets is set, the linked Dual HD EQ settings are also changed. We recommend storing Dual HD EQ settings in a Preset in advance.• The Equalizer Presets setting can be configured when Defeat is “Off.”Parametric Equalizer (Dual HD EQ) can adjust the center frequency/Q Factor (bandwidth)/level in the front seats and the rear seats, respectively.You can adjust only to the approximate frequency zone, but can then compensate by performing advanced correction of the sound.Setting item:Dual HD EQ• When the Defeat setting is “On,” you cannot perform the set up.• When the Sound Setup of the Shortcut Setup is selected to “BASS ENGINE SQ,” you cannot perform the set up.1Adjust the Dual HD EQ to your preference.Front/Rear speaker switching buttonNot displayed when Front/Rear Sync is ”On” ( ).Front/Rear speaker interlock buttonAdjusting the BandTouch [Band] to select the band to be adjusted.Band1 Band2 ••• Band8 Band9 Band1• You can select a band directly by touching the screen. Setting the Media Xpander (MX HD) Equalizer PresetsAdjusting the Parametric Equalizer Curve (Dual HD EQ)On: When you want the Front and Rear speakers to have the same setting, set to ”On” ( ).Off: When you want to set the Front and Rear speakers independently, set to ”Off” ( ).](https://usermanual.wiki/ALPINE-ELECTRONICS/9ZUA147/User-Guide-2952471-Page-33.png)
![34-ENAdjusting the FrequencyTouch [] or [] of “Frequency” to adjust the frequency of the selected band.Adjustable frequency bands:20 Hz to 20 kHz (in 1/3 octave steps)Adjusting the LevelTouch [] or [] of “Level” to adjust the level of selected band.Setting contents:-14 to +14 (Initial setting: 0)Setting the BandwidthTouch [] or [] of “Q Factor” to select the bandwidth. Setting contents:Wide (Initial setting) / Medium / Narrow2To adjust another band, repeat step 1, and adjust all bands.3To store the adjusted setting value, touch and hold [Preset 1], [Preset 2], or [Preset 3] for at least 2 seconds.• Band2 and Band8 are the same as the Bass and Treble controls.• For details on setting Bass and Treble, see “Adjusting Bass Level/Treble Level” (page 19).• Settings exceeding the frequency of adjacent bands are not available.• While adjusting the Dual HD EQ, you should consider the frequency response of the connected speakers.• When the Dual HD EQ is adjusted, the Equalizer Presets are overridden.• When Equalizer Presets is set, the linked Dual HD EQ settings are also changed. We recommend storing Dual HD EQ settings in a Preset in advance.•Touch [Flat] to initialize all values.Calling the Dual HD EQ adjusted valueCalling the pre-set Dual HD EQ adjusted value.Tou ch [Preset 1], [Preset 2], or [Preset 3] on the Dual HD EQ screen.The setting stored in the Preset will be recalled.Before performing the following procedures, see “About the Crossover” (page 36).Setting item:X-Over• When the Sound Setup of the Shortcut Setup is selected to “BASS ENGINE SQ,” you cannot perform the set up.1Tou ch [Channel] to select the channel.Each time you touch, the channel switches.• The channel being adjusted is displayed in red.2Adjust the crossover to your preference.Selecting the Cut-Off Frequency Touch [] or [] of “Frequency,” and then select the cut-off frequency.Setting contents:20 / 25 / 31.5 / 40 / 50 / 63 / 80 (Initial setting) / 100 / 125 / 160 / 200 HzAdjusting the SlopeTouch [] or [] of “Slope,” and then adjust the HPF or LPF slope.Setting contents:0 (Initial setting) / 6 / 12 / 18 / 24 dB/oct.Adjusting the LevelTouch [] or [] of “Level,” and then adjust the HPF or LPF level.Setting contents:-12 to 0 dB (Initial setting: 0)3Repeat steps 1 to 2 to make adjustment to the other channels.4To store the adjusted setting value, touch and hold [Preset 1], [Preset 2], or [Preset 3] for at least 2 seconds.•Touch [Flat] to initialize all values.• If the Rear Speaker setting is “Off,” the Rear Speaker setting cannot be edited (page 32).• If the Subwoofer setting is “Off,” the Subwoofer setting cannot be edited (page 32).• While adjusting the X-Over you should consider the frequency response of the connected speakers.Calling the X-Over adjusted valueCalling the pre-set X-Over adjusted value.Tou ch [Preset 1], [Preset 2], or [Preset 3] on the X-Over screen.The setting stored in the Preset will be recalled.Band1: 20 Hz~100 Hz (63 Hz)Band2: 63 Hz~315 Hz (125 Hz)Band3: 125 Hz~500 Hz (250 Hz)Band4: 250 Hz~1 kHz (500 Hz)Band5: 500 Hz~2 kHz (1 kHz) Band6: 1 kHz~4 kHz (2 kHz)Band7: 2 kHz~7.2 kHz (4 kHz)Band8: 5.8 kHz~12 kHz (8 kHz)Band9: 9 kHz~20 kHz (16 kHz)Adjusting the Crossover Settings (X-Over)Front HPF Rear HPF Subw. LPF Front HPF](https://usermanual.wiki/ALPINE-ELECTRONICS/9ZUA147/User-Guide-2952471-Page-34.png)
![35-ENBefore performing the following procedures, see “About Time Correction” (page 37).Setting item:Time Correction1Touch the Correction mode button.The pop up screen for selecting the correction mode is displayed.2Tou ch [ms], [cm] or [inch] to select the mode for making adjustments.The selected mode is displayed on the Correction mode button.3Tou ch [] or [] for each speaker to adjust the time or distance. 0.0 msec to 9.9 msec (0.1 msec/step)0.0 cm (0.0 inch) to 336.6 cm (132.7 inch) (3.4 cm/step)All speaker setting values are adjustable in the range of 15 ms or 510 cm.4To store the adjusted setting value, touch and hold [Preset 1], [Preset 2], or [Preset 3] for at least 2 seconds.•Touch [Flat] to set all values to 0.0.• If the Rear Speaker setting is “Off,” the Rear Speaker setting cannot be edited (page 32).• If the Subwoofer setting is “Off,” the Subwoofer setting cannot be edited (page 32).Calling the Time Correction ValueCalling the pre-set time correction value.Tou ch [Preset 1], [Preset 2], or [Preset 3] on the time correction screen.The setting stored in the Preset will be recalled.If Defeat is “On,” MX HD, Equalizer Presets and Dual HD EQ functions are turned Off. This disables any settings made for these functions.Setting item:DefeatSetting contents:Off (Initial setting) / OnSetting item:Source Volume Setup Radio / SiriusXM / Compressed Media*1 / iPod Music / iPod Video or AUX*2, 3 / DVD*3 / Bluetooth Audio / Factory Audio*4Setting contents:-14 to +14 (Initial setting: 0)*1 Compressed Media is the music data in a USB flash drive (MP3/WMA/AAC/FLAC). *2 The item selected in AUX Source Select (iPod Video or AUX) is displayed. For details, see “Setting the AUX Mode” (page 43).*3 The source name set in “HDMI Setup” (page 44) and “Setting the Auxiliary (AUX) Name” (page 44) is displayed.*4 Not displayed when an iDataLink module is not connected.• Settable source differs depending on the connected device and settings.You can adjust the volume of the incoming call.Setting item:Caller LevelSetting contents:1 to 11 (Initial setting: 5)You can adjust the transmit volume, during the call.Setting item:Microphone LevelSetting contents:1 to 11 (Initial setting: 5)You can adjust the receive volume, during the call.Setting item:Ring Tone LevelSetting contents:1 to 6 (Initial setting: 3)You can change the volume of the sound heard when a button is touched. Setting item:Key Sound FeedbackSetting contents:0 to 6 (Initial setting: 3)Adjusting the Time Correction (TCR)Setting DefeatCorrection modeSetting the Volume for Each SourceAdjusting the Caller LevelAdjusting the Microphone LevelAdjusting the Ring Tone LevelVolume Setting](https://usermanual.wiki/ALPINE-ELECTRONICS/9ZUA147/User-Guide-2952471-Page-35.png)
![36-ENThe sound can be muted when the shift gear lever is set to the reverse (R) position enabling you to easily hear sensors, etc., while reversing your car.Setting item:Mute While Backing UpSetting contents:Off / On (Initial setting)You can restore the Dual HD EQ*/X-Over*/Time Correction*/MX HD Level/Rear Speaker/Subwoofer/Subwoofer Level/Subwoofer Phase to factory settings.Setting item: Default Sound SettingsTouch [Set], and the confirmation message appears.To initialize, touch [OK].*The setting values that are stored in Preset 1 to Preset 3 cannot be initialized.About the CrossoverCrossover (X-Over):This unit is equipped with an active crossover. The crossover limits the frequencies delivered to the outputs. Each channel is controlled independently. Thus, each speaker pair can be driven by the frequencies for which they have been optimally designed.The crossover adjusts the HPF (high pass filter) or LPF (low pass filter) of each band, and also the slope (how fast the filter rolls off the highs or lows).Adjustments should be made according to the reproduction characteristics of the speakers. Depending on the speakers, a passive network may not be necessary. If you are unsure about this point, please consult your authorized Alpine dealer.• HPF (high pass filter): Cuts the lower frequencies and allows the higher frequencies to pass.• LPF (low pass filter): Cuts the higher frequencies and allows the lower frequencies to pass.• Slope: The level change (in dB) for a frequency change of one octave.• The higher the slope value, the steeper the slope becomes.• Adjust the slope to FLAT to bypass the HP or LP filters.• Do not use a tweeter without the HPF on or set to a low frequency, as it may cause damage to the speaker due to the low frequency content.• Adjustment should be made according to the recommended crossover frequency of the connected speakers. Determine the recommended crossover frequency of the speakers. Adjusting to a frequency range outside that recommended may cause damage to the speakers.For the recommended crossover frequencies of Alpine speakers, refer to the respective Owner’s Manual. We are not responsible for damage or malfunction of speakers caused by using the crossover outside the recommended value.Setting Audio Mute On/Off while Backing upOff: Does not mute.On: Mutes when the shift gear lever is set to the reverse (R) position.Default Sound SettingsCut-off frequency (1/3 octave steps) Slope LevelHPF LPF HPF LPFSubwoofer(LPF) ---- 20 Hz - 200 Hz ----FLAT, –6, –12, –18, –24 dB/oct.0 to–12 dBRearspeaker(HPF)20 Hz - 200 Hz ----FLAT, –6, –12, –18, –24 dB/oct.---- 0 to–12 dBFrontspeaker(HPF)20 Hz - 200 Hz ----FLAT, –6, –12, –18, –24 dB/oct.---- 0 to–12 dBLevel adjusting(0 to –12 dB)Output frequency range Output frequency rangeSlope adjusting20 Hz (Different from actual display) LPF cut-off frequencyHPF cut-off frequencyLow range High rangeSlope FLATSubwoofer Rear speakerFront speaker200 Hz](https://usermanual.wiki/ALPINE-ELECTRONICS/9ZUA147/User-Guide-2952471-Page-36.png)
![38-ENPicture Quality Setup[Picture Quality] is selected on the General Setup Menu screen in step 1. See “General Setup” (page 31).You can set up items related to an image.Settable items differ depending on the application. [Video] (Video media)*1:Visual EQ / Brightness / Color / Tint / Contrast / Sharpness[Camera]*2:Brightness / Color / Contrast[Navigation]:Brightness / Contrast*1 “Video” can be selected while a video is playing.*2 The camera names are not displayed when “Off” is set (page 45).You can select a mode suitable for the subject image.Setting item:Visual EQSetting contents:Off (Initial setting) / Night / Soft / Sharp / Contrast• To return to the default video settings, set this function to Off. Any Visual EQ selection or changes made are reset their initial settings.Setting item:BrightnessSetting content:-15 to +15 (Initial setting: 0)You can adjust the brightness between MIN (-15) and MAX (+15). When it reaches the minimum or maximum point, the display shows “MIN” or “MAX” respectively. Setting item:ColorSetting content:-15 to +15 (Initial setting: 0)You can adjust the color between MIN (-15) and MAX (+15). When it reaches the minimum or maximum point, the display shows “MIN” or “MAX” respectively.Setting item:TintSetting content:R15 to G15 (Initial setting: 0)Adjust the Color from R15 to G15.Setting item:ContrastSetting content:-15 to +15 (Initial setting: 0)You can adjust the contrast between MIN (-15) and MAX (+15). When it reaches the minimum or maximum point, the display shows “LOW” or “HIGH” respectively.Setting item:SharpnessSetting content:-5 to +5 (Initial setting: 0)Picture quality adjustment range is -5 to +5. “SOFT” and “HARD” appear as the minimum and maximum values specified.When adjusting audio (video media), you can store the settings made for “Adjusting Brightness, Color, Tint, Contrast and Sharpness.”Setting item:Preset 1 / Preset 21After completing “Adjusting Brightness, Color, Tint, Contrast and Sharpness” (page 38), touch and hold [Preset 1] or [Preset 2] to save the settings. 2Tou ch [Preset 1] or [Preset 2] to call the saved settings. Selecting the Visual EQ Mode (Factory’s setting)Off: Initial SettingNight: Suitable for movies in which dark scenes frequently appear.Soft: Suitable for CGs and animated films.Sharp: Suitable for old movies where images are not clearly shown.Contrast: Suitable for recent movies.Adjusting BrightnessAdjusting Color of PictureAdjusting Tint of PictureAdjusting Image ContrastAdjusting Picture QualitySaving and calling the adjusted picture quality](https://usermanual.wiki/ALPINE-ELECTRONICS/9ZUA147/User-Guide-2952471-Page-38.png)
![39-ENDisplay/Key Setup[Display/Key] is selected on the General Setup Menu screen in step 2. See “General Setup” (page 31).You can set up the brightness, color, display, etc., of the screen.1Tou ch [Screen/Lighting] in the Display/Key Setup Menu screen.The Screen/Lighting setup screen appears.Setting item:Dimmer / Key Illumination Level / Screen Dimmer LevelSetting the Brightness of the BacklightingBacklighting is provided by LEDs light built into the liquid crystal panel. The illumination control adjusts the brightness of the backlighting based on the car ambient lighting for easier viewing.Setting item:DimmerSetting contents:Auto (Initial setting) / On / Off• When “On” is set, the setting is also applied for the button lighting in “Adjusting the Dimmer of Button Lighting at Night” (page 39), and “Adjusting the Minimum Level of Backlight” (page 39).Adjusting the Dimmer of Button Lighting at NightYou can adjust the brightness of the button lighting at night with the dimmer.Setting item:Key Illumination LevelSetting level:-2 to +2 (Initial setting: 0)• This setting is only available when “Dimmer” is set to “On” or “Auto.”Adjusting the Minimum Level of BacklightYou can adjust the brightness of the backlight. This function could be used, for instance, to change the screen brightness while traveling at night.Setting item:Screen Dimmer LevelSetting content:-15 to +15 (Initial setting: 0)You can adjust the level between MIN (-15) and MAX (+15). When it reaches the minimum or maximum point, the display shows “MIN” or “MAX” respectively.• This setting is only available when “Dimmer” is set to “On” or “Auto.”You can choose from 8 different display colors.Setting item:Screen ColorSetting contents:Blue (Initial setting) / Light Blue / Aqua / Red / Green / Amber / Yellow / WhiteScroll display is available if folder name, file name or tag information is entered.Setting item:Text ScrollSetting contents:Off (Initial setting) / On*The text scroll is not available while driving.You can set the artwork position to the center or the left.Setting item:Artwork PositionSetting contents:Center / Left (Initial setting)Screen/Lighting CustomizeAuto: Adjust the brightness of the background illumination of the monitor automatically to the brightness of the car interior.On: Keep the background illumination of the monitor dark.Off: Deactivate Auto Dimmer mode to keep the background illumination of the monitor bright.Switching the Display ColorSetting the Text ScrollOff: Turns off the scroll mode.On*: Turns on the Auto scroll mode. Scroll display is repeated as long as the mode is turned on.Switching the Artwork Position](https://usermanual.wiki/ALPINE-ELECTRONICS/9ZUA147/User-Guide-2952471-Page-39.png)
![40-ENGeneral Setup[General] is selected on the General Setup Menu screen in step 1. See “General Setup” (page 31).You can set up items related to the language, etc.The Setup menu, feedback information, etc. for this unit can be changed to appear in the selected language.Setting item:LanguageSetting contents:The character code to be used for tag text information displayed on the screen can be selected from 7 character codes. Setting item:FormatSetting contents:Latin-1 / Latin-9 (Initial setting) / Russian / Chinese / Thai / Arabic / Hebrew[About] enables you to check the Serial No., Firmware Version, Model Name, and to initialize various settings.Displaying the Product InformationYou can view the version information of this product. Make note of this information and refer to it whenever you contact Alpine Tech Support or an Alpine-authorized dealer.Setting contents: Serial No. / Firmware Version / Model NameInitializing the SystemYou can initialize all data, to restore the factory settings. Remove the USB flash drive, etc. from the system before operationSetting item:Clear All Settings1Tou ch [Reset] of “Clear All Settings.”2After the confirmation message appears, touch [OK].The confirmation screen appears again.3Tou ch [OK].The system starts initialization.• Do not turn on/off the power, change the ignition key position or remove the screen panel until system restart is completed.This unit has a Demonstration feature for the display. When you turn on this function, the unit will enter demo mode automatically. To quit demo mode, set Demo mode to Off.Setting item: Demo modeSetting contents: Off (Initial setting) / On• If you perform an operation during the Demo mode, the demonstration is temporarily stopped.Vehicle Setup[Vehicle] is selected on the General Setup Menu screen in step 1. See “General Setup” (page 31).Vehicle Setup enables you to check the connection status of Reverse Lead/Parking Brake Lead.Setting item:Installation StatusThe Installation check screen is displayed.Setting the Menu LanguageFormat settingsLatin-1: ISO 8859-1Latin-9: ISO 8859-15Russian: ISO 8859-5Chinese: GB18030-2005Thai: CP874Arabic: CP1256Hebrew: CP1255About X109DSetting Demo mode to Off/OnInstallation Setup](https://usermanual.wiki/ALPINE-ELECTRONICS/9ZUA147/User-Guide-2952471-Page-40.png)
![41-EN[Source] is selected on the Setup main screen in step 3. See “Setup Operation” (page 28).Source Setup Menu screen<Setting items>*1 This setting can be set when the SiriusXM source is being selected.*2 This setting cannot be changed while the AUX source is being selected.*3 This setting is only available when “AUX” is set to “On” ( ).*4 This setting cannot be changed while the HDMI source is being selected.*5 This setting cannot be set when the iDataLink module (sold separately) is connected.1Select the desired item.2To switch the setting, touch [], [], [], [], or mark the checkboxes “Off” ( ) or “On” ( ).• If “ ” appears, there is a further hierarchy. Touch the desired item.3Tou ch [] to return to the main source screen.• To return to the previous List screen, touch [] or [] in the previous page. For details, see “About Basic Operation for List Screen” (page 17).Radio Setup [Radio] is selected on the Source Setup Menu screen in step 1. See “Source Setup” (page 41).This unit can set your preferred tone quality for FM radio source.Setting item:FM Tuner SettingSetting contents:Normal (Initial setting) / HiFi / Stable• Noise may be more noticeable when HiFi is set, depending on the reception status. In this case, the Normal setting is recommended.During manual tuning, you can select the frequency step for FM analog radio station searching.Setting item:FM Frequency StepSetting contents:200kHz (Initial setting) / 100kHzSiriusXM Setup[SiriusXM] is selected on the Source Setup Menu screen in step 1. See “Source Setup” (page 41).The following operations can be performed to manage the stored Songs, Artists and Sports Teams information. (To learn about how to store the information, see “Storing the desired Song/Artist” on page 66 and “Setting the Favorite Sports Team Alerts” on page 42.)Source SetupRadioFM Tuner SettingFM Frequency StepSiriusXM*1Alert SetupAlertAlert Delete AllFavorite Team SetupParental LockSignal IndicatorAUX*2, 5AUX Source Select*3AUX Name*3Signal*3HDMI*4Bluetooth PandoraThe following steps 1 to 3 are common to each “Setting item” of Source Setup. See each section for details.Setting the TUNER (FM) Tone Quality (Tuner Condition)Normal: Standard settingHiFi: High-quality settingStable: Control noiseSetting the TUNER (FM) Frequency Step](https://usermanual.wiki/ALPINE-ELECTRONICS/9ZUA147/User-Guide-2952471-Page-41.png)
![42-ENThis menu option allows you to enable the Artist/Song/Team alert for individual Artists/Songs/Teams (On or Off) or to delete individual stored Artist/Song/Team alerts (Delete).Setting item:Alert SetupSet to “On” ( ) to enable the alert for the Artist/Song or Team.Set to “Off” ( ) to disable the alert for the Artist/Song or Team.• To delete the list, touch [ ] (Delete), and then touch [OK].This menu option allows you to temporarily disable the Artist/Song/Game Alerts for all Artists/Songs/Games. When the Alerts are re-enabled, individual Artist/Song/Game Alert disabled in the Alert List menu setting remain disabled. Setting item:AlertSetting contents:On / OffIf “On” ( ) is set, the alert for all stored Artists/Songs/Games is enabled.If “Off” ( ) is set, the alerts for all stored Artists/Songs/Games are disabled.This operation will delete all alerts (artists, songs and teams) stored in memory.Setting item:Alert Delete All1Tou ch [Reset] of “Alert Delete All.”A message is displayed.2Tou ch [OK] to clear the information of all stored Artist, Song, and Game alert items.Touch [Cancel] to cancel. This menu option allows you to select your favorite teams, organized by leagues, so that you will be alerted later when your favorite teams are playing on other channels. Once selected, you will be alerted when games that those teams are playing in can be heard on a SiriusXM channel.Setting item:Favorite Team SetupSetting contents:On / Off1Tou ch [Favorite Team Setup].A sports league list is displayed.2Select the desired league.The display changes to the team list of the selected league.3Touch the checkboxes on the Team list to set teams to “” (registered) or “” (released).•When “” (registered) is set, scrolling text of the Team name, Total registrations, and Remaining number of registration slots is displayed for two seconds, then the team is registered as a Favorite Team.• When you set a team that is registered as an Alert to “” (released), scrolling text for confirmation is displayed. Touch [OK] to cancel the registration.• The maximum number of registered Teams, Artists, and Songs is 50. For details on how to register an Artist alert or Song alert, see “Storing the desired Song/Artist” (page 66).When the number of registered Teams, Artist, and Songs exceeds 50If the total number of registered Teams, Artists, and Songs is already at 50 when “” (registered) is set, then scrolling text is displayed, asking whether you want to replace a registered Artist/Song/Team with the new one. If you want to replace one, go to step 4.4Tou ch [OK].The list of registered Artists/Songs/Teams is displayed.• If you want to cancel the registration of your Favorite Team, then touch [Cancel], and return to step 3.5Touch the Artist, Song, or Team name that you want to replace.Scrolling text of the Team name, Total registrations, and Remaining number of registration slots is displayed for 2 seconds, then the team is registered as a Favorite Team.• For details on deleting a registered Artist, Song, or Team beforehand, to secure a registration slot in advance, see “Setting the Alert individually for an Artist/Song/Favorite Team” (page 42).You can lock out channels with passcode protection. Channels that are locked cannot be accessed without entering the passcode. You can unlock a channel or change the passcode using this menu option.Setting item:Parental Lock1Tou ch [Parental Lock].A passcode input screen is displayed.Setting the Alert individually for an Artist/Song/Favorite TeamSetting ON/OFF of all Songs/Artists/Games AlertDeleting all stored AlertSetting the Favorite Sports Team AlertsSetting the Parental Lock](https://usermanual.wiki/ALPINE-ELECTRONICS/9ZUA147/User-Guide-2952471-Page-42.png)
![43-EN2Touch the numeric keypad to input a 4-digit passcode.The initial default 4-digit passcode is set to 0000.After entering the digit, it is displayed as “*” (asterisk).•Touch [] to delete an entered number.•Touch [Delete All] to delete all entered numbers.3Tou ch [Enter].Setting the Lock status of individual channels4Tou ch [Locked Channels].The channels list screen is displayed.5Touch the checkboxes “On” ( ) or “Off ” ( ) of the channels list to set the Parent Lock Off/On.Clearing the Lock of ALL the locked Channels4Tou ch [Clear All Locked Channels].5Tou ch [OK] to clear the lock of all the locked channels.Touch [Cancel] to cancel.Changing the Lock Passcode4Tou ch [Edit Code].The numeric keypad screen is displayed.5Use the keypad to enter the current (old) 4-digit passcode.The initial passcode is set to 0000.•Touch [] to delete an entered number.•Touch [Delete All] to delete all entered numbers.6Tou ch [Enter] to confirm the entry. 7Now use the keypad to enter the new 4-digit passcode. 8Tou ch [Enter].9Then use the keypad to enter the new 4-digit passcode a second time to verify it.10 Tou ch [Enter].• Remember to keep a note of the passcode in a safe place in case you forget the code.While listening to a SiriusXM Channel, the Signal strength of the current channel will be displayed.Setting item:Signal IndicatorThis menu item displays the SiriusXM signal strength as Strong, Good, Weak or No Signal.• If the Signal Indicator reports Weak or No Signal and your vehicle is parked outside with no obstructions to the southern sky, then your SiriusXM antenna may not be properly installed or may have become damaged.AUX Setup[AUX] is selected on the Source Setup Menu screen in step 1. See “Source Setup” (page 41).You can set up the items related to the Auxiliary device.Setting item:AUXSetting contents:Off / On (Initial setting)Make sure the AUX is set to “On” ( ). See “AUX Setup” (page 43).Connection with external input devices is available through the AUX Input connector. An optional adapter cable is required (standard RCA to 3.5ø mini-phono plug or 3.5ø to 3.5ø mini phono plug).You can also play back video connecting with an optional AV cable (4-pole mini AV plug to 3-RCA).Setting item:AUX Source SelectSetting contents:iPod Video / AUX (Initial setting)• When an iPod video is selected or the current source is AUX, this setting cannot be adjusted.Usable 4-pole mini AV plugThe unit accepts the following 4-pole mini AV plug pin-out:• Please check pin-out carefully before use of this product. Depending on the cable, there may be no picture and/or sound.Signal Strength InformationOff: AUX source is not displayed.On: AUX source is displayed.Setting the AUX ModeiPod Video: Set when connected to an iPod or iPhone.AUX: Set when connected to an external input device.Audio L (White)Audio R (Red)GroundVideo (Yellow)](https://usermanual.wiki/ALPINE-ELECTRONICS/9ZUA147/User-Guide-2952471-Page-43.png)
![44-ENMake sure the AUX is set to “On” ( ). See “AUX Setup” (page 43).Setting item:AUX NameSetting contents:AUX (Initial setting) / AUX DVD / GAME / External DVD / DVD Changer / DVB-T / TV You can make this setting only when AUX is set to “On” ( ). See “AUX Setup” (page 43).Setting item:SignalSetting contents:Auto (Initial setting) / NTSC/PALHDMI Setup[HDMI] is selected on the Source Setup Menu screen in step 1. See “Source Setup” (page 41).You can set the name of an external device connected via HDMI.Setting item:HDMISetting contents:HDMI (HDMI 1*) / DVD (Initial setting)*When the HDMI selector is set to “On,” “HDMI 1” is displayed in the Setting contents. For details on setting the HDMI selector, see “Setting the HDMI Selector On/Off” (page 49).Setting the Bluetooth Pandora®[Bluetooth Pandora] is selected on the Source Setup Menu screen in step 1. See “Source Setup” (page 41).To use Bluetooth Pandora, set the Bluetooth Pandora setting to “On.”Setting item: Bluetooth PandoraSetting contents: Off / On (Initial Setting)• When “On” is set, the Bluetooth Pandora® source is displayed on the Menu screen.• When the current source is Bluetooth Pandora, this setting cannot be adjusted.[System] is selected on the Setup main screen in step 3. See “Setup Operation” (page 28).System Setup Menu screen<Setting items>*1 When you select “Camera Selector” in “Camera Select”, the setting item is different. For details, see “Setting Multi Camera to On/Off ” (page 47).*2 When Camera Select is set to “Off,” you cannot select this item.*3 You can select this item only when Camera Select is “Front” or “Rear.”*4 You can select this item only when Camera Select is “Rear.”*5 Set this setting after closing the Alpine TuneIt App.1Select the desired item.2To switch the setting, touch [], [], [], [], or mark the checkboxes “Off” ( ) or “On” ( ).• If “ ” appears, there is a further hierarchy. Touch the desired item.3Tou ch [] to return to the main source screen.• To return to the previous List screen, touch [] or [] in the previous page. For details, see “About Basic Operation for List Screen” (page 17).Setting the Auxiliary (AUX) Name Switching the Visual Input Signal SystemAuto: The video input signal type (NTSC or PAL) will be automatically selected.NTSC/PAL: Choose the video input signal type manually.HDMI (HDMI 1):Set when a smartphone is connected via HDMI.DVD: Set when the DVD player is used.System SetupCamera*1Camera SelectCamera Signal*2Guide Adjustment*3Camera Interrupt (Power Mode)*4Factory System SetupUSB/iPod / SiriusXM / Bluetooth AudioHands-free ConnectionDefault Vehicle ScreenMaestro ModuleRear Seat EntertainmentRear Seat EntertainmentRemote SensorExternal AccessoriesExternal Audio ProcessorRSE Aux Switch BoxHDMI selectorExternal Accessory CtrlSmartphone AppsAlpine TuneIt App*5The following steps 1 to 3 are common to each “Setting item” of System Setup. See each section for details.](https://usermanual.wiki/ALPINE-ELECTRONICS/9ZUA147/User-Guide-2952471-Page-44.png)
![45-ENCamera Setup[Camera] is selected on the System Setup Menu screen in step 1. See “System Setup” (page 44).You can set up items related to the Camera.Setting item:Camera SelectSetting contents:Off (Initial setting) / Front / Rear / Other / Camera Selector*When selecting Camera Selector, you can set the Front Camera/Rear Camera/Side Camera to On/Off. For details, see “Setting Multi Camera to On/Off” (page 47).When the camera is connected, the video input signal type can be chosen.Further setting item:Camera SignalSetting contents:NTSC (Initial setting) / PALThe video pattern can be changed when connected to Multi View Camera.When Camera Select is set to “Off” or “Other,” you cannot select this item.Setting item:Guide Adjustment1Tou ch [Guide Adjustment].The camera guide adjustment screen is displayed.Multi View compatible Side Camera2Touch [Front] or [Rear].The view will change to the selected view. Multi View compatible Front Camera/Rear Camera2Tou ch [Back], [Panorama], [Corner], or [Top].The view will change to the selected view. •[Back] will not appear for the Front camera.• For an explanation of video patterns, see the camera Owner’s Manual.You can adjust the camera guide position.Setting item:Guide Adjustment1Tou ch [Guide Adjustment].The camera guide adjustment screen is displayed.• If the video pattern is set to “Corner (Rear/Front Camera only),” the camera guide will not be displayed.• When you connect a Multi View compatible camera, select a Video Pattern to make a guide adjustment.• To adjust the guide position of the Rear Camera, touch [Hitch Guide On] or [Hitch Guide Off] to display/hide the Hitch Guide. You can adjust the Hitch Guide to mark the position of the junction between your vehicle and your trailer.• When you connect a Multi View compatible Side Camera, after selecting the Video Pattern, touch [] (Left steering) or [ ] (Right steering) to make the guide adjustment that matches the position of the steering wheel in your vehicle.2Tou ch [Adjust].•If [Adjust] does not appear, proceed to step 3.3Touch the guide you intend to adjust.Guide line can also be selected by touching [] [].Rear Camera screen exampleWhen Hitch Guide is set to Off• You cannot adjust the position of the yellow guide line “ ” in the center independently.It is calculated to be centered between the two yellow guide lines “ ” and “ ” on the left and right, and centered between the green line “ ” and red guide line “ ”.When Hitch Guide is set to On• You can adjust the Hitch Guide to mark the position of the junction between your vehicle and your trailer.Setting the Camera InputFront: Front cameraRear: Rear cameraOther: Side camera, Room camera, etc.Camera Selector*:Front Camera/Rear Camera/Side Camera connected to the optional Multi Camera Interface module.Setting the Camera Signal InputSwitching Video Patterns for Multi View CameraAdjusting the Rear/Front/Side Camera Guide](https://usermanual.wiki/ALPINE-ELECTRONICS/9ZUA147/User-Guide-2952471-Page-45.png)
![46-ENFront Camera screen exampleSide Camera screen example4Tou ch [], [], [] or [] to adjust the position of the guide.• Touching [Clear] clears adjustments and returns to the setting before guide line alteration. 5After the adjustment is completed, touch [Set].Adjusting Guides Simultaneously (for Rear/Side Camera only)<Rear Camera>1Tou ch [Link].The 3 vertical guides of the currently-selected guide link together, allowing them to be adjusted simultaneously.When Hitch Guide is set to Off• Note on the yellow guide line “ ” in the centerThe yellow guide line “ ” is centered between the two yellow guide lines, “ ” and “ ” on the left and right, or the green line “ ” on the top and red guide line “ ” below.When Hitch Guide is set to On<Side Camera>1Tou ch [Link].The 2 vertical guides of the currently-selected guide link together, allowing them to be adjusted simultaneously.Turning Guide Display On/Off (Rear/Front Camera only)Turning the selected guide off.1Tou ch [On/Off].The currently selected guide will turn off.2To turn the guide on, touch [On/Off] again.• Guides that are turned off are still adjustable.Returning Guides to Default1Tou ch [Default].A message window will appear.2Tou ch [OK].Adjusted values will return to default settings.You can set whether to display the rear camera image when the gear lever is moved to the reverse (R) position while the unit is turned off.You can select this item only when Camera Select is “Rear.”Setting item:Camera Interrupt (Power Mode)Setting contents:On (Initial setting) / OffCamera Interrupt Setting (Power OFF Mode) (Rear Camera Only)On: The rear camera image is displayedOff: The rear camera image is not displayed](https://usermanual.wiki/ALPINE-ELECTRONICS/9ZUA147/User-Guide-2952471-Page-46.png)
![47-ENWhen connecting the optional Multi Camera Interface module, you can connect up to 3 cameras as Front Camera/Rear Camera/Side Camera. • When using the optional Multi Camera Interface module, select “Camera Selector” to set the “Front Camera /Rear Camera/Side Camera” to ”On”( )/”Off”( ).Setting item: Front Camera / Rear Camera / Side Camera / Default Camera*Setting contents:Off (Initial setting) / On*You can change the Default Camera only when you set more than one camera for Front Camera/Rear Camera/Side Camera to “On.” For details, see “Setting a Default Camera” (page 47).Setting a Default CameraWhen connecting an optional Multi View Camera, you can set which camera image is displayed when you touch the Camera button on the Menu screen or press the (CAMERA) button.Setting item:Default CameraSetting contents:Front / Rear / Side• The initial setting differs depending on the cameras set to “On” in “Setting Multi Camera to On/Off.”Factory System Setup[Factory System Setup] is selected on the System Setup Menu screen in step 1. See “System Setup” (page 44).You can set whether the following source icon in the Menu screen is available.Setting item:USB/iPod (Initial setting: Both) / SiriusXM (Initial setting: Aftermarket) / Bluetooth Audio (Initial setting: Aftermarket)Setting contents:Both / Factory / Aftermarket*USB/iPod only.• The iDataLink source icons not displayed on the Menu screen when no iDataLink module is connected even though “Both” or “Factory” is set.• You cannot set the source that is currently being played.Select to pair the Bluetooth compatible phone with this unit or the connected iDataLink module.Setting item:Hands-free ConnectionSetting contents:Factory / Aftermarket (Initial setting)• When “Factory” is selected, the screen changes to the Phone menu screen of the iDataLink module.Press and hold the (Favorite) button for at least 2 seconds or touch the Menu screen (page 20) to display the Info mode screen, and then set the following.Setting item:Default Vehicle ScreenSetting contents:Climate / Vehicle Info. / Gauges / Parking Assist / Last mode (Initial setting)• Depending on the car, some setting contents or this setting item may not be displayed. You can change the setting of the connected iDataLink module.Setting item:Maestro Module• Depending on the iDataLink module, the setting contents may differ.Setting Multi Camera to On/OffCamera Signal:See “Setting the Camera Signal Input” (page 45)Guide Adjustment:See “Adjusting the Rear/Front/Side Camera Guide” (page 45)Camera Interrupt (Power Mode):See “Camera Interrupt Setting (Power OFF Mode) (Rear Camera Only)” (page 46)Setting the Source CategoryBoth*: Both the sources listed above from this unit and iDataLink module are available.Factory: Only the source listed above from iDataLink module is available.Aftermarket: Only the source listed above from this unit is available.Setting the Hands-free ConnectionFactory: Select to pair the Bluetooth compatible phone with the connected iDataLink module.Aftermarket: Select to pair the Bluetooth compatible phone with this unit.Setting the Default Vehicle ScreenSetting the Maestro Module](https://usermanual.wiki/ALPINE-ELECTRONICS/9ZUA147/User-Guide-2952471-Page-47.png)
![48-ENRear Seat Entertainment Setup[Rear Seat Entertainment] is selected on the System Setup Menu screen in step 1. See “System Setup” (page 44).When a Rear monitor equipped with HDMI input is connected to this unit, change this setting to “On.” You can output images to the Rear monitor. For details, see “Rear Seat Entertainment Function” (page 19).Setting item:Rear Seat EntertainmentSetting contents:Off (Initial setting) / On• When this setting is “On,” you can use this unit to switch the Plasmacluster or Illumination of a Rear monitor with the Plasmacluster function or Illumination function.Setting the Rear Seat Entertainment SystemMake sure the Rear Seat Entertainment is set to “On” ( ). See “Rear Seat Entertainment Setup” (page 48).Setting item:Plasmacluster/Illumination ColorSetting contents:Off (Initial setting) / On• For details on adjusting Plasmacluster/Illumination, see “Rear Seat Entertainment Function” (page 19).• When the Rear Seat Entertainment setting is set to “Off,” you cannot select this item.• Set the coordination color and Plasmacluster controls on the Rear monitor to “Navi.” When set to “Rear monitor,” you cannot operate them from this unit.Make sure the Rear Seat Entertainment is set to “On” ( ). See “Rear Seat Entertainment Setup” (page 48).For remote control operation, the remote sensor of the external device (Rear monitor, etc.) can be switched, as you prefer.Setting item:Remote SensorSetting contents:Front (Initial setting) / Rear• You can also control this setting from the Rear Seat Entertainment System Setup screen. For details, see “Rear Seat Entertainment Function” (page 19).External Accessories Setup [External Accessories] is selected on the System Setup Menu screen in step 1. See “System Setup” (page 44).When using an external audio processor, set to “On” ( ).Setting item:External Audio ProcessorSetting contents:Off (Initial setting) / On• When this setting is “On,” the Volume level is fixed at 10. Also, Balance/Fader/Subwoofer Level/Subwoofer Phase/Bass/Treble/MX HD/EQ Presets/Dual HD EQ/X-Over/Time Correction/Defeat/Phone Speaker/Default Sound Settings are set to “Off” or “Flat” and cannot be adjusted.• Use the External Audio Processor to adjust volume.Remote Sensor SettingFront: The remote sensor of this unit is effective.Rear: The remote sensor of Rear monitor is effective.Setting the External Audio Processor](https://usermanual.wiki/ALPINE-ELECTRONICS/9ZUA147/User-Guide-2952471-Page-48.png)
![49-ENWhen displaying an AUX image in the rear monitor, you need an external AUX distribution box.When using an external AUX distribution box, set to “On” ( ).Setting item:RSE Aux Switch BoxSetting contents:Off (Initial setting) / OnIf you connect an HDMI selector, you can connect two HDMI devices.When using an HDMI selector, set to “On” ( ).Setting item:HDMI selectorSetting contents:Off (Initial setting) / On• For details on switching the HDMI source when two HDMI devices are connected, see “HDMI Operation” (page 77).When you have connected the optional External Accessory Control module, set this setting to “On” to turn the headlights ON/OFF or adjust the air suspension from this unit.Setting item:External Accessory CtrlSetting contents:Off (Initial setting) / On• When set to “On,” the [ ] (Ext Acc Ctrl) icon is displayed on the Menu screen.• For details on the External Accessory screen and its operation, see “External Accessory Control Operation” (page 95).Smartphone Apps Setup[Smartphone Apps] is selected on the System Setup Menu screen in step 1. See “System Setup” (page 44).Set Alpine TuneIt App to USB (iPhone) when an iPhone is connected, or set to Bluetooth (Android) when an Android Smartphone is paired.Setting item:Alpine TuneIt AppSetting contents:Off / USB (iPhone) (Initial setting) / Bluetooth (Android)*• Set this setting after closing the Alpine TuneIt App.• For this function to work properly, specific applications must be installed on your Smartphone before connection. Consult your Alpine dealer or the Alpine website for details.• Only the iPhone and certain Android Smartphones support this function.*Not displayed when Bluetooth is set to Off. For details, see “Bluetooth Setup” (page 29)Setting the Additional AUX BOX Setting the HDMI Selector On/OffSetting the External Accessory Control Off: No Smartphone is connected.USB (iPhone): When an iPhone is connected to the unit’s USB port, you can program the unit’s sound tuning parameters, or communicate with SNS.Bluetooth (Android):Set this when an Android Smartphone is paired with this unit via Bluetooth technology. And after Bluetooth Audio is connected, you can program the unit’s sound tuning parameters, or communicate with SNS.](https://usermanual.wiki/ALPINE-ELECTRONICS/9ZUA147/User-Guide-2952471-Page-49.png)
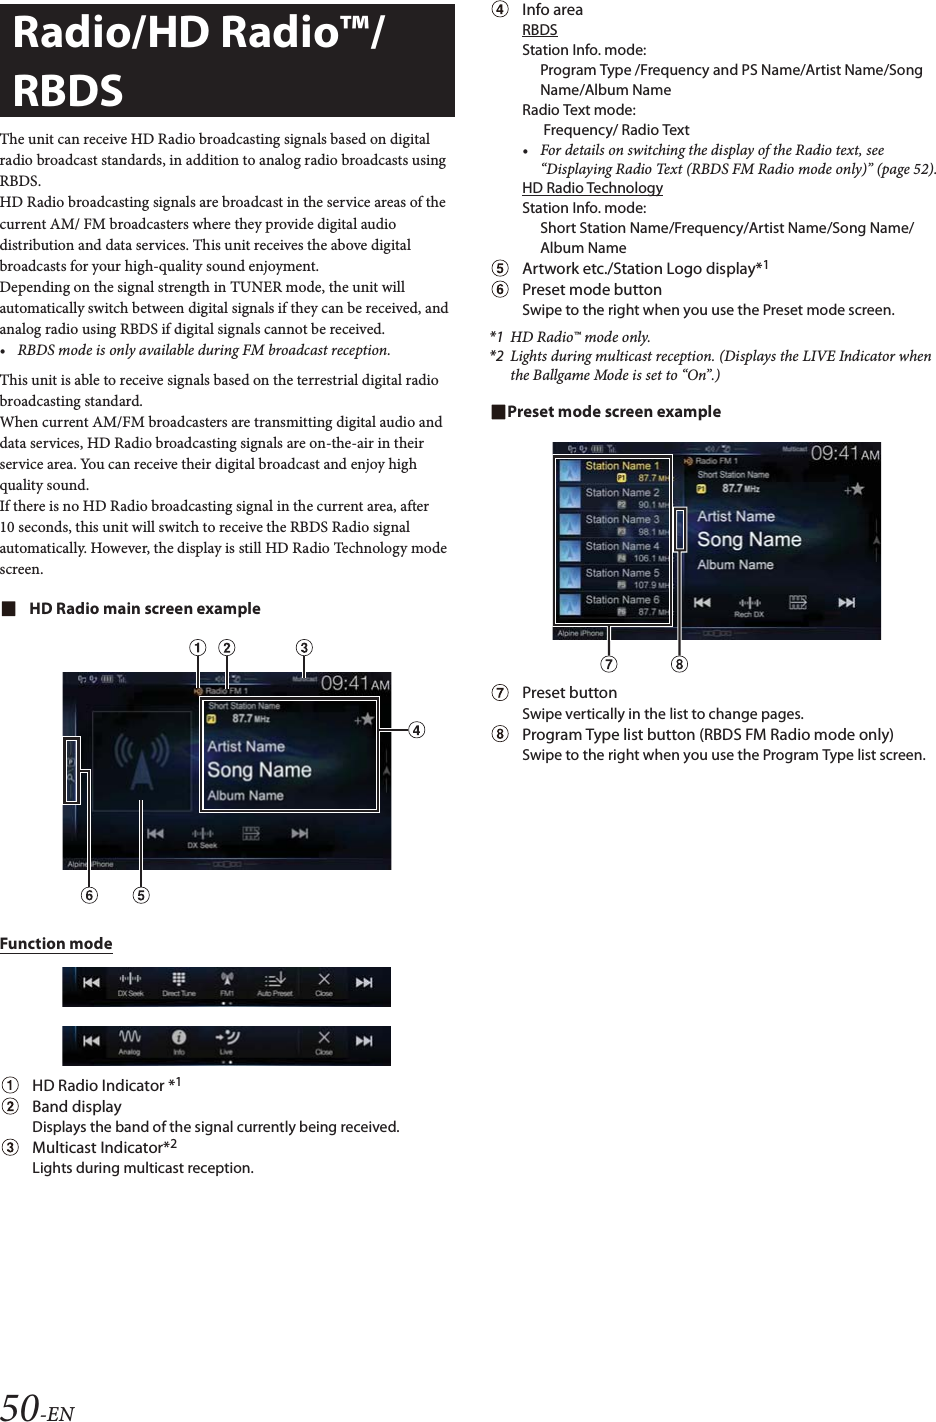
![51-ENListening to the Radio1Press the (AUDIO) button to select radio mode.The display shows the radio mode screen.• You can select and change the source from the Menu screen (page 20) or the Favorite screen (page 23).2Tou ch [].The radio band select pop up screen is displayed.•[] button displays the current selected band. (e.g. [FM1])3Select the desired band from FM1/FM2/AM.4Tou ch []. The tuning mode selection popup is displayed.•[] button displays the current selected mode. (e.g. [DX Seek])5Touch the desired tuning mode.The radio frequency up or down button changes depending on the tuning mode.• There are two modes you can select for auto tuning, DX and Local:- DX Seek (Distance) mode*; Both strong and weak stations will be tuned in.-Local Seek mode*; Only strong stations will be tuned in.The initial setting is DX.- D (Digital).DX Seek mode;Automatically receives a receivable digital broadcast.- D (Digital).Local Seek mode;Automatically receives a strong digital broadcast only.-Manual mode;The frequency is manually tuned in steps- Program Type Seek mode (RBDS FM Radio mode only);The currently selected program type station will be tuned.• During Forced Analog mode, digital broadcasts cannot be received.*Depending on the signal, a digital or analog broadcast is received.6Tou ch [], [] or [], [] to change the radio frequency up or down respectively.In manual mode, touch and hold to change the frequency continuously.• The , buttons provide the same functions above.Presetting Stations Manually1Tune in a desired radio station you wish to store in the preset memory by manual or automatic seek tuning.2Touch the Preset number you want to store, for at least 2 seconds.The selected station is stored.3Repeat the procedure to store up to 11 other stations onto the same band.To use this procedure for other bands, simply select the desired band and repeat the procedure.A total of 36 stations can be stored in the preset memory (12 stations for each band; FM1, FM2, or AM).• For details on switching to the Preset mode screen, see in “HD Radio main screen example” (page 50).• If a preset memory has already been set in the same preset number, it will be cleared and the new station will be memorized.Presetting Stations AutomaticallyThe tuner can automatically seek and store 12 strong stations in the selected band in ascending order of frequency.Select the desired band then touch and hold [] (Auto Preset).The tuner automatically seeks and stores 12 strong stations into the preset buttons in ascending order of frequency.When automatic storing has completed, the station stored in the preset 1 is selected.• If no stations are stored, the tuner will return to the original station you were listening to before the automatic storing procedure began.• You can cancel this process by touching [ ] (Auto Preset) while the tuner is automatically seeking stations. Canceling will return the tuner preset to the previous setting.Tuning to Preset StationsYou can tune in the preset stations in memory on either band using its preset number.1Tou ch [].The radio band select pop up screen is displayed.•[] button displays the current selected band. (e.g. [FM1])2Select the desired band from FM1/FM2/AM.3Touch any one of the Preset numbers you have already stored in the Preset mode screen.The preset station is received.• For details on switching to the Preset mode screen, see in “HD Radio main screen example” (page 50).Radio Basic OperationDX Seek Local Seek D.DX Seek D.Local SeekManual Program Type](https://usermanual.wiki/ALPINE-ELECTRONICS/9ZUA147/User-Guide-2952471-Page-51.png)
![52-ENInputting Frequency Directly and Receiving the Radio StationYou can input a frequency of the same band directly and receive the radio station.1Tou ch [] (Direct Tune).The numeric keypad input mode screen appears.2Touch a desired number.Touch [] to delete an entered number.Touch [Delete All] to delete all entered numbers.3Tou ch [Enter] on the numeric keypad mode screen to confirm your selection.Touch [] to hide the keypad display.Receiving a Multicast (HD Radio™ Mode only)Multicasting is the ability to broadcast multiple program streams over a single FM frequency. This increases the amount and diversity of content choices. A maximum of 8 multicast station channels can be selected on this unit.• “Multicast” indicator appears when signal reception is possible.• The station number of the current broadcast station appears behind the frequency (ex. 90.3 MHz-HD5 means there are 5 stations on 90.3 MHz).Tou ch [], [] or [], [].The sub channel of the received radio station is changed.• If reception is lost during SPS broadcasting due to weak or no signal, the screen will display “HDx Signal loss.”Selecting the Receivable Program Type (RBDS FM Radio mode only)You can select and receive the currently receivable stations in the Program Type list screen.Program Type list screen example• For details on switching to the Program Type list screen, see in “Preset mode screen example” (page 50).Select the desired program type in the Program Type list screen.Program Type Seek starts and the receivable program type is received.If no Program Type station is found, “No program type available.” will be displayed.•Touch [] or [] to select the same program type station as the currently selected program type after switching the tuning mode to Program Type (Program Type Seek) mode.Forced Analog ModeActivate the Compulsory Analog Radio mode to receive only analog radio signals.Tou ch [] (Analog).The [] (Analog) button is highlighted. To cancel Compulsory Analog Radio mode, touch [] (Analog) again.• During Forced Analog mode, only analog broadcasts will be received even when digital broadcasts become available.Displaying Radio Text (RBDS FM Radio mode only)Text messages from a radio station can be displayed.1Tune in a radio station that transmits text messages.2Tou ch [] (Info) in the FM radio mode repeatedly to switch to the desired display.Station Info.Mode Radio Text Mode Station Info.ModeStation Info. ModeProgram Type /Frequency and PS Name/Artist Name/Song Name/Album NameRadio Text ModeFrequency/Radio Text](https://usermanual.wiki/ALPINE-ELECTRONICS/9ZUA147/User-Guide-2952471-Page-52.png)
![53-ENUsing Ballgame ModeIn all digital broadcasts, a time delay is added. When listening to live broadcasts (such as sporting events) it may be desirable to remove this delay. Tou ch [] (Live) to switch On/Off.The LIVE Indicator is displayed when Ballgame Mode is set to “On.”• When receiving a live broadcast while the Ballgame mode is on, the LIVE indicator is highlighted. (During live broadcast)About the Feature Logos• Digital, CD-quality sound. HD Radio Technology enables local radio stations to broadcast a clean digital signal. AM sounds like today’s FM and FM sounds like a CD.• Program Service Data: Contributes to the superior user experience of HD Radio Technology. Presents song name, artist, station IDs, HD2/HD3 Channel Guide, and other relevant data streams.• Adjacent to traditional main stations are extra local FM channels. These HD2/HD3 Channels provide new, original music as well as deep cuts into traditional genre.• Visual information related to content being played on your HD Radio receiver, such as Album Art, historical photographs, still art from live broadcasts, among other related content.LIVE Indicator](https://usermanual.wiki/ALPINE-ELECTRONICS/9ZUA147/User-Guide-2952471-Page-53.png)
![54-ENYou can play back music files (MP3/WMA/AAC/FLAC) stored in a USB flash drive on the internal player of this system.USB Audio main screen exampleFunction modeArtwork display• You can change the artwork position. For details, see “Switching the Artwork Position” (page 39).Current track no./Total song no.Artist titleSong titleAlbum titleElapsed timeQuick Search buttonTouch or swipe to right to use the Quick Search mode.Quick Search mode screen exampleSwipe vertically in the list to change pages.Full Search mode buttonSwipe to the right when you use the Full Search mode screen.Playback1Press the (AUDIO) button to select USB mode.The display shows the USB mode screen.• You can select and change the source in the Menu screen (page 20) or Favorite screen (page 23).2Tou ch [] or [] or to select the desired track (file).Returning to the beginning of the current (or previous) track (file):Touch [].Fast reverse :Touch and hold [].Advancing to the beginning of the next track (file) :Touch [].Fast forward :Touch and hold [].• The , buttons provide the same functions above.3To pause playback, touch [/].Touching [/] again will resume playback.During playback, the [] indicator is displayed in Audio main screen. During a pause, the [] indicator is displayed in the Audio main screen.• The playback time may not be correctly displayed when a VBR (Variable Bit Rate) recorded file is played back.• If there is tag information, artist name/album name/track name is displayed.•ID3 tag/WMA tagIf an MP3/WMA/AAC/FLAC file contains ID3 tag/WMA tag information, the ID3 tag/WMA tag information is displayed. (e.g., song name, artist name, and album name)Repeat Play1Tou ch [].The Repeat mode select pop up screen is displayed.•The [] button displays the currently selected mode.2Select your desired Repeat mode.USB Flash drive (Optional)Folder : Only files in a folder are repeatedly played back.File : Only the file currently playing is repeatedly played back.OFF : Repeat mode Off.](https://usermanual.wiki/ALPINE-ELECTRONICS/9ZUA147/User-Guide-2952471-Page-54.png)
![55-ENRandom Play1Tou ch [].The Random Play mode select pop up screen is displayed.•The [] button displays the currently selected mode.2Select your desired Random Play mode.Searching for a Desired SongYou can search for your desired song by using one of two modes; the Quick Search mode and the Full Search mode.Quick Search mode Touch your desired Folder name or File name.The selected Folder*1 or File is played.*1 The first file in the selected folder is played back.• For details on switching to the Quick Search mode, see in “USB Audio main screen example” (page 54).Full Search mode Touch your desired Folder name*2 or File name.When you select a File name, the selected song is played.When you select a Folder name, repeat the same procedure to select another Folder name or File name.*2 When you touch the [] by a Folder name, the unit plays from the first song in the Folder.• For details on switching to the Full Search mode, see in “Quick Search mode screen example” (page 54).• To switch the displayed list or return to the previous page in the Full Search mode, see “About Basic Operation for List Screen” (page 17).ALL : All songs in the USB flash drive are played back in random sequence. Any one song does not play back again until all songs have been played back.Folder : A Folder is selected randomly and songs in the Folder are played back in order. After all songs are played in a Folder, the next Folder is selected randomly.File : All songs in the Folder (Folder/File) including the song currently being played are played back in random sequence.OFF : Random mode Off.](https://usermanual.wiki/ALPINE-ELECTRONICS/9ZUA147/User-Guide-2952471-Page-55.png)
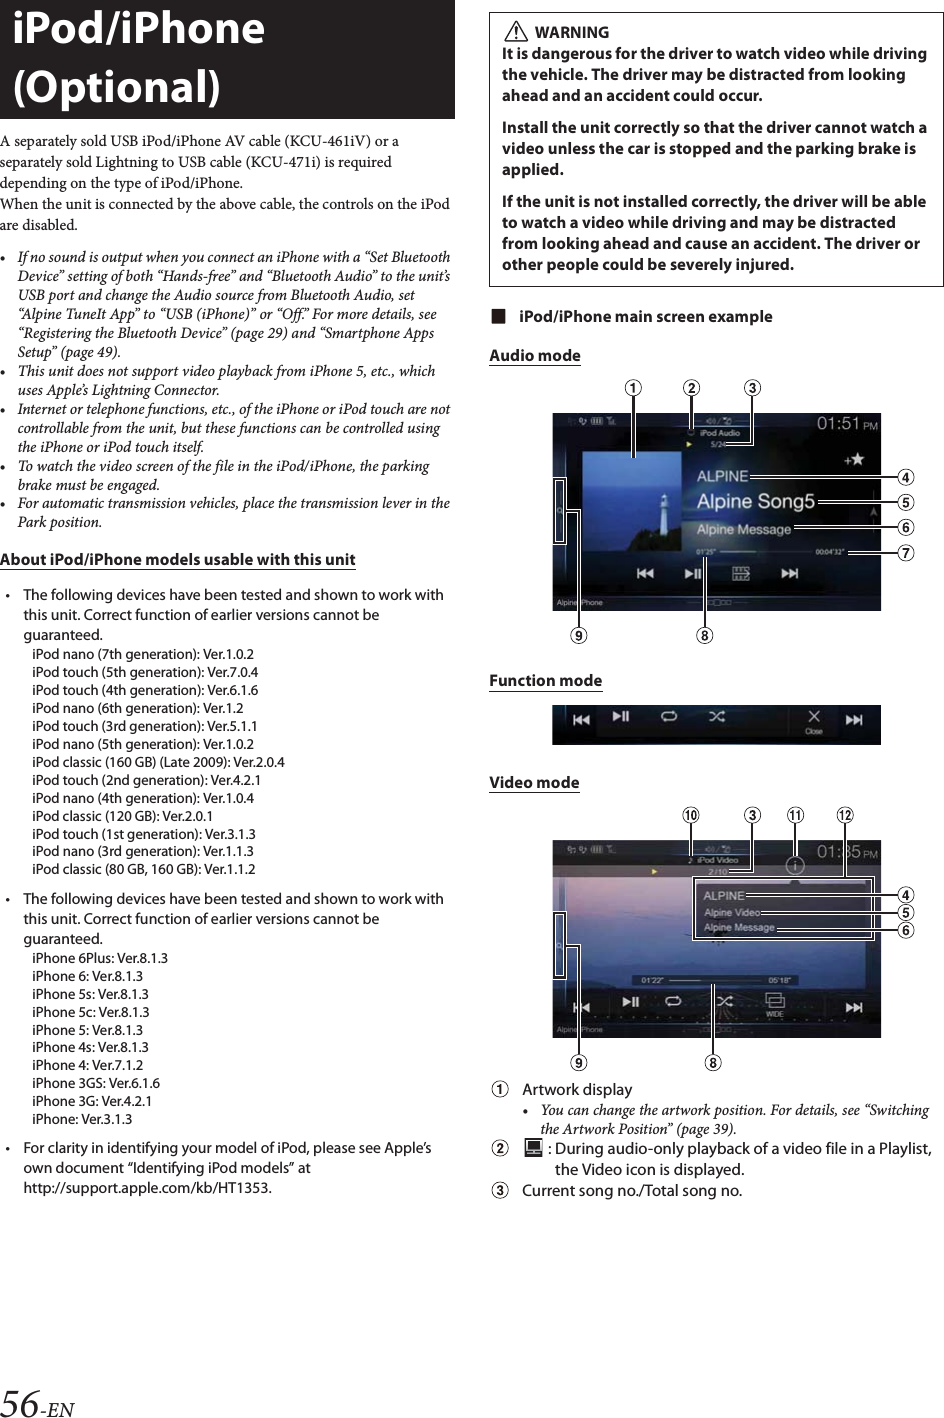
![57-ENArtist title/Release Date*Song title/Episode title*Album title/Podcast title*Total time for playingElapsed timeQuick Search buttonTouch or swipe to the right when using Quick Search mode. : During audio-only playback of a music file in a video Playlist, the Music icon is displayed.Info mode switching button (Video mode only)Info mode display*Podcast mode.Quick Search mode screen exampleSwipe vertically in the list to change pages.Full Search buttonSwipe to the right when using Full Search mode.The iPod/iPhone operation screen display during video file playbackTouch the screen while the iPod/iPhone playback screen is displayed.The iPod/iPhone operation screen is displayed.• The operation screen changes to the visual screen in the iPod mode for 5 seconds after an operation has been performed.• For your safety, video is not displayed and only audio can be heard while driving.Playback1Press the (AUDIO) button to select iPod mode.The display shows the iPod mode screen.• You can select and change the source in the Menu screen (page 20) or Favorite screen (page 23).2Tou ch [] or [] or to select the desired track (file).Returning to the beginning of the current (or previous) track (file):Touch [].Fast reverse the current track :Touch and hold [].Advancing to the beginning of the next track (file) :Touch [].Fast forward the current track :Touch and hold [].• The , buttons provide the same functions above.3To pause playback, touch [/].• If a song is playing on the iPod/iPhone before it is connected to the unit, it will continue playing when it is connected.• An episode may have several chapters. The chapter can be changed by touching [] or [].• If the artist, album or song name, created in iTunes, has too many characters, songs may not be played back when connected to the unit. Therefore, a maximum of 64 characters is recommended. The maximum number of characters for the unit is 64.• Some characters may not be correctly displayed. Searching for a Music FileAn iPod/iPhone can contain thousands of songs. For this reason, this unit can make various searches using the search function as shown below.Using the Playlist/Artist/Album/Podcast/Audiobook/Genre/Composer/ Song search mode’s individual hierarchy, you can narrow down your search as shown in the table below.<MUSIC Search Menu>In Quick Search mode, the list from the previous search mode is displayed. For example, if the last time you searched for songs in Albums, the Album list is displayed. If you have never used the search mode with the currently connected ipod/iphone, touching the Quick Search button to switch to the Full Search mode.In Quick Search mode, touch the desired list (for example, Album list).The selected Album is played.• To switch into Quick Search mode, see in “iPod/iPhone main screen example” (page 56).• To search within an Album, go to the Full Search mode.Hierarchy 1 Hierarchy 2 Hierarchy 3 Hierarchy 4Playlists Songs — —Artists Albums Songs —Albums Songs — —Songs———Podcasts Episodes — —Genres Artists Albums SongsComposers Albums Songs —Audiobooks — — —Quick Search Mode](https://usermanual.wiki/ALPINE-ELECTRONICS/9ZUA147/User-Guide-2952471-Page-57.png)
![58-ENFor example: Searching by Artist nameThe following example explains how an Artists search is performed. Another search mode can be used for the same operation, although the hierarchy differs.1Tou ch [Artists] in the Full Search mode screen.The Artists search screen is displayed.• To switch into Full Search mode, see in “Quick Search mode screen example” (page 57).2Select the desired artist.To play back the Artist directly1Touch [] of the artist’s name.All songs of the selected artist are played back.To search for the Album of the Artist1 Touch the selected artist name.The Albums search screen of the selected artist is displayed.2Touch [] of the desired album’s name.All songs of the selected album are played back.To search for a Song in the Album of the Artist1 Touch the desired artist’s name.All albums of the selected artist are displayed.3Touch the desired album’s name.All songs of the selected album are displayed.4Touch the desired song’s name.The selected song is played back.•Touching [] of “All” will play back all songs in the list.• Touching “All” will display the search list in the next hierarchy.• An alphabet skip function is available. See “Alphabet Search Function” (page 58).• To switch the displayed list or return to the previous page in the Full Search mode, see “About Basic Operation for List Screen” (page 17).Searching for a Desired Video FileYou can select a movie, music video, etc., from the list screen.• Video search mode depends on the iPod/iPhone. If the specification of the iPod/iPhone is changed, the search mode on this unit will also be changed.Examples for the video search mode•Video Playlists•Movies•Music Videos, etc.For example: Searching by MovieThe following example explains how a Movie search is performed. Another search mode can be used for the same operation, although the hierarchy differs.1Touch the [Video] icon in the Full Search mode screen.The Video search screen is displayed.• To switch into Full Search mode, see in “Quick Search mode screen example” (page 57).• If the Video icon is not displayed, touch [More] to change the Search mode.2Tou ch [Movies].The Movies search screen is displayed.3Touch the desired movie.The selected movie is played back.Alphabet Search Function The unit is provided with an alphabet search function for effective searching. When you use this function in the search mode, you can quickly search an artist or a song, etc. This is an example of how to search Artist Name for names beginning with “R”.1Touch “O-U” of the alphabet group.“O P Q R S T U” of the alphabet group “O - U” is displayed.2Touch “R” you want to search.Artist names beginning with “R” are displayed.3Touch your desired artist name.• If there are no names in the list beginning with that letter, the next letter of the alphabet is searched.For example: If there are no names beginning with “R,” the search list begins with “S.”.Full Search Mode](https://usermanual.wiki/ALPINE-ELECTRONICS/9ZUA147/User-Guide-2952471-Page-58.png)
![59-ENRepeat PlayTou ch [] to repeatedly play back the currently track.The tracks (files) will be played repeatedly.Touch [] again to deactivate Repeat play.Random Play (Shuffle)1Tou ch [].The Random Play mode select pop up screen is displayed.•The [] button displays the currently selected mode.2Select your desired Random Play mode.The selected Random Play mode changes the button.Switching Display Modes (During Video File Play Back)You can switch the Display Mode while playing a Video File.1Tou ch [].The Display Mode select pop up screen is displayed.•The [] button displays the currently selected mode. (e.g. [Normal])• You cannot operate them while driving.2Select your desired Display Mode.Wide modeIn Wide mode, the monitor displays a normal picture wider to fit in a wide-screen monitor by evenly stretching out the picture horizontally.Cinema modeIn Cinema mode, the monitor displays a normal picture by stretching out the picture horizontally and vertically. This mode is good for displaying a cinema type picture at the 16:9 ratio.Normal modeIn Normal mode, the monitor displays a normal picture at the centerof the screen with a vertical black band at each side.Track Repeat OFF Track Repeat Song : All files in the iPod are played back in random sequence.Album : The songs on each album are played back in proper order. Upon completing of all the songs on the album, the next album is selected randomly. This continues until all albums have been played.Songs : Song shuffle randomly plays back songs within a selected category (playlist, album, etc.). The songs within the category are played just once until all songs have been played.OFF : Random mode Off.](https://usermanual.wiki/ALPINE-ELECTRONICS/9ZUA147/User-Guide-2952471-Page-59.png)
![60-ENPandora® internet radio is your own FREE personalized radio now available to stream music on your Smartphone (which runs Android OS, iOS or BlackBerry OS).Just start with the name of one of your favorite artists, songs or classical composers and Pandora® will create a “station” that plays their music and more music like it.The unit enables you to interact with your Pandora® account by connecting an iPhone and smartphone that has the latest version of the Pandora® application installed.• If no sound is output when you connect an iPhone with a “Set Bluetooth Device” setting of both “Hands-free” and “Bluetooth Audio” to the unit’s USB port and change the Audio source from Bluetooth Audio, set “Alpine TuneIt App” to “USB (iPhone)” or “Off.” For more details, see “Registering the Bluetooth Device” (page 29) and “Smartphone Apps Setup” (page 49).iPhone Pandora main screen exampleFunction mode Bluetooth Pandora main screen exampleFunction mode Track/Artist bookmark icon/Shuffle indicatorStation nameArtist NameSong NameAlbum NamePlaying timeArtwork displayListening to Pandora®1Launch Pandora® on the smartphone.2Press the (AUDIO) button to select Pandora® or Bluetooth Pandora® mode.The display shows the Pandora mode screen.• You can select and change the source in the Menu screen (page 20) or Favorites screen (page 23).3To pause playback, touch [/].4To skip to the next song, touch [].• The operation to replay a previous song is not available.• Pandora® limits the number of skips allowed on their service. If you attempt to skip songs beyond the limit, “You’ve reached your skip limit.” is displayed.• Even if you reconnect an iPhone without launching Pandora Application while the power is off, Pandora mode (not iPod mode) is displayed when power is turned back on.• Depending on the signal status, song may be stopped during playback.• While receiving an advertisement, you cannot operate any buttons other than [ / ] (play/pause) and [ ] (Search).• The playback time may not be correctly displayed.• The display content varies when ads are received.Pandora® internet radio (optional)](https://usermanual.wiki/ALPINE-ELECTRONICS/9ZUA147/User-Guide-2952471-Page-60.png)
![61-EN “Thumbs” FeedbackYou can personalize your stations with “Thumbs Up” or “Thumbs Down” feedback, which the system takes into account for future music selections.During playback, touch [] for thumbs up, or touch [] for thumbs down.• In some situations, “Thumbs” feedback may not be available.Searching for a Desired StationYou can display your station list and select stations directly from the unit.1Tou ch [] (Search) to activate the Search mode.Alphabet Search2Tou ch [By A-Z].The “By A-Z” search mode is activated and the station names are listed alphabetically.3Touch the desired station.Pandora will play that station.Search by Date Added2Tou ch [By Date].The “By Date” search mode is activated and the station names are listed by the date they were added to the account.3Touch the desired station.Pandora will play that station.ShuffleUse Shuffle to create a playlist based on two or more of your Pandora stations. Edit your Shuffle station selections on the Pandora Compatible Application for iPhone when it is not connected to the unit.1Tou ch [] (Search) to activate the Search mode.The “By A-Z” or “By Date” search mode is activated and the station name is displayed.2Tou ch [] (Shuffle).• The indicator lights, and the songs from the created stations are played back in random sequence.Creating a New StationBasing on the currently playing song or artist, a personalized Pandora station can be created. The new station will play more music like it.Free word1During playback, touch [] (New Station).The Key Pad screen is displayed. You can enter a keyword and search for Artist/Song.2Enter a keyword and touch [OK].3Touch the desired list.The new station is automatically applied.• For details of how to input characters from the keypad, refer to “How to Input Characters and Numbers (Keypad)” (page 22).• You cannot operate them while driving.Artist/TrackDuring playback, touch [] (Artist) or [] (Track).• The created station is saved to your station list.• When the Smartphone is not connected to this unit, you can create personalized Pandora® stations using the Pandora® Application on your Smartphone. You can also create stations on the web at www.pandora.com.• In some situations, creating a new station may not be available. • You cannot perform this operation while driving.Bookmarking a Desired Track or ArtistThe currently playing song or artist can be bookmarked and saved to your Pandora account.During playback, touch [] (Artist) or [] (Track).The current track or artist is bookmarked. “ ” icon or “ ” icon is displayed.• Your bookmarks can be viewed on your “Profile” page at www.pandora.com.• In some situations, bookmarks may not be available. : The “ ” indicator appears in the display. Pandora® will add similar music to your station.: The “ ” indicator is displayed. Pandora® will ban that song from your station, and the current song is skipped. If the number of skips allowed has reached its limit, the current song continues to play back.](https://usermanual.wiki/ALPINE-ELECTRONICS/9ZUA147/User-Guide-2952471-Page-61.png)
![62-ENConnecting a Bluetooth Device (Bluetooth Pandora® Only)Registering a Bluetooth device in the unit enables automatic connection.If it does not connect automatically, run through the connection procedure again.1Tou ch [] (Settings).The Device Setting select pop up screen is displayed.2Tou ch [Reconnect].Bluetooth connection will start.1Tou ch [] (Settings).The Device Setting select pop up screen is displayed.2Tou ch [Disconnect].The Bluetooth connection is disconnected.If multiple Bluetooth devices are registered in this device, you can change the connection among the registered devices.1Tou ch [] (Settings).2Tou ch [Change].3Tou ch [] (Audio) or [ ] (Hands-free) of the selected device.The connection will transfer to the selected device.Disconnecting the Bluetooth ConnectionChanging the connecting Bluetooth Device](https://usermanual.wiki/ALPINE-ELECTRONICS/9ZUA147/User-Guide-2952471-Page-62.png)
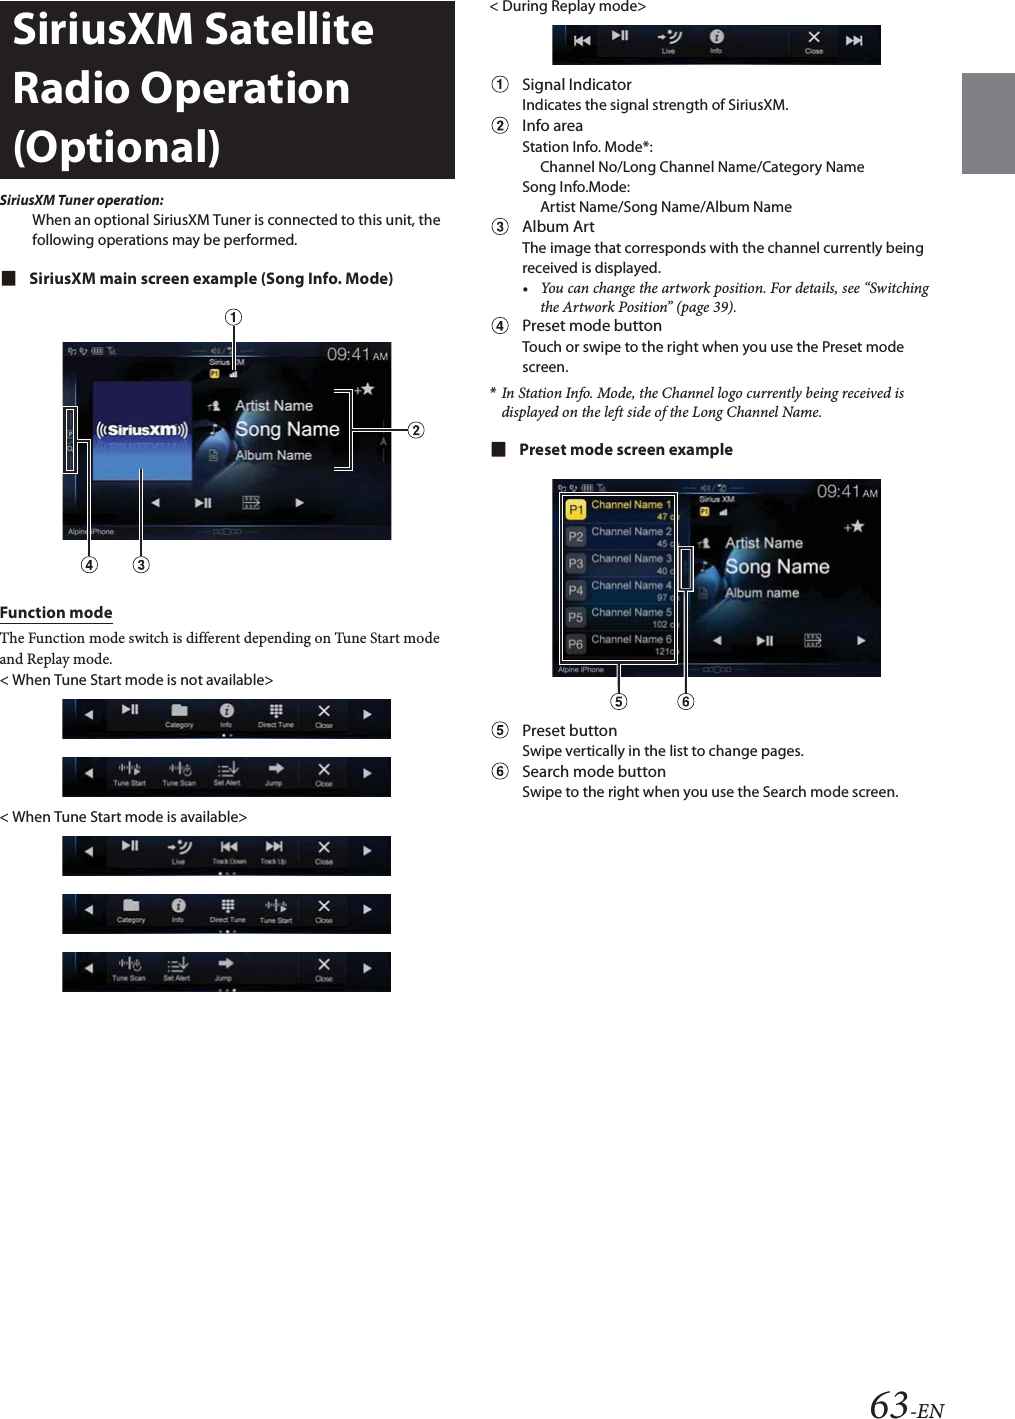
![64-ENReceiving Channels with the SiriusXM TunerAbout SiriusXM Satellite RadioEverything worth listening to is on SiriusXM, getting over 130 channels, including the most commercial-free music, plus the best sports, news, talk and entertainment. A SiriusXM Tuner and Subscription are required. For more information, visit www.siriusxm.com/activatenow, or call 1-866-635-2349.To activate SiriusXM Canada service, go www.xmradio.ca and click on “ACTIVATE RADIO” in the top right corner, or call 1-877-438-9677.• The SiriusXM Satellite Radio controls on this unit are available only when a SiriusXM Tuner is connected.1Press the (AUDIO) button to select SiriusXM mode.The display shows the SiriusXM mode screen.• You can select and change the source in the Menu screen (page 20) or Favorites screen (page 23).2Tou ch [] or [] to select the desired channel. Touching and holding either button will rapidly browse through the channels.• Refer to the SiriusXM Tuner User Guide for details on how to install the SiriusXM Tuner.Tuning Channels by CategoryChannels are grouped into categories based on the type of content heard on the channels.1Tou ch [] (Category) on the SiriusXM main screen to activate the category browsing mode.The channels within the category of the current channel are listed.Category browsing mode screen example• Touching [] (Info) changes the display of information for the channels in the category with the following three options.Channel No./Channel Name Channel No./Artist Name Channel No./Song Title Channel No./Content Info Channel No./ Channel Name2Tou ch [ ] (Category Up) or [] (Category Down) on the category browsing mode screen to select a desired category.The Category Name is shown at the top of the display.3Select the desired channel.• If no operation is performed for 10 seconds, the category browsing mode is canceled.Changing the DisplayText information, such as the channel name, artist name/feature, and song/program title, is available with SiriusXM or channel. The unit can display this text information as explained below.Tou ch [] (Info).Each time you touch this button, the Station Info. mode and the Song Info. mode switch alternately. For displayed contents, see “SiriusXM main screen example (Song Info. Mode)” (page 63).Checking the SiriusXM Radio ID NumberTo subscribe to the SiriusXM Satellite Radio service, it is necessary to locate and identify the Radio ID of your SiriusXM Tuner. You can check the Radio ID on the bottom surface of the SiriusXM Tuner box. You can also check it from this unit by performing the following procedure.1While receiving SiriusXM Radio, touch [] or [] to select channel “0”.The unit displays the ID number.2To cancel the ID number display, change the channel other than “0”.• The SiriusXM Radio ID does not contain the letters I, O, S, or F.Storing Channel PresetsYou can store 18 of your favorite SiriusXM channels for easy recall with Preset buttons.1Touch the Preset number you want to store, for at least 2 seconds.The selected channel is stored.2Repeat the procedure to store up to 17 other channels.A total of 18 channels can be stored in the preset memory.• For details on switching to the SiriusXM main screen, see in “SiriusXM main screen example (Song Info. Mode)” (page 63).• If you store a new channel into a preset which already has a channel assigned, the current channel will be cleared and replaced with the new one.Tuning Channels using PresetsTouch any one of the Preset numbers you have already stored in the Preset mode screen.The preset station is received.• For details on switching to the SiriusXM main screen, see in “SiriusXM main screen example (Song Info. Mode)” (page 63).](https://usermanual.wiki/ALPINE-ELECTRONICS/9ZUA147/User-Guide-2952471-Page-64.png)
![65-ENTune Start FunctionUse Tune Start to play music content from its beginning on programmed preset stations. The user can, therefore, enjoy the full track (i.e. song) rather than hearing what’s left from its current live playback position.1Touch and hold [] (Tune Start) for at least 2 seconds to activate or deactivate the Tune Start function.When the Tune Start function is activated, [ ] (Tune Start) is highlighted.2On the Preset Mode screen, touch the Preset number.Tune Start mode will begin.During Tune Start mode, the difference between the “ ” indicator and the current time is displayed.• To switch to the Preset mode screen, see in “SiriusXM main screen example (Song Info. Mode)” (page 63).• The number of preset channels that Tune Start can access differs depending on the SiriusXM Tuner Box.•Touching [ ] (Track Up) or [ ] (Track Down) will move a track up/down.• To fast reverse, touch and hold [ ] (Track Down) and to fast forward, touch and hold [ ] (Track Up).• When you touch [] (Live) or [] (Tune Start) during Tune Start, the program currently selected in Tune Start mode changes to the program currently being broadcast.• This function is available only when SiriusXM Tuner-SXV200 is connected or later is connected. When Tuner-SXV200 is connected, this function is available only for Preset channels 1-6. When Tuner-SXV300 is connected, this function is available for all Preset channels.• Preset stations that play other than music-type content will start playing the channel from the current live play point when selected.Tune Scan FunctionWhile listening to SiriusXM Satellite Radio, you can scan through all the songs you missed from your current band of preset channels.1Tou ch [] (Tune Scan).The [ ] (Tune Scan) highlighted during Tune Scan mode.2Tou ch [] (Tune Scan) during scan playback, tune scan mode will be canceled and the selected track will be played back normally.Touch and hold [ ] (Tune Scan) for at least 2 seconds during scan playback to cancel Tune Scan mode. The tuner returns to the channel before Tune Scan was initiated.• Touch [ ] or [ ] during Tune scan mode to switch the Preset channel that Tune Scan is accessing.• This function is available when SiriusXM Tuner-SXV200 is connected or later is connected. When Tuner-SXV200 is connected, this function is available only for Preset channels 1-6. When Tuner-SXV300 is connected, this function is available for all Preset channels.• If no operation is performed during the scanning process, when scanning finishes, the next mode depends on the SiriusXM Tuner.• During Tune Scan mode, the artist and song name will be displayed.• The SiriusXM Tune scans through the songs from the preset music channels on the current band only, scanning from oldest to newest.• The number of Preset channels and the play times that can perform Tune Scan differ depending on the SiriusXM Tuner box.Search Function1Touch the Search mode button on the Preset mode screen.The Search list screen appears.• To switch into Search mode, see in “Preset mode screen example” (page 63).Search item:All Channels / Category Name*1 / My Music / My Games / Featured*2*1 The Category name for the channel currently being received is displayed.*2 Displayed only when the SiriusXM Tuner-SXV200 is connected.• You can switch the category by touching [] (Category Up) or [] (Category Down) on the List screen after selecting a Search item other than Featured.•You can switch the display format by touching [] (Info) in the List screen after selecting a Search item.Channel No./Channel Name Channel No./Artist Name Channel No./Song Title Channel No./Content Info Channel No./Channel NameSearching by Channel2Tou ch [All Channels].All Channels will be displayed in a list.3Touch the selected channel.Searching by Category2Touch Category Name.The channels within the category of the current channel are listed.3Touch the selected channel.The channel you selected is received.Searching by My Music2Tou ch [My Music]*.The artist names and song titles that you have stored and are currently playing will be displayed in a list.*Displayed only when the stored song or artist is broadcasting.3Touch the desired artist/song.The channel of the selected artist/song being broadcast is received.Searching by My Games2Tou ch [My Games]*.The sport teams that you have stored and the game is currently broadcasting will be displayed in a list.*Displayed only when the game of stored team is broadcasting.3Touch the desired team.The channel of the selected game being broadcast is received.](https://usermanual.wiki/ALPINE-ELECTRONICS/9ZUA147/User-Guide-2952471-Page-65.png)
![66-ENSearching by Featured Favorites1Tou ch [Featured]*.The Category that SiriusXM recommends will be displayed in a list.*Displayed only when the SiriusXM Tuner-SXV200 is connected.2Touch the desired category.3Touch the desired channel within the selected category.Selecting the Channel DirectlyYou can directly select the channel number on the display of the numeric keypad.1Tou ch [] (Direct Tune).The numeric keypad input screen is displayed.2Touch to input the channel number.3Tou ch [Enter].The selected channel is received.Storing the desired Song/ArtistWhile listening to SiriusXM Satellite Radio, you can be alerted when your favorite songs or artists are playing on other channels. An interruption Alert will be displayed when a matching artist or song is found on another channel. For receiving interruption Alert information, see “Receiving and Tuning to an Alert”.1Tou ch [] (Set Alert) for at least 2 seconds on the SiriusXM mode screen.The Memory type selection screen is displayed.2Touch the ”Artist Saved” or “Song Saved” to select the store type.Scrolling text of the Artist’s name (Song Title), Total registrations, and Remaining number of registration slots is displayed for 2 seconds, then the Artist or Song is registered as an Artist alert or Song alert.• The maximum number of registered Teams, Artists, and Songs is 50. For details on how to register a Favorite Team, see “Setting the Favorite Sports Team Alerts” (page 42).• “Artist /Song Unavailable” appears on the display if both the artist and song is not available to be stored. • “Artist (Song) Unavailable” is displayed if just the artist (song) is not available to be stored. “Artist (Song) Saved” is displayed if this Artist (Song) was previously stored.• If there is no memory space, “Alert Memory Full” is displayed, and then you are asked whether you want to replace a stored item. If you select “OK,” then the list of stored alert items is displayed. Touch the item that you want to replace.Receiving and Tuning to an AlertWhenever a stored sports team, artist, or song is playing on another channel, an interruption Alert appears on the unit display. To tune to the game, artist or song identified by the alert, follow the steps below:1When stored information is broadcast, after displaying “Song Alert”, “Artist Alert” or “Game Alert,” the screen changes to My Music list*1 or My Games list*2 display.*1 Only for Song Alert and Artist Alert.*2 Only for Game Alert.2Touch the channel on the list you want to receive.The display changes to the selected channel and the channel is received.•Touch [] (Info) on the My Music list/My Games list screen, the information of the broadcasting channels will be changed.Each time you touch the [] (Info), the display changes as below.My Music list (Artist Alert):Artist name Song Title Channel name Artist nameMy Music List (Song Alert):Song Title Channel Name Artist Name Song TitleMy Games list:League Short Name/Team Abbrev/Team Nickname Channel name League Short Name/Team Abbrev/Team NicknameReplay FunctionIn SiriusXM mode, you can pause, rewind and replay of live Satellite Radio.Replay mode screen exampleBuffer usageCurrent Replay pointReplay status indicator ( or )Replay rangeTime to live1Tou ch [/] to Pause playing of the channel content.The “ (Pause)” indicator and replay progress bar is displayed.2Tou ch [/] again to resume playing the content.The “ (Play)” indicator lights up and offset playback commences.](https://usermanual.wiki/ALPINE-ELECTRONICS/9ZUA147/User-Guide-2952471-Page-66.png)
![67-EN3Tou ch [] to exit Instant Replay and listen to live content.• To fast reverse, touch and hold [] and to fast forward, touch and hold [].•Touching [] or [] will move a track up/down.• If you change channels while in Replay mode, the contents of the replay buffer are emptied.• The allowed recording time differs depending on the SiriusXM Tuner box.Parental Lock FunctionThis function can help restrict the listening of channels to children of appropriate age levels only. For information on setting the Parental Control passcode, see “Setting the Parental Lock” (page 42).When a locked channel is selected, “Channel <xxx> Locked” is displayed and then the numeric keypad appears for you to enter the passcode.Input the 4-digit passcode you set in “Setting the Parental Lock” (page 42).The initial number is 0000.• If you input a wrong passcode, “Incorrect Pass Code entered” is displayed.• After entering the correct passcode, you can access all locked channels without entering the passcode again until the unit is powered off and then back on.Using Jump Memory and Jump Recall functionThe Jump Channel is a special channel that you can jump to with the press of a dedicated button and then jump back to the previous channel. This channel is often used to select your favorite SiriusXM traffic and weather report channel.1To store the Jump channel in memory, touch and hold [] (Jump) for at least 2 seconds.2Tou ch [] (Jump) to recall and tune to the saved Jump channel.3Tou ch [] (Jump) again to receive the previous channel.• While receiving the Jump channel, you cannot perform other operations.• Only one channel can be stored as the jump source channel. When you want to store a new channel, the old channel will be cleared and the new one will be memorized.](https://usermanual.wiki/ALPINE-ELECTRONICS/9ZUA147/User-Guide-2952471-Page-67.png)
![68-ENWhen making HDMI connections, you need to set HDMI on the unit suitable for the connected device. For details, see “HDMI Setup” (page 44).For details on how to operate the DVD player, see “DVD Player Operation” (page 68).For details on how to operate iPhones and Smartphones, see “HDMI Operation” (page 77).HDMI selector is used when you add HDMI devices (iPhone or other Smartphones).• Set “Setting the HDMI Selector On/Off ” (page 49) to “On” when using the HDMI selector.• For details on how to switch the HDMI source by using the HDMI selector, see “Switching the source when two HDMI devices are connected” (page 77).You can also operate the DVD player using the Remote Control unit supplied with this unit. For detailed notes on handling and operating the Remote Control unit, see “About Remote Control Operation” (page 96).• For precautions concerning the use of discs, usable discs, and formats, see “Cautions about Discs” (page 98) and “About the Supported Formats” (page 100).Inserting/Ejecting a Disc1Press c (Eject).The monitor is opened.2Insert the disc with the label side facing up.Insert the disc until it is automatically pulled into the unit.• Do not touch the surface of the disc directly with your fingers.• Before inserting or removing the disc, always turn the ignition key to ACC or ON. • You cannot remove or insert the disc with the ignition key turned to OFF.1Press (Eject) button.When the disc has been ejected part way, take it out.• If the disc cannot be ejected by pressing (Eject), press and hold (Eject) again for at least 3 seconds.2Press c (Eject) button again to close the monitor.DVD Player SETUPYou can setup only when a disc is not inserted or playback stopped.1Tou ch [] (Setup).The Setup main screen is displayed.Setting items:System Setup / DVD Contents Setup / CD Contents Setup / Audio Setup2Tou ch [] or [] to select the setting item.3Tou ch [Enter] , then touch [], [], [] or [] to change the setting item.4Tou ch [] to return to the main source screen.•Touch [] (Return) to return to the previous display.• For details on the [] (Setup) button, see Function mode in “CD/MP3/WMA/AAC/WAV” (page 71) or “DVD” (page 72).HDMI DeviceAbout HDMI selector (Optional)DVD Player OperationInserting the DiscRemoving the DiscYou cannot perform DVD Player Setup while driving.Your vehicle must be parked with the ignition key in the ACC or ON position. For details, see “To display the Setup Menu screen” in “Setup Operation” (page 28).](https://usermanual.wiki/ALPINE-ELECTRONICS/9ZUA147/User-Guide-2952471-Page-68.png)
![69-ENSwitching the Bar ColorSelect the colors (8) used for highlighting items in the System Setup screen.Setting items:Bar ColorSetting contents:Blue / Green / Light blue / Amber (Initial setting) / Aqua blue / Yellow / Red / WhiteSetting the TV Screen ModeSetting item:TV Screen Aspect Setting contents:16:9 (Wide) (Initial setting) / 4:3 (Letter Box) / 4:3 (Pan Scan)• For some discs, the picture may not be set to the selected screen size. (For details, refer to the explanation on the disc’s jacket.)• You can also switch the TV Screen mode by touching [] (Display Mode) on the display of this unit. For details, see “Switching Display Modes (During Video File Play Back)” (page 59).4:3 (Letter Box):Select this when connected to a conventional 4:3 size (normal TV aspect ratio) monitor. There may be black stripes visible at the top and bottom of the screen (when playing a 16:9 size movie). The width of these stripes will depend upon the original aspect ratio of the theatrical release of the movie.4:3 (Pan Scan):Select this when connected to a conventional 4:3 size monitor. The picture will fill the entire TV screen. However, due to the mismatch in aspect ratio, parts of the movie at the extreme left and right sides will not be visible (when playing a 16:9 size movie).16:9 (Wide):Select this when connected to a wide screen TV. This is the factory setting.Delaying Image OutputUse this function when an external audio processor is connected. Depending on the connected audio processor, the audio and image currently played back may not be output at the same time. In this case, you can output an image delayed by 0.1 second by setting to On.Setting item:Video DelaySetting contents:Off (Initial setting) / On• If a disc with a high compression rate is played back, the image and audio may be distorted.Returning to the Initial SettingYou can return the contents you previously set to the initial factory settings.Setting item:Setup InitializeSetting contents:Yes / No (Initial setting)Setting the languageThe audio language, subtitle language and menu language can be set according to your preferences.Once set, this becomes the default language. This function is convenient when you always want to listen in English. (Not all discs allow changing the default language. If not, the factory default language applies.)Setting item:LanguagesSetting contents:Audio / Subtitle / MenuFurther Setting contents: Auto (Initial setting) / Off (Subtitle only) / English / French / Japanese / Italian / German / Swedish / Spanish / Chinese / Russian / Others• If you change the language setting when the disc is in the unit, the setting is decided with one of the following operations.-Disc eject.- Turn OFF the main unit.- Switch the source on the head unit.• To temporarily change the language of the current disc, either do so from the DVD menu or using the operation described in the section “Switching the Audio Tracks” (page 76).• If the disc does not include the selected language, the disc’s default language is set.System SetupOn: Output image is delayed by 0.1 second.Yes: Returns to the initial setting.No: Does not returns to the initial setting.DVD Contents SetupAudio: Set the audio track language.Subtitle: Set the language of the subtitles displayed on the screen.Menu: Set the language used for the menus (title menu, etc.).Auto: The disc is played with the audio language or subtitle language set as the priority language for the disc.Off: Subtitles are not displayed. (Subtitle only)Others: Set this to play the disc with a language other than one of the languages displayed. Touch [Enter], then use the numeric keypad (“0” to “9”) to input the 4-digit language code. Then touch [Enter] again. For the language codes, refer to “List of Language Codes” (page 103).](https://usermanual.wiki/ALPINE-ELECTRONICS/9ZUA147/User-Guide-2952471-Page-69.png)
![70-EN• Languages set upon shipment from the factory:Audio language : AutoSubtitle language : AutoMenu language : Auto•Touch [] (Return) to return to the previous display.Playing MP3/WMA/AAC/WAV DataSetting item:CD Play ModeSetting contents:CD-DA (Initial setting) / CompressThis unit can play back CDs containing both CD and MP3/WMA/AAC/WAV data (created in Enhanced CD (CD Extra) format).Setting the Video CD Play ModeWhen playing a Playback Control (PBC) enabled video CD, you can choose to set PBC On or Off.Setting item:VCD Play ModeSetting contents:PBC On (Initial setting) / PBC Off• You can set PBC On or Off directly by pressing Remote Control’s MENU.Displaying the Disc Status Automatically (CD/MP3/WMA/AAC/WAV only)When playing a CD/MP3/WMA/AAC/WAV file, you can choose to display the Disc Status (track number, etc.) automatically.Setting item:Auto DisplaySetting contents:Off / On (Initial setting)Setting the Digital OutputUse the following procedure to set the digital audio signal output from this unit.Setting item:Digital OutOutput Modes:Dolby D / DTSSetting contents:Bitstream / LPCM (Initial setting)•Touch [] (Return) will return to the previous screen.• Set to “LPCM” to connect to the unit.Digital audio outputSetting the Downmix ModeThis function applies to Dolby Digital, DTS stream sound.Setting item:Downmix ModeSetting contents:Stereo (Initial setting) / Surround EncodedCD Contents SetupCD-DA: Only CD data can be played back.Compress: Only MP3/WMA/AAC/WAV data can be playedback.PBC On: The PBC menu is displayed.PBC Off: The PBC menu is not displayed.On: The Disc Status is displayed automatically while playing back.Off: Disc Status is not displayed automatically while playing back.Audio SetupBitstream: Select “Bitstream” when you want to connect a digital audio processor to play Dolby Digital or DTS audio. When “Bitstream” is selected, the HDMI audio will be muted. The X109D optical output must be used for the external processor.LPCM: The audio signal recorded on the disc is converted to 48 kHz/16 bit (for DVDs) or 44.1 kHz (for video CDs and CDs) linear PCM audio signals for output.Disc Audio recording format Digital output settingOptical digital audio output (when a digital audio processor is connected)Digital audio output (HDMI output)Format Fs QLPCM(DVD, CD)48/96kHz 16/20/24bitBitstream LPCM 2chDown mix(48kHz/16bit)—LPCMLPCM 2chDown mix(48kHz/16bit)44.1kHz 16bitBitstream LPCM 2ch(44.1kHz/16bit)—LPCM LPCM 2ch(44.1kHz/16bit)Dolby Digital(DVD) 48kHz 16/18/20bitBitstream Bit stream(Max 7.1ch) —LPCMLPCM Encode2ch Down mix(48kHz/16bit)LPCM Encode2ch Down mix(48kHz/16bit)DTS(DVD, CD)48/96kHz 16/20/24bitBitstream Bit stream(Max 6.1ch) —LPCMLPCM Encode2ch Down mix(48kHz/16bit)LPCM Encode2ch Down mix(48kHz/16bit)44.1kHz 16/20/24bitBitstream Bit stream(Max 5.1ch) —LPCMLPCM Encode2ch Down mix(44.1kHz/16bit)LPCM Encode2ch Down mix(44.1kHz/16bit)MPEG1(DVD, Video CD)48kHz 16bitBitstream Bitstream (Max 5.1ch) —LPCMLPCM Encode2ch Down mix(48kHz/16bit)LPCM Encode2ch Down mix(48kHz/16bit)44.1kHz 16bitBitstream Bit stream —LPCMLPCM Encode2ch(44.1kHz/16bit)LPCM Encode2ch(44.1kHz/16bit)MPEG2(DVD) 48kHz 16bitBitstream Bit stream(Max 5.1ch) —LPCMLPCM Encode2ch Down mix(48kHz/16bit)LPCM Encode2ch Down mix (48kHz/16bit)MP3/WMA/AAC8/11.025/12/16/22.05/24/32/44.1/48kHz16bitBitstream LPCM Encode2ch (32kHz,44.1kHz or48kHz/16bit)—LPCMLPCM Encode2ch (32kHz, 44.1kHz or 48kHz/16bit)WAV 44.1kHz 16bitBitstream LPCM Encode2ch(44.1kHz/16bit)—LPCMLPCM Encode2ch(44.1kHz/16bit)Stereo: Stereo Downmix.Surround Encoded:Surround compatible Downmix.](https://usermanual.wiki/ALPINE-ELECTRONICS/9ZUA147/User-Guide-2952471-Page-70.png)
![71-ENMP3/WMA/AAC/WAV main screen exampleInfo modeFunction mode (MP3/WMA/AAC/WAV)Folder no.File no.Album titleSong titleArtist titleElapsed timeFunction mode (CD)• If there is no CD text, the message “NO TEXT” appears.Playback1Press the (AUDIO) button to select DVD (CD) mode.The display shows the DVD (CD) mode screen.• You can also select and change from the Menu screen (page 20) or Favorite screen (page 23).2Tou ch [] or [] to select the desired track (file).Returning to the beginning of the current (or previous) track (file):Touch [].Fast reverse :Touch and hold [].Advancing to the beginning of the next track (file) :Touch [].Fast forward :Touch and hold [].• The , buttons provide the same functions above.3To pause playback, touch [/].• The unit can play back MP3/WMA/AAC/WAV files saved to CD or DVD.For further information about playing or storing MP3/WMA/AAC/WAV files, see pages 100 and 101 before using the unit.• Any file protected by DRM (Digital Rights Management) copy protection, cannot be played back on this unit.• If a disc contains both audio data and MP3/WMA/AAC/WAV data, this unit plays back only the audio data.• The track display for CD audio data playback shows the track numbers recorded on the disc.• If an MP3/WMA/AAC/WAV disc with many files and folders is played, it may take longer than normal to start playback.• The playback time may not be correctly displayed when a VBR (Variable Bit Rate) recorded file is played back.• For details on switching the HDMI source when you have connected the HDMI selector and two HDMI devices, see “Switching the source when two HDMI devices are connected” (page 77).Stopping PlaybackTou ch [] during playback.“STOP” is displayed, and playback stops.• Playback starts from the beginning when [/] is touched while playback is stopped.Repeat PlayTou ch [] to repeatedly play back.The tracks (files) will be played repeatedly.The repeat mode switches every time the button is touched.*Only files in a folder are repeatedly played back.• If the Repeat Play mode is activated during MIX playback, the MIX mode will be canceled.CD/MP3/WMA/AAC/WAVCD:Track Repeat Off Track RepeatMP3/WMA/AAC:Repeat File Repeat Folder* Off Repeat File](https://usermanual.wiki/ALPINE-ELECTRONICS/9ZUA147/User-Guide-2952471-Page-71.png)
![72-ENMIX (Random Play)Tou ch [] during playback.The tracks (files) on the disc will be played back in a random sequence.The MIX mode switches every time [] is touched.*1 Only files in a folder are played back in random sequence.*2 All files on the disc will be played back in a random sequence.• If the MIX mode is activated during Repeat playback, the Repeat Play mode will be canceled.• If you select a track by using the search mode, the MIX play mode will be canceled.File/Folder Name Search (Concerning MP3/WMA/AAC/WAV)1Tou ch [] (Search) during playback.The search mode is activated.The mode is changed to the search mode, and the list select panel appears.2Tou ch [] or [] in the list select panel to select Folder or File, then touch [Enter].When selecting Folder, select File following same procedure, then touch [Enter].• When there are 9 or more names on the list, a page number is displayed. Tou ch [] or [] to change the page.•Touch [] or [] to change the list select panel location from right to left or vice-versa.• To return to the previous hierarchy, touch [].Selecting Folders (Concerning MP3/WMA/AAC/WAV)Tou ch [] (Folder Down) or [ ] (Folder Up) to select the folder.Info Mode Function You can display the DISC information.1During playback, touch [] (Display).The playback status is displayed.2The playback status display closes when [] (Display) is touched.• For details on the display example, see Info mode in “MP3/WMA/AAC/WAV main screen example” (page 71).DVD Video main screen exampleFunction modeInfo modeTitle no./Chapter no.Audio signal output/Subtitle/AngleElapsed timeVideo CD main screen exampleFunction modeCD:MIX Off MIXMP3/WMA/AAC:MIX Folder*1MIX Disc*2Off MIX Folder*1DVD](https://usermanual.wiki/ALPINE-ELECTRONICS/9ZUA147/User-Guide-2952471-Page-72.png)
![73-ENInfo modeCurrent track no.Playback control (PBC)/Current audio statusElapsed timeDisc types that can be used for each heading are represented by the following marks.The DVD operation screen displayTouch the screen while the DVD playback screen is displayed.To display the operation screen, touch [Control].• The operation screen changes to the visual screen in the DVD mode for 5 seconds after an operation has been performed.• If you try to activate the DVD while driving, the display will show the warning-Picture off for your safety.• Some operations cannot be carried out depending on the disc or playback screen.Playing a Disc 1Press the (AUDIO) button to select DVD (CD) mode.The display shows the DVD (CD) mode screen.When a disc is inserted into the disc slot of the DVD Player, with the label side facing up, the unit starts playback of the disc.• The reverse side of a double-sided DVD will not be played automatically. Remove the disc, turn it over, and reinsert it.• DO NOT insert discs containing maps for the navigation system. Doing so could result in damage.• For details on switching the HDMI source when you have connected the HDMI selector and two HDMI devices, see “Switching the source when two HDMI devices are connected” (page 77).• For your safety, video is not displayed and only audio can be heard while driving.DVD Commercial Video discs (used for the distribution of movies, etc.) or a DVD-R/DVD-RW, DVD+R/DVD+RW recorded in a video mode can be used.Video-CD discs can be used.WARNINGIt is dangerous for the driver to watch the DVD while driving the vehicle. The driver may be distracted from looking ahead and an accident could occur.Install the unit correctly so that the driver cannot watch DVD unless the vehicle is stopped and the emergency brake is applied.If the unit is not installed correctly, the driver will be able to watch DVDs while driving the vehicle and may be distracted and could cause an accident. The driver or other people could be severely injured.CAUTION• Not all functions will operate for every DVD. See the individual DVD’s instructions for details on the features supported.• Fingerprints on a disc may adversely affect playback. If a problem occurs, remove the disc and check for fingerprints on the playback side. Clean the disc if necessary.• If you switch the power or Ignition key OFF or change sources during playback, playback will continue where you left off when you resume playback. • If you try to perform an invalid operation (based on the type of disc being played), the following mark is displayed on the monitor screen:• Play Position Memory Function Even if you turn power off or switch the Ignition key to OFF during playback or change the source, playback will continue from the point where playback stopped when the power is turned ON again.](https://usermanual.wiki/ALPINE-ELECTRONICS/9ZUA147/User-Guide-2952471-Page-73.png)
![74-ENOn DVD mode, menu screens may appear automatically. If this happens, perform the operation described below to start playback.Direct Menu Operations 1Touch the screen while the DVD menu is being displayed.Directly touch operation switches displayed on the screen to operate.• To display the operation screen, touch [Control].2Touch the DVD menu directly.Menu Operations 1Tou ch [] (Menu Control).The menu operation mode will be displayed.• You cannot operate them while driving.2Tou ch [Key].The Key panel is displayed.3Select a desired menu item by touching [], [], [] or [].•Touch [] or [] to change the Key panel location from right to left or vice-versa. • Touching [] in the operation panel returns to the screen in step 1.• Touching [Key] displays the numeric keypad input mode screen.For details of the numeric keypad input mode screen, see “Numeric Keypad Input Operations” (page 74).4Tou ch [Enter] to confirm the selected item.1Tou ch [key] again in the menu operation mode.The numeric keypad input mode screen appears2Touch a desired number.Touch [] to delete an entered number.To delete all the numbers you have entered, touch [] for at least 2 seconds.3Tou ch [Enter] on the numeric keypad input mode screen to confirm your selection.Touch [] to hide the keypad display.• You cannot operate them while driving.When a DVD contains two or more titles, the top menu screen appears.Tou ch [] (Top Menu).The top menu screen appears.• To perform necessary operations, see “If a Menu Screen Appears” (page 74).With a DVD having two or more menus, a menu screen will appear for the programs available, in addition to the main programs.Tou ch [] (Menu).The Root menu screen appears.• To perform necessary operations, see “If a Menu Screen Appears” (page 74).Playing Still Frames (Pausing) 1During playback, touch [/].2Tou ch [/] to resume playback.• No sound is played during the still frame mode.• The image or sound may stop temporarily when playback starts from the pause mode. This is not a malfunction.If a Menu Screen Appears• Some operations cannot be performed depending on the disc.Numeric Keypad Input Operations Displaying the Top Menu Screen Displaying the Menu Screen](https://usermanual.wiki/ALPINE-ELECTRONICS/9ZUA147/User-Guide-2952471-Page-74.png)
![75-ENStopping Playback Tou ch [] during playback.“STOP” is displayed, and playback stops.• Playback starts from the beginning when [/] is touched while playback is stopped.Fast-forwarding/Fast-reversing 1During playback, touch and hold [] (Fast-reverse) or touch and hold [] (Fast-forward).When pressed for more than 1 second, the disc is forwarded/reversed at double speed.When held for 5 more seconds, the disc is forwarded/reversed at 8 times the normal speed.When held for 10 more seconds, the disc is forwarded/reversed at 32 times the normal speed.2Release or to return to normal playback.• No sound is played back during fast-forwarding/fast-reversing.• On DVD mode, the menu screen may reappear during fast-forwarding/fast-reversing.• This operation may not be possible on certain discs.Finding the Beginnings of Chapters/Tracks/Files During playback, touch [] or [].The chapter/track/file switches each time the button is touched, and playback of the selected chapter/track/file starts.• Some DVDs do not have chapters.• Be sure to turn PBC off before starting the search. See “Setting the Video CD Play Mode” (page 70).Forward/Reverse frame-by-frame Playback 1In the pause mode, touch [] or [].The picture advances by one frame each time the button is touched.2Tou ch [/] to return to normal mode.• No sound is output during forward frame-by-frame playback.• You can only execute reverse frame-by frame playback when playing DVD-V.Repeat Playback Use this function to play the disc’s titles, chapters or tracks, etc., repeatedly.Tou ch [] to repeatedly play back.The repeat mode switches every time the button is touched.DVD Video• The Repeat mode is always turned off when [] is touched and held for at least 2 seconds.• Only discs containing a Playlist can be displayed.Video CD• Display may vary depending on the connected devices.• The track/disc repeat modes cannot be used on Video CDs with playback control (PBC). These modes can be carried out after turning PBC off. See “Setting the Video CD Play Mode” (page 70).• For some discs it is not possible to switch the repeat mode.: Touch this to start playback from the beginning of the following chapter, track or file.: Touch this to start playback from the beginning of the current chapter, track or file.Supplementary explanations“Chapters” are divisions of movies or musical selections on DVDs.“Tracks” are divisions of movies or musical selections on Video CD.The chapter is played repeatedly.The title is played repeatedly.Playback returns to normal mode.ChapterTitleOffThe track is played repeatedly.TrackThe disc is played repeatedly.Off](https://usermanual.wiki/ALPINE-ELECTRONICS/9ZUA147/User-Guide-2952471-Page-75.png)
![76-ENSearching by Title Number Use this function to easily find positions on the DVD using the DVD’s titles. Perform operations while playback is stopped.1Tou ch [] (Menu Control).The menu operation mode screen appears.2Tou ch [Key] again in the menu operation mode.3Enter a desired title by touching its number.See page 74 for operation of the numeric keypad.4Tou ch [Enter].Playback will start from the number selected.5Tou ch [].• This function cannot be used on discs on which no title numbers are recorded.• Some disc may not accept any operation.• You cannot operate them while driving.Searching Directly by Chapter Number Use this function to easily move to the beginnings of the chapters on the disc. Perform operations during playback or while playback is paused.1Tou ch [] (Menu Control).The menu operation mode screen appears.2Tou ch [Key] again in the menu operation mode.3Touch and enter the chapter number you want to play.See page 74 for operation of the numeric keypad.4Tou ch [Enter] to confirm your selection.Playback will start from the selected chapter.5Tou ch [].• This function is not available for a disc on which chapters are not stored.• You cannot operate them while driving.Switching the Angle On DVDs in which scenes have been filmed from multiple angles, the angle can be switched during playback.Tou ch [] (Angle).The angle switches between the angles recorded on the disc every time the button is touched.• Some time may be required for the angle to change.• Depending on the disc, the angle may switch in one of two ways.- Seamless: The angle switches smoothly.- Non-seamless: When the angle is switched, a still picture is displayed first, after which the angle switches.Switching the Audio Tracks DVDs with multiple audio tracks or languages allow switching the sound during playback.Tou ch [] (Audio).The sound switches between the alternate audio tracks recorded on the disc every time the button is touched.• The alternate track selected becomes the default setting every time the power is turned on or the disc is replaced. If the disc does not include that track, the disc’s default language is selected instead.• Not all discs will allow changing the alternate audio tracks during playback. In these cases, select audio tracks from the DVDs menu.• There may be a delay before the selected alternate track begins to play.Video CDs with multiplex audioTou ch [] (Audio).The left and right channels will be output as shown below, each time the button is touched.Audio: LL Audio: RR Audio: LR Audio: LLSwitching the Subtitles (Subtitle Language) With DVDs on which multiple subtitle languages are recorded, the subtitle language can be switched during playback; moreover, subtitles can be hidden.Tou ch [] (Sub Title).Touching this button repeatedly selects sequentially the subtitle languages recorded on the disc, and then turns the subtitles OFF.• There may be a delay before the selected subtitle appears.• Not all discs will allow changing the subtitles during playback. In these cases, select subtitles from the DVDs menu.• The subtitle language selected becomes the default setting every time the power is turned on or the disc is replaced. If the disc does not include that language, the disc’s default language is selected instead.However, the subtitle language may differ depending on the disc.• For some discs, the subtitles will be displayed even when this is set to OFF. However, the subtitle language may differ depending on the disc.Info Mode Function You can display the DISC information.1During playback, touch [] (Display).The playback status is displayed.2The playback status display closes when [] (Display) is touched.• For details on the display example, see Info mode in “DVD Video main screen example” (page 72) or “Video CD main screen example” (page 72).Switching Display ModesYou can switch the Display Mode by touching [] (Display Mode). For details, see “Switching Display Modes (During Video File Play Back)” (page 59).• You cannot operate them while driving.](https://usermanual.wiki/ALPINE-ELECTRONICS/9ZUA147/User-Guide-2952471-Page-76.png)
![77-ENiPhone, Smartphone, etc.The output of your electronic device will be mirrored on this unit through the HDMI connector. Control from this unit is not possible.• The electronic device must possess an HDMI output interface.• Not all devices with an HDMI output interface can be recognized by this unit.• Use only the Alpine Special HDMI connection cable.1Press the (AUDIO) button to select HDMI mode.The display shows the HDMI mode screen.• You can select and change the source in the Menu screen (page 20) or Favorite screen (page 23).• For your safety, video is not displayed and only audio can be heard while driving.2In HDMI player mode, the screen of the device displays the content of electronic equipment by mirror image.You can select Display Mode. For details, see “Switching Display Modes (During Video File Play Back)” (page 59).• You cannot operate them while driving.Switching the source when two HDMI devices are connectedYou can switch the source only when you have connected the HDMI selector and “Setting the HDMI Selector On/Off” (page 49) is set to “On.”Screen example when the HDMI Setup is “HDMI 1”Tou ch [] (HDMI 2).The HDMI source changes to HDMI 2, and the Function button changes to [ ] (HDMI 1).Each time you touch [ ] (HDMI 1)* or [ ] (HDMI 2), the HDMI source changes.*When HDMI Setup is “DVD,” the Function button is changed to [ ] (DVD).HDMI OperationWARNINGIt is dangerous for the driver to watch the HDMI image while driving the vehicle. The driver may be distracted from looking ahead and an accident may occur.Install the unit correctly so that the driver cannot watch the HDMI image unless the vehicle is stopped and the emergency brake is applied.If the unit is not installed correctly, the driver will be able to watch the HDMI image while driving the vehicle and may be distracted causing an accident. The driver or other people may be severely injured.](https://usermanual.wiki/ALPINE-ELECTRONICS/9ZUA147/User-Guide-2952471-Page-77.png)
![78-ENSetup Before UsingBluetooth is a wireless technology allowing communication between a mobile device or personal computer over short distances. This enables a hands-free call or data transmission between Bluetooth compatible devices. Bluetooth transmission is available in the unlicensed 2.4 GHz spectrum if the distance between devices is within 10 meters. For details, refer to the Bluetooth website (http://www.bluetooth.com/).• Depending on the Bluetooth version, a Bluetooth compatible device may not be able to communicate with this unit.• Proper function of this unit with all Bluetooth compatible devices is not guaranteed. For handling of the Bluetooth compatible device, consult your Alpine dealer or Alpine website.• Depending on the surroundings, Bluetooth wireless connection may be unstable.• When you place a call, or perform setup operations, be sure to stop your car in a safe place.• Depending on the connected Bluetooth compatible device(s), the function may differ. Also refer to the Owner’s Manual of the connected device(s).Hands-free calls are possible when using a HFP (Hands-Free Profile) compatible mobile phone with this unit.• Avoid performing a hands-free call in heavy traffic or on narrow or winding streets.• Close the windows while calling to reduce background noise.• If both calling parties are using hands-free devices, or the call is made in a noisy location, difficulty hearing the other person’s voice is normal. • Depending on telephone line conditions or certain mobile devices used, voices may sound unnatural.• When using a microphone, speak as directly as you can into the microphone to obtain the best sound quality.• Certain mobile phone features are dependent on the capabilities and settings of your service provider’s network. Additionally, certain features may not be activated by your service provider, and/or the provider’s network settings may limit the feature’s functionality.Always contact your service provider about feature availability and functionality.All features, functionality, and other product specifications, as well as the information contained in the Owner’s Manual are based upon the latest available information and are believed to be accurate at the time of printing.Alpine reserves the right to change or modify any information or specifications without notice or obligation.Before using the hands-free phone/audio function, the following settings need to be made.1Set “Bluetooth” to “On” ( ).2Register a Bluetooth device in this unit (page 29).• See “Bluetooth Setup” (page 29).• You can search for this unit using a Bluetooth compatible device, and then connect that Bluetooth compatible device to this unit. The device name of this unit is “ALPINE NAVI” and the initial number of the passcode is “0000.” Also refer to the Owner’s Manual of the connected device(s).• Before using the hands-free function, make sure “Setting the Hands-free Connection” (page 47) is set to “Aftermarket” or “Factory.”Touch [Phone] in the Menu screen to display the Phone menu screen (page 78).Phone menu screen exampleRecent Events list*You can display up to 60 items, such as phone numbers of the most recent incoming calls, missed calls and outgoing calls, and contact names that are registered in the Phone Book. When 60 items exist in the list, the oldest item is deleted when a newer item is to be added.Contacts list*You can make a phone call from the Phone Book, or edit the Phone book.Keypad screenUse to type a phone number.Edit*Use to edit the Contacts list.*When you connect two Hands-Free Phones, the information of the Bluetooth device set to Primary is displayed.Bluetooth OperationAbout BluetoothAbout the Hands-free PhoneBefore Using BluetoothHands-free Phone Control[Phone] button](https://usermanual.wiki/ALPINE-ELECTRONICS/9ZUA147/User-Guide-2952471-Page-78.png)
![79-ENAnswering a CallIncoming calls are announced by the received call ring tone and a displayed message (PHONE No., etc.).1An incoming call triggers the ringtone and an incoming call display.2Touch incoming call notification screen.The call starts.• During a call, the audio for the current mode on the unit is muted. After calling, playback will resume.• When the caller’s number is transmitted to the system, if the caller’s name is stored in the phone book, the name is displayed. If the name is not stored, the number is displayed.•Touch [] (Decline) to reject an incoming call.• By touching the call info area during phone call, you can change to the Phone Operation screen and adjust the speech volume, etc. For details, see “Operations During a Conversation” (page 82).•Touch [] during a conversation to hide the call info area. To display it again, Touch or swipe downward on [] on the upper part of the screen.• During an incoming call or a conversation on the Primary (Secondary) Hands-Free Phone, if there is an incoming call on the Secondary (Primary) Hands-Free Phone, you cannot answer the call on the Secondary (Primary) Hands-Free Phone without first ending the call on the Primary (Secondary) Hands-Free Phone.Hanging up the Telephone1Tou ch [] (End Call).The call finishes.Call Waiting FunctionIf a call comes in from another phone during a call, a notice is displayed on the screen. This function can only be used if the connected mobile phone has a call waiting function service included.Second incoming call during a conversation in the call info areaBy touching the second incoming call notification screen, you can put the current call on hold and answer the second call.• To switch a party, touch the on-hold screen.•To finish a call, touch [] (End Call).Incoming call notification screenCall info areaSecond incoming call notification screenOn-hold screen](https://usermanual.wiki/ALPINE-ELECTRONICS/9ZUA147/User-Guide-2952471-Page-79.png)
![80-ENSecond incoming call during a conversation in the Phone Operation screen• The display or operation may differ depending on the connected mobile phone or the caller’s mobile phone.By touching the second incoming call notification screen, you can put the current call on hold and answer the second call.• To switch a party, touch the on-hold screen.•To finish a call, touch [] (End Call).• This unit supports only the Call Waiting function of a mobile phone. The second call function and three-way calling function of a mobile phone cannot be operated from this unit. Also the screen display may malfunction.CallingYou can make a phone call using the Short Cut function of numbers that have been registered in Favorite. For details, see “Favorite Function” (page 23).1Press the (Favorite) button.The Favorite screen is displayed.Favorite screen2Touch the Short Cut icon.A contact’s name, phone number, and a confirmation message of the phone number are displayed.3Tou ch [Call].The phone call is started.Making a phone call from the Recent Events list1Tou ch [] (Recents) to change to the Recent Events list screen.Dialed history: Names or Numbers/DateReceived history: Names or Numbers/DateMissed Incoming history: Names or Numbers/Date2Touch the name of the contact you want to call.The Detail info screen is displayed.3Tou ch [].The phone call is started.Calling from the Contacts list (Phone Book)1Tou ch [] (Contacts) to change to the Contacts list screen.2Touch the name of the contact you want to call.The Phone Operation screen is displayed.3Tou ch [].The phone call is started.Calling by Favorite FunctionSecond incoming call notification screenCall On Hold screenMaking a phone call using the Phone Menu](https://usermanual.wiki/ALPINE-ELECTRONICS/9ZUA147/User-Guide-2952471-Page-80.png)
![81-ENEntering a Phone Number to Make a Call1Tou ch [ ] (Keypad).The number input screen (Keypad) appears.Touch [] to delete an entered number.Touch [Delete All] to delete all entered numbers.2Enter the phone number you wish to call.• You can enter up to 31 digits.3Tou ch [] (Call).A confirmation message of the phone number appears.4Tou ch [Call].The phone call is started.Using Voice Recognition functionYou can use Siri function of your iPhone or make a telephone call by using voice operation of your smartphone.You can use the Siri function of your iPhone. To use this function, set the Siri setting of your iPhone to ON.• Connect your iPhone to the unit via Bluetooth, then set to “Hands-free” or “Both” (page 29).• The available functions differ depending on the connected iPhone.• Ask Siri to play a track from the music library applies only to USB source.• Siri and other streaming services are enabled by connecting to compatible smartphones that are able to receive data. Please ensure that cellular data and/or Wi-Fi is turned on in the smartphone to enjoy these features.• Extensive use of Siri or other streaming services may increase your phone’s data usage. Please check with your phone company to ensure you have an appropriate Data plan.1Press and hold the (AUDIO) button for at least 2 seconds.The Voice Control mode screen is displayed.2Speak into the microphone.• If no speech is detected, the unit may pause depending on version of the connected iPhone. In that case, touch the microphone icon [] in the center of the Voice Control mode screen. You can continue to use the Voice Control mode.3To finish the Voice Control mode, touch [ ] or press and hold the (AUDIO) button for at least 2 seconds.• Depending on the iPhone, the Siri function may finish automatically.Adjusting the volumeAdjust the speaker/microphone volumes in Voice Control mode. Perform the same procedure to adjust the speaker/microphone volumes of hands-free phone.Tou ch [] or [].Adjust the speaker and microphone volumes.Stopping input to the microphoneIf the surrounding sound (road noise, etc.) is loud, you may wish to cut input to the microphone for 3 seconds.Touch [ ].You can make a telephone call by using voice operation.• Connect your smartphone to the unit via Bluetooth, then set to “Hands-free” or “Both” (page 29).1Press and hold the (AUDIO) button for at least 2 seconds.The Voice Dial mode screen is activated.2Say the telephone number* or name* you want to call, into the microphone.*The number and name depend on the voice dial information stored in the smartphone.3To finish the Voice Dial mode, touch [ ] or press and hold the (AUDIO) button for at least 2 seconds.• You can perform this operation only when a voice dial compatible smartphone is connected.• The Voice Dial function performance depends on the recognition range of the smartphone and mounting location of the microphone. Note where the microphone is mounted.• Voice dial operation depends on the function being available on the smartphone. For details, refer to the owner’s manual of the smartphone.• Depending on the smartphone, the Voice Dial operation may finish automatically.Using SiriVoice Dial Function](https://usermanual.wiki/ALPINE-ELECTRONICS/9ZUA147/User-Guide-2952471-Page-81.png)
![82-ENAdjusting the volumeAdjust the speaker/microphone volume in Voice Dial mode. Perform the same procedure to adjust the speaker/microphone volume of hands-free phone.Tou ch [] or [].Adjust the speaker and microphone volumes.Stopping input to the microphoneIf the surrounding sound (road noise, etc.) is loud, you may wish to cut input to the microphone for 3 seconds.Touch [ ].Operations During a ConversationPhone Operation screenName and phone number• If registered with a Group, the Group Name is also displayed. Although, depending on the connected mobile phone, it may not be displayed.Conversation timeYou can adjust Caller Level and Mic. Level (Microphone Level) during a phone call.Tou ch [] or [].You can adjust the volume in 11 levels.The voice output for calls is switchable between car speakers and the mobile phone speaker.Tou ch [] (Speaker).• Depending on the mobile phone, this operation may not be possible.Transmits a DTMF (Touch-Tone) during a call.1Tou ch [ ] (Keypad).The number input screen (Keypad) appears.2Input number.• You can transmit a Touch-Tone signal during a call.Phone Book FunctionPhone Book screen exampleUse to search by directly inputting a name or phone number with the Keypad.For details, see “How to Input Characters and Numbers (Keypad)” (page 22).Displayed when multiple phone numbers are registered. Touch [] to display the registered phone number list.Use to narrow down your search for names, etc.For details, see “Alphabet Search Function” (page 58).Touch [] to register as Favorite.You can synchronize the system’s phone book with the mobile phone’s phone book.1Tou ch [] (Edit).2Tou ch [Download].3Tou ch [Sync].Synchronization of the phone books starts.• You can store up to 1,000 registered name in the phone book.• You can store up to 5 phone numbers by one person’s name.1Tou ch [] (Edit).2Tou ch [Download].3Tou ch [Add].Stays on standby for connection of the mobile phone.•Touch [Cancel] to cancel the standby mode.4The mobile phone accesses this unit and then transfers the phone book from the mobile phone to this unit.• Mobile phone connection is canceled while the phone book is being transferred.Adjusting the Speech VolumeChanging the Voice OutputDTMF (Touch-Tone) FunctionSynchronizing the Phone BookAdding the Phone Book](https://usermanual.wiki/ALPINE-ELECTRONICS/9ZUA147/User-Guide-2952471-Page-82.png)
![83-ENDeleting One Entry from the Phone Book1Tou ch [] (Edit).2Touch the checkbox [] of the contact name (or phone number) you want to delete. A tick ( ) appears in the checkbox.• You can choose up to 10 names and numbers at a time.3Tou ch [ ] (Delete).The confirmation screen is displayed.If multiple phone numbers are registered, they are all deleted.4Tou ch [OK].The selected number is deleted.Deleting All Entries from the Phone Book1Tou ch [] (Edit).2Tou ch [ ] (Delete All).The confirmation screen is displayed.3Tou ch [OK].All entries of the phone book are deleted.You can make a call using the phone book search function.1Tou ch [] (Search).The Input User Name screen (Keypad) is displayed.2Input the string of letters of the name that you want to search, then touch [OK].A list of names beginning with the string of letters you entered is displayed.3Touch the name you want to call.The Phone Operation screen is displayed.4Tou ch [].The phone call is started.• For details of how to input characters using the keypad, see “How to Input Characters and Numbers (Keypad)” (page 22).• If there are fewer than five registered items in the phone book, you cannot use the phone book search function.If a Bluetooth compatible mobile phone, portable player, etc. is connected by wireless, you can play back a song (operation is controllable from the unit).• Operation may vary, depending on the Bluetooth compatible device.Bluetooth Audio main screen exampleFunction modeCurrent track no./Total song no.Artist titleSong titleAlbum titleElapsed timeTouch or swipe to the right to use the Quick Search mode and Full Search mode.If you have never used Search mode with the connected Bluetooth Audio device, touching this button to switch to Full Search mode screen.Quick Search mode screen exampleSwipe vertically in the list to change pages.Full Search buttonSwipe to the right when using Full Search mode.• The displayed onscreen buttons may differ depending on the AVRCP version.• Song title/Artist title/Album title/Elapsed time do not display for AVRCP Ver. 1.0.Deleting the Phone Book EntriesSearching in the Phone BookBluetooth Audio](https://usermanual.wiki/ALPINE-ELECTRONICS/9ZUA147/User-Guide-2952471-Page-83.png)
![84-EN• To play back audio, a mobile phone or a portable player conforming to A2DP (Advanced Audio Distribution Profile) or AVRCP (Audio/Video Remote Control Profile) is required. Not all functions work with all devices.• During a call, sound on the Bluetooth audio source is paused.Compatible AVRCP versions: 1.0, 1.3, 1.4, 1.5• Available functions may differ depending on the AVRCP version.Playback1Press the (AUDIO) button to select Bluetooth Audio mode.The display shows the Bluetooth Audio mode screen.• You can also select and change the source in the Menu screen (page 20) or the Favorite screen (page 23).2Tou ch [] or [] to select the desired track (file).Returning to the beginning of the current file:Touch [].Fast backward the current file:Touch and hold [].Advance to the beginning of the next file:Touch [].Fast forward the current file:Touch and hold [].• The , buttons provide the same functions above.3To pause playback, touch [ / ].• Operations may differ depending on the connected Bluetooth compatible device.Repeat PlayAvailable for AVRCP Ver. 1.3, 1.4 and 1.5 only.1Tou ch [].The Repeat mode select pop up screen is displayed.•[] displays the currently selected mode.2Select your desired Repeat mode.The selected Repeat mode changes the button.• Operations may differ depending on the connected Bluetooth compatible device.Random PlayAvailable for AVRCP Ver. 1.3, 1.4 and 1.5 only.1Tou ch [].The Random Play mode select pop up screen is displayed.•The [] button displays the currently selected mode.2Select your desired Random Play mode.The selected Random Play mode changes the button.• Operations may differ depending on the connected Bluetooth compatible device.Search FunctionAvailable for AVRCP Ver. 1.4 and 1.5 only.The displayed list differs with the connected Bluetooth device. You can search for your desired song by using one of two modes; the Quick Search mode and the Full Search mode.Quick Search mode Touch your desired Group name or File name.The selected Group*1 or file is played back.*1 The first file in the selected Group is played back.• To switch into Quick Search mode, see in “Bluetooth Audio main screen example” (page 83).Full Search mode Touch your desired Group name*2 or File name.When you select a File name, the selected song is played.When you select a Group name, repeat the same procedure to select another Group name or File name.*2 When you touch the [] by a Group name, the unit plays from the first song in the Group.• To switch into Full Search mode, see in “Quick Search mode screen example” (page 83).• To switch the displayed list or return to the previous page in the List screen, see “About Basic Operation for List Screen” (page 17).All Track : Once all of the songs have finished playing, play back is repeated, starting with the first song.Group : Only files in a group are repeatedly played back.Single Track : Only the track currently playing is repeatedly played back.Off : Repeat mode Off.All Track : All songs in the Bluetooth compatible devices are played back in random sequence. Any one song does not play back again until all songs have been played back.Group : A Group is selected randomly and songs in the Group are played back in order. After all songs are played in the Group, the next Group is selected randomly.Off : Random mode Off.](https://usermanual.wiki/ALPINE-ELECTRONICS/9ZUA147/User-Guide-2952471-Page-84.png)
![85-ENConnecting a Bluetooth DeviceRegistering a Bluetooth device in the unit enables automatic connection.If it does not connect automatically, run through the connection procedure again.1Tou ch [] (Settings).The Device Setting select pop up screen is displayed.2Tou ch [Reconnect].Bluetooth connection will start.1Tou ch [] (Settings).The Device Setting select pop up screen is displayed.2Tou ch [Disconnect].The Bluetooth connection is disconnected.If multiple Bluetooth devices are registered in this device, you can change the connection among the registered devices.1Tou ch [] (Settings).2Tou ch [Change].3Tou ch [] (Audio) or [ ] (Hands-free) of the selected device.The connection will transfer to the selected device. Disconnecting the Bluetooth ConnectionChanging the connecting Bluetooth Device](https://usermanual.wiki/ALPINE-ELECTRONICS/9ZUA147/User-Guide-2952471-Page-85.png)
![86-ENOperating Auxiliary Devices (Optional)To operate devices connected to the AUX terminals of the unit, follow the procedure described below.• Set AUX to “On.” See “AUX Setup” (page 43).• Depending on the connected unit, the onscreen buttons may not work, or their operation may differ.• When the iDataLink module (sold separately) is connected, the Auxiliary (AUX) mode is not available.Press the (AUDIO) button to select Auxiliary (AUX)* mode.The display shows the Auxiliary (AUX) mode screen.*The name which is given as the mode name in “Setting the Auxiliary (AUX) Name” (page 44) is displayed.• For your safety, video is not displayed and only audio can be heard while driving.• You can select and change the source in the Menu screen (page 20) or Favorite screen (page 23).• For details on the connected auxiliary device, refer to its owner’s manual.AUX Operation Screen Display During Video File PlaybackTouch the screen.The Auxiliary (AUX) operation screen is displayed.• The operation screen changes to the visual screen in the Auxiliary (AUX) mode for 5 seconds after an operation has been performed. To hide the Auxiliary (AUX) operation screen, touch the video display area.Example for AUX, AUX DVD, GAME, USB Player mode display[] (Display Mode)For details, see “Switching Display Modes (During Video File Play Back)” (page 59).• You cannot operate them while driving.External DVD player display example[]Touch the switch to go back to the beginning of the current chapter/track/file. Touch the switch once more to find the beginning of the previous chapter/track/file. Touch and hold to fast reverse.[]Touch the switch to advance to the beginning of the next chapter/track/file. Touch and hold to fast forward.[/]Switches between play and pause.[]Touching during play initiates a pre stop. Touching again stops play.[]Starts/Stop repeat play.[]Starts/Stop M.I.X. play.Auxiliary DeviceWARNINGIt is dangerous (and illegal in many states) for the driver to watch TV/video while driving the vehicle. The driver may be distracted from looking ahead and an accident could occur.Install the unit correctly so that the driver cannot watch TV/video unless the car is stopped and the parking brake is applied.If the unit is not installed correctly, the driver will be able to watch TV/video while driving and may be distracted from looking ahead and cause an accident. The driver or other people could be severely injured.Operating an AUX, AUX DVD, GAME or USB PlayerOperating an External DVD Player](https://usermanual.wiki/ALPINE-ELECTRONICS/9ZUA147/User-Guide-2952471-Page-86.png)
![87-EN[] (Top Menu)Calls up the Top Menu screen.[] (Menu)Calls up the Menu screen.[] (Menu Control)*Calls up the menu operation mode.[] (Folder Down)Switches the program/playlist/folder down.[] (Folder Up)Switches the program/playlist/folder up.[ ] (Display Mode)*You can set the Display Mode. For details, see “Switching Display Modes (During Video File Play Back)” (page 59).[] (Angle)Switches angle.[] (Audio)Switches audio.[] (Sub Title)Switches sub titles.*You cannot operate them while driving.Menu operation mode screen example[Key]Displays the Key panel ( ).[], []Moves key panel location.[]Closes menu operation mode.[]Closes key panel.[ ], [ ], [ ], [ ]Moves menu cursor.[Enter]Determines the selected item.[Return]Returns to the previous item/screen.The DVD Changer operation mode screen and the Menu operation mode screen are the same as the external DVD player operation screen. See “Operating an External DVD Player.”External DVD changer screen example[Disc1]-[Disc6]Selects a Disc.• Touch the left side of the operation screen or swipe the operation screen to the right to display the Disc selection screen.Menu operation mode screen example[]Switches the Channel number / Favorite channel number down.[]Switches the Channel number / Favorite channel number up.[ ] (Channel or Favorite)Switches between the Channel mode and the Favorite channel mode.[ ] (EPG)*Call up the Electronic Program Guide (EPG). [] (Menu)*Call up the menu screen.[] (Menu Control)*Call up the menu operation mode.[] (A/V)Switches the source.[] (Scan)Touch the switch to start the scan procedure.[] (Display Mode)You can set the Display Mode. For details, see “Switching Display Modes (During Video File Play Back)” (page 59).*You cannot operate them while driving.Operating an External DVD ChangerOperating the Mobile Digital TV Receiver (DVB-T)](https://usermanual.wiki/ALPINE-ELECTRONICS/9ZUA147/User-Guide-2952471-Page-87.png)
![88-ENMenu operation mode screen example[], [ ]Switches the Channel number / Preset channel down.[], [ ]Switches the Channel number / Preset channel up.[] (Band)Switches the band.[ ] (Tune) (Channel or Preset or Manual)Switches amongst Channel mode, Preset mode, and Manual mode. [] (Auto Preset)The tuner automatically seeks and stores stations.[ ] (Display Mode)*You can set the Display Mode. For details, see “Switching Display Modes (During Video File Play Back)” (page 59).*You cannot operate them while driving.Operating a TV](https://usermanual.wiki/ALPINE-ELECTRONICS/9ZUA147/User-Guide-2952471-Page-88.png)
![89-ENWhen an optional camera is connected, the view video of camera can be output to the monitor.Front camera, Rear camera or Side camera can be connected to this unit.Make the Camera Select setting (Front, Rear, Side or Other) according to your connected camera. For details, see “Setting the Camera Input” (page 45).When using the optional Multi Camera Interface module, you can connect up to 3 cameras: Front Camera, Rear Camera, and Side Camera. When connecting the optional Multi Camera Interface module, you need to set each camera to On/Off in “Setting Multi Camera to On/Off” (page 47).When displaying the camera view while connected to the optional Multi Camera Interface module, you can switch the camera view using the switch button at the top of the screen.Front camera:When the HCE-C257FD is connected, conditions in front of the vehicle, such as objects, people and other hazards, can be seen.Rear camera:If an HCE-C127D/HCE-C157D/HCE-C252RD camera is connected, when the vehicle is reversed, the rear camera view (guide marks for vehicle width and available distance) is displayed automatically on the screen of this unit.Side camera:If the HCE-C259SD is connected, you can check for obstacles in the blind spot on the passenger side.Other camera:Set when connecting to a camera other than the Front camera or Rear camera, such as a room camera and side camera.Rear Camera Operation1Press the MENU button.The menu screen is displayed.• You can also display the menu screen by touching [] on the lower part of the Audio source screen or by swiping upward.2Tou ch [Camera].The Rear Camera view is displayed.• Touch the screen while the camera image is being displayed, and touch [] or [] to return to the main source screen or previous screen.• You can perform a Guide Adjustment. For details, see “Adjusting the Rear/Front/Side Camera Guide” (page 45).• If you connect a Front Camera and Side Camera using the optional Multi Camera Interface module, you can display the Rear camera image using the [Camera] button only when you set “Setting a Default Camera” (page 47) to” Rear”. If you connect a Front Camera and Side Camera at the same time, touch [Front] or [Side] in the Rear Camera image to switch the Camera image.• You can also switch the Camera view by Pressing (CAMERA) button.1Shift the gear lever to the reverse (R) position.The rear view image is displayed while the car remains in reverse.2If you shift the gear lever to a position other than reverse (R), the monitor returns to the previous screen.• Never depend solely on the camera when backing up. Always turn and look and only use the camera for additional assistance.• This function is effective when the reverse wire is properly connected.• If you use the optional Multi Camera Interface module, be sure to set Rear Camera in “Setting Multi Camera to On/Off” (page 47) to ”On” ( ). If setting to ”Off” ( ), you cannot display the Rear camera image.• If you set to Front or Side in “Setting a Default Camera” (page 47), the Rear camera image is also displayed.• You can perform a Guide Adjustment. For details, see “Adjusting the Rear/Front/Side Camera Guide” (page 45).If the camera has a view switch function, the Direct Change switch is displayed.1Touch the screen when the image from the rear camera is displayed.The operation screen is displayed on the screen.• After a 5-second time-out, the operation screen returns to the camera display screen. 2Tou ch [Back], [Panorama], [Corner] or [Top]. The image pattern changes. • For detailed information about image patterns, see the camera Owner’s Manual. • You can perform a Guide Adjustment. For details, see “Adjusting the Rear/Front/Side Camera Guide” (page 45).1Touch the screen when the image from the camera is displayed. The operation screen is displayed on the screen.• After a 5-second time-out, the operation screen returns to the camera display screen.Camera Operation (Optional)You can adjust the quality of the camera image.Setting items: Brightness / Color / ContrastSee “Picture Quality Setup” (page 38).Displaying the Rear Camera Image from the Menu screen[Camera] buttonDisplaying the rear view video while the car is in reverseSwitching the Image Pattern for the Rear Camera[Back]: Rear View[Panorama]: Panorama View[Corner]: Corner View[Top]: Ground ViewGuide Display ON/OFF Setting](https://usermanual.wiki/ALPINE-ELECTRONICS/9ZUA147/User-Guide-2952471-Page-89.png)
![90-EN2Tou ch [Guide Off] or [Hitch Guide Off] on the Rear camera display screen.The guide disappears, and then the [Guide Off] or [Hitch Guide Off] switch changes to [Guide On] or [Hitch Guide On].3Tou ch [Guide On] or [Hitch Guide On] to turn on the guide.1Touch the screen when the image from the camera is displayed. The operation screen is displayed on the screen.• After a 5-second time-out, the operation screen returns to the camera display screen.2Tou ch [ Caution].• For each touch, the caution location moves to the top or bottom of the screen. About the Rear Camera GuideTo display the guide, set “Guide Display ON/OFF Setting” (page 89) to On. Also, to adjust the guide, see “Adjusting the Rear/Front/Side Camera Guide” (page 45). You can also turn off the guide in the Rear camera display screen.Indication mark meaningWhen the car is put into reverse gear, the monitor switches to the rear view camera image. Guides appear to help visualize the car’s width and distance from the rear bumper.Car width extension marks (red, yellow and green in order of distance)If properly calibrated, the marks indicate the car’s width. This helps guide the car’s path when backing up in a straight line.The marks represent the distance from the rear of the car (from the rear end of the bumper).• The marks do not move in synchronization with the steering wheel.• Set the marks to suit the car’s width.Distance guidance marksThe marks represent the distance from the rear of the car (from the rear end of the bumper).• The marks do not move in synchronization with the steering wheel.• We recommend that you measure the actual distance to the marks when parked on a level surface.• Depending on the condition of the car or road surface, the range of vision may vary.• The camera has a limited range of vision. Objects at extreme angles to the camera (e.g. under the bumper or at opposite ends of the bumper) may not be in the its field-of-vision.• The rear camera image may have a tint which is different from the actual surroundings.• Depending on the car, the guidance may deviate to the right or left. This is not a malfunction.Distance guidance markThe distance guides represent the ground level distance from the rear bumper. It is difficult to accurately estimate the distance to objects above ground level.In the following example, the distance to A is 0.5 m and the distance to B is 1 m.<Screen><Positions of A, B and C>In the screen, according to the distance guidance marks, the truck seems to be parked about 1 m away (at the position B). In actual fact, however, if you reversed to position A, you would collide with the truck.In the screen, positions A, B and C seem to be located in order of proximity. However, in actual fact, the position A and C are the same distance, and B is farther away than positions A and C.• The car width extension mark represents the distance to the road surface. The distance to an object on the road is not accurately represented by the guides.Error between the screen and the actual road surfaceIn the following conditions, errors are produced between the screen guidance and the actual road surface. (The illustrations represent a case when the camera is installed in the standard position.)When there is a steep upward slope behind the car (example)<Screen>Adjusting the Caution Display LocationCBA (about 0.5 m)about 1 mDistance guidance marks](https://usermanual.wiki/ALPINE-ELECTRONICS/9ZUA147/User-Guide-2952471-Page-90.png)
![91-EN<Situation of the car>The distance guidance mark represents the distance to a flat road surface. Therefore in the case of an upward slope behind the car, the distance guides are displayed closer to the rear bumper than the actual distance. For example, if there is an obstacle on the upward slope, it may appear farther away than its actual position.Also, an error may occur between the guidance and the actual path of the car on the road surface.When there is a steep downward slope behind the car (example)<Screen><Situation of the car>In the case of a downward slope behind the car, the distance guides are displayed farther from the rear bumper than the actual distance. If there is an obstacle on the downward slope, it seems closer than its actual position.Also, an error may occur between the guidance and the actual path of the car on the road surface.Front Camera Operation1Press the MENU button.The menu screen is displayed. • You can also display the menu screen by touching [] on the lower part of the Audio source screen or by swiping upward.2Tou ch [Camera].The Front Camera view is displayed.• Touch the screen while the camera image is being displayed, and touch [] or [] to return to the main source screen or previous screen.• You can perform a Guide Adjustment. For details, see “Adjusting the Rear/Front/Side Camera Guide” (page 45).• If you connect a Front Camera using the optional Multi Camera Interface module, you can display the Front camera image using the [Camera] button only when you set “Setting a Default Camera” (page 47) to “Front”. If you connect a Rear Camera and Side Camera at the same time, touch [Rear] or [Side] in the Rear Camera image to switch the Camera image.• You can also switch the Camera view by Pressing (CAMERA) button.If the camera has a view switch function, the Direct Change switch is displayed.1Touch the screen when the image from the front camera is displayed. The operation screen is displayed on the screen.• After a 5-second time-out, the operation screen returns to the camera display screen.2Tou ch [Panorama], [Corner] or [Top]. The image pattern changes. • For detailed information about image patterns, see the camera Owner’s Manual.• You can perform a Guide Adjustment. For details, see “Adjusting the Rear/Front/Side Camera Guide” (page 45).Actual distancesError ErrorError ErrorDisplaying the Front Camera image from the Menu screen.Switching the Image Pattern for the Front Camera[Panorama]: Panorama View[Corner]: Corner View[Top]: Ground View[Camera] button](https://usermanual.wiki/ALPINE-ELECTRONICS/9ZUA147/User-Guide-2952471-Page-91.png)
![92-ENAs with the rear camera, the front camera guide display ON/OFF setting and Caution display location can be adjusted. See “Guide Display ON/OFF Setting” (page 89) and “Adjusting the Caution Display Location” (page 90) for the operations.Side Camera Operation1Press the MENU button.The menu screen is displayed.• You can also display the menu screen by touching [ ] on the lower part of the Audio source screen or by swiping upward.2Tou ch [Camera].The Side Camera view is displayed.• Touch the screen while the camera image is being displayed, and touch [] or [] to return to the main source screen or previous screen.• You can perform a Guide Adjustment. For details, see “Adjusting the Rear/Front/Side Camera Guide” (page 45).• If you connect a Side Camera using the optional Multi Camera Interface module, you can display the Side camera image using the [Camera] button only when you set “Setting a Default Camera” (page 47) to “Side”. If you connect a Rear Camera and Front Camera at the same time, touch [Rear] or [Front] in the Rear Camera image to switch the Camera image.• You can also switch the Camera view by Pressing (CAMERA) button.If the camera has a view switch function, the Direct Change switch is displayed.1Touch the screen when the image from the side camera is displayed.The operation screen is displayed on the screen.• After a 5-second time-out, the operation screen returns to the camera display screen.2Tou ch [Rear] or [Front].The image pattern changes.• For detailed information about image patterns, see the camera Owner’s Manual.• You can perform a Guide Adjustment. For details, see “Adjusting the Rear/Front/Side Camera Guide” (page 45).About the adjustment of guide display ON/OFF setting and adjustment of Caution display location Displaying the Side Camera image from the Menu screen.[Camera] buttonSwitching the Image Pattern for the Side CameraRear: Vehicle Rear viewFront: Vehicle Front view](https://usermanual.wiki/ALPINE-ELECTRONICS/9ZUA147/User-Guide-2952471-Page-92.png)
![93-ENThis unit allows communication with the vehicle’s iDataLink module, when available. This data gives status on various vehicle modes as well as the ability to control certain vehicle operations.When you use iDataLink mode, set each setting other than “Aftermarket” in “Setting the Source Category” (page 47).• Available functions differ depending on your vehicle. For details, refer to your vehicle’s instruction manual.About Audio InterruptAudio Interrupt is the function that outputs sound from the unit when Voice Information (audio reading from the phone book, etc.)* from the vehicle occurs.• The Audio Interrupt function of the vehicle differs depending on the type and grade of the vehicle.*For your safety, when interrupted with Voice Information, you cannot operate the buttons on the front panel or the touch buttons on the display, except for some operations.- The operating restrictions may differ depending on which mode the unit is in during Voice Information.- You can use the (CAMERA) button to display the camera view and switch the image pattern while the camera image is being displayed.- You can use the (MUTE) button or the / (DOWN/UP) button to control the volume of Voice Information.- Operation of the Remote Control unit is also restricted.Access to iDataLink ModeYou can check the car’s status, set the air conditioning, etc.1Press and hold the (Favorite) button for at least 2 seconds, or touch [] (Vehicle Info.) in the Menu screen to activate iDataLink mode.• The iDataLink mode screen selected in “Setting the Default Vehicle Screen” (page 47) is displayed.2Touch the desired tag on the top of the screen.Select item:Climate / Gauges / Park Sensor / Vehicle Info. / Car Setting• The displayed tag options differ depending on the type of vehicle.Climate screen example3Adjust or confirm the item/information accordingly.• Operable functions and displays may differ depending on the vehicle.iDataLink Function Screen exampleClimate screen exampleYou can control the temperature inside the vehicle, etc.Gauges screen exampleYou can check the vehicle's speed, the engine's rotation speed, etc.Parking sensor screen exampleYou can check the distance from the front and rear of the vehicle to an obstacle.• If the car sensor detects an obstacle, the screen automatically changes to the Parking sensor screen. For details, see “About Parking Sensor screen” (page 94).iDataLink Operation](https://usermanual.wiki/ALPINE-ELECTRONICS/9ZUA147/User-Guide-2952471-Page-93.png)
![94-ENVehicle Information screen exampleYou can check for open doors, check the tire pressure, the battery life, etc. for the vehicle.Car Setting screen example (Generic List screen)The Generic List/Popup Window/Current source control screen is displayed.The Parking sensor screen turns on when the front or rear sensor on your vehicle detects an obstacle within a certain distance.Parking Sensor Full screen exampleWhen the front or rear sensor detects an obstacle within a certain distance, the Parking Sensor screen is displayed, and the indicator ( - ) that corresponds with that area lights up.Indicator colors when an obstacle is detected.Red: close distanceOrange: medium distanceYellow: long distance• Depending on the speed of the vehicle, when moving faster than a certain speed, the Parking Sensor screen may not be displayed.• Vehicles that do not have the obstacle detection sensor cannot use this function.*[] is displayed only when the Front camera or Rear camera is interlocked.Parking Sensor Camera interlock screen example (Rear camera)You can check for obstacles through an interlocked camera image by connecting a Front or Rear Camera.• Touch the Camera image area to switch to the Camera full screen. (While displaying the Camera full screen, touch the Camera screen, then touch [Sensor] to return to the Parking Sensor Camera interlock screen.)• Touch the car icon to switch to the Parking sensor full screen. (Touch [] on the Parking Sensor full screen to return to the Parking Sensor Camera interlock display.)• To use this function, set the Camera Select setting to “Front/Other” or “Rear.” For details, see “Setting the Camera Input” (page 45).• If you connect a Front Camera/Rear Camera/Side Camera using the optional Multi Camera Interface module, you can switch the Camera display. For details on the camera settings when connected to the Multi Camera Interface module, see “Setting Multi Camera to On/Off ” (page 47). For details on how to switch the camera display, see “Camera Operation (Optional)” (page 89).About Parking Sensor screen](https://usermanual.wiki/ALPINE-ELECTRONICS/9ZUA147/User-Guide-2952471-Page-94.png)
![95-ENExternal Accessory Control OperationYou can set the headlights to ON/OFF or adjust the air suspension from this unit by connecting the optional External Accessory Control module.• In order to keep external accessory control outputs on during the ignition cycle, please change “Accessory During Crank” to “On”. Otherwise all switches will be turned off.[Setup] [System] [Factory System Setup] [Maestro Module] [Maestro Features] [Maestro Module] [Accessory During Crank] “On”The following explains how to edit the control switches, because the functions that can be controlled differ depending on the type of vehicle.1Tou ch [] (Ext Acc Ctrl) in the Menu screen to activate External Accessory screen.The External Accessory screen is displayed.2Tou ch [] (Edit).The Edit Control Switches screen is displayed.3Edit each switch.When changing an icon:Touch the icon, and select your desired icon from the Icon Type list. After selecting the icon, set the Output Type (Timing)* for each function.*The Output Type (Timing) sets the operating time for that function when you touch the icon on the External Accessory screen.When changing the name:Touch the icon name, then input characters into Edit Name (Keypad). You can also select a basic name from the [Template] of the Keypad. For details on how to input characters using the keypad, see “How to Input Characters and Numbers (Keypad)” (page 22). (When a basic name is selected from the Template, the icon will be changed according to the basic name.)When changing the layout of the switches:Drag and drop an icon to the desired location.To revert to a default icon:Touch the check box “ ” of the icon that you want to revert to default, and then touch [ ] (Reset). If you touch [ ] (Reset All), all icons revert to default icons.4After editing is complete, touch [] (Back).5After the caption for the confirmation is displayed, touch [OK].• If you touch [] (Cancel) while editing, the edits are reset and the screen returns to the previous Edit screen. You cannot edit the External Accessory screen while driving.Your vehicle must be parked with the ignition key in the ACC or ON position. For details, see “To display the Setup Menu screen” in “Setup Operation” (page 28).Pulse: The operating time when you touch the icon. (Select from 11 steps, ranging 0.5 sec. to 10 sec.)Latch: Switch On/Off by touching the icon.Momentary: Operating time lasts from when an icon is touched to when it is released.](https://usermanual.wiki/ALPINE-ELECTRONICS/9ZUA147/User-Guide-2952471-Page-95.png)
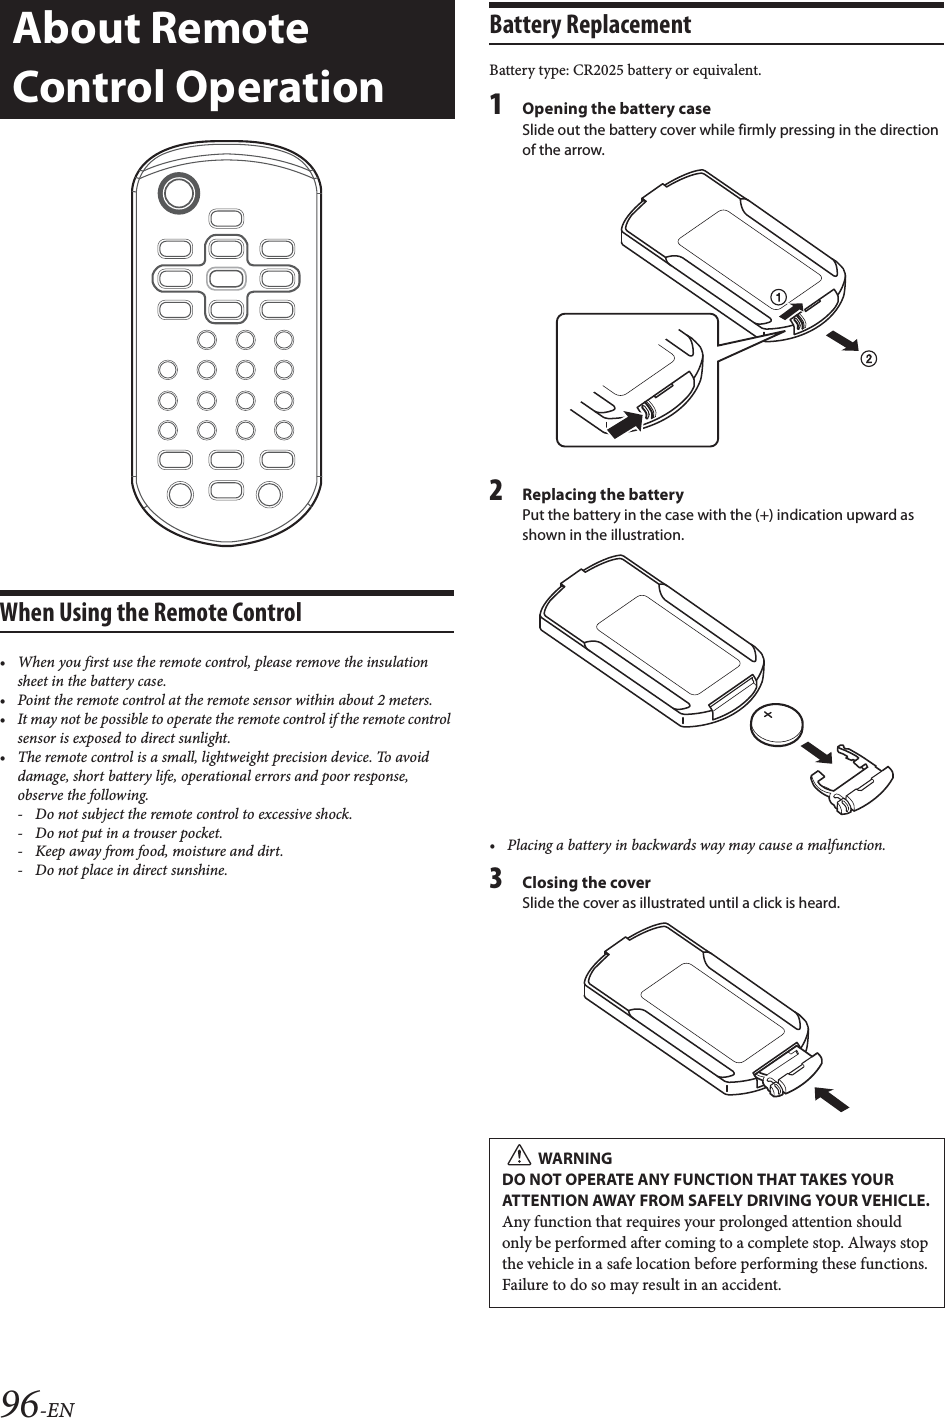
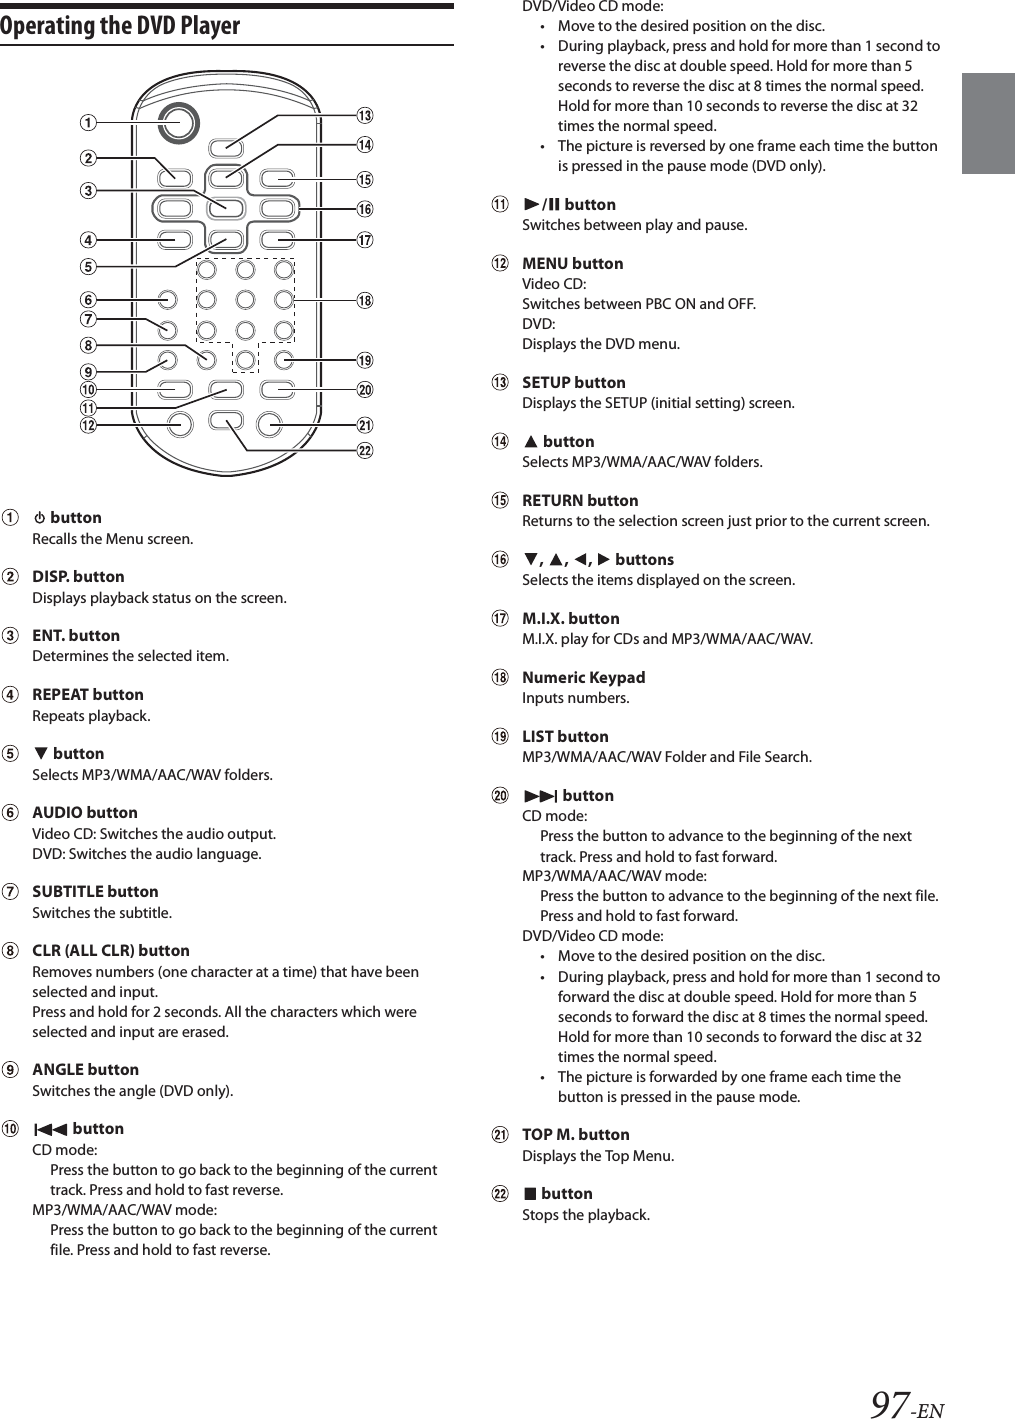
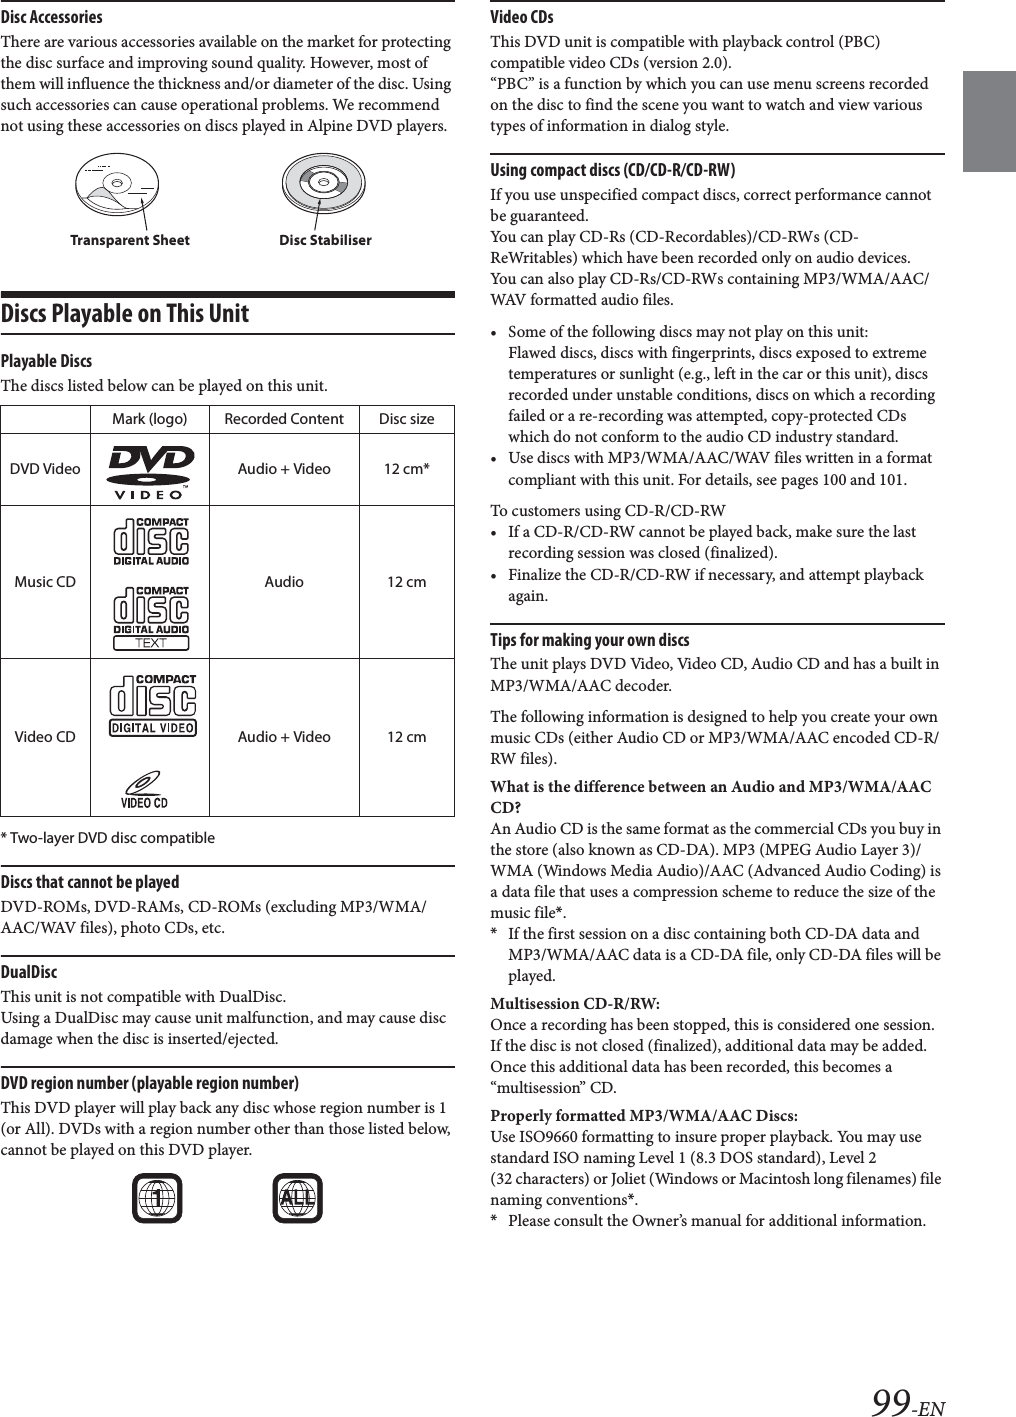
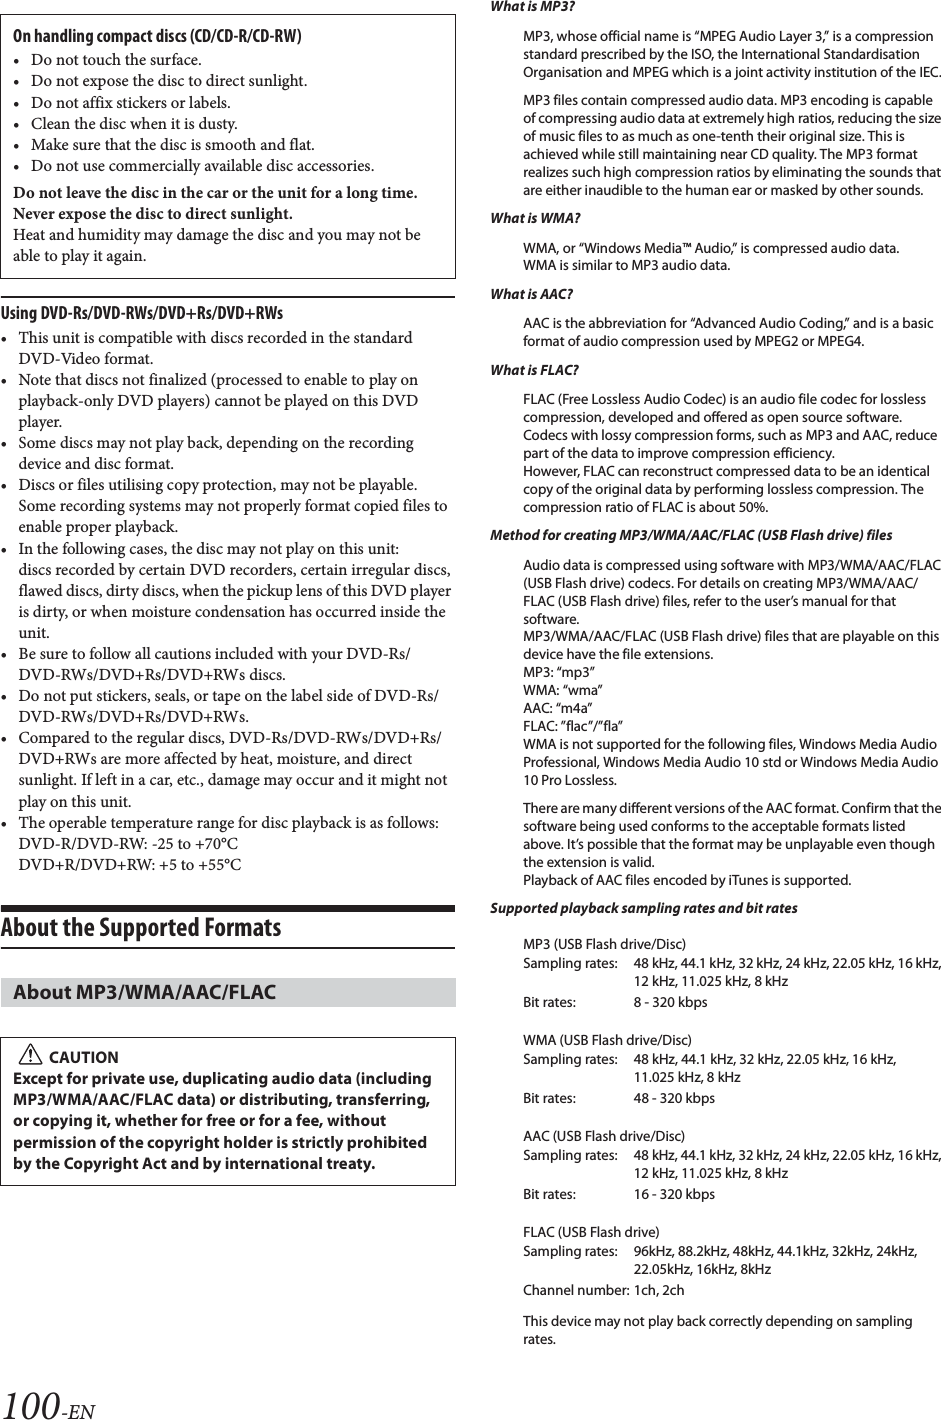
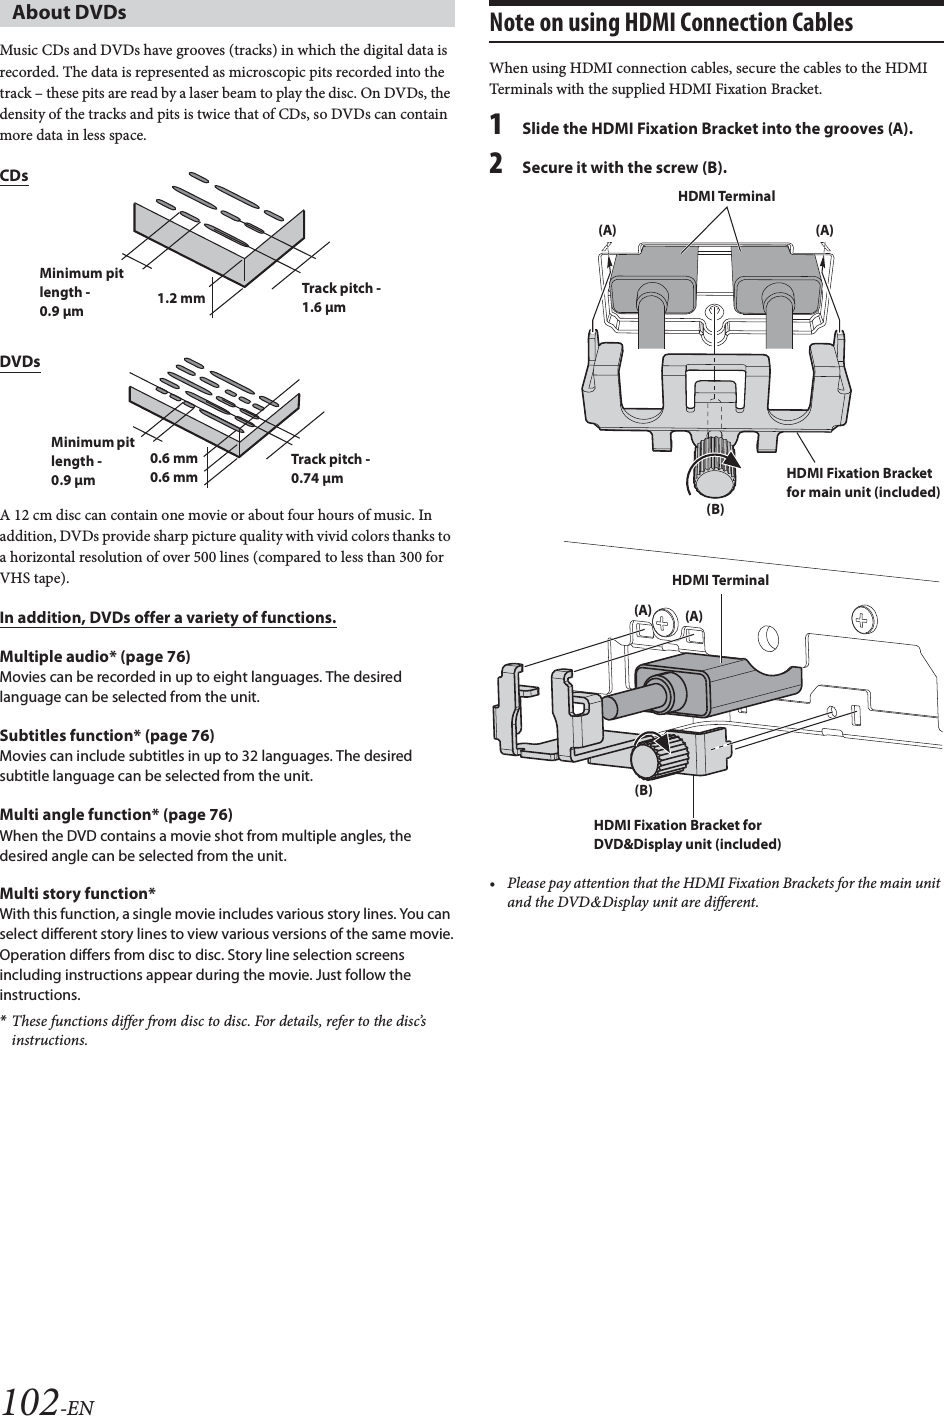

![106-ENBluetoothPlease connect a Bluetooth audio device.• The Bluetooth audio device was not connected correctly.- Check the settings for the unit and the Bluetooth audio device and reconnect.Unable to download phonebook.• Phonebook failed to read due to mobile phone disconnection, etc. - Check the mobile phone connection, and then conduct synchronizing and adding again. (See page 82)• The connected mobile phone does not support synchronizing of its phone book.- Connect the mobile phone that supports synchronizing the phone book, then synchronize again. (See page 82)HDMIHDMI communication error,Please check your device and try again.•Communication error.- Turn the ignition key off, and then set to ON again.- Check the display by reconnecting between the HDMI and the unit, using the HDMI cable.- Check the display by reconnecting between the HDMI device and the unit.HDMI current error, Please reconnect your device and try again.• Abnormal current is run to the HDMI connector device.- Turn the ignition key off, and then set to ON again.- Disconnect the HDMI device from the unit, and then reconnect it.HDMI monitor communication error. Please check the connection or restart system.• HDMI device communication error.- Turn the engine (ACC) OFF/ON. Or, check the HDMI cable where it connects to the HDMI monitor.Too many monitors are connected to the HDMI output.Please check the connection.• More than 4 HDMI monitors are connected.• A cascade connection using more than 2 distributors is made.- Use one distributor and less than 4 HDMI monitors when connecting.iDataLinkCAN Communication error•Communication error.- Check the iDataLink module connection.SiriusXMCheck Tuner• The SiriusXM Tuner is disconnected or the unit is having trouble communicating with the Tuner.- Connect the Tuner or check the Tuner connection to the back of the unit.Check Antenna• The SiriusXM Satellite Radio antenna or cable is either damaged or not connected correctly to the SiriusXM Tuner.- Check that the SiriusXM antenna cable is connected to the SiriusXM Tuner and check that the antenna cable is not kinked or otherwise damaged. Replace the antenna if necessary.No Signal• The SiriusXM satellite signal is too weak at the current location.- Move the vehicle to a location with a clear view of the southern sky.- Make sure the Satellite Radio antenna is properly mounted and not obstructed by metal objects.Channel <xxx> Not SubscribedCall SiriusXM to Subscribe• The active channel has become unsubscribed or the requested channel is not available in your subscription package.- Visit www.siriusxm.com for information on subscribing to this channel.- The unit will revert to the previous selected channel or to channel 1 automatically.Channel <xxx> Not Available• The active channel is no longer in the SiriusXM channel lineup or the user has entered an invalid channel number.- Visit www.siriusxm.com for information on the current channel lineup.• The unit will revert to the previous channel or to channel 1 automatically.Subscription UpdatedPress OK to Continue•Your subscription has been updated.- Touch [OK] to clear this message.Channel <xxx> Locked• A locked channel is selected.- Input the passcode on the number keypad screen, see “Parental Lock Function” (page 67). If wrong passcode is input, “Incorrect Pass Code entered” will be displayed and the unit will revert to the previous channel.Updating · · ·• The Featured Favorites channels are during updating.Updating Teams, please wait• While the Game table is during updating, the [Game Alert Setup] button in SiriusXM setup mode is touched.Replay Memory Full• Buffer for Replay is full.Replay Memory Near Full• Buffer for Replay will fill to capacity within 11 seconds.](https://usermanual.wiki/ALPINE-ELECTRONICS/9ZUA147/User-Guide-2952471-Page-106.png)