Blaupunkt Europe CT945 Car DVD PLAYER User Manual USER S MANUAL
Blaupunkt Europe GmbH Car DVD PLAYER USER S MANUAL
UserManual.wiki
>
Blaupunkt Europe
>
CT945 User Manual
Users Manual
Navigation menu
Upload a User Manual
Namespaces
Wiki Guide
HTML
PDF
Info
Views
User Manual
Discussion / Help
Navigation

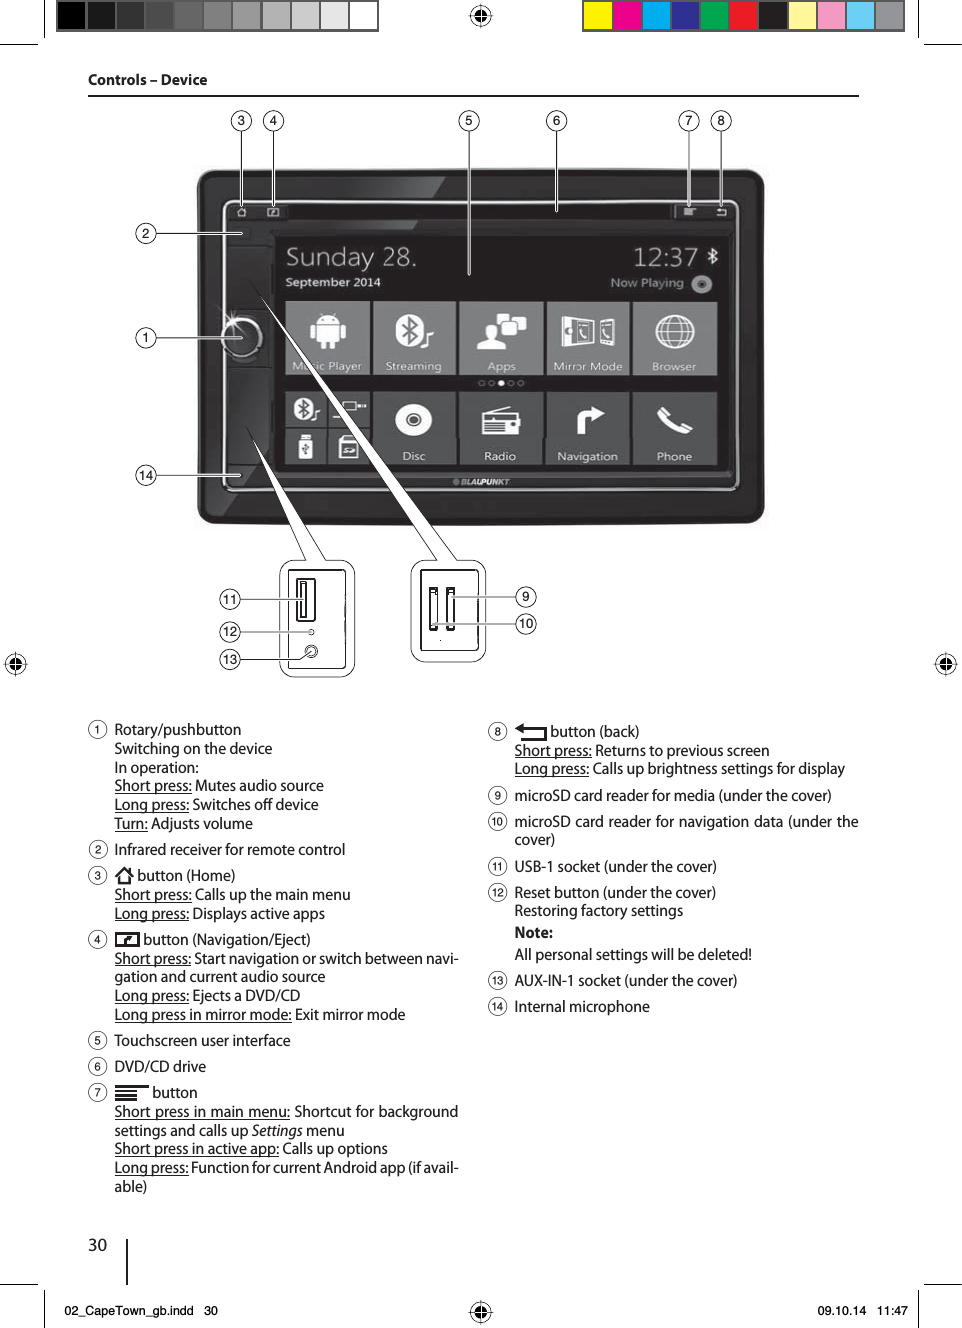
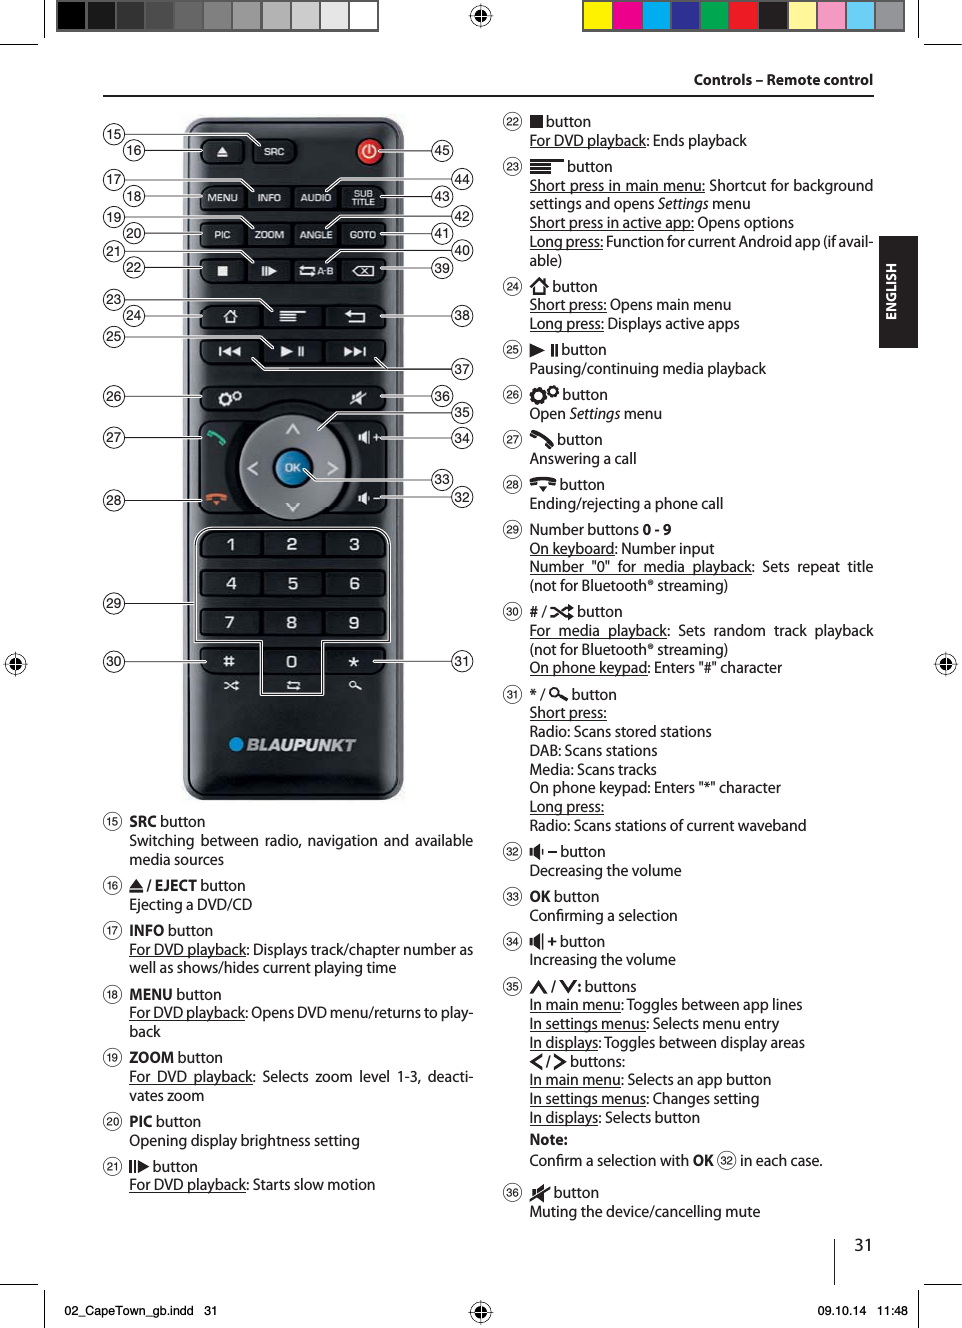
![32Controls – Remote control | ContentsSafety notes .............................................................. 33Symbols used ........................................................................ 33Road safety............................................................................. 33General safety notes ........................................................... 34Declaration of conformity................................................. 34Cleaning notes.......................................................... 34Disposal notes........................................................... 34Scope of delivery ...................................................... 34Software update....................................................... 34Placing the device in operation............................... 35Switching on/o................................................................... 35Volume..................................................................................... 35Operation .................................................................. 35Touchscreen........................................................................... 35Navigation in menus........................................................... 36Settings in menus ................................................................ 36Keyboard input..................................................................... 36Android status bar and menu ......................................... 36Main menu ................................................................ 37Opening main menu .......................................................... 37The main menu display ..................................................... 37Customizing the main menu........................................... 38Sound settings.......................................................... 39Opening sound settings.................................................... 39The equalizer display 1 ...................................................... 39The equalizer display 2 ...................................................... 39System settings......................................................... 40Opening system settings .................................................. 40The Settings display............................................................ 40External devices and data carriers.......................... 41Basic information................................................................. 41DVD/CD mode ...................................................................... 42USB data carrier .................................................................... 42microSDHC cards ................................................................. 42Audio/video playback of iPod/iPhone ......................... 42Bluetooth® sources.............................................................. 43Radio.......................................................................... 44Starting radio playback...................................................... 44Radio display ......................................................................... 44Options menu ....................................................................... 44DAB/DAB+ (CAPE TOWN 945 only) .................. 45Starting DAB playback ....................................................... 45DAB display............................................................................ 45Options menu ....................................................................... 46U/ buttonShort press:Radio: Changes frequency in incrementsDAB: Selects previous/next stationMedia: Selects previous/next trackLong press:Fast searchingV buttonShort press: Returns to previous screen Long press: Calls up brightness settings for displayW buttonDeletes last keyboard entry X buttonFor DVD playback: Repeats individual section YGOTO buttonFor radio playback: Selects frequencyFor media/DVD playback: Selects track/chapter numberZANGLE buttonFor DVD playback: Selects camera viewing angle (if alternative camera viewing angle is available) [SUBTITLE buttonFor DVD playback: Selects subtitle language\AUDIO buttonFor DVD playback: Selects playback language]/ POWER buttonSwitching the device on/o Contents02_CapeTown_gb.indd 32 09.10.14 11:48](https://usermanual.wiki/Blaupunkt-Europe/CT945/User-Guide-2447257-Page-4.png)
![36Navigation in menusChanging to the main menu쏅Press the [ ] button.or:쏅Touch the [ ] button.Note:Repeatedly pressing the [ ] button will also re-turn you to the main menu.Changing to the previous screen or the higher-level menu쏅Press the [ ] button.or:쏅Touch the [ ] button.or:쏅Touch the [ ] button.Settings in menusActivating/deactivating options쏅To activate or deactivate options, tap on the corre-sponding menu entry or symbol.Activated: - - -Deactivated: - - -ControlCertain settings can be made using a slider.쏅Tap on the desired point of the slider or swipe along the slider.Conrming a settingIn some cases, settings made have to be conrmed rst before they become active.쏅Touch the [ ] button.Additional settingsSome options oer additional settings.쏅Touch the [ ] button to open the settings menu.Keyboard inputA keyboard is displayed for entering text or numeric values:1 237 4568Notes:tThe navigation app uses its own keyboard (see the chapter "Navigation").tFor entries that allow only certain characters, such as numbers, a special keyboard may be opened.The keyboard oers dierent options:1Input display2Conrm input3Delete last input4Short press: Conrms inputLong press: Discards input5Short press: Inputs charactersLong press: Displays special characters for selection6Short press: Inputs charactersLong press: Displays keyboard settings7For text input: Changes between capital and non-capital lettersFor number/character input: Changes to additional special characters or returns8Set keyboard to text or number and character inputAndroid status bar and menuThe Android status bar displays, e.g. Android messages, running Android apps and WLAN, Bluetooth and mobile radio status:In regular operation, the Android status bar is hidden and displayed only in navigation mode.Displaying the Android status bar쏅Tap on the time display on the top right corner of the display.Operation02_CapeTown_gb.indd 36 09.10.14 11:48](https://usermanual.wiki/Blaupunkt-Europe/CT945/User-Guide-2447257-Page-8.png)
![37ENGLISHNote:The Android status bar is automatically hidden again after approx. 10 seconds.Expanding the Android status bar쏅Tap on the displayed status bar and swipe down.The Android menu opens and allows, e.g., access to the settings of active apps.Note:The Android menu is automatically hidden again after approx. 5 seconds.Main menuOpening main menu쏅Press the [ ] button.Note:The display of many apps also features a button for changing to the main menu.The main menu display1 2 35 4678The main menu features the following areas and displays:1Date2Current audio/video source3Time/Bluetooth™ status4App main line:This line contains the buttons for up to 5 apps. Note:You can determine which apps appear on the app main line (see the section "Customizing the main menu").Tip:Place the buttons for the apps you use most frequently on the app main line.5Expanded app lineThis line contains the buttons for up to 25 apps.Swipe to the right or left on the line to scroll through the 5 areas of the line.Note:You can determine which apps appear on the expanded app line (see the section "Customizing the main menu").Tip:Place the buttons for the apps you use occasionally on the expanded app line.Operation | Main menu02_CapeTown_gb.indd 37 09.10.14 11:48](https://usermanual.wiki/Blaupunkt-Europe/CT945/User-Guide-2447257-Page-9.png)
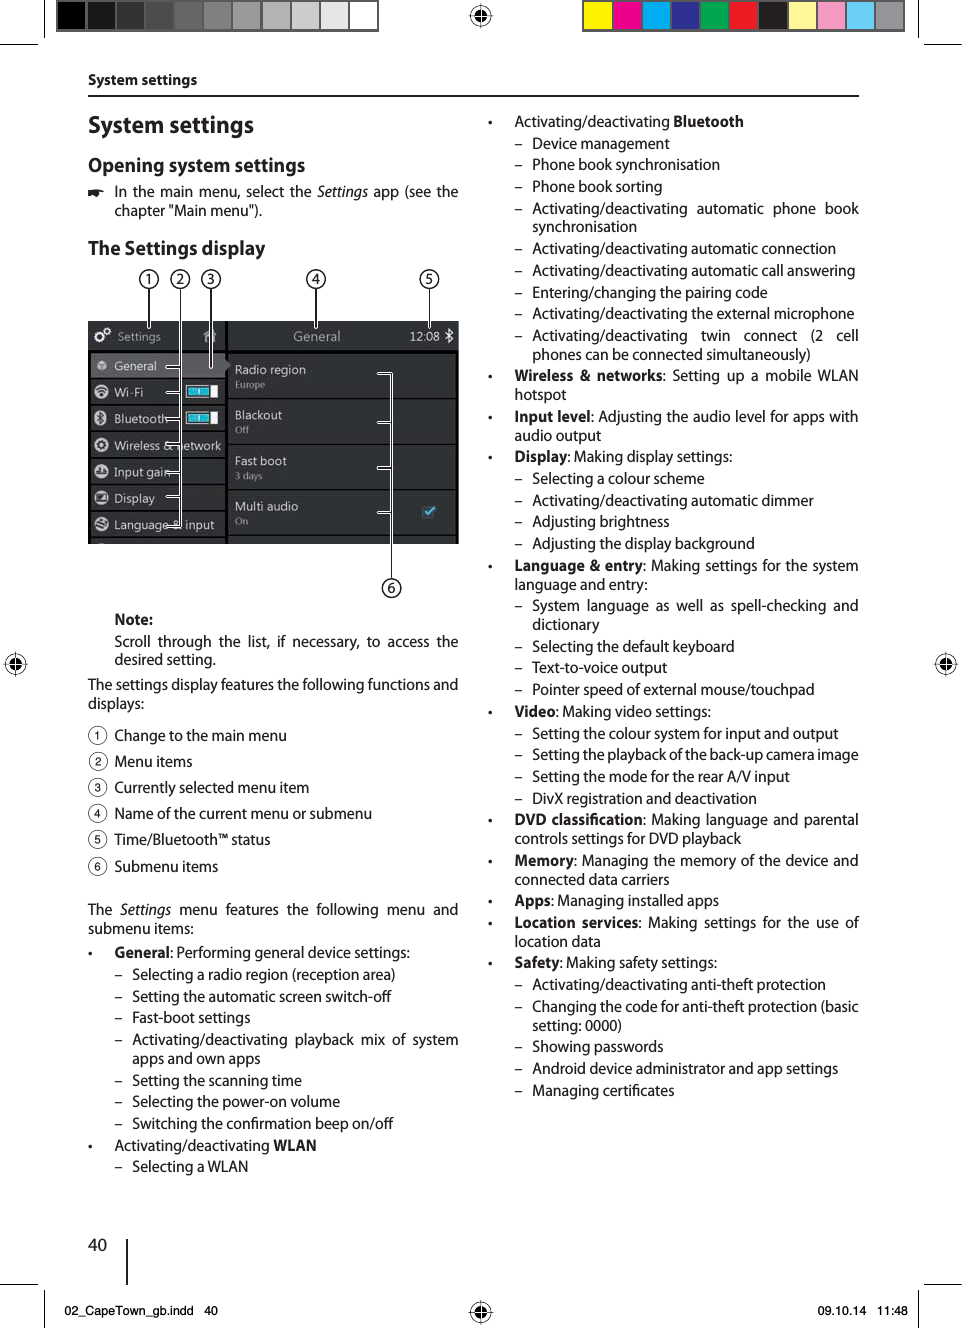
![39ENGLISHSound settingsOpening sound settings쏅In the main menu, select the Equalizer app (see the chapter "Main menu").Note:You can also open the equalizer or balance/fader set-tings from within the options menu of other apps.The equalizer display 11 2 53 467810 9The equalizer display 1 features the following functions and displays:1Change to the main menu2Change to the equalizer display 2 (see the following section)3Select frequency band for adjustment (see items 6,7 and 8).4Frequency band display5Time/Bluetooth™ status6Q-factor setting:Set the quality factor Q for the selected frequency band3 with the buttons [ ] and [ ].7Frequency setting:Select the centre frequency to be set within the selected frequency band 3 with the buttons [ ] and [ ].8Level setting:Adjust the level for the selected centre frequency 7with the buttons [ ] and [ ].9Equalizer presettings: Tap on a presetting to select it.:Reset equalizer to the preset values.The equalizer display 21 2 53 49 8 67The equalizer display 2 features the following functions and displays:1Change to the main menu2Change to the equalizer display 1 (see the previous section)3With activated subwoofer 4: Set the low-pass frequency with the buttons [ ] and [ ]4Activating/deactivating the subwoofer and, if acti-vated, set the subwoofer level with the buttons [ ] and [ ]5Time/Bluetooth™ status6 Activating/deactivating high-pass and, if activated, set the frequency with the buttons [ ] and [ ]7With activated subwoofer 4: Set the phase with the buttons [ ] and [ ]8Adjusting balance and fader:Shift the volume distribution with the buttons [ ] and [ ] (balance) or [ ] and [ ] (fader),or:Tap on a point in the displayed passenger compart-ment to directly adjust the corresponding volume distribution.9Current balance and fader valueSound settings02_CapeTown_gb.indd 39 09.10.14 11:48](https://usermanual.wiki/Blaupunkt-Europe/CT945/User-Guide-2447257-Page-11.png)
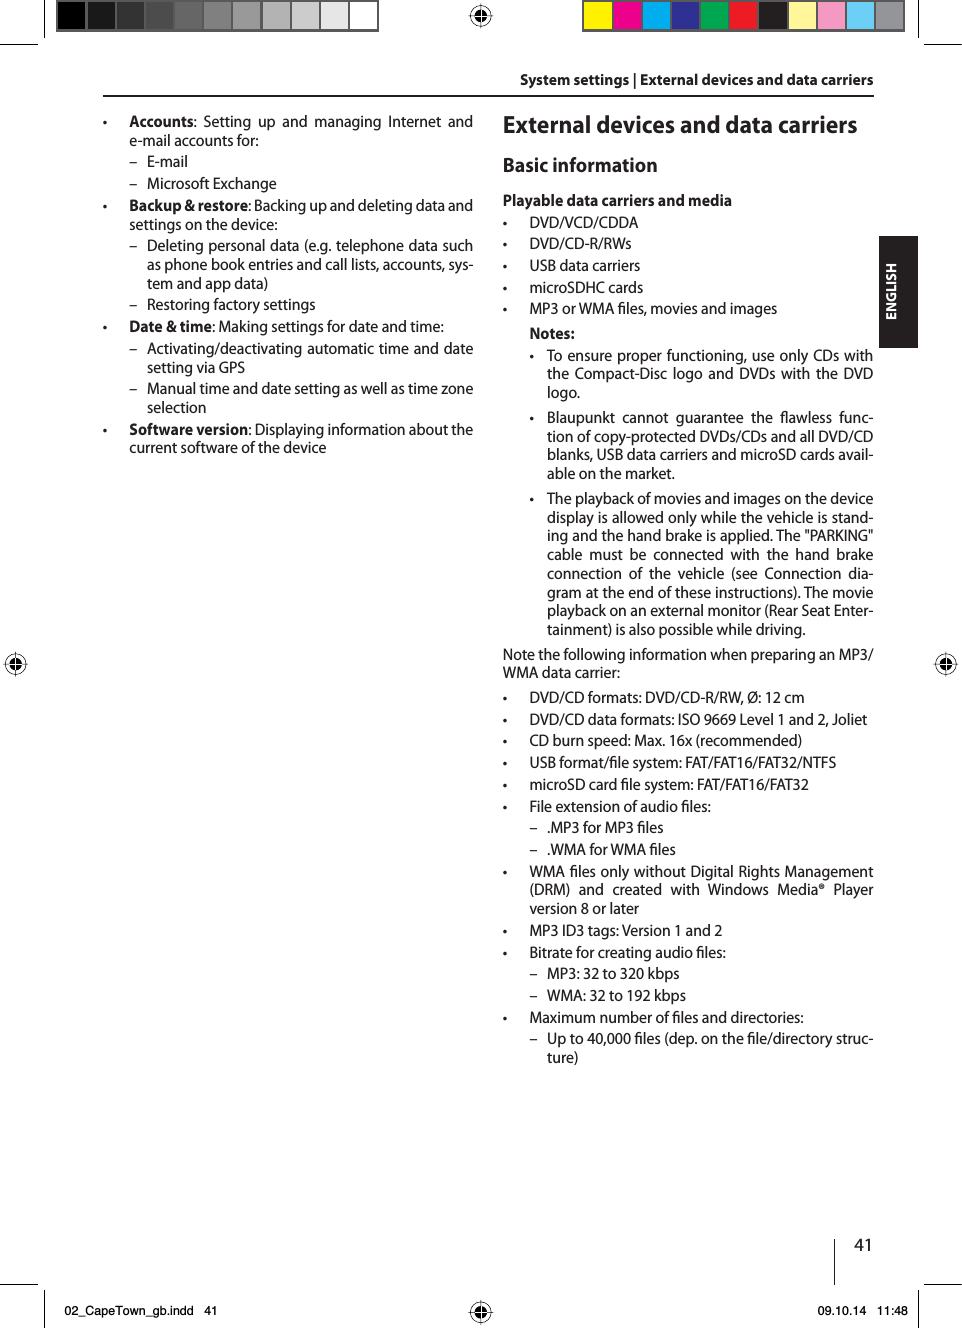
![44RadioNote:This car sound system is set to the reception area Europe at the factory. You can set a dierent recep-tion area (see the chapter "System settings", General/Radio region option).Starting radio playback쏅In the main menu, select the radio app (see the chap-ter "Main menu").The radio display opens (see the next section) and playback starts.Radio display1 2 439 8 7 5610The radio display features the following functions and displays:1Change to the main menu2Station info area:tCurrent frequency/station name/radio texttCurrent memory banktFrequency scaleNote:Tap on the frequency scale or swipe across the frequency scale to change the frequency.[]Short press: Increases the frequency in incrementsLong press: Starts ascending seek tuning[]Short press: Decreases the frequency in incrementsLong press: Starts descending seek tuning3Selecting the waveband/memory bankNote:Reception area Europe only: If the AM memory bank is selected, another tap on AM changes to the LW waveband. Tap on LW again to return to the AM waveband.4Time/Bluetooth™ status5Scanning stored stations of the current memory bank6Memory locations of the current memory bankShort press: Calls up the stored stationLong press: Saves the set stationNote:Every memory bank features 10 memory locations, whereas the memory bank FMTS (Travelstore) oers 8 memory locations. Swipe across the list of memory locations to scroll to additional memory locations.7Starting the Travelstore functionThe 8 strongest stations in the current waveband are automatically stored.Note:This function is available only for the memory banks FMT and AMT.8Scanning stations of the current waveband9Switching priority for trac announcements on/oNotes:tThis function is only available for the FM wave-band.tThe volume for switched-through trac an-nouncements can be adjusted with the volume control during an announcement. The most recently adjusted volume is stored.:Opening/closing the options menu (see the next section)Options menuThe options menu features the following functions and settings:General:tEqualizer: Makes equalizer settings and sets volume distributionNote:For further details, read the chapter "Sound settings".For the FM waveband:tFrequency Input: Jumps to a frequency.Keyboard options:–OK: Conrms the entry–[ ]: Deletes the last entry–Cancel: Cancels the entryRadio02_CapeTown_gb.indd 44 09.10.14 11:48](https://usermanual.wiki/Blaupunkt-Europe/CT945/User-Guide-2447257-Page-16.png)
![45ENGLISHtLocal: Switches local reception on/o.With local reception, only the stations with the strongest reception are returned.tRDS Alternative Frequency (Europe only): Switches RDS AF on/o. If RDS AF is activated, the device automatically changes to the strongest frequency of the set station.tRDS Regional (Europe only): Switches RDS regional mode on/o.If regional mode is activated, the device changes only to the alternative frequencies of the set station that broadcast the same regional programme.tRDS Time (Europe only): Switches RDS time on/o.With RDS CT activated, the time of the device is automatically set via the received RDS signal.tPTY List (Europe,USA only): Opens a list of pro-gramme typesTap on the desired programme type to restrict reception to the corresponding stations.tHi-Cut Filter: Switches the Hi-cut lter for improving playback on/oFor the AM waveband:tEnter Frequency: Jumps to a frequency.Keyboard options:–OK: Conrms the entry–[ ]: Deletes the last entry–Cancel: Cancels the entrytLocal: Switches local reception on/o.With local reception, only the stations with the strongest reception are returned.Radio | DAB/DAB+DAB/DAB+ (CAPE TOWN 945 only)The device can be used for DAB playback. Note:For the DAB playback, the optional Blaupunkt DAB+ Tuner Box 945 must be connected.Starting DAB playback쏅In the main menu, select the DAB app (see the chap-ter "Main menu").The DAB display opens (see the next section) and playback starts.DAB display1 2 4311 10 9 8 567The DAB display features the following functions and displays:1Change to the main menu2Station info area (current station name/additional DAB info)3DAB reception status4Time/Bluetooth™ status5Scanning stored stations6Memory locationsShort press: Calls up the stored stationLong press: Saves the set stationNotes:30 memory locations are available. Swipe across the list of memory locations to scroll to additional mem-ory locations.7Selecting a station:[]Changes to the next station[]Changes to the previous station8Scanning all receivable stations9Switching priority for trac announcements on/o02_CapeTown_gb.indd 45 09.10.14 11:48](https://usermanual.wiki/Blaupunkt-Europe/CT945/User-Guide-2447257-Page-17.png)
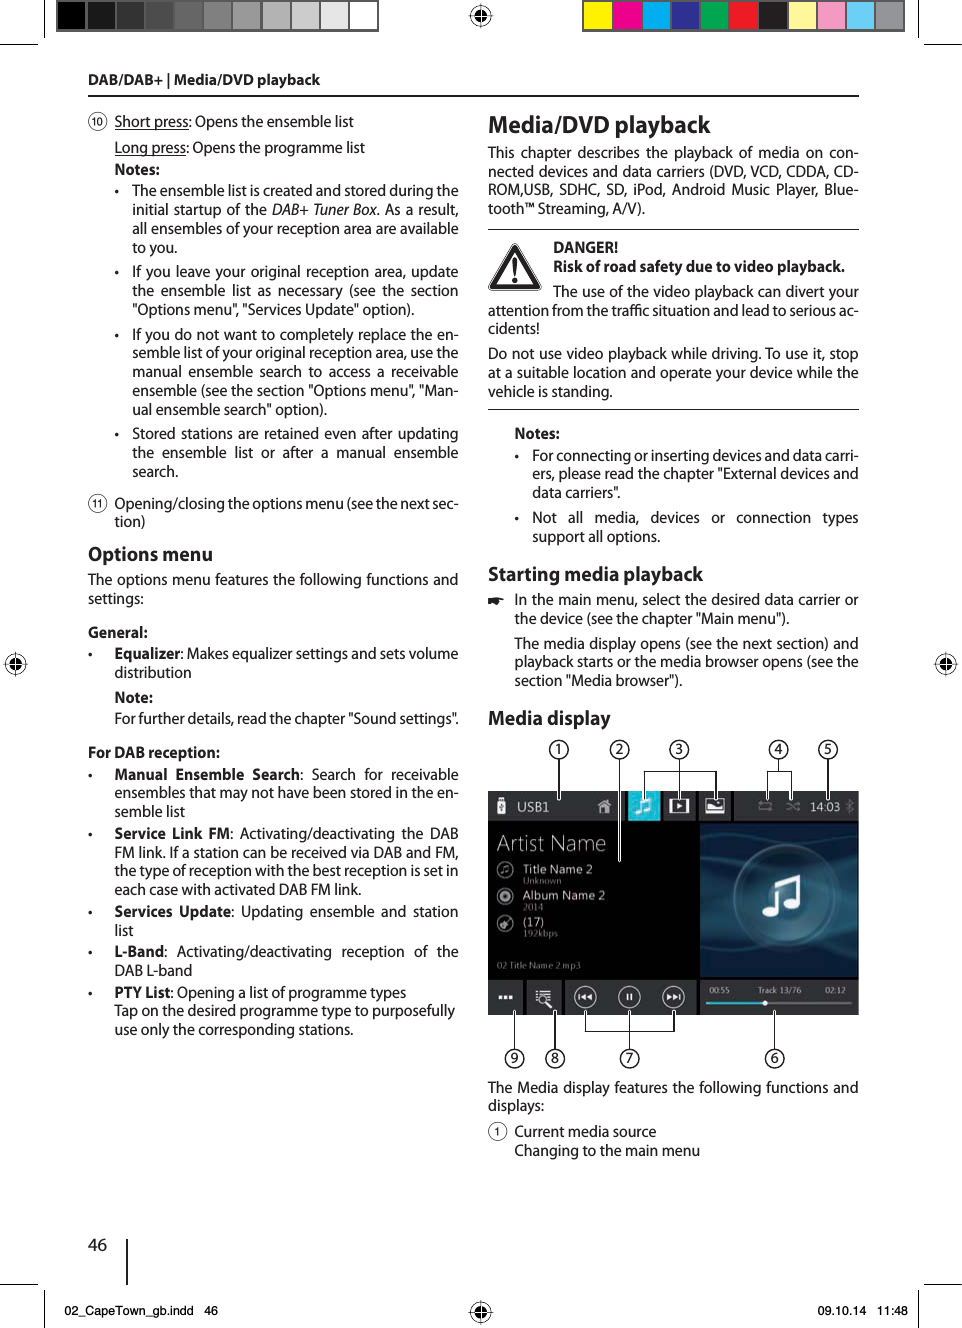
![47ENGLISHMedia/DVD playback 2Track info area:For audio playback: Track information such as name of track, artist and cover art (not for A/V)For video/image/DVD playback: Image playbackNotes:tTrack information (ID3 tags) must be provided by the connected data carrier or device.tFor image playback, the menu bars are automati-cally hidden after approx. 3 seconds. To show the menu bars again, tap on the display.3Changing the media type(for USB/SDHC/SD/CD-ROM):[ ] Audio track[]Video title[]ImagesWhen changing the media type, the media browser is automatically opened (see the next section).4Setting repeat title/random track playback(not for DVD/BT streaming/ A/V):[ ] Repeat title o[]Repeat all tracks of current selection (for iPod only)[]Repeat all tracks of the folder[]Repeat current track[]Random track playback o[]Random track playback on (if necessary, only within the currently repeated tracks)5Time/Bluetooth™ status6Playback process (not for image playback):tCurrent track number/number of trackstCurrent timetTotal timetProgress barNote:Tap on the progress bar or swipe across the progress bar to go to a dierent position in the current playback.7Controlling playback:[ ] Short press: Changes to the next track/DVD chapterPress and hold: Fast searching forward[]Interrupting/continuing playback[]Short press: Changes to the previous track/DVD chapterPress and hold: Fast searching reverse8Track selectiontFor USB/SDHC/SD/CD-ROM:Short press: Opens media browser for media type and folder (see the next section)Long press (not for CD-ROM): Opens media browser for title information (see the section "Media browser for track information")tFor audio CD: Track selectiontFor DVD: Opens DVD menutFor iPod/Android Music Player: Opens media browser for track information (see the section "Media browser for track information")9Opening/closing the options menu (see the section "Options menu")Media browser for media type and folder16 5 234The media browser for media type and folder features the following functions and displays:1Current media type2Name of current folder3Opening subfolder4Starting a track5Changing to higher-level folder6Closing the media browser02_CapeTown_gb.indd 47 09.10.14 11:48](https://usermanual.wiki/Blaupunkt-Europe/CT945/User-Guide-2447257-Page-19.png)
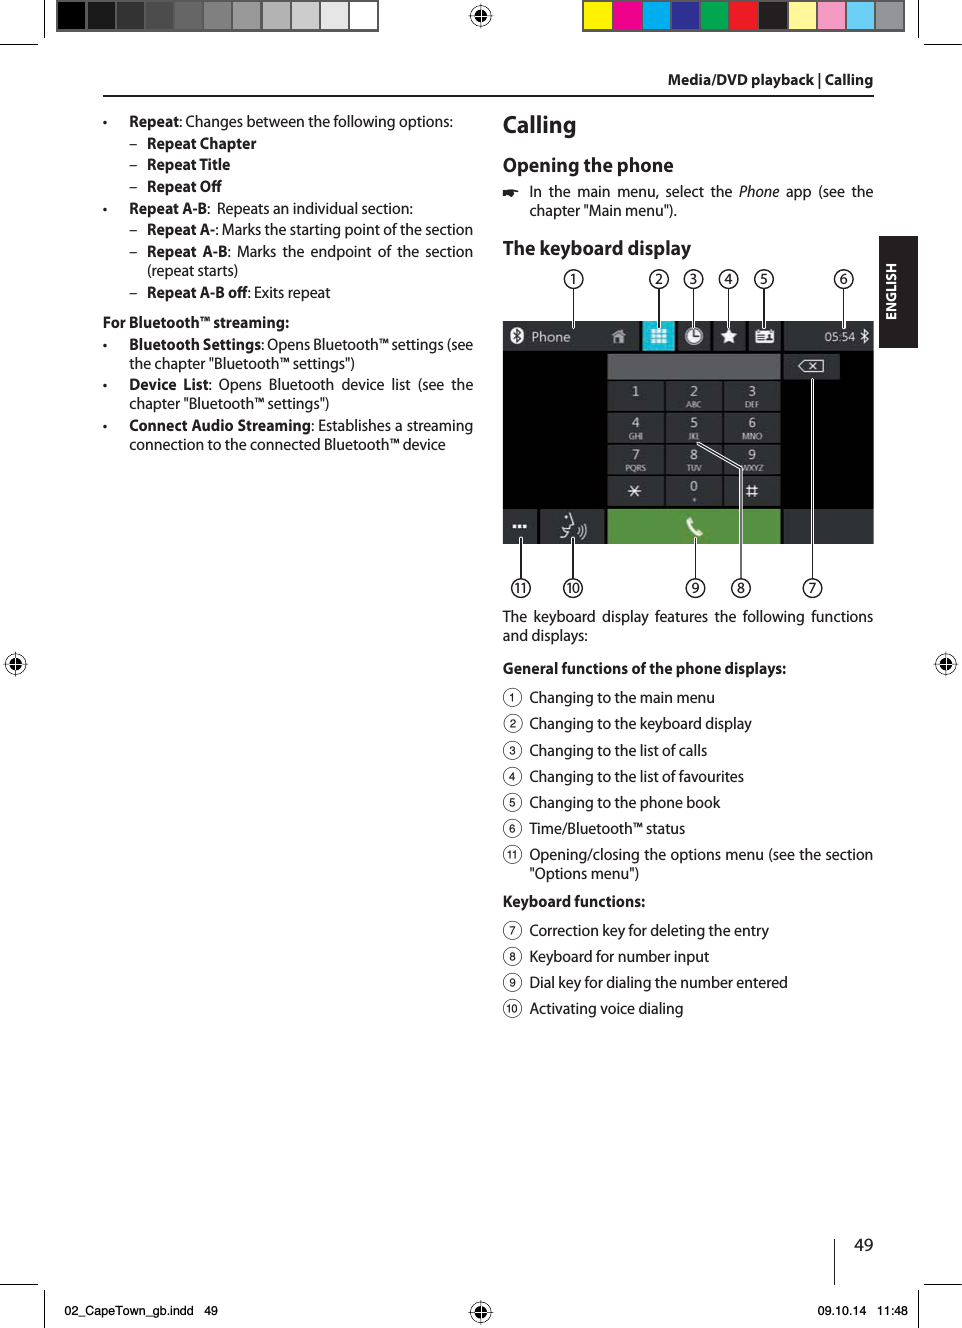
![48Media browser for title information3 2 1The media browser for title information features the following functions and displays:1Available selection categories or corresponding tracks2Changing to higher-level category3Closing the media browserOptions menuThe options menu features the following functions and settings:General:tEqualizer: Makes equalizer settings and sets volume distributionNote:For further details, read the chapter "Sound settings".For audio playback from data carriers:tMix: Changes between these options:–[]Random track playback o–[]Randomly play all trackstRepeat: Changes between these options:–[]Repeat current track–[]Repeat all tracks of the folder–[]Repeat title otScan: Scans trackstKeyboard: Selects a track based on its track number.Keyboard options:–OK: Conrms the entry–[ ]: Deletes the last entry–Cancel: Cancels the entrytTag selection: Activates/deactivates additional track information (composer, year of release, bitrate)For video playback from data carriers:tFormat: Selects image format for playbacktKeyboard: Selects a title based on its title number.Keyboard options:–OK: Conrms the entry–[ ]: Deletes the last entry–Cancel: Cancels the entrytMix: Changes between these options:–[ ] Random track playback o–[]Randomly play all trackstRepeat: Changes between these options:–[]Repeat current track–[]Repeat all tracks–[]Repeat title oFor image playback from data carriers:tRotate left: Rotates the image counterclockwisetRotate right: Rotates the image clockwisetSlideshow Settings: Denes settings for the slide showtMix: Changes between these options:–[]Random image playback o–[]Randomly play all images of the current foldertRepeat: Changes between these options:–[]Repeat all titles of the folder–[]Repeat title otKeyboard: Selects image based on its number.Keyboard options:–OK: Conrms the entry–[ ]: Deletes the last entry–Cancel: Cancels the entrytZoom +: Zooms intZoom –: Zooms outFor DVD playback:tFormat: Selects image format for playbacktSubtitle: Activates/deactivates display of subtitlestInfo: Activates/deactivates display of title and chap-ter number as well as current timetGo to: Jumps to a title or chapter of the DVD.Keyboard options:–OK: Conrms the entry–[ ]: Deletes the last entry–Chapter/title: Toggles between title and chapter selectiontViewing angle: Selects alternative perspective of the current playback (only if provided by the DVD for the current scene)tVideo language: Changes the playback languageMedia/DVD playback02_CapeTown_gb.indd 48 09.10.14 11:48](https://usermanual.wiki/Blaupunkt-Europe/CT945/User-Guide-2447257-Page-20.png)
![50The list of calls1The list of calls features the following functions and dis-plays:1List of the most recently called numbers/contacts with date and time of the callTap on an entry to call the number/contact.Phone book and list of favouritesNote:The phone book contains all the contacts from the phone book of your cell phone.The list of favourites contains only the contacts which you selected as favourite in the phone book at the device.2 13The phone book or list of favourites features the follow-ing functions and displays:1Letter menu: Jumping to the selected starting letter in the list of contacts2Opening a keyboard for name search in the list of contacts3Entries of the list of contactsShort press: Calls number/contact or displays num-bers (if several numbers are available)Long press (in the phone book only): Adds number/contact to the list of favouritesThe Options menuThe options menu features the following functions and settings:tBluetooth Setting: Opens Bluetooth™ settings (see the chapter "Bluetooth™ settings")tDevice List: Opens Bluetooth device list (see the chapter "Bluetooth™ settings")tPhone Book Sync: Copies contacts from the phone book of the cell phone to the device/updates contacts on the deviceNote:You can automatically synchronise the device phone book with the phone book of the cell phone (see the chapter "System settings", Bluetooth/Auto Phone Book Sync option).Incoming/outgoing call2 145 3An incoming call provides the following functions and displays:1Switching between internal (INT) and external (EXT) microphone2Muting the microphone3Call/phone call handling:[ ] Rejecting a call (for incoming call)Cancelling a call (for outgoing call)Ending a phone call (for ongoing call)[ ] Answering a call (for incoming call)4Switching a phone call between device and cell phone5Caller info– Contact name/caller number (if available)– Call durationCalling02_CapeTown_gb.indd 50 09.10.14 11:48](https://usermanual.wiki/Blaupunkt-Europe/CT945/User-Guide-2447257-Page-22.png)
![52First useIf you are using the navigation for the rst time, the setup wizard is automatically started. With the help of the setup wizard, you can, e.g., set the language of the navigation, allow or reject the transfer of GPS data and make dier-ent basic settings of the navigation.As soon as you made the desired settings in the setup wizard and conrmed them, the navigation menu opens (see the next section).Navigation menu1 267 5 34The navigation menu features the following functions and displays:1Changing to the map view2Entering/selecting a destination (see the section "Entering a destination")3Creating a route with possible interim destinations or editing/deleting a planned route (see the section "Planning a route")4Opening a menu for additional options (see the section "Additional options")5Opening the menu for navigation settings6Displaying TMC trac announcements7Exiting the navigationEntering a destination1 2 3 4 57 6The destination menu features the following functions and displays:1Finding a destination based on keywords. The key-word can be, e.g. part of a street name, a point of interest category or a point of interest.Note:The destination is searched in the vicinity of a location (by default your current position). Tap on Change to select a dierent location.2Finding an address3Finding a point of interestOptions:tFast retrieval: Lists all points of interest in your vicinitytCustomised search: Find points of interest in a city, nearby or – for a planned route – on the way or close to the destination.tPetrol stations, restaurants, car parks or over-nighting in your vicinity or – for a planned route – on the way or close to the destination.4Find on map: Tap on the map to determine a place of destination.Note:Options for the map display:tSwipe: Moving the map sectiont[ + ] / [ – ]: Zooming in/outt[ ]: Moving the map section back over your current position5Selecting a destination from your favourites6Selecting a destination from the last destinations7Direct access to the last two destinationsNavigation02_CapeTown_gb.indd 52 09.10.14 11:48](https://usermanual.wiki/Blaupunkt-Europe/CT945/User-Guide-2447257-Page-24.png)
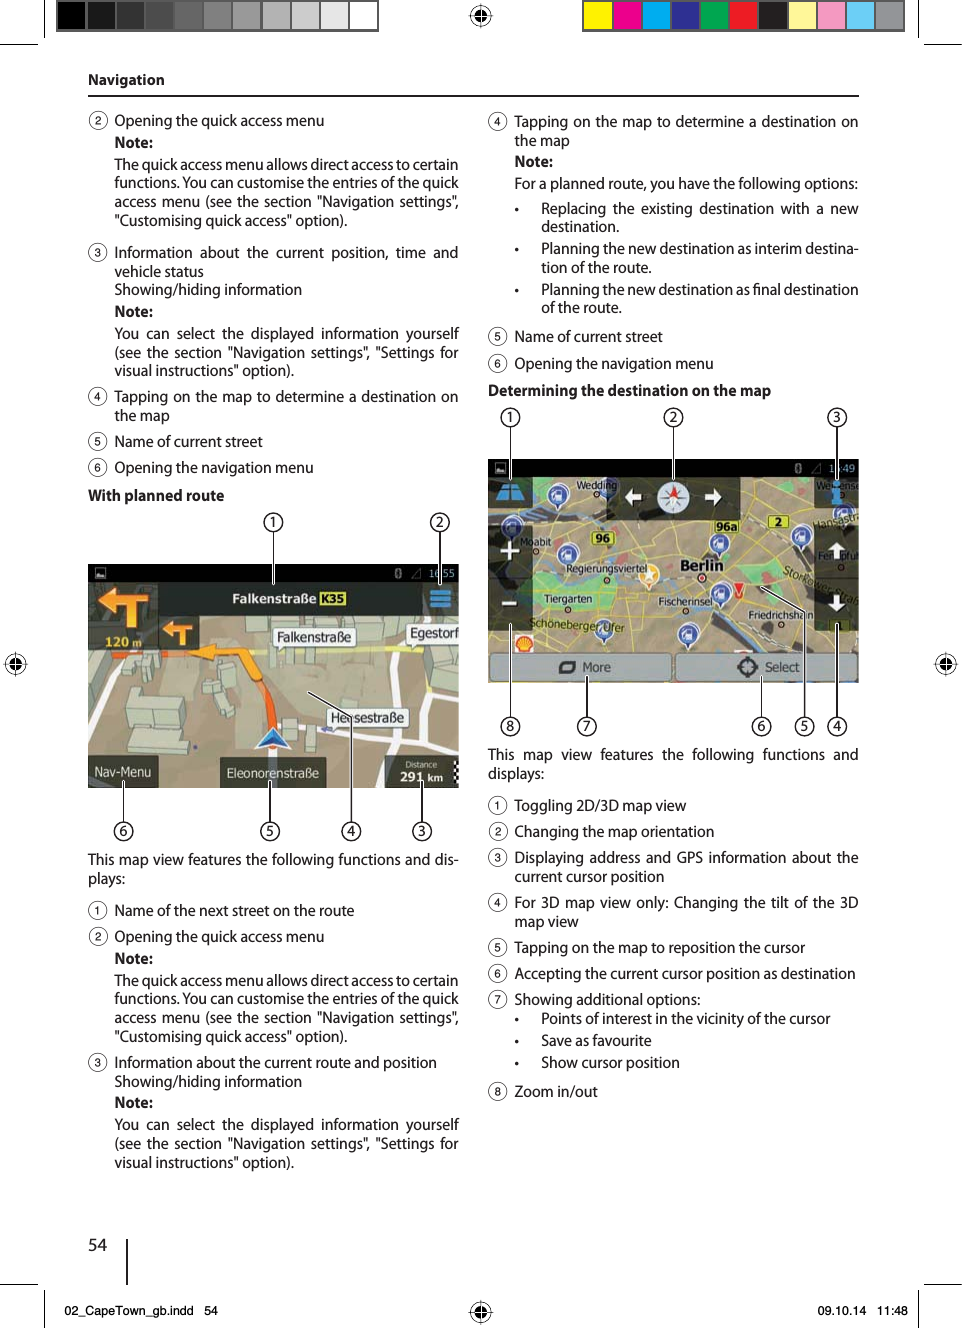
![53ENGLISHPlanning a route1 2 345The route menu features the following functions and displays:1Information about the current route2Creating a route or – for a planned route – changing a route3Displaying a planned route and route information in the map overviewNote:Options for the map display:tSwipe: Moving the map sectiont[ + ] / [ – ]: Zooming in/outt[ ]: Displaying the entire route in the map sec-tion4Deleting a planned route5Avoiding certain sections of a planned routeOptions:tAvoiding special sections: Excluding special sec-tions (such as certain motorway sections or toll roads) from the planned routetAvoid sections ahead: Excluding the section ahead of you, up to 50 km long, from the planned routetAvoid certain street: Excluding a certain street from the planned routetRestore original route: Allow all previously excluded sections again for the route planningKeyboard inputA keyboard is displayed for entering text or numeric values:1 236 45The keyboard oers dierent options:1Input display2Deleting last input3Showing special characters4Conrming input5Showing keyboard settings6Toggling between uppercase and lowercaseMap viewsWithout planned route1 2356 4This map view features the following functions and displays:1House numbers at your current positionDisplaying GPS information about the current posi-tionNavigation02_CapeTown_gb.indd 53 09.10.14 11:48](https://usermanual.wiki/Blaupunkt-Europe/CT945/User-Guide-2447257-Page-25.png)
![56Rear Seat Entertainment (RSE)The device features audio and video outputs for the rear area of the vehicle to which two external monitors and headphones, e.g. via suitable jacks, can be connected.The following sources are available for the Rear Seat Entertainment: tDisctUSB RSE (rear side)tA/V In 1tA/V In 2tDVB-T (with optional accessories)쏅Select the desired source in the main menu and start playback.쏅In the main menu (if necessary under Apps), select the Rear Zone app.쏅Under Rear Zone, select the previously started source.The playback now also takes place in the rear area of the vehicle.Note:During the RSE playback, you can select a dierent source for the front area of the vehicle in the main menu. The RSE playback of the originally selected source continues unimpeded.쏅To exit the RSE, select the Rear Zone app again and tap on Rear O.Showing device display on external monitorIf the installation position of the device is not optimal for viewing displays (e.g. for using the navigation), you can output the device display on an external monitor.쏅In the main menu (if necessary under Apps), select the Rear Zone app.To switch the playback on an external monitor on or o,쏅tap on Front Display.Note:As long as the playback on an external monitor is switched on, you cannot use the Rear Seat Entertain-ment.Steering wheel-mounted controls (SWC)Up to 8 functions of the device can be operated via existing steering wheel-mounted controls. This requires assigning the desired functions to the buttons of the steering wheel-mounted controls.Note:The SWC function operates with analogue control signals (passive resistive matrix). Depending on the vehicle type, you may require an additional interface.쏅In the main menu (if necessary under Apps), select the SWC app.In the rst step, assign the desired functions to up to 8 placeholders:쏅Select one of the placeholders 1 - 8.쏅Select a function for this placeholder.An assigned placeholder is identied by a check mark. A selected function is identied by the number of the placeholder.쏅Repeat these steps for every additional function to be assigned to the steering wheel-mounted controls.In the next step, assign the assigned placeholders to the buttons of the steering wheel-mounted controls:쏅Tap on Learn.Placeholder 1 and the assigned function are displayed.쏅Press a button of the remote control for approx. 1 second.The displayed function is assigned to the buttonbeing pressed.쏅Tap on [ ] to assign the next function.Note:Tap on [ ] to return to a previous function and, if necessary to reassign it.Rear Seat Entertainment | Showing device display on external monitor | Steering wheel-mounted controls02_CapeTown_gb.indd 56 09.10.14 11:48](https://usermanual.wiki/Blaupunkt-Europe/CT945/User-Guide-2447257-Page-28.png)