DIGEN DGU-6E14-N3 MGN AVN User Manual
DIGEN MGN AVN Users Manual
UserManual.wiki
>
DIGEN
>
DGU 6E14 N3 User Manual
Users Manual
Navigation menu
Upload a User Manual
Namespaces
Wiki Guide
HTML
PDF
Info
Views
User Manual
Discussion / Help
Navigation

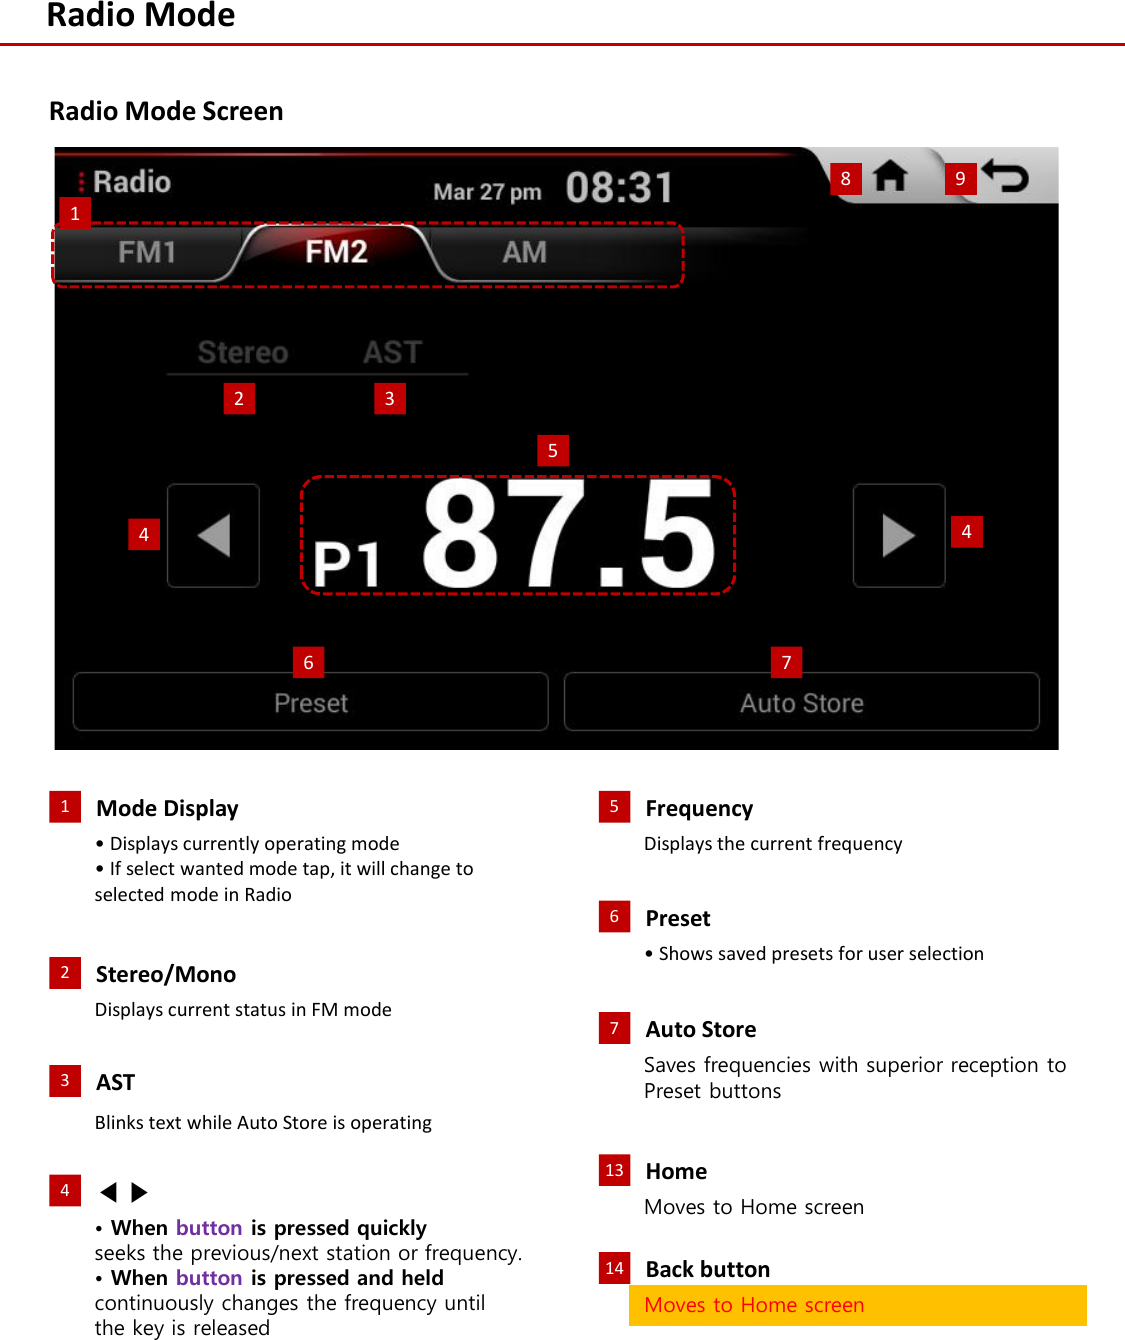
![Starting ModePress the [RADIO] key ▶Select the desired tab.Pressing the [RADIO] key on the head unit to change the mode in order of FM1 → FM2 → AM.Radio ModeUsing SEEK/TRACKPress the [SEEK], [TRACK] key to automatically search for frequencies.• When key is pressed shortly : Scans and receives the previous/next frequency• When key is pressed and held : Changes frequencies while pressed. Upon release, scans and receivesthe next frequencyUsing TUNETurn the TUNE knob left/right to select the frequency.• FM1/FM2 : Increases/decreases by 100kHz• AM : Increases/decreases by 9kHzSelecting PresetsPress the [Preset] button ▶Select the preset you want to listen to.InformationiYou can save up to 6 preset channels each for FM1, FM2 and AM.](https://usermanual.wiki/DIGEN/DGU-6E14-N3/User-Guide-2813385-Page-17.png)
![Saving Radio FrequencyRadio ModeSaving ManuallyAfter selecting frequency ▶Press the [Preset] button ▶Press and hold the preset list.A 'beep' will sound and the frequency is saved to the selected preset button.Saving AutomaticallyPress the [Auto Store] button to automatically save receivable frequencies to Preset buttons.A total of 18 frequencies with six preset frequencies each for FM1/FM2/AM modes can be saved.InformationiWhile Auto Store is operating, pressing the [Auto Store] button again will cancel the function and play the previous frequency.](https://usermanual.wiki/DIGEN/DGU-6E14-N3/User-Guide-2813385-Page-18.png)
![Starting ModeMedia ModePress the [HOME] key ▶Press the [Media] icon ▶Select an icon you want.](https://usermanual.wiki/DIGEN/DGU-6E14-N3/User-Guide-2813385-Page-19.png)
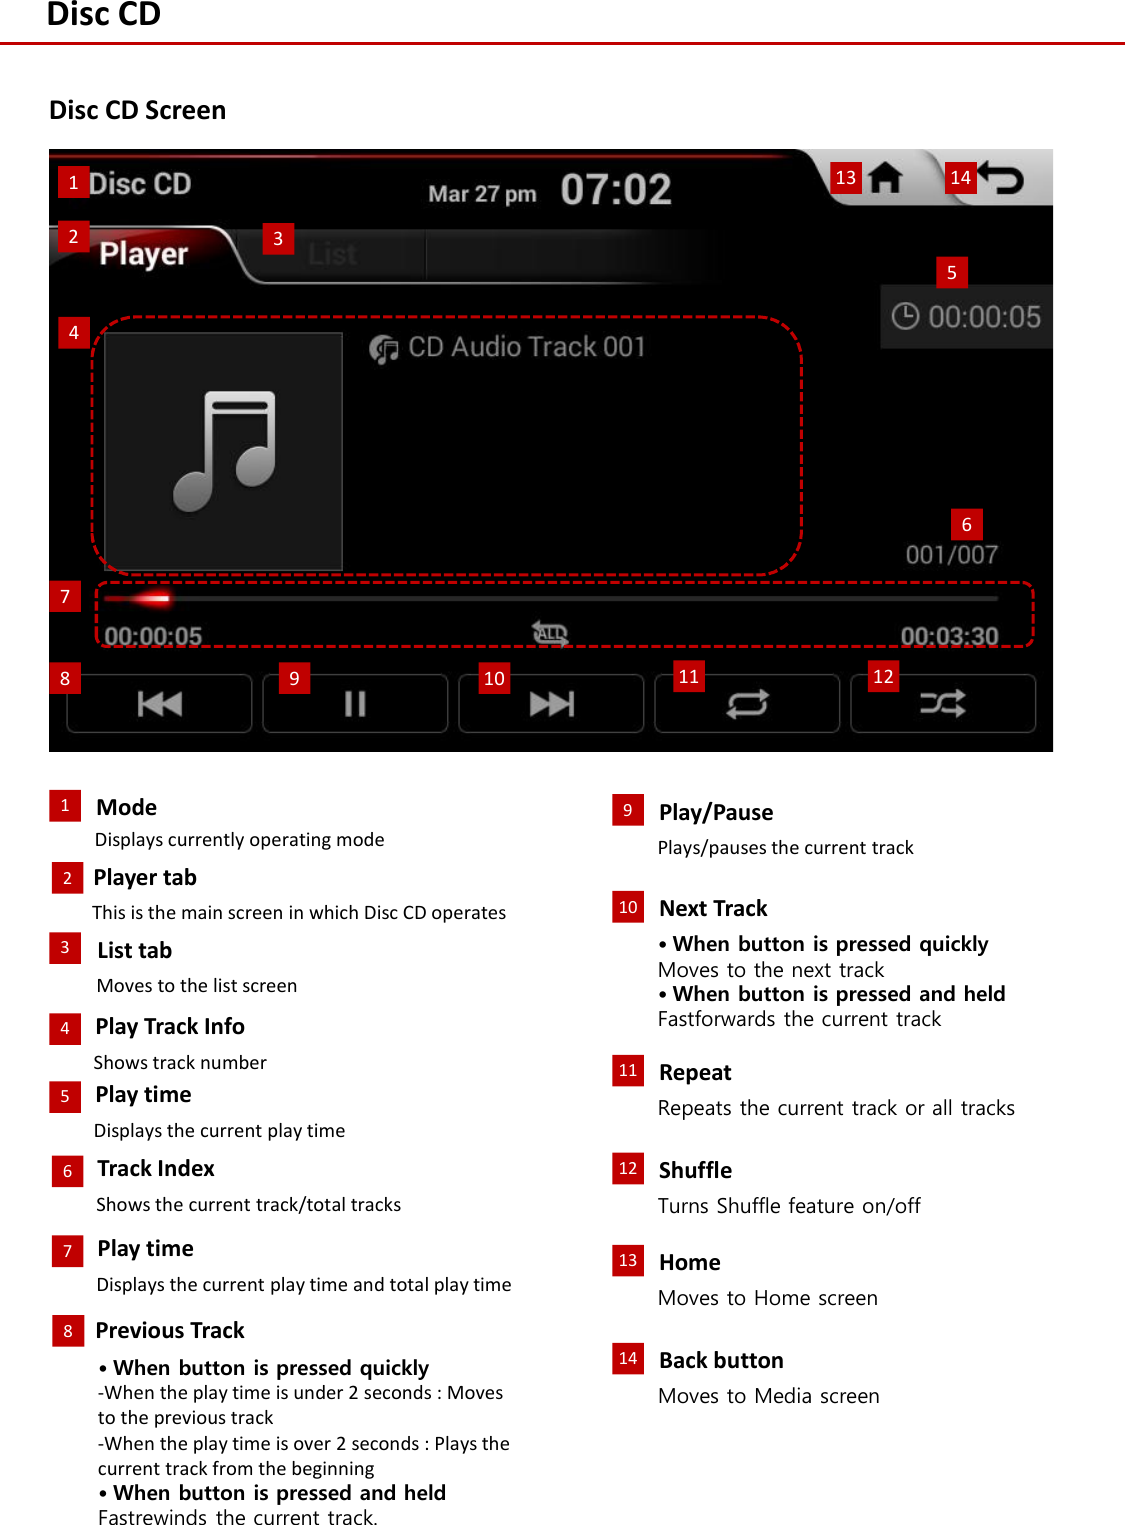
![Starting ModePress the [HOME] key ▶Press the [Media] icon ▶Press the [Disc CD].Disc CDFast-forwarding or Rewinding CD TracksWhile playing ▶Press and hold the [ l<<, >>l ] button.While the [ l<<, >>l ] button is being pressed, the track will rewind or fastforward.Once released, the track will begin playing at normal speed.InformationiCD mode will automatically start once a CD is inserted.Playing a CD• Press the [▶] button to play the track.• Press the [ll] button to pause the track.Selecting TracksWhile playing ▶Press the [∧SEEK , TRACK ∨] key or press the [ l<<, >>l ] button to select the previous/next track.](https://usermanual.wiki/DIGEN/DGU-6E14-N3/User-Guide-2813385-Page-26.png)
![Searching CD TracksTurn the TUNE knob ▶Search tracks ▶Once the desired track name is displayed, press the TUNE knob.Disc CDShufflePress the [ ].When searching tracks, the track number is displayed in red.Pressing the TUNE knob will play the correspondingtrack.InformationiIf the TUNE knob is not pressed within 5 seconds of searching tracks, the track info for the current track is restored.RepeatPress the [ ].Each time the button is pressed, the option is changed from Repeat all ( ) ▶Repeat One ( ).Each time the button is pressed, the option is changed from Shuffle On ( ) ▶Shuffle Off.Searching from the CD List ScreenPress the [List] tab ▶Turn the TUNE knob ▶Search tracks ▶Once the desired track number is displayed, press TUNE knob.When searching tracks, pressing the TUNE knob will play the track highlighted in red.Searching from the Player Screen](https://usermanual.wiki/DIGEN/DGU-6E14-N3/User-Guide-2813385-Page-27.png)
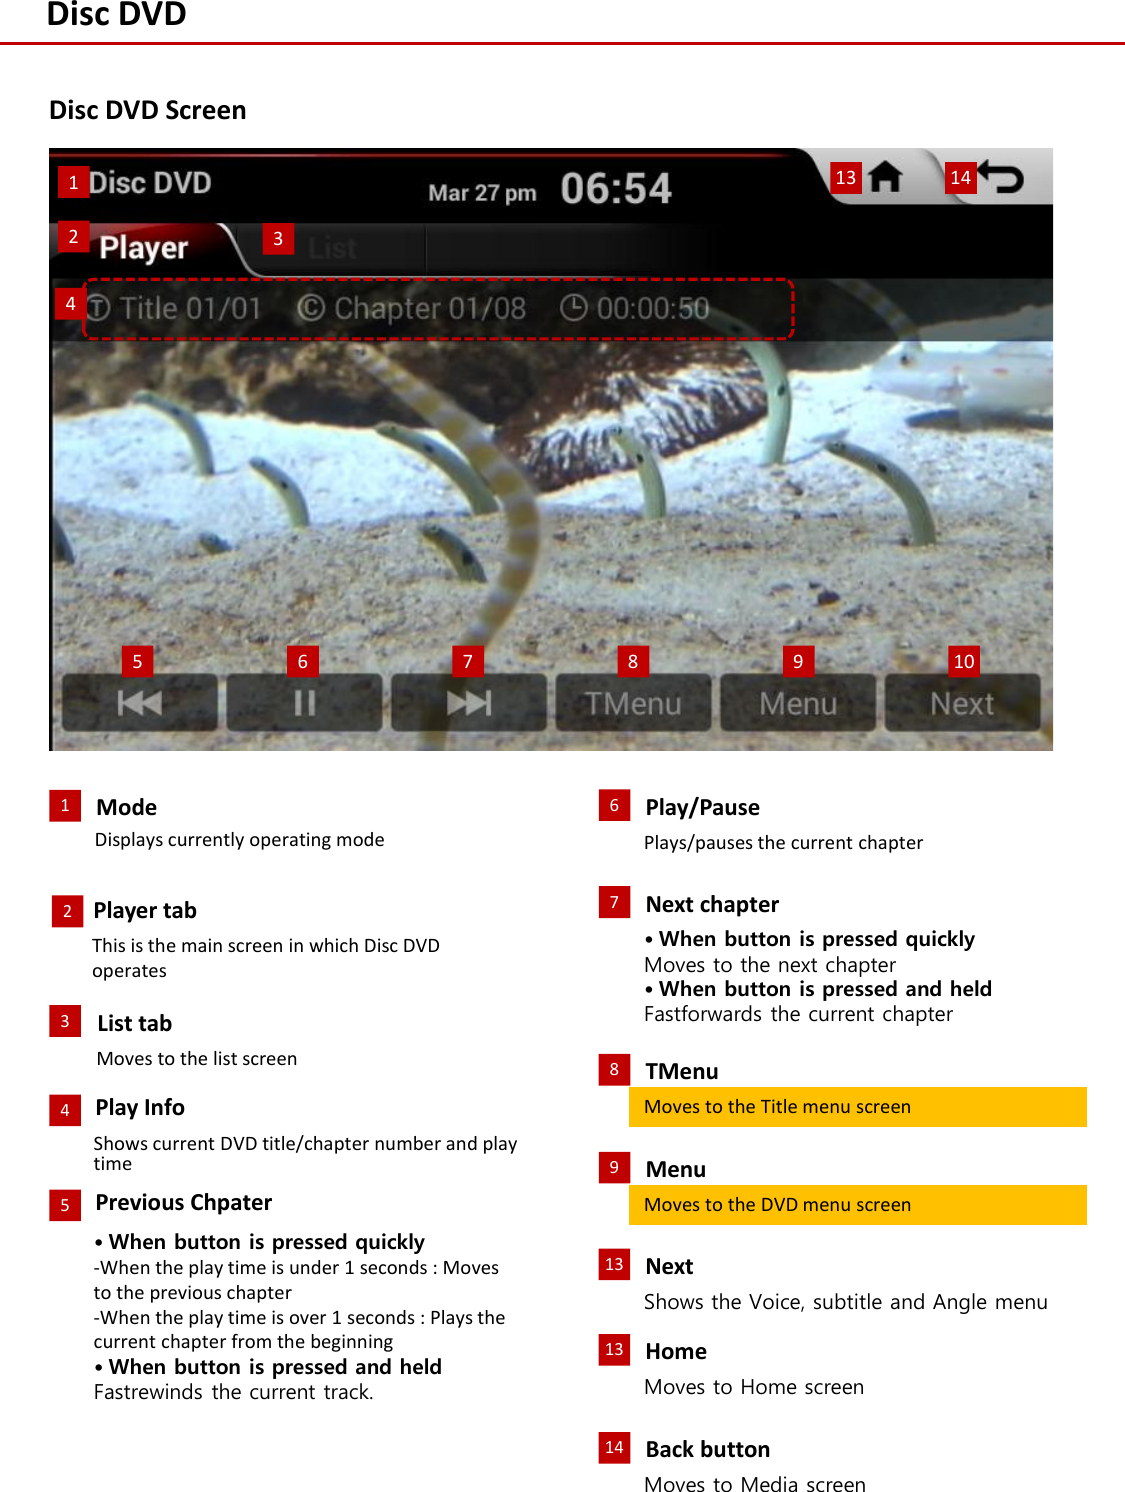
![Starting ModePress the [HOME] key ▶Press the [Media] icon ▶Press the [Disc DVD].Disc DVDFast-forwarding or Rewinding DVD ChapterWhile playing ▶Press and hold the [ l<<, >>l ] button.While the [ l<<, >>l ] button is being pressed, the chapter will rewind or fastforward.Once released, the chapter will begin playing at normal speed.Playing a DVD• Press the [▶] button to play the chapter.• Press the [ll] button to pause the chapter.Selecting ChaptersWhile playing ▶Press the [∧SEEK , TRACK ∨] key or press the [ l<<, >>l ] button to select the previous/next chapter.InformationiVCD mode will automatically start once a VCD is inserted.](https://usermanual.wiki/DIGEN/DGU-6E14-N3/User-Guide-2813385-Page-29.png)
![Searching Titles/ChaptersPress the [List] tab to search DVD titles and chapters.Disc DVDVoice LanguagePress the [Next] ▶Press the [Voice].Press the [Title] ▶Turn the TUNE knob ▶Search titles ▶Once the desired title number is displayed, press TUNE knob.When searching titles, pressing the TUNE knob will play the title highlighted in red.Title/DVD MenuPress the [TMenu] or [Menu].Push the controller up/down/left/right directions to select the desired menu and press the |Select| button.Each time the button is pressed, the voice language is changed in order.Searching ChaptersPress the [Chapter] ▶Turn the TUNE knob ▶Search chapter ▶Once the desired chapter number is displayed, press TUNE knob.When searching chapters, pressing the TUNE knob will play the chapter highlighted in red.Searching Titles](https://usermanual.wiki/DIGEN/DGU-6E14-N3/User-Guide-2813385-Page-30.png)
![Disc DVDSubtitle LanguagePress the [Next] ▶Press the [Subtitle].Each time the button is pressed, the subtitle language is changed in order.AnglePress the [Next] ▶Press the [Angle].Each time the button is pressed, the angle is changed in order.](https://usermanual.wiki/DIGEN/DGU-6E14-N3/User-Guide-2813385-Page-31.png)

![Starting ModePress the [HOME] key ▶Press the [Media] icon ▶Press the [Disc CD].Disc VCDFast-forwarding or Rewinding VCD TracksWhile playing ▶Press and hold the [ l<<, >>l ] button.While the [ l<<, >>l ] button is being pressed, the track will rewind or fastforward.Once released, the track will begin playing at normal speed.InformationiVCD mode will automatically start once a VCD is inserted.Playing a VCD• Press the [▶] button to play the track.• Press the [ll] button to pause the track.Selecting VCD TracksWhile playing ▶Press the [∧SEEK , TRACK ∨] key or press the [ l<<, >>l ] button to select the previous/next track.](https://usermanual.wiki/DIGEN/DGU-6E14-N3/User-Guide-2813385-Page-33.png)
![Searching VCD TracksDisc VCDPBCPress the [PBC] to display PBC screen.RepeatPress the [ ].Each time the button is pressed, the option is changed from Repeat all ( ) ▶Repeat One ( ).Input the page number you want to play ▶Press the [Select].Press the [back] button or [PBC OFF] to move to the Player screen.Press the [List] tab ▶Turn the TUNE knob ▶Search tracks ▶Once the desired track number is displayed, press TUNE knob.When searching files, pressing the TUNE knob will play the file highlighted in red.InformationiPBC menu only operates with PBC-compatible Video CDs .Return](https://usermanual.wiki/DIGEN/DGU-6E14-N3/User-Guide-2813385-Page-34.png)
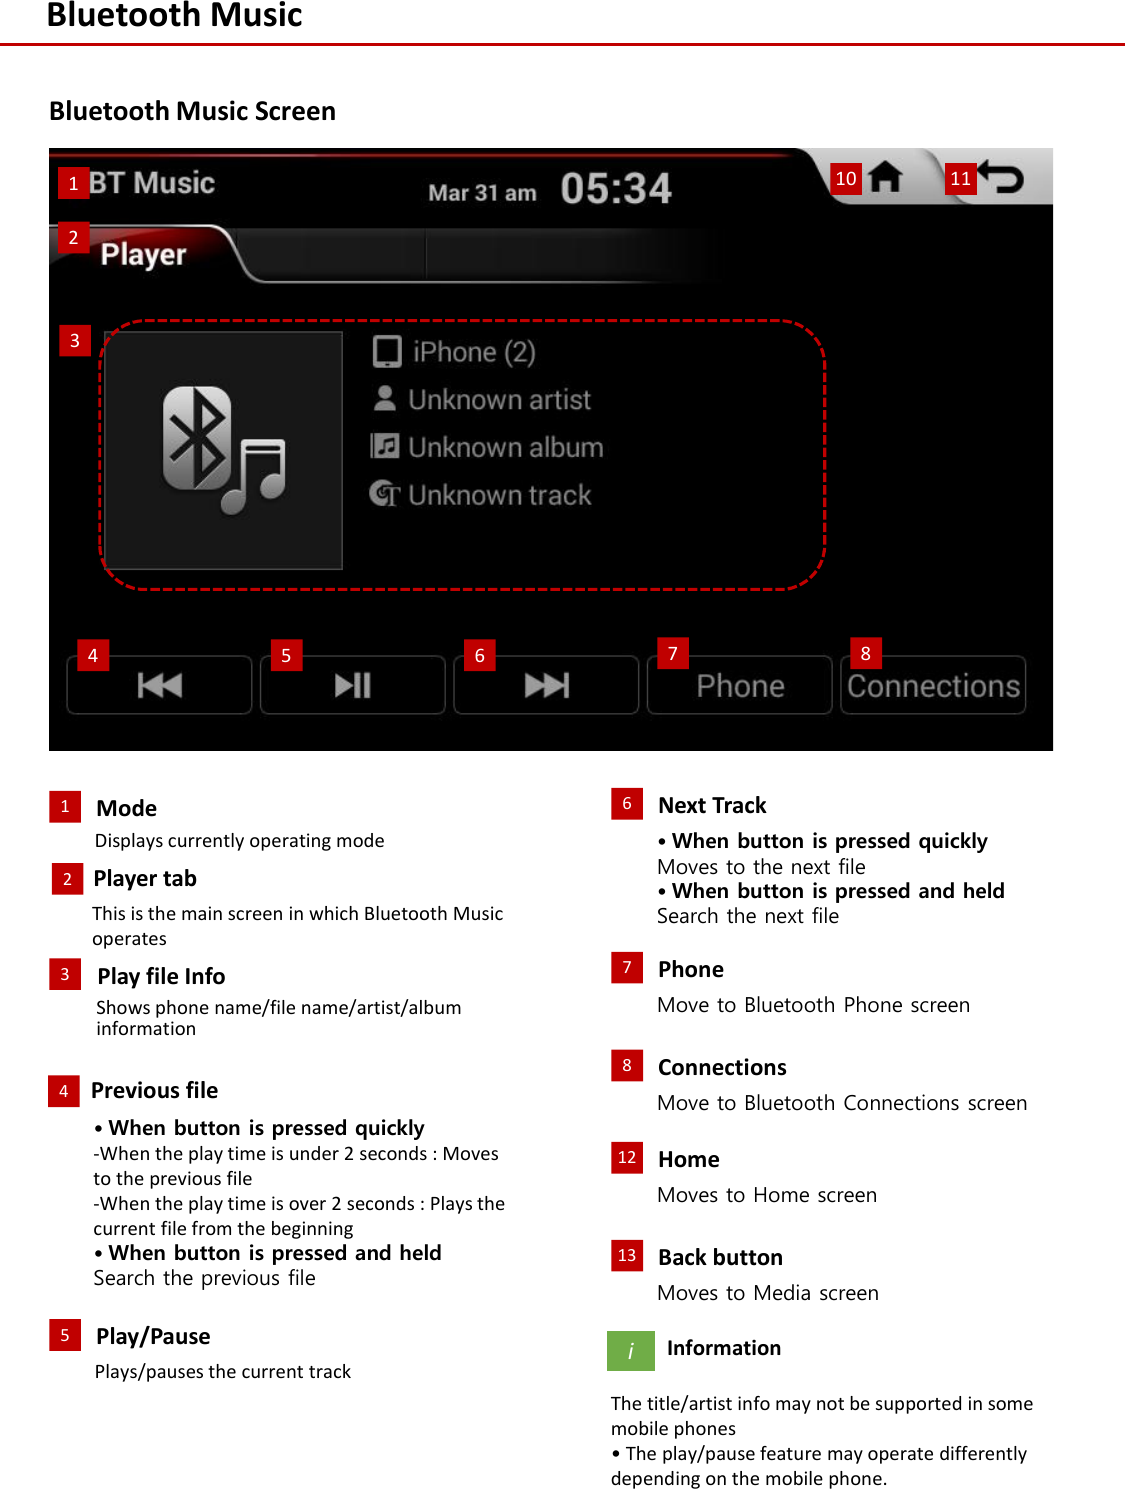
![Starting ModePress the [HOME] key ▶Press the [Media] icon ▶Press the [BT Music].Bluetooth MusicIf the Bluetooth device is not connected, then the USB Image icon will be disabled.Using Bluetooth® Music Mode•Bluetooth® Music Mode can be used only when a Bluetooth® phone has been connected.•While Bluetooth® Music is playing, if the Bluetooth® phone is disconnected, then the music will also stop.•Bluetooth® streaming audio may not be supported in some mobile phones.Playing Bluetooth Music• Press the [▶] button to play the file.• Press the [ll] button to pause the file.Selecting USB Image filesWhile playing ▶Press the [∧SEEK , TRACK ∨] key or press the [ l<<, >>l ] button to select the previous/next file.Switching to Bluetooth Phone mode While playing ▶Press the [Phone] button.](https://usermanual.wiki/DIGEN/DGU-6E14-N3/User-Guide-2813385-Page-36.png)
![Bluetooth MusicSetting ConnectionPress the [Connections] button to add a new Bluetooth® phone, connect/disconnect, delete and delete all.For details on setting connection, refer to “Bluetooth Connection” page xx.](https://usermanual.wiki/DIGEN/DGU-6E14-N3/User-Guide-2813385-Page-37.png)
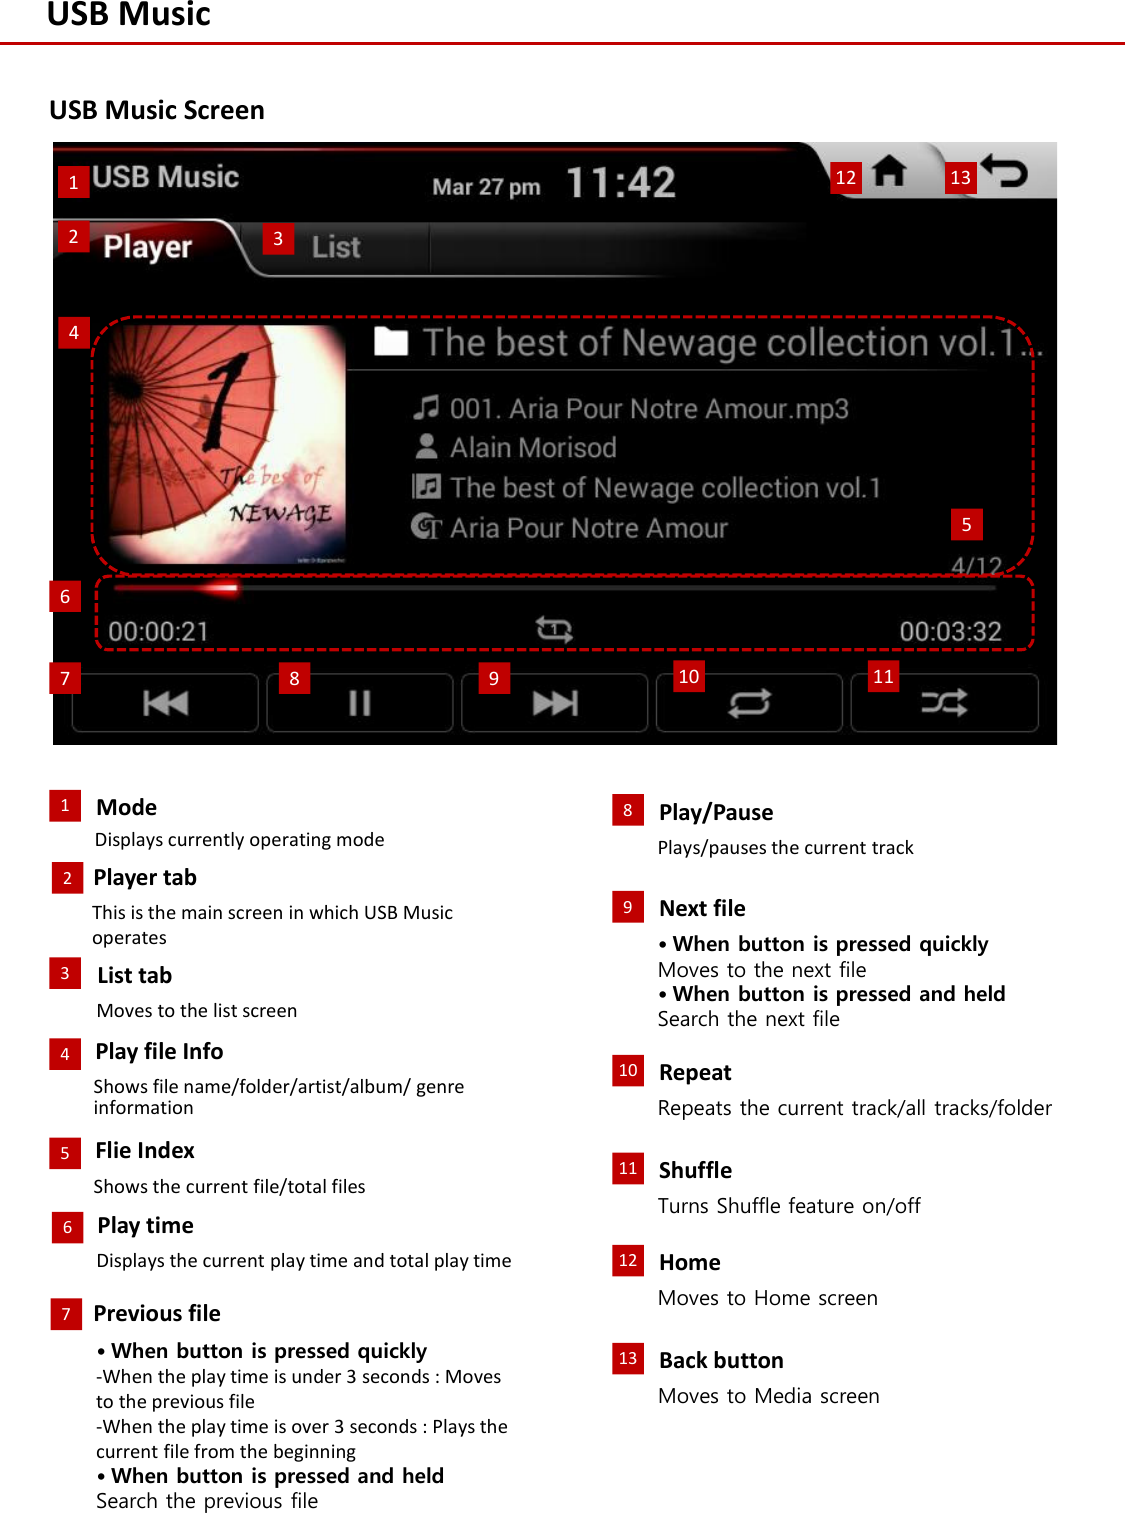
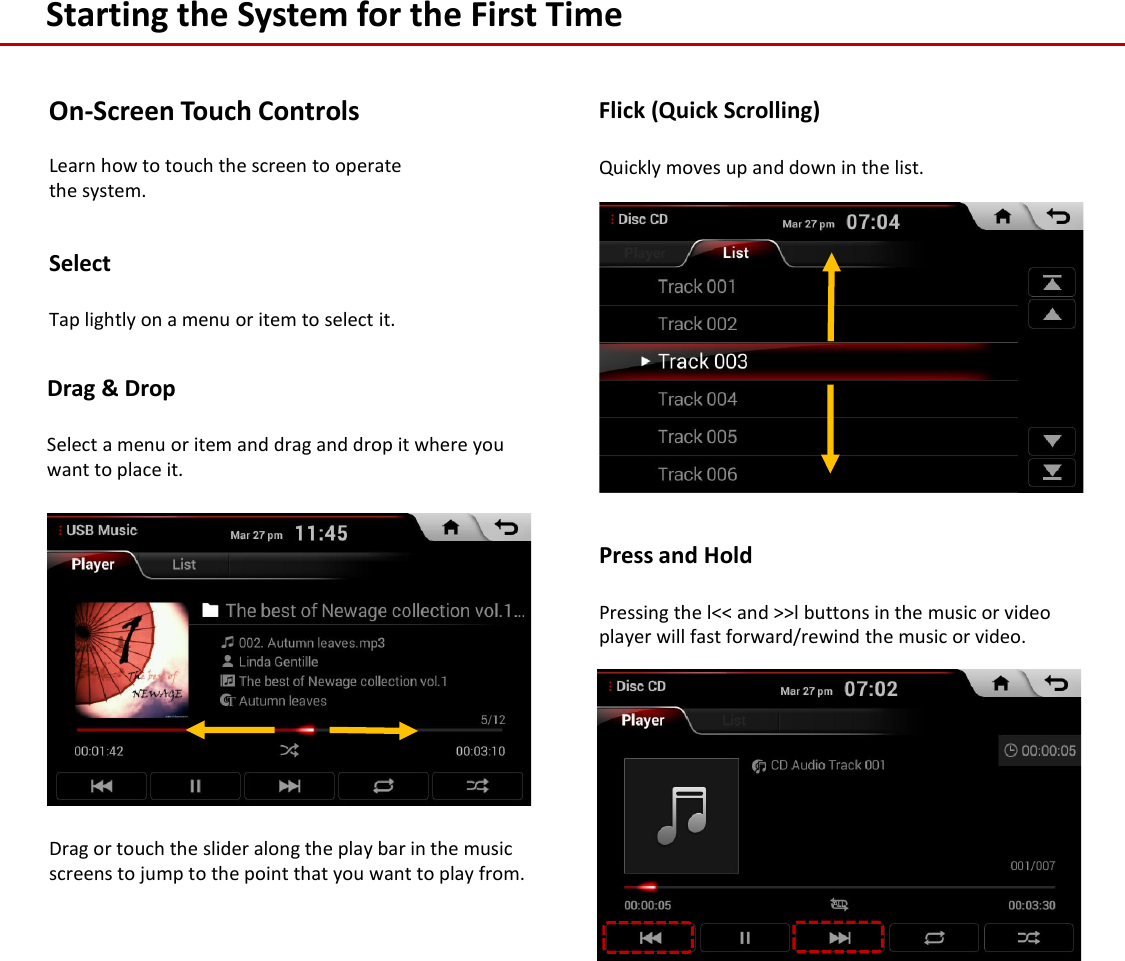
![Starting ModePress the [HOME] key ▶Press the [Media] icon ▶Press the [USB Music].USB MusicFast-forwarding or Rewinding USB Music filesWhile playing ▶Drag or touch the slider along the play bar in the music screens to jump to the point that you want to play from.InformationiUSB mode will automatically start once a USB is connected.Playing USB Music• Press the [▶] button to play the file.• Press the [ll] button to pause the file.Selecting USB Music filesWhile playing ▶Press the [∧SEEK , TRACK ∨] key or press the [ l<<, >>l ] button to select the previous/next file.If the USB is not connected, then the USB Music icon will be disabled.Press and hold the [∧SEEK , TRACK ∨] key or press the [ l<<, >>l ] button to search the previous/next file quickly.While the [∧SEEK , TRACK ∨] key or [ l<<, >>l ] button is being pressed, the file name is displayed in red.Once released, the track you select will begin playing.](https://usermanual.wiki/DIGEN/DGU-6E14-N3/User-Guide-2813385-Page-41.png)
![Searching USB Music filesTurn the TUNE knob ▶Search files ▶Once the desired file name is displayed, press the TUNE knob.USB MusicShufflePress the [ ].When searching files, the file name is displayed in red.Pressing the TUNE knob will play the correspondingfile.InformationiIf the TUNE knob is not pressed within 5 seconds of searching files, the file info for the current file is restored.RepeatPress the [ ].Each time the button is pressed, the option is changed from Repeat all ( ) ▶Repeat Folder ( ) ▶Repeat One ( ).Each time the button is pressed, the option is changed from Shuffle On ( ) ▶Shuffle Folder ( )▶Shuffle Off.Searching from the UBS Music List ScreenPress the [List] tab ▶Turn the TUNE knob ▶Search files ▶Once the desired file is displayed, press TUNE knob.When searching files, pressing the TUNE knob will play the file highlighted in red.Searching from the Player Screen](https://usermanual.wiki/DIGEN/DGU-6E14-N3/User-Guide-2813385-Page-42.png)
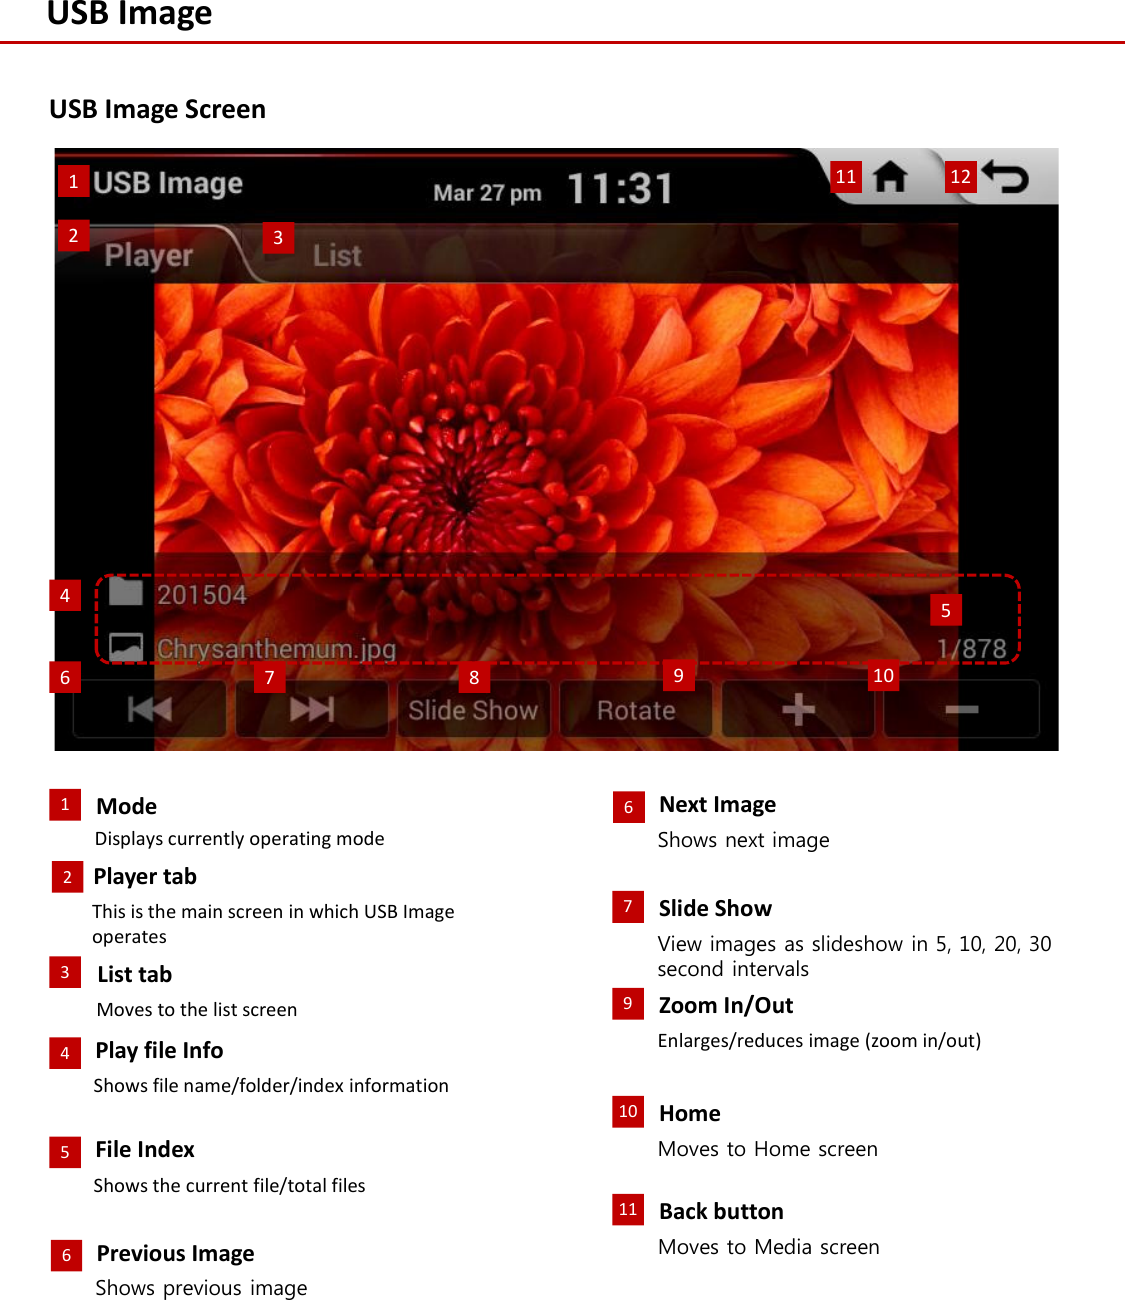
![Starting ModePress the [HOME] key ▶Press the [Media] icon ▶Press the [USB Image].USB ImageInformationiUSB mode will automatically start once a USB is connected.While playing ▶Press the [ l<<, >>l ] button to view the previous/next file.If the USB is not connected, then the USB Image icon will be disabled.Selecting USB Image filesSearching from the UBS Image List ScreenPress the [List] tab ▶Flick the lists or Press [▲, ▼] buttons ▶Search files ▶Once the desired file is displayed, press the file name.Slide ShowPress the [Slide Show] ▶Press the Show time. Image slide show intervals can be set at 5sec , 10sec , 20sec , or 30sec intervals.](https://usermanual.wiki/DIGEN/DGU-6E14-N3/User-Guide-2813385-Page-44.png)
![RotateUSB ImagePress the [Rotate].Each time the Rotate button is pressed, the image is rotated from 0˚ → 90˚ → 180˚ → 270˚ degrees.Informationi• The image will be restored to its original position when returning to it after viewing a different image.Adjusting Image SizePress the [+, -].The scale can be changed to x1/4, x1/2, x1, x2, x4.Press the [△▽◁▷] to move the screen.](https://usermanual.wiki/DIGEN/DGU-6E14-N3/User-Guide-2813385-Page-45.png)

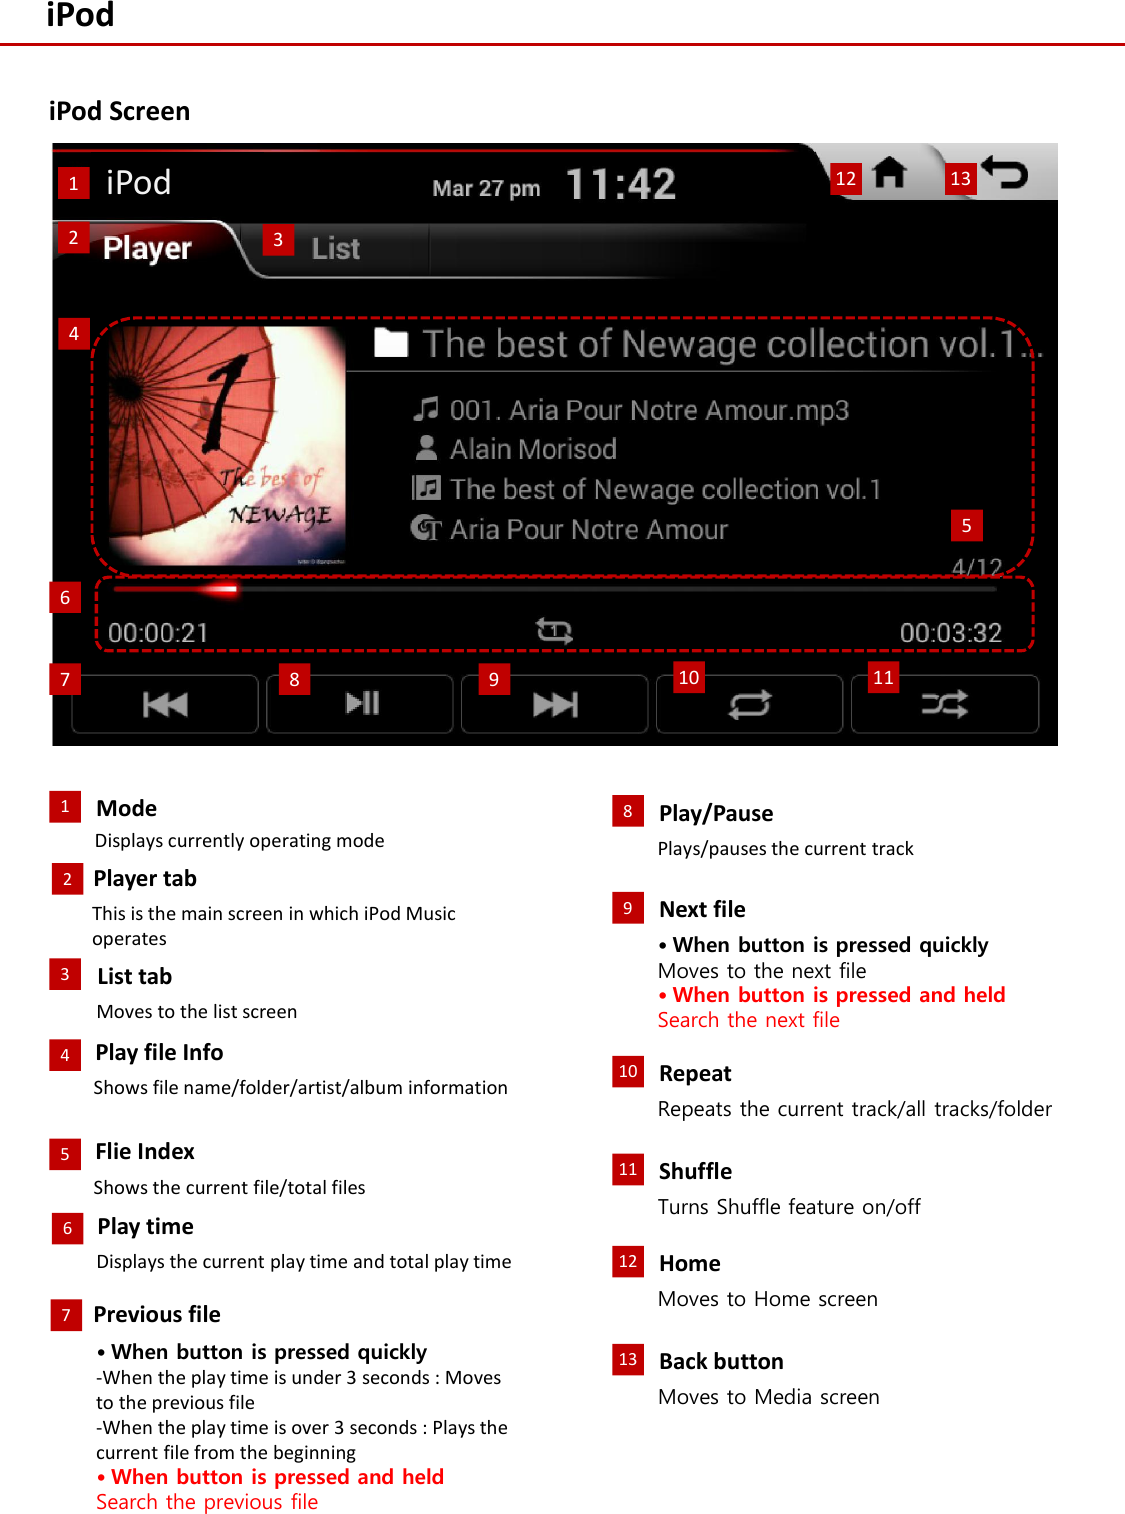
![Starting ModePress the [HOME] key ▶Press the [Media] icon ▶Press the [iPod].iPodInformationiUSB mode will automatically start once a USB is connected.Playing iPod Music• Press the [▶] button to play the file.• Press the [ll] button to pause the file.Selecting USB Music filesWhile playing ▶Press the [∧SEEK , TRACK ∨] key or press the [ l<<, >>l ] button to select the previous/next file.If the iPod is not connected, then the iPod icon will be disabled.Note• Some iPods with unsupported communication protocols may not properly operate with the Audio system.iPodiPod](https://usermanual.wiki/DIGEN/DGU-6E14-N3/User-Guide-2813385-Page-49.png)
![iPodShufflePress the [ ].RepeatPress the [ ].Each time the button is pressed, the option is changed from Repeat all ( ) ▶Repeat One ( ).Each time the button is pressed, the option is changed from Shuffle On ( ) ▶Shuffle Off.Searching USB Music filesPress the [List] tab ▶Turn the TUNE knob ▶Search files ▶Once the desired file is displayed, press TUNE knob.When searching files, pressing the TUNE knob will play the file highlighted in red.Search tracks by list type. Search for songs according to Playlist, Artist, Song, Album and Genre.](https://usermanual.wiki/DIGEN/DGU-6E14-N3/User-Guide-2813385-Page-50.png)
![When no phones have been pairedBluetooth ConnectionPress the [HONE] key ▶Press the [Phone] icon ▶Press the [Yes] button ▶Pair your car after your mobile phone detects the Bluetooth device ▶Enter the passkey or accept the authorization pop-up ▶Connect Bluetooth.Pairing and Connecting a Phone When a phone is already pairedBefore you can use the Bluetooth feature, you must first pair/connect your mobile phone to your car.Up to 5 Bluetooth devices can be paired. Only one Bluetooth device can be connected at a time.The default passkey is 0000.The device name above is an example.Check the actual information on the product.Press the [HONE] key ▶Press the [Phone] icon ▶Press the [Connections] button.Select the Phone name you want to connect ▶Press the [Connect] button.If the phone you want to connect does not exist, Press the [New Registration] button to pair a new Bluetooth® device.Informationi• To learn more about searching from Bluetooth® devices and pairing, refer to the user's manual for your Bluetooth® device.• Bluetooth® devices cannot be paired when the vehicle is in motion. first park the vehicle to pair a Bluetooth® device.11 2 3 4Name Description1 New RegistrationPair a new Bluetooth® device2 Connect Connect a Bluetooth® device3 Delete Delete a paired Bluetooth® device4 Delete All Delete all paired Bluetooth®device](https://usermanual.wiki/DIGEN/DGU-6E14-N3/User-Guide-2813385-Page-53.png)
![Bluetooth ConnectionPress the [HONE] key ▶Press the [Phone] icon to display the following screen. When your phone is connectedPress the [HONE] key ▶Press the [Phone] icon ▶Press the [Connections] button ▶Select the Phone name you want to disconnect ▶Press the [YES].Disconnecting a DevicePress the [HONE] key ▶Press the [Phone] icon ▶Press the [Connections] button ▶Select the Phone name you want to delete▶Press the [YES].Delete a DeviceInformationiIf a paired phone is deleted, the call history and contacts will also be deletedPress the [Delete All] button to delete all paired Bluetooth® device.Note• Once Bluetooth connection is successful, the name of the connected mobile phone will be displayed on the phone screen and Bluetooth handsfree functions will be ready to be operated.• Some functions may not be supported due to limited Bluetooth compatibility between the car system and mobile phone.](https://usermanual.wiki/DIGEN/DGU-6E14-N3/User-Guide-2813385-Page-54.png)
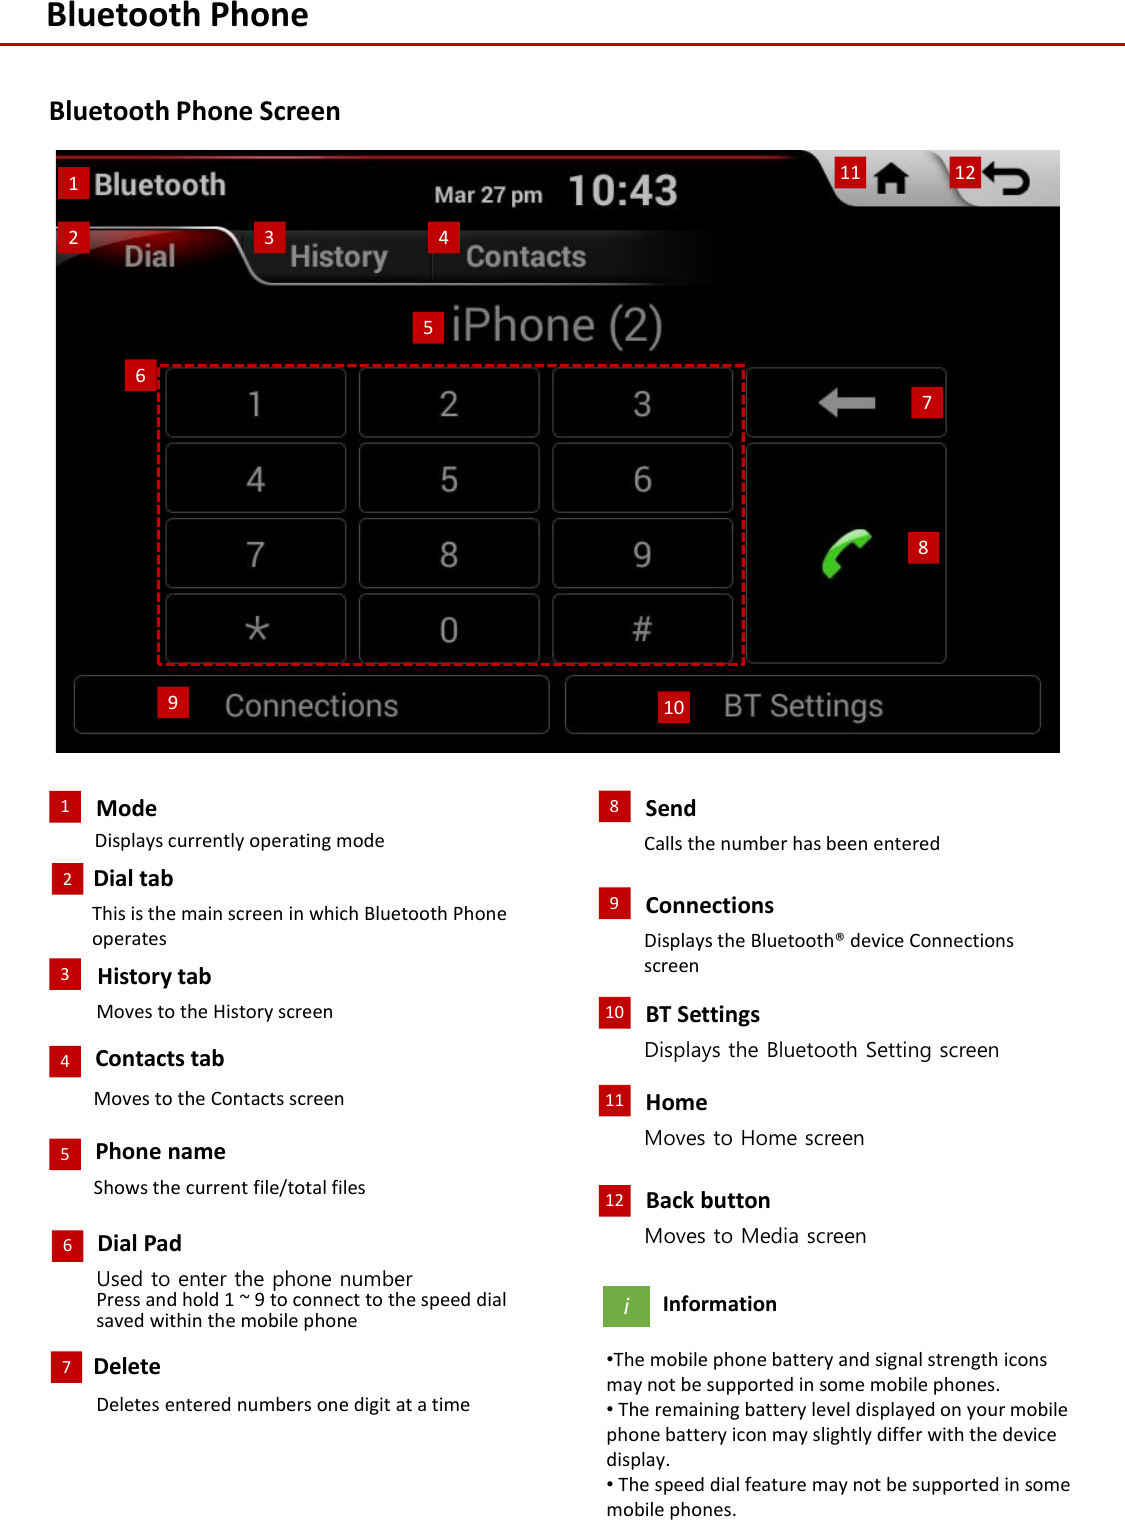
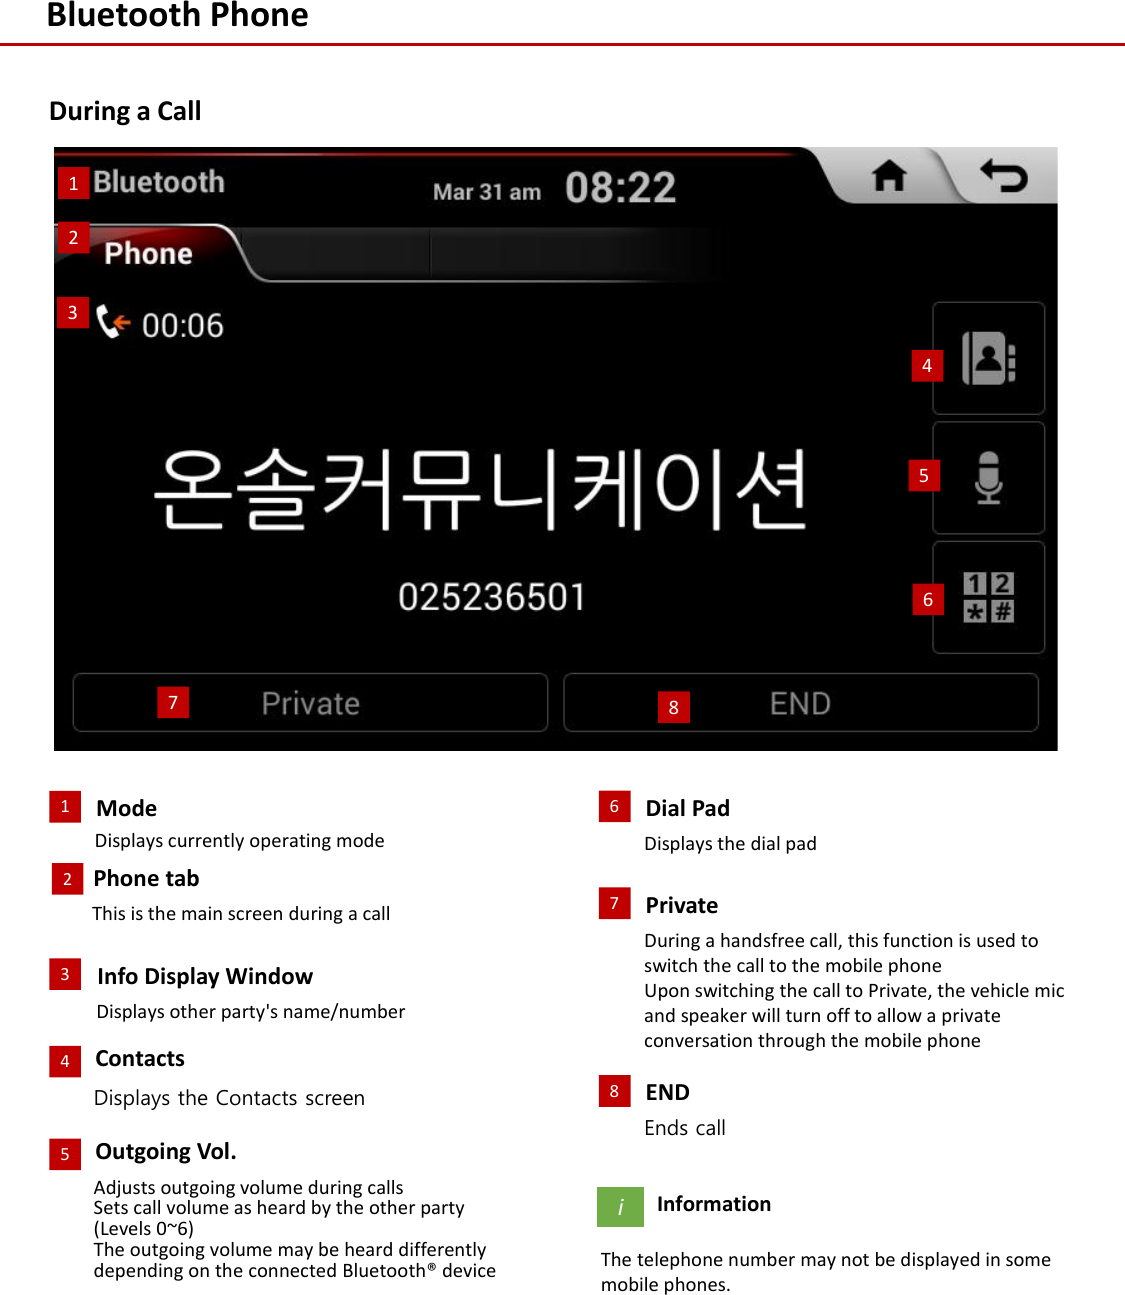
![Bluetooth ConnectionEnter number on the Dial Pad ▶Press the [ ].Making a CallWithin the Phone screen, press the [History] button ▶Press and hold contact from the Call History.Making a Call from Call HistoryWithin the Phone screen, press the [Contacts] button ▶Press contact from the Contacts ▶Press [Call]Making a Call from ContactsCalling by Dialing a NumberInformationiMost Audio and Setup mode features will not operate during a Bluetooth® handsfree call. Only the call volume and Navigation mode screen can be operated.Enter the 1 or 2 digit speed dial number with the Dial Pad ▶Press and hold the last number.Making a Call from Speed DialInformationi• For speed dials saved within mobile phones, up to 2 digits are supported.• Saving or changing speed dial numbers through the head unit is not supported.Informationi• Calling through the contacts is not possible when there is no contacts or the Bluetooth® phone has not been connected.• Within the Contacts screen, press the Download button to download the contacts saved in your mobile phone into the vehicle.• For more information on downloading contacts, refer to the "Contacts ▶Downloading contacts" section.](https://usermanual.wiki/DIGEN/DGU-6E14-N3/User-Guide-2813385-Page-57.png)
![Bluetooth ConnectionIncoming call notice ▶Press the [Yes] button.Answering a CallDuring Handsfree call ▶Press the [Private].Operating features during a CallThe call will be switched from the handsfree to the Bluetooth® mobile phone.Informationi•When the incoming call pop-up is displayed, most functions within AV mode will not operate. •The telephone number may not be displayed in some mobile phones.Incoming call notice ▶Press the [No] button .Rejecting a CallInformationi•The reject call function may not be supported in some mobile phones.When a call is received on the connected phone, the bell will sound and the phone number of the other party will be displayed on the incoming call pop-up, as shown here.Switching Call to Bluetooth® PhoneDuring call on mobile phone ▶Press the [Hand Off].Switching Call to HandsfreeThe call will be switched from the Bluetooth® mobile phone to the car handsfree.](https://usermanual.wiki/DIGEN/DGU-6E14-N3/User-Guide-2813385-Page-58.png)
![Bluetooth ConnectionWhile on a call ▶Press the [END] button.Ending a CallWhile on a call ▶Use the VOL knob on the head unit or the to adjust the ring/call volume.Adjusting the Ring/Call VolumeWhile on a call ▶Press the [ ] ▶Set Outgoing Volume ▶Press [OK] .Setting Mic VolumeInformationiThe volume heard by the other party may differ depending on the mobile phone. If call volume heard by the other party is too low or too high, adjust the volume setting.The Bluetooth® handsfree call will end.](https://usermanual.wiki/DIGEN/DGU-6E14-N3/User-Guide-2813385-Page-59.png)
![Bluetooth ConnectionPress the [HONE] key ▶Press the [Phone] icon ▶Press the [Contacts] tab.ContactsPress the [Download] button in the Contacts screen.Downloading Mobile Phone ContactsInformationi•Mobile phone contacts can only be searched when a Bluetooth® device is connected. •For contacts, up to 5,000 entries can be downloaded to each paired Bluetooth® device.•It is possible to download contacts during a call or while operating Bluetooth® streaming audio mode.•It is not possible to download contacts when the contacts download setting has been turned off within your Bluetooth® device.•Some devices may also require device authorization to download contacts.•If downloading cannot be normally conducted, check the Bluetooth® device settings or whether download confirm popup is displayed on the phone screen.•The download feature may not be supported in some mobile phones.•Check to see that the Bluetooth® device supports the download feature. 12345Name Description1 Buetooth®Device NameName of connected Bluetooth® device2 Information Displays contacts details3 List Page Displays total number of list pages and current listpage (List page jump upon selecting scroll area)4 Call Calls the number has been seleted5 Download Download contacts from Bluetooth® deviceInformationi•Upon downloading mobile phone contacts, the previous corresponding data is deleted.•This feature may not be supported in some mobile phones.•Upon downloading, contacts saved in your mobile phone are simultaneously downloaded.](https://usermanual.wiki/DIGEN/DGU-6E14-N3/User-Guide-2813385-Page-60.png)
![Bluetooth ConnectionPress the [ ] of the desired phone number from the mobile contacts list to check details about the contact Checking Mobile Contacts DetailsPress the [History] tab in the Phone screen.Call HistoryInformationi•The call history may not be saved in the call history list in some mobile phones.•Calls received with hidden caller ID will not become saved in the call history list. •Calling through the call history is not possible when there is no call history or the Bluetooth® phone has not been connected.• Up to 50 dialed, incoming, and missedcall history lists can be downloaded. Thedialed/incoming time and call time informationare not supported.The time of received/dialed calls and call time information are not saved.Press the [Call] button to make a call.Press the [Delete] button to delete the contacts.InformationiDeleting contacts in the car will not be applied to your mobile phone.Entering Call History Screen1 2 3Name Description1 Displays the incoming callhistory list2 Displays the outgoing call history list3 Displays the missed call historylist](https://usermanual.wiki/DIGEN/DGU-6E14-N3/User-Guide-2813385-Page-61.png)
![Bluetooth ConnectionPress the [HONE] key ▶Press the [Phone] icon ▶Press the [BT Settings] tab.Bluetooth® SettingsPress the [Download Contacts] button ▶Select the desired option.Download ContactsSetting Auto ConnectionPress the [Auto Connection] button ▶Select the desired option.If you select [Connect automatically], the Bluetooth® device will automatically be connected when the car ignition is turned on.If you do not want to connect automatically, Select [Do not connect automatically].When connecting a Bluetooth® device, it is possible to automatically download contacts.](https://usermanual.wiki/DIGEN/DGU-6E14-N3/User-Guide-2813385-Page-62.png)