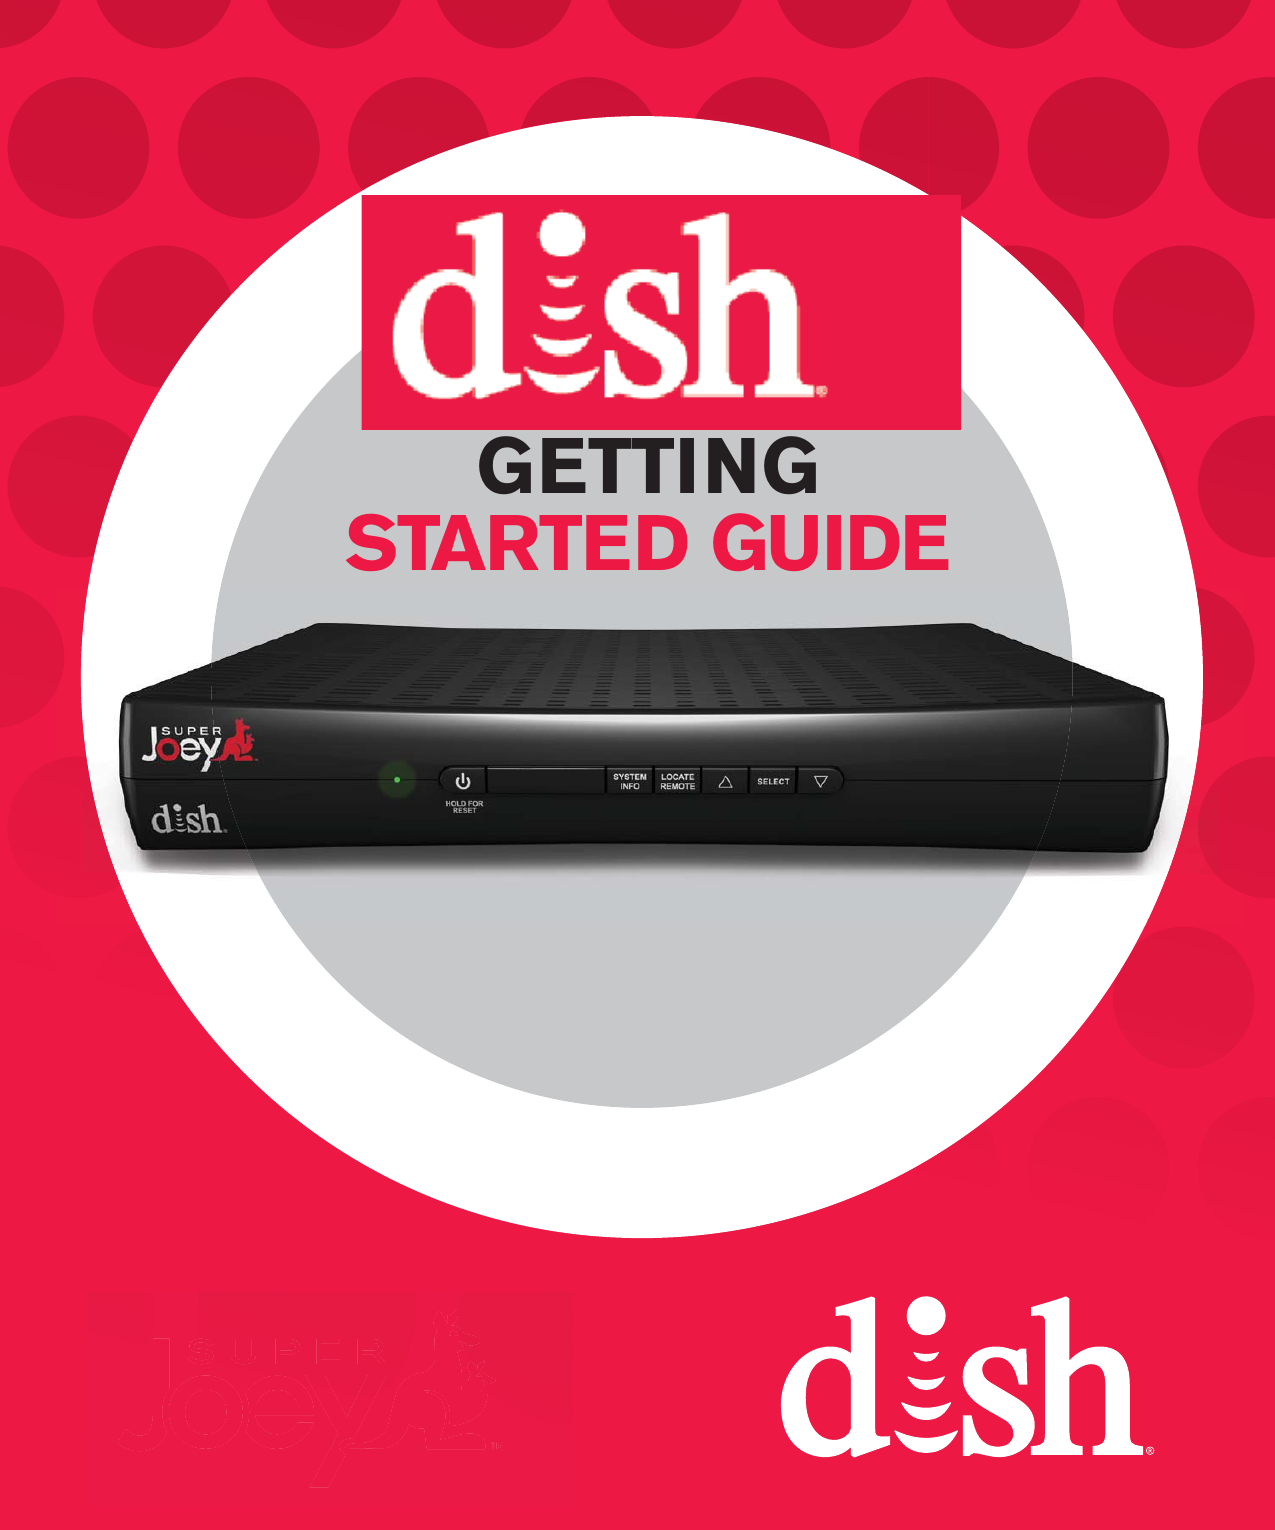
DISH Technologies MJK462 ZIGBEE Satellite Set Top Box User Manual User Guide ID089 DRAFT

Echostar Technologies LLC ZIGBEE Satellite Set Top Box User Guide ID089 DRAFT

User Guide ID089 DRAFT

Super JoeyGETTINGSTARTED GUIDE
Warning and Attention SymbolsYou must be aware of safety when you install and use this system. This Super Joey Getting Started Guide provides various procedures. If you do some of these procedures carelessly, you could injure or kill yourself or damage equipment or property. Some other procedures require special attention.7KHOLJKWQLQJÀDVKZLWKDUURZKHDGV\PEROZLWKLQDQHTXLODWHUDOWULDQJOHis intended to alert the user to the presence of uninsulated “dangerous YROWDJH´ZLWKLQWKHSURGXFW¶VHQFORVXUHWKDWPD\EHRIVXI¿FLHQWPDJQLWXGHto constitute a risk of electric shock to persons.The exclamation point within an equilateral triangle is intended to alert the user to the presence of important operating and maintenance (servicing) instructions in the literature accompanying the appliance.The Class II equipment symbol means the equipment has additional insulation and does not need to be grounded.For Your Safety Warning: Do not try to open the case of the receiver. There is risk of electrical shock, which may cause damage to the receiver and/or personal injury or death to you. There are no user-serviceable parts inside the receiver. Opening the receiver’s case or making unauthorized changes will void the warranty.:DUQLQJ7RUHGXFHWKHULVNRI¿UHRUHOHFWULFVKRFNGRQRWH[SRVHWKLVappliance to rain or moisture.Important Software NoticeAs with all software controlled products, unexpected behavior could arise if the user tries to perform operations in a non-routine manner. This product, like almost any other high tech product, is subject to bugs and hence EchoStar CANNOT AND DOES NOT GUARANTEE OR WARRANT THAT ALL FEATURES, SUCH AS PARENTAL CONTROLS, WILL WORK AS INTENDED UNDER ALL CIRCUMSTANCES. EchoStar endeavors to improve such conditions and will periodically download improvements.
iEquipment and Software Covered by this User GuideThis Super Joey Getting Started Guide covers the Super Joey™ receiver and software models Super Joey. This Super Joey Getting Started Guide may cover other devices not listed here.Publishing InformationCopyright © 2013. EchoStar Technologies L.L.C., Englewood, Colorado 80112. All rights reserved.The information in this Super Joey Getting Started Guide may change without notice. Revisions may be issued to tell you about such changes.Send comments or questions about this Super Joey Getting Started Guide to  techpubs@echostar.com orTechnical Publications, EchoStar Technologies L.L.C, 90 Inverness Drive Circle East, Englewood, Colorado 80112.DISH Network is a registered trademark of DISH Network L.L.C.All product names, trade names, or corporate names mentioned in this Super Joey Getting Started Guide are acknowledged to be the proprietary property of the registered owners.Manufactured under license from Dolby Laboratories. Dolby and the double-D symbol are trademarks of Dolby Laboratories.®+'0,WKH+'0,ORJRDQG+LJK'H¿QLWLRQ0XOWLPHGLDInterface are trademarks or registered trademarks of HDMI Licensing LLC.This equipment may incorporate copyright protection technology that is protected by U.S. patents, patent applications, and/or other intellectual property rights. Use of such copyright protection technology is intended for home and other limited pay-per-view uses only unless otherwise authorized. Reverse engineering or disassembly is prohibited.
ii1  Read these instructions.2  Keep these instructions.3  Heed all warnings.4  Follow all instructions.5  Do not use the apparatus near water.6  Clean only with a dry cloth.7  Do not block any ventilation openings. Install in accordance with the manufacturer’s instructions.8  Do not install near any heat sources such as radiators, heat registers, stoves, or RWKHUDSSDUDWXVLQFOXGLQJDPSOL¿HUVWKDWSURGXFHKHDW9  Do not defeat the safety purpose of the polarized or grounding-type plug. A polarized plug has two blades with one wider than the other. A grounding-type plug has two blades and a third grounding prong. The wide blade or the third prong are provided IRU\RXUVDIHW\,IWKHSURYLGHGSOXJGRHVQRW¿WLQWR\RXURXWOHWFRQVXOWDQHOHFWULFLDQfor replacement of the obsolete outlet.10  Protect the power cord from being walked on or pinched, particularly at plugs, convenience receptacles, and the point where they exit from the apparatus.11  2QO\XVHDWWDFKPHQWVDFFHVVRULHVVSHFL¿HGE\WKHPDQXIDFWXUHU12  Unplug the apparatus during lightning storms or when unused for long periods of time.13  5HIHUDOOVHUYLFLQJWRTXDOL¿HGVHUYLFHSHUVRQQHO6HUYLFLQJLVUHTXLUHGZKHQWKHapparatus has been damaged in any way, such as the power supply cord or plug is damaged, liquid has been spilled or objects have fallen into it, the apparatus has been exposed to rain or moisture, does not operate normally, or has been dropped.14  The power plug must be readily accessible so that the apparatus can be easily disconnected from the AC power.15  The receiver is still connected to the AC power whenever it is plugged into a live power outlet, even if it is turned off using the remote control or front panel buttons.16  1RÀDPHVRXUFHVVXFKDVOLWFDQGOHVVKRXOGEHSODFHGRQWKHHTXLSPHQW17  7KHDSSDUDWXVVKDOOQRWEHH[SRVHGWRGULSSLQJRUVSODVKLQJDQGQRREMHFWV¿OOHGwith liquids, such as vases, shall be placed on the top of it.18  Use only the power supply provided with the receiver. Unplug the receiver power cord by gripping the power plug, not the cord.19  'RQRWRYHUORDGZDOORXWOHWVRUH[WHQVLRQFRUGVWKLVFDQUHVXOWLQDULVNRI¿UHRUelectrical shock.20  Never insert objects of any kind into the receiver through openings, as the objects PD\WRXFKGDQJHURXVYROWDJHSRLQWVRUVKRUWRXWSDUWV7KLVFRXOGFDXVH¿UHRUelectrical shock.Important Safety Instructions
iiiImportant Safety Instructions, continued21  Do not locate the antenna near overhead light or power circuits, or where it can fall into such power lines or circuits. When installing the antenna, take extreme care to avoid touching such power lines or circuits, as contact with them can be fatal.22  Do not attempt to service the receiver yourself, as opening or removing covers may expose you to dangerous voltage and will void the Limited Warranty. Refer all servicing to authorized service personnel.23  Unplug the receiver from the AC power outlet before cleaning.24  Do not place the receiver in an enclosure such as a cabinet without proper ventilation.25  Do not install the receiver in any area where the temperature can be less than 40°F or more than 113°F. If the receiver is cold to the touch, do not plug it in immediately. Let it sit unplugged at room temperature for at least 45 minutes before plugging it in.26  Use an outlet that contains surge suppression or ground fault protection. During an electrical storm or when the receiver is left unattended and unused for long periods of time, unplug the power cord from the wall outlet, disconnect the lines between the receiver and the antenna, and disconnect the telephone line. These actions provide additional protection against damage caused by lightning or power line surges.27  Tighten all of the coaxial cable connections only by hand. If you use a wrench, you may overtighten the connections and damage your equipment.Proper Care of Your Equipment Always handle the receiver carefully.  Excessive shock and vibration can damage it. If the equipment is turned on and needs to be moved, unplug the equipment and let it sit for al least 30 seconds before moving it. The use of accessories or attachments not recommended by the receiver manufacturer and voids the Limited Warranty. Do not stack the receiver on top of or below other electronic devices as this can cause heat build-up and vibration. 2QVRPH79VWKHSUHVHQFHRI¿[HGLPDJHVIRUH[WHQGHGSHULRGVRIWLPHPD\cause them to be permanently imprinted on the screen. Consult your TV user guide for information on whether this a problem for your TV, what operating/viewing restrictions apply to avoid this problem, and associated TV warranty coverage.
ivIf this equipment does cause harmful interference to radio or television reception, which can be determined by turning the equipment off and on, the user is encouraged to try to correct the interference by one or more of the following measures:  Reorient or relocate the antenna assembly. Increase the separation between the equipment. Connect the equipment into an outlet on a circuit different from that to which the receiver is connected. Consult the dealer or an experienced radio/TV technician for help.Important Safety Instructions, continuedNote to Antenna Installer:  This reminder is provided to call the antenna installer’s attention to the National Electrical Code® (NEC) which provides guidelines for proper bonding and grounding of antennas and their associated cabling.
1Super Joey Receiver With the Super Joey™ receiver, watch and record up to 8 channels of KLJKGH¿QLWLRQ+'DQGVWDQGDUGGH¿QLWLRQ6'SURJUDPPLQJZKLOHhaving the next-generation of TV content delivered, including multimedia services over IP-based networks. The Super Joey receiver uses coaxial connections within the dwelling to connect to the host receiver, a Hopper® or a Hopper® with Sling, and delivers HD programming and recorded programs from that receiver to the Super Joey receiver. Content includes live, paid, and DVR programming in HD, SD, and 3D. The Super Joey receiver adds two tuners to your Whole Home DVR network, making them available to the Hopper receivers and other Joey receivers in your Hopper® Whole-Home HD DVR System. Like a Joey® box, the Super Joey receiver can display prerecorded content from the DVR or IP-delivered content.A Hopper or Hopper with Sling receiver supports up to three Joey boxes and one Super Joey through the coaxial connections.  A Super Joey receiver must be directly connected to an Integrator, which is connected to an LNBF.The remote uses radio frequency (RF) signals to control the Super Joey receiver and IR signals to control any other equipment you have programmed. RF signals travel relatively long distances and can go through walls and other solid objects. IR signals, used in TV, DVD, and AUX device modes, travel up to 40 feet in a straight line-of-sight and cannot go through walls or other solid objects. Point the remote directly at the equipment you want to control without any objects blocking the signal path.
The front and back panels of the Super Joey receiver are provided below.Front Panel Controls2Super Joey Receiver, continued PowerTurn the Super Joey receiver on and off or hold to reset itRear Panel ConnectionsSystem InfoDisplays the System Info screenLocate RemoteTriggers the remote to emit tones, making it HDVLHUWR¿QGSelectSelect menu items and eventsUp/Down ArrowsNavigate through menus or channelsUSB PortConnects to multimedia devicesHDMI® OutputProvides high-GH¿QLWLRQGLJLWDODXGLRand video to the TVEthernetConnects to the broadband home networkAudio/Video OutputHigh-quality standard-GH¿QLWLRQFRQQHFWLRQWRWKHTV audio and video inputHome Video NetworkConnects to the home network through the coaxial cableDigital AudioOptical connection to a high-quality digital sound decoding systemPowerProvides power to the Super Joey receiver
3To use the features described in this section, make sure you are in SAT mode by pressing the SAT Mode button. Use SAT Mode to control the Super Joey receiver.Note: Some features may not be available.SAT ModePower & TV PowerTop button turns the Super Joey receiver on/offBottom button turns the TV on/offVolume and Mute ButtonsControl TV volumeProgramming requiredRecallReturn to last TV channel viewedPIP (Picture-In-Picture) ButtonsNot available at this time.Number ButtonsEnter a channel number or navigate the program guideMenuAccess receiverfeatures and settingsThemesSearch for programs using ThemesInfoRetrieve info on programsSearchSearch for a programShortcut KeysAccess frequently used featuresDigital Video Recorder (DVR) ButtonsPause live TV and play or record programmingFormatFormat the picture to the desired width to match the program you are viewingSystem WizardPress and hold to backup and restore receiver and remotesettingsArrow/Select ButtonsChannel up/down, navigate through menus, and select a desired optionView SatelliteProgrammingExit out of any menu/guide and return to viewing live TVCancelReturn to previous menu or return to watching a programBrowseSee what is on other channels while watching TVProgram GuideDisplay current and future satellite program listingsPage ButtonsPage up/down in Program Guide and event contentPress this button for SAT ModePair/InputPair remote to a Super Joey receiver
4TV ModeTo use the features described in this section, make sure you are in TV mode by pressing the TV Mode button. Remote programming is required. Note: Some features may not be available depending on your model.Note: Remote operation is different on DISH TVs.  See your DISH TV User’s Guide for proper operation.Power & TV PowerTop button turns the TV on/offBottom button turns the TV on/offPress this button for TV ModeMuteTurn TV volume on or offRecallReturn to last TV channel viewedPIP (Picture-In-Picture) ButtonsNot available at this time.Number ButtonsEnter a channel numberTV MenuAccess menu features available on some TVsPair/InputSwitch between TV inputs (available only for certain makes and models of TVs)Up/Down Arrow ButtonChannel up/down on the TVVolumeControl TV volume (available depending on your TV model)Select ButtonSelect a program or menu
5DVD ModeTo use the features described in this section, make sure you are in DVD mode by pressing the DVD Mode button. In addition to operating a DVD player, you can also use this mode to operate a VCR or Blu-ray Disc™ (BD) player. Remote programming is required. Note: Some features may not be available depending on your device model.Power & TV PowerTop button turns the DVD/VCR/BD on/offBottom button turns the TV on/offNumber Buttons8VHWRJHWWRVSHFL¿FFKDSWHUVon the DVD; the function of remote number buttons depends on the deviceView SatelliteProgrammingExit out of any menu/guide and return to viewing live TVPress this button for DVD ModeFWDForward a videotape or DVD/BDPlayPlay a videotape or DVD/BDPausePause a videotape or DVDBackRewind a videotapeor reverse a DVD/BDStopStop playing a DVD/BD, stop playing or recording a videotapeRecordRecord on a videotape
6DVR Functions Displays a list of recorded programs.   Plays a live or recorded program.   Pauses a live or recorded program.    Stops recording a program or playing a recorded program.   Records a program.     Press BACK once to reverse the program four times as fast as normal play. Press BACK twice to reverse at 15 times normal speed, three times to reverse at 60 times normal speed, and four times to reverse at 300 times normal speed. The on-screen bar shows how far you’ve gone. For a live program, you can only reverse back to the last channel change or back one hour, whichever RFFXUV¿UVW   Press SKIP BACK to skip back about 10 seconds in a program.
7  Press FWD (Forward) once to fast-forward through the program four times normal speed. Press FWD twice to forward at 15 times normal speed, three times to forward at 60 times normal speed, and four times to forward at 300 times normal speed. The on-screen bar shows how far you have gone. Of course, you cannot forward into the part of a live program that has not been broadcast yet.  Press SKIP FWD to skip ahead about 30 seconds in the program.    Press PAUSE and then press BACK to reverse the program in slow motion at 1/4 the speed of normal play. Press BACK again to reverse at normal speed.     Press PAUSE and then press FWD to forward the program in slow motion at 1/15 the speed of normal play. Press FWD twice to forward at 1/4 as fast as normal play. Press FWD three times to play the program. Of course, you cannot forward a live program that has not been broadcast yet.  DVR Functions, continued
8Using Remote Button ShortcutsButtons In Guide Display Scroll in ListsMove 3 hours back By 1 screen upwardMove 3 hours ahead By 1 screen downward24 hours back To beginning of list24 hours ahead To end of listIn addition to their normal functions, some buttons on your remote control have special shortcut functions. These shortcuts are enabled while navigating the on-screen Electronic Program Guide (EPG) or viewing the scrollable list of events.DVR ButtonsThe following table lists some of these shortcuts for the gray set of buttons that normally control your DVR functions. Note: Scheduled updates to your receiver software may add to or modify these shortcuts.
9Buttons From Live TV ElsewhereAccess TV Viewing StatusJumps to menu bar and displays the red button menu optionAccess Quick Clicks listJumps to menu bar and displays the green button menu optionAccess Settings screenJumps to menu bar and displays the yellow button menu optionAccess Network Settings Jumps to menu bar and displays the blue button menu option. From the EPG, expands or collapses select channel rangesColored ButtonsThe following table lists some of the shortcuts for the colored set of buttons on your remote control. Note: Scheduled updates to your receiver software may add to or modify these shortcuts.Using Remote Button Shortcuts, continued
RG-6 Coaxial CableHome Video Network PortRG-6 Coaxial Cable IntegratorIntegrator10Connecting to Home Video NetworkConnect one end of RG-6 coaxial cable to the HOME VIDEO NETWORK port on the back of the Super Joey receiver.Connect the other end of coaxial cable to the Integrator. Do not cover the vents or stack anything on the Super Joey receiver. Covering the vents or stacking anything on the Super Joey receiver can cause heat build-up, which voids the Limited Warranty.Connect the power cord to the back of the Super Joey receiver and plug into an outlet.The Super Joey receiver uses your home’s coaxial TV cable to communicate to the host receiver, Hopper or Hopper with Sling, making it possible to share programming and recorded content. 123
 or11Connecting to TVConnect cable(s) to the appropriate connection on the back of the Super Joey receiver. This receiver supports HDMI technology or RCA-type connections. Connect the other end of the cable to the appropriate input of your TV or monitor.&RQ¿UPWKDWERWK\RXU79DQGWKH6XSHU-RH\receiver are connected to a power outlet.Turn on the Super Joey receiver and TV. Change your TV to the correct input or source. Consult your TV user’s guide for assistance.,IWKLVLVWKH¿UVWWLPHWKDWWKH6XSHU-RH\receiver has been turned on, the Receiver Setup Wizard appears. See page 13 for going through the Setup Wizard.  Note: In most cases, connecting the HDMI cable provides plug-and-play control of the TV’s display resolution and other settings. However, your TV may require selecting a different format to display from the Super Joey receiver during setup.7XUQXSWKHYROXPHRQ\RXU79DQGFRQ¿UPyou have sound. If you don’t have sound, your system may require you to connect audio (red and white) RCA-type cables between the  Super Joey receiver’s Audio Outputs and the TV’s audio input connections.1243
12Inserting the BatteriesPull the remote battery cover off.Insert 4 AAA batteries of the same type and kind, making sure to match the plus (+) ends with the plus markings on the battery case.Replace the remote battery cover.123
13Setting Up the Super Joey ReceiverTurn on the Super Joey receiver and your TV. The Starting Up screen appears.The cursor appears on the screen.After a few minutes, the Receiver Setup Wizard screen appears. Please wait while the Super Joey downloads software and reboots.Note:  If the message Hopper Download Incomplete appears, select OK to continue with the software download and reboot.1Before setting up the Super Joey receiver, make sure your host UHFHLYHULVVHWXS¿UVW7RVHWXSWKH6XSHU-RH\UHFHLYHUIROORZWKHsteps below.
14Setting Up the Super Joey Receiver, continuedPress SAT   or PAIR   on your remote. The Pair Remote option becomes highlighted.Note:  If you are replacing your receiver and stored your settings, select Restore on the popup that appears.Select a Location Name for the Super Joey and select Next. If your connection is recognized, the video resolution is correctly selected; select Next. If you change the format for the HDTV setup, select the video resolution for your HDTV under TV Type and select Next. Select Yes to save the settings.34Continued on the next page2
15The system tests for connectivity.Select Next to reboot your Super Joey and continue to the next step.The system searches for a Hopper.Setting Up the Super Joey Receiver, continued5Continued on the next page
16Setting Up the Super Joey Receiver, continuedSelect Save to link the Super Joey receiver to the Hopper or Hopper with Sling receiver.Once the host receiver is linked, the Super Joey receiver is authorized. This step may take a few minutes.76Continued on the next page
17Setting Up the Super Joey Receiver, continued8If you are replacing a receiver and had established parental controls on the Super Joey, you can restore these parental controls at this time. Select Yes to restore previously created parental controls.Select Watch TV to watch your DISH programming.Select Guide to display the program guide.Select Settings to display the Settings Menu.9
Lookup Code18You can program your DISH remote to control another device, such as a TV, DVD, Blu-ray Disc™SOD\HU9&5DXGLRUHFHLYHURUDPSOLÀLHUThe receiver scans the database of codes for the particular device and WULHVHDFKFRGH:KHQ\RX¿QGRQHWKDWZRUNV\RXVDYHWKDWFRGH.Typically, the TV mode button is programmed to a TV; the DVD mode button is programmed to a DVD, Blu-ray Disc™ player, or VCR; and the AUX button to a DVD, Blu-ray Disc™ player, VCR, audio receiver, RUDPSOL¿HU+RZHYHUHDFKRIWKH0RGHEXWWRQVLVSURJUDPPDEOHWRwhatever device you select.Turn the device and receiver on.Press MENU and select Settings.  From the Settings screen, select Remote Manager.  Select the TV Code, DVD Code, or AUX Code option on the Remote Manager screen. If programming in TV or DVD Code, continue to step 4. If programming in AUX Code, continue with this step.For programming in AUX Mode only:Scroll the Aux Device list to select and highlight your device type. Select Next.Select the Lookup Code option. 123Programming Remote to Control Another Device4
YesNo19Scroll the Sort By (or Aux Device) list to position the selected option within the blue highlight bar. Highlight the device’s name in the Brand list and select Next.Select Yes to test the remote with the device.Press the Mode button for the device you are setting up.  Release. Press POWER to turn off your device. If device turns off, continue with step 10. If it does not turn off, press and release SAT      to switch modes. Select No and return to step 6 for the next code.56789Programming Remote to Control Another Device, continuedK-LSort byKI-JKI-M-NMO-QOR-SRRRCSBrandRRadioShackRRRealisticRReocRRevolutionHDRR
YesORNoSave20Using the remote, turn the device on and try some other remote buttons to make VXUHWKH\ZRUN:KHQ¿QLVKHGSUHVVDQGrelease SAT      to switch modes.If the code worked for other buttons, select Yes and continue to step 11. If the code did not work, select No and return to step 6 for the next code for the brand of your device.On the Remote Manager screen, FRQ¿UPWKDWWKHGHYLFH¶VEUDQGQDPHLVLQparentheses after a four-digit code. Select Save.To protect these settings, consider  backing them up (see Backing Up  Settings on page 24).Programming Remote to Control Another Device, continued1011
21Setting Parental ControlsPress MENU.Select Settings.Select Parental Controls. The Parental Controls screen appears.To place parental controls on the programming coming to the TV connected to this Super Joey receiver, you can either copy the settings from the Hopper or Hopper with Sling receiver, or you can set different parental controls for your Super Joey receiver. To copy the parental controls that have been set for the Hopper or Hopper with Sling receiver, go to your Hopper or Hopper with Sling receiver, press MENU, select Settings, select Parental Controls, and select Copy Settings. Select your Super Joey receiver to have the same settings as the Hopper or Hopper with Sling.To set parental controls on the Super Joey receiver, follow the procedure provided below. 123Continued on next page
SaveHide AdultChannelsYesYNoNRestrictPurchasesYesYNoNRatingsRestrictionsMediumMHighHNoneNLowMLRestrictApplicationsYesYNoN224Select one of the following from Ratings Restrictions: None Low Medium HighSelect Yes to hide adult channels or leave No selected. Select Yes to restrict purchases or leave No selected.Select Yes to restrict applications or leave No selected.Select Save&RQ¿UP3DVVZRUG67Setting Parental Controls, continued58
23Sharing ContentIf DOO¿YHWXQHUVDUHLQXVH\RXPD\HLWKHUMRLQRQHRIWKHHYHQWVRUwatch a program found under PrimeTime Anytime™, On Demand, or recorded on the DVR. Press the red button to display the TV Activity screen. You may join a program that is being displayed on another TV on your home network or watch PrimeTime Anytime, On Demand, or a program recorded on the DVR. If the event is grayed out, you are unable to join it.Under Watch Anytime, select an event under DVR, PrimeTime Anytime, or On Demand by using the Arrow keys on the remote to highlight your option and pressing SELECT.12
BackBackup24Backing Up SettingsAfter setting up the remote and the Super Joey receiver, you can back up your settings. If you back up your settings, you can easily restore your settings.Press MENU, select Settings, and then select System Wizard. ,I\RXKDYH¿QLVKHGVHWWLQJXSDnew remote and receiver, select Backup. Backup saves your receiver and remote settings.When Backup is complete, select Back to return to System Wizard. Press VIEW LIVE TV to return to your satellite programming.1234
BackRestore25Restoring Settings If you should lose settings that have been backed up (see Backing Up Settings on page 24), you can restore the remote and receiver settings.Press MENU, select Settings, and then select System Wizard. If you are setting up a new remote and used Backup with the previous remote, click on Restore to restore the settings. Select either Receiver or Remote settings to restore from the Device List.:KHQ5HVWRUHLV¿QLVKHGVHOHFWBack to return to System Wizard. Repeat step 3 to restore settings for either Receiver or Remote, depending on which one was selected earlier.Press VIEW LIVE TV to return to your DISH programming.54321DeviceRemoteRRReceiverRRRR
LOCATEREMOTE26Locating the RemotePress LOCATE REMOTE on the front panel of the Super Joey receiver.  If the missing remote control is paired to this Super Joey receiver and within radio frequency (RF) range, there should be a VHULHVRIWRQHV\RXKHDUWRKHOS¿QGWKHlocation of the remote. It may take up to 30 seconds after touching LOCATE REMOTE before you hear the tones. Press any button on the remote to turn off the Locate tones DIWHU¿QGLQJWKHUHPRWHIf you do not hear any tones after pressing LOCATE REMOTE, press the SYSTEM INFO button on the front panel.  The System Info screen lists the paired remote(s). If the remote control you want WR¿QGLVQRWOLVWHGRULWLVQRWSDLUHGWRthe Super Joey receiver, using LOCATE REMOTE is not an option. If the remote control you ZDQWWR¿QGLVRXWof RF range, LOCATE REMOTE is not an option.When you are looking for the remote, try the LOCATE REMOTE feature on the front panel of the Super Joey receiver. 12
27TroubleshootingThere is no picture on the TV after connecting it to the Super Joey receiver.What to do: Check that all connections are hand-tightened. Verify that DISH programming is displaying on the Hopper or the Hopper with Sling receiver. If all connections are good and the Hopper or Hopper with Sling receiver is working as expected, try connecting the Super Joey receiver to the TV using an RCA-type connection. If using an RCA-type connection, set the correct input for this connection on the TV and change the settings for the TV on the Super Joey receiver to match your TV’s settings.Your remote control does not work well when controlling the receivers.What to do: Verify that your remote has fresh batteries. There is a Battery Level indicator on the System Info screen that displays three levels: Green (good), Yellow (low), and Red (critical).  If this indicator is at Yellow or Red, replace the batteries with new batteries of the same type and kind. Verify that your remote is paired. This information is provided on the System Info screen. If it is not paired, pair the remote.Other devices, such as wireless routers, Bluetooth®, 2G phones, and microwave ovens, could create interference and affect the performance of your remote. Move your Super Joey receiver away from other electronic devices that could potentially cause interference. Use this information if you have a problem using the Super Joey receiver. To solve a particular problem, do the following: ,QWKHIROORZLQJVHFWLRQ¿QGWKHLQIRUPDWLRQWKDWUHODWHVWRWKHSUREOHPyou are experiencing. Try the suggested solution for that problem. Make sure your remote control has fresh batteries. If you see the Remote Battery Low warning on your TV screen, it is time to change the batteries.  Visit mydish.com/support.
28Troubleshooting, continuedYour picture is snowy (or black or blue).What to do: Make sure your TV is tuned to the correct channel. Make sure the cables are completely and correctly connected from the Super Joey receiver to the TV and from the Super Joey receiver to the home network.While performing a remote control procedure, the remote control stops working.What to do:  Start over again. If you don’t press a button for  20 seconds in a programming sequence, the remote shuts off its programming function.My remote is not working.What to do:  Verify the batteries are installed according to the diagram inside the remote control’s battery compartment.  Check the Battery Level indicator located in the System Info screen. This indicator displays three levels: Green (good), Yellow (low), and Red (critical). If this indicator is at Yellow or Red, replace the batteries with batteries of the same type and size. &RQ¿UPWKHUHPRWHLVLQWKHFRUUHFWPRGHIRUWKHGHYLFH\RXZDQWWRcontrol. For example, to control the Super Joey receiver, press SAT on the remote before the function you want performed.Make sure you are using the correct remote control provided for your Super Joey receiver. The remote uses radio frequency (RF) signals to operate your Super Joey receiver. Other equipment is usually controlled using infrared (IR) light signals. If you have programmed the remote to control your equipment in other device modes, then the remote control must have a clear line-of-sight to the front of these other devices.Check that the connection to the home network is hand-tightened.
29Troubleshooting, continuedIf your remote is showing that it is paired but isn’t working, select Un-Pair on the System InfoVFUHHQDQGOLVWHQIRUWKHFRQ¿UPDWLRQWRQH3UHVV INPUT/PAIR to pair the remote again. If you do not hear the tone, continue with the next suggestion.If your remote is not listed or cannot be un-paired on the System Info screen, then complete the following steps:1  Press and hold SAT until all the Mode buttons light up and release.  2  Press RECALL and 0 (the number zero) at the same time and release (SAT lights up). 3  Press SEARCH and release (SAT lights up). 4  Press VOL+ and release (SAT lights up). 5  Press STOP and release (un-pair tone is heard). 6  Press SYSTEM INFO on the front panel. 7  Press INPUT/PAIR and release to pair the remote again.:KHQ,SUHVVDEXWWRQRQWKHUHPRWHDOOWKH0RGH/('VÀDVKWhat to do:KHQEDWWHULHVDUH¿UVWLQVHUWHGLQWRWKHUHPRWHWKHUHPRWHgoes through an initializing process. This process takes about ten seconds, and pressing a key while the remote is booting up causes the SAT, TV, and $8;PRGHEXWWRQVWRÀDVK,IDUHPRWHVWD\VLQWKLVVWDWHIRUORQJHUWKDQtwo minutes, replace the batteries (see page 12).My PIP (Picture-In-Picture) button isn’t working.What to do: The PIP feature is available only with the Hopper or the Hopper with Sling receivers.I am trying to watch a program, but the TV Viewing Status displays instead.What to do: All tuners on the receivers are currently in use, either by other TVs; the DVR is recording a program; the receivers are taking a software download; and/or a remote viewing session is occurring. You can wait until a tuner becomes available, watch the same programming that is displaying on another TV, or select PrimeTime Anytime™, On Demand, or DVR.
30Limited WarrantyThis Limited Warranty is a legal document. Keep it in a safe place. Remember to retain your Bill of Sale for warranty service! Any items returned without a copy of the Proof of Purchase will be considered out of warranty.What the Warranty CoversThis warranty extends only to the original user of the equipment and is limited to the SXUFKDVHSULFHRIHDFKSDUW',6+1HWZRUN//&DQGLWVDI¿OLDWHGFRPSDQLHV³',6+´warrant this system against defects in materials or workmanship as follows:Labor: For a period of one (1) year from the original date of purchase, if DISH determines that the equipment is defective subject to the limitations of this warranty, it will be replaced at no charge for labor. DISH warrants any such work done against defects in materials or workmanship for the remaining portion of the original warranty period.Parts: For a period of one (1) year from the original date of purchase, DISH will supply, at no charge, new or re-manufactured parts in exchange for parts determined to be defective subject to the limitations of this warranty. DISH warrants any such replacement parts against defects in materials or workmanship for the remaining part of the original warranty period. Note: “Parts” means items included in this package, which may include the satellite dish assembly, receiver, LNBF, remote control, power supply, or dish mounting hardware. It does not include other parts purchased separately.What the Warranty Does Not CoverThis warranty does not cover installation of the system. If applicable, such installation will be warranted under a separate installation agreement.This warranty does not cover consumer instruction, physical setup or adjustment of any consumer electronic devices, remote control batteries, signal reception problems, loss of use of the system, or unused programming charges due to system malfunction.This warranty does not cover cosmetic damage, damage due to lightning, electrical RUWHOHSKRQHOLQHVXUJHVEDWWHU\OHDNDJH¿UHÀRRGRURWKHUDFWVRI1DWXUHDFFLGHQWmisuse, abuse, repair or alteration by other than authorized factory service, use of accessories not recommended by the receiver manufacturer, negligence, commercial or institutional use, or improper or neglected maintenance.This warranty does not cover equipment sold AS IS or WITH ALL FAULTS, shipping and handling, removal or reinstallation, shipping damage if the equipment was not packed and shipped in the manner prescribed, nor equipment purchased, serviced, or operated outside the continental United States of America.
31Limited Warranty, continuedLegal LimitationsREPLACEMENT AS PROVIDED UNDER THIS WARRANTY IS YOUR EXCLUSIVE REMEDY. DISH SHALL NOT BE HELD LIABLE FOR ANY INCIDENTAL OR CONSEQUENTIAL DAMAGES FOR BREACH OF ANY EXPRESSED OR IMPLIED WARRANTY ON THIS SYSTEM, NOR FOR ANY INCIDENTAL OR CONSEQUENTIAL DAMAGES RESULTING FROM THE USE OF, OR INABILITY TO USE, THIS SYSTEM. SOME STATES MAY LIMIT OR EXCLUDE THE FOREGOING LIMITATION, SO THE ABOVE EXCLUSION OR LIMITATION MAY NOT APPLY TO YOU. EXCEPT TO THE EXTENT PROHIBITED BY APPLICABLE LAW, UNDER NO CIRCUMSTANCES SHALL DISH’S LIABILITY, IF ANY, EXCEED THE PURCHASE PRICE PAID FOR THIS SYSTEM. ANY IMPLIED WARRANTY OF MERCHANTABILITY OR FITNESS FOR A PARTICULAR PURPOSE ON THIS SYSTEM IS LIMITED IN DURATION TO THE PERIOD OF THIS THIS WARRANTY. SOME STATES DO NOT ALLOW LIMITATIONS ON HOW LONG A STATUTORY OR IMPLIED WARRANTY LASTS, SO THE ABOVE LIMITATION MAY NOT APPLY TO YOU. DISH RESERVES THE RIGHT TO REFUSE TO HONOR THIS WARRANTY IF DISH DETERMINES ANY OF THE ABOVE EXCEPTIONS TO HAVE CAUSED THIS SYSTEM NOT TO HAVE PERFORMED PROPERLY. THIS WARRANTY SHALL BE VOID IF ANY FACTORY-APPLIED IDENTIFICATION MARK, INCLUDING BUT NOT LIMITED TO SERIAL OR CONDITIONAL ACCESS NUMBERS, HAS BEEN ALTERED OR REMOVED. THIS WARRANTY SHALL ALSO BE VOID IF THE RECEIVER HAS BEEN OPENED BY AN UNAUTHORIZED PERSON.If You Need AssistanceCall the Customer Service Center at 1-800-333-DISH (3474). Have the date of purchase and either your customer account number, the receiver conditional access number, or the receiver model number UHDG\'LVSOD\WKH6\VWHP,QIRVFUHHQWR¿QGWKHVHQXPEHUVA Customer Service Representative will assist you. If the Representative determines you should return any equipment, you will be directed to call a Return Authorization representative. Before shipping any equipment, you must talk to a Return Authorization representative and must obtain a Return Authorization (RA) number.You will be given the appropriate address for which to return your equipment. Whether under warranty or not, you will be responsible for the cost of shipping back the defective equipment. For faster service, see the Advance Exchange Program below.Returned equipment must be packaged properly, using either the original shipping materials or the packaging in which the replacement equipment is shipped. Include a copy of the Bill of Sale. Any items returned without a copy of the Proof of Purchase will be considered out of warranty. Follow the instructions given to you by the Customer Service Representative.Write the RA number in large, clearly visible characters on the outside of the shipping box that you use to return the equipment. To avoid confusion and misunderstandings, shipments without an RA number clearly visible on the outside of the box will be returned to you at your expense.
32DISH Exchange ProgramDISH offers two options if you need to replace your satellite receiver equipment or its accessories.Advance Exchange ProgramThe Advance Exchange Program allows you to have replacement equipment shipped LPPHGLDWHO\WR\RXGHSHQGLQJXSRQZKHUH\RXOLYHLWFRXOGWDNHWKUHHWR¿YHEXVLQHVVGD\VAlong with replacement equipment, you will receive a prepaid shipping label and instructions on how to return the defective equipment. The shipping charge, for receiving replacement equipment and returning the defective equipment, is a one-time fee based on DISH’s competitive bulk shipping rates (additional charges may apply outside of the continental US). This fee will be charged to your billing account or your valid credit card. If you do not ship the defective equipment to DISH within ten days after receiving the replacement, your billing account or credit card will be charged the market price of the replacement. If you return the defective equipment after ten days, you will receive a full refund less an administrative fee. If your equipment is out of warranty and can be repaired your billing account or credit card will be charged the standard repair fee for the replacement. If damage to the defective equipment is found, which DISH in its sole discretion determines has voided the warranty, or makes the equipment unrepairable, billing account or credit card will be charged the market price of the replacement.Post Receipt Exchange ProgramYou may choose to ship the equipment to us at your cost. To provide faster service, upon receipt of your equipment you will be shipped a replacement. Your original equipment will not be available for return. If the defective equipment is covered under this warranty, a replacement will be shipped back to you at no additional cost (additional charges may apply outside the continental US).If your equipment is not covered under warranty and can be repaired your billing account or credit card will be charged the standard repair fee for the replacement. If damage to the defective equipment is found, which DISH in its sole discretion determines has voided the warranty, or makes the equipment unrepairable, your billing account or credit card will be charged the market price of the replacement.An accessory is any DISH branded equipment, displaying the DISH logo, excluding the receiver, cables and hookups, and non-mechanical components. A one-year warranty becomes effective upon the activation of the DISH system or date of purchase, if bought separately. A proof of purchase is required to verify the purchase date. If an accessory has an expired warranty, no exchange will be issued. You may purchase replacement accessories from DISH or your local retailer.Accessory Warranty
45FCC ComplianceThe following text is extracted from Federal Communications Commission (FCC) regulations, as of the publication date of this User’s Guide. Contact the FCC (see following) or your library for the complete text of the regulations. This device complies with Part 15 of FCC Rules. Operation is subject to the following two conditions:1.  This device may not cause harmful interference and2.  This device must accept any interference received, including interference that may cause undesired operation.This equipment has been tested and found to comply with the limits for a Class B digital device, pursuant to Part 15 of the FCC Rules. These limits are designed to provide protection against harmful interference in a residential installation. This equipment generates, uses, and can radiate radio frequency energy and, if not installed and used in accordance with the instructions, may cause harmful interference to radio communications. However, there is no guarantee that interference will not occur in a particular installation. If this equipment does cause harmful interference to radio or television reception, which can be determined by turning the equipment off and on, the user is encouraged to try to correct the interference by following one or more of the following measures: Reorient or relocate the receiving antenna. Increase the separation between the equipment and receiver. Connect the equipment into an outlet on a circuit different from that to which the receiver is connected. Consult the dealer or an experienced radio/TV technician for help.'RQRWPDNHFKDQJHVRUPRGL¿FDWLRQVWRWKLVHTXLSPHQW7KLVFRXOGYRLGWKHXVHU¶Vauthority to operate the equipment.Product must be installed at least 20 cm (~8 inches) from typical person locations per FCC RF exposure regulations.If none of these remedies stops the radio interference, you should contact a licensed radio/television technician, your satellite dealer, or call the Customer Service Center at 1-800-333-DISH (3474), for assistance.
46Agreement on Internet Usage via Super Joey ReceiverThe software contained in the receiver may reference, display, link to, and provide users access to web services, sites, and information located worldwide through the Internet. Because EchoStar Corporation and DISH Network have no control over such sites and information, we make no representations, warranties or guarantees as to such sites and information, including but not limited to:(a) the accuracy, availability, sequence, completeness, timeliness, copyright compliance, legality, content, validity, or quality of any such sites or information, or(b) whether using the software may result in locating unintended, inappropriate, or objectionable content.Because some of the content on the Internet consists of material that is adult-oriented, restricted to viewers at least 18 years of age or the age of majority where you live, or otherwise objectionable to some people or viewers, under the age of 18, the results of using the software may automatically and unintentionally result in the generation or display of sites, links, or references to such objectionable and/or adult-oriented material.By using the software, you acknowledge that neither EchoStar Technologies L.L.C. nor DISH Network L.L.C. makes any representations, or warranties, or guarantees with regard to any sites or information displayed by or accessed by in connection with use of the software. EchoStar Technologies L.L.C., DISH Network L.L.C., their UHVSHFWLYHGLUHFWDQGLQGLUHFWVXEVLGLDULHVDQGSDUHQWVDQGWKHRI¿FHUVGLUHFWRUVand shareholders of any of the foregoing companies shall not, directly or indirectly, be liable in any way to you or to any other person or entity for the content you receive using the software or for any inaccuracies, errors in, or omissions from the content. (FKR6WDU7HFKQRORJLHV//&',6+1HWZRUN//&DQGWKHLUUHVSHFWLYHDI¿OLDWHVand licensors reserve the right to change, suspend, remove, or disable access to any services at any time without notice. In no event will EchoStar Technologies L.L.C., DISH Network L.L.C., their respective direct and indirect subsidiaries and parents, or WKHRI¿FHUVGLUHFWRUVDQGVKDUHKROGHUVRIDQ\RIWKHIRUHJRLQJFRPSDQLHVEHOLDEOHfor the removal of or disabling of access to any such services. EchoStar Technologies //&',6+1HWZRUN//&DQGWKHLUUHVSHFWLYHDI¿OLDWHVDQGOLFHQVRUVPD\DOVRimpose limits on the use of or access to certain services, in any case, and without notice or liability.
47If You Need Help1.  Review the user guides available at mydish.com/manuals. 2. See Troubleshooting on page 27. 3.  On your receiver, select the Help tile from the Main Menu. 4. Visit mydish.com/chat for 24/7 support. 5.  Call the Customer Service Center at  1-800-333-DISH (3474). For additional information, refer to the Residential Customer Agreement included with your host receiver and available at mydish.com/legal.
48IndexLLimited Warranty  30Locate Remote  26PParental Controls  21Program Remote to Control Another Device  18RRear Panel Connections  2Remote ButtonShortcuts  8Residential Customer   Agreement  33Restore Settings  25SSAT mode  3Set up Super Joey Receiver  13Share Content  23TTroubleshooting  27TV mode  4WWarranty  30BBack up Settings  24CConnect Receiver to Home Video Network  10Connect Receiver to TV  151DDVD mode  5DVR buttonsBack  6DVR  6Forward  7Pause  6Play  6Record  6Skip Back  6Skip Forward  7Stop  6DVR Functions  6EExchange Program  32FFCC  45Front Panel Controls  2IInsert Batteries  12Internet Usage Agreement  46
49Super Joey Receiver InformationPurchase Location Name:     Purchase Location Telephone Number:      Super Joey Receiver Serial Number:       Super Joey Receiver Smart Card Conditional Access Number:     Remote Control Settings  Television Code (TV Mode):          DVD Code (DVD Mode):           Auxilliary Device Code (AUX Mode):       Auxilliary Device Type (AUX Mode):                   You may need to provide this information if you call the Customer Service Center. Note: Some of the items listed below may not be used at this time.
For all your customer needs,  go to mydish.com/chat or call the Customer Service Centerat 1-800-333-DISH (3474)

Navigation menu