FMS DVT780 Car A/V System User Manual Manual Draft 0508
FMS CO.,LTD. Car A/V System Manual Draft 0508
UserManual.wiki
>
FMS
>
DVT780 User Manual
Manual
Navigation menu
Upload a User Manual
Namespaces
Wiki Guide
HTML
PDF
Info
Views
User Manual
Discussion / Help
Navigation
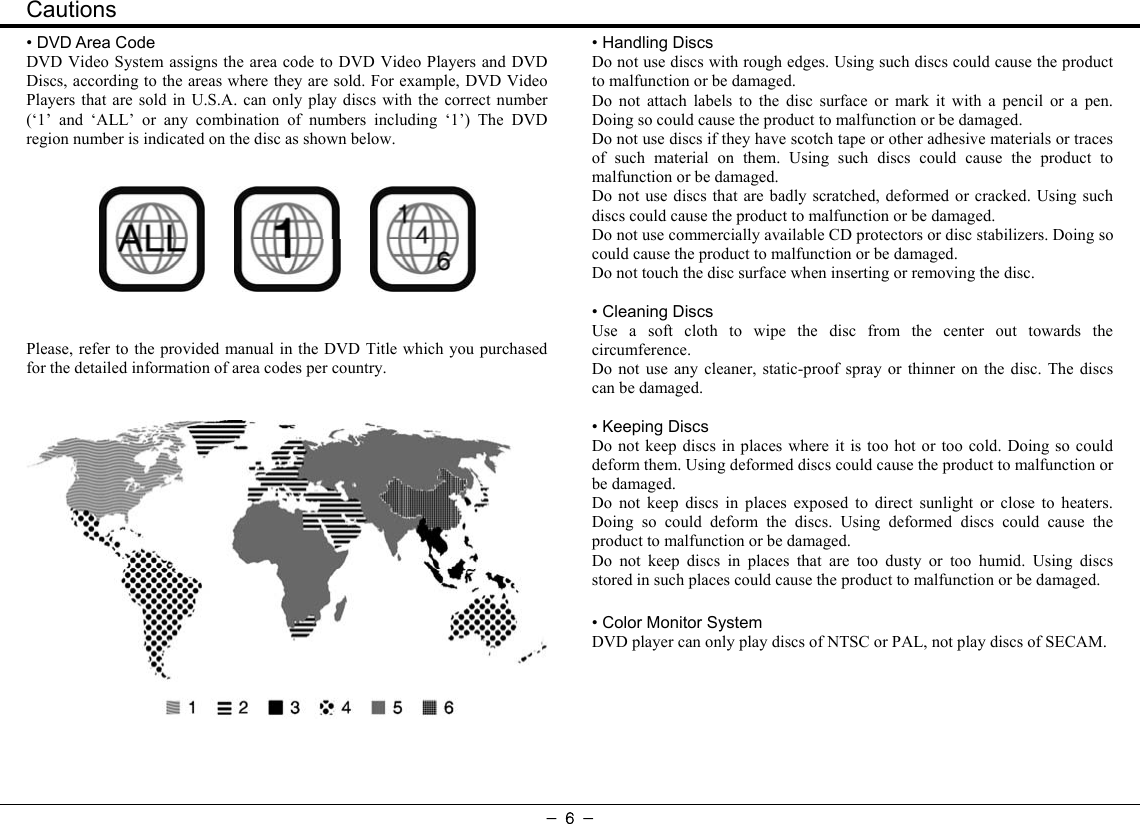
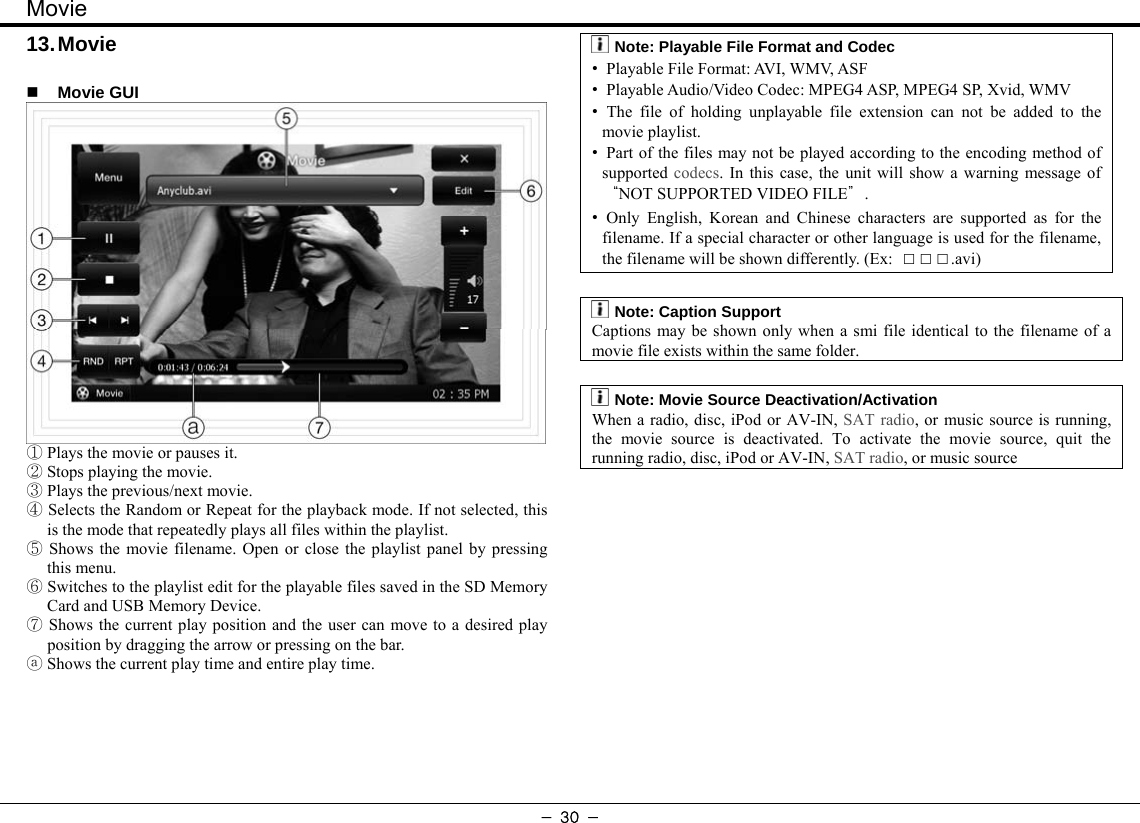
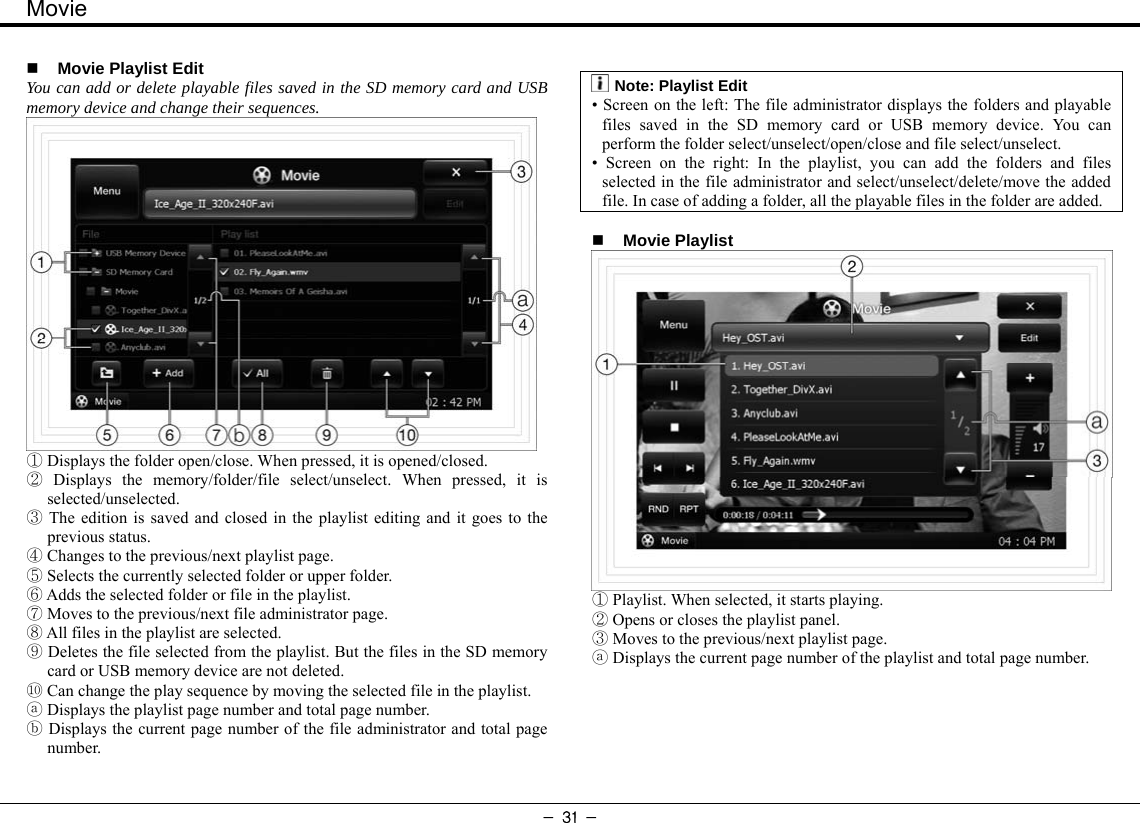
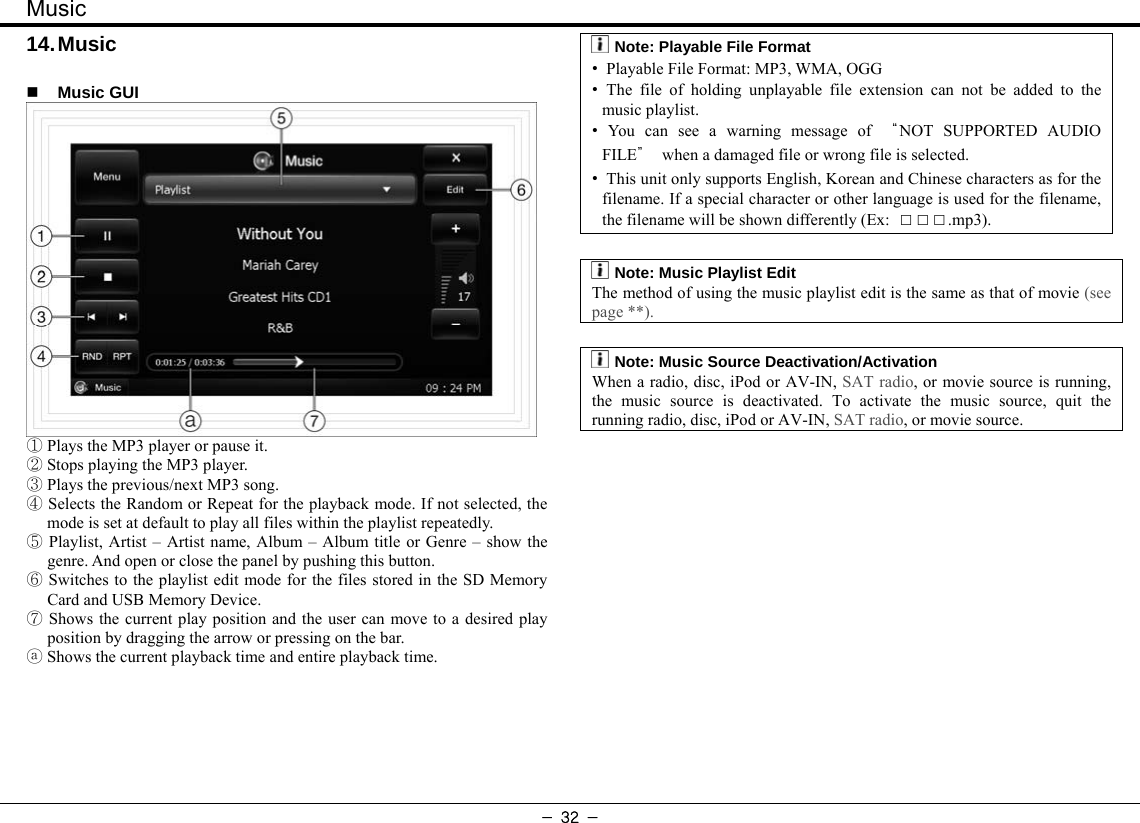
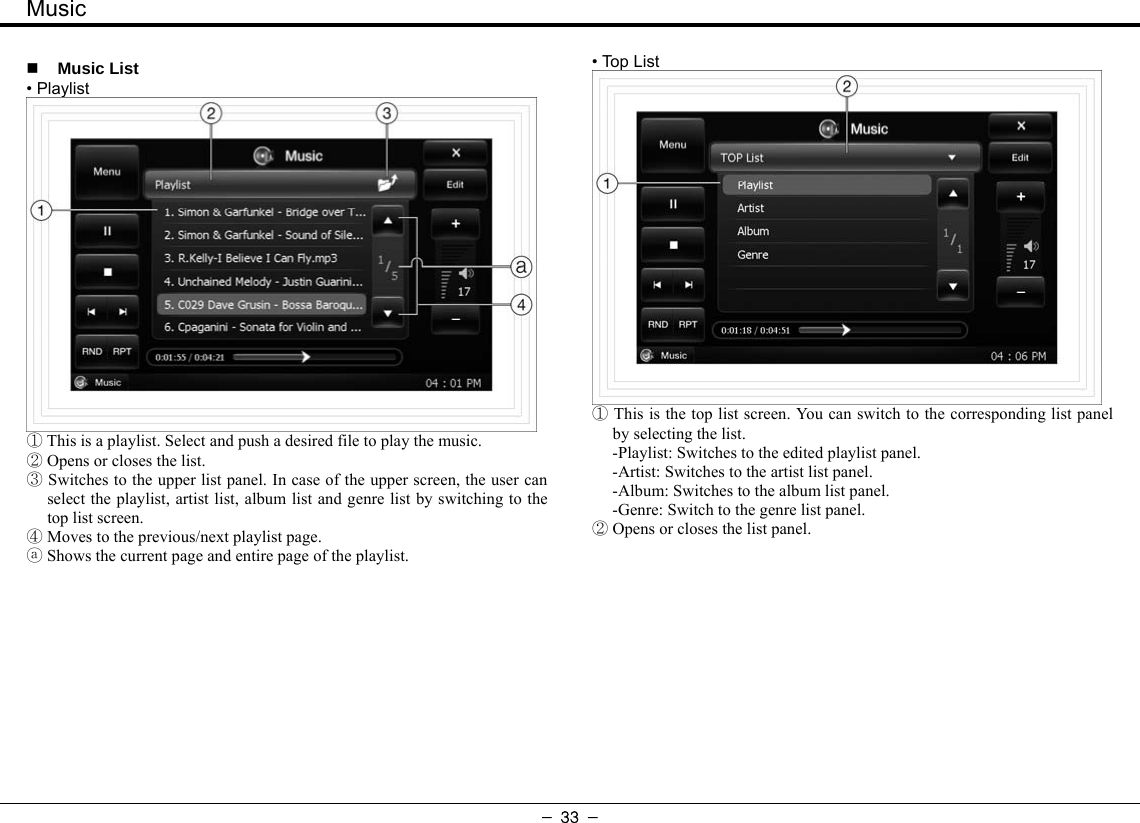
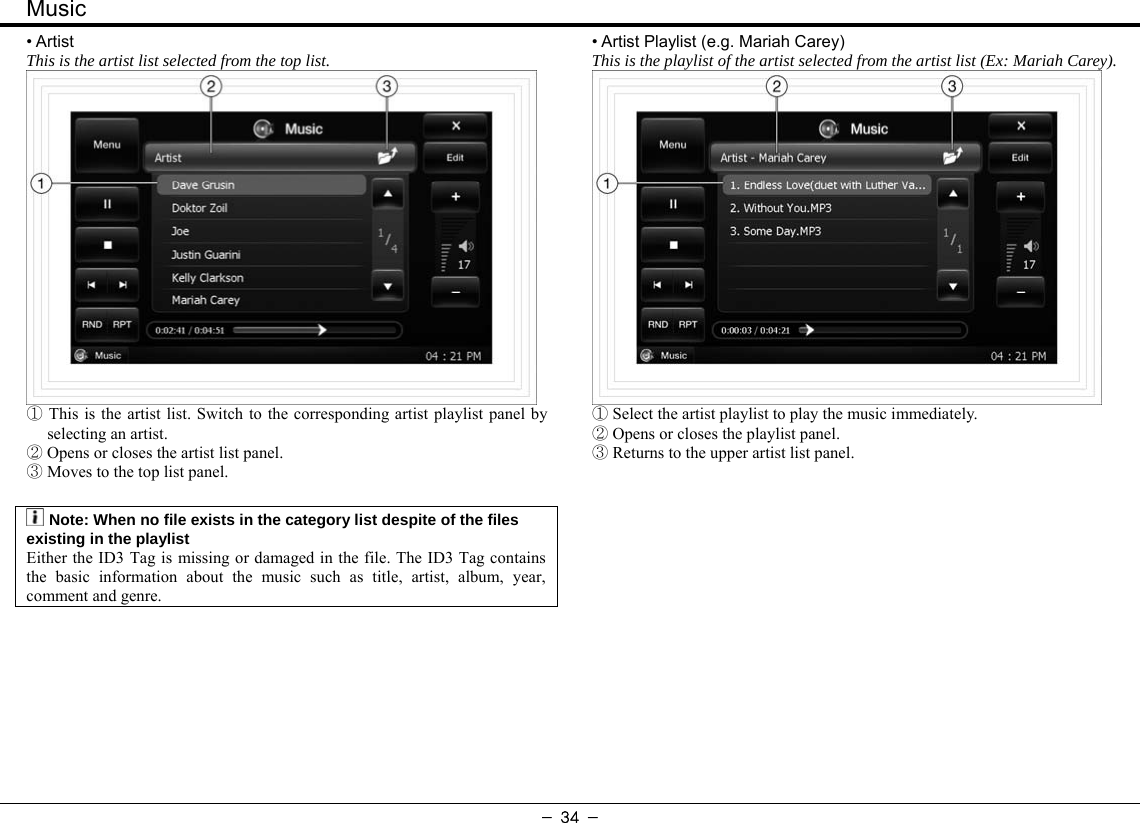
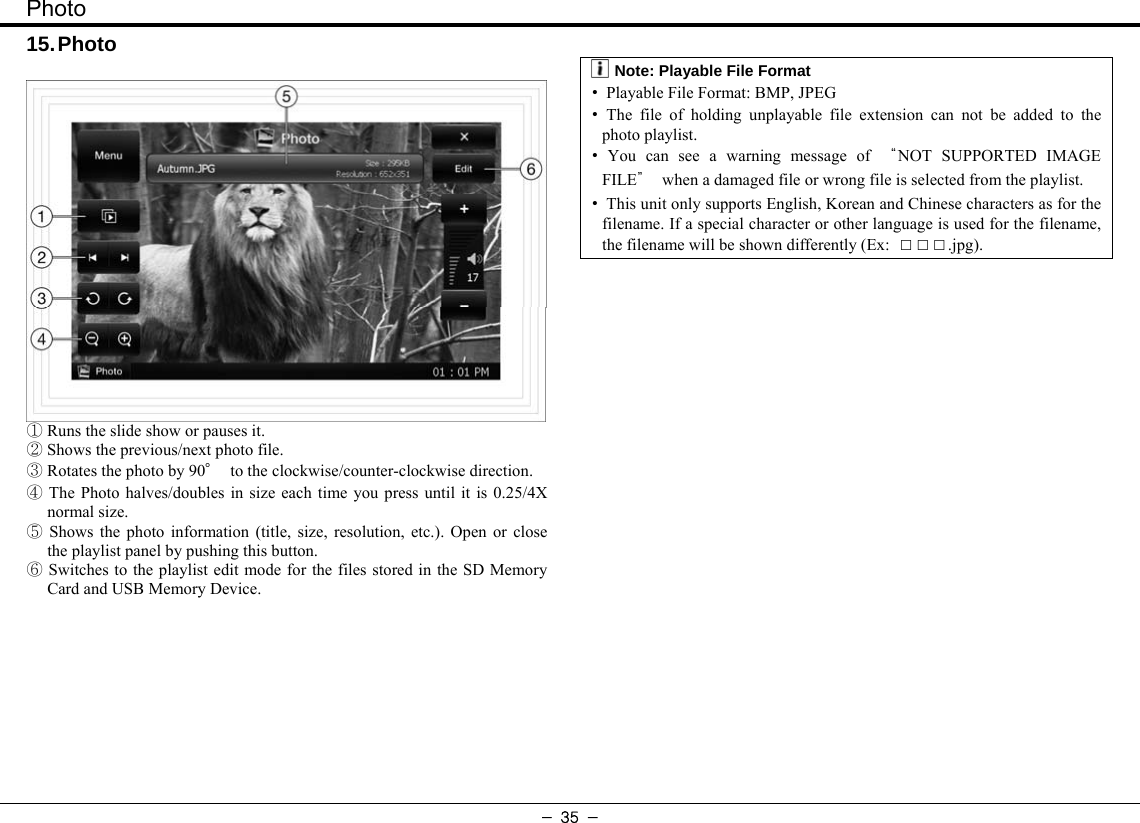
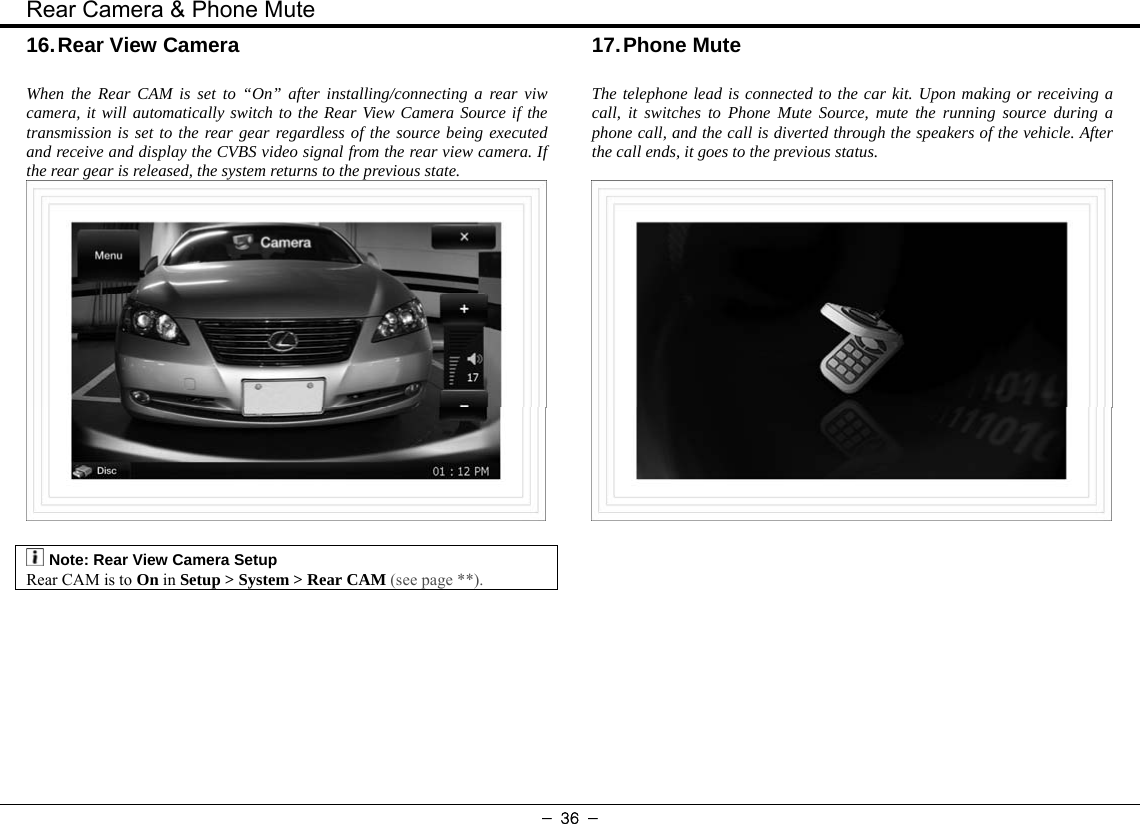
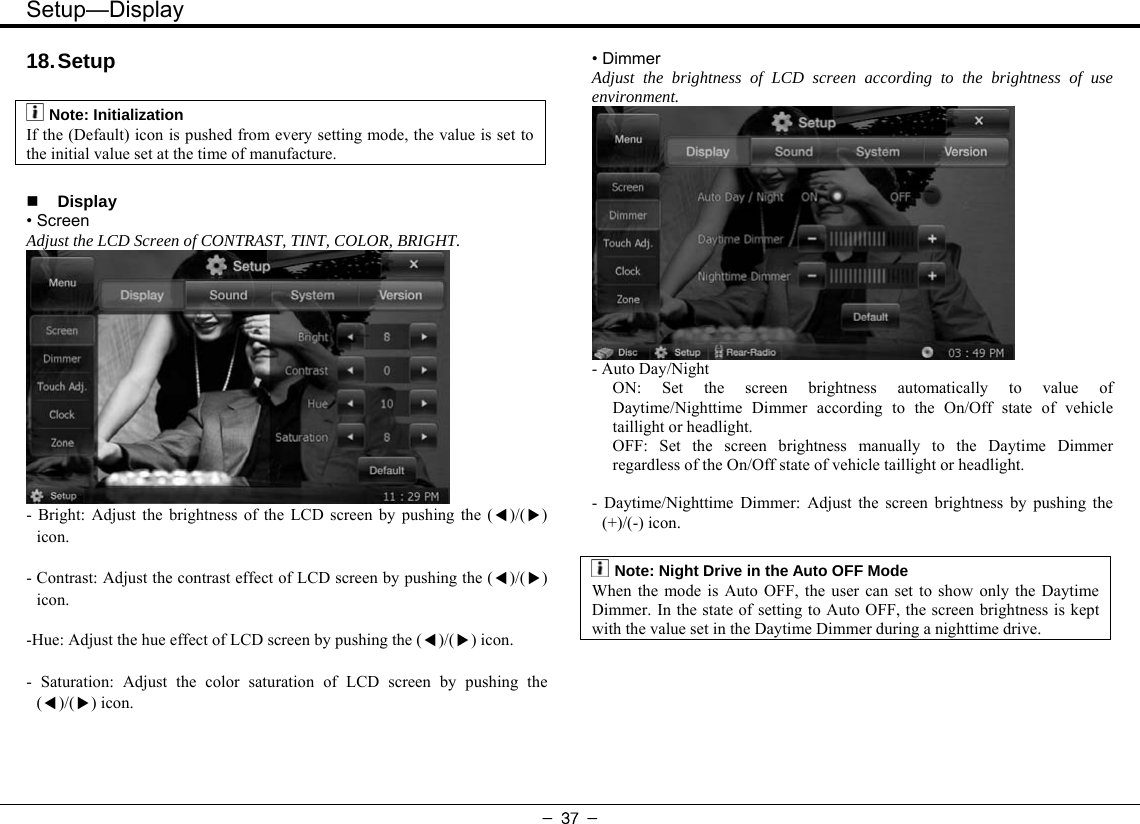
![Product Features - 9 - 2. Product Features Main Unit Wide TFT LCD Touch Screen① - It outputs video signals on the touch screen. - You can manipulate menus by touching each icon. [Mute] Button② - It mutes the sound or cancels the Mute function. [Volume] Button③ - It increases or decreases the volume level. [ ④ ] Button - It repeats the recent navigation audio signals. - When pressed for over one second, it returns to the navigation source. [ ⑤ ] Button - (Ignition key is in ACC or ON and power is Off) The power is turned on. - It sequentially switches between running sources. - When pressed for over one second, the power is turned off. [ ⑥ ] Button - It goes to the main menu for you to select a source. - When pressed for over one second, it goes to Setup. [Tilt] Button⑦ - By pressing it shortly, the slope of LCD panel changes by one level. - While pressing it, the slope of LCD panel continuously changes. - By adjusting the slope, you can insert or remove the SD card that contains the navigation map program, video files, MP3 files, and picture files. [ ⑧ ] Button - In order to insert, exchange, or remove a disc, it automatically adjusts the slope of LCD panel. - When a disc is inserted, it automatically extracts the disc. ⓐ Remote Control Receiver - It receives signals from the remote control. :Note: Use of remote control When you have any devices with remote controls other than of this product, the use of remote control may cause malfunction of other devices. Reset Holeⓑ - When this product malfunctions, you can reset the system by poking a pin (e.g. clip) through this hole.](https://usermanual.wiki/FMS/DVT780/User-Guide-949391-Page-9.png)
![Product Features - 10 - Remote Control [PWR/SRC]① - It functions the same as the Body [ ] button. ② [BAND] Button • Radio - It switches the frequency band (AM → FM1 → FM2→ AM). - When pressed for over one second, it switches the radio source (AM-FM → HD → AM-FM). ③ Numeric Button • Radio - Select any of frequencies (1–6) stored in Preset. - When pressed for over one second, the current frequency is stored in the corresponding preset (1–6). - Enter the frequency in the frequency input panel. • Disc: Enter values for Title, Chapter, and Track in the corresponding panel. • Movie/Music/Photo: Select a file in the playback list panel. • Phone: Enter the phone number. [SETUP] ④Button - It returns to the main menu. - When pressed for over one second, it goes to Setup. [DIRECT] ⑤Button • Radio: Opens or closes the frequency input panel. • Disc: Opens or closes the Title/Chapter/Track input panel. • Movie/Music/Photo: Opens or closes the playback list panel. [VOLUME] ⑥Button - It increases or decreases the volume level. [▲/▼//] ⑦◀▶Button • Navigation: Moves the map up/down/left/right. • Radio - / : ◀▶ Repeats scanning (8 seconds) of receivable frequencies forward or backward. When pressed again, the function ends. - ▼: Removes the frequency entered in the frequency input panel. • Disc: Moves the cursor on the DVD/VCD control. • iPod: / : ◀▶ Performs the Rewind/Fast Forward function. [ENT] ⑧Button • Radio: Select a frequency that has been entered in the frequency input panel. • Disc - Select values for Title, Chapter, and Track entered in the corresponding panel. - Select the item where the cursor is located in the DVD/VCD control. • iPod: Stops the Rewind/Fast Forward function.](https://usermanual.wiki/FMS/DVT780/User-Guide-949391-Page-10.png)
![Product Features - 11 - • Phone: When a phone call is issued or received for the entered phone number, it answers. • Movie/Music/Photo: Selects or unselects a playback file in the playback list editing area. [RETURN] ⑨Button • Radio: Closes the frequency input panel. • Disc: Closes the Title/Chapter/Track input panel. [MUTE] ⑩Button - Performs or cancel the Mute function. [PLAY/PAUSE] ⑪Button • Disc/iPod/Phone/Movie/Music: Plays back a file or pauses it. • Photo: Starts or stops a slideshow. :Note: Manipulation of MP3 player on the Bluetooth mobile phone This function works only when your mobile phone supports the Bluetooth stereo headset and has the MP3 player function. [STOP] ⑫Button • Disc/iPod/Phone/Movie/Music/Photo: Stops the playback. [SEEK] ⑬Button: • Radio: Used to select a previous or next receivable frequency. • Disc: Used to select a previous or next chapter/track. • iPod/ Phone/Movie/Music/Photo: Used to select a previous or next file. :Note: Multi Zone Rear Source When Multi Zone Rear Source is active, the remote control can control the rear source only. In this case, the current source (front source) can be controlled by using the icon.](https://usermanual.wiki/FMS/DVT780/User-Guide-949391-Page-11.png)
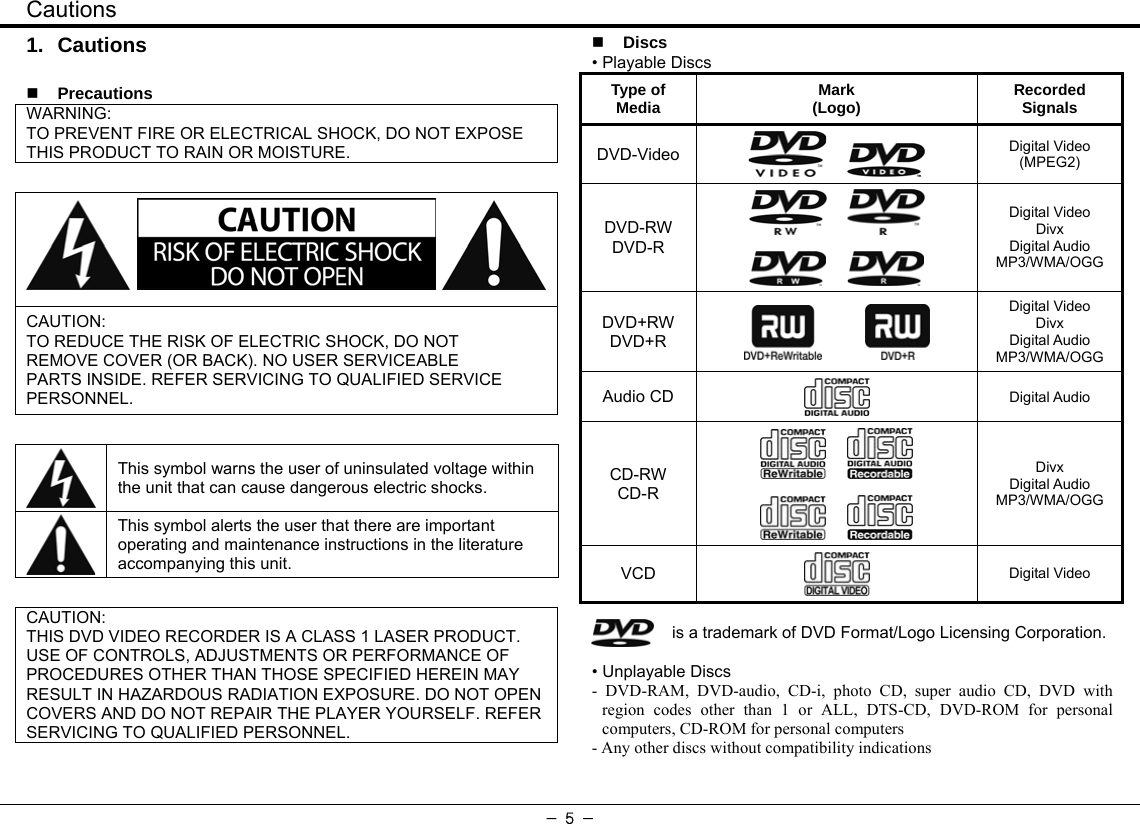
![Basic Operation - 12 - 3. Basic Operation Initial Use and Power Supply The power of this product is set to Off by default. Accordingly when you use this product for the first time after installation, move the ignition key location to ACC or ON and press the [ ] button on the remote control to supply power to the product. When the power is supplied, the LCD panel is moved inside and returns to the original position. :Caution: Battery Discharge Use this product while the car engine is started. If you use this for a long time while the engine is not started, the battery may be exhausted. Then you cannot start the car engine. When the ignition key is turned to LOCK or extracted, the current source and settings are automatically saved and the power is turned off. When the ignition key is turned to ACC or ON, the power is automatically turned on and the saved settings are returned. When the [ ] button is pressed for over one second, the power is turned off. In this case, turn the ignition key to ACC or ON and press the [ ] button to supply power. :Note: Automatic Start When you press the [ ] button for over one second to turn off the power, the power of the product is not automatically turned on when starting the engine. In order to automatically turn on the product, do not press the [ ] button but stop the engine by using the ignition key. :Note: Disk Resume Play If you turned off the power with a disc inserted, when you play back the disc after turning on the power, it is played back from the location where you previously listened. :Note: Illumination at Night Driving When you turn on headlights at night driving, the lamp for the product is turned on even though you turn off the power of the product. Volume Adjustment When you press the [Volume] button or Volume (+)/(-) icons on the LCD screen, the volume level increases or decreases. :Danger: Volume for Safe Driving Set to the adequate volume level in which you can hear the sound from outside. :Danger: Max. Volume Setting If the power is turned off while the volume is higher than Max. Volume set in Setup > Sound > Speaker Control, when you turn on the power again, the volume is adjusted to Max. Volume. Mute When you press the [Mute] button or the Mute icon on the LCD screen, the Mute function is activated and the shape of icon is changed. When you press the icon again, the function is deactivated. :Note: No Sound When the video of the product is normal but no sound is heard, check whether the Mute function is active.](https://usermanual.wiki/FMS/DVT780/User-Guide-949391-Page-12.png)
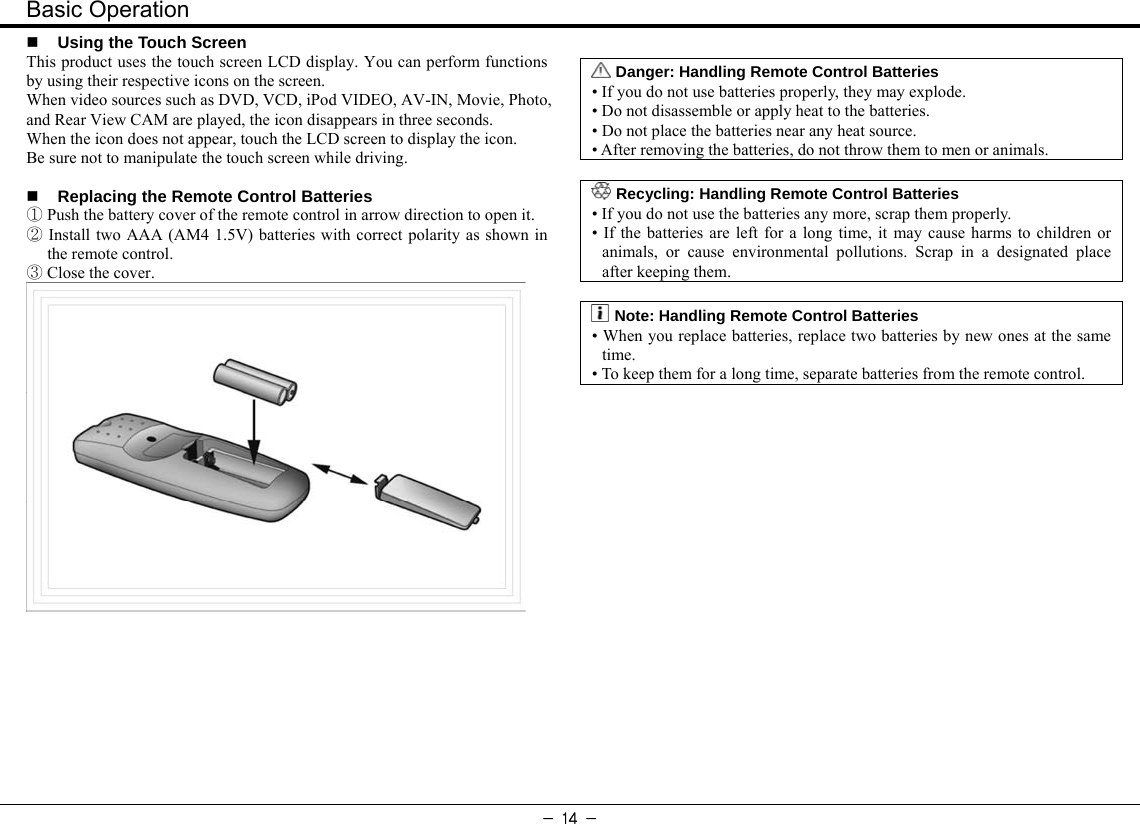
![Basic Operation - 13 - Adjusting the Slope of LCD panel By pressing the [Tilt] button shortly, you can change the slope of LCD panel level by level. When you press the [Tilt] button continuously, the slope of LCD panel changes continuously. :Note: Auto Close • You can set this in Setup > System > ETC (see page **). • ON: When the engine is stopped, the LCD panel is automatically closed. When the engine is started, the slope of LCD panel is automatically adjusted to the finally saved angle. Angle adjustment during use Power OFF by ignition key Power ON by ignition key • OFF: Even if the engine is stopped or started, the LCD panel is not automatically closed and sustains the current angle. Angle adjustment during use Power OFF by ignition key Power ON by ignition key :Caution: LCD Panel TILT Mechanism Do not forcibly move the LCD panel or press it hard. It may cause a product damage or malfunction. Inserting and Removing Disc/SD Memory Card When you press the [ ] button, the LCD panel moves downward to expose the slot for disc insertion on the rear. Push a disc in arrow direction to insert it. When a disc is inserted in the slot, push the [ ] button. The LCD panel moves downward and extracts the disc. After removing it, press the [ ] button again to move the LCD panel to the previous angle. :Note: Disc Ejection and LCD Panel Angle If the current angle of the LCD panel is lower than the moving angle of the [ ] button, when you press the [ ] button, the LCD panel does not move but (if a disc is inserted) just extracts the disc. When you insert/remove/replace a disc and press the [ ] button again, the LCD panel does not move. In this case, adjust the angle by using the [Tilt] button. By using the [Tilt] button, you can move the LCD panel downward and extract or insert an SD memory card for the slot on the rear panel.](https://usermanual.wiki/FMS/DVT780/User-Guide-949391-Page-13.png)
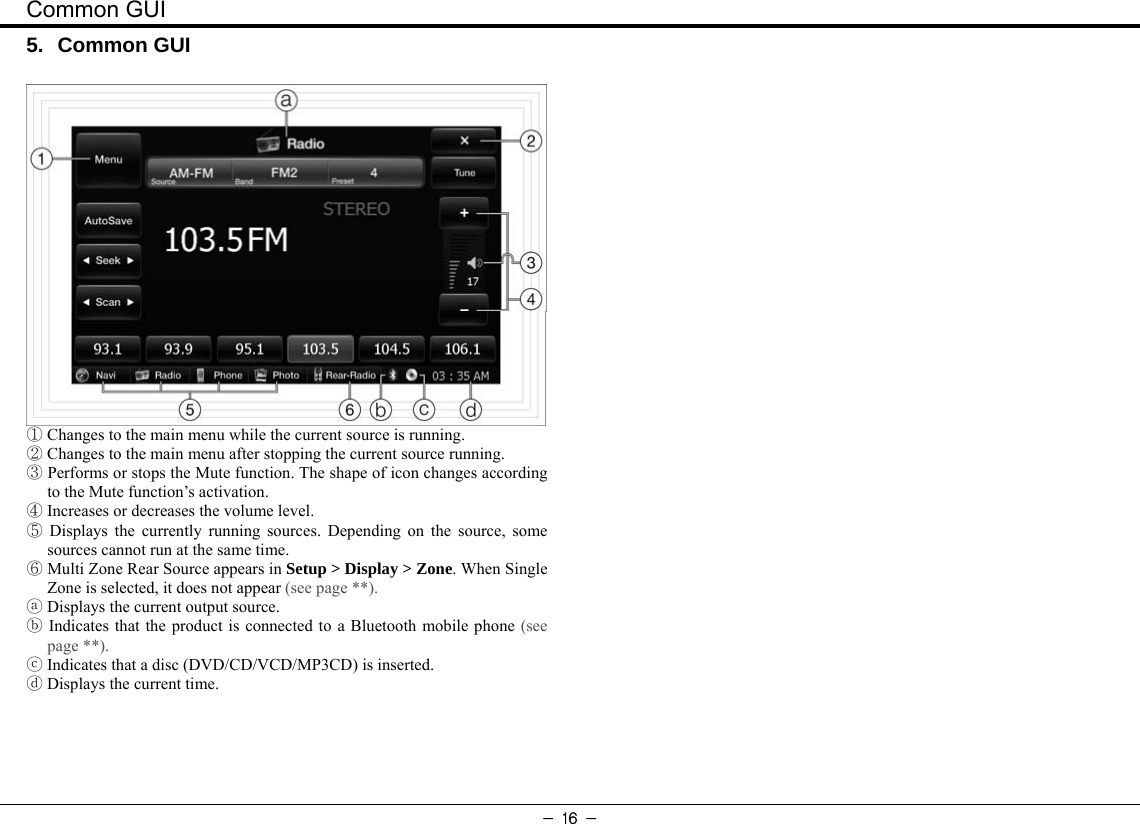
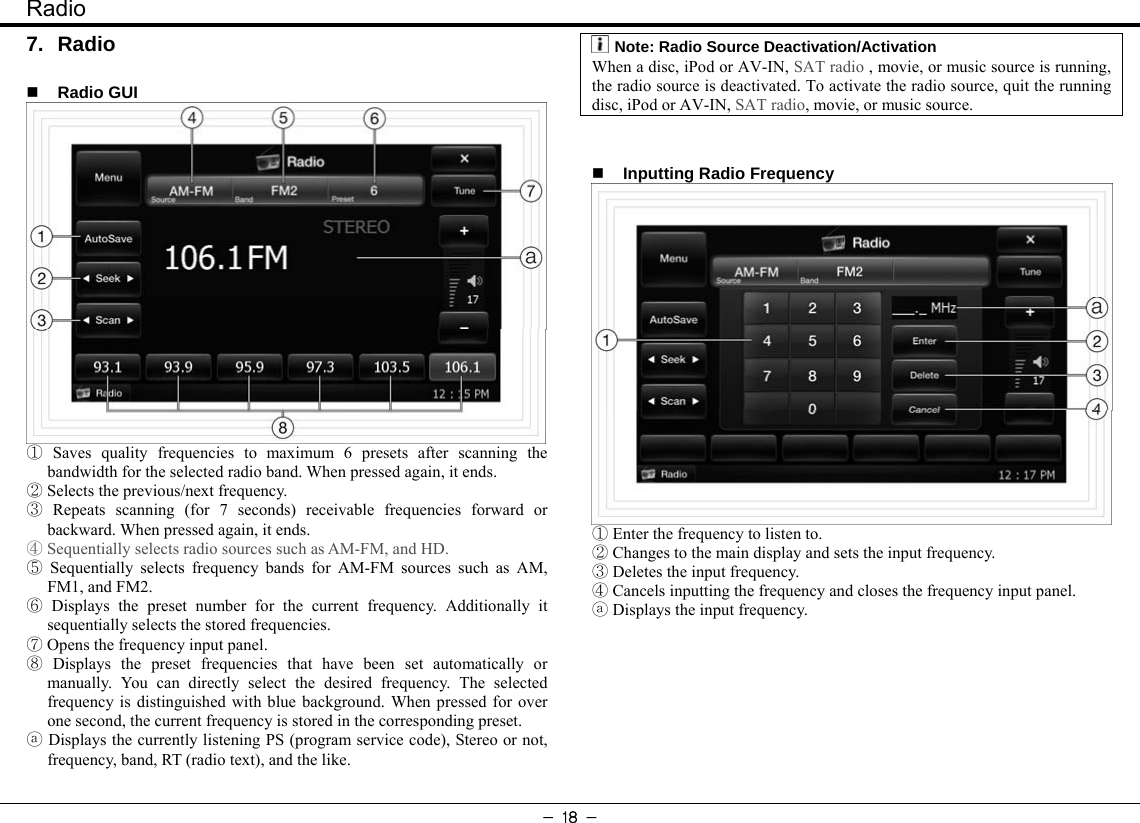
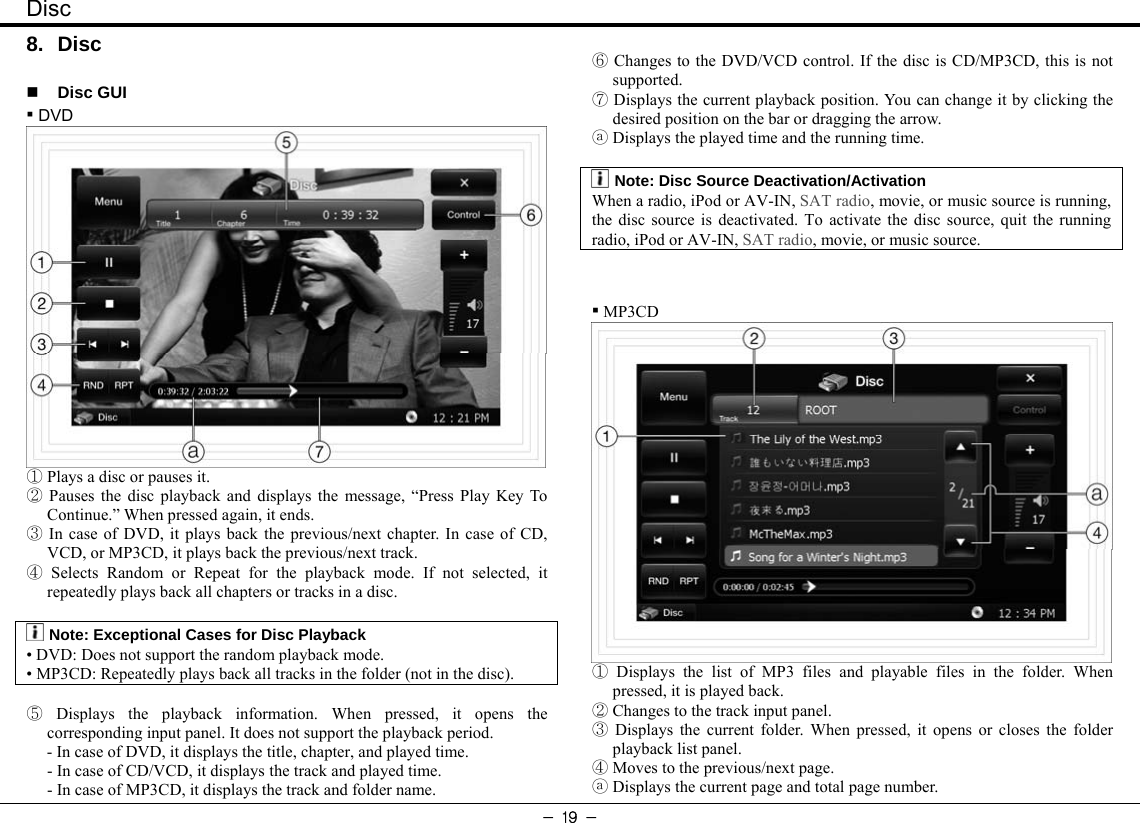
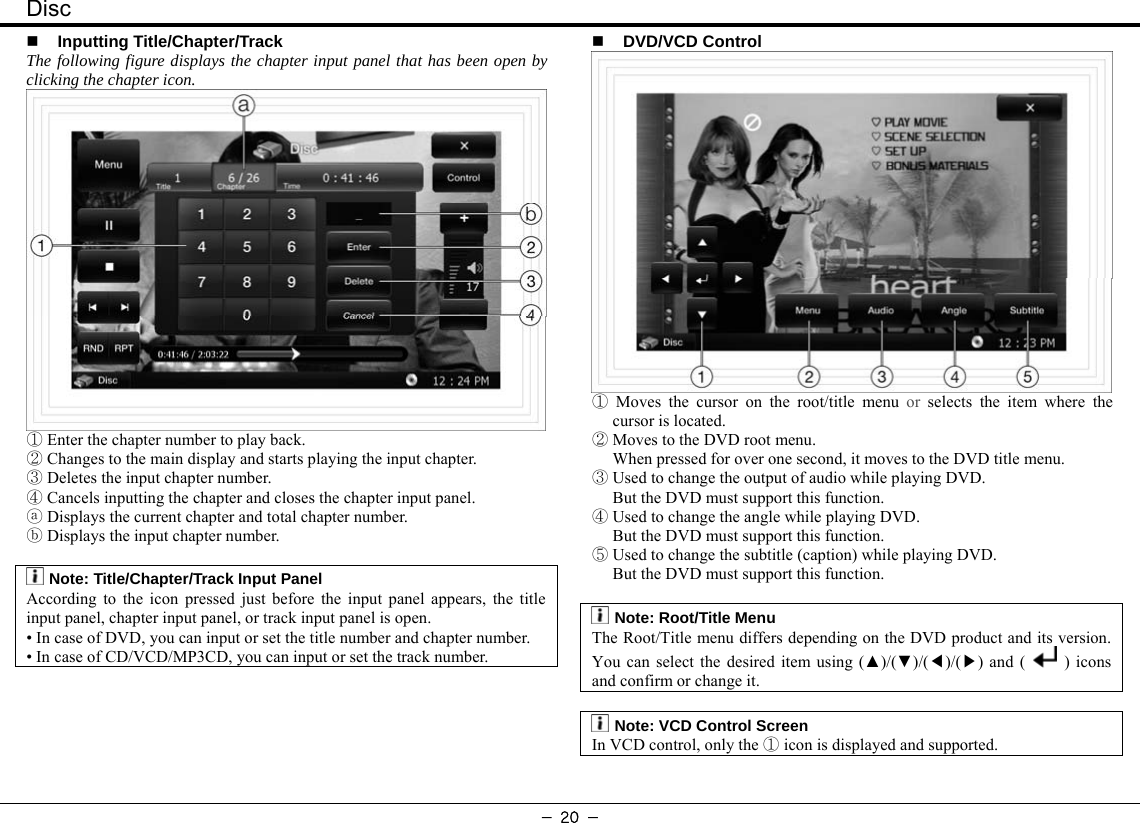
![Selecting Source on - 15 - 4. Selecting Source Selecting a source on the Main Menu • Click any source icon on the main menu to run it. • When you press the [ ] button on the body or [PWR/SRC] button on the remote control, the next source is selected. • The sources that cannot be run with the currently running source are deactivated. In order to run a deactivated source, stop the running source first and run the desired source. • The currently running source appears on the bar at the bottom. But the rear view camera source does not appear. :Note: Rear Source • A rear source can be selected in Setup > Display > Zone > Multi Zone (see page **). • When the phone rings, Phone automatically runs (see page **). • When you back your car, Rear View Camera automatically runs (see page **). Moving to the Main Menu • When you press the [ ] button on the body or the [SETUP] button on the remote control while a source is running, the main menu appears. • When you click the menu icon on the upper left corner, the main menu appears while the current source is running. • When you click the X icon on the upper right corner, the current source stops running and the main menu appears. • When video sources such as DVD, VCD, iPod VIDEO, AV-IN, Movie, Photo, and Rear View CAM are played, the icon disappears in three seconds. • When the icon does not appear, touch the LCD screen to display the icon. .](https://usermanual.wiki/FMS/DVT780/User-Guide-949391-Page-15.png)
![Navigation - 17 - 6. Navigation Insert the SD memory card that contains the Navigation map program into the NAVI slot and refer to the user guide for the Navigation map program that is separately provided. :Note: Moving to the Main Menu while Navigation is Running The icon does not appear while the Navigation is running or outputting. Press the [ ] button on the body or the [SETUP] button on the remote control to move to the main menu.](https://usermanual.wiki/FMS/DVT780/User-Guide-949391-Page-17.png)

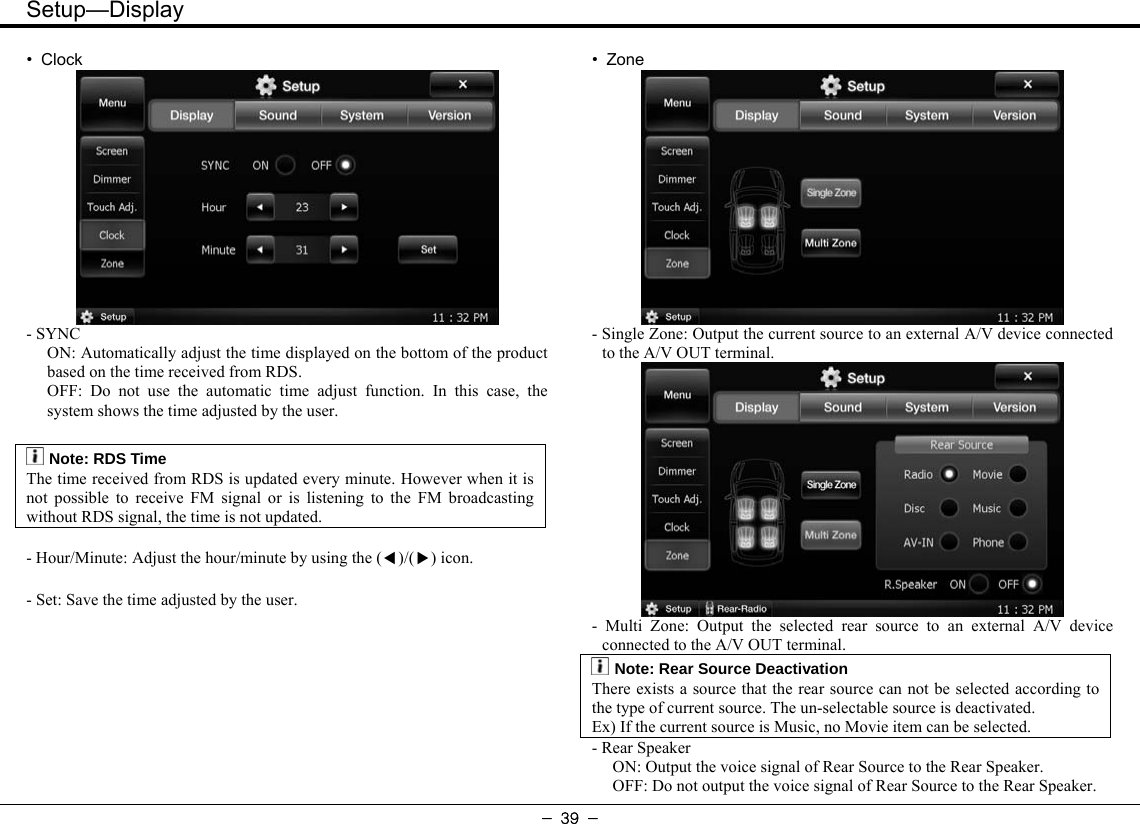
![Setup—Display - 38 - • Touch Adjustment The screen icon may not work well as the touch sensitivity of the LCD screen is changed due to the severe temperature change of environmental change. In this case, the user can optimize the touch sensitivity by the adjusting the touch sensitivity of the LCD screen. ① Start the Touch Adjust Mode. ②Touch the center of plus marks (+) correctly that moves in the order of center→left top→left bottom→right bottom→right top. ③After adjusting the sensitivity by pushing a total of five times, push the screen to apply the newly adjusted values. To return to the previous setting values after canceling the adjusted values, please wait for 30 seconds. :Note: Emergency Mode When it is not possible to touch the touch adjustment icon because the touch sensitivity of LCD screen is severely altered, push the main unit button [ ] for 1 long second to switch to the Setup – Display – Screen and again, push the main unit button [ ] for 1 long second. Then, you can enter the Touch Adjustment screen.](https://usermanual.wiki/FMS/DVT780/User-Guide-949391-Page-38.png)

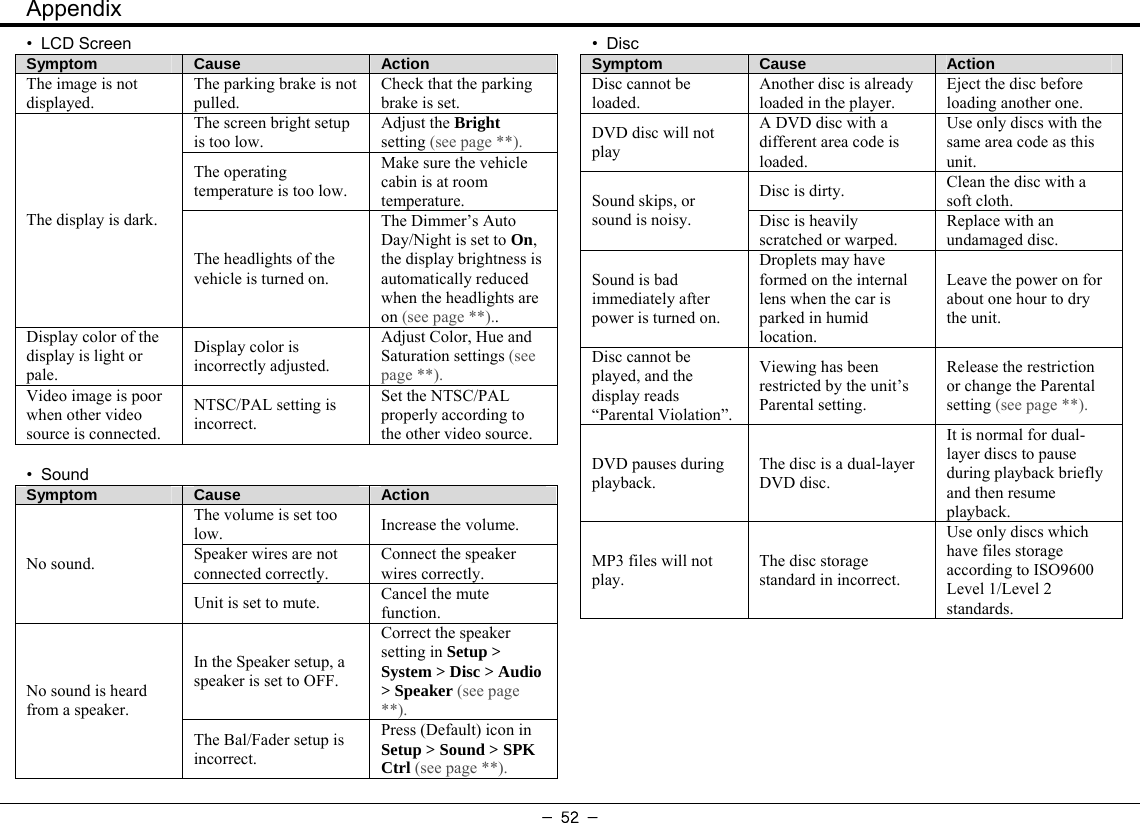
![Appendix - 51 - 19. Appendix Trouble Shooting If the problem continues after performing the following actions, please contact the place of purchase or customer support center (***-****-****). • DVD Player Message Symptom Action Please Check Disc When the unit can not read the disk. Clean the disk or replace it with another disk. Err 0 When the temperature of DVD Loader is no less than 75 degrees. Turn off the power of this product and adjust the temperature. Err 1 When the temperature of DVD Loader is not more than – 30 degrees.Turn off the power of this product and adjust the temperature. Err 5 When the spindle motor does not work properly.Turn off and on the power again. Tray Error When the tray is locked because of an inserted disc. Turn off and on the power again. Take out the disk forcefully by pushing and holding the [ ] button for a few seconds. Input Invalid When pushing a button or icon incorrectly. Play Back Only When entering a playback command not supported in the current mode. Push the correct button or icon. • General Symptom Cause Action Power does not turn on. Fuse has blown. Replace with a fuse of same amperage. If the fuse blow again, consult with the dealer from whom you purchased the unit. The operating environment is too cold or too hot. Operate the unit at room temperature. Nothing happens when buttons are pressed. Display is not accurate. The microprocessor has malfunctioned due to electrical noise, static or other causes. Turn off the unit and then power it up again. Touch screen is not working properly. The touch screen is incorrectly aligned. Adjust the touch screen sensitivity of the LCD screen. Sunlight is interfering with the remote control IR Sensor. Try use this unit where there in no direct sunlight hitting the sensor. The remote control does not work. Batteries of remote control are dead or there is no battery in the remote control. Check and/or replace the batteries in the remote control unit.](https://usermanual.wiki/FMS/DVT780/User-Guide-949391-Page-51.png)