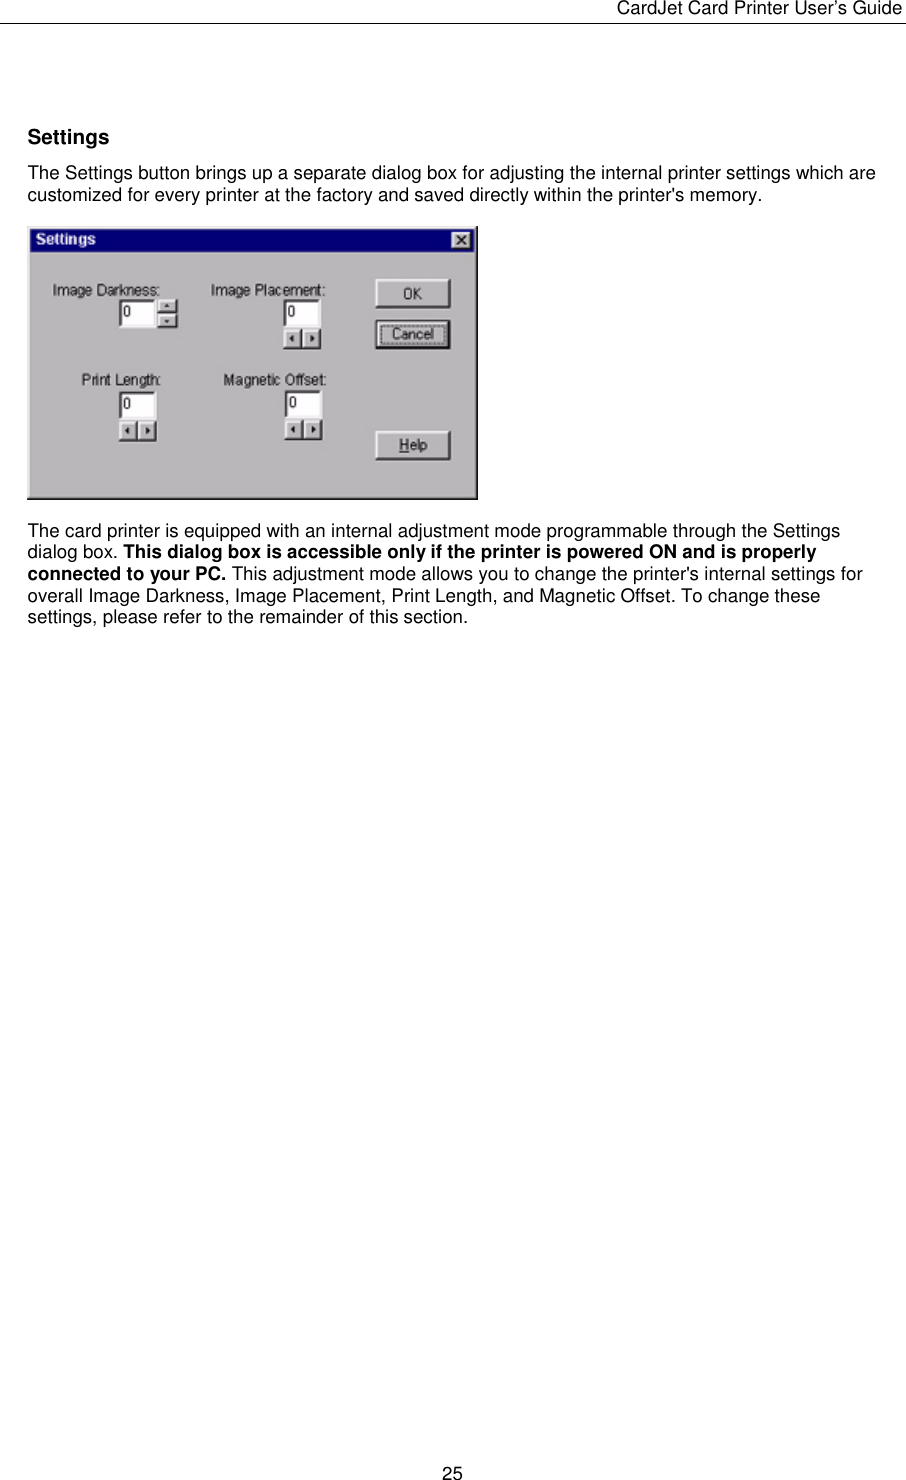
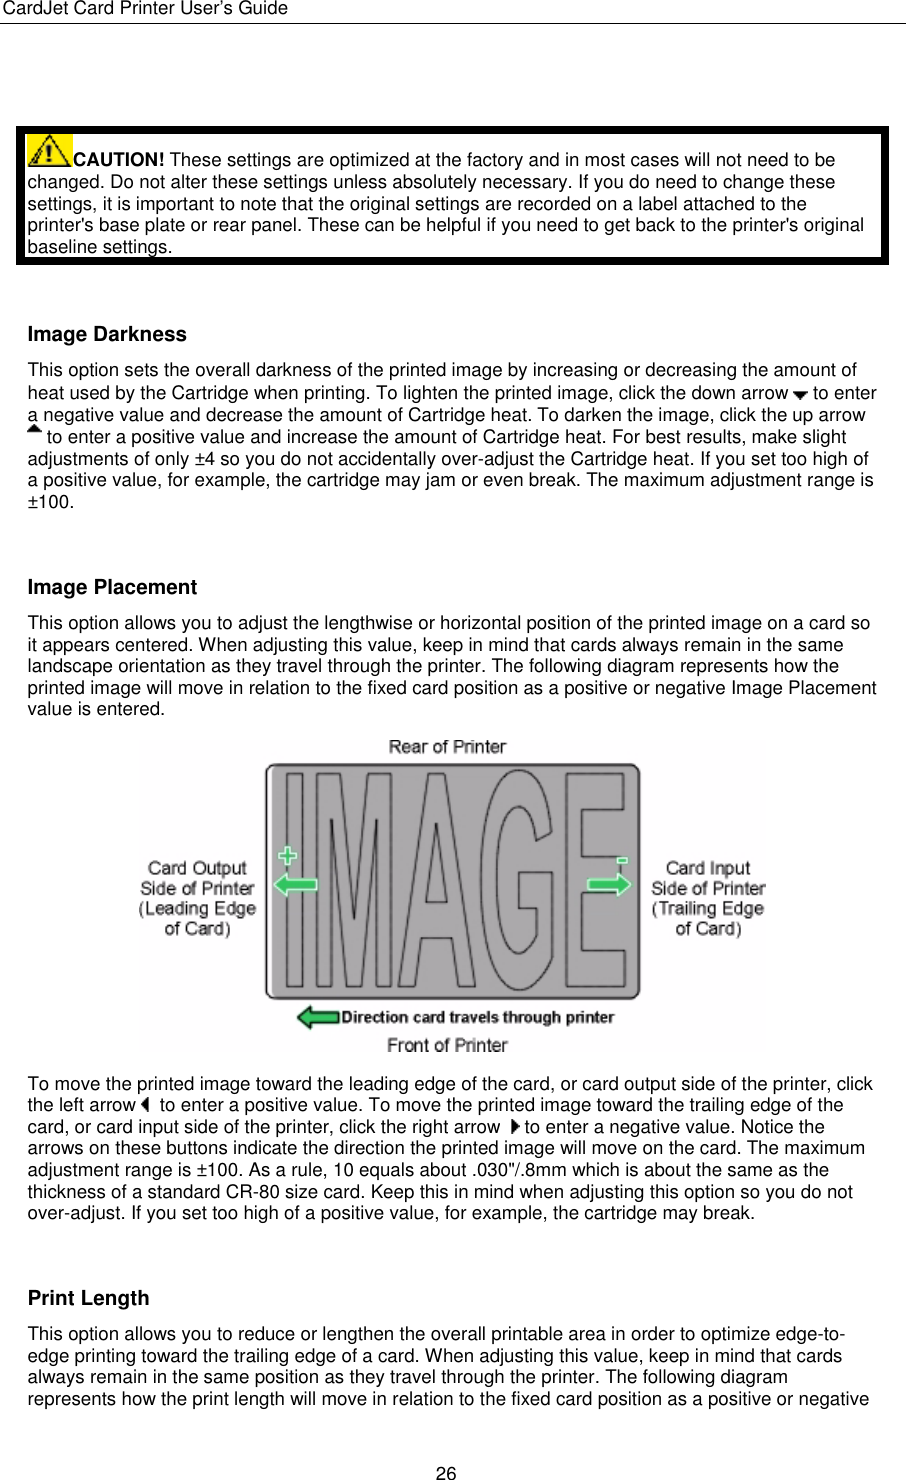
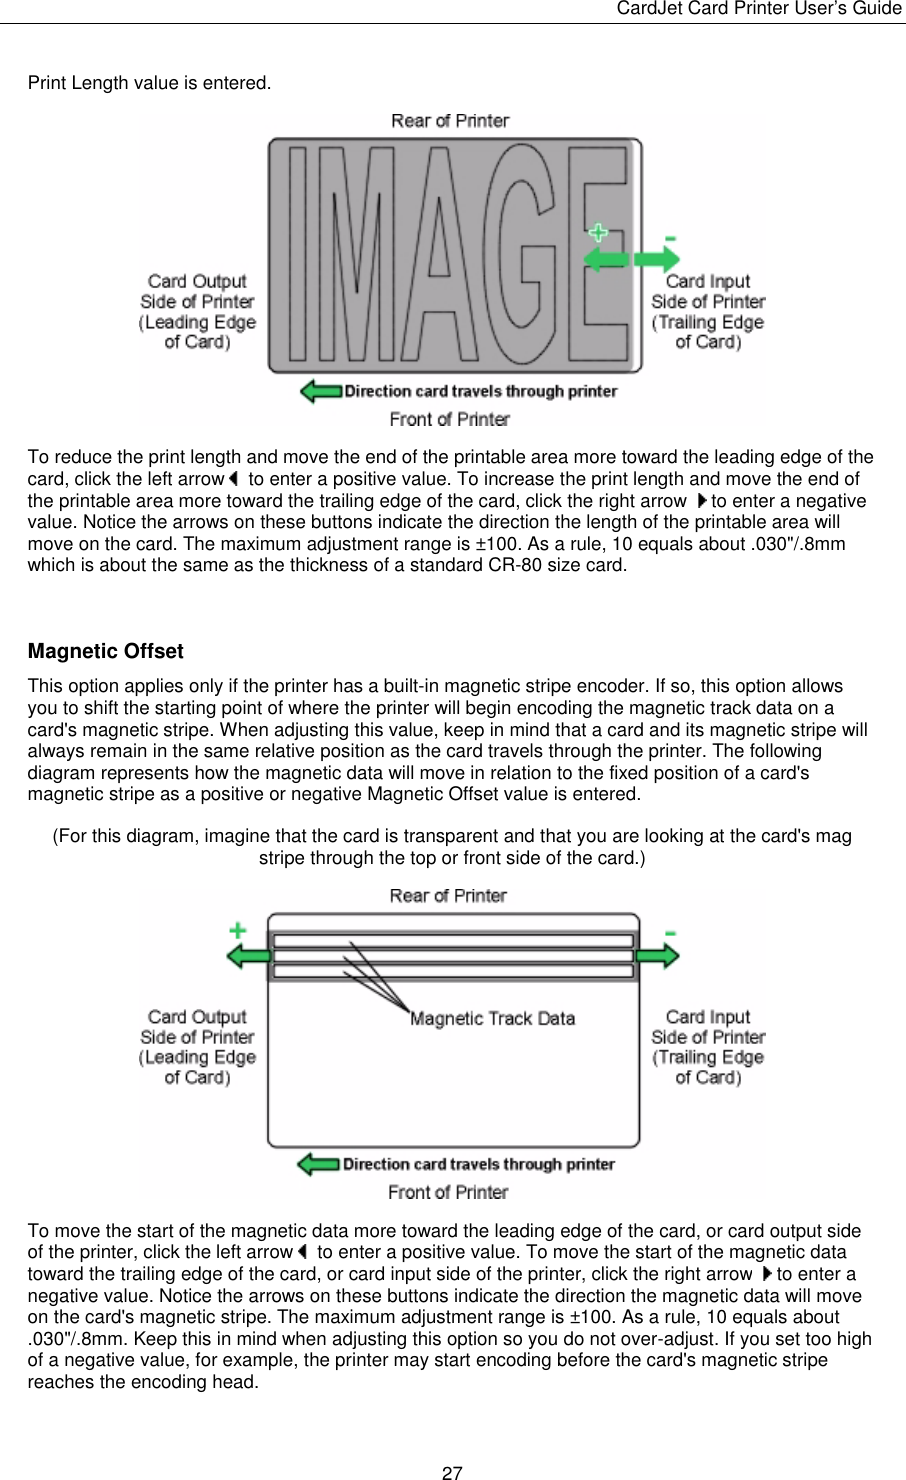
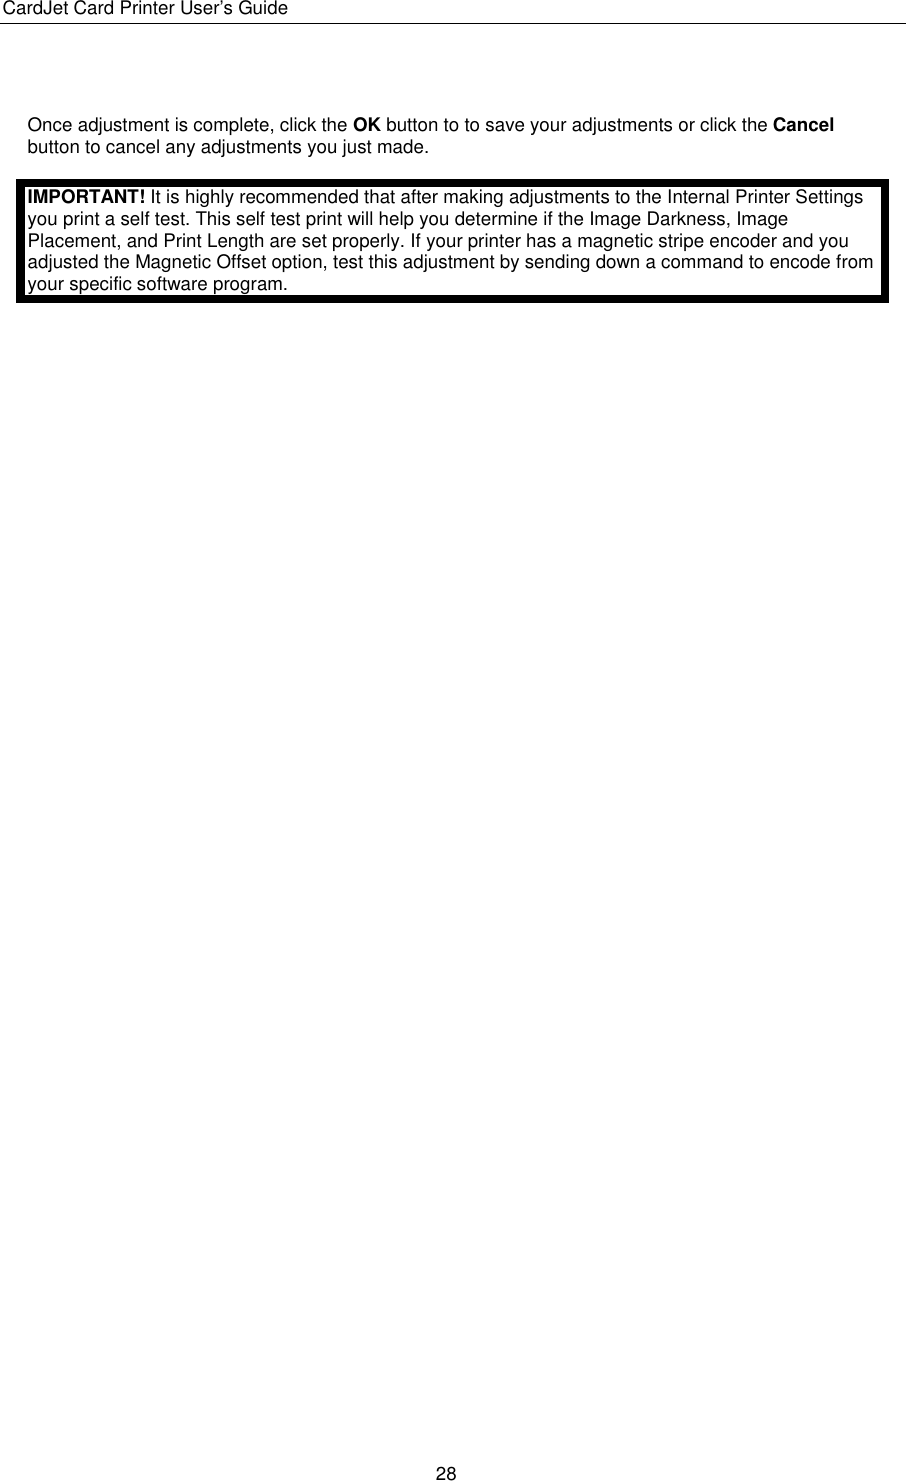
Fargo Electronics X001200 CardJet Card Printer User Manual Introduction

Fargo Electronics Inc CardJet Card Printer Introduction

Users Manual

 CardJet Card Printer      User’s Guide X001200
CardJet Card Printer User’s Guide  i Notices The information in this document is subject to change without notice. NO WARRANTY OF ANY KIND IS MADE WITH REGARD TO THIS MATERIAL, INCLUDING, BUT NOT LIMITED TO, THE IMPLIED WARRANTIES OF MERCHANTABILITY AND FITNESS FOR A PARTICULAR PURPOSE. No liability is assumed for errors contained herein or for incidental damages in connection with the furnishing, performance, or use of this material. This document contains proprietary information which is protected by copyright. All rights are reserved. No part of this document may be photocopied, reproduced, or translated into another language without prior written consent. Patents Pending Trademark Acknowledgments CardJet is a trademark and FARGO is a Registered trademark. IBM is a registered trademark of International Business Machines Corporation. Windows is a registered trademark of Microsoft Corporation. All other trademarks are the property of their respective owners. Revision History Edition 1.0, 102502 P/N L000XXX © Copyright 2002. All rights reserved. For Users in the United States: This equipment has been tested and found to comply with the limits for a Class B digital device, pursuant to Part 15 of the FCC Rules. These limits are designed to provide reasonable protection against harmful interference in a residential installation. This equipment generates, uses, and can radiate radio frequency energy and, if not installed and used in accordance with the instructions, may cause harmful interference to radio communications. However, there is no guarantee that interference will not occur in a particular installation. If this equipment does cause harmful interference to radio or television reception, which can be determined by turning the equipment off and on, the user is encouraged to try to correct the interference by one or more of the following measures:   Re-orient or relocate the receiving antenna.   Increase the separation between the equipment and receiver.   Connect the equipment into an outlet on a circuit different from that to which the receiver is connected.   Consult the dealer or an experienced radio/TV technician for help. Use of a shielded cable is required to comply with the Class B limits of Part 15 of the FCC Rules. You are cautioned that any changes or modifications not expressly approved in this manual could void your authority to operate and/or obtain warranty service for this equipment. For Users in Canada: This digital apparatus does not exceed the Class B limits for radio noise for digital apparatus set out on the Radio Interference Regulations of the Canadian Department of Communications.
CardJet Card Printer User’s Guide  1 Le present appareil numerique n'emet pas de bruits radioelectriques depassant les limites applicables aux appareils numeriques de la Class B prescrites dans le Reglement sur le brouillage radioelectrique edicte par le ministere des Communications du Canada. For Users in Taiwan:
CardJet Card Printer User’s Guide  2 Safety Precautions Before operating the unit, please read the following safety precautions carefully. Warnings CAUTION! TO PREVENT FIRE OR SHOCK HAZARD, DO NOT EXPOSE THE UNIT TO RAIN OR MOISTURE. TO REDUCE THE RISK OF ELECTRIC SHOCK, DO NOT REMOVE FRONT, TOP OR BACK PANELS. NO USER-SERVICEABLE PARTS INSIDE. REFER SERVICING TO QUALIFIED SERVICE PERSONNEL.   Operate the unit only on 100-240 VAC, 50/60 Hz. If you have any doubt as to whether you have a unit with the correct voltage rating for your country's power supply, DO NOT attempt to use the unit. Contact your dealer or the factory.   Stop operation immediately if any liquid or solid object should fall into the cabinet. Unplug the unit and have it checked by qualified service personnel.   Do not disassemble the cabinet. Refer servicing only to qualified personnel.   Use only the AC power cord included with this unit or an equivalent cord.   This device is electrostatic sensitive. It may be damaged if exposed to static electrical discharges. (Discharges may be generated by various means, such as walking on a carpeted floor.) Be sure to observe all established Electro-Static Discharge (ESD) procedures while handling cables in or near the Circuit Board and Cartridge Assemblies. Always wear an appropriate personal grounding device, such as a wrist strap with integral resistor, connected to an ESD ground to avoid potential damage. At a minimum, make positive contact with the bare metal chassis of the printer with your hand before proceeding with the procedure.   Sicherheitsmaßnahmen Machen Sie sich vor Inbetriebnahme des Geräts mit den Sicherheitsmaßnahmen gründlich vertraut. Sicherheitshinweise VORSICHT! ZUR VERHÜTUNG VON FEUERGEFAHR ODER ELEKTRISCHEN SCHLÄGEN DAS GERÄT VOR REGEN ODER FEUCHTIGKEIT SCHÜTZEN. UM DIE GEFAHR VON STROMSCHLÄGEN ZU VERHINDERN, OBERE, SEITLICHE UND HINTERE ABDECKUNG NICHT ABNEHMEN. DAS GERÄT ENTHÄLT KEINE TEILE, DIE VOM BENUTZER GEWARTET WERDEN KÖNNEN. WARTUNGSARBEITEN DÜRFEN NUR VON QUALIFIZIERTEM FACHPERSONAL DURCHGEFÜHRT WERDEN.   Das Gerät nur mit 100-240 V 50/60 Hz Wechselstrom betreiben. Wenn Sie nicht sicher sind, ob Ihr Gerät mit der Spannung des örtlichen Stromnetzes arbeitet, DAS GERÄT NICHT IN BETRIEB NEHMEN. Wenden Sie sich an Ihren Händler oder den Hersteller des Geräts.   Den Betrieb sofort unterbrechen, wenn ein Gegenstand in das Gehäuse gefallen oder Flüssigkeit eingedrungen ist. Den Netzstecker ziehen und das Gerät von qualifiziertem Wartungspersonal überprüfen lassen.
CardJet Card Printer User’s Guide  3   Keine Gehäuseteile abnehmen. Wartungsarbeiten nur von qualifiziertem Fachpersonal durchführen lassen.   Consignes de sécurité Avant d'utiliser l'appareil, prière de lire attentivement les consignes de sécurité suivantes. Avertissements ATTENTION! POUR EVITER TOUT RISQUE D'INCENDIE OU D'ELECTROCUTION, NE PAS EXPOSER L'APPAREIL A LA PLUIE OU A L'HUMIDITE. POUR EVITER TOUTE DECHARGE ELECTRIQUE, NE PAS RETIRER LES PANNEAUX avant, superieur OU ARRIERE. NE PAS TENTER DE REPARER SOI-MEME LES PIECES A L'INTERIEUR DE L'APPAREIL. CONFIER L'ENTRETIEN DE L'APPAREIL A UN PERSONNEL QUALIFIE.   Faire fonctionner l'appareil uniquement sur courant alternatif de 100/240 V, 50 ou 60 Hz. En cas de doute sur la compatibilité entre la tension nominale de l'appareil et le courant du pays d'utilisation, NE PAS TENTER D'UTILISER L'APPAREIL. Contacter le revendeur ou l'usine.   Arrêter immédiatement le fonctionnement si un liquide ou un solide venait à s'infiltrer à l'intérieur de l'armoire. Débrancher l'appareil et le faire vérifier par un personnel qualifié.   Ne pas démonter l'appareil. Confier l'entretien de l'appareil uniquement à un personnel qualifié   Precauciones de seguridad Antes de operar la unidad, haga el favor de leer detenidamente las siguientes precauciones de seguridad. Advertencias ¡PRECAUCION! PARA EVITAR PELIGROS DE INCENDIO O CHOQUE ELECTRICO, NO EXPONGA LA UNIDAD A LA LLUVIA NI A LA HUMEDAD. PARA REDUCIR EL RIESGO DE CHOQUE ELECTRICO, NO QUITE LOS PANELES FRONTALES, SUPERIORES, LATERALES NI DE FONDO. EL INTERIOR NO TIENE PIEZAS REPARABLES POR EL USUARIO. PARA SERVICIO DE REPARACION Y MANTENIMIENTO SOLICITE LA ATENCION DE UN TECNICO DE SERVICIO AUTORIZADO.   Opere la unidad sólo a 100-240 VAC, 50/60 Hz. Si no está seguro que la unidad que tiene es compatible al voltaje de la corriente eléctrica de su país, NO INTENTE USAR LA UNIDAD. Llame al representante de ventas o a la fábrica.   Detenga la operación inmediatamente si algún líquido u objeto sólido cayera en el armario. Desenchufe la unidad y hágala revisar por un técnico de servicio autorizado.   No desarme el armario. Para servicio de mantenimiento, solicite la atención de un técnico autorizado.
CardJet Card Printer User’s Guide  4   Precauzioni per la Sicurezza Prima di dare inizio al funzionamento dell’unità, siete pregati di leggere attentamente le seguenti precauzioni di sicurezza. Avvertenze ATTENZIONE! Onde evitare il pericolo di incendio o scossa elettrica, non esporre l’unità alla pioggia od umidità. EVITARE DI RIMUOVERE I PANNELLI ANTERIORE, SUPERIORE, O POSTERIORE PER RIDURRE IL RISCHIO DI SCOSSA ELETTRICA. LA MANUTENZIONE DELLE PARTI INTERNE DELL’UNITÀ NON É di competenza dell’utente. ai fini della riparazione rivolgersi al personale di competenza.   Negli Stati Uniti e Canada l’unità funziona solo con alimentazione a 100-240 VAC, 50/60 Hz. Qualora non abbiate la certezza che il trasformatore e la spina di cui disponete siano quelli adeguati all’alimentazione erogata nel vostro paese, NON USARE L’UNITÀ. Rivolgersi piuttosto al rivenditore o la fabbrica del luogo.   Arrestare immediatamento il funzionamento dell’unità qualora si verifichi un versamento di liquido o la caduta di un oggetto solido all’interno del suo alloggiamento.   Non smontare la struttura dell’alloggiamento. Le riparazioni sono competenza soltanto di personale qualificato.   Precauções de Segurança Antes de operar esta unidade, leia cuidadosamente as seguintes precauções de segurança. Advertências CUIDADO! Para evitar perigo de choques elétricos ou incÊndio, não exponha a unidade à chuva ou umidade. Para reduzir o risco de choques elétricos, não remova os painéis DIANTEIRO, SUPERIOR OU TRASEIRO. NENHUMA PEÇA no interior desta unidade pode ser consertada pelo usuÁrio. peça ASSIStÊncia ao pessoal de manutençÃo qualificado.   Opere esta unidade somente em 100-240 VAC, 50/60 Hz. Se você não souber se a sua unidade tem a voltagem correta para o sistema elétrico do seu pais, NÃO TENTE USAR ESTA UNIDADE. Entre em contato com seu revendedor ou com a fábrica.   Pare imediatamente a operação se qualquer líquido ou objeto sólido cair em seu gabinete. Desligue a unidade e mande examiná-la por pessoal qualificado.   Não desmonte o gabinete. Peça assistência somente ao pessoal qualificado.
CardJet Card Printer User’s Guide  5
CardJet Card Printer User’s Guide  6
CardJet Card Printer User’s Guide  7      Introduction   Thank You... ...for choosing a CardJet Card Printer. Your printer has been designed to produce stunning, photo-quality color or monochrome output. It offers many features which easily allow you to create full-color, durable cards complete with:   Photographs   High resolution graphics   Text   Bar codes   And much more. To begin printing with your new printer, please refer to the topics in this User's Guide in the order in which they appear. This user-friendly guide provides complete step-by-step instructions for setting up, using, and maintaining your card printer.
CardJet Card Printer User’s Guide  8 A.  Special Features Your card printer has many distinct advantages over other color card printers. The following highlights its many special features:   Edge-to-edge printing in full-color or monochrome   Fast print speed of just 30 seconds per full-color card    In-line printing and optional magnetic stripe encoding for fast, efficient batch printing   Inkjet printing capability for printing continuous-tone photos and crisp, readable bar codes   Intuitive, easy-to-use control buttons and LED indicators And best of all, operation of the printer is simple and straight forward. Your card printer will print from any IBM-PC® or compatible running Windows® 2000/XP. This means that you can use the printer with virtually any software package running under these operating systems without any special set-up or configuration beyond the initial installation of the software driver and interface cable.
CardJet Card Printer User’s Guide  9      Getting Started   A.  Choosing A Good Location   Place the unit in a location with adequate air circulation to prevent internal heat build up.   Use the printer's dimensions as a guideline for the minimum clearances to the unit. Note: Allow for adequate clearance above the unit to accommodate the height of the unit with its Top Cover open.   Do not install unit (a) near heat sources such as radiators or air ducts, or (b) in a place subject to direct sun-light, excessive dust, mechanical vibration or shock. About Moisture Condensation If the unit is brought directly from a cold to a warm location, or is placed in a very damp room, moisture may condense inside the unit. Should this occur, print quality may not be optimum. Leave the unit turned OFF in a warm, dry room for several hours before using. This will allow the moisture to evaporate.
CardJet Card Printer User’s Guide  10 B.  Unpacking And Inspection While unpacking your printer, inspect the carton to ensure that no damage has occurred during shipping. Make sure that all supplied accessories are included with your unit. The following items should be included with your printer:   Printer   Power Cord   Software Installation CD — Includes:   Printer Driver Software (Installation - Setup)   This User's Guide   Warranty Statement and Registration Card Save the carton and packing materials. They are designed to be re-used and will come in handy when transporting the unit.
CardJet Card Printer User’s Guide  11 C.  Applying Power The printer has a universal power supply properly configured for the power used in your country. To connect this power cord to the printer, locate the appropriate power cord for your country and refer to the following steps: 1.  Locate the power cord delivered with your printer. 2.  Place the DC power plug end of the power cord into the printer's Power Input Port. 3.  Place the AC power plug end of the power cord into an available wall outlet. Power is automatically applied to the printer when it is plugged in. Press the Power button   if you wish to turn the printer OFF. If the printer will not be used for a long period of time, unplug the power supply cord from the wall outlet.
CardJet Card Printer User’s Guide  12 D.  Opening The Top Cover 1.  Open the Top Cover of the printer by lifting up on its bottom edge and tilting the cover back into its fully open position. 2.  To close the Top Cover, gently lower the Top Cover until it closes securely. Note: The Top Cover must be closed securely in order for your printer to operate.
CardJet Card Printer User’s Guide  13 E.  Identifying The Printer Features    Top Cover Opens to allow access to the Cartridge, cartridge, and card path. This cover must be closed in order for the printer to begin printing (see Opening The Top Cover).   Power Button and LED The Power button   turns the printer ON and OFF. It also serves to cancel the current print job and reset the printer for the next print job. If a card is left within the printer after a print job is canceled, it will automatically be ejected when the printer is turned back ON.   Media Button and LED The Media button   is used to pause the printer during normal operation and also to resume operation after an error condition is cleared. In general, as the icon above this button indicates, errors are related to either the cartridge or the cards. If an error occurs, the Media LED will flash. In this case, correct the error, and press the Media button to resume. The printer must have both the Power LED and the Media LED illuminated in order to print.   Card Input Hopper Load card cartridge into this hopper.   Power Port Connect to the included power cord (see Applying Power).   Interface Port Connect to a Windows PC with a USB cable.
CardJet Card Printer User’s Guide  14      Ink Cartridges And  Blank Cards   A.  About Ink Cartridges As described in How Your Card Printer Works, your card printer utilizes inkjet methods to print images directly onto blank cards.  The Inkjet print cartridge combines the yellow (Y), magenta (M), and cyan (C) inks. By combining all colors, this cartridge allows you to print full-color, photo-quality images with sharp, black text and bar codes.  Please note that the printer requires specialized cartridges in order to function properly. If you do not use these authorized cartridges, you will not be able to print. To order additional materials, please contact your authorized reseller.
CardJet Card Printer User’s Guide  15 B.  Loading Supplies 1. Install Color Install the both ink cartridges into the printer.    2. Close Top Cover  3. Install Cards Install the Card Cartridge.  Gently push it down until you hear it snap into place.
CardJet Card Printer User’s Guide  16      Using The Card Printer   A.  Connecting The Printer to Your Computer The card printer is designed to be used with any IBM-PC or compatible running Windows 2000/XP. For best results, a Pentium™ class 133 MHz computer with 32 MB of RAM or higher and 200 MB free hard disk space is required. To connect the printer to your computer, obtain the appropriate interface cable, and refer to the following steps: 1.  Connect the cable to the printer.   2.  Connect the other side of your cable to the back of your PC at the USB connector.
CardJet Card Printer User’s Guide  17 B.  Installing The Windows Printer Driver The card printer can be used with virtually any Microsoft Windows 2000/XP software application program. This is accomplished through what is called a "printer driver." The printer driver is simply software which gives the printer all the information needed for printing. The printer driver software is located on the Software Installation CD included with your printer. The following describes how to install the printer driver.   Installing The Printer Driver From The Software Installation CD To install the printer driver, close down all other programs and insert the Software Installation CD into your computer's CD drive. The CD will automatically open and prompt you to click on the photo of your specific printer model to begin installation.  Follow the on-screen instructions to complete installation. Once installed, the "Card Printer" icon for your specific printer model will appear in the Printers folder. The User's Guide will also automatically install along with the printer driver. An icon for this will appear in the Start->Programs->Fargo folder. Select this icon to open the User's Guide any time you have a question about operating your printer.  If the CD installer program does not automatically open when the CD is inserted into your computer, refer to the following steps to manually open the CD installer: Note: This section of the Operator's Manual assumes that you are already familiar with Windows and know how it operates. If you are not yet familiar with Windows, consult the appropriate Microsoft documentation to become familiar with the basics of Windows before proceeding. 1.  Insert the Software Installation CD into your computer's CD drive. 2. Use My Computer or Windows Explorer to view the contents of the CD. Windows Explorer can be opened by selecting it from the Start, Programs menu. 3. Double-click on the Setup.exe file listed on the CD. 4.  The CD will automatically open and prompt you to click on the photo of your specific printer model to begin installation. Follow the on-screen instructions to complete installation. Once installed, the "Card Printer" icon for your specific printer model will appear in the Printers folder.   Installing Printer Driver Updates Occasionally, new printer driver versions are released which have new or updated features. Before installing an updated printer driver version, always delete the existing printer driver version from your system. To do this, select Start, Programs and point to the Fargo folder. Then, select the Uninstall Printer Driver icon for your specific printer model as shown here.  Once the existing printer driver is deleted, the updated version can be installed. The best way to get
CardJet Card Printer User’s Guide  18 printer driver updates is to download them from the Fargo Website at www.personaprinters.com. The following instructions explain how to download and install updated printer drivers.   Downloading Downloadable printer driver files have names ending in ".exe" and are self-extracting PKZip archives. A PKZip archive is a package, containing one or more files, that has been "zipped" to make it smaller and provide easy downloading of numerous files simultaneously. An archive that is self-extracting is capable of "unzipping" itself. To download the latest printer driver version, click on the printer driver's highlighted ".exe" file name on the web site. You will then be prompted to "Save this program to disk." Click OK, then choose the folder in which you would like to save the printer driver file. You may wish to save it in an empty folder to prevent mingling its files with others already on your computer. Once the file has completely downloaded to your computer, "unzip" the contents of the file by simply double-clicking on it. The archive will "unzip" itself, revealing its contents as a new list of files within the folder.   Installing 1. Click the Start button, point to Settings, and select Printers. 2. Double-click on the Add Printer icon. 3.  Follow the on-screen instructions to begin installation. When prompted, click on the Have Disk button; the Install From Disk window will appear. 4. Click on Browse, navigate to the folder containing the printer driver files you just downloaded and unzipped, and click on OK. Click on OK again to close the Install From Disk window, then click on NEXT. 5.  Follow the remainder of the on-screen instructions to complete installation. When prompted, do not have Windows print a test print, since you most likely performed a printer self test while you were setting up your printer. Once installed, the "Card Printer" icon for your printer will appear in the Printers folder. Note: The downloadable version of the printer driver does not include the User's Guide due to its large size. If you performed the uninstall procedure above, the User's Guide will remain on your system and work seamlessly with the new printer driver. New versions of the User's Guide will also be released occasionally and can be downloaded separately by clicking here.       C.  Setting Up The Printer Driver Once the appropriate printer driver for your computer has been installed, you will need to set the driver up with the proper print options. To open the printer driver setup window, please refer to the following steps for your specific operating system:
CardJet Card Printer User’s Guide  19 Windows 2000/XP 1. Click the Start button, point to Settings, and select Printers. 2.  Click on your specific Card Printer icon with the right mouse button, and select Printing Preferences... if using Windows 2000/XP.   Note: If you would like to permanently save your printer driver settings so you will not need to change them again, do so through the main printer driver setup window described above. Although most applications do allow you to change these same printer driver options from their own Print screens, your settings may not be permanently saved.   To change or verify the appropriate printer driver options for your print job, please refer to the topics describing each of the printer driver's tabs.   Hint: If you have questions once you are in the printer driver setup window, click on the Help button within that window to get help on the specific tab you are currently viewing. To get help on a specific printer driver option, right-click on the option, and then click on What's This?.
CardJet Card Printer User’s Guide  20 D.  Card Tab   Card Size Indicates that the printer accepts standard, "credit card" size CR-80 cards. The dimensions of the total print area for this card size appear in the Print Width and Print Length boxes. Click on the inches or mm option to choose the desired unit of measurement. When designing a card format, always set the card size or page size within your card design program to the exact dimensions of a CR-80 card (3.375"L x 2.125"W / 85.6mmL x 54mmW).   Orientation Select either Portrait or Landscape. Selecting Portrait causes the card to print in a vertical orientation. Selecting Landscape causes the card to print in a horizontal orientation. An icon illustrating a printed card helps represent the difference between the two.   Copies Specifies the number of copies to be printed.   Test Print This option allows you to send a simple self test print to the printer. This test print procedure can be helpful in ensuring that your computer is effectively communicating with the printer, and that the printer is functioning properly.   About Clicking this button opens a dialog box containing the copyright and version information about this printer driver software.
CardJet Card Printer User’s Guide  21 E.  Device Options Tab   Cartridge Type Allows you to select the cartridge type option that's appropriate for the type of cartridge you are using.   Color Matching (CARDJET only) Allows you to choose the color matching options which best fits the requirements of your print job. Select None if you are more interested in print speed rather than print color, if you have already color corrected your image for printing, or if you are using some other third party color matching software. Select Algebraic if you would like the printer driver to make very simple, yet fast, color balance adjustments. This option gives you more natural looking images without actually utilizing any specific color matching software and without slowing down the processing speed of the printer driver. It also allows you to further customize the printed color of your cards through the Image Color tab. Select Monitor if you would like the printer driver to make color corrections similar to the Algebraic option but through a more complex color matching algorithm. This option shifts colors more radically so the colors in your image will more closely match how they appear on your monitor.   Rotate Image 180 Degrees This option allows you to rotate the image on the front of your card 180 degrees when printed. This option is often used to change the position of the printed image in relation to the set location of a card's magnetic stripe or smart chip.   Pause for Low Cartridge Select this option is you would like a definitive warning when you are running low on cartridge. When this option is selected, the printer will "beep", pause, and the Media LED   will flash when approximately 10-20 prints remain on the cartridge. At this time, you can either (a) replace the cartridge and press the Media button   to continue printing with a new cartridge or (b) leave the existing cartridge in printer and press the Media button  . For option (b), once the Media button is pressed, the printer will continue printing until the end of the cartridge, but will beep once before each print job. It will not be necessary to press the Media button again to continue printing once it has been pressed initially during a batch print. When this option is not selected, the printer will still "beep" once before each print job when approximately 10-20 prints remain on the cartridge, however, the printer will not pause. Instead, it will continue printing until the end of the cartridge, without user intervention.
CardJet Card Printer User’s Guide  22 F.  Image Color Tab When the Algebraic color matching option is selected, this option allows you to control the Contrast and Gamma of the printed image, as well as the individual color balance of Yellow, Magenta, and Cyan. In most cases, the default settings of these options will suffice. To control the overall darkness and lightness of the printed image, adjust the Dye-Sub Intensity slide by clicking and dragging the slide's box or by clicking on the left and right arrows. Moving the slide to the left causes less heat to be used in the printing process, thus generating a lighter print. Moving the slide to the right causes more heat to be used, thus generating a darker print. This slide only affects those images printed with inkjet cartridge panels (YMC). To return all options to their factory settings, click on the Default button.
CardJet Card Printer User’s Guide  23 G.  Calibrate Tab  This option allows you to control the position of the printable area in relation to the card, calibrate sensors, and adjust the internal printer settings which are customized for every printer and saved directly within the printer's memory.   Image Position  The Image Position controls allow you to adjust the position of the overall print area to be precisely centered on a card. To adjust the Image Position values, click on the Vertical and Horizontal adjustment arrows. When adjusting these values, keep in mind that cards always remain in the same position as they travel through the printer, regardless of image orientation. To illustrate this, the card illustration shown in the Image Position box will flip and rotate according to whether you have selected Portrait, Landscape, or Rotate 180 Degrees. However, the outline around the illustration will always remain in the same landscape orientation.      The following diagram represents how the printed image will move in relation to the fixed card position as positive and negative image placement values are entered.
CardJet Card Printer User’s Guide  24    As you can see, the Vertical adjustment moves the image more toward the rear of the printer if a positive number is entered and more toward the front of the printer if a negative number is entered. The Horizontal adjustment moves the image more toward the card output side of the printer if a positive number is entered and more toward the card input side of the printer if a negative number is entered. The maximum value for the Vertical and Horizontal adjustments is ±100 pixels (10 pixels = about .03"/.8mm).   Hint: Notice the direction the Vertical and Horizontal adjustment arrows point within the Image Position window are representative of the direction the printed image moves.
CardJet Card Printer User’s Guide  25  Settings The Settings button brings up a separate dialog box for adjusting the internal printer settings which are customized for every printer at the factory and saved directly within the printer's memory.   The card printer is equipped with an internal adjustment mode programmable through the Settings dialog box. This dialog box is accessible only if the printer is powered ON and is properly connected to your PC. This adjustment mode allows you to change the printer's internal settings for overall Image Darkness, Image Placement, Print Length, and Magnetic Offset. To change these settings, please refer to the remainder of this section.
CardJet Card Printer User’s Guide  26  CAUTION! These settings are optimized at the factory and in most cases will not need to be changed. Do not alter these settings unless absolutely necessary. If you do need to change these settings, it is important to note that the original settings are recorded on a label attached to the printer's base plate or rear panel. These can be helpful if you need to get back to the printer's original baseline settings.   Image Darkness This option sets the overall darkness of the printed image by increasing or decreasing the amount of heat used by the Cartridge when printing. To lighten the printed image, click the down arrow   to enter a negative value and decrease the amount of Cartridge heat. To darken the image, click the up arrow  to enter a positive value and increase the amount of Cartridge heat. For best results, make slight adjustments of only ±4 so you do not accidentally over-adjust the Cartridge heat. If you set too high of a positive value, for example, the cartridge may jam or even break. The maximum adjustment range is ±100.   Image Placement This option allows you to adjust the lengthwise or horizontal position of the printed image on a card so it appears centered. When adjusting this value, keep in mind that cards always remain in the same landscape orientation as they travel through the printer. The following diagram represents how the printed image will move in relation to the fixed card position as a positive or negative Image Placement value is entered.  To move the printed image toward the leading edge of the card, or card output side of the printer, click the left arrow  to enter a positive value. To move the printed image toward the trailing edge of the card, or card input side of the printer, click the right arrow  to enter a negative value. Notice the arrows on these buttons indicate the direction the printed image will move on the card. The maximum adjustment range is ±100. As a rule, 10 equals about .030"/.8mm which is about the same as the thickness of a standard CR-80 size card. Keep this in mind when adjusting this option so you do not over-adjust. If you set too high of a positive value, for example, the cartridge may break.   Print Length This option allows you to reduce or lengthen the overall printable area in order to optimize edge-to-edge printing toward the trailing edge of a card. When adjusting this value, keep in mind that cards always remain in the same position as they travel through the printer. The following diagram represents how the print length will move in relation to the fixed card position as a positive or negative
CardJet Card Printer User’s Guide  27 Print Length value is entered.  To reduce the print length and move the end of the printable area more toward the leading edge of the card, click the left arrow  to enter a positive value. To increase the print length and move the end of the printable area more toward the trailing edge of the card, click the right arrow  to enter a negative value. Notice the arrows on these buttons indicate the direction the length of the printable area will move on the card. The maximum adjustment range is ±100. As a rule, 10 equals about .030"/.8mm which is about the same as the thickness of a standard CR-80 size card.   Magnetic Offset This option applies only if the printer has a built-in magnetic stripe encoder. If so, this option allows you to shift the starting point of where the printer will begin encoding the magnetic track data on a card's magnetic stripe. When adjusting this value, keep in mind that a card and its magnetic stripe will always remain in the same relative position as the card travels through the printer. The following diagram represents how the magnetic data will move in relation to the fixed position of a card's magnetic stripe as a positive or negative Magnetic Offset value is entered. (For this diagram, imagine that the card is transparent and that you are looking at the card's mag stripe through the top or front side of the card.)  To move the start of the magnetic data more toward the leading edge of the card, or card output side of the printer, click the left arrow  to enter a positive value. To move the start of the magnetic data toward the trailing edge of the card, or card input side of the printer, click the right arrow  to enter a negative value. Notice the arrows on these buttons indicate the direction the magnetic data will move on the card's magnetic stripe. The maximum adjustment range is ±100. As a rule, 10 equals about .030"/.8mm. Keep this in mind when adjusting this option so you do not over-adjust. If you set too high of a negative value, for example, the printer may start encoding before the card's magnetic stripe reaches the encoding head.
CardJet Card Printer User’s Guide  28   Once adjustment is complete, click the OK button to to save your adjustments or click the Cancel button to cancel any adjustments you just made. IMPORTANT! It is highly recommended that after making adjustments to the Internal Printer Settings you print a self test. This self test print will help you determine if the Image Darkness, Image Placement, and Print Length are set properly. If your printer has a magnetic stripe encoder and you adjusted the Magnetic Offset option, test this adjustment by sending down a command to encode from your specific software program.
CardJet Card Printer User’s Guide  29 H.  Magnetic Encoding Tab  This option only applies if your printer has an optional Magnetic Stripe Encoding Module installed. Select this button to display options for controlling the magnetic stripe encoding process. The following describes these options and the printer's magnetic encoding process.  Overview The card printer can be purchased with either a high-coercivity factory-installed Magnetic Stripe Encoding Module or a low-coercivity module. The printer cannot encode both types of magnetic stripes interchangeably within the same printer. To change the ISO standards for tracks 1, 2, and 3, adjust the following Magnetic Encoding options accordingly.    Magnetic Track Selection The ISO encoding standard provides encoding capability for either high or low-coercivity cards on tracks 1, 2, and 3 and is the industry's most widely used mode of magnetic encoding. If your application requires customization of the standard ISO encoding process, use the Magnetic Track Selection option to specify which track you would like to configure through the Magnetic Track Options. Although the default ISO Magnetic Track Options should be correct for almost all applications, these options can be customized if your application requires it. Please note that all options must be changed separately for each of the three individual tracks. If you would like to set these options back to the ISO standard settings once they have been changed, simply select the Default button for each of the separate tracks. Please refer to the following for a description of all Magnetic Track Options.
CardJet Card Printer User’s Guide  30  IMPORTANT! The Magnetic Track Selections are used only for configuring the way in which each of the three magnetic tracks will encode. They DO NOT designate which tracks the printer will encode (for example, if you would like to encode only Track 2). This must be done through your specific software program. Also, note that although the printer driver will remember the settings you specified for each of the three tracks, the printer driver will always default to displaying the options for Track 1 whenever the printer driver setup screen is first opened.   Magnetic Track Options Use these options to customize the ISO encoded data format for each of the magnetic stripe's three tracks. Remember that each track must be customized independently of the other two. This means you must specify which of the three tracks to customize by selecting one of the three track options. After making the required selection, the Magnetic Track Options box displays the current set of customization options for the selected track. Note that for most applications, however, the default settings of these options should not need to be changed.  Bit Density This option enables customization of the Bit Recording Density (Bits per Inch) used to encode the magnetic data on the currently selected track. The default ISO Standard selections for this option are: Track 1 - 210 BPI Track 2 - 75 BPI Track 3 - 210 BPI  Character Size This option enables customization of the Character Data Size (Bits per Character) used to encode the magnetic data on the currently selected track. Note this character size includes the parity bit, if enabled. The default ISO Standard selections for this option are: Track 1 - 7 BPC Track 2 - 5 BPC Track 3 - 5 BPC  ASCII Offset This option enables customization of the Character ASCII Offset used to encode the magnetic data on the currently selected track. This character offset value is subtracted from the ASCII value of each magnetic stripe data character prior to encoding on the track. The default ISO Standard selections for this option are: Track 1 - SPACE Track 2 - ZERO Track 3 - ZERO   Character Parity
CardJet Card Printer User’s Guide  31 This option enables customization of the Character Data Parity used to encode the magnetic data on the currently selected track. The default ISO Standard selections for this option are: Track 1 - ODD Track 2 - ODD Track 3 - ODD  LRC Generation This option enables customization of the LRC Generation Mode used to encode the magnetic data on the currently selected track. The default ISO Standard selections for this option are: Track 1 - EVEN Track 2 - EVEN Track 3 - EVEN    Verification This option instructs the printer to verify that all magnetic data has been correctly encoded on each card. If the Auto Eject 1st Error option is selected, the printer will automatically eject a card containing magnetic data that cannot be verified. Note, however, that only the first misverified card will be automatically ejected. If a second consecutive card cannot be verified, the printer will signal an error and go into manual eject mode. This is done so that if, for example, you have loaded cards with the wrong type of magnetic stripe, the printer will not automatically feed and eject your entire card supply. The auto eject option is the most direct means of dealing with misverified cards, but may be undesirable if batch printing since misverified blank cards are ejected into the same stack as verified printed cards. For this reason, a Manual Eject Each Error option is also provided. When this option is selected, the printer will signal an error communicating the magnetic data could not be verified. When this occurs, press the appropriate softkey to manually eject the misverified card and set it aside from the verified cards. With either of these options, you can specify the number of times you would like the printer to retry its verification pass. A range of 1-5 retries can be selected. This option is helpful since magnetic stripe verification can sometimes require more than a single pass.   Shift Data Left The Shift Data Left option is applied to all tracks when selected. This option shifts the recorded magnetic data to the left-hand side of the card's magnetic stripe. This is useful in situations that require cards to be readable with insert type readers that may not be able to read the right-hand side of the card.    ISO Track Locations The magnetic encoding module encodes onto tracks in accordance with an ISO 7811-2 magnetic stripe. Refer to the following diagram for track locations:
CardJet Card Printer User’s Guide  32    Sending Track Information Magnetic track data is sent in the form of text strings from the application software to the printer driver along with all of the other printable objects within your card design. In order for the printer driver to differentiate between magnetic track data and the rest of the printable objects, the magnetic track data strings must be uniquely "tagged." In other words, specific characters must be added to the magnetic track data in order for the printer driver to know which data is to be encoded, which tracks to encode, when the track data stops and starts, and so forth. In some cases, these specific characters are automatically added to the string of track data by customized ID software applications. In most cases, however, the user must manually add these characters to the string of magnetic track data. If these characters are not added to the track data, the text intended for the magnetic track will most likely appear as printed text on the card. To avoid this, track information must be entered as follows. When entering track data, the "~" character is entered first, followed by the track number (1, 2, or 3) on which you intend to encode the data. The data to be encoded should then follow. The first character of this data string must be the track's specific Start Sentinel (SS) and the last character must be the specific End Sentinel (ES). The characters or data in between the SS and ES can include all of the valid characters specific to each track. The number of these characters, however, is limited by each track's maximum character capacity. When segmenting track data, the appropriate Field Separator (FS) must be used. The following table shows the SS, ES, FS, and the valid characters defined for each track.    Start Sentinel End Sentinel Field Separator Valid Characters Maximum Number of Characters Track 1 % ? ^ ASCII 32-95 (see table below) 78 Track 2 ; ? = ASCII 48-63 (see table below) 39 Track 3 ; ? = ASCII 48-63 (see table below) 106   ASCII Code Character 32 space 33 ! 34 "
CardJet Card Printer User’s Guide  33 35 # 36 $ 37 % 38 & 39 ' 40 ( 41 ) 42 * 43 + 44 ' 45 - 46 . 47 / 48 0 49 1 50 2 51 3 52 4 53 5 54 6 55 7 56 8 57 9 58 : 59 ; 60 < 61 = 62 > 63 ? 64 @
CardJet Card Printer User’s Guide  34 65 A 66 B 67 C 68 D 69 E 70 F 71 G 72 H 73 I 74 J 75 K 76 L 77 M 78 N 79 O 80 P 81 Q 82 R 83 S 84 T 85 U 86 V 87 W 88 X 89 Y 90 Z 91 [ 92 \ 93 ] 94 ^
CardJet Card Printer User’s Guide  35 95 _   The following example illustrates how track data should be entered for tracks 1, 2, and 3: Example: Sending data to Track 1 ~1%JULIE ANDERSON^623-85-1253? Sending data to Track 2 ~2;0123456789? Sending data to Track 3 ~3;0123456789?
CardJet Card Printer User’s Guide  36  I.  Printing A Card Now that you have set up the printer, loaded media, and installed the printer driver, you are ready to print a card. Follow these steps to print your first card: 1.  Go to the application program in which you will be creating your cards and open or create a card format. 2.  Once you are ready to print, select Print Setup (or the equivalent) from the program's File menu to verify that the printer driver settings are correct for your card design. (Depending on your application program, you may need to set your printer driver settings through the Control Panel to ensure they are applied.) 3.  After you've properly configured the driver, select Print from your application. The printer's RIP (raster image processing) begins. The image processing time will vary depending upon the complexity of the image and the processing speed of your computer. 4.  After the image is processed, the printer will begin printing directly onto the card.  5.  When printing is complete, the finished card will eject. If everything looks good, you have successfully completed set-up, initial testing, and printing with your card printer. Please refer to the remaining topics of this User's Guide for important information on printer maintenance and troubleshooting.
CardJet Card Printer User’s Guide  37      Maintenance   Your card printer is built to require a minimum amount of maintenance. Nevertheless, there are a few procedures you can perform on a regular basis or as needed to ensure the best possible performance.  A.  Supplies Required For the maintenance procedures outlined for your printer, you will need a Printer Cleaning Kit, available from your reseller. This kit includes the following:   Cleaning Pens pre-moistened with 99.99% isopropyl alcohol for cleaning your printer.   Cleaning Pads pre-moistened with 99.99% isopropyl alcohol for cleaning your printer's general inside and outside area. IMPORTANT! As with any electronic device, internal components of the printer, such as the Cartridge, may be damaged if exposed to static electrical discharges. To avoid potential damage, always wear an appropriate personal grounding device, such as a wrist strap (with integral resistor) connected to an ESD ground. Or, at a minimum, make positive contact with the bare metal chassis of the printer with your hand prior to touching any internal electrical components.
CardJet Card Printer User’s Guide  38 B.  Cleaning The Card Feed Rollers The Card Feed Rollers move the card throughout the print process. Cleaning these rollers will help prevent card jams and card contamination and will ultimately lead to better print quality and extended Cartridge life. To ensure consistent printer operation, clean these rollers approximately every 1000 prints or during every cartridge change depending on the cleanliness of your card stock and the environment in which the printer is located. Also clean if the rollers appear dirty or if your cards start showing speckles or debris on the printed surface. Refer to the following to clean all these rollers through a single, easy process:  1.  Leave the printer power ON, and open the printer's Top Cover. (Note you DO NOT need to remove the cartridge from the printer for this procedure.) 2.  Remove all card from the printer's Card Input Hopper. 3. Get a Cleaning Card from the Printer Cleaning Kit, and remove its adhesive backing paper. 4.  Insert the Cleaning Card into the card output end of the printer until the card stops. Be sure to insert the card so that the longest end of the card is inserted first with the sticky side facing UP. 5.  Press and hold the printer's Media button   to feed the Cleaning Card all the way back through the printer until it stops. 6.  Close the printer's Top Cover, and pull the Cleaning Card out of the Card Input Hopper. Repeat this cleaning procedure if additional cleaning is necessary. Once the rollers are clean, close the Top Cover and re-insert cards into the input hopper.
CardJet Card Printer User’s Guide  39 C.  Cleaning The Platen Roller The printer's Platen Roller should be cleaned approximately every 250 prints or during every cartridge change. This helps prevent jams and maintain the best print quality. Also perform this procedure if the roller is visibly dirty. Use the following steps to clean the roller:   1.  Leave the power ON, and open the printer's Top Cover. 2.  Remove the cartridge. 3.  Locate the Platen Roller. 4. Use a Cleaning Pad from the Printer Cleaning Kit to wipe the roller clean. Press the Power button   and Media button   to move the roller back and forth while cleaning. 5.  After the roller is clean and completely dry, replace the printing supplies and close the printer.
CardJet Card Printer User’s Guide  40 D.  Cleaning The Printer's Exterior The printer has a durable casing that should retain its luster and appearance for many years. Clean it only with a Cleaning Pad from the Printer Cleaning Kit. DO NOT use cleaning solvents of any kind or spray the cabinet with a cleaner!    E.  Cleaning The Printer's Interior As you use your printer, dust and other particles may accumulate inside the printer. These particles are attracted to the cartridge or blank card by static produced during printing and can contaminate the printed card causing spots or speckles to appear. Periodically, use the following procedure to remove dust and other contaminants: 1.  Open the printer's Top Cover. 2.  Remove the cartridge from the printer. 3. Use a Cleaning Pad from the Printer Cleaning Kit to wipe out all visible areas inside the printer. Remove any debris that may be inside. Be extremely careful not to let any alcohol drip inside the printer! 4.  Re-install the printing supplies, and close the printer.
CardJet Card Printer User’s Guide  41      Troubleshooting   If you have difficulty operating the printer, the suggestions in this section should, in most cases, solve the problem. If you still have difficulty after trying these suggestions, contact your authorized reseller for technical assistance.  A.  Clearing A Card Jam If a card becomes jammed inside the printer, the Media LED will flash and the printer will pause operation. At this point you can either try to correct the problem and continue printing with the same card, or remove the card completely and continue printing with a new card. Refer to the following steps for instructions on doing either:   1.  Leave the power ON, and open the printer's Top Cover. 2.  Remove the cartridge if necessary. 3.  If you would like to try to correct the problem and continue printing with the same card, do so by pressing the Power button to advance the card or the Media button to reverse the card. Use these buttons to help free the card from its jam. Try not to move the card too far from where it was just before the jam occurred. Once the jam is cleared, replace cartridge, close the printer, and press the Media button button to resume printing. 4.  If you would like to remove the jammed card completely, do so by using the Power and Media buttons to manually eject the card. Then, close the printer. Press the Power button to reboot the printer and cancel all jobs within the printer's memory. In this case, you must also cancel and resend the print job from your computer. For best results, cancel the job from your computer first, then press the printer's Power button.
CardJet Card Printer User’s Guide  42 B.  Interpreting the LED Lights The Power and Media LED lights located on the front of the printer can tell you a lot about what is happening inside the printer. To accurately interpret what it means when these lights are on, off, or flashing, please refer to the following table.  Power LED Media LED Cause / Solution On solid On solid Printer is ON and READY to print. On solid Flashing Indicates an error with the media (cartridge or cards). Refer to the following suggestions: -The cards or cartridge have run out. Replace as necessary. -Check that cards and cartridge are properly installed in the printer. Also check that cards are pushed all the way into the printer's Input Hopper. -Check that the proper cartridge type is installed according to the cartridge type option selected in the printer driver. -Check for a cartridge jam or card jam. -The Cartridge Sensor may need to be recalibrated. -Are you using a cartridge other than one sold specifically for use with your printer? Remember, the printer takes highly specialized cartridges. -If your printer has a magnetic encoding module installed and you are attempting to encode magnetic information onto a card while printing, a flashing Media LED can also indicate an encoding mis-verify. If information is not encoded properly or encoded onto a bad magnetic stripe, the printer is unable to verify the encoded data. When this happens, the printer will eject the card before printing begins and the Media LED will begin flashing. Press the Media button to resume encoding and printing with a new card. Flashing On solid Indicates a possible error with your printer's memory. Contact your authorized reseller for technical assistance. On solid Off Indicates the printer is ON, but that it is off-line or paused. Press the Media button to get the printer back to its READY mode. Off Off Indicates the printer power is OFF. Be sure power is connected, and press the Power button if you would like to turn the printer back ON.
CardJet Card Printer User’s Guide  43 C.  General Troubleshooting Suggestions The printer doesn't seem to work at all.   Make sure that the power cord is plugged in securely on both ends and that the printer is ON. Confirm power is applied by pressing the Power button  . Also, be sure the printer is ready. Both the Power LED   and Media LED   should be illuminated when the printer is ready to print.   Make certain that the printer cable is securely connected. An error message in the software application telling you that the printer is not responding is often due to a missing or defective interface cable.  My prints have a thin line or scratch traveling the entire card length.      There may be dust on the Cartridge. Clean the Cartridge.   Your blank cards may have scratches on them. Check your card stock and replace if necessary.   There may be a scratch or a burned out element in the Cartridge. Contact your authorized reseller for assistance. 
CardJet Card Printer User’s Guide  44 My prints have "spots" (small white or colored voids) and/or dust on them.      Most likely due to dust inside the printer. Clean the inside of the printer.   May also be caused by dust or embedded contaminants on the card. Be sure the cards you are using are clean and stored in a dust free environment. Some cards have embedded contaminants in their surface and should not be used.  My printed cards look too dark or too light.
CardJet Card Printer User’s Guide  45    The print intensity may not be set properly for your image. Adjust the Image Intensity setting within the Image Color tab of the printer driver by moving the slider 5-10% to the left to lighten or to the right to darken.   May also be caused by an improper internal printer setting. Check the Image Darkness value, and verify it matches the factory default value given on the settings label on the printer's rear or bottom panel.  The printing gets cut off or is not centered on the card, and a white border appears.
CardJet Card Printer User’s Guide  46    Use the Image Position option within the Calibrate tab of the printer driver to precisely center the image.   In the case of white leading or trailing edge border, as shown in the top sample, this may also be caused by an improper internal printer setting. Check the Image Placement and Print Length values, and verify these match the factory default values given on the settings label on the printer's rear or bottom panel. 
CardJet Card Printer User’s Guide  47 The photos on my ID cards look very pixelated or grainy.   Good  Bad   For best photo-realistic output, you should always use high resolution 24-bit color images. If scanning an image, always scan the image at a 24-bit color setting, at the same size at which you will be printing, and at 300 dpi. If you stretch or "blow up" a small or low resolution image, you will always get a pixelated or grainy effect when printing.   If capturing images with a digital camera or video camera, be sure the camera has a high enough resolution for photos to be printed at about the same size at which they were captured.  The printer seems to skip cartridge panels, cartridge panels out the usual YMCK order (resulting in strangely colored output), or simply wind the cartridge until the printer's Media LED   flashes.   Check that the proper cartridge type is installed according to the cartridge type option selected in the printer driver.   Calibrate the Cartridge Sensor.  The card or cartridge is jammed.   If your inkjet cartridge is sticking to the card, check to see that you are using blank cards with a polished PVC finish. A card with a dull or sticky finish can cause the cartridge to stick to its surface causing the cartridge to jam or even break.   If you are using an acceptable video imaging card stock and the cartridge is still consistently being jammed down into the drive roller, you may need to reposition the Headlift Assembly of the Cartridge. To do this, close the printer's Top Cover. With the printer powered ON, push down both the Power   and Media   buttons at the same time. You should then hear the Headlift Assembly rotate and realign itself.   Review the proper procedures for clearing cartridge jams and card jams.
CardJet Card Printer User’s Guide  48      Technical Specifications   Print Method: CardJet: Inkjet Resolution: 300 dpi (11.8 dots/mm) Colors: CardJet: Up to 16.7 million Print Speed:* CardJet: 30 seconds per card / 120 cards per hour  Accepted Standard Card Sizes: CR-80 (3.375"L x 2.125"W / 85.6mmL x 54mmW) Print Area: CardJet: CR-80 edge-to-edge Accepted Card Thickness: 30 mil (.030" / .76mm)
CardJet Card Printer User’s Guide  49 Memory: 2MB RAM Printer Drivers: Windows 2000/XP System Requirements: IBM-PC or compatible, Windows 95/98, Windows NT 4.0, or Windows 2000, Pentium™ class 133 MHz computer with 32 MB of RAM or higher, 200 MB free hard disk space or higher, ECP parallel port with DMA access Interface: USB 1.1 Operating Temperature: 65° to 80° F / 18° to 27° C Humidity: 20-80% non-condensing Dimensions: 6.7"H x 13.1"W x 10.5"D / 170mmH x 333mmW x 267mmD Weight: 15 lbs. / 7 kg Agency Listings: Safety: UL 60950, CSA C22.2 (No. 60950) and UL-GS (EN60950 A1-A4, A11), CE Emissions: FCC Class B, CRC c1374, ITS-EMC, CE (EN55022 Class B: 1995; EN55024:1997) BSMI Supply Voltage: 100-240 VAC, .6-1.3 A Supply Frequency: 50 Hz/60 Hz

Navigation menu