GSL Solutions ICABR01 INTCV01 User Manual part 1 of 2
GSL Solutions, Inc. INTCV01 part 1 of 2
UserManual.wiki
>
GSL Solutions
>
ICABR01 User Manual
>
User Manual part 1 of 2
Contents
1.
User Manual part 1 of 2
2.
User Manual part 2 of 2
User Manual part 1 of 2
Navigation menu
Upload a User Manual
Namespaces
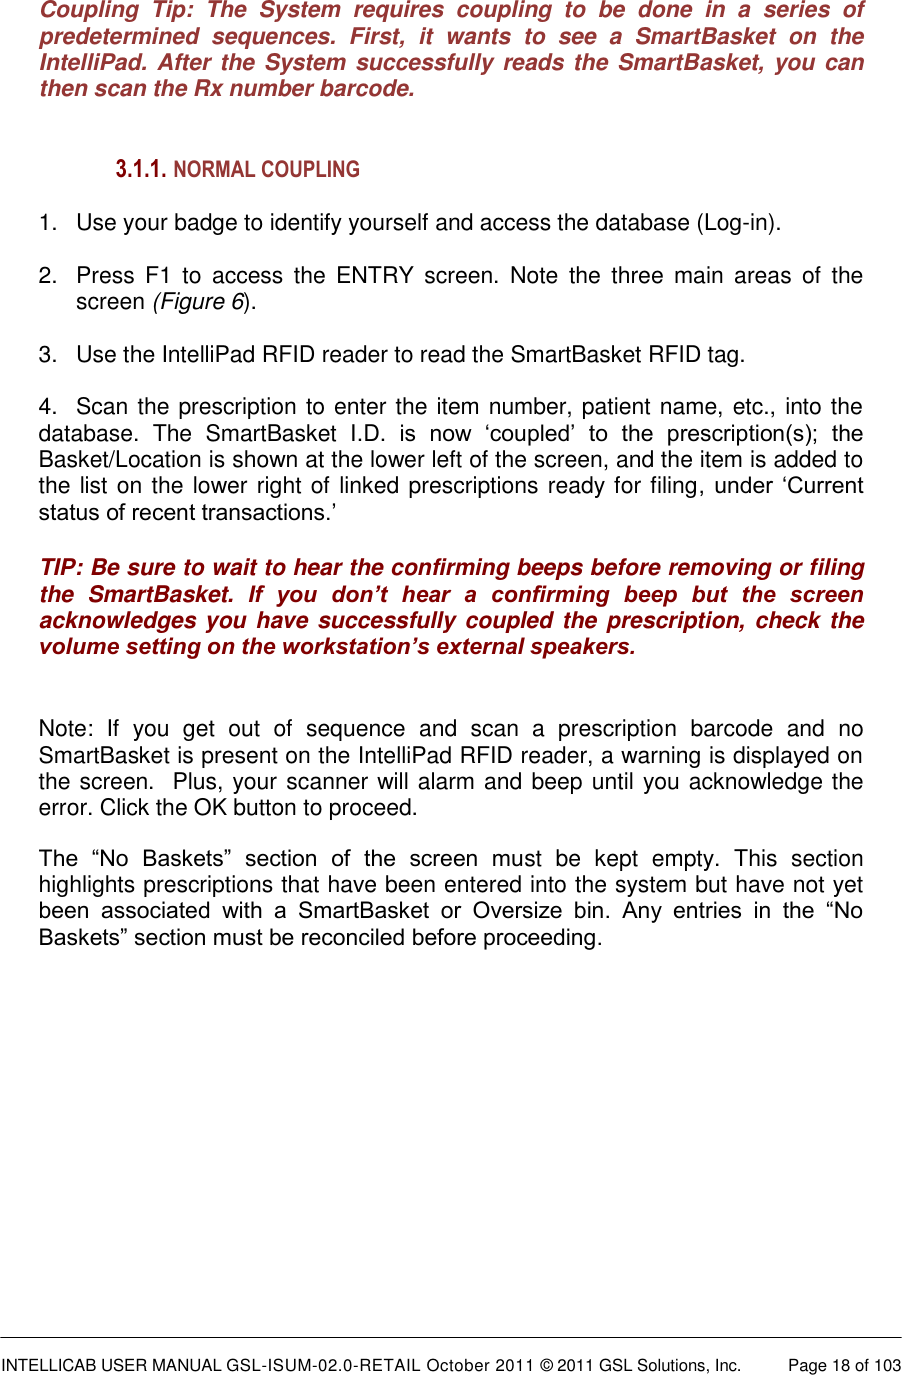
Wiki Guide
HTML
PDF
Info
Views
User Manual
Discussion / Help
Navigation
![INTELLICAB USER MANUAL GSL-ISUM-02.0-RETAIL October 2011 © 2011 GSL Solutions, Inc. Page 3 of 103 INTELLICAB™ SYSTEM USER’S GUIDE TABLE OF CONTENTS CHAPTER 1. INTRODUCTION .................................................................................................................................. 8 1.1. USING THE INTELLICAB™ SYSTEM.............................................................................................. 8 1.1.1. SYSTEM OPERATIONS ................................................................................................................. 9 1.1.2. TERMS ......................................................................................................................................... 10 1.1.3. EQUIPMENT DESCRIPTION ...................................................................................................... 10 1.2. GSL INTELLISYS FEATURES ....................................................................................................... 11 1.2.1. ENTRY [F1] ................................................................................................................................... 11 1.2.2. VERIFY [F3] .................................................................................................................................. 11 1.2.3. SEARCH [F2] ................................................................................................................................ 11 1.2.4. RETURN TO STOCK [F4] ............................................................................................................ 11 1.2.5. INSPECT [F6] ............................................................................................................................... 11 1.2.6. HISTORY [F7] ............................................................................................................................... 11 1.2.7. REPORTS [F10] ........................................................................................................................... 11 1.2.8. ADMIN [Alt+A] .............................................................................................................................. 11 CHAPTER 2. BASIC SYSTEM OPERATION .................................................................................................... 12 2.1. STARTING INTELLISYS ON THE WORKSTATION ................................................................. 12 2.2. LOGGING IN/OUT OF THE SYSTEM ............................................................................................. 13 2.2.1 LOGGING IN AT THE BEGINNING OF SHIFT. ............................................................................ 13 2.2.2. ACCESSING (USING) THE SYSTEM .......................................................................................... 14 2.2.3. MULTIPLE SERVER LOG-IN ....................................................................................................... 14](https://usermanual.wiki/GSL-Solutions/ICABR01.User-Manual-part-1-of-2/User-Guide-1636884-Page-3.png)
![INTELLICAB USER MANUAL GSL-ISUM-02.0-RETAIL October 2011 © 2011 GSL Solutions, Inc. Page 4 of 103 2.3. LOG OUT OF THE SYSTEM ......................................................................................................... 16 CHAPTER 3. ENTER PRESCRIPTIONS INTO THE SYSTEM - ENTRY [F1] ................................................. 17 3.1. USING THE ENTRY [F1] SCREEN ................................................................................................ 17 3.1.1. NORMAL COUPLING ................................................................................................................... 18 3.1.2. COUPLING PRESCRIPTION(S) IN THE REFRIGERATOR ........................................................ 19 3.1.3. COUPLING PRESCRIPTION(S) TO THE OVERSIZED AREA.................................................... 21 3.1.4. CUSTOM ITEM COUPLING ......................................................................................................... 21 3.2. SPECIAL ACTION ICONS .............................................................................................................. 23 3.2.1. NOTES .......................................................................................................................................... 24 3.2.2. REMOVE ITEMS FROM THE SYSTEM ....................................................................................... 25 3.2.3. RESET ITEMS FROM A SMARTBASKET ................................................................................... 25 3.2.4. REMOVE ITEMS FROM A SMARTBASKET ............................................................................... 25 3.2.5. CREATE A FOA/TOS FOR AN ITEM ........................................................................................... 26 3.2.6. DO NOT DISPENSE BEFORE DATE........................................................................................... 27 3.2.7. CREATION DATE ......................................................................................................................... 27 3.3. COUPLED PRESCRIPTION(S) AND SMARTBASKETS ............................................................... 28 3.3.1. FILE COUPLED PRESCRIPTIONS IN THE INTELLICAB.......................................................... 29 CHAPTER 4. RETRIEVE PRESCRIPTIONS - SEARCH [F2] ............................................................................. 30 4.1. THE RETRIEVAL PROCESS: PHOTO OVERVIEW ...................................................................... 30 4.2. LOCATE A PRESCRIPTION FOR RETRIEVAL ............................................................................. 30 4.3. PICK TO THE LIGHT ...................................................................................................................... 34 4.3.1. FOLLOW THE LIGHTS................................................................................................................. 34 4.3.2. SECOND PATIENT IDENTIFIER .................................................................................................. 34 4.3.3. MANDATORY CONSULT ............................................................................................................. 38 4.3.4. AUTHENTICATE........................................................................................................................... 40 4.3.5. RETRIEVE .................................................................................................................................... 40](https://usermanual.wiki/GSL-Solutions/ICABR01.User-Manual-part-1-of-2/User-Guide-1636884-Page-4.png)
![INTELLICAB USER MANUAL GSL-ISUM-02.0-RETAIL October 2011 © 2011 GSL Solutions, Inc. Page 5 of 103 4.4. AUTOSIGN ...................................................................................................................................... 42 4.4.1. BASIC AUTOSIGN PROCEDURE ............................................................................................... 42 4.4.2. AUTOSIGN PROCESSING OPTIONS ......................................................................................... 43 4.5. OTHER FEATURES ........................................................................................................................ 44 CHAPTER 5. RETURN PRESCRIPTIONS TO STOCK (RTS) - [ F4 ].............................................................. 46 5.1. RTS PROCESS ............................................................................................................................... 46 5.2. RTS REPORTS ............................................................................................................................... 48 CHAPTER 6. INSPECT PRESCRIPTIONS - INSPECT [ F6 ] ............................................................................. 49 6.1. FINDING PRESCRIPTIONS USING THE INSPECT TAB .............................................................. 49 CHAPTER 7. IDENTIFY PRESCRIPTION STATUS - HISTORY [ F7 ] ............................................................. 54 7.1. NARROWING YOUR SEARCH ...................................................................................................... 55 CHAPTER 8. GENERATE A REPORT - REPORTS [ F10 ] ................................................................................ 57 8.1. REPORT TYPES. ............................................................................................................................ 57 8.2. REPORT BY PATIENT NAME. ....................................................................................................... 57 8.3. REPORT BY LOCATION. ............................................................................................................... 57 8.4. RX AGING REPORT. ...................................................................................................................... 57 8.5. REPORT BY DRUG. ....................................................................................................................... 57 8.6. VOLUME SUMMARY. ..................................................................................................................... 57 8.7. VOLUME BY OPERATOR. ............................................................................................................. 57 8.8. HISTORY. ........................................................................................................................................ 57 8.9. PARTIALLY DELIVERED ORDERS. .............................................................................................. 57 8.10. HIPAA NOTICES........................................................................................................................... 57 8.11. TAG MISREADS. .......................................................................................................................... 58 8.12. CENTRAL FILL RECEIVE. ........................................................................................................... 58 8.13. CENTRAL FILL RETURN. ............................................................................................................ 58 8.14. INVENTORY. ................................................................................................................................. 58 8.15. STEPS TO GENERATE A REPORT............................................................................................. 58 8.16. VOLUME REPORTS. .................................................................................................................... 59 8.17. VOLUME BY OPERATOR. ........................................................................................................... 61 CHAPTER 9. THE SYSTEM ADMINISTRATOR .................................................................................................. 62 9.1. INITIAL SET UP AND ADMINISTRATOR FUNCTIONS ................................................................ 62 9.2. ACCESS LEVEL ............................................................................................................................. 62 9.2.1. ADMINISTRATOR ........................................................................................................................ 62 9.2.2. SUPERVISOR ............................................................................................................................... 62](https://usermanual.wiki/GSL-Solutions/ICABR01.User-Manual-part-1-of-2/User-Guide-1636884-Page-5.png)

![INTELLICAB USER MANUAL GSL-ISUM-02.0-RETAIL October 2011 © 2011 GSL Solutions, Inc. Page 9 of 103 combination of Lights, Sound and RFID technology to deliver real-time confirmation that the worker retrieved the correct prescription(s). 1.1.1. SYSTEM OPERATIONS User accountability is a key feature of the System. During System set-up, each user is given a defined User Role and assigned a User SmartBadge™. The User Role determines which system operations will be available to the particular user, and the SmartBadge confirms the user’s access for every operation. From linking prescriptions to opening drawers, user access and all system activity are recorded in real-time. Five basic user roles must be defined when the system is installed: the Operators, the Pharmacists (RPh), the Vault Tech, the Supervisors, and the Administrators. A checklist for entering users into the system is provided in Appendix A. 1.1.1.1. Operators. In general, all users can perform the following operations: ENTRY [F1] is used to enter customer data and begin the filing process, including the linking/unlinking process of associating with SmartBaskets. SEARCH [F2] is used for will-call lookup and prescription retrieval. RETURN TO STOCK [F4] is used to locate items to be restocked. HISTORY [F7] is used to locate available information about single or multiple prescriptions, whether or not they have been delivered. REPORTS [F10] are used to Print reports or Save them to a file. 1.1.1.2. RPH. Reserved for the Pharmacist. The Pharmacist can override warnings, but does not have access to the Admin [Press Alt+A] screen. 1.1.1.3. Supervisors perform the general operations, above, plus: INSPECT [F6] – locate prescriptions for verification (does not unlink). NOTE: The System software provides real-time tracking of prescriptions. All screens are dynamic, and refresh in real time, so users continuously receive accurate information. 1.1.1.4. Administrators have a unique set of functions they must perform to prepare the system for use and maintenance. The Administrator functions are included in Chapter 9. A separate function –ADMIN [A + Alt]– is available only to Administrative personnel and is used to configure the database, enter](https://usermanual.wiki/GSL-Solutions/ICABR01.User-Manual-part-1-of-2/User-Guide-1636884-Page-9.png)
![INTELLICAB USER MANUAL GSL-ISUM-02.0-RETAIL October 2011 © 2011 GSL Solutions, Inc. Page 11 of 103 SmartBadge™ – An I.D. badge that uses the same RFID technology as the SmartBaskets to identify users to the IntelliCab drawers and the Will-Call Client. 2D Scanner – Multiple purpose scanner. Used primarily at customer pickup windows for its ability to read 2 dimensional barcodes on I.D. cards. Bluetooth scanner – Wireless scanner used to remotely couple items into overstock and refrigerator locations. Signature Pad – A USB powered device used in conjunction with AutoSign to capture a patient’s signature. 1.2. GSL INTELLISYS FEATURES ► Press the associated Function or Combo keys to access each of these features: 1.2.1. ENTRY [F1]─to quickly enter customer information via a keyboard or barcode reader and begin the filing process. 1.2.2. VERIFY [F3]─to ... 1.2.3. SEARCH [F2]─to locate a patient’s prescriptions and associated items, such as notes, special orders, etc. IntelliSys allows for several ways to search the database. The preferred and most accurate way is to scan the patient’s I.D. card. Alternatively, prescriptions can be retrieved using only a few key strokes to identify the customer’s name, prescription I.D., etc. 1.2.4. RETURN TO STOCK [F4]─to locate and retrieve items that need to be retrieved from Will Call and returned to stock. 1.2.5. INSPECT [F6] ─to locate a prescription, drug, or patient filed in the IntelliCab to verify content, patient, or quantity. After inspection, the SmartBasket does not require re-linking. (User must have supervisor access for this function to be visible). 1.2.6. HISTORY [F7]─to locate available information about single or multiple prescription(s), whether or not they have been delivered. 1.2.7. REPORTS [F10]─to print reports or save to file. Users can view and print reports by drug and quantity, patient name, location, aging status, or partial delivery status. 1.2.8. ADMIN [A + Alt]─available only to Administrative personnel and can be used to configure the database, enter badge and user I.D. information, set intervals for reports, etc. This option is not visible to non-Administrative users.](https://usermanual.wiki/GSL-Solutions/ICABR01.User-Manual-part-1-of-2/User-Guide-1636884-Page-11.png)
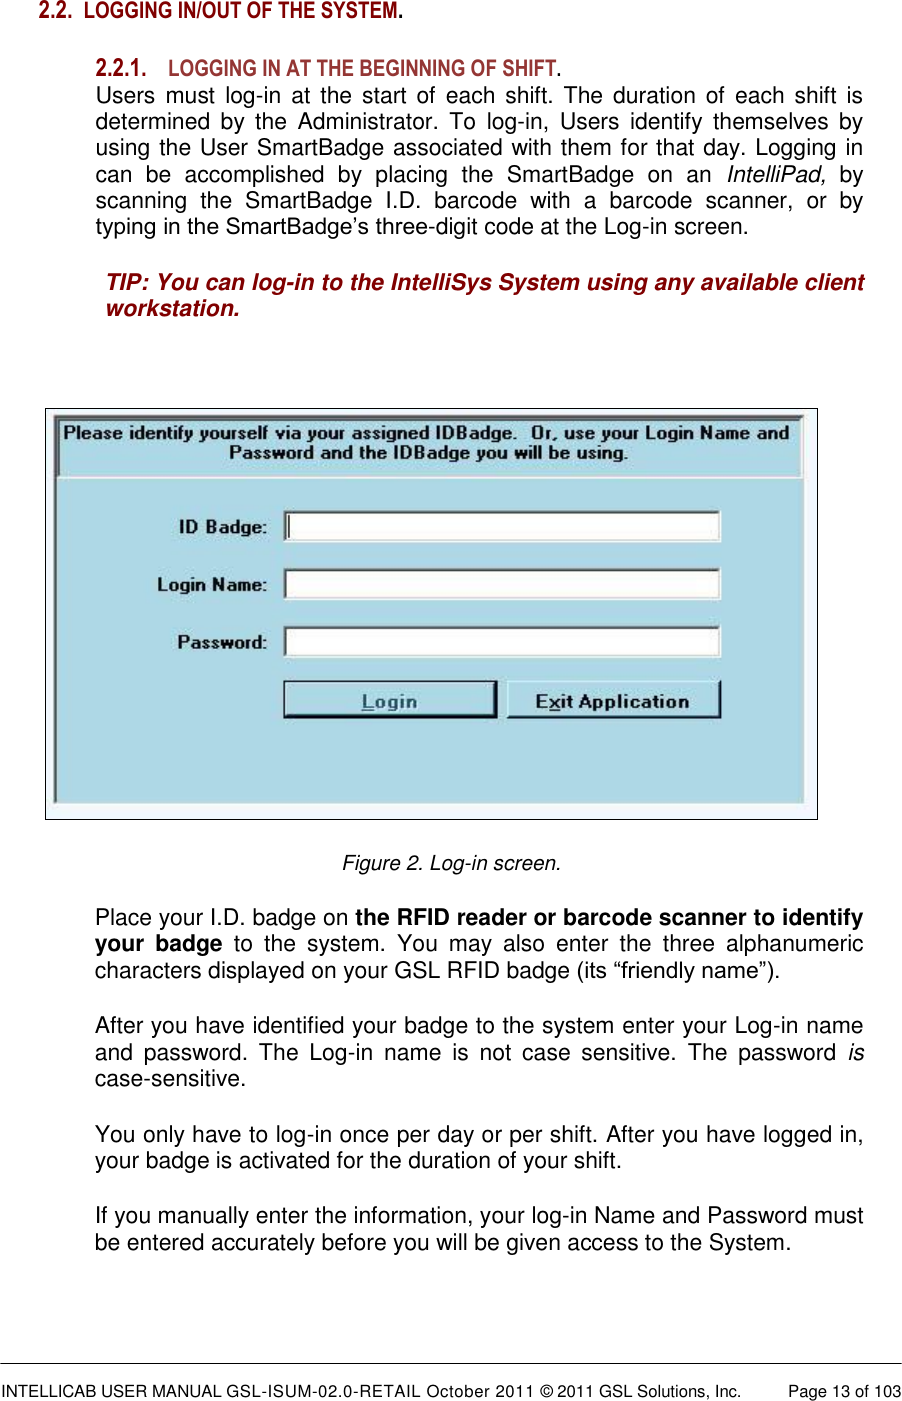
![INTELLICAB USER MANUAL GSL-ISUM-02.0-RETAIL October 2011 © 2011 GSL Solutions, Inc. Page 14 of 103 2.2.2. ACCESSING (USING) THE SYSTEM After completing the ‘beginning of shift’ log-in; the user can access the System by: a) Placing the associated I.D. badge on an RFID reader; b) scanning the SmartBadge barcode with any available GSL scanner, or, c) typing the SmartBadge “friendly” name and providing username and password. 2.2.3. MULTIPLE SERVER LOG-IN Some installations of IntelliSys require independent servers for multiple local pharmacies. While each pharmacy “site” is accessible from any location, you must treat each log-in as unique for each location. For instance, if you log-into pharmacy A for the day and later need to access the database at pharmacy B, you must also log-in in for the day at pharmacy B. When logging into a system with multiple servers, you must first select the proper location and log-in as normal. To access the Log-in screen, press [F9] to log-out and then click the “Switch Servers” button. Figure 3. The server selection dialog box. Select the server you wish to log-in to and click the OK button.](https://usermanual.wiki/GSL-Solutions/ICABR01.User-Manual-part-1-of-2/User-Guide-1636884-Page-14.png)
![INTELLICAB USER MANUAL GSL-ISUM-02.0-RETAIL October 2011 © 2011 GSL Solutions, Inc. Page 15 of 103 Figure 4. Multi Server Log-in Box. Note the Server identified in the bottom of the box by name and color. Each server will have a unique name and color associated with it. Click the Switch Server button on the bottom right to return to the server selection dialog box. When working in a multiple-site configuration, make sure to enter prescriptions into the correct pharmacy server. Figure 5. The Entry Screen [F1]. TIP: Each server location is identified at the top of the screen by name and a color.](https://usermanual.wiki/GSL-Solutions/ICABR01.User-Manual-part-1-of-2/User-Guide-1636884-Page-15.png)
![INTELLICAB USER MANUAL GSL-ISUM-02.0-RETAIL October 2011 © 2011 GSL Solutions, Inc. Page 16 of 103 2.3. LOGGING OUT To log-out, press [F9] or click the symbol. TIP: GSL recommends users log-out whenever they leave the workstation for a period of time. This ensures the system only records transactions performed by active users.](https://usermanual.wiki/GSL-Solutions/ICABR01.User-Manual-part-1-of-2/User-Guide-1636884-Page-16.png)
![INTELLICAB USER MANUAL GSL-ISUM-02.0-RETAIL October 2011 © 2011 GSL Solutions, Inc. Page 17 of 103 CHAPTER 3. ENTER PRESCRIPTIONS INTO THE SYSTEM – ENTRY [ F1 ] Figure 6. ENTRY [F1] screen. The Working Area is used to provide all the necessary information about a given prescription or set of prescriptions. The right side provides current status of the prescription(s). Note: For installations where multiple local pharmacies can be accessed, you must first select and log-into the proper location before entering prescriptions into the system. (See section 2.2.3.) ► During the prescription entry process, the System software continuously displays the real-time status of items associated with a given patient, as shown in the two areas on the right side of the entry screen. In the Associated items area on the left side of the ENTRY [F1] screen, icon buttons are used to provide additional information or to modify a prescription entry. 3.1. USING THE ENTRY [F1] SCREEN The association between a SmartBasket and the prescription(s) it contains must be entered into the system at some time during the production process, before the prescription is filed. This process is known as “coupling” or “linking”. Types of Coupling: Coupling prescriptions to a SmartBasket. Coupling prescriptions in the Refrigerator. Coupling prescriptions to the Oversized Area. Custom Item Coupling (Lost I.D. Card, Hard Copy Prescription, etc.). WORKING AREA](https://usermanual.wiki/GSL-Solutions/ICABR01.User-Manual-part-1-of-2/User-Guide-1636884-Page-17.png)
![INTELLICAB USER MANUAL GSL-ISUM-02.0-RETAIL October 2011 © 2011 GSL Solutions, Inc. Page 19 of 103 Figure 7. ENTRY [F1] screen: Scan rejected - no SmartBasket present. Click the OK button to proceed. 3.1.2. COUPLING PRESCRIPTION(S) IN THE REFRIGERATOR Note: You can file refrigerator items using any of the GSL “Workstations” or “Coupling” (with IntelliPad) stations. The filing process is slightly different depending on the type of scanner (tethered or wireless) associated with the workstation. 3.1.2.1. COUPLING STATION WITH WIRELESS SCANNER If using a GSL Coupling Station (with an IntelliPad), the user must a) Click on the ‘Allow RX Scan Without Basket’ button located in the upper-right of the Entry [F1] screen (see Figure 8). b) Scan the barcode on the desired prescription(s) with the wireless Bluetooth scanner. c) Locate an empty bar-coded storage bin in the refrigerator. Scan the barcode on the empty bin and the user will hear a “happy” chirp indicating the linking occurred. Note: The “Allow Rx Scan Without a Basket” button will deactivate after each successful coupling attempt and must be reclicked to couple to another location.](https://usermanual.wiki/GSL-Solutions/ICABR01.User-Manual-part-1-of-2/User-Guide-1636884-Page-19.png)
![INTELLICAB USER MANUAL GSL-ISUM-02.0-RETAIL October 2011 © 2011 GSL Solutions, Inc. Page 20 of 103 Figure 8. Entry screen close-up showing the “Allow Rx Scan without Basket” message. 3.1.2.2. COUPLING STATION WITH TETHERED SCANNER In this case, the user must bring the empty refrigerator basket to the workstation. The process is similar to 3.1.2.1: a) The user must click on the ‘Allow RX Scan Without Basket’ button located in the upper-right of the ENTRY [F1] screen (see Figure 8). b) Scan the prescription number barcode(s). c) Scan the barcode on the empty bin and the user will hear a “happy” chirp indicating the linking occurred. 3.1.2.3. WORKSTATION WITH TETHERED SCANNER Note: By definition “Workstations” do NOT have an associated IntelliPad. It is not necessary to click the “Allow RX Scan Without Basket” button. In fact the button won’t be visible in the Workstation configurations. The process: a) Go to the ENTRY [F1] screen. b) Scan the prescription number barcode(s) c) Scan the barcode on the empty bin and the user will hear a “happy” chirp indicating the linking occurred.](https://usermanual.wiki/GSL-Solutions/ICABR01.User-Manual-part-1-of-2/User-Guide-1636884-Page-20.png)
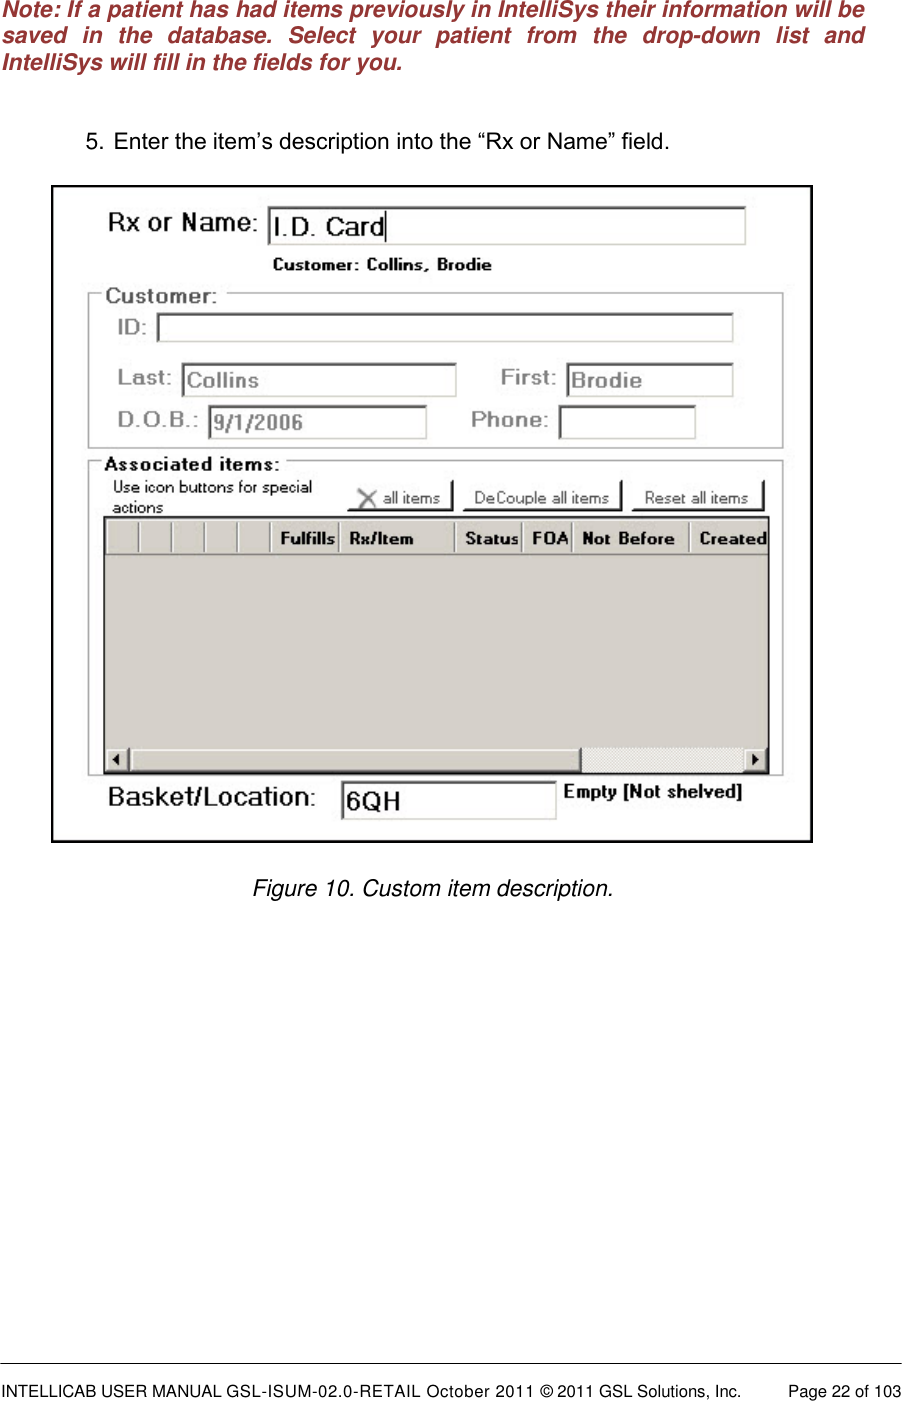
![INTELLICAB USER MANUAL GSL-ISUM-02.0-RETAIL October 2011 © 2011 GSL Solutions, Inc. Page 21 of 103 3.1.3. COUPLING PRESCRIPTION(S) TO THE OVERSIZED AREA To file prescriptions in the oversized area, follow the steps listed above in section 3.1.2 COUPLING PRESCRIPTION(S) IN THE REFRIGERATOR. 3.1.4. CUSTOM ITEM COUPLING A custom item is any non-prescription item without a barcode. For example you can couple a lost I.D. card or a hard copy prescription, to be handed back to the patient, into a SmartBasket. 1. Press [F1] to access the ENTRY screen. 2. Place a basket on the IntelliPad. 3. Enter the patient’s social security number into the “Rx or Name” field. Note: entering the Patient’s social security number allows the items to be found in the Search [F2] tab by scanning the patient’s I.D. card. If the social security number is not known enter the patient’s last name; when the patient returns the item will have to be found manually. 4. Enter all known customer information in the Customer Data field and click OK. It is important to fill in as much demographic information as possible to enable the Second Patient Identifier feature to work. Figure 9. Customer data field.](https://usermanual.wiki/GSL-Solutions/ICABR01.User-Manual-part-1-of-2/User-Guide-1636884-Page-21.png)
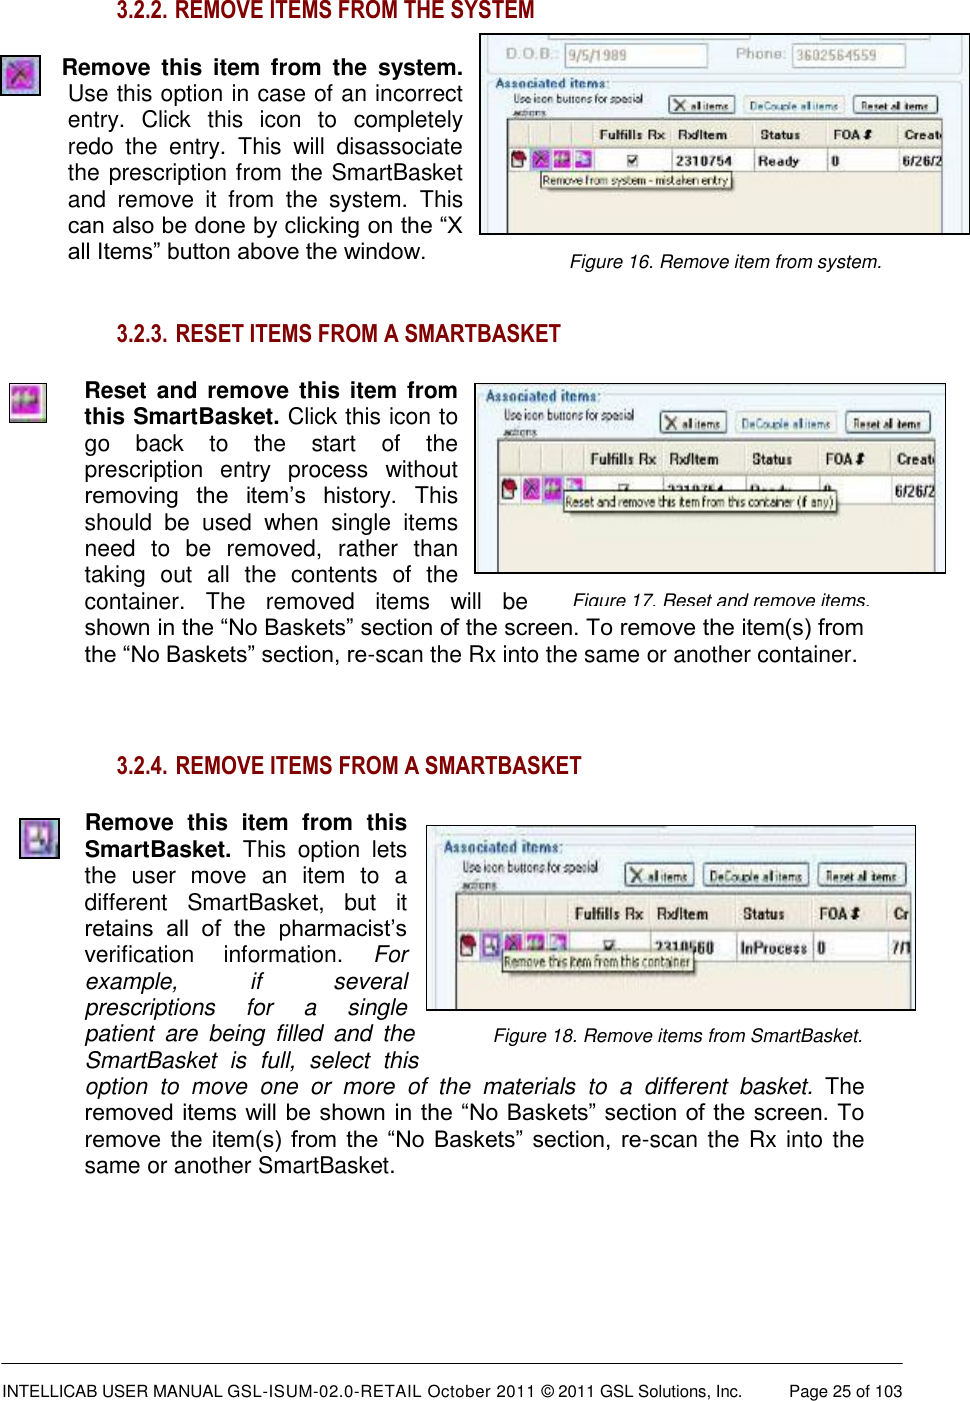
![INTELLICAB USER MANUAL GSL-ISUM-02.0-RETAIL October 2011 © 2011 GSL Solutions, Inc. Page 23 of 103 TIP: When placing the prescription items in the SmartBasket, make sure products containing foil seals and wrappers are not placed at the back of the SmartBasket. Foil packaging can interrupt the successful reading of the RFID tag in the basket (Figures 11 and 12). Figures 11 and 12. Incorrect and Correct placement of items in SmartBasket. Foil packaging should not be placed at back of basket. 3.2. SPECIAL ACTION ICONS. Special action icons in the Associated items window are used to deliver information or manage the status associated with a prescription. For example, notes may be entered with a prescription. You can hover or hold the cursor over each icon to see its function: Figure 13. ENTRY [F1] screen close-up – Associated items.](https://usermanual.wiki/GSL-Solutions/ICABR01.User-Manual-part-1-of-2/User-Guide-1636884-Page-23.png)
![INTELLICAB USER MANUAL GSL-ISUM-02.0-RETAIL October 2011 © 2011 GSL Solutions, Inc. Page 24 of 103 [Figures 15 -21. Icons and messages in the Associated items window.] 3.2.1. NOTES Notes. Hover over this icon to see any Notes already entered, or click to enter a new Note. Once a Note is entered, the Notes icon will be highlighted yellow. When the retrieval function is performed, a flashing alert above the patient’s name will indicate the notes below. Figure 14. Entry screen close-up – Highlighted Notes icon. Hold the cursor over the highlighted Notes icon to see any notes entered regarding the prescription, including by whom and when the item was entered. To add a note to a prescription, click the Notes icon, type in the information, and then close the box by clicking the “x” in the right corner or by moving the cursor outside the box. Figure 15. ENTRY [F1] screen close-up – Notes Window.](https://usermanual.wiki/GSL-Solutions/ICABR01.User-Manual-part-1-of-2/User-Guide-1636884-Page-24.png)
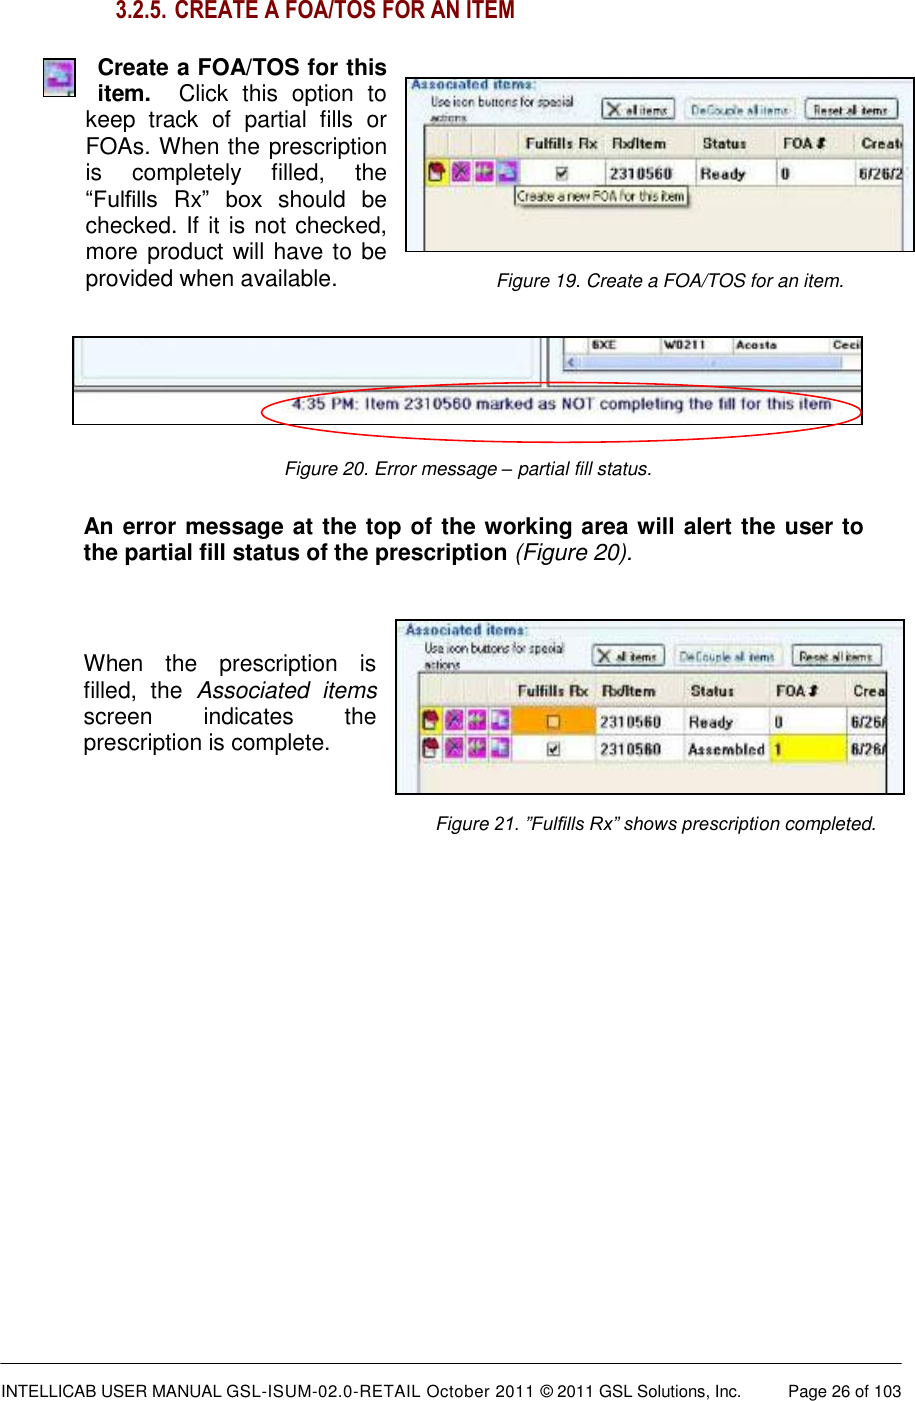
![INTELLICAB USER MANUAL GSL-ISUM-02.0-RETAIL October 2011 © 2011 GSL Solutions, Inc. Page 27 of 103 3.2.6. DO NOT DISPENSE BEFORE DATE IntelliSys gives you the ability to change the date the item is available for pickup. A user attempting to dispense the items will receive a warning that the item is not due to be dispensed until a specific date and will not have access to the items prior to the entered date. To change the date click on the date in the “Not Before” column and enter a new date in the MM/DD/YYYY format, either by typing or by using the date picker, and press [Enter]. After the date has been changed it will be highlighted yellow to indicate the date has been modified. Figure 22.The yellow highlighted date indicates a modified date. Note: Supervisors and Pharmacists will still get a warning when attempting to pull an item before a “Do Not DSP Before” date but they may choose to override it. 3.2.7. CREATION DATE. You may also edit the creation date using the same methods as described for changing the do not dispense date. Changing this date will only affect when the item will be pulled for non-compliance. You cannot enter a future date into this field. A date picker is also provided here for easier editing.](https://usermanual.wiki/GSL-Solutions/ICABR01.User-Manual-part-1-of-2/User-Guide-1636884-Page-27.png)
![INTELLICAB USER MANUAL GSL-ISUM-02.0-RETAIL October 2011 © 2011 GSL Solutions, Inc. Page 28 of 103 3.3. COUPLED PRESCRIPTION(S) AND SMARTBASKETS ► Prescriptions entered into the System’s database and “coupled” or associated with a particular SmartBasket are then ready to be shelved (placed into the IntelliCabs). All coupled prescriptions, shelved or unshelved, are displayed on the lower right side of the Entry screen under the heading ‘Verified’ (Figure 23). Figure 23. ENTRY [F1] screen close-up – Prescriptions ready for delivery. Figure 24.Coupling Stations associate prescriptions with SmartBaskets for filing and retrieval.](https://usermanual.wiki/GSL-Solutions/ICABR01.User-Manual-part-1-of-2/User-Guide-1636884-Page-28.png)
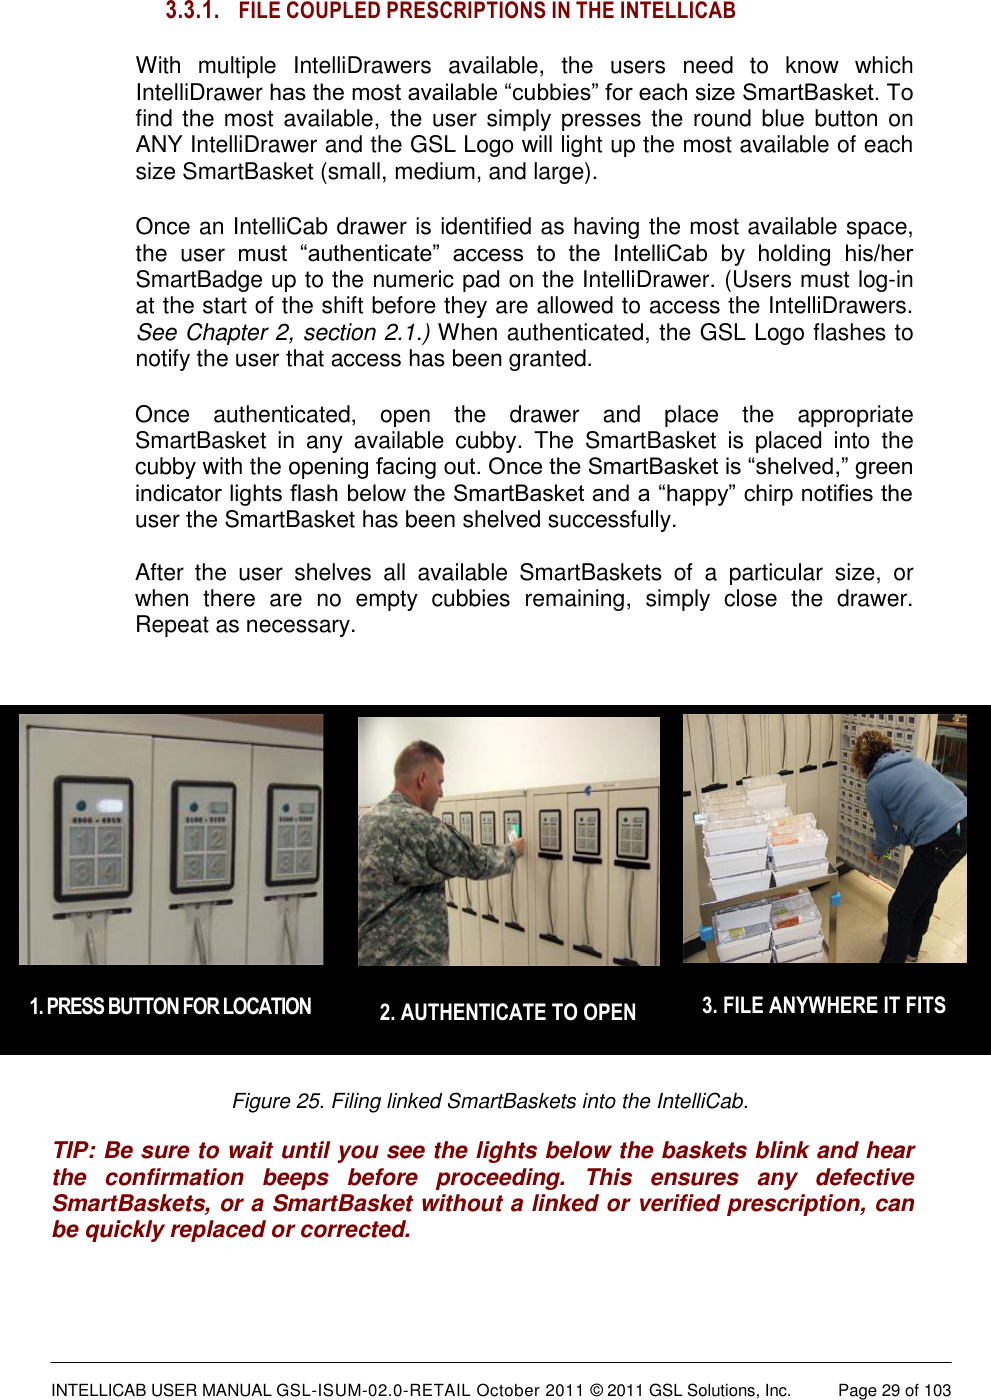
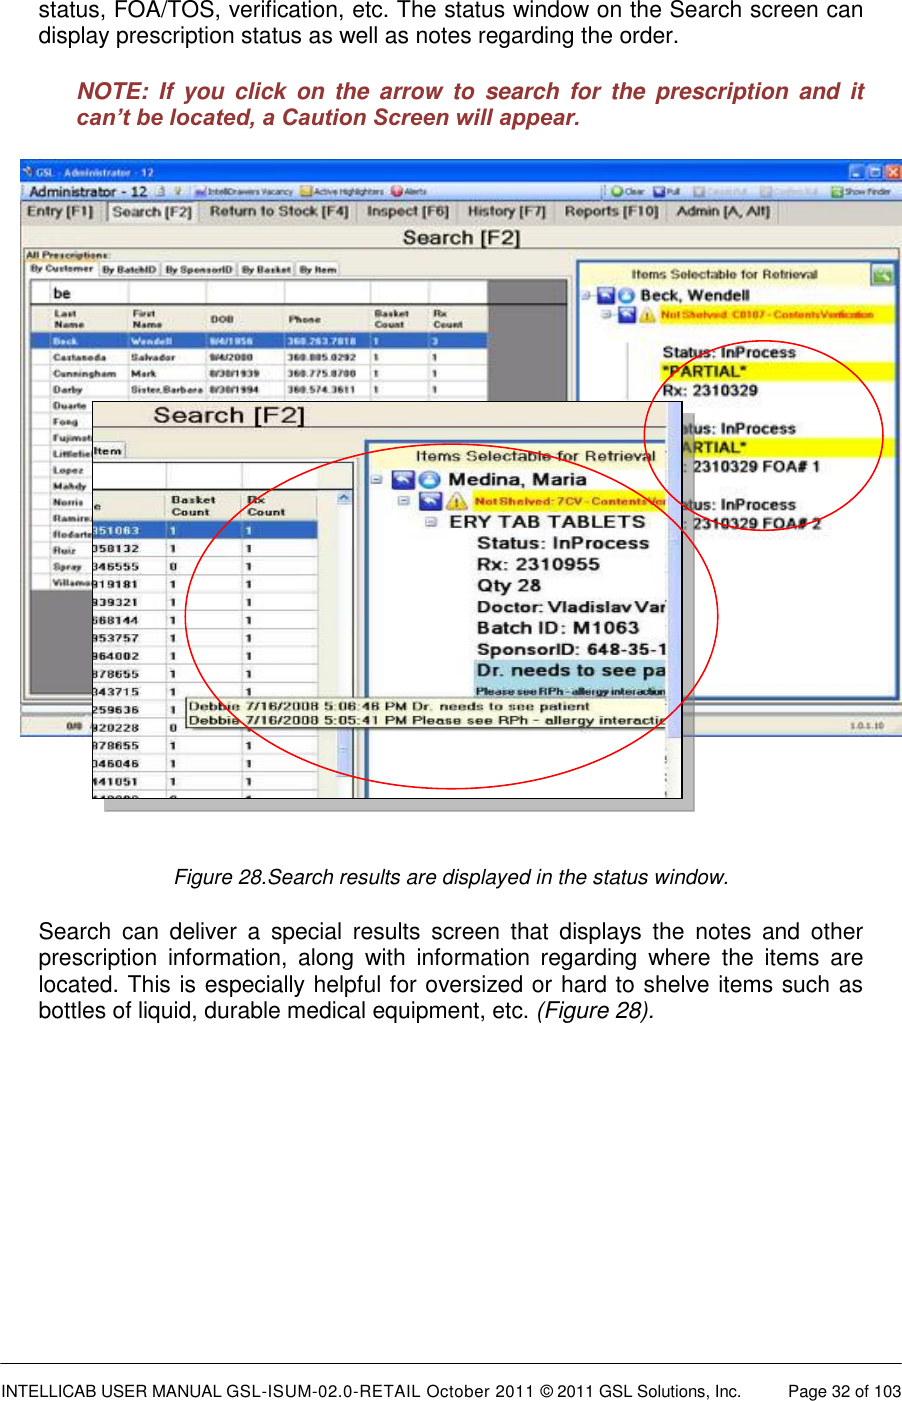
![INTELLICAB USER MANUAL GSL-ISUM-02.0-RETAIL October 2011 © 2011 GSL Solutions, Inc. Page 30 of 103 1. LOOK-UP, THEN PRESS [F12] 3. RETRIEVE 2. AUTHENTICATE 1. LOOK-UP, THEN PRESS [F12] 3. RETRIEVE 2. AUTHENTICATE CHAPTER 4. RETRIEVE PRESCRIPTIONS - SEARCH [ F2 ] 4.1. THE RETRIEVAL PROCESS: PHOTO OVERVIEW Figure 26.The Prescription Retrieval Process – Look-up, Get Pick Number, Follow the Lights. 4.2. LOCATE A PRESCRIPTION FOR RETRIEVAL Prescriptions can be located in several ways, depending on how the system is configured. Identification information used to search for a prescription may include entering several letters of the patient’s name, the customer I.D., SmartBasket number, Item number, etc. 1. Press or click on the SEARCH [F2], if it is not currently displayed. 2. Enter the information associated with the prescription you want to locate. You can place the cursor in any of the white boxes associated with a particular data field, such as “Last Name,” “First Name,” “DOB,” etc., and then enter the I.D. information. If only a partial name or other I.D. is](https://usermanual.wiki/GSL-Solutions/ICABR01.User-Manual-part-1-of-2/User-Guide-1636884-Page-30.png)
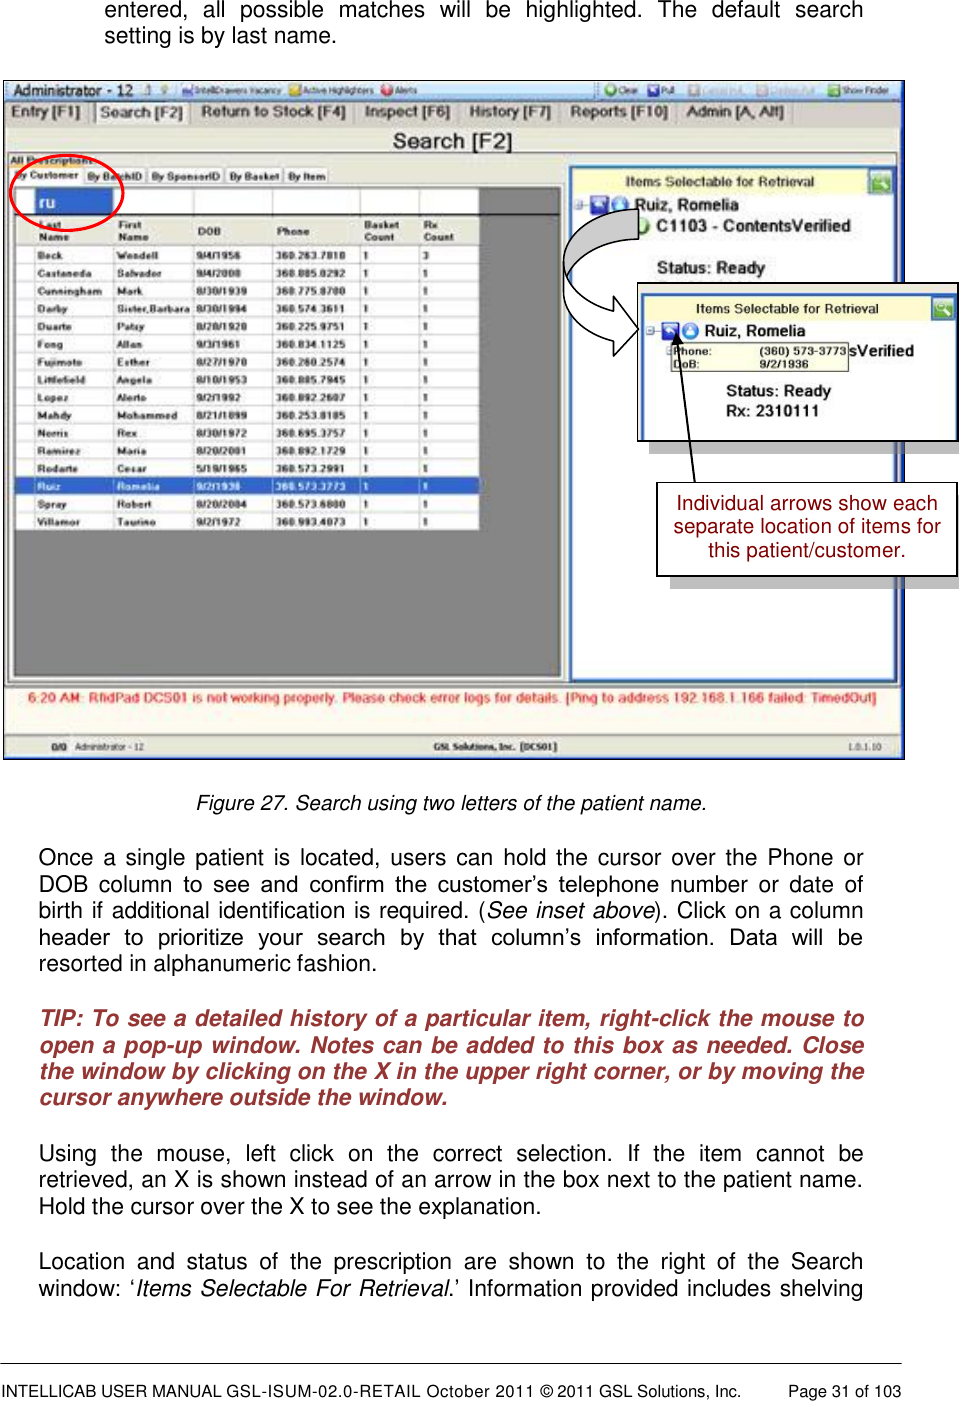
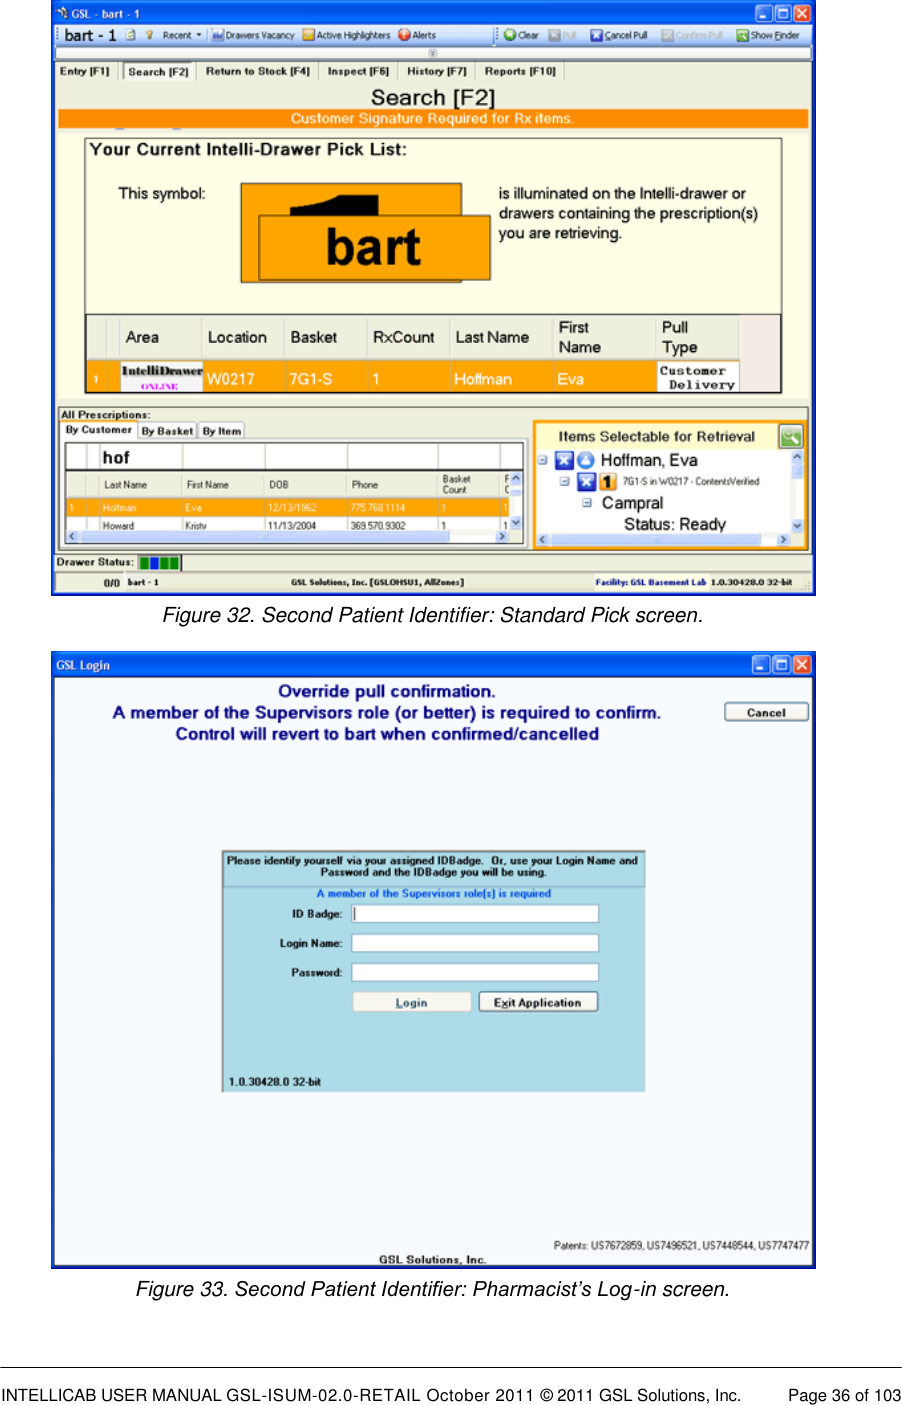
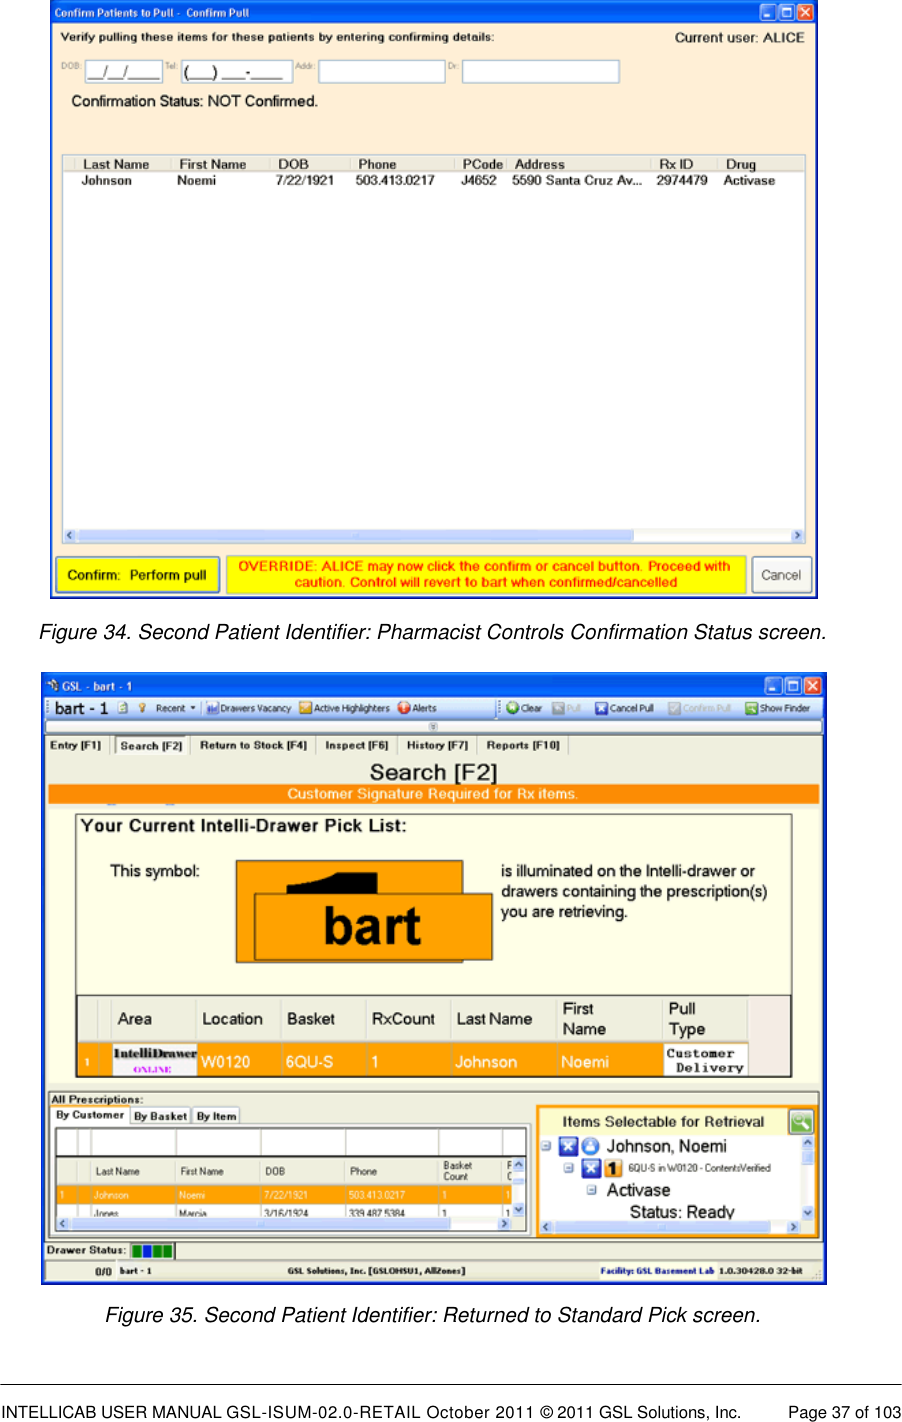
![INTELLICAB USER MANUAL GSL-ISUM-02.0-RETAIL October 2011 © 2011 GSL Solutions, Inc. Page 34 of 103 4.3. PICK TO THE LIGHT 4.3.1. FOLLOW THE LIGHTS. Once a patient is selected, press [F12] or click on the “Pull” button in the top right corner of the screen to initiate retrieval. Proceed to the IntelliCab which displays the light and number matching that on the workstation. 4.3.2. SECOND PATIENT IDENTIFIER. The Second Patient Identifier feature codifies Pharmacy “Best Practice and Rules” that requires the dispensing clerk to ask the patient for a second patient identifier such as Date of Birth, Telephone Number, Dr. Name, or Patient Street Address to ensure dispensing accuracy. The dispensing clerk enters this information into the “Confirmation Status: Not Confirmed” screen (Figure 30) and presses [Enter]. When the screen displays “Confirmation Status: Confirmed” (Figure 31), press [Enter] once more and the “Pick” screen (Figure 32) is displayed. The dispensing clerk’s name and pick assignment number will be displayed on the workstation screen. Proceed to the IntelliCab which displays the light and number matching that on the workstation. Figure 30. Second Patient Identifier: Confirmation Status screen.](https://usermanual.wiki/GSL-Solutions/ICABR01.User-Manual-part-1-of-2/User-Guide-1636884-Page-34.png)
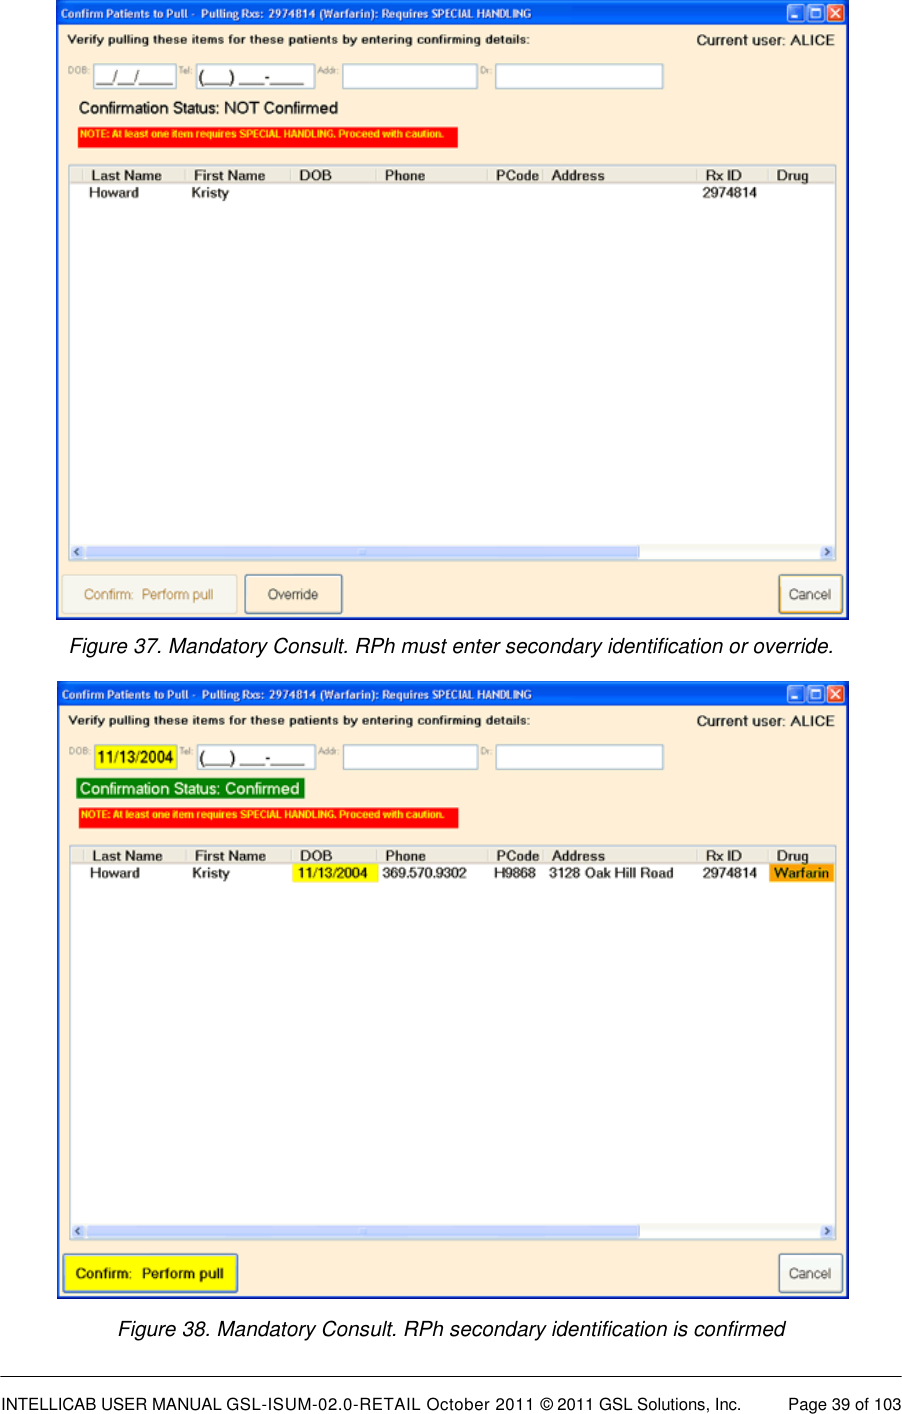
![INTELLICAB USER MANUAL GSL-ISUM-02.0-RETAIL October 2011 © 2011 GSL Solutions, Inc. Page 35 of 103 Figure 31. Second Patient Identifier: Confirmation Status Confirmed. If the person picking up for the patient does not know the secondary information, the RPh must become involved. The dispensing clerk clicks on the [Override] button on the bottom of the screen (Figure 30) and another log-in screen appears (Figure 33) and the RPh must log-in in order to override. Note at the top of the screen (Figure 34) that the RPh now has control. At this point, if the RPh has enough information to discover if the person picking up the prescription is picking up for the correct patient, they may now press the [Confirm: Perform Pull] button, or press [Enter] on the keyboard. Control then reverts back to the dispensing clerk who now receives a “Pick” screen (Figure 35). All overrides and actions are logged within the system in the prescription’s History.](https://usermanual.wiki/GSL-Solutions/ICABR01.User-Manual-part-1-of-2/User-Guide-1636884-Page-35.png)
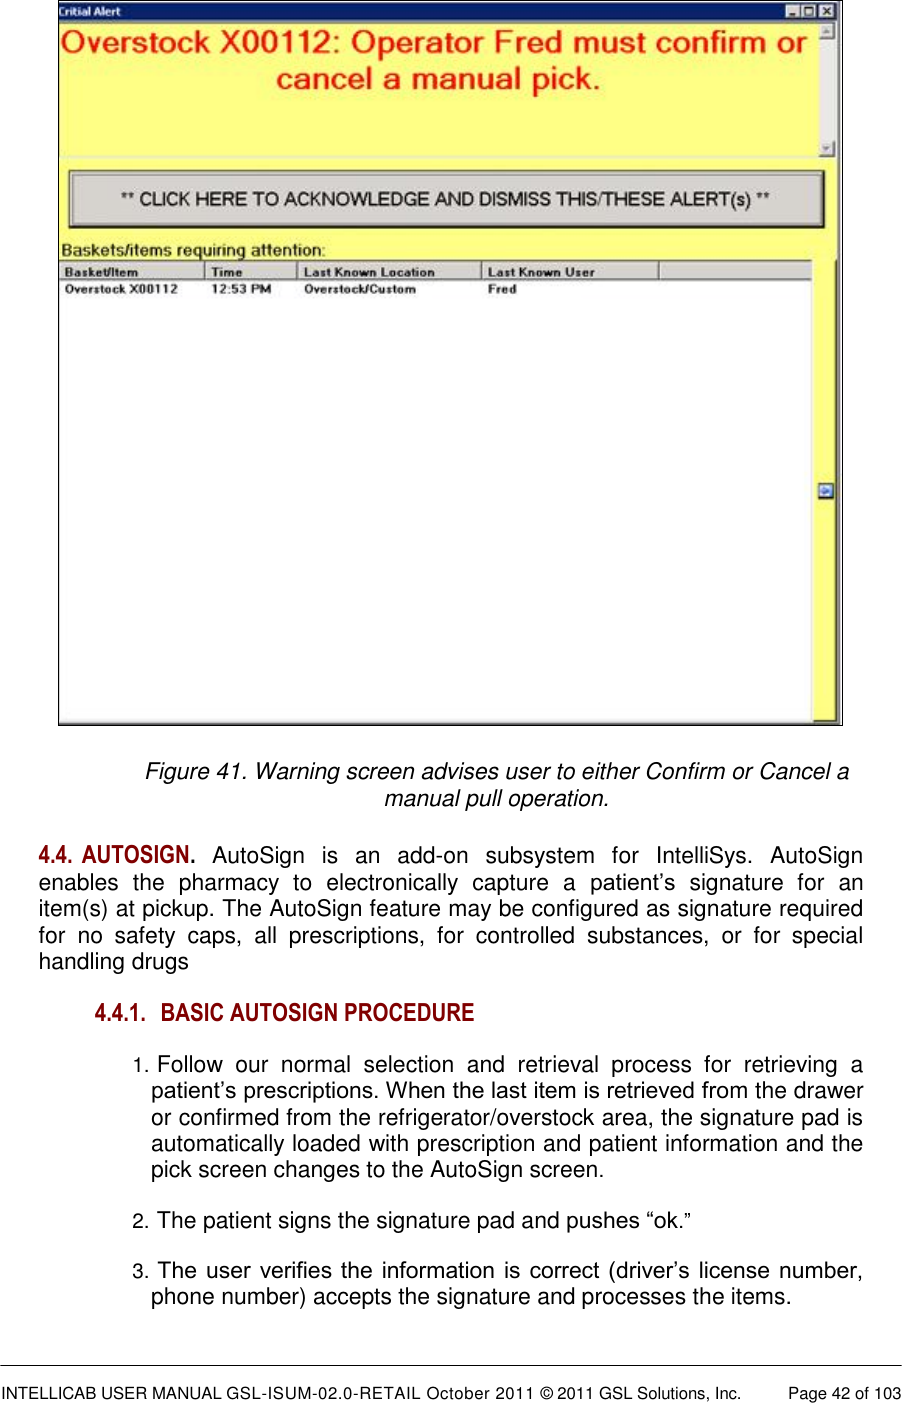
![INTELLICAB USER MANUAL GSL-ISUM-02.0-RETAIL October 2011 © 2011 GSL Solutions, Inc. Page 38 of 103 4.3.3. MANDATORY CONSULT. The Mandatory Consult feature involves drugs that need special handling by the RPh in order to ensure that the prescription is dispensed to the correct patient. The dispensing clerk attempts to perform the retrieval operation and receives a message that a RPh MUST become involved. (Figure 36) At this point the RPh needs to log-in and perform the Pull [F12], retrieval and deliver functions. Figure 36. Mandatory Consult. Special Handling Required. The RPh logs-in, receives the Second Patient Identifier screen and must enter the secondary identification or override. (Figures 37 and 38). The RPh clicks the [Confirm: Perform Pull] button on the screen, or press [Enter] on the keyboard. At this point they will receive the normal retrieval screen. (Figure 39). Note the message on screen saying to Proceed with Caution. Alert tones also occur, further indicating this is a special case. The RPh retrieves the Rx, consults, and then logs off [F9], allowing the dispensing clerk to proceed.](https://usermanual.wiki/GSL-Solutions/ICABR01.User-Manual-part-1-of-2/User-Guide-1636884-Page-38.png)
![INTELLICAB USER MANUAL GSL-ISUM-02.0-RETAIL October 2011 © 2011 GSL Solutions, Inc. Page 40 of 103 . Figure 39. Mandatory Consult. Normal retrieval screen showing an Rx that is in a basket that has not been shelved. 4.3.4. AUTHENTICATE. After identifying the IntelliCab which displays the light and number matching that on the workstation, hold the SmartBadge up to the front panel on the IntelliCab to authenticate access to the cabinet. The SmartBadge should be held there until the identified number and light start blinking. 4.3.5. RETRIEVE. Once authenticated to access the IntelliCab, the user opens the drawer and locates the SmartBasket with the 3 green LED lights displayed BELOW the SmartBasket. The user removes the SmartBasket and returns to the workstation. A patient may have prescriptions in multiple SmartBaskets. If more than one SmartBasket is lit, remove ALL SmartBaskets as noted above. If more than one IntelliCab is displaying the user’s number and light, this process can be repeated as necessary. Once all SmartBaskets are retrieved, the workstation will return to the Search [F2] screen. 4.3.6. If the workstation displays ‘Your Current Manual Pick List:’ the user proceeds to the location listed on the screen and retrieves the items.](https://usermanual.wiki/GSL-Solutions/ICABR01.User-Manual-part-1-of-2/User-Guide-1636884-Page-40.png)
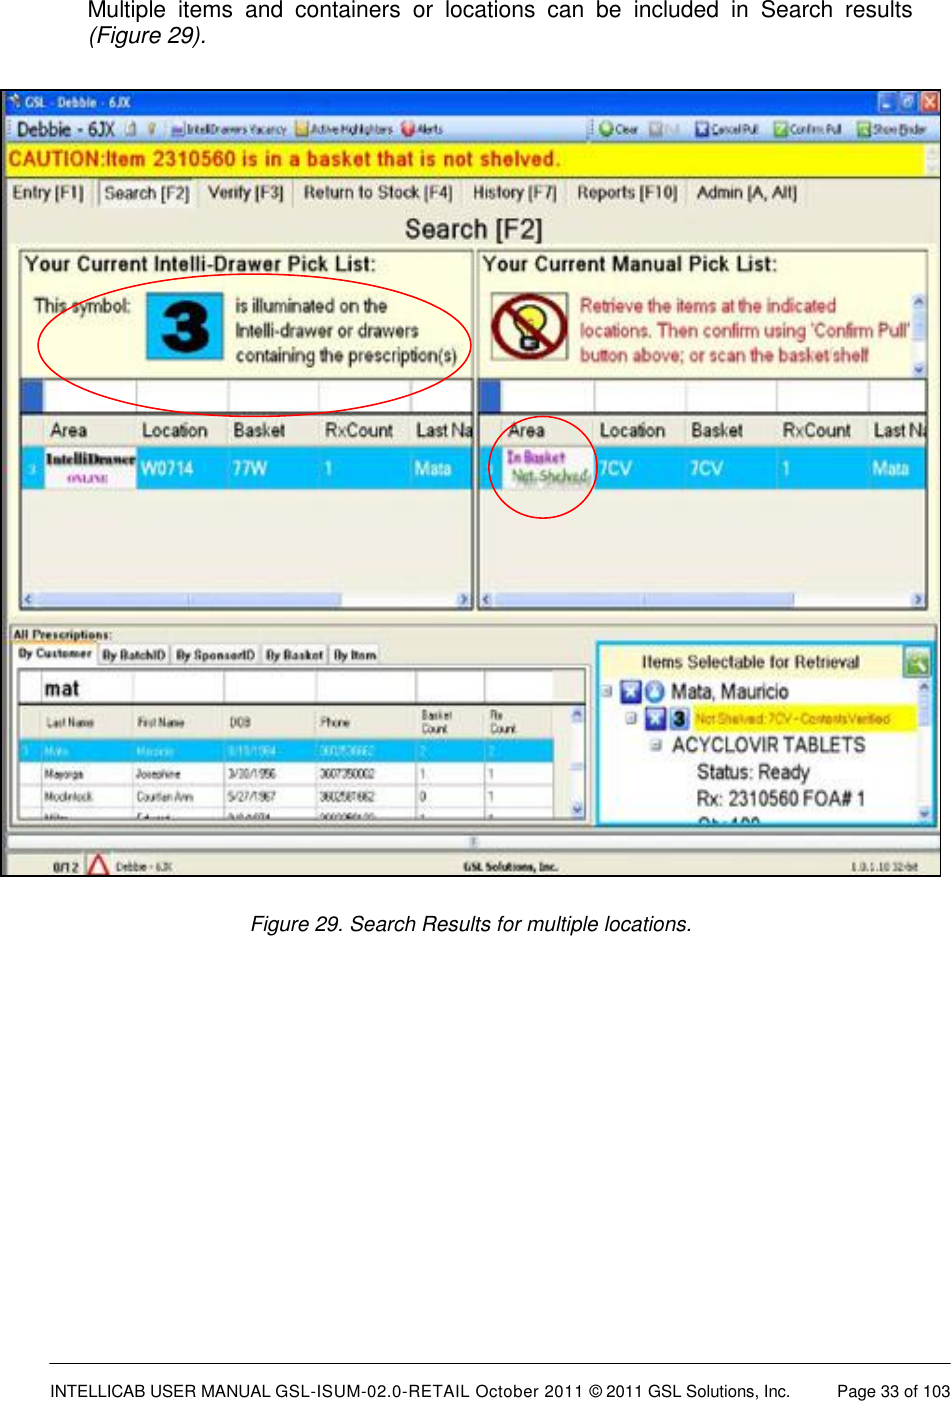
![INTELLICAB USER MANUAL GSL-ISUM-02.0-RETAIL October 2011 © 2011 GSL Solutions, Inc. Page 41 of 103 Figure 40. Search results may vary, depending on the system configuration. Oversized or unusual items can be located readily using flexible location identification during prescription linking. 4.3.7. When retrieving items from the Oversized or Refrigerated area, the user must return to the workstation and scan the Rx number. A warning screen will be displayed if the user forgets to confirm or cancel the manual pull of the item (see Figure 41). If this occurs, the user may click on the "confirm pull" button in the upper right side of the Search [F2] screen. Only use this method if the user can confirm they did dispense to the patient and forgot to scan the medication out of the system.](https://usermanual.wiki/GSL-Solutions/ICABR01.User-Manual-part-1-of-2/User-Guide-1636884-Page-41.png)

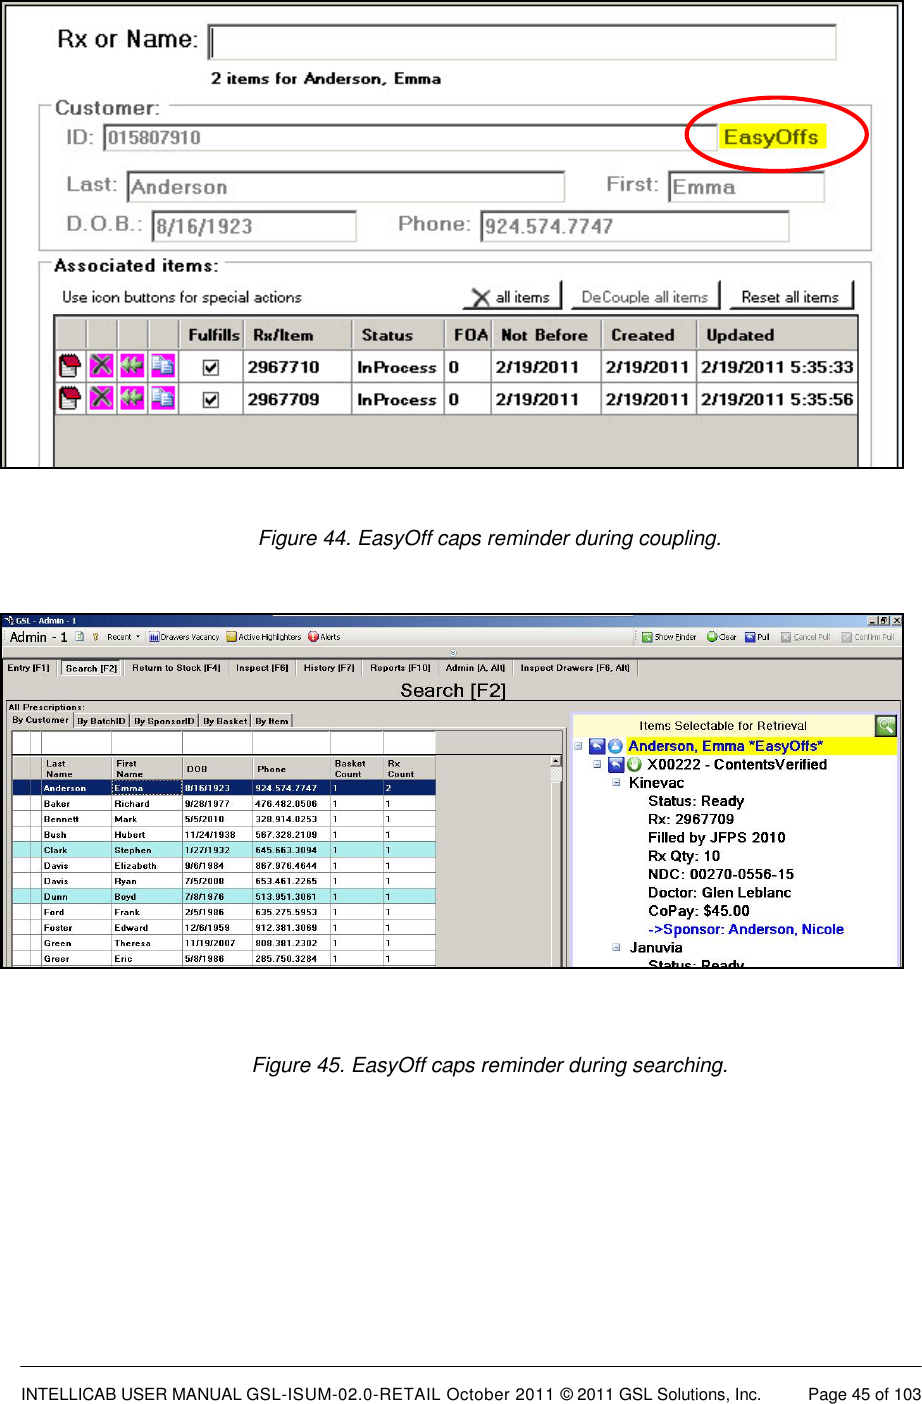
![INTELLICAB USER MANUAL GSL-ISUM-02.0-RETAIL October 2011 © 2011 GSL Solutions, Inc. Page 44 of 103 be retrieved from the History [F7] tab. (See Chapter 7 for more information on the History [F7] tab). Once all the correct boxes have been chosen for each item simply click the “process all items” button to complete the process and return to the SEARCH [F2] screen. 4.5. OTHER FEATURES EASYOFF CAPS AUTHORIZATION To capture a signature for EasyOff caps, click on the History tab or press F7. Locate, highlight, and right click on the patient’s name. Then select Show Patient/Customer. Click the Capture button and have the patient sign on the signature pad and click OK. After the patient clicks OK, click the Accept Signature button on your Workstation. Figure 43. EasyOff Caps Authorization. After the patient has authorized EasyOff caps, IntelliSys will display a reminder when the prescriptions are coupled and retrieved.](https://usermanual.wiki/GSL-Solutions/ICABR01.User-Manual-part-1-of-2/User-Guide-1636884-Page-44.png)
![INTELLICAB USER MANUAL GSL-ISUM-02.0-RETAIL October 2011 © 2011 GSL Solutions, Inc. Page 46 of 103 CHAPTER 5. RETURN PRESCRIPTIONS TO STOCK (RTS) - [ F4 ] The System streamlines the Return to Stock (RTS) process. IntelliSys tracks the age of a prescription, in real time, from the moment it was coupled. Depending on the system’s configuration, the Return to Stock [F4] screen displays the currently defined pick list. Note that the Initial Creation date (ENTRY [F1] screen) may be modified to change when prescriptions are returned to stock (Figure 46). 5.1. RTS PROCESS Press [F4] or click the Return to Stock [F4] button to access the Return to Stock screen. 5.1.1. Highlight the prescriptions you want to pull for return. There are multiple ways to highlight the items you wish to pull for RTS. 5.1.1.1. Enter the number of days you wish to pull above the Age column. Figure 46. Return to Stock [F4] screen. Selected items ready to pull. Blue highlighted items are controlled substances. 5.1.1.2. [SHIFT] click. To use [SHIFT] click, click on the uppermost item you wish to RTS. Then scroll down and hold the shift key on the keyboard and click the last prescription you want to RTS. Every prescription between the two items clicked will automatically be highlighted.](https://usermanual.wiki/GSL-Solutions/ICABR01.User-Manual-part-1-of-2/User-Guide-1636884-Page-46.png)
![INTELLICAB USER MANUAL GSL-ISUM-02.0-RETAIL October 2011 © 2011 GSL Solutions, Inc. Page 47 of 103 5.1.1.3. Click on the Pull button located in the upper-right side of the SEARCH [F2] screen or push [F12]. Follow the usual Pick to the Light retrieval steps. After the items are retrieved from the IntelliCabs, follow normal DRX procedures. Figure 47. Return to Stock [F4] screen – find everything in a specified age range. Note: only users identified as RPh or Administrators are allowed access to controlled substances for RTS. Figure 48. Return to Stock [F4] – Controlled substances warning.](https://usermanual.wiki/GSL-Solutions/ICABR01.User-Manual-part-1-of-2/User-Guide-1636884-Page-47.png)
![INTELLICAB USER MANUAL GSL-ISUM-02.0-RETAIL October 2011 © 2011 GSL Solutions, Inc. Page 48 of 103 Figure 49. REPORTS [F10] can be generated based on RTS. 5.2. RTS REPORTS can be output to a printer, saved as a PDF file, or exported to Microsoft® Excel (see Figure 49). For more on reports see Chapter 7.](https://usermanual.wiki/GSL-Solutions/ICABR01.User-Manual-part-1-of-2/User-Guide-1636884-Page-48.png)
![INTELLICAB USER MANUAL GSL-ISUM-02.0-RETAIL October 2011 © 2011 GSL Solutions, Inc. Page 49 of 103 CHAPTER 6. INSPECT PRESCRIPTIONS - INSPECT [ F6 ] The INSPECT [F6] function allows a user to retrieve and inspect the contents of a linked SmartBasket(s). After the SmartBasket is retrieved, it may either be unlinked or re-shelved without having to re-link the contents to the SmartBasket. Tip: This function can be very useful if you want to find all locations of prescriptions for drug recalls. Controlled Substance FilterSearch BarSearch Results AreaFigure 50. INSPECT [F6] screen. NOTE: The INSPECT [F6] screen is only visible to users authorized by a supervisor. The setting must be selected in the system configurator located on the server (see your GSL site administrator). 6.1. FINDING PRESCRIPTIONS USING THE INSPECT TAB If access is granted by a supervisor, the INSPECT [F6] tab is visible on the top banner of the screen. Click or press [F6] to display the Inspect screen.](https://usermanual.wiki/GSL-Solutions/ICABR01.User-Manual-part-1-of-2/User-Guide-1636884-Page-49.png)
![INTELLICAB USER MANUAL GSL-ISUM-02.0-RETAIL October 2011 © 2011 GSL Solutions, Inc. Page 51 of 103 An unchecked box will list only Non-controlled items. Simply type the information you are searching for and click the Filter button on the right side of the screen. A table will appear with the results (Figure 51). Left mouse click on the first item to highlight; then right mouse click to see a text box of options. At this point you have two choices: Enable the item to pull for inspection, or Show Details for…1. Container or 2.Patient name and prescription data. Figure 51. INSPECT [F6] screen – right mouse click to enable pull for inspection. If an item is Enabled to pull for inspection, then follow the lights to the IntelliCab that displays the number and color displayed on the screen (same as the retrieval process). Once you retrieve the item for inspection, the prescription may be decoupled from the SmartBasket (see ENTRY [F1] screen) or re-shelved. If you want to return the prescription to the cabinet (in the original SmartBasket) you may simply return it to any open cubby in the same IntelliDrawer as long as the drawer remained open during inspection. If you closed the drawer after retrieval, the item must be Verified [F3] before returning it to the IntelliDrawer.](https://usermanual.wiki/GSL-Solutions/ICABR01.User-Manual-part-1-of-2/User-Guide-1636884-Page-51.png)
![INTELLICAB USER MANUAL GSL-ISUM-02.0-RETAIL October 2011 © 2011 GSL Solutions, Inc. Page 52 of 103 Figure 52. INSPECT [F6] screen – right mouse click to Show Detail for... patient. If you choose to Show Detail for… then you must click on either the container button, patient name button or the prescription button. Clicking on the patient name button allows the user to see the prescription history, i.e., drug name and quantity. Clicking the container button allows the user to see the history of the container and its current location. Clicking on the prescription button displays the patients name, I.D., DOB, and phone number.](https://usermanual.wiki/GSL-Solutions/ICABR01.User-Manual-part-1-of-2/User-Guide-1636884-Page-52.png)
![INTELLICAB USER MANUAL GSL-ISUM-02.0-RETAIL October 2011 © 2011 GSL Solutions, Inc. Page 53 of 103 Figure 53. INSPECT [F6] screen with container contents displayed. Figure 54. INSPECT [F6] screen with patient contents displayed.](https://usermanual.wiki/GSL-Solutions/ICABR01.User-Manual-part-1-of-2/User-Guide-1636884-Page-53.png)
![INTELLICAB USER MANUAL GSL-ISUM-02.0-RETAIL October 2011 © 2011 GSL Solutions, Inc. Page 54 of 103 CHAPTER 7. IDENTIFY PRESCRIPTION STATUS - HISTORY [ F7 ] The HISTORY [F7] screen can display detailed information about every item in the database. Users can choose to review the history of every prescription, or only those which have been delivered. Data Filter BarDatabaseHistoric Data Figure 55. History [F7] screen. Press F7 or click on the History [F7] button to access the History screen.](https://usermanual.wiki/GSL-Solutions/ICABR01.User-Manual-part-1-of-2/User-Guide-1636884-Page-54.png)
![INTELLICAB USER MANUAL GSL-ISUM-02.0-RETAIL October 2011 © 2011 GSL Solutions, Inc. Page 55 of 103 7.1. NARROWING YOUR SEARCH The History [F7] tab has a comprehensive filter bar to assist you in searching for data. 7.1.1. Start and End date. Use this to reduce the table to a manageable size by limiting the range of dates. 7.1.2. Most recent. Check this box to display only the most recent activity for each prescription in the database. If left unchecked each action for each prescription will be individualized and listed in the database area of the history screen. 7.1.3. Controlled Substance Filter This filter works identically to the INSPECT Controlled substance filter. A shadowed check will include all items in the list. A checked box will list only Controlled substances. An unchecked box will list only Non-controlled items. 7.1.4. Operators The Operators drop down box contains a list of all users. To include specific users check the box located next to their name. More than one user may be selected at a time. To select all users you may either check or uncheck all the boxes.](https://usermanual.wiki/GSL-Solutions/ICABR01.User-Manual-part-1-of-2/User-Guide-1636884-Page-55.png)
![INTELLICAB USER MANUAL GSL-ISUM-02.0-RETAIL October 2011 © 2011 GSL Solutions, Inc. Page 56 of 103 7.1.5. States The States drop down box is a list of all the possible actions that may have been taken on a particular prescription. Check the box to select the appropriate action. 7.1.6. Filter The filter is used to filter specific elements from the database. The filter works exactly as the filter in the Inspect [F6] tab. See 6.1 for more information. Once a prescription is delivered, it will no longer show an association with a Basket. Notes can be added to specific prescriptions and recalled later from this screen by clicking on Add Notes. Figure 56. HISTORY [F7] screen – view detailed information on prescription status and notes.](https://usermanual.wiki/GSL-Solutions/ICABR01.User-Manual-part-1-of-2/User-Guide-1636884-Page-56.png)