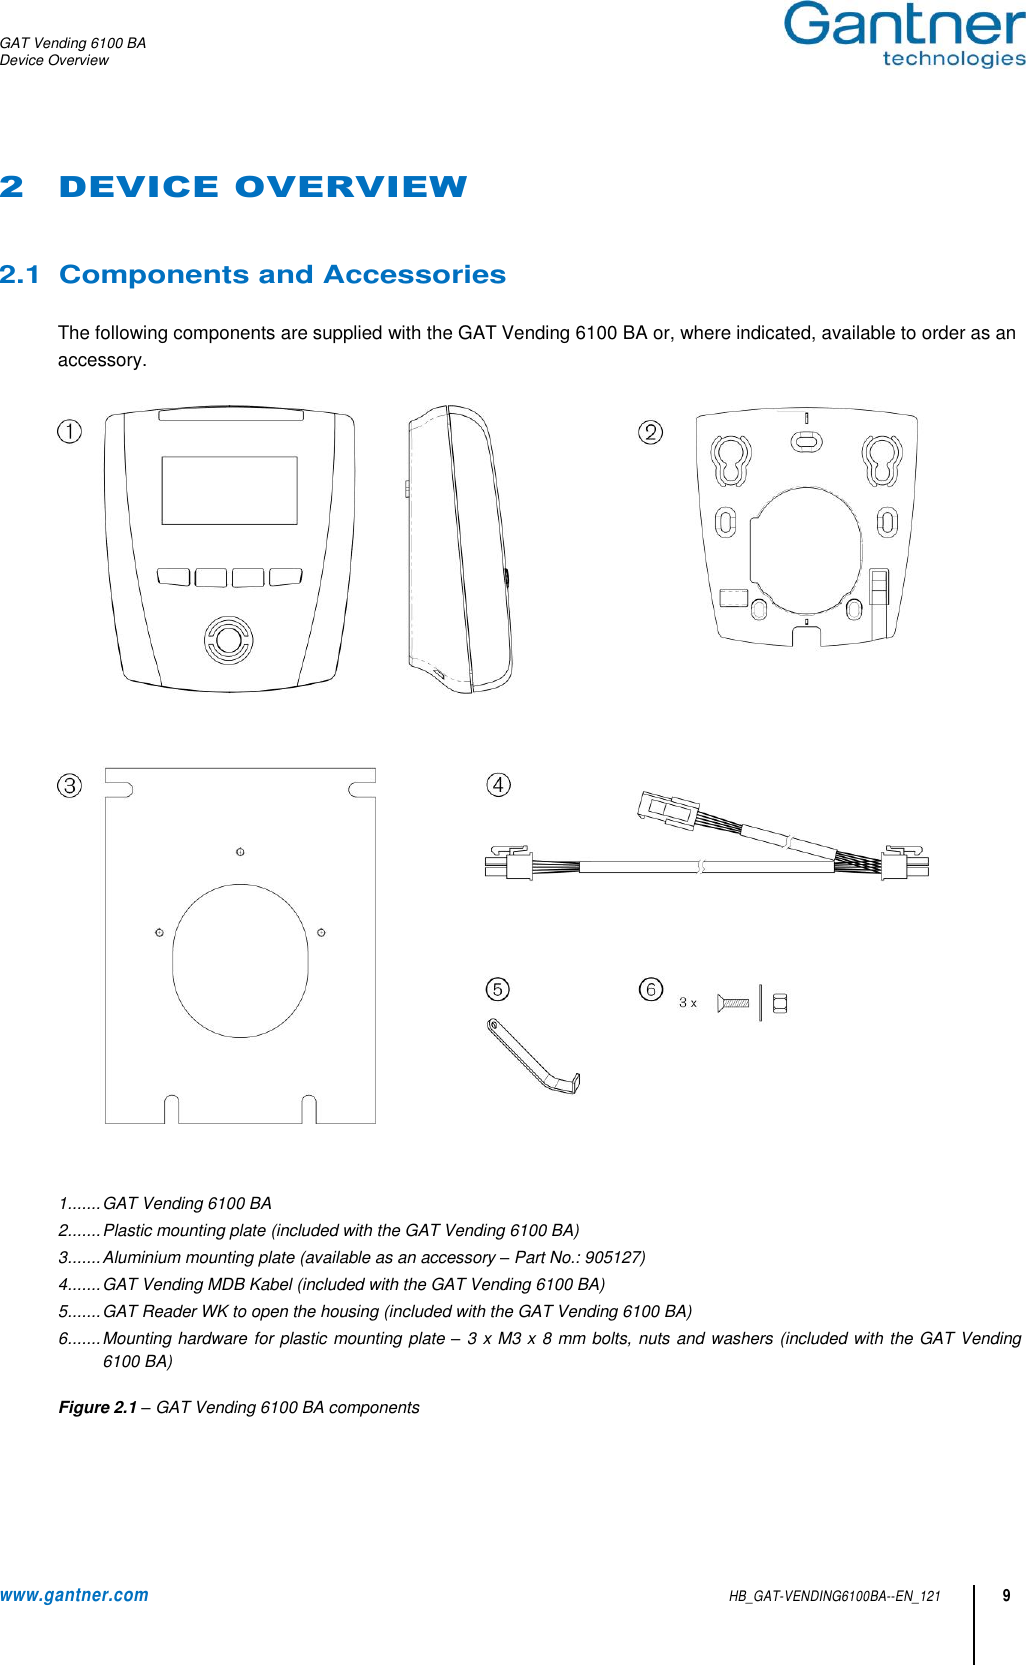
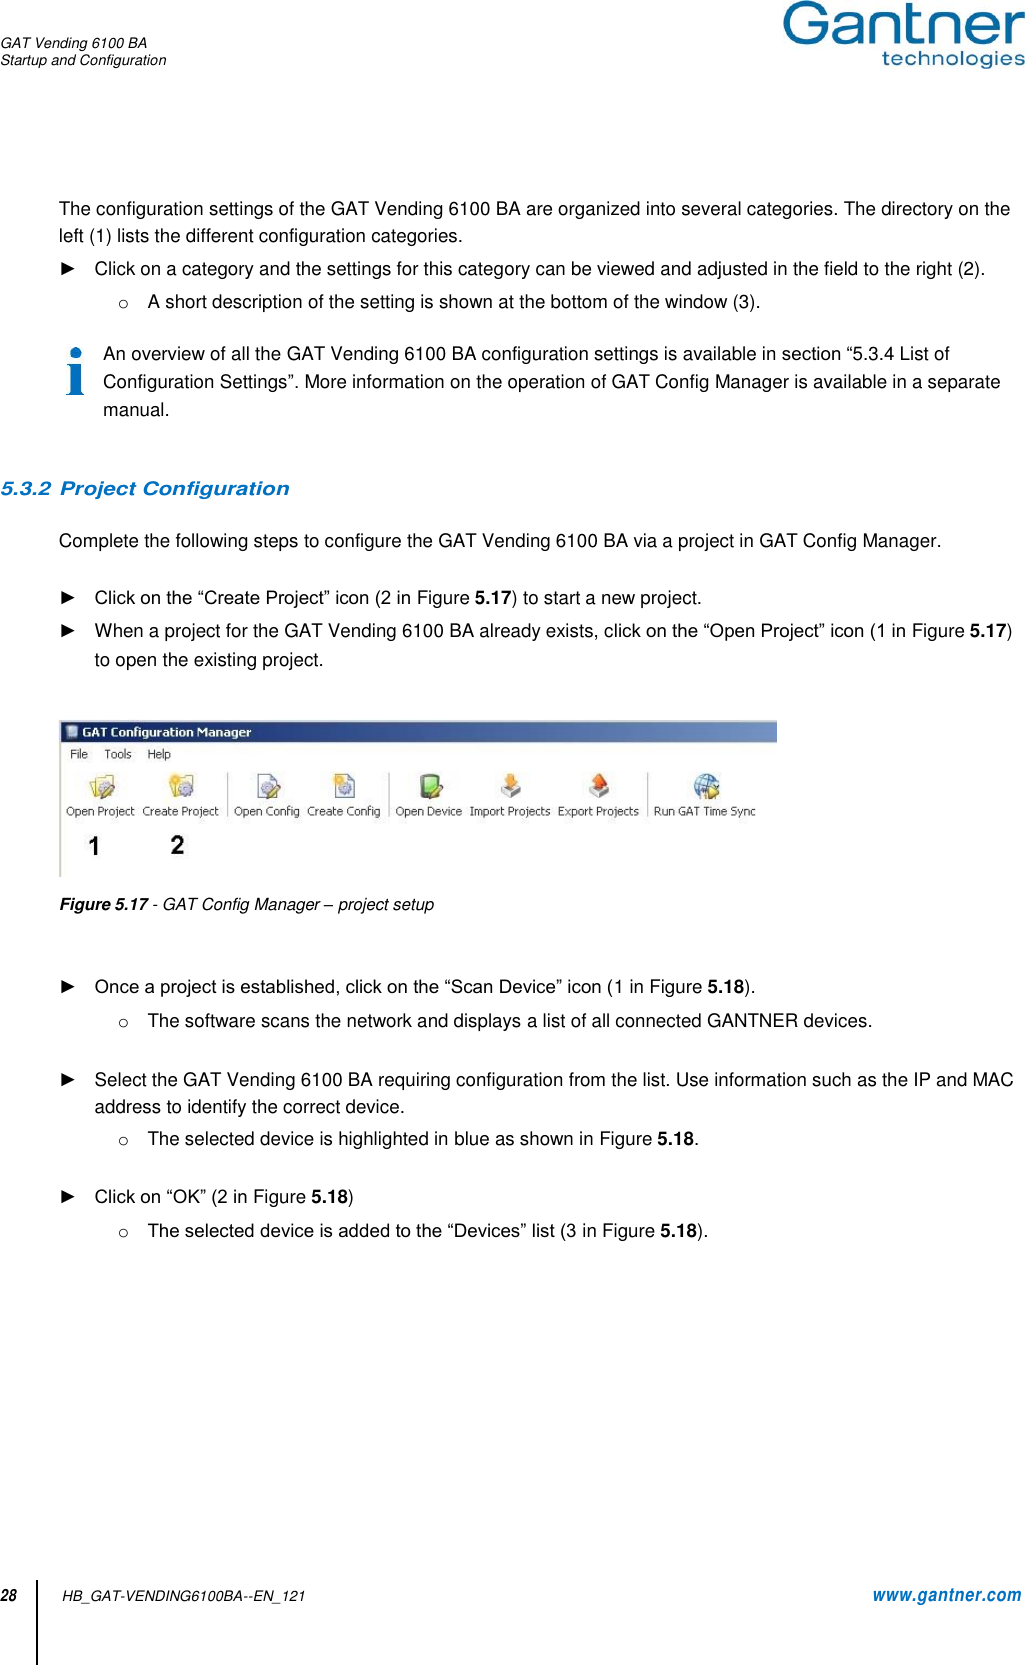
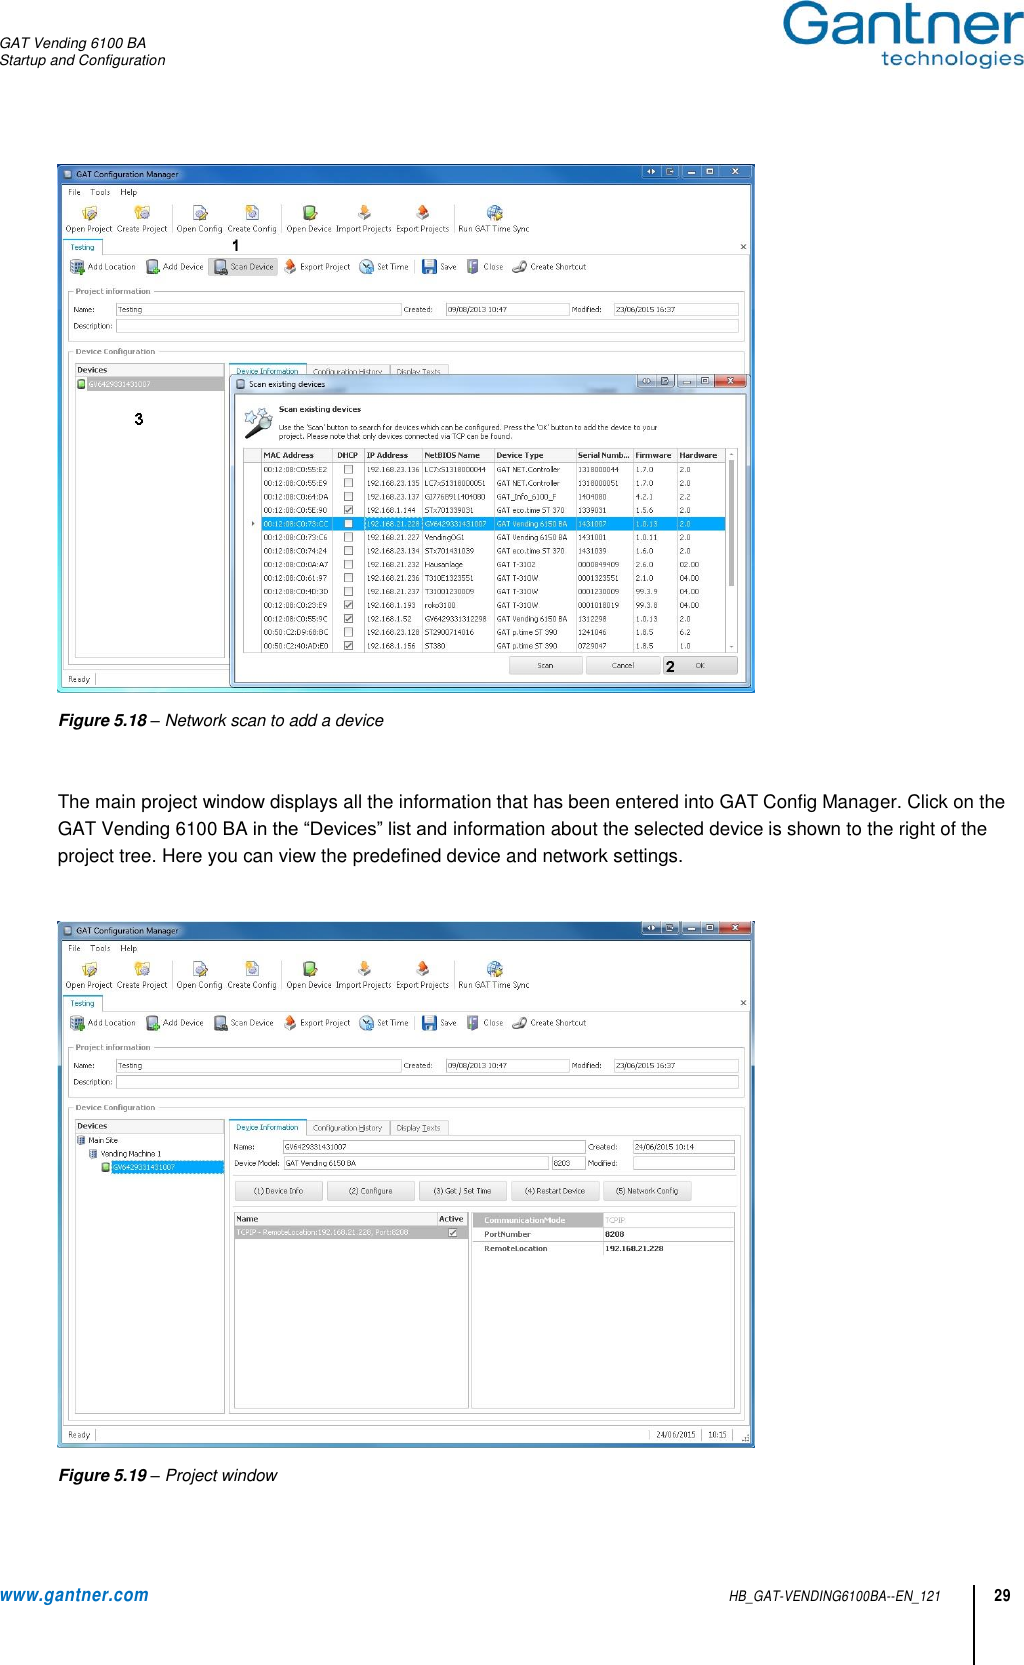
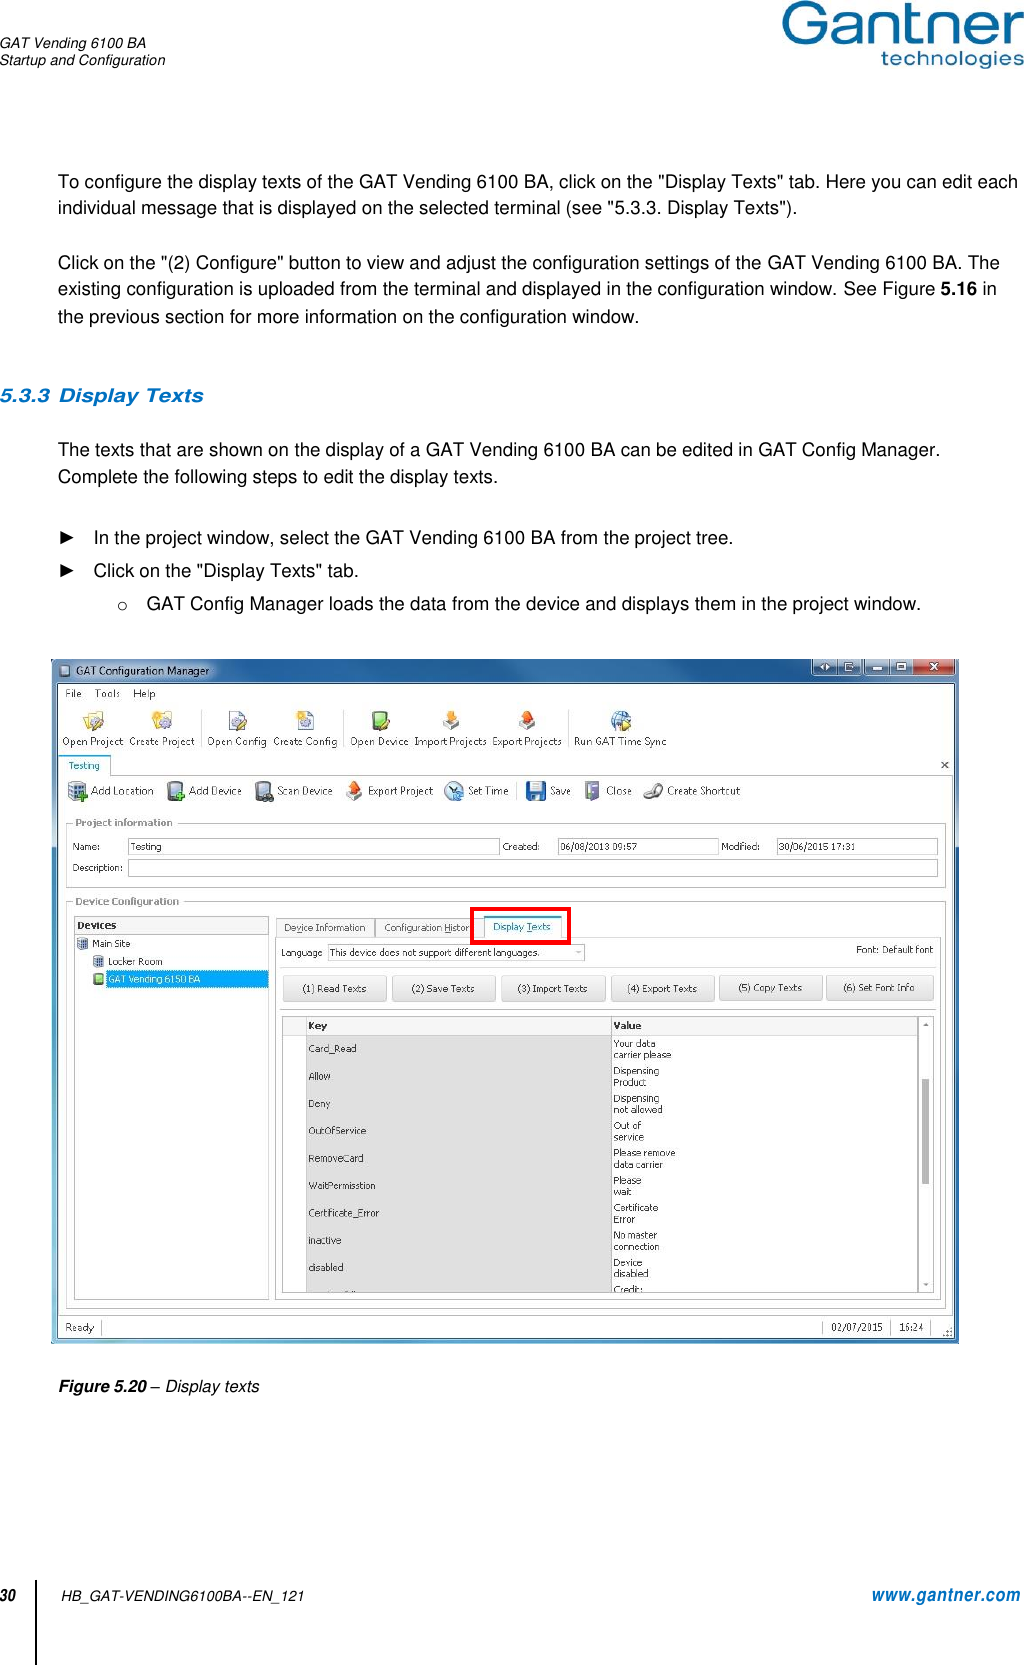
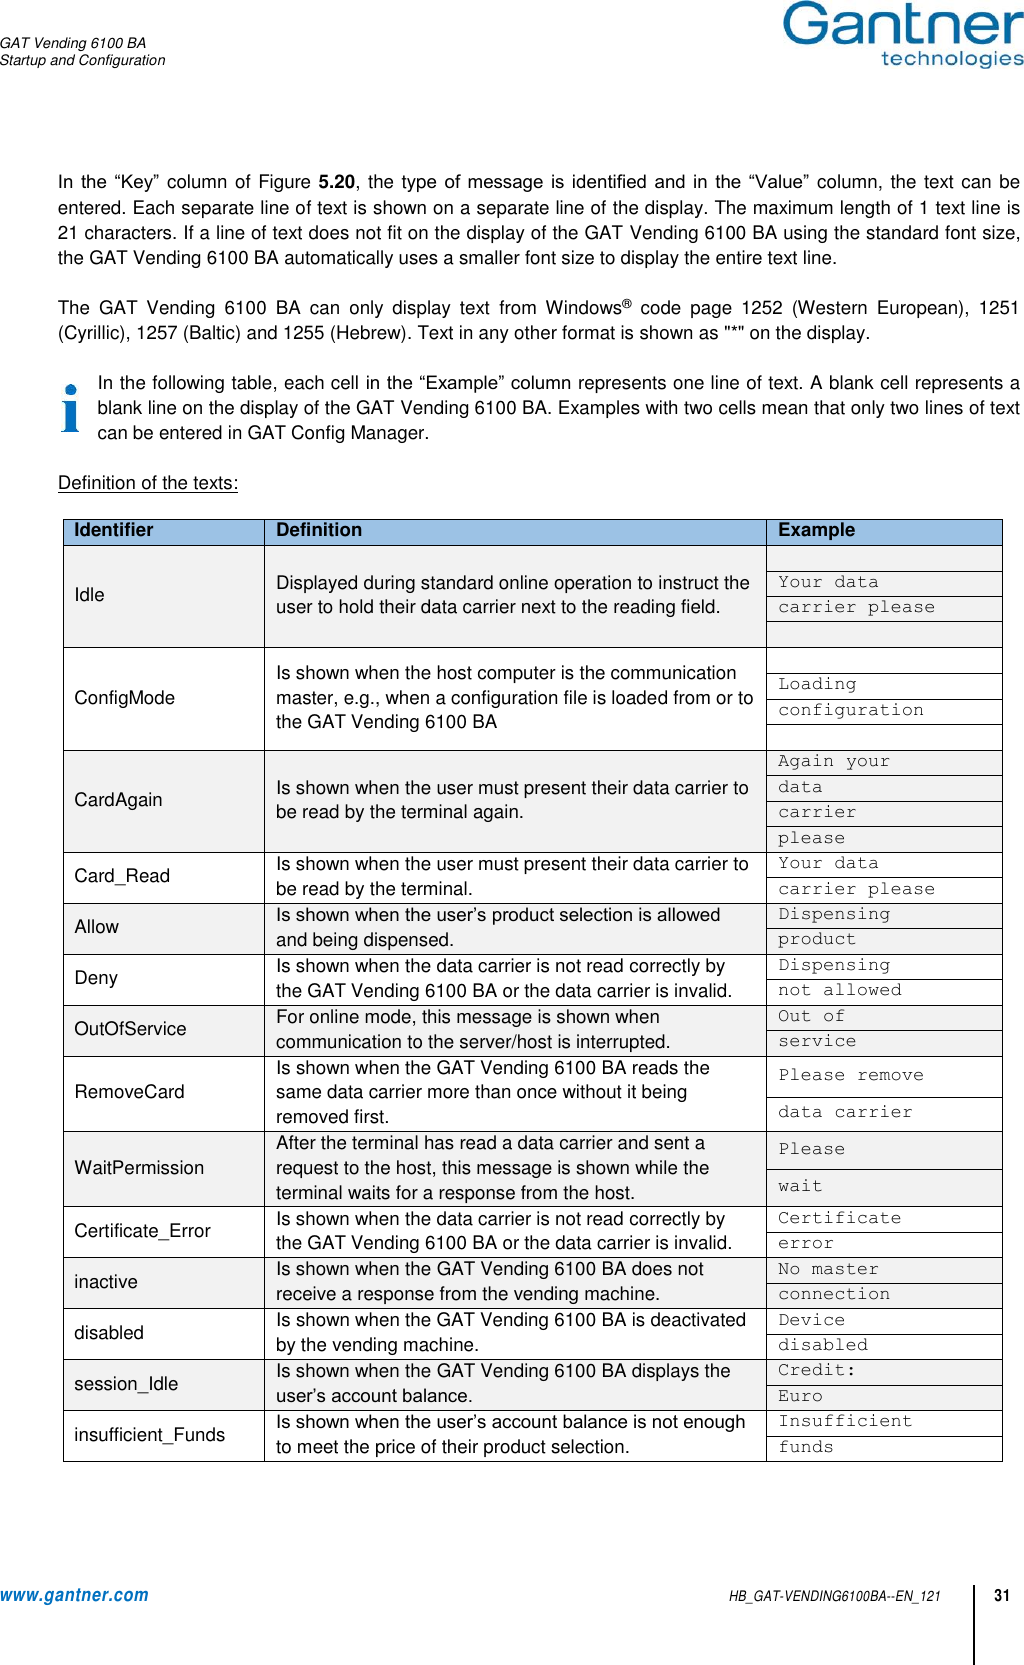
Gantner Electronic GEA1160017A RFID Payment Terminal for Vending Machines User Manual GAT Vending 6100 BA
Gantner Electronic GmbH RFID Payment Terminal for Vending Machines GAT Vending 6100 BA
UserManual.wiki
>
Gantner Electronic
>
GEA1160017A User Manual
Manual
Navigation menu
Upload a User Manual
Namespaces
Wiki Guide
HTML
PDF
Info
Views
User Manual
Discussion / Help
Navigation
![GAT Vending 6100 BA 4 HB_GAT-VENDING6100BA--EN_121 www.gantner.com General Warning and Safety Instructions Dear Customer, We congratulate you on selecting a product (appliance or software) from GANTNER Electronic GmbH. Our aim is to ensure our product operates with safety and to your complete satisfaction. To achieve this aim, please take this opportunity to familiarize yourself with the following guidelines: 1. The installation, commissioning, operation, and maintenance of the product must be carried out in accordance with the technical conditions of operation as described in the corresponding product documentation. 2. Before installing, commissioning, operating, or maintaining the product, it is essential to read the corresponding chapter of this manual and observe the instructions and information therein. 3. If there are some points which are not entirely clear, please do not take a chance. All queries can be clarified by your GANTNER representative or by ringing the GANTNER support hotline. 4. Where not otherwise specifically documented, the appropriate installation, commissioning, operation and maintenance of the product is the customer’s responsibility. 5. Directly on receipt of the goods, inspect both the packaging and the product itself for any signs of damage. Also check that the delivery is complete and includes all accessories, documentation, auxiliary devices, etc. 6. If the packaging or product has been damaged in transport, or should you suspect that it may have a fault, the product must not be put into service. Contact your GANTNER representative who will resolve the problem as quickly as possible. 7. The installation, commissioning, and servicing of our products must be performed by suitably trained personnel. In particular, electrical connections must only be made by correspondingly qualified specialists. Always observe the relevant installation regulations in accordance with the national Electrical Engineers Association (e.g., ÖVE [Austrian], VDE [Germany]). 8. Where not otherwise stated, installation and maintenance work on our products must be carried out when disconnected from the power supply. This applies in particular to appliances that are normally supplied by low-voltage current. 9. It is prohibited to alter the products or remove protective shields and covers. 10. Do not attempt to repair a product after a defect, failure, or damage is detected. In addition, do not put the product back into operation. In such cases, it is essential to contact your GANTNER representative or the GANTNER support hotline. 11. GANTNER Electronic GmbH accepts no responsibility for any injuries or damage caused as a result of improper use. 12. Although care is taken and we are continuously aiming for improvement, we cannot completely exclude the possibility of errors appearing in our documentation. GANTNER Electronic GmbH therefore accepts no responsibility for the completeness or the accuracy of this manual. The right is reserved to make alterations at any time without prior notice. 13. Should you discover any fault with the product or in its accompanying documentation, or you have any suggestions for improvement, you may confidently inform your GANTNER representative or GANTNER Electronic GmbH directly. 14. We especially look forward to hearing from you if you just want to tell us that everything is functioning perfectly. We wish you a successful experience with our product and look forward to welcoming you again as a customer soon.](https://usermanual.wiki/Gantner-Electronic/GEA1160017A/User-Guide-3367487-Page-4.png)

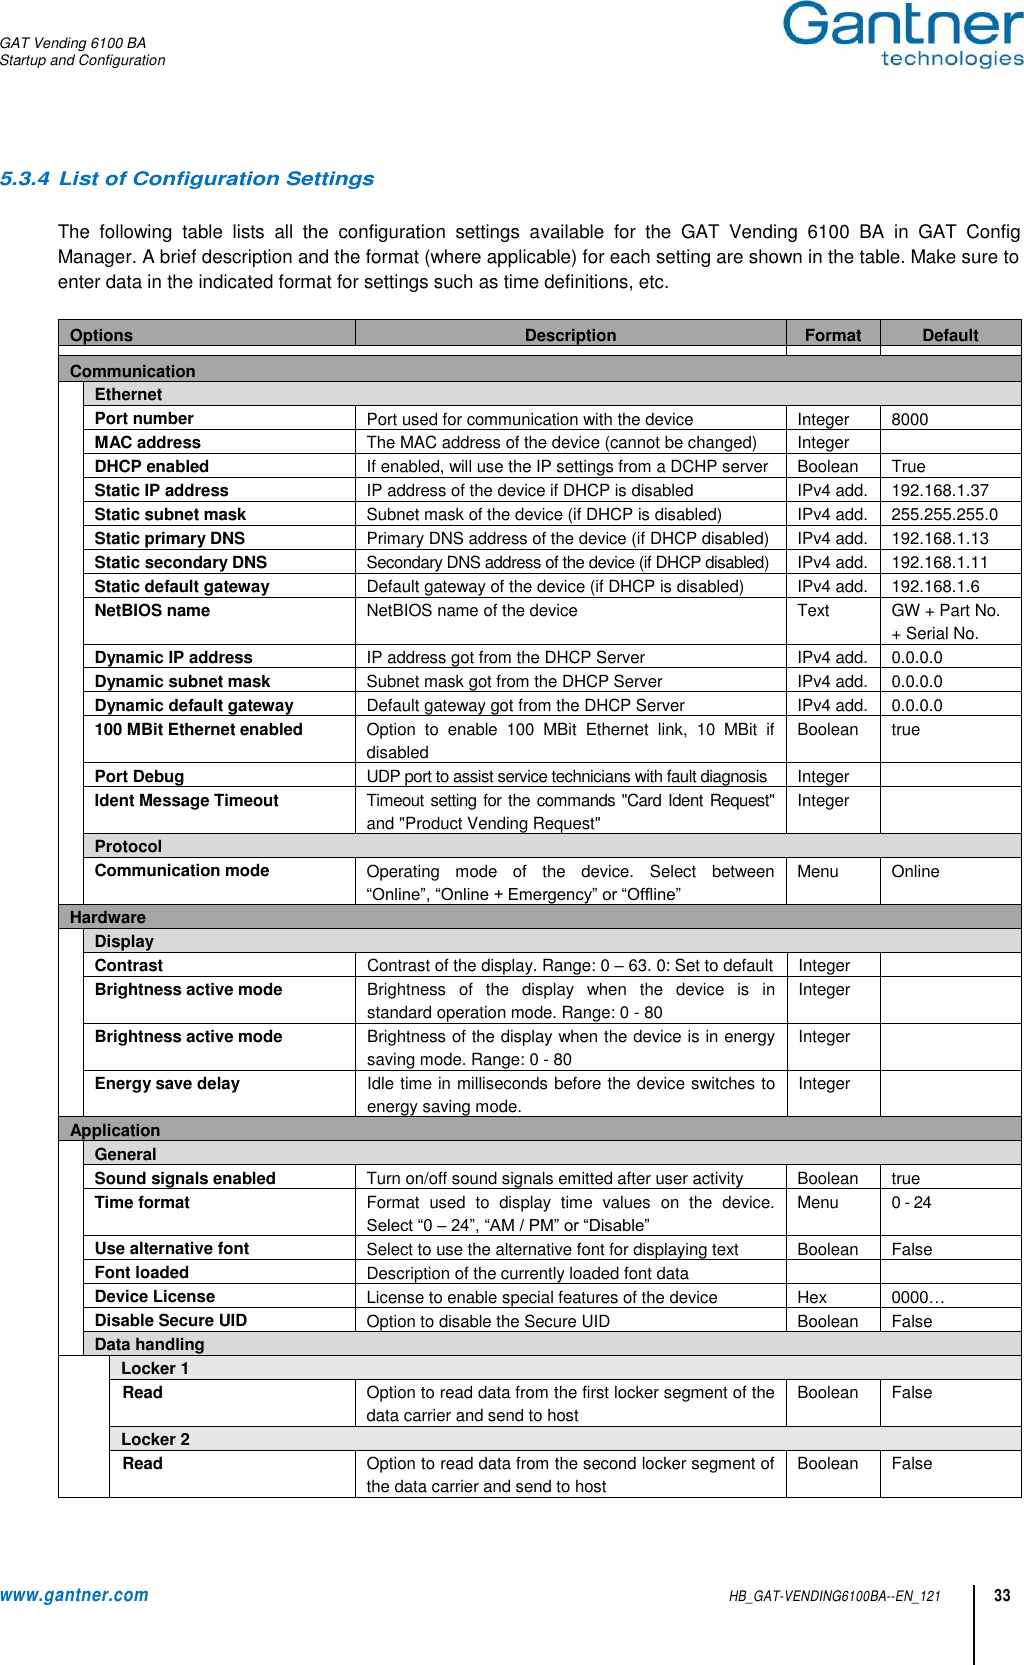
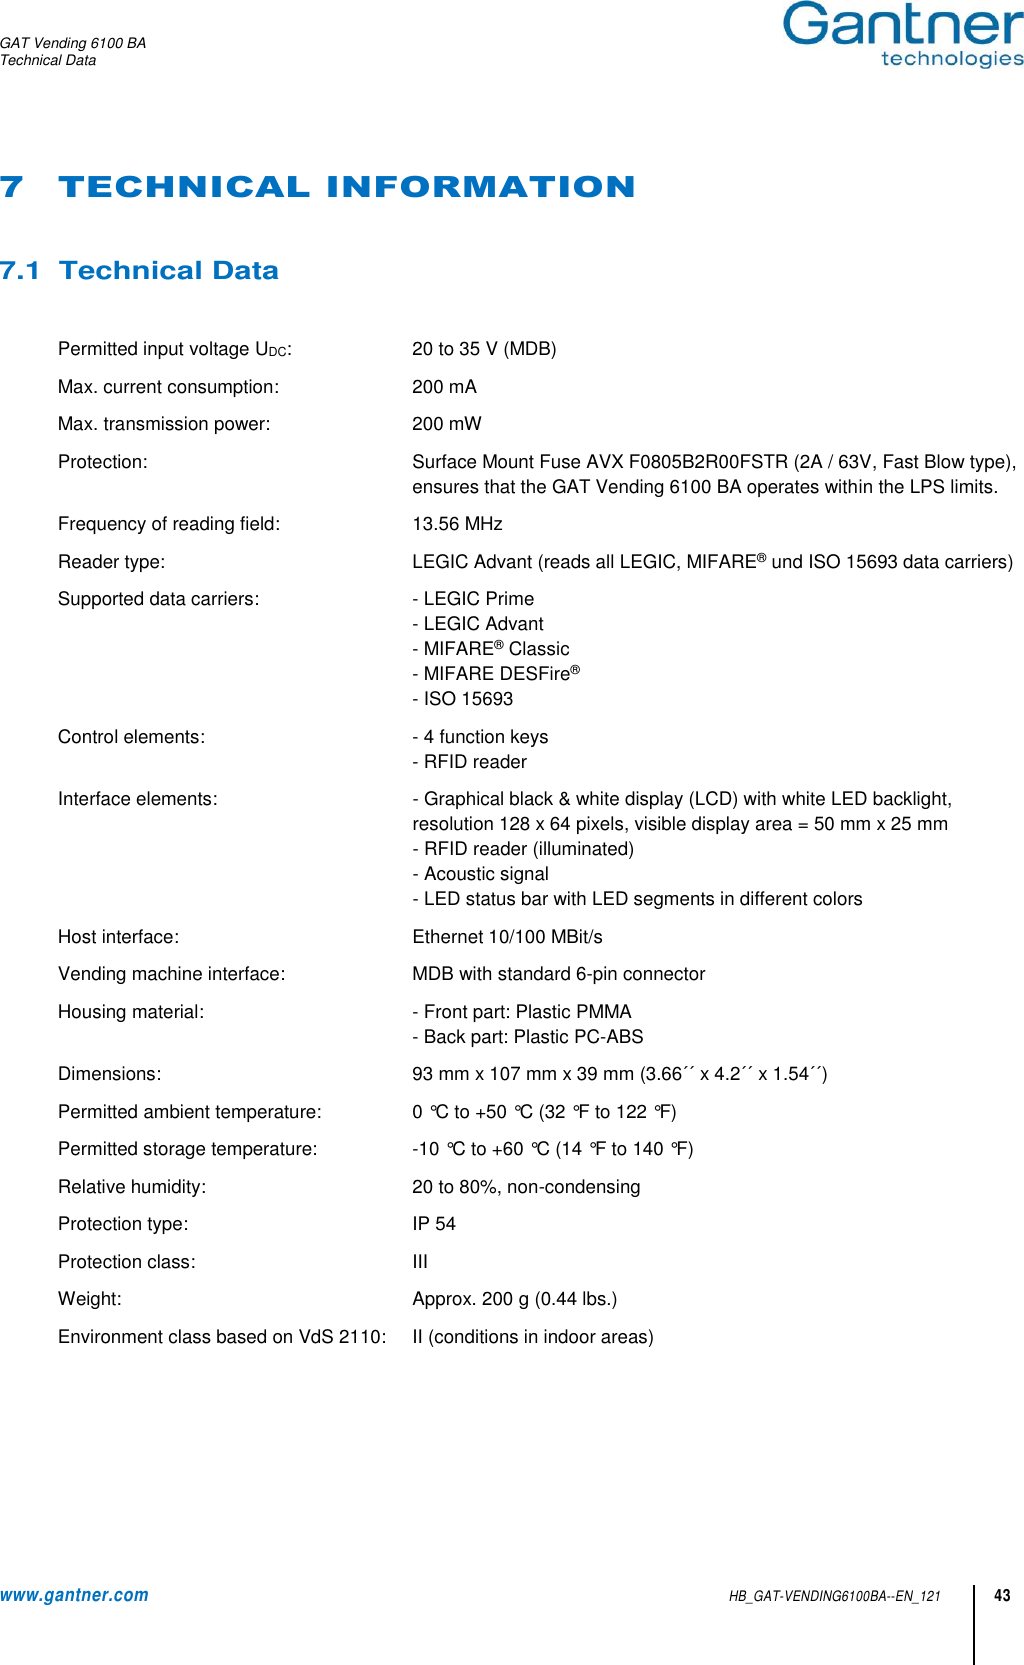
![GAT Vending 6100 BA Startup and Configuration www.gantner.com HB_GAT-VENDING6100BA--EN_121 35 Emergency Mode Funds Simulated account balance (in cents) for every data carrier in emergency mode Integer 8000 Payment type Select the price setting: “Default Price”, “Price List”, “Discount Group”, “Discount”, “Surcharge” Menu Default Price Discount/Surcharge [%] Define a percentage price discount / surcharge Integer 0 User group Define the user group Integer 0 Pricelist/Disc grp Define the pricelist / discount group Integer 0 Emergency revalue Option to allow revaluing in emergency mode Boolean False Pseudo always idle Option to simulate a valid card with emergency mode settings. The user must present their data carrier only once per vending transaction. Boolean False Unknown cash value Option to send the “Cash value not determined” value when emergency values are used (0xFFFF). Not supported by many vending machines. Boolean False Offline Mode Cash segment NB GANTNER cash segment to read account data from Integer 1 Comm. Gateway Enable Comm Gateway Option to enable the communication gateway Boolean False Reader Read Mifare Option to read MIFARE data carriers Boolean True Read Legic Prime Option to read LEGIC Prime data carriers Boolean True Read Legic Advant Option to read LEGIC Advant data carriers Boolean False Read ISO 15693 Option to read ISO 15693 data carriers Boolean False Read FeliCa UID Option to read the UID of FeliCa data carriers Boolean False Read Inside Secure UID Option to read the UID of Inside Secure data carriers Boolean False Read ISO 14443B UID Option to read the UID of ISO 14443B data carriers Boolean False LEGIC Options for reading LEGIC data carriers. Company ID Company ID for the device. All data carriers must have the same company ID to be used with the device Hex 9999 Subsite Additional key for division of site keys Hex 00 Subsite enabled Option to check the subsite keys of data carriers Boolean False SSC Data carrier segment ID for SSC (cash segment) Hex 1A MIFARE Options for reading MIFARE data carriers. Site key Site key of the device. All data carriers must have the same site key to be used at the device Hex 73E0818B… Subsite Additional key for division of site keys Hex 00 Enable subsite Option to check the subsite keys of data carriers Boolean False Position Locker 1 Indicates the data carrier segment for locker 1 data Integer 4 Position Locker 2 Indicates the data carrier segment for locker 2 data Integer 5 ISO Options for reading of ISO 15693 data carriers. Site key Site key of the device. All data carriers must have the same site key to be used at the device Hex 73E0818B… Subsite Additional key for division of site keys Hex 00 Subsite enabled Option to check the subsite keys of data carriers Boolean False Position FID Indicates the data carrier segment for general data Integer 13 Position Locker 2 Indicates the data carrier segment for certificate data Integer 15 Position Locker 1 Indicates the data carrier segment for locker 1 data Integer 19 Position Locker 2 Indicates the data carrier segment for locker 2 data Integer 23 Third Party Segment ID Segment ID for third party data on the data carrier Integer Data start Start of the third party data segment Integer Data length Length of the third party data segment Integer](https://usermanual.wiki/Gantner-Electronic/GEA1160017A/User-Guide-3367487-Page-35.png)

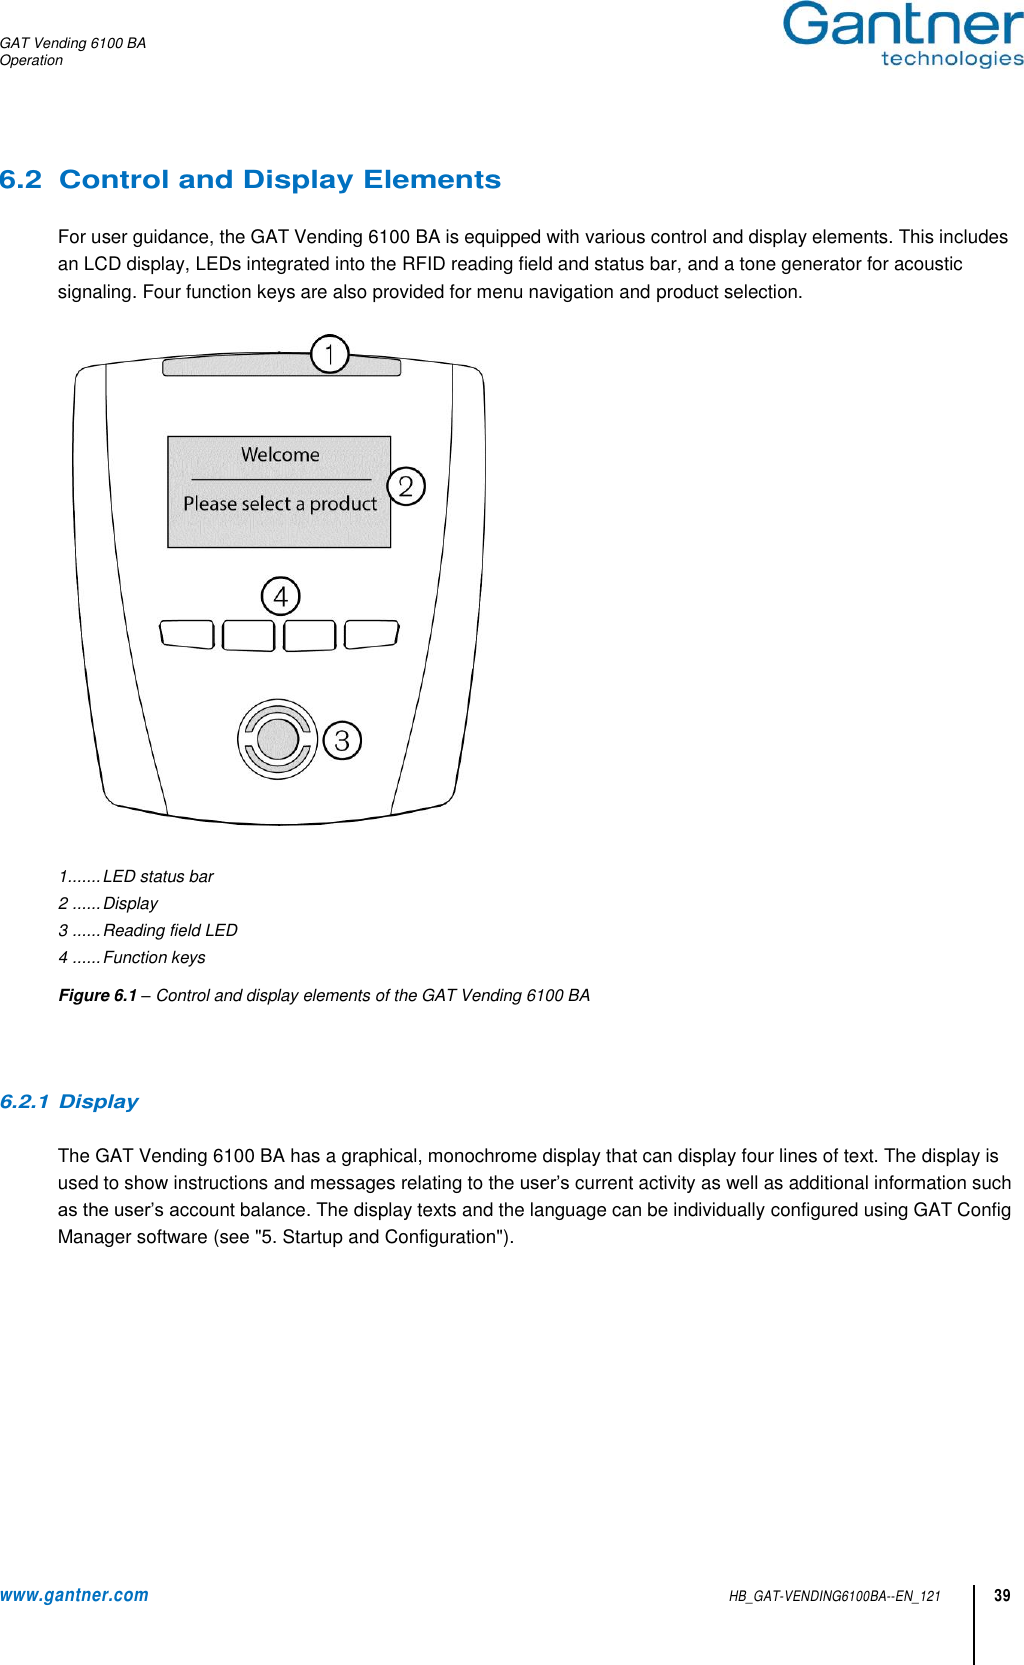
![GAT Vending 6100 BA Technical Data www.gantner.com HB_GAT-VENDING6100BA--EN_121 45 This product is herewith confirmed to comply with the requirements set out in the Council Directives on the Approximation of the laws of the Member States relating to Electromagnetic Compatibility Directive 2004/108/EG. This product is in conformity with the following EC directives, including all applicable amendments: - 1999/5/EC (R&TTE directive) - 2011/65/EU (Restriction of the use of certain hazardous substances in electrical and electronic equipment) The GAT Vending 6100 BA was developed and fabricated under the quality management standard ISO 9001 and GANTNER Electronic GmbH is also certified according to standard ISO 14001. The WEEE symbol on GANTNER products and their packaging indicates that the corresponding material must not be disposed of with normal household waste. Instead such marked waste equipment must be disposed of by handing it over to a designated electronic waste recycling facility. Separating and recycling this waste equipment at the time of disposal will help to conserve natural resources and ensure that it is recycled in a manner that protects human health and the environment. Please contact your local authority for further details of your nearest electronic waste recycling facility. GANTNER is committed to meeting or exceeding the requirements of the RoHS directive (2011/65/EU). The RoHS directive requires that manufacturers eliminate or minimize the use of lead, mercury, hexavalent chromium, cadmium, polybrominated biphenyls and polybrominated diphenyl ethers in electrical and electronic equipment sold in the EU after July 1, 2006. FCC INFORMATION (U.S.A.) This equipment has been tested and found to comply with the limits for a Class A digital device, pursuant to part 15 of the FCC Rules. These limits are designed to provide reasonable protection against harmful interference when the equipment is operated in a commercial environment. This equipment generates, uses, and can radiate radio frequency energy and, if not installed and used in accordance with the instruction manual, cause harmful interference to radio communications. Operation of this equipment in residential area is likely to cause harmful interference in which case the user will be required to correct the interference at his own expense. FCC Warning Statement [Any] changes or modifications not expressly approved by the party responsible for compliance could void the user's authority to operate the equipment. FCC Label This device complies with Part 15 of the FCC Rules. Operation is subject to the following two conditions: (1) this device must not cause harmful interference, and (2) this device must accept any interference received, including interference that may cause undesired operation. INDUSTRY CANADA INFORMATION This device complies with Industry Canada’s licence-exempt RSSs. Operation is subject to the following two conditions: (1) This device may not cause interference; and (2) This device must accept any interference, including interference that may cause undesired operation of the device. Le présent appareil est conforme aux CNR d’Industrie Canada applicables aux appareils radio exempts de licence. L’exploitation est autorisée aux deux conditions suivantes : 1) l’appareil ne doit pas produire de brouillage; 2) l’appareil doit accepter tout brouillage radioélectrique subi, même si le brouillage est susceptible d’en compromettre le fonctionnement. _ Note: This manual is valid from April 18th, 2017. It is subject to change. Amendments can be made without prior notice at any time.](https://usermanual.wiki/Gantner-Electronic/GEA1160017A/User-Guide-3367487-Page-45.png)