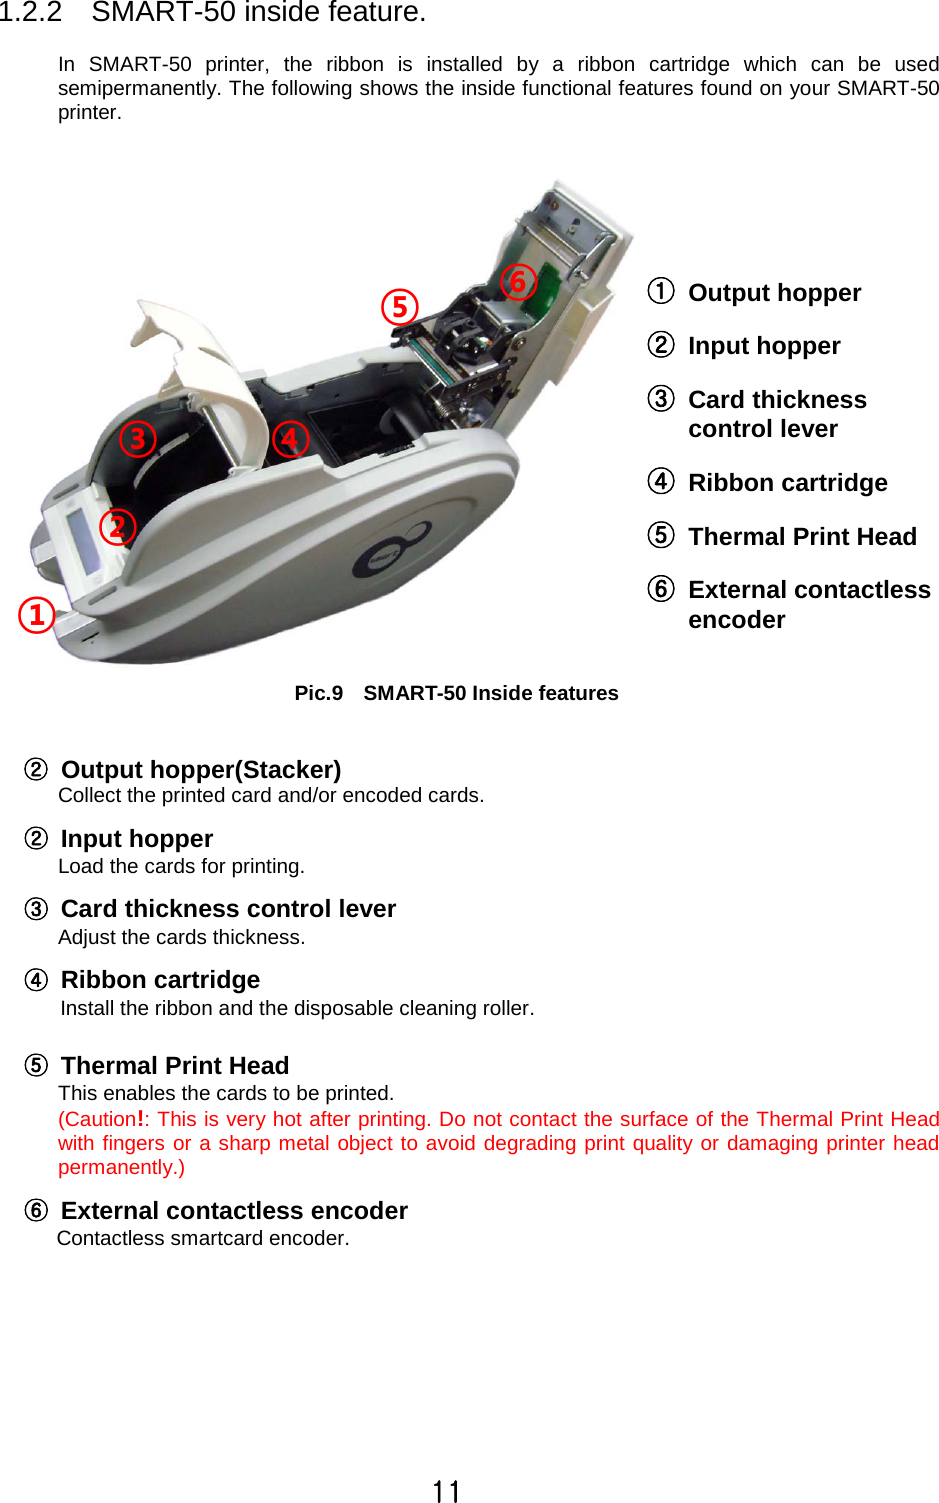
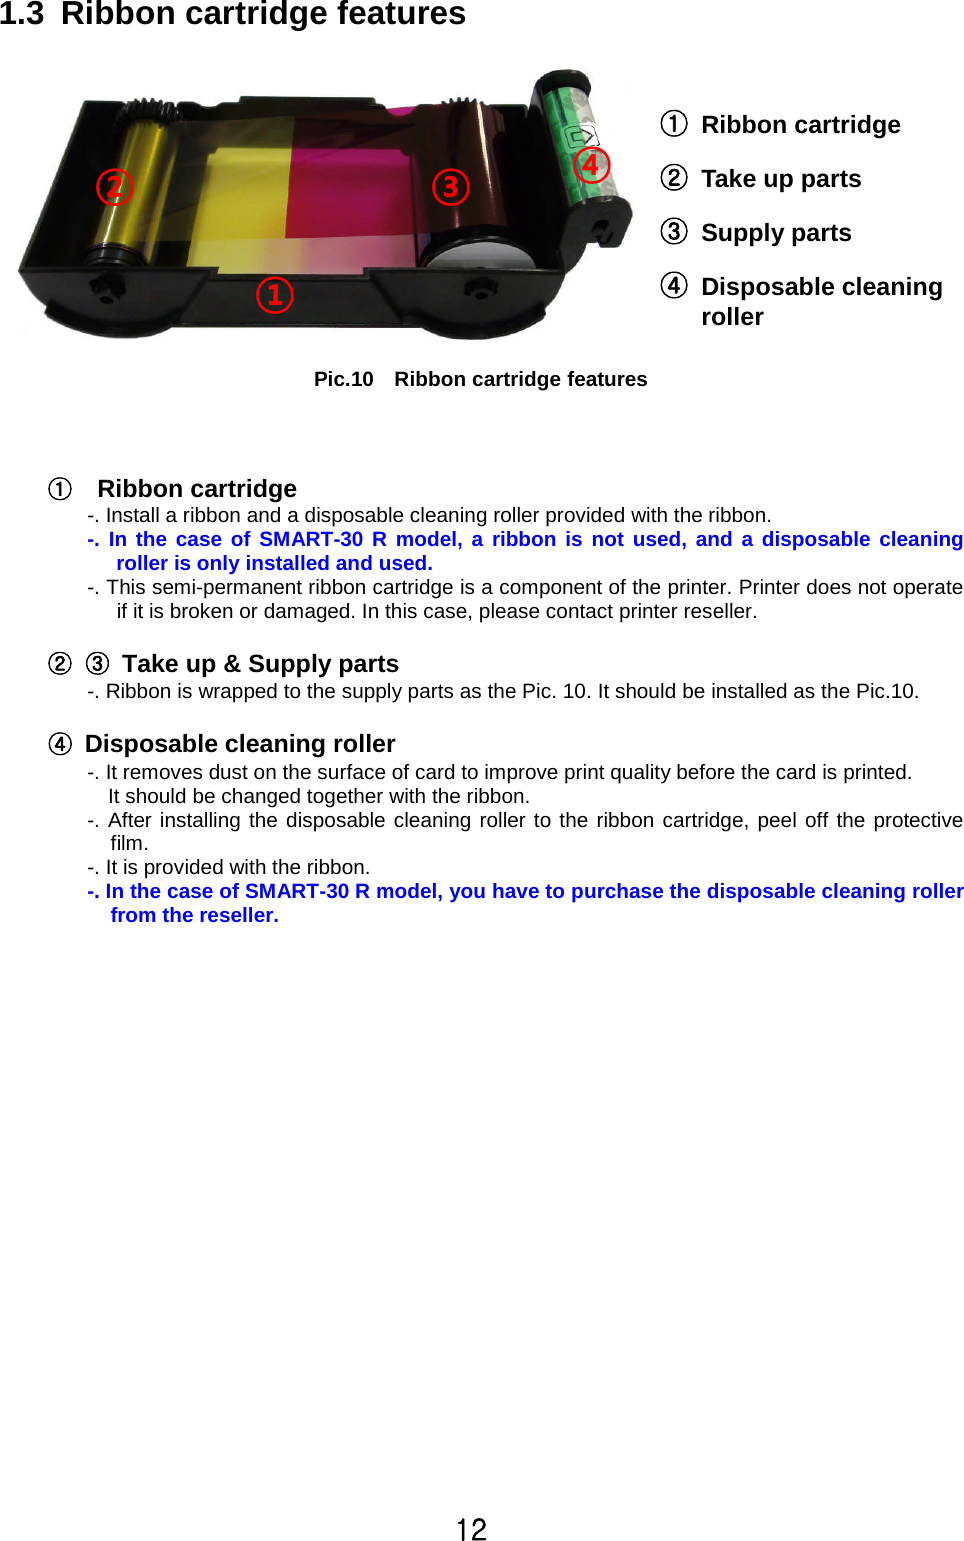
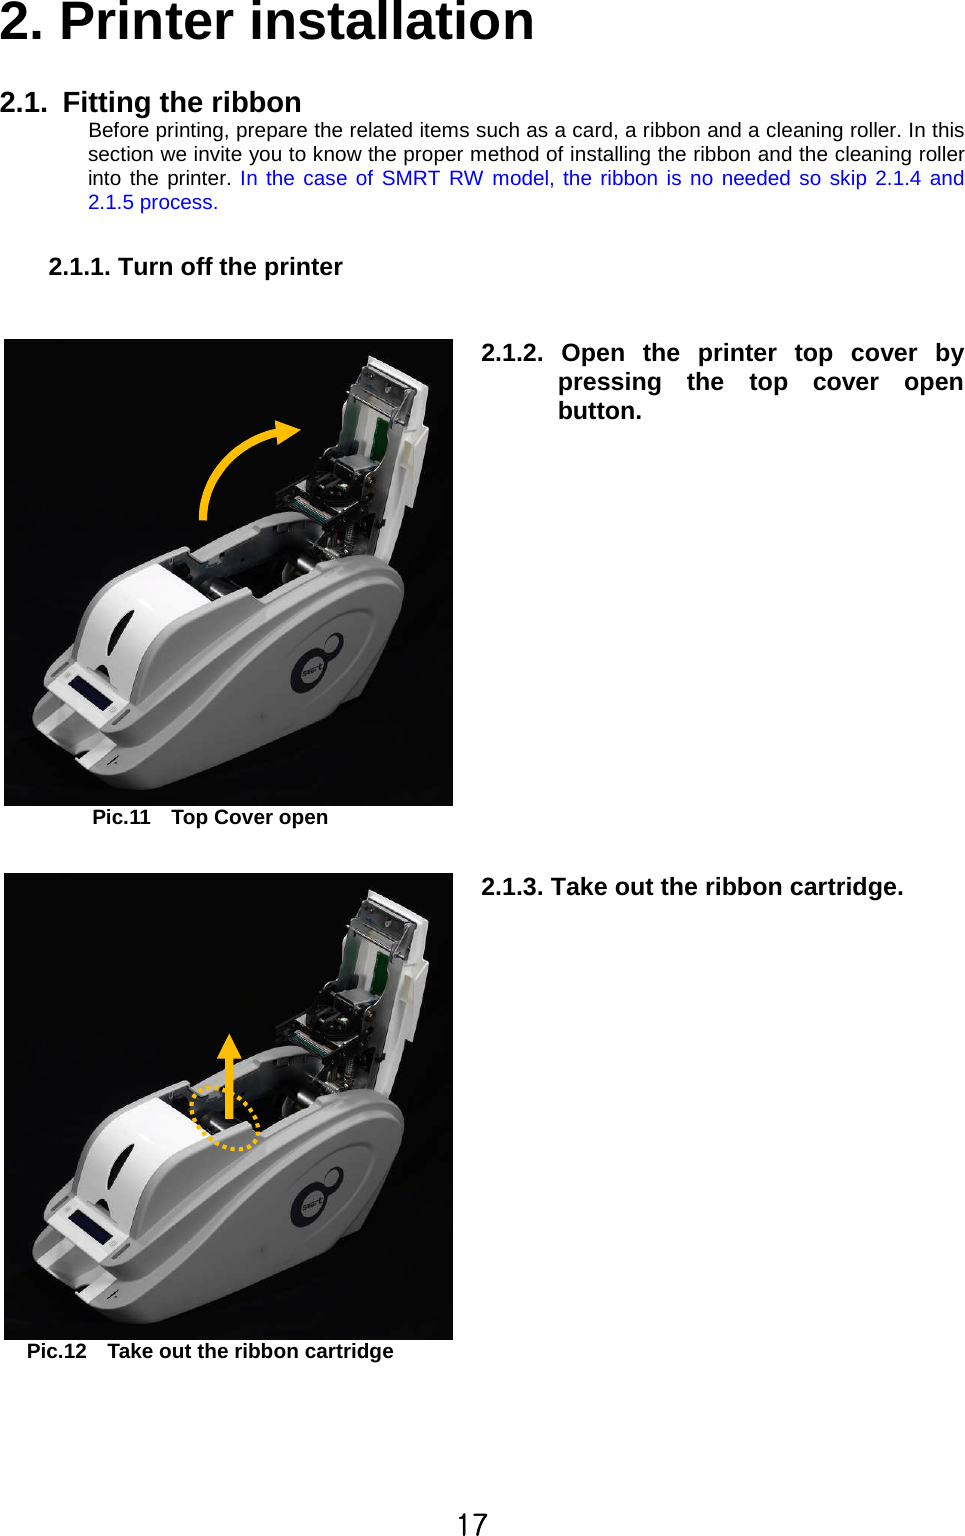
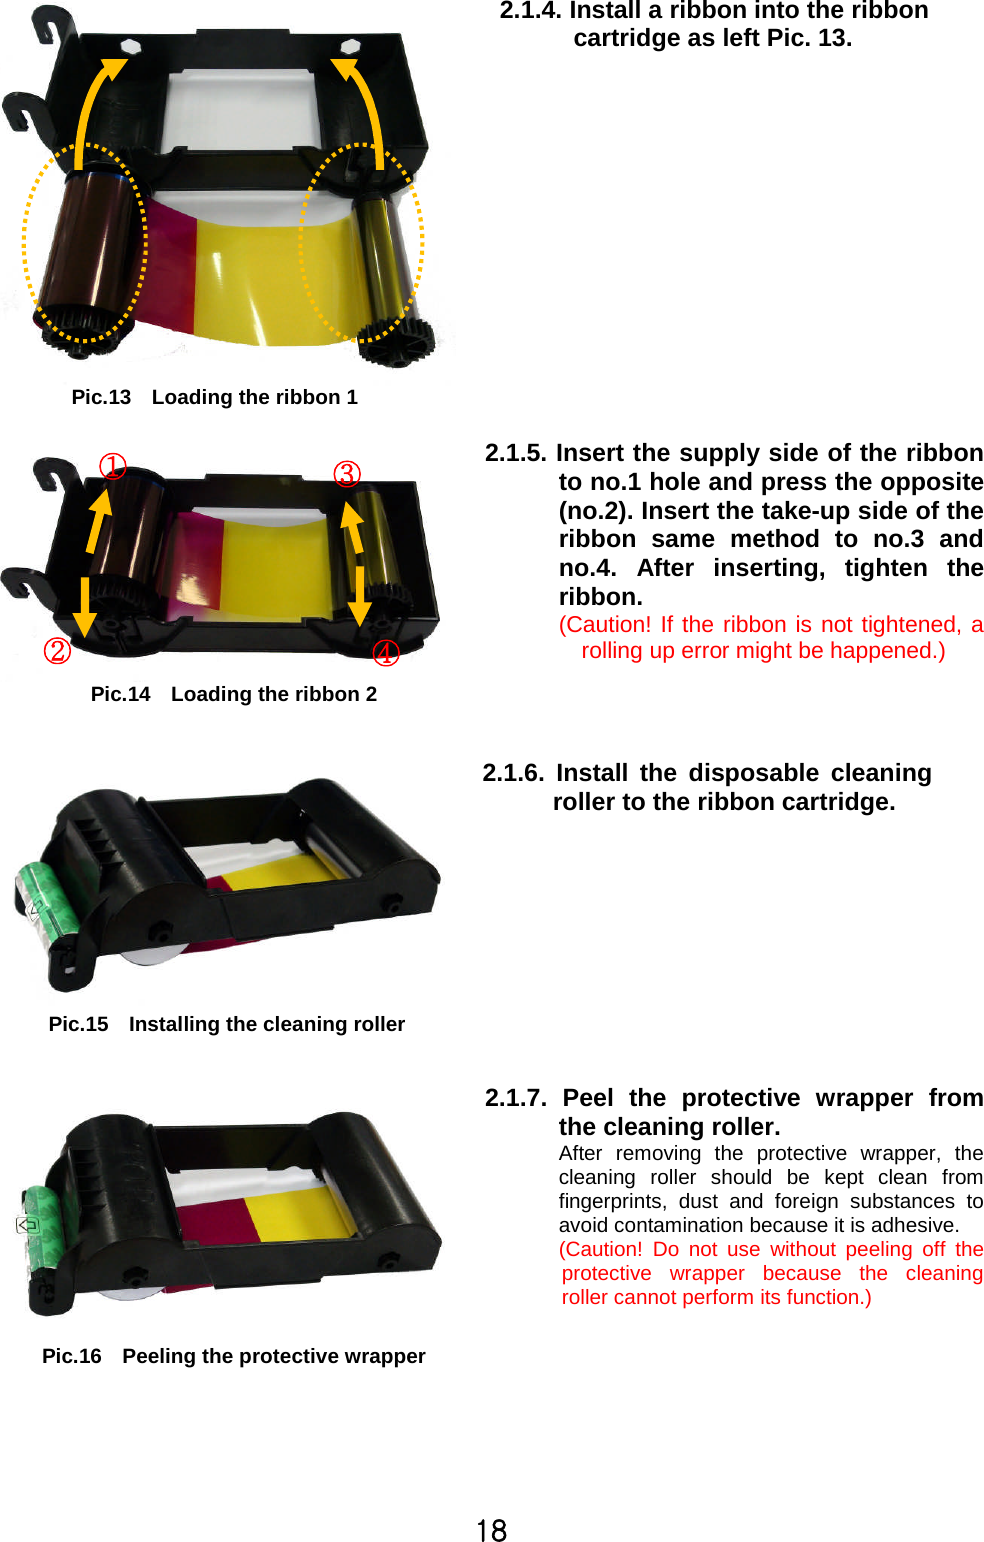
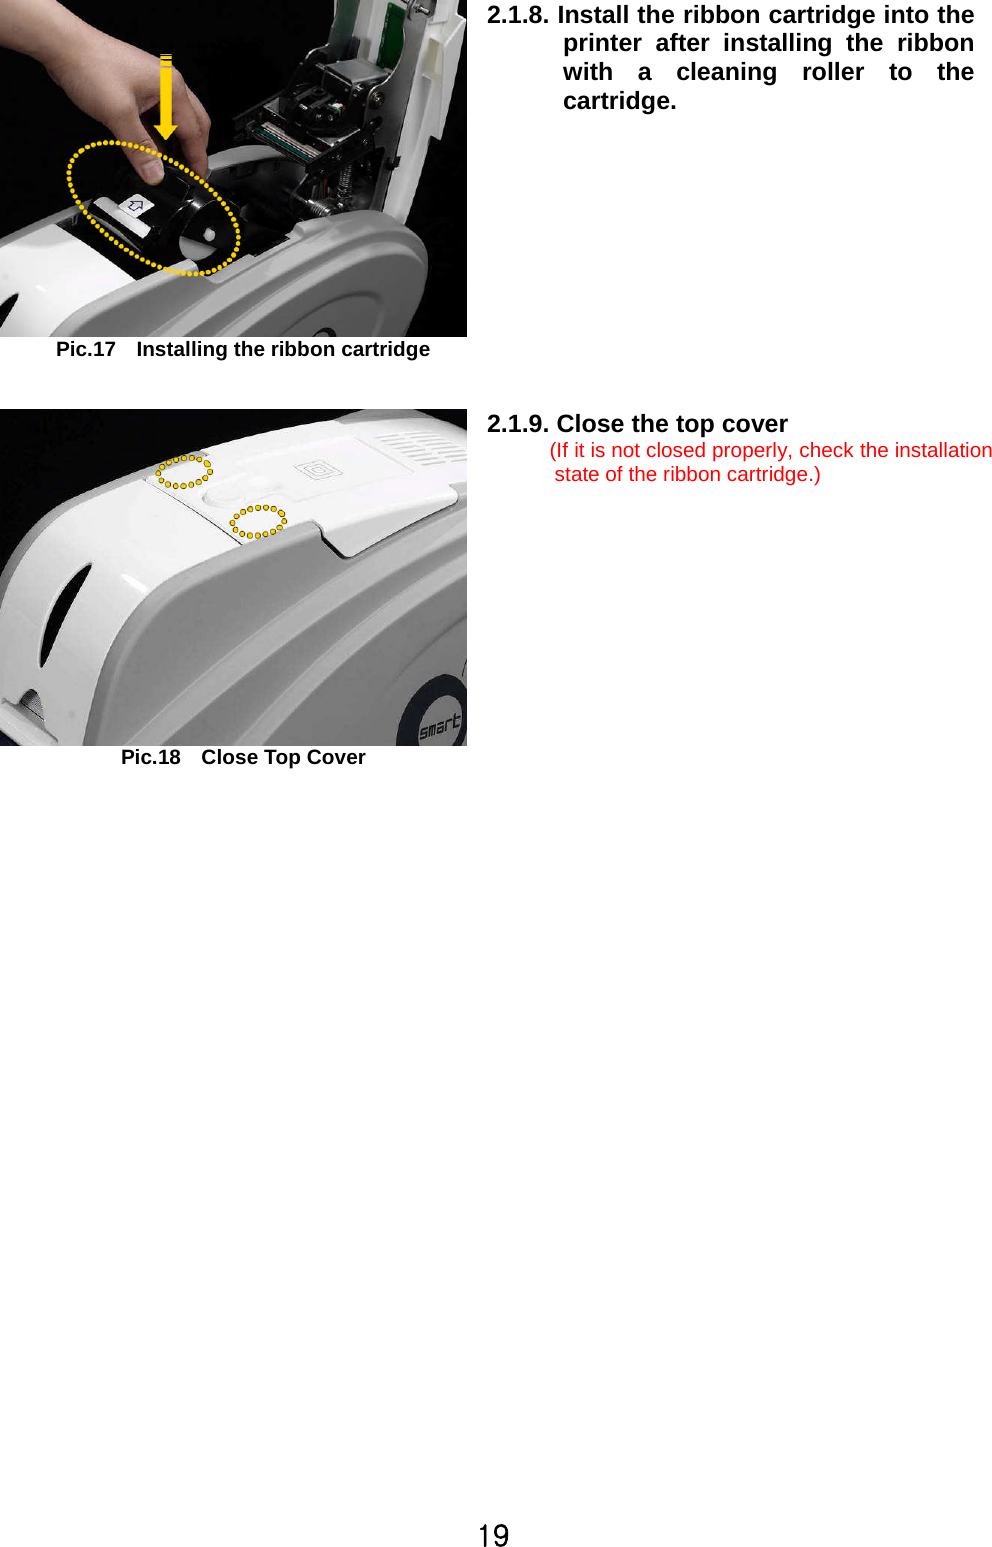
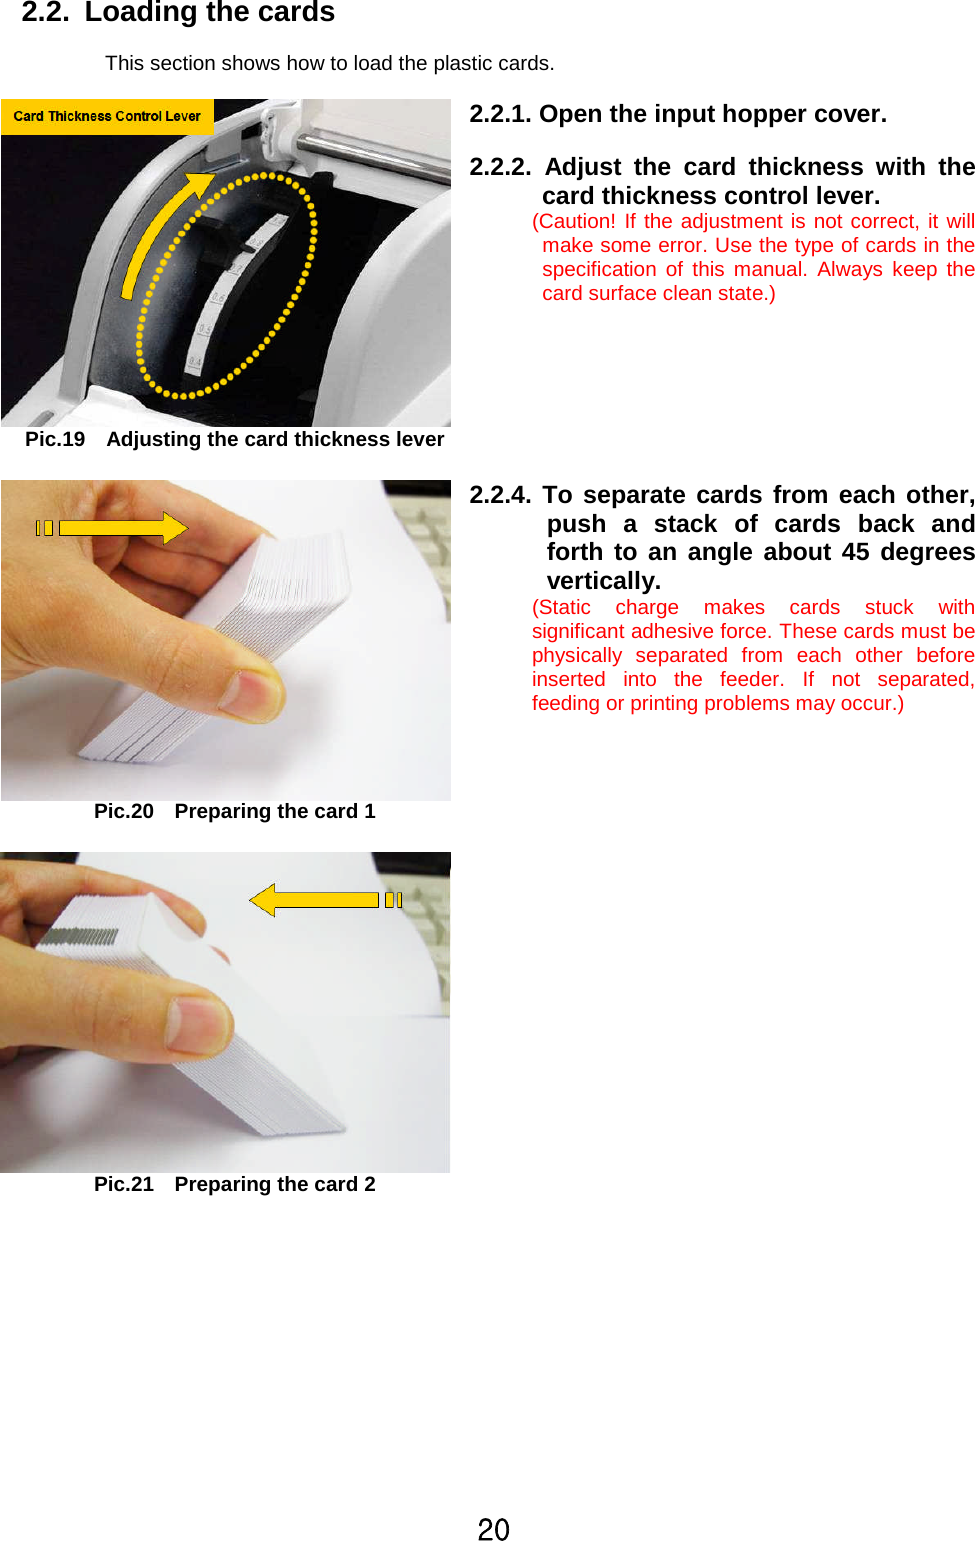
IDP SMART-30S Card Printer User Manual
IDP Corp., Ltd. Card Printer
UserManual.wiki
>
IDP
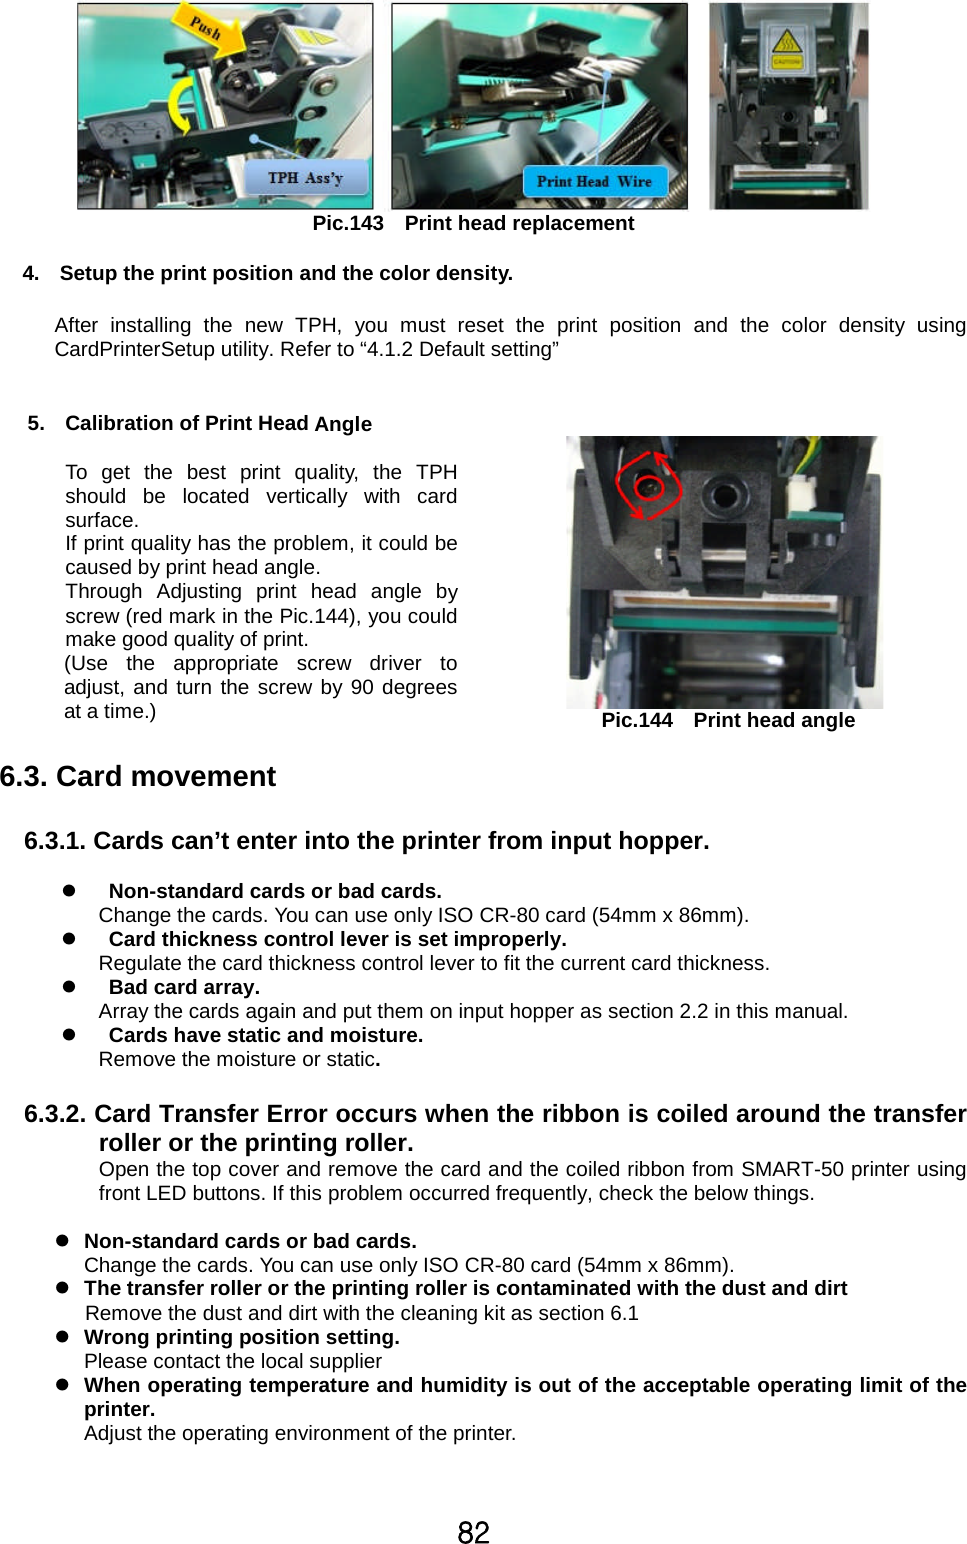
>
SMART 30S User Manual
User Manual
Navigation menu
Upload a User Manual
Namespaces
Wiki Guide
HTML
PDF
Info
Views
User Manual
Discussion / Help
Navigation
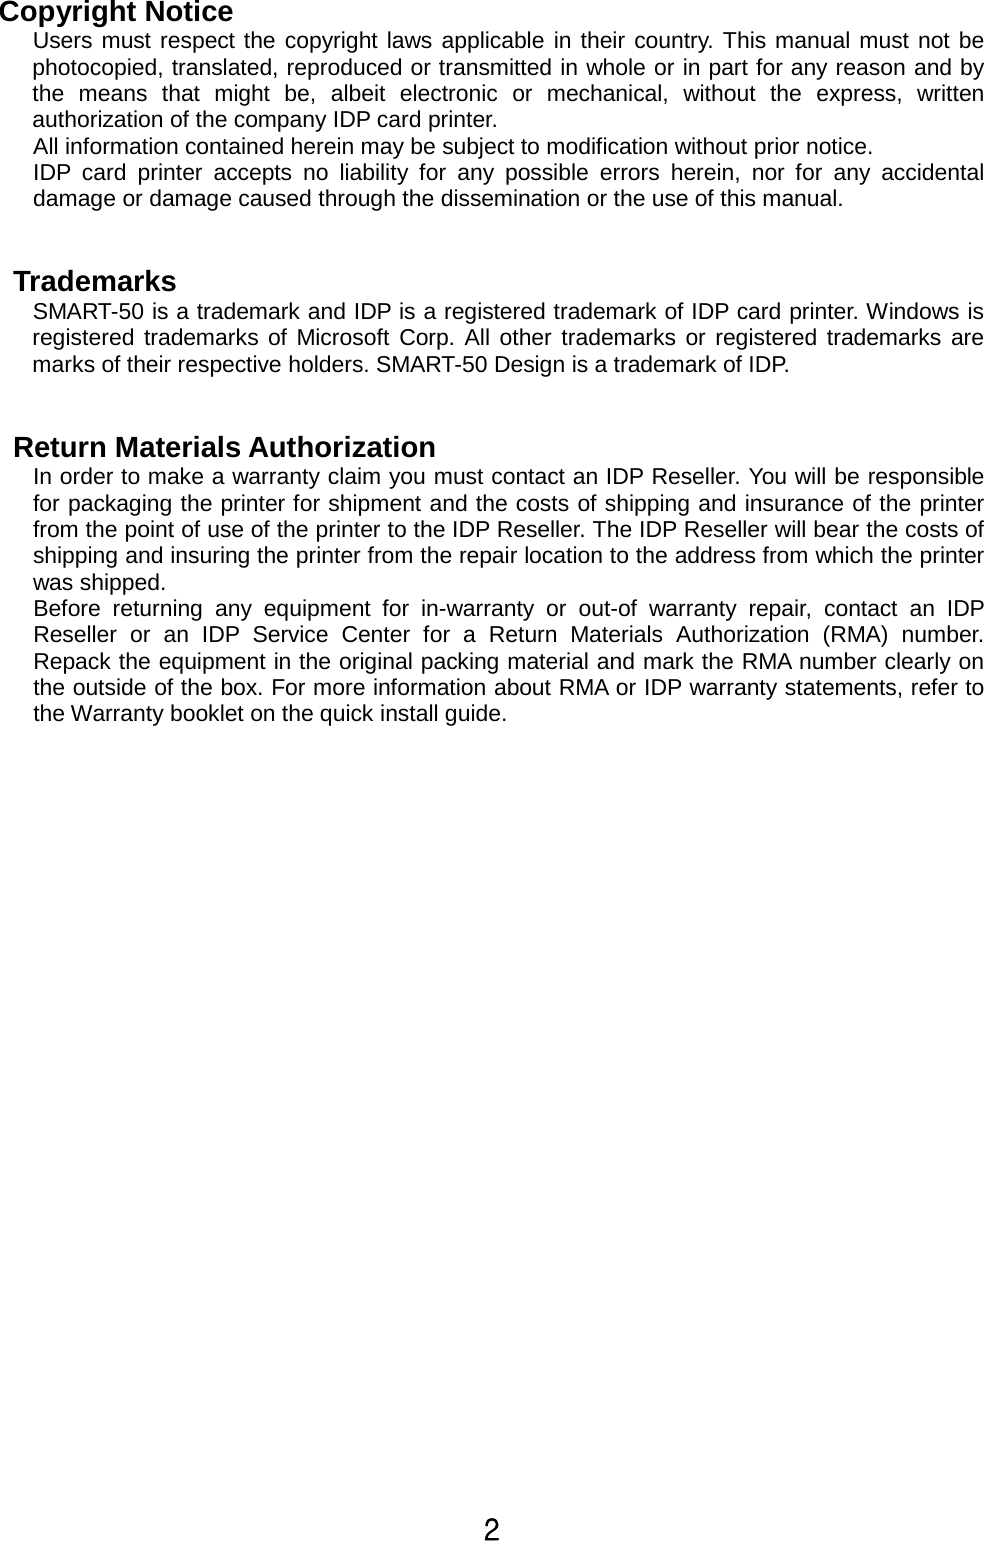
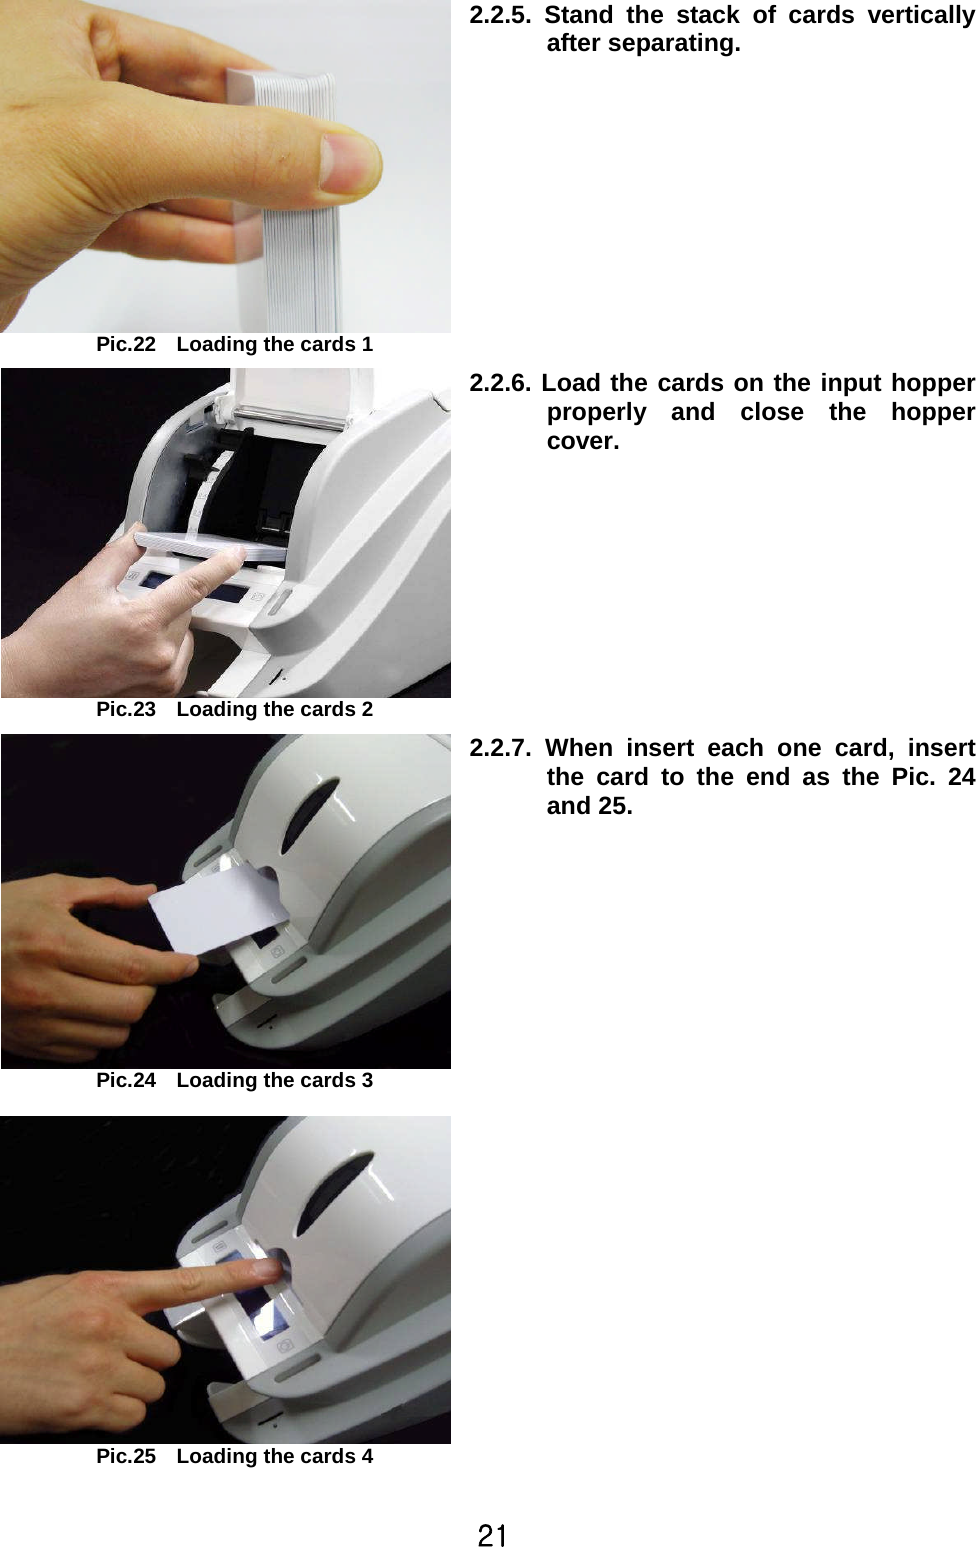
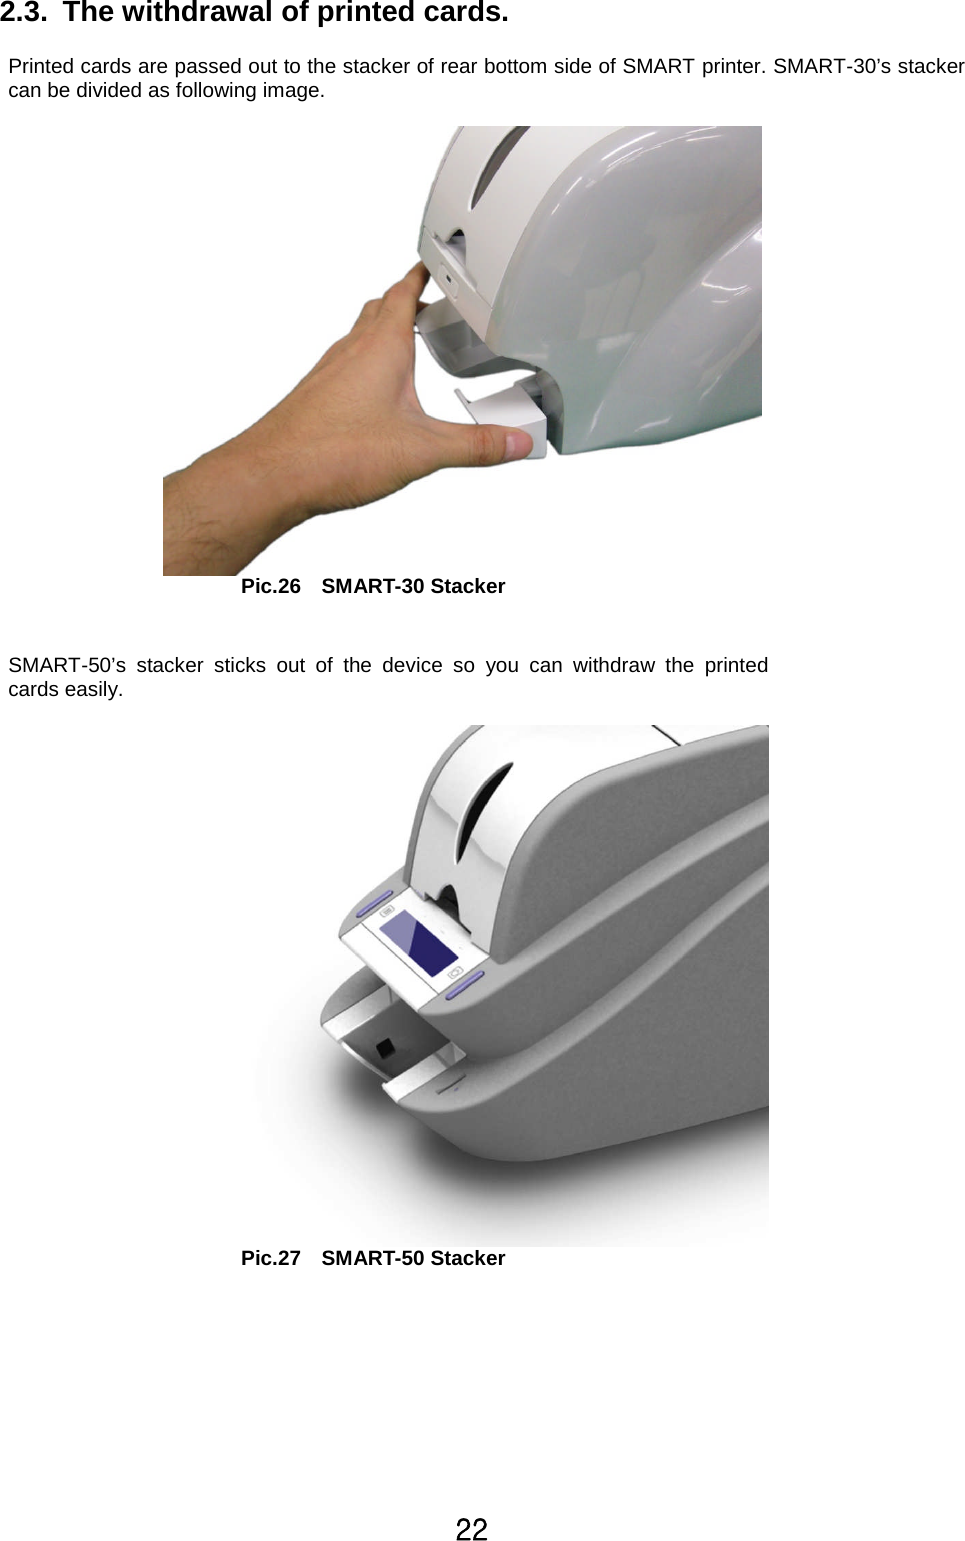
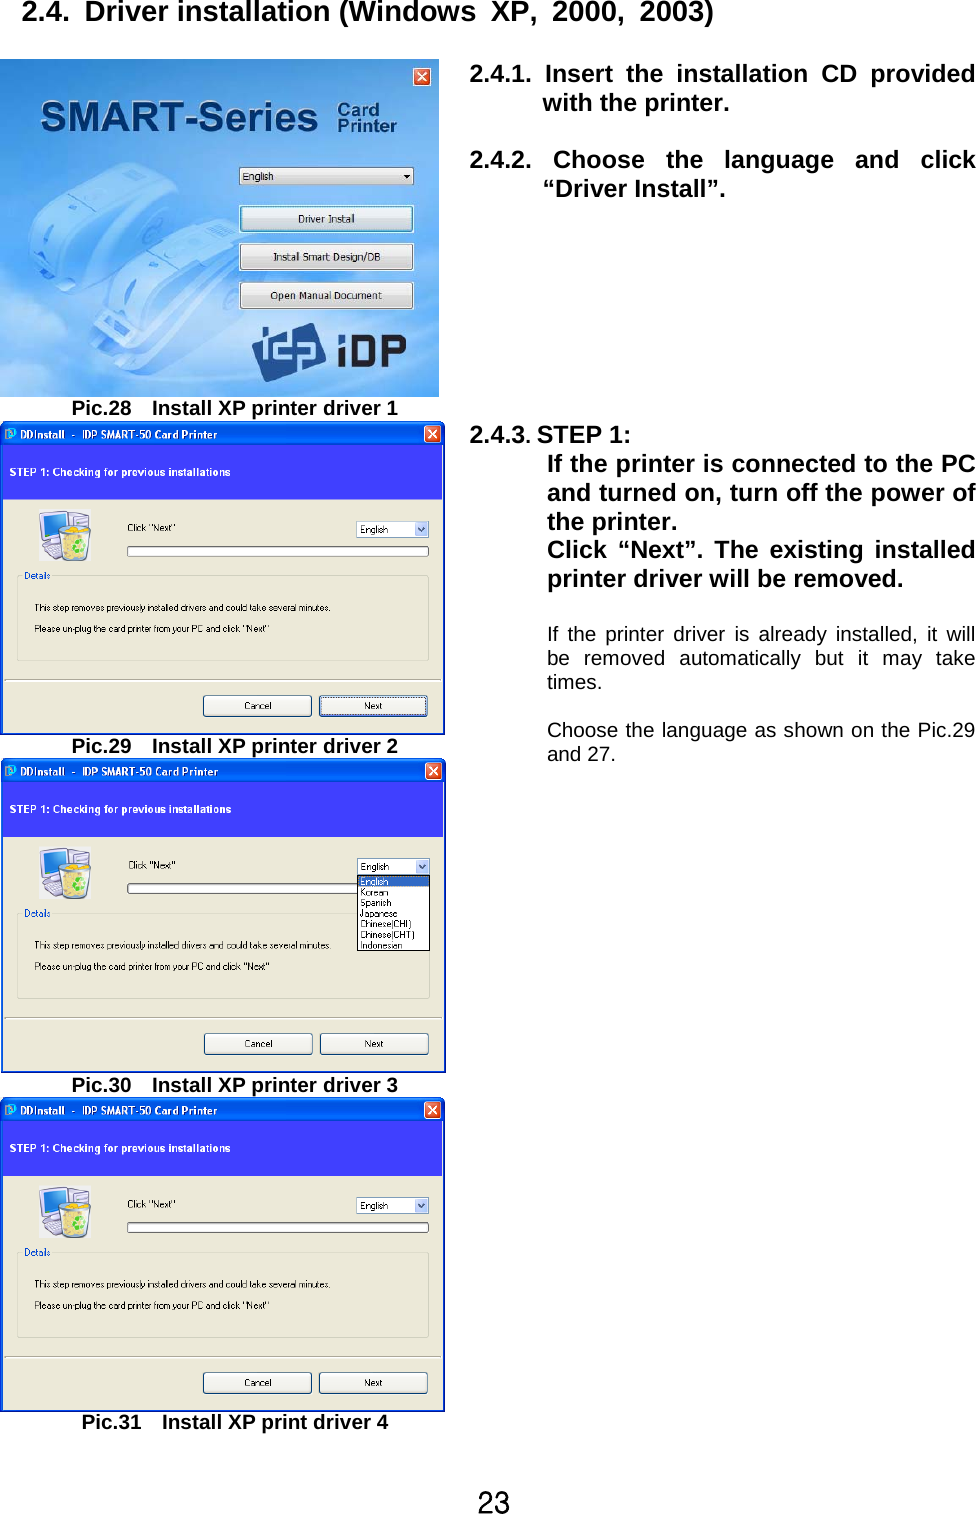
![ZTable of Contents1. IntroductionUUUUUUUUUUUUUUUUUUUUUUUUUUUUUUUUUUUUUUUUUUUUUUUUUUUUUUUUUUUUUUUUUUUUUUUU ^1.1 Printer outside features UUUUUUUUUUUUUUUUUUUUUUUUUUUUUUUUUUUUUUUUUUUUUUUUUUUUUUUUUUUUUUUUUUUUUUUUU ^1.1.1 SMART-30 outside feature. UUUUUUUUUUUUUUUUUUUUUUUUUUUUUUUUUUUUUUUUUUUUUUUUUUUUUUUUUUUUUUUUUUUU ^1.1.2 SMART-50 outside feature. UUUUUUUUUUUUUUUUUUUUUUUUUUUUUUUUUUUUUUUUUUUUUUUUUUUUUUUUUUUUUUUUUUUU _1.2 Printer inside featuresUUUUUUUUUUUUUUUUUUUUUUUUUUUUUUUUUUUUUUUUUUUUUUUUUUUUUUUUUUUUUUUUUUUUUUUUUUUUUUUU XW1.2.1 SMART-30 inside feature.UUUUUUUUUUUUUUUUUUUUUUUUUUUUUUUUUUUUUUUUUUUUUUUUUUUUUUUUUUUUUUUUUUU XW1.2.2 SMART-50 inside feature.UUUUUUUUUUUUUUUUUUUUUUUUUUUUUUUUUUUUUUUUUUUUUUUUUUUUUUUUUUUUUUUUUUU XX1.3 Ribbon cartridge featuresUUUUUUUUUUUUUUUUUUUUUUUUUUUUUUUUUUUUUUUUUUUUUUUUUUUUUUUUUUUUUUUUUUUUUUUUUUU XY1.4 LCD panel display & button operationUUUUUUUUUUUUUUUUUUUUUUUUUUUUUUUUUUUUUUUUUUUUUUUUUUUUUUUU XZ2. Printer installationUUUUUUUUUUUUUUUUUUUUUUUUUUUUUUUUUUUUUUUUUUUUUUUUUUUUUUUUUUUUUU X^2.1. Fitting the ribbonUUUUUUUUUUUUUUUUUUUUUUUUUUUUUUUUUUUUUUUUUUUUUUUUUUUUUUUUUUUUUUUUUUUUUUUUUUUUUUUUUUUUUUU X^2.2. Loading the cardsUUUUUUUUUUUUUUUUUUUUUUUUUUUUUUUUUUUUUUUUUUUUUUUUUUUUUUUUUUUUUUUUUUUUUUUUUUUUUUUUUUUUUU YW2.3. The withdrawal of printed cards. UUUUUUUUUUUUUUUUUUUUUUUUUUUUUUUUUUUUUUUUUUUUUUUUUUUUUUUUUUUUUUU YY2.4. Driver installation (Windows XP, 2000, 2003)UUUUUUUUUUUUUUUUUUUUUUUUUUUUUUUUUUUUUUUUUUUUU YZ2.5. Driver installation (Windows Vista, 7, 8)UUUUUUUUUUUUUUUUUUUUUUUUUUUUUUUUUUUUUUUUUUUUUUUUUUUU ZW2.5. Network configurationUUUUUUUUUUUUUUUUUUUUUUUUUUUUUUUUUUUUUUUUUUUUUUUUUUUUUUUUUUUUUUUUUUUUUUUUUUUUUUU Z]3. Driver configuration UUUUUUUUUUUUUUUUUUUUUUUUUUUUUUUUUUUUUUUUUUUUUUUUUUUUUUUUUUU [\3.1. Checking printer propertiesUUUUUUUUUUUUUUUUUUUUUUUUUUUUUUUUUUUUUUUUUUUUUUUUUUUUUUUUUUUUUUUUUUUUUUU [\3.2. Changing printer properties UUUUUUUUUUUUUUUUUUUUUUUUUUUUUUUUUUUUUUUUUUUUUUUUUUUUUUUUUUUUUUUUUUUUUU [\3.3. Other settingsUUUUUUUUUUUUUUUUUUUUUUUUUUUUUUUUUUUUUUUUUUUUUUUUUUUUUUUUUUUUUUUUUUUUUUUUUUUUUUUUUUUUUUUUUUUU \W4. Utilities UUUUUUUUUUUUUUUUUUUUUUUUUUUUUUUUUUUUUUUUUUUUUUUUUUUUUUUUUUUUUUUUUUUUUUUUUUUUUUU \Z4.1. Card Printer SetupUUUUUUUUUUUUUUUUUUUUUUUUUUUUUUUUUUUUUUUUUUUUUUUUUUUUUUUUUUUUUUUUUUUUUUUUUUUUUUUUUUUUU \Z4.2. Card Printer Test UUUUUUUUUUUUUUUUUUUUUUUUUUUUUUUUUUUUUUUUUUUUUUUUUUUUUUUUUUUUUUUUUUUUUUUUUUUUUUUUUUUUUUU ]Z4.3. Firmware upgrade UUUUUUUUUUUUUUUUUUUUUUUUUUUUUUUUUUUUUUUUUUUUUUUUUUUUUUUUUUUUUUUUUUUUUUUUUUUUUUUUUUUUU ]`5. Optional device driver installationUUUUUUUUUUUUUUUUUUUUUUUUUUUUUUUUUUUUU ^Y5.1. Contact smartcard readerUUUUUUUUUUUUUUUUUUUUUUUUUUUUUUUUUUUUUUUUUUUUUUUUUUUUUUUUUUUUUUUUUUUUUUUUUU ^Y6. TroubleshootingUUUUUUUUUUUUUUUUUUUUUUUUUUUUUUUUUUUUUUUUUUUUUUUUUUUUUUUUUUUUUUUUU ^^6.1. Cleaning the printerUUUUUUUUUUUUUUUUUUUUUUUUUUUUUUUUUUUUUUUUUUUUUUUUUUUUUUUUUUUUUUUUUUUUUUUUUUUUUUUUUUU ^^6.2 TPH (Thermal Print Head) replacement UUUUUUUUUUUUUUUUUUUUUUUUUUUUUUUUUUUUUUUUUUUUUUUUUUUUUU _X6.3. Card movement UUUUUUUUUUUUUUUUUUUUUUUUUUUUUUUUUUUUUUUUUUUUUUUUUUUUUUUUUUUUUUUUUUUUUUUUUUUUUUUUUUUUUUUUU _Y6.4. Printing quality UUUUUUUUUUUUUUUUUUUUUUUUUUUUUUUUUUUUUUUUUUUUUUUUUUUUUUUUUUUUUUUUUUUUUUUUUUUUUUUUUUUUUUUUUU _Z6.5. Magnetic stripe encoding UUUUUUUUUUUUUUUUUUUUUUUUUUUUUUUUUUUUUUUUUUUUUUUUUUUUUUUUUUUUUUUUUUUUUUUUUU _[6.6. General operationUUUUUUUUUUUUUUUUUUUUUUUUUUUUUUUUUUUUUUUUUUUUUUUUUUUUUUUUUUUUUUUUUUUUUUUUUUUUUUUUUUUUUU _[7. Printer specificationUUUUUUUUUUUUUUUUUUUUUUUUUUUUUUUUUUUUUUUUUUUUUUUUUUUUUUUUUUU _]](https://usermanual.wiki/IDP/SMART-30S/User-Guide-2065635-Page-3.png)
![[Table of PicturesPic.1 SMART-30 front featuresUUUUUUUUUUUUUUUUUUUUUUUUUUUUUUUUUUUUUUUUUUUUUUUUUUUUUUUUUUUUUUUUUUUUUUUUUUUUUUUUUUUUUUUUUUUU ^Pic.2 SMART-30backfeaturesUUUUUUUUUUUUUUUUUUUUUUUUUUUUUUUUUUUUUUUUUUUUUUUUUUUUUUUUUUUUUUUUUUUUUUUUUUUUUUUUUUUUUUUUUUUU ^Pic.3 SMART-50 front featuresUUUUUUUUUUUUUUUUUUUUUUUUUUUUUUUUUUUUUUUUUUUUUUUUUUUUUUUUUUUUUUUUUUUUUUUUUUUUUUUUUUUUUUUUUUUU _Pic.4 SMART-50 rear featuresUUUUUUUUUUUUUUUUUUUUUUUUUUUUUUUUUUUUUUUUUUUUUUUUUUUUUUUUUUUUUUUUUUUUUUUUUUUUUUUUUUUUUUUUUUUUU _Pic.5 SMART-50SUUUUUUUUUUUUUUUUUUUUUUUUUUUUUUUUUUUUUUUUUUUUUUUUUUUUUUUUUUUUUUUUUUUUUUUUUUUUUUUUUUUUUUUUUUUUUUUUUUUUUUUUUUUUUUUU `Pic.6 SMART-50DUUUUUUUUUUUUUUUUUUUUUUUUUUUUUUUUUUUUUUUUUUUUUUUUUUUUUUUUUUUUUUUUUUUUUUUUUUUUUUUUUUUUUUUUUUUUUUUUUUUUUUUUUUUUUUUU `Pic.7 SMART-50LUUUUUUUUUUUUUUUUUUUUUUUUUUUUUUUUUUUUUUUUUUUUUUUUUUUUUUUUUUUUUUUUUUUUUUUUUUUUUUUUUUUUUUUUUUUUUUUUUUUUUUUUUUUUUUUU `Pic.8 SMART-30 Inside featuresUUUUUUUUUUUUUUUUUUUUUUUUUUUUUUUUUUUUUUUUUUUUUUUUUUUUUUUUUUUUUUUUUUUUUUUUUUUUUUUUUUUUUUUU XWPic.9 SMART-50 Inside featuresUUUUUUUUUUUUUUUUUUUUUUUUUUUUUUUUUUUUUUUUUUUUUUUUUUUUUUUUUUUUUUUUUUUUUUUUUUUUUUUUUUUUUUUU XXPic.10 Ribbon cartridge featuresUUUUUUUUUUUUUUUUUUUUUUUUUUUUUUUUUUUUUUUUUUUUUUUUUUUUUUUUUUUUUUUUUUUUUUUUUUUUUUUUUUUUUU XYPic.11 Top Cover openUUUUUUUUUUUUUUUUUUUUUUUUUUUUUUUUUUUUUUUUUUUUUUUUUUUUUUUUUUUUUUUUUUUUUUUUUUUUUUUUUUUUUUUUUUUUUUUUUUUUUU X^Pic.12 Take out the ribbon cartridgeUUUUUUUUUUUUUUUUUUUUUUUUUUUUUUUUUUUUUUUUUUUUUUUUUUUUUUUUUUUUUUUUUUUUUUUUUUUUUUUUU X^Pic.13 Loading the ribbon 1UUUUUUUUUUUUUUUUUUUUUUUUUUUUUUUUUUUUUUUUUUUUUUUUUUUUUUUUUUUUUUUUUUUUUUUUUUUUUUUUUUUUUUUUUUUUUU X_Pic.14 Loading the ribbon 2UUUUUUUUUUUUUUUUUUUUUUUUUUUUUUUUUUUUUUUUUUUUUUUUUUUUUUUUUUUUUUUUUUUUUUUUUUUUUUUUUUUUUUUUUUUUUU X_Pic.15 Installing the cleaning roller UUUUUUUUUUUUUUUUUUUUUUUUUUUUUUUUUUUUUUUUUUUUUUUUUUUUUUUUUUUUUUUUUUUUUUUUUUUUUUUUUU X_Pic.16 Peeling the protective wrapperUUUUUUUUUUUUUUUUUUUUUUUUUUUUUUUUUUUUUUUUUUUUUUUUUUUUUUUUUUUUUUUUUUUUUUUUUUUUUU X_Pic.17 Installing the ribbon cartridgeUUUUUUUUUUUUUUUUUUUUUUUUUUUUUUUUUUUUUUUUUUUUUUUUUUUUUUUUUUUUUUUUUUUUUUUUUUUUUUUU X`Pic.18 Close Top Cover UUUUUUUUUUUUUUUUUUUUUUUUUUUUUUUUUUUUUUUUUUUUUUUUUUUUUUUUUUUUUUUUUUUUUUUUUUUUUUUUUUUUUUUUUUUUUUUUUUUU X`Pic.19 Adjusting the card thickness lever UUUUUUUUUUUUUUUUUUUUUUUUUUUUUUUUUUUUUUUUUUUUUUUUUUUUUUUUUUUUUUUUUUUUUUUU YWPic.20 Preparing the card 1 UUUUUUUUUUUUUUUUUUUUUUUUUUUUUUUUUUUUUUUUUUUUUUUUUUUUUUUUUUUUUUUUUUUUUUUUUUUUUUUUUUUUUUUUUUUUUU YWPic.21 Preparing the card 2 UUUUUUUUUUUUUUUUUUUUUUUUUUUUUUUUUUUUUUUUUUUUUUUUUUUUUUUUUUUUUUUUUUUUUUUUUUUUUUUUUUUUUUUUUUUUUU YWPic.22 Loading the cards 1 UUUUUUUUUUUUUUUUUUUUUUUUUUUUUUUUUUUUUUUUUUUUUUUUUUUUUUUUUUUUUUUUUUUUUUUUUUUUUUUUUUUUUUUUUUUUUUU YXPic.23 Loading the cards 2 UUUUUUUUUUUUUUUUUUUUUUUUUUUUUUUUUUUUUUUUUUUUUUUUUUUUUUUUUUUUUUUUUUUUUUUUUUUUUUUUUUUUUUUUUUUUUUU YXPic.24 Loading the cards 3 UUUUUUUUUUUUUUUUUUUUUUUUUUUUUUUUUUUUUUUUUUUUUUUUUUUUUUUUUUUUUUUUUUUUUUUUUUUUUUUUUUUUUUUUUUUUUUU YXPic.25 Loading the cards 4 UUUUUUUUUUUUUUUUUUUUUUUUUUUUUUUUUUUUUUUUUUUUUUUUUUUUUUUUUUUUUUUUUUUUUUUUUUUUUUUUUUUUUUUUUUUUUUU YXPic.25 SMART-30 Stacker UUUUUUUUUUUUUUUUUUUUUUUUUUUUUUUUUUUUUUUUUUUUUUUUUUUUUUUUUUUUUUUUUUUUUUUUUUUUUUUUUUUUUUUUUUUUUUUUU YYPic.25 SMART-50 Stacker UUUUUUUUUUUUUUUUUUUUUUUUUUUUUUUUUUUUUUUUUUUUUUUUUUUUUUUUUUUUUUUUUUUUUUUUUUUUUUUUUUUUUUUUUUUUUUUUU YYPic.26 Install XP printer driver 1 UUUUUUUUUUUUUUUUUUUUUUUUUUUUUUUUUUUUUUUUUUUUUUUUUUUUUUUUUUUUUUUUUUUUUUUUUUUUUUUUUUUUUUU YZPic.27 Install XP printer driver 2 UUUUUUUUUUUUUUUUUUUUUUUUUUUUUUUUUUUUUUUUUUUUUUUUUUUUUUUUUUUUUUUUUUUUUUUUUUUUUUUUUUUUUUU YZPic.28 Install XP printer driver 3 UUUUUUUUUUUUUUUUUUUUUUUUUUUUUUUUUUUUUUUUUUUUUUUUUUUUUUUUUUUUUUUUUUUUUUUUUUUUUUUUUUUUUUU YZPic.29 Install XP print driver 4 UUUUUUUUUUUUUUUUUUUUUUUUUUUUUUUUUUUUUUUUUUUUUUUUUUUUUUUUUUUUUUUUUUUUUUUUUUUUUUUUUUUUUUUUUU YZPic.30 Install XP print driver 5 UUUUUUUUUUUUUUUUUUUUUUUUUUUUUUUUUUUUUUUUUUUUUUUUUUUUUUUUUUUUUUUUUUUUUUUUUUUUUUUUUUUUUUUUUU Y[Pic.31 Install XP print driver 6 UUUUUUUUUUUUUUUUUUUUUUUUUUUUUUUUUUUUUUUUUUUUUUUUUUUUUUUUUUUUUUUUUUUUUUUUUUUUUUUUUUUUUUUUUU Y[Pic.32 Install XP printer driver 7 UUUUUUUUUUUUUUUUUUUUUUUUUUUUUUUUUUUUUUUUUUUUUUUUUUUUUUUUUUUUUUUUUUUUUUUUUUUUUUUUUUUUUUU Y[Pic.33 Install XP printer driver 8 UUUUUUUUUUUUUUUUUUUUUUUUUUUUUUUUUUUUUUUUUUUUUUUUUUUUUUUUUUUUUUUUUUUUUUUUUUUUUUUUUUUUUUU Y[Pic.34 Install XP printer driver 9 UUUUUUUUUUUUUUUUUUUUUUUUUUUUUUUUUUUUUUUUUUUUUUUUUUUUUUUUUUUUUUUUUUUUUUUUUUUUUUUUUUUUUUU Y\Pic.35 Install XP printer driver 10 UUUUUUUUUUUUUUUUUUUUUUUUUUUUUUUUUUUUUUUUUUUUUUUUUUUUUUUUUUUUUUUUUUUUUUUUUUUUUUUUUUUUU Y\Pic.36 Install XP printer driver 11 UUUUUUUUUUUUUUUUUUUUUUUUUUUUUUUUUUUUUUUUUUUUUUUUUUUUUUUUUUUUUUUUUUUUUUUUUUUUUUUUUUUUU Y\Pic.37 Install XP printer driver 12 UUUUUUUUUUUUUUUUUUUUUUUUUUUUUUUUUUUUUUUUUUUUUUUUUUUUUUUUUUUUUUUUUUUUUUUUUUUUUUUUUUUUU Y]Pic.38 Install XP printer driver 13 UUUUUUUUUUUUUUUUUUUUUUUUUUUUUUUUUUUUUUUUUUUUUUUUUUUUUUUUUUUUUUUUUUUUUUUUUUUUUUUUUUUUU Y]Pic.39 Install XP printer driver 14 UUUUUUUUUUUUUUUUUUUUUUUUUUUUUUUUUUUUUUUUUUUUUUUUUUUUUUUUUUUUUUUUUUUUUUUUUUUUUUUUUUUUU Y]Pic.40 Install XP printer driver 15 UUUUUUUUUUUUUUUUUUUUUUUUUUUUUUUUUUUUUUUUUUUUUUUUUUUUUUUUUUUUUUUUUUUUUUUUUUUUUUUUUUUUU Y]Pic.41 Install XP printer driver 16 UUUUUUUUUUUUUUUUUUUUUUUUUUUUUUUUUUUUUUUUUUUUUUUUUUUUUUUUUUUUUUUUUUUUUUUUUUUUUUUUUUUUU Y^Pic.42 Install XP printer driver 17 UUUUUUUUUUUUUUUUUUUUUUUUUUUUUUUUUUUUUUUUUUUUUUUUUUUUUUUUUUUUUUUUUUUUUUUUUUUUUUUUUUUUU Y^Pic.43 Install XP printer driver 18 UUUUUUUUUUUUUUUUUUUUUUUUUUUUUUUUUUUUUUUUUUUUUUUUUUUUUUUUUUUUUUUUUUUUUUUUUUUUUUUUUUUUU Y^Pic.44 Install XP printer driver 19 UUUUUUUUUUUUUUUUUUUUUUUUUUUUUUUUUUUUUUUUUUUUUUUUUUUUUUUUUUUUUUUUUUUUUUUUUUUUUUUUUUUUU Y_Pic.45 Install XP printer driver 20 UUUUUUUUUUUUUUUUUUUUUUUUUUUUUUUUUUUUUUUUUUUUUUUUUUUUUUUUUUUUUUUUUUUUUUUUUUUUUUUUUUUUU Y_Pic.46 Install XP printer driver 21 UUUUUUUUUUUUUUUUUUUUUUUUUUUUUUUUUUUUUUUUUUUUUUUUUUUUUUUUUUUUUUUUUUUUUUUUUUUUUUUUUUUUU Y_Pic.47 Install XP printer driver 22 UUUUUUUUUUUUUUUUUUUUUUUUUUUUUUUUUUUUUUUUUUUUUUUUUUUUUUUUUUUUUUUUUUUUUUUUUUUUUUUUUUUUU Y_Pic.48 Install XP printer driver 23 UUUUUUUUUUUUUUUUUUUUUUUUUUUUUUUUUUUUUUUUUUUUUUUUUUUUUUUUUUUUUUUUUUUUUUUUUUUUUUUUUUUUU Y`](https://usermanual.wiki/IDP/SMART-30S/User-Guide-2065635-Page-4.png)
![\Pic.49 Install XP printer driver 24 UUUUUUUUUUUUUUUUUUUUUUUUUUUUUUUUUUUUUUUUUUUUUUUUUUUUUUUUUUUUUUUUUUUUUUUUUUUUUUUUUUUUU Y`Pic.50 Install XP printer driver 25 UUUUUUUUUUUUUUUUUUUUUUUUUUUUUUUUUUUUUUUUUUUUUUUUUUUUUUUUUUUUUUUUUUUUUUUUUUUUUUUUUUUUU Y`Pic.51 Install Win7 driver 1 UUUUUUUUUUUUUUUUUUUUUUUUUUUUUUUUUUUUUUUUUUUUUUUUUUUUUUUUUUUUUUUUUUUUUUUUUUUUUUUUUUUUUUUUUUUUUUU ZWPic.52 Install Win7 driver 2 UUUUUUUUUUUUUUUUUUUUUUUUUUUUUUUUUUUUUUUUUUUUUUUUUUUUUUUUUUUUUUUUUUUUUUUUUUUUUUUUUUUUUUUUUUUUUUU ZWPic.53 Install Win7 driver 3 UUUUUUUUUUUUUUUUUUUUUUUUUUUUUUUUUUUUUUUUUUUUUUUUUUUUUUUUUUUUUUUUUUUUUUUUUUUUUUUUUUUUUUUUUUUUUUU ZWPic.54 Install Win7 driver 4 UUUUUUUUUUUUUUUUUUUUUUUUUUUUUUUUUUUUUUUUUUUUUUUUUUUUUUUUUUUUUUUUUUUUUUUUUUUUUUUUUUUUUUUUUUUUUUU ZWPic.55 Install Win7 driver 5 UUUUUUUUUUUUUUUUUUUUUUUUUUUUUUUUUUUUUUUUUUUUUUUUUUUUUUUUUUUUUUUUUUUUUUUUUUUUUUUUUUUUUUUUUUUUUUU ZXPic.56 Install Win7 driver 6 UUUUUUUUUUUUUUUUUUUUUUUUUUUUUUUUUUUUUUUUUUUUUUUUUUUUUUUUUUUUUUUUUUUUUUUUUUUUUUUUUUUUUUUUUUUUUUU ZXPic.57 Install Win7 driver 7 UUUUUUUUUUUUUUUUUUUUUUUUUUUUUUUUUUUUUUUUUUUUUUUUUUUUUUUUUUUUUUUUUUUUUUUUUUUUUUUUUUUUUUUUUUUUUUU ZXPic.58 Install Win7 driver 8 UUUUUUUUUUUUUUUUUUUUUUUUUUUUUUUUUUUUUUUUUUUUUUUUUUUUUUUUUUUUUUUUUUUUUUUUUUUUUUUUUUUUUUUUUUUUUUU ZXPic.59 Install Win7 driver 9 UUUUUUUUUUUUUUUUUUUUUUUUUUUUUUUUUUUUUUUUUUUUUUUUUUUUUUUUUUUUUUUUUUUUUUUUUUUUUUUUUUUUUUUUUUUUUUU ZYPic.60 Install Win7 driver 10 UUUUUUUUUUUUUUUUUUUUUUUUUUUUUUUUUUUUUUUUUUUUUUUUUUUUUUUUUUUUUUUUUUUUUUUUUUUUUUUUUUUUUUUUUUUUU ZYPic.61 Install Win7 driver 11 UUUUUUUUUUUUUUUUUUUUUUUUUUUUUUUUUUUUUUUUUUUUUUUUUUUUUUUUUUUUUUUUUUUUUUUUUUUUUUUUUUUUUUUUUUUUU ZYPic.62 Install Win7 driver 12 UUUUUUUUUUUUUUUUUUUUUUUUUUUUUUUUUUUUUUUUUUUUUUUUUUUUUUUUUUUUUUUUUUUUUUUUUUUUUUUUUUUUUUUUUUUUU ZYPic.63 Install Win7 driver 13 UUUUUUUUUUUUUUUUUUUUUUUUUUUUUUUUUUUUUUUUUUUUUUUUUUUUUUUUUUUUUUUUUUUUUUUUUUUUUUUUUUUUUUUUUUUUU ZZPic.64 Install Win7 driver 14 UUUUUUUUUUUUUUUUUUUUUUUUUUUUUUUUUUUUUUUUUUUUUUUUUUUUUUUUUUUUUUUUUUUUUUUUUUUUUUUUUUUUUUUUUUUUU ZZPic.65 Install Win7 driver 15 UUUUUUUUUUUUUUUUUUUUUUUUUUUUUUUUUUUUUUUUUUUUUUUUUUUUUUUUUUUUUUUUUUUUUUUUUUUUUUUUUUUUUUUUUUUUU ZZPic.66 Install Win7 driver 16 UUUUUUUUUUUUUUUUUUUUUUUUUUUUUUUUUUUUUUUUUUUUUUUUUUUUUUUUUUUUUUUUUUUUUUUUUUUUUUUUUUUUUUUUUUUUU Z[Pic.67 Install Win7 driver 17 UUUUUUUUUUUUUUUUUUUUUUUUUUUUUUUUUUUUUUUUUUUUUUUUUUUUUUUUUUUUUUUUUUUUUUUUUUUUUUUUUUUUUUUUUUUUU Z[Pic.68 Install Win7 driver 18 UUUUUUUUUUUUUUUUUUUUUUUUUUUUUUUUUUUUUUUUUUUUUUUUUUUUUUUUUUUUUUUUUUUUUUUUUUUUUUUUUUUUUUUUUUUUU Z[Pic.69 Install Win7 driver 19 UUUUUUUUUUUUUUUUUUUUUUUUUUUUUUUUUUUUUUUUUUUUUUUUUUUUUUUUUUUUUUUUUUUUUUUUUUUUUUUUUUUUUUUUUUUUU Z[Pic.70 Install Win7 driver 20 UUUUUUUUUUUUUUUUUUUUUUUUUUUUUUUUUUUUUUUUUUUUUUUUUUUUUUUUUUUUUUUUUUUUUUUUUUUUUUUUUUUUUUUUUUUUU Z\Pic.71 Install Win7 driver 21 UUUUUUUUUUUUUUUUUUUUUUUUUUUUUUUUUUUUUUUUUUUUUUUUUUUUUUUUUUUUUUUUUUUUUUUUUUUUUUUUUUUUUUUUUUUUU Z\Pic.72 Install Win7 driver 22 UUUUUUUUUUUUUUUUUUUUUUUUUUUUUUUUUUUUUUUUUUUUUUUUUUUUUUUUUUUUUUUUUUUUUUUUUUUUUUUUUUUUUUUUUUUUU Z\Pic.73 Install Win7 driver 23 UUUUUUUUUUUUUUUUUUUUUUUUUUUUUUUUUUUUUUUUUUUUUUUUUUUUUUUUUUUUUUUUUUUUUUUUUUUUUUUUUUUUUUUUUUUUU Z\Pic.74 Rear view of SMART-50 printer 1 UUUUUUUUUUUUUUUUUUUUUUUUUUUUUUUUUUUUUUUUUUUUUUUUUUUUUUUUUUUUUUUUUUUUUUUUUUU Z]Pic.75 Rear view of SMART-50 printer 2 UUUUUUUUUUUUUUUUUUUUUUUUUUUUUUUUUUUUUUUUUUUUUUUUUUUUUUUUUUUUUUUUUUUUUUUUUUU Z]Pic.76 Running the NetAdmin UUUUUUUUUUUUUUUUUUUUUUUUUUUUUUUUUUUUUUUUUUUUUUUUUUUUUUUUUUUUUUUUUUUUUUUUUUUUUUUUUUUUUUUUUU Z^Pic.77 Network printer is not foundUUUUUUUUUUUUUUUUUUUUUUUUUUUUUUUUUUUUUUUUUUUUUUUUUUUUUUUUUUUUUUUUUUUUUUUUUUUUUUUUUU Z^Pic.78 Connecting to USB portUUUUUUUUUUUUUUUUUUUUUUUUUUUUUUUUUUUUUUUUUUUUUUUUUUUUUUUUUUUUUUUUUUUUUUUUUUUUUUUUUUUUUUUUU Z_Pic.79 NetAdmin Log-inUUUUUUUUUUUUUUUUUUUUUUUUUUUUUUUUUUUUUUUUUUUUUUUUUUUUUUUUUUUUUUUUUUUUUUUUUUUUUUUUUUUUUUUUUUUUUUUUUUUU Z_Pic.80 Dynamic IP configuration UUUUUUUUUUUUUUUUUUUUUUUUUUUUUUUUUUUUUUUUUUUUUUUUUUUUUUUUUUUUUUUUUUUUUUUUUUUUUUUUUUUUUU Z`Pic.81 Static IP configuration UUUUUUUUUUUUUUUUUUUUUUUUUUUUUUUUUUUUUUUUUUUUUUUUUUUUUUUUUUUUUUUUUUUUUUUUUUUUUUUUUUUUUUUUUUU Z`Pic.82 Network service configurationUUUUUUUUUUUUUUUUUUUUUUUUUUUUUUUUUUUUUUUUUUUUUUUUUUUUUUUUUUUUUUUUUUUUUUUUUUUUUUU [WPic.83 OCP configuration UUUUUUUUUUUUUUUUUUUUUUUUUUUUUUUUUUUUUUUUUUUUUUUUUUUUUUUUUUUUUUUUUUUUUUUUUUUUUUUUUUUUUUUUUUUUUUUUU [WPic.84 Network user configuration UUUUUUUUUUUUUUUUUUUUUUUUUUUUUUUUUUUUUUUUUUUUUUUUUUUUUUUUUUUUUUUUUUUUUUUUUUUUUUUUUUU [XPic.85 USB port state UUUUUUUUUUUUUUUUUUUUUUUUUUUUUUUUUUUUUUUUUUUUUUUUUUUUUUUUUUUUUUUUUUUUUUUUUUUUUUUUUUUUUUUUUUUUUUUUUUUUUUU [XPic.86 Rebooting the network moduleUUUUUUUUUUUUUUUUUUUUUUUUUUUUUUUUUUUUUUUUUUUUUUUUUUUUUUUUUUUUUUUUUUUUUUUUUUUUUU [YPic.87 Reset to defaultUUUUUUUUUUUUUUUUUUUUUUUUUUUUUUUUUUUUUUUUUUUUUUUUUUUUUUUUUUUUUUUUUUUUUUUUUUUUUUUUUUUUUUUUUUUUUUUUUUUUUU [YPic.88 Upgrading the firmware 1 UUUUUUUUUUUUUUUUUUUUUUUUUUUUUUUUUUUUUUUUUUUUUUUUUUUUUUUUUUUUUUUUUUUUUUUUUUUUUUUUUUUUUU [ZPic.89 Upgrading the firmware 2 UUUUUUUUUUUUUUUUUUUUUUUUUUUUUUUUUUUUUUUUUUUUUUUUUUUUUUUUUUUUUUUUUUUUUUUUUUUUUUUUUUUUUU [ZPic.90 Upgrading the firmware 3 UUUUUUUUUUUUUUUUUUUUUUUUUUUUUUUUUUUUUUUUUUUUUUUUUUUUUUUUUUUUUUUUUUUUUUUUUUUUUUUUUUUUUU [[Pic.91 Printer properties 1UUUUUUUUUUUUUUUUUUUUUUUUUUUUUUUUUUUUUUUUUUUUUUUUUUUUUUUUUUUUUUUUUUUUUUUUUUUUUUUUUUUUUUUUUUUUUUUU [\Pic.92 Printer properties 2UUUUUUUUUUUUUUUUUUUUUUUUUUUUUUUUUUUUUUUUUUUUUUUUUUUUUUUUUUUUUUUUUUUUUUUUUUUUUUUUUUUUUUUUUUUUUUUU [\Pic.93 LayoutUUUUUUUUUUUUUUUUUUUUUUUUUUUUUUUUUUUUUUUUUUUUUUUUUUUUUUUUUUUUUUUUUUUUUUUUUUUUUUUUUUUUUUUUUUUUUUUUUUUUUUUUUUUUUUUUUUUU []Pic.94 Advanced Setup UUUUUUUUUUUUUUUUUUUUUUUUUUUUUUUUUUUUUUUUUUUUUUUUUUUUUUUUUUUUUUUUUUUUUUUUUUUUUUUUUUUUUUUUUUUUUUUUUUUU [^Pic.95 Paper / Ribbon / PrintingUUUUUUUUUUUUUUUUUUUUUUUUUUUUUUUUUUUUUUUUUUUUUUUUUUUUUUUUUUUUUUUUUUUUUUUUUUUUUUUUUUUUUUUU [_Pic.96 Side / Media UUUUUUUUUUUUUUUUUUUUUUUUUUUUUUUUUUUUUUUUUUUUUUUUUUUUUUUUUUUUUUUUUUUUUUUUUUUUUUUUUUUUUUUUUUUUUUUUUUUUUUUUUUU [`Pic.97 Laminator UUUUUUUUUUUUUUUUUUUUUUUUUUUUUUUUUUUUUUUUUUUUUUUUUUUUUUUUUUUUUUUUUUUUUUUUUUUUUUUUUUUUUUUUUUUUUUUUUUUUUUUUUUUUUU [`Pic.98 Printer sharingUUUUUUUUUUUUUUUUUUUUUUUUUUUUUUUUUUUUUUUUUUUUUUUUUUUUUUUUUUUUUUUUUUUUUUUUUUUUUUUUUUUUUUUUUUUUUUUUUUUUUUU \WPic.99 Ports UUUUUUUUUUUUUUUUUUUUUUUUUUUUUUUUUUUUUUUUUUUUUUUUUUUUUUUUUUUUUUUUUUUUUUUUUUUUUUUUUUUUUUUUUUUUUUUUUUUUUUUUUUUUUUUUUUUUUU \WPic.100 AdvancedUUUUUUUUUUUUUUUUUUUUUUUUUUUUUUUUUUUUUUUUUUUUUUUUUUUUUUUUUUUUUUUUUUUUUUUUUUUUUUUUUUUUUUUUUUUUUUUUUUUUUUUUUUUUU \XPic.101 Color ManagementUUUUUUUUUUUUUUUUUUUUUUUUUUUUUUUUUUUUUUUUUUUUUUUUUUUUUUUUUUUUUUUUUUUUUUUUUUUUUUUUUUUUUUUUUUUUUUU \XPic.102 ServiceUUUUUUUUUUUUUUUUUUUUUUUUUUUUUUUUUUUUUUUUUUUUUUUUUUUUUUUUUUUUUUUUUUUUUUUUUUUUUUUUUUUUUUUUUUUUUUUUUUUUUUUUUUUUUUUUU \XPic.103 LaminatorUUUUUUUUUUUUUUUUUUUUUUUUUUUUUUUUUUUUUUUUUUUUUUUUUUUUUUUUUUUUUUUUUUUUUUUUUUUUUUUUUUUUUUUUUUUUUUUUUUUUUUUUUUUUU \Y](https://usermanual.wiki/IDP/SMART-30S/User-Guide-2065635-Page-5.png)
![]Pic.104 CardPrinterSetup Log-inUUUUUUUUUUUUUUUUUUUUUUUUUUUUUUUUUUUUUUUUUUUUUUUUUUUUUUUUUUUUUUUUUUUUUUUUUUUUUUUUUUUUUU \ZPic.105 CardPrinterSetup startUUUUUUUUUUUUUUUUUUUUUUUUUUUUUUUUUUUUUUUUUUUUUUUUUUUUUUUUUUUUUUUUUUUUUUUUUUUUUUUUUUUUUUUUU \ZPic.106 CardPrinterSetup – Card Printer Basic Setup UUUUUUUUUUUUUUUUUUUUUUUUUUUUUUUUUUUUUUUUUUUUUUUUUUUUUU \[Pic.107 SMART-30 R density UUUUUUUUUUUUUUUUUUUUUUUUUUUUUUUUUUUUUUUUUUUUUUUUUUUUUUUUUUUUUUUUUUUUUUUUUUUUUUUUUUUUUUUUUUUU \\Pic.108 Color density UUUUUUUUUUUUUUUUUUUUUUUUUUUUUUUUUUUUUUUUUUUUUUUUUUUUUUUUUUUUUUUUUUUUUUUUUUUUUUUUUUUUUUUUUUUUUUUUUUUUUUU \]Pic.109 Resin Black density UUUUUUUUUUUUUUUUUUUUUUUUUUUUUUUUUUUUUUUUUUUUUUUUUUUUUUUUUUUUUUUUUUUUUUUUUUUUUUUUUUUUUUUUUUUUU \]Pic.110 Overlay density UUUUUUUUUUUUUUUUUUUUUUUUUUUUUUUUUUUUUUUUUUUUUUUUUUUUUUUUUUUUUUUUUUUUUUUUUUUUUUUUUUUUUUUUUUUUUUUUUUUU \]Pic.111 CardPrinterSetup – Card Printer Advanced SetupUUUUUUUUUUUUUUUUUUUUUUUUUUUUUUUUUUUUUUUUUUUUUUUU \_Pic.112 CardPrinterSetup – Laminator Basic Setup UUUUUUUUUUUUUUUUUUUUUUUUUUUUUUUUUUUUUUUUUUUUUUUUUUUUUUUUU ]WPic.113 CardPrinterSetup – Laminator Advanced SetupUUUUUUUUUUUUUUUUUUUUUUUUUUUUUUUUUUUUUUUUUUUUUUUUUUU ]XPic.114 CardPrinterTestUUUUUUUUUUUUUUUUUUUUUUUUUUUUUUUUUUUUUUUUUUUUUUUUUUUUUUUUUUUUUUUUUUUUUUUUUUUUUUUUUUUUUUUUUUUUUUUUUUUU ]ZPic.115 Magnetic stripe encodingUUUUUUUUUUUUUUUUUUUUUUUUUUUUUUUUUUUUUUUUUUUUUUUUUUUUUUUUUUUUUUUUUUUUUUUUUUUUUUUUUUUUU ]\Pic.116 Contact smartcard encodingUUUUUUUUUUUUUUUUUUUUUUUUUUUUUUUUUUUUUUUUUUUUUUUUUUUUUUUUUUUUUUUUUUUUUUUUUUUUUUUU ]]Pic.117 Contactless smartcard encoding UUUUUUUUUUUUUUUUUUUUUUUUUUUUUUUUUUUUUUUUUUUUUUUUUUUUUUUUUUUUUUUUUUUUUUUUU ]^Pic.118 Upgrading printer firmwareUUUUUUUUUUUUUUUUUUUUUUUUUUUUUUUUUUUUUUUUUUUUUUUUUUUUUUUUUUUUUUUUUUUUUUUUUUUUUUUUUU ]`Pic.119 Ready for firm-ware upgradeUUUUUUUUUUUUUUUUUUUUUUUUUUUUUUUUUUUUUUUUUUUUUUUUUUUUUUUUUUUUUUUUUUUUUUUUUUUUUUUU ^WPic.120 Firm-ware manual upgrade UUUUUUUUUUUUUUUUUUUUUUUUUUUUUUUUUUUUUUUUUUUUUUUUUUUUUUUUUUUUUUUUUUUUUUUUUUUUUUUUUU ^WPic.121 Ready for laminator firm-ware upgrade UUUUUUUUUUUUUUUUUUUUUUUUUUUUUUUUUUUUUUUUUUUUUUUUUUUUUUUUUUUUUUU ^XPic.122 Firm-ware manual upgrade UUUUUUUUUUUUUUUUUUUUUUUUUUUUUUUUUUUUUUUUUUUUUUUUUUUUUUUUUUUUUUUUUUUUUUUUUUUUUUUUUU ^XPic.123 Contact smartcard reader driver installation UUUUUUUUUUUUUUUUUUUUUUUUUUUUUUUUUUUUUUUUUUUUUUUUUUUUUUU ^YPic.124 License agreementUUUUUUUUUUUUUUUUUUUUUUUUUUUUUUUUUUUUUUUUUUUUUUUUUUUUUUUUUUUUUUUUUUUUUUUUUUUUUUUUUUUUUUUUUUUUUUU ^ZPic.125 Installing the contact smartcard reader driver UUUUUUUUUUUUUUUUUUUUUUUUUUUUUUUUUUUUUUUUUUUUUUUUUUUUU ^ZPic.126 Completing the smartcard reader driver installationUUUUUUUUUUUUUUUUUUUUUUUUUUUUUUUUUUUUUUUUUUUU ^[Pic.127 Found New Hardware WizardUUUUUUUUUUUUUUUUUUUUUUUUUUUUUUUUUUUUUUUUUUUUUUUUUUUUUUUUUUUUUUUUUUUUUUUUUUUUUUU ^\Pic.128 Installation method selectionUUUUUUUUUUUUUUUUUUUUUUUUUUUUUUUUUUUUUUUUUUUUUUUUUUUUUUUUUUUUUUUUUUUUUUUUUUUUUUU ^\Pic.129 Driver location UUUUUUUUUUUUUUUUUUUUUUUUUUUUUUUUUUUUUUUUUUUUUUUUUUUUUUUUUUUUUUUUUUUUUUUUUUUUUUUUUUUUUUUUUUUUUUUUUUUUU ^]Pic.130 Completing the driver installationUUUUUUUUUUUUUUUUUUUUUUUUUUUUUUUUUUUUUUUUUUUUUUUUUUUUUUUUUUUUUUUUUUUUUUUU ^]Pic.131 Exclusive cleaning card for SMART-50 printerUUUUUUUUUUUUUUUUUUUUUUUUUUUUUUUUUUUUUUUUUUUUUUUUUUUUU ^^Pic.132 Printer cleaning start UUUUUUUUUUUUUUUUUUUUUUUUUUUUUUUUUUUUUUUUUUUUUUUUUUUUUUUUUUUUUUUUUUUUUUUUUUUUUUUUUUUUUUUUUUU ^^Pic.133 Printer cleaning Step 1UUUUUUUUUUUUUUUUUUUUUUUUUUUUUUUUUUUUUUUUUUUUUUUUUUUUUUUUUUUUUUUUUUUUUUUUUUUUUUUUUUUUUUUUU ^_Pic.134 Printer cleaning Step 2UUUUUUUUUUUUUUUUUUUUUUUUUUUUUUUUUUUUUUUUUUUUUUUUUUUUUUUUUUUUUUUUUUUUUUUUUUUUUUUUUUUUUUUUU ^_Pic.135 Printer cleaning Step 3UUUUUUUUUUUUUUUUUUUUUUUUUUUUUUUUUUUUUUUUUUUUUUUUUUUUUUUUUUUUUUUUUUUUUUUUUUUUUUUUUUUUUUUUU ^`Pic.136 Printer cleaning Step 4UUUUUUUUUUUUUUUUUUUUUUUUUUUUUUUUUUUUUUUUUUUUUUUUUUUUUUUUUUUUUUUUUUUUUUUUUUUUUUUUUUUUUUUUU ^`Pic.137 Printer cleaning Step 5UUUUUUUUUUUUUUUUUUUUUUUUUUUUUUUUUUUUUUUUUUUUUUUUUUUUUUUUUUUUUUUUUUUUUUUUUUUUUUUUUUUUUUUUU _WPic.138 Printer cleaning Step 6UUUUUUUUUUUUUUUUUUUUUUUUUUUUUUUUUUUUUUUUUUUUUUUUUUUUUUUUUUUUUUUUUUUUUUUUUUUUUUUUUUUUUUUUU _WPic.139 Thermal Print Head UUUUUUUUUUUUUUUUUUUUUUUUUUUUUUUUUUUUUUUUUUUUUUUUUUUUUUUUUUUUUUUUUUUUUUUUUUUUUUUUUUUUUUUUUUUUUU _XPic.140 Print head setupUUUUUUUUUUUUUUUUUUUUUUUUUUUUUUUUUUUUUUUUUUUUUUUUUUUUUUUUUUUUUUUUUUUUUUUUUUUUUUUUUUUUUUUUUUUUUUUUUUU _XPic.141 Print head replacementUUUUUUUUUUUUUUUUUUUUUUUUUUUUUUUUUUUUUUUUUUUUUUUUUUUUUUUUUUUUUUUUUUUUUUUUUUUUUUUUUUUUUUUU _YPic.142 Print head angleUUUUUUUUUUUUUUUUUUUUUUUUUUUUUUUUUUUUUUUUUUUUUUUUUUUUUUUUUUUUUUUUUUUUUUUUUUUUUUUUUUUUUUUUUUUUUUUUUUU _YPic.142 Printing quality trouble 1 UUUUUUUUUUUUUUUUUUUUUUUUUUUUUUUUUUUUUUUUUUUUUUUUUUUUUUUUUUUUUUUUUUUUUUUUUUUUUUUUUUUUU _ZPic.143 Printing quality trouble 2 UUUUUUUUUUUUUUUUUUUUUUUUUUUUUUUUUUUUUUUUUUUUUUUUUUUUUUUUUUUUUUUUUUUUUUUUUUUUUUUUUUUUU _ZPic.144 Printing quality trouble 3 UUUUUUUUUUUUUUUUUUUUUUUUUUUUUUUUUUUUUUUUUUUUUUUUUUUUUUUUUUUUUUUUUUUUUUUUUUUUUUUUUUUUU _ZPic.145 Printing quality trouble 4 UUUUUUUUUUUUUUUUUUUUUUUUUUUUUUUUUUUUUUUUUUUUUUUUUUUUUUUUUUUUUUUUUUUUUUUUUUUUUUUUUUUUU _[Pic.146 Printing quality trouble 5 UUUUUUUUUUUUUUUUUUUUUUUUUUUUUUUUUUUUUUUUUUUUUUUUUUUUUUUUUUUUUUUUUUUUUUUUUUUUUUUUUUUUU _[Pic.148 Printer Specification 1UUUUUUUUUUUUUUUUUUUUUUUUUUUUUUUUUUUUUUUUUUUUUUUUUUUUUUUUUUUUUUUUUUUUUUUUUUUUUUUUUUUUUUUUUU _]Pic.149 Printer Specification 2UUUUUUUUUUUUUUUUUUUUUUUUUUUUUUUUUUUUUUUUUUUUUUUUUUUUUUUUUUUUUUUUUUUUUUUUUUUUUUUUUUUUUUUUUU _^Pic.150 Printer Specification 3UUUUUUUUUUUUUUUUUUUUUUUUUUUUUUUUUUUUUUUUUUUUUUUUUUUUUUUUUUUUUUUUUUUUUUUUUUUUUUUUUUUUUUUUUU __](https://usermanual.wiki/IDP/SMART-30S/User-Guide-2065635-Page-6.png)


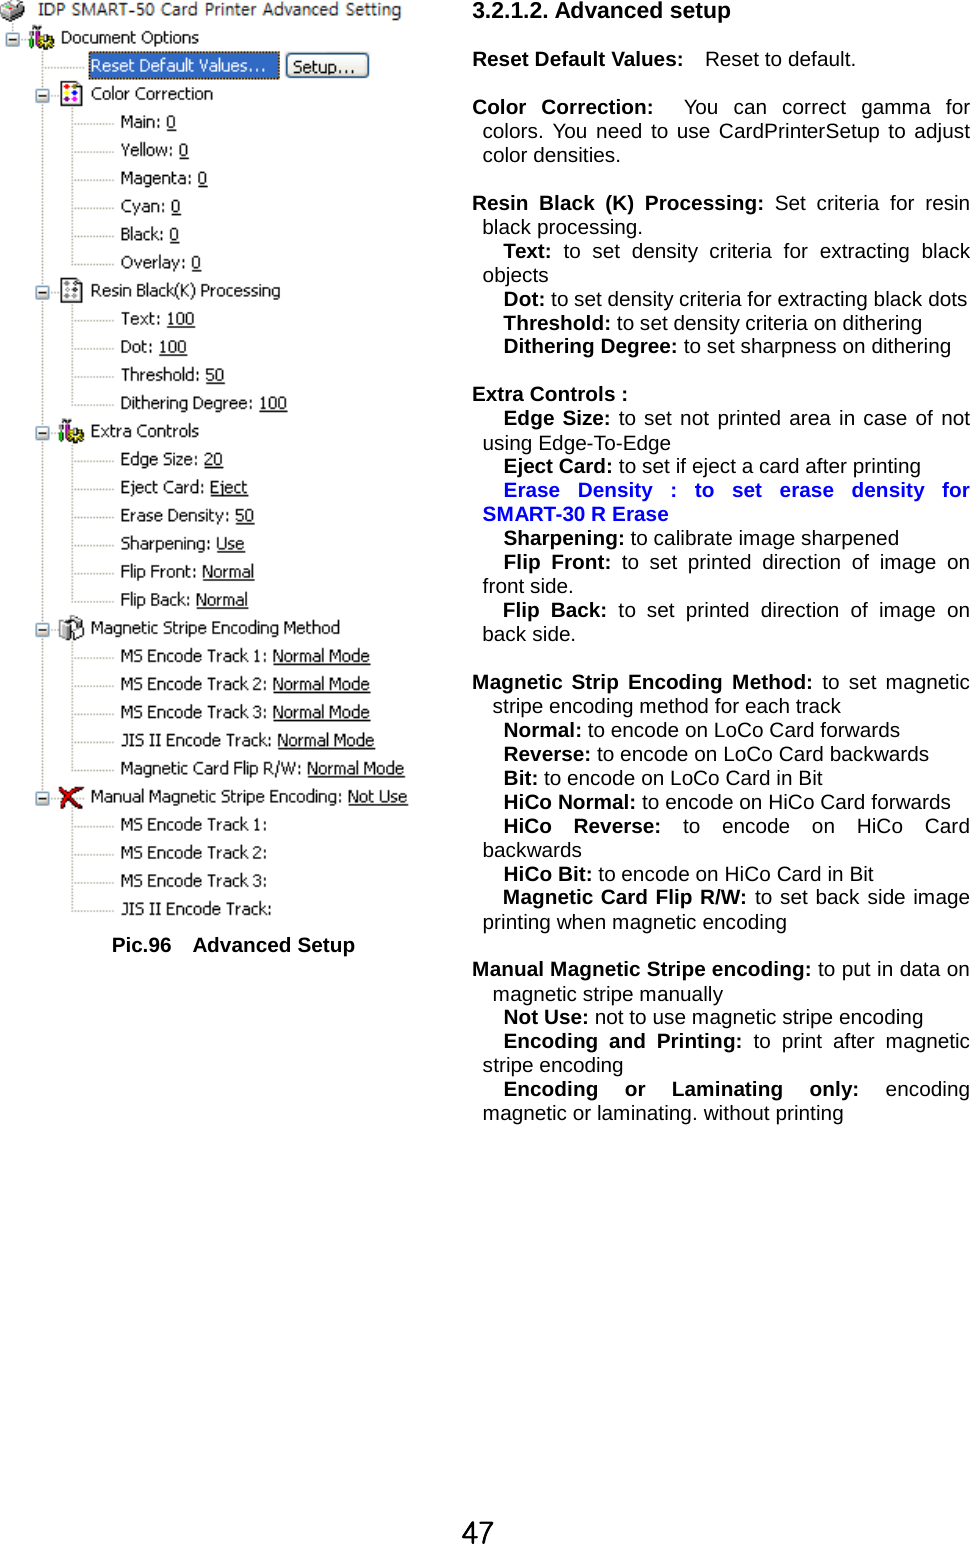
![X]Description of laminator error codeError code Description0Laminator head up error2Laminator head down error4Laminator card in error6Laminator card move error8Laminator card front out error9Laminator card rear out error10 Flipper error13 Error while laminating15 Laminator initializing error16 Laminator film zero error17 Laminator film search error31 No laminating film](https://usermanual.wiki/IDP/SMART-30S/User-Guide-2065635-Page-16.png)

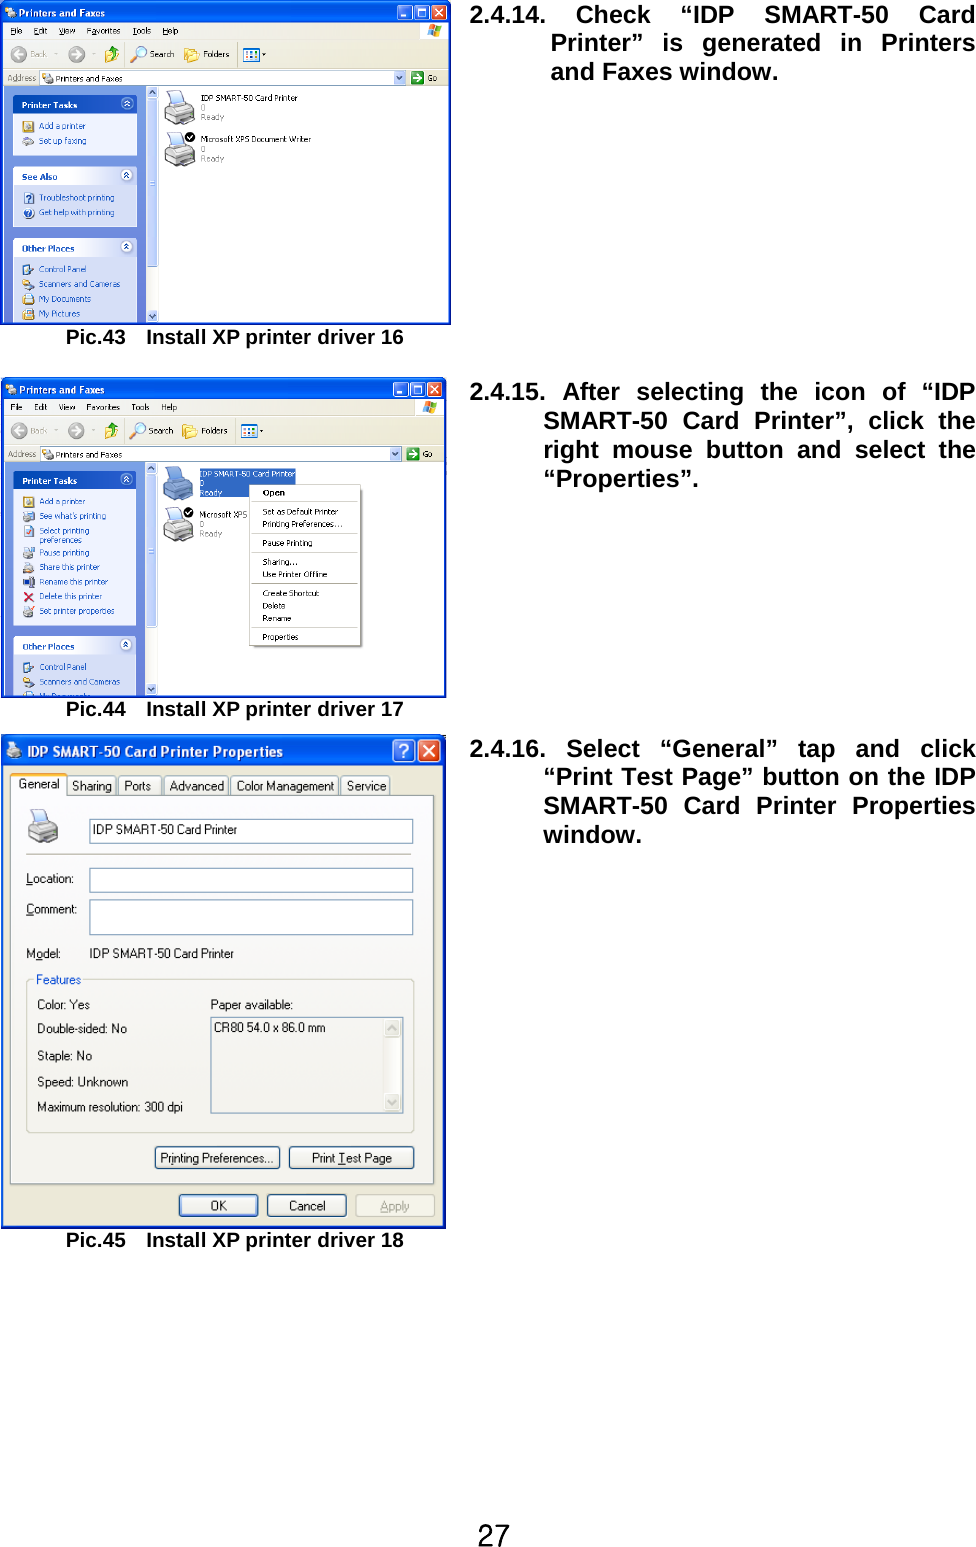
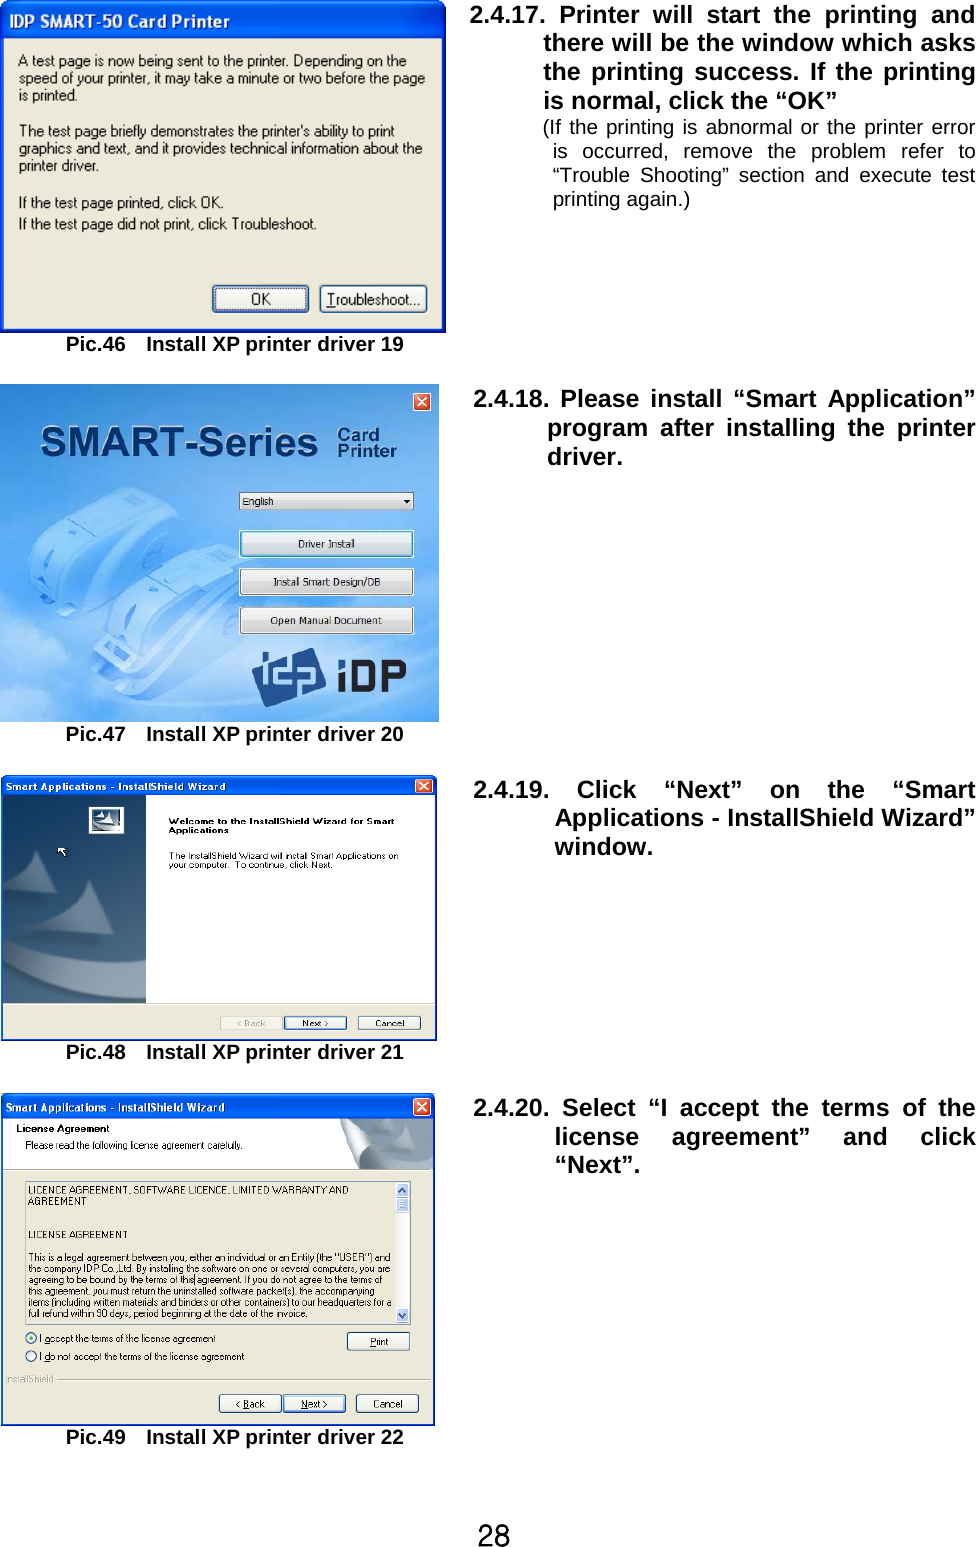
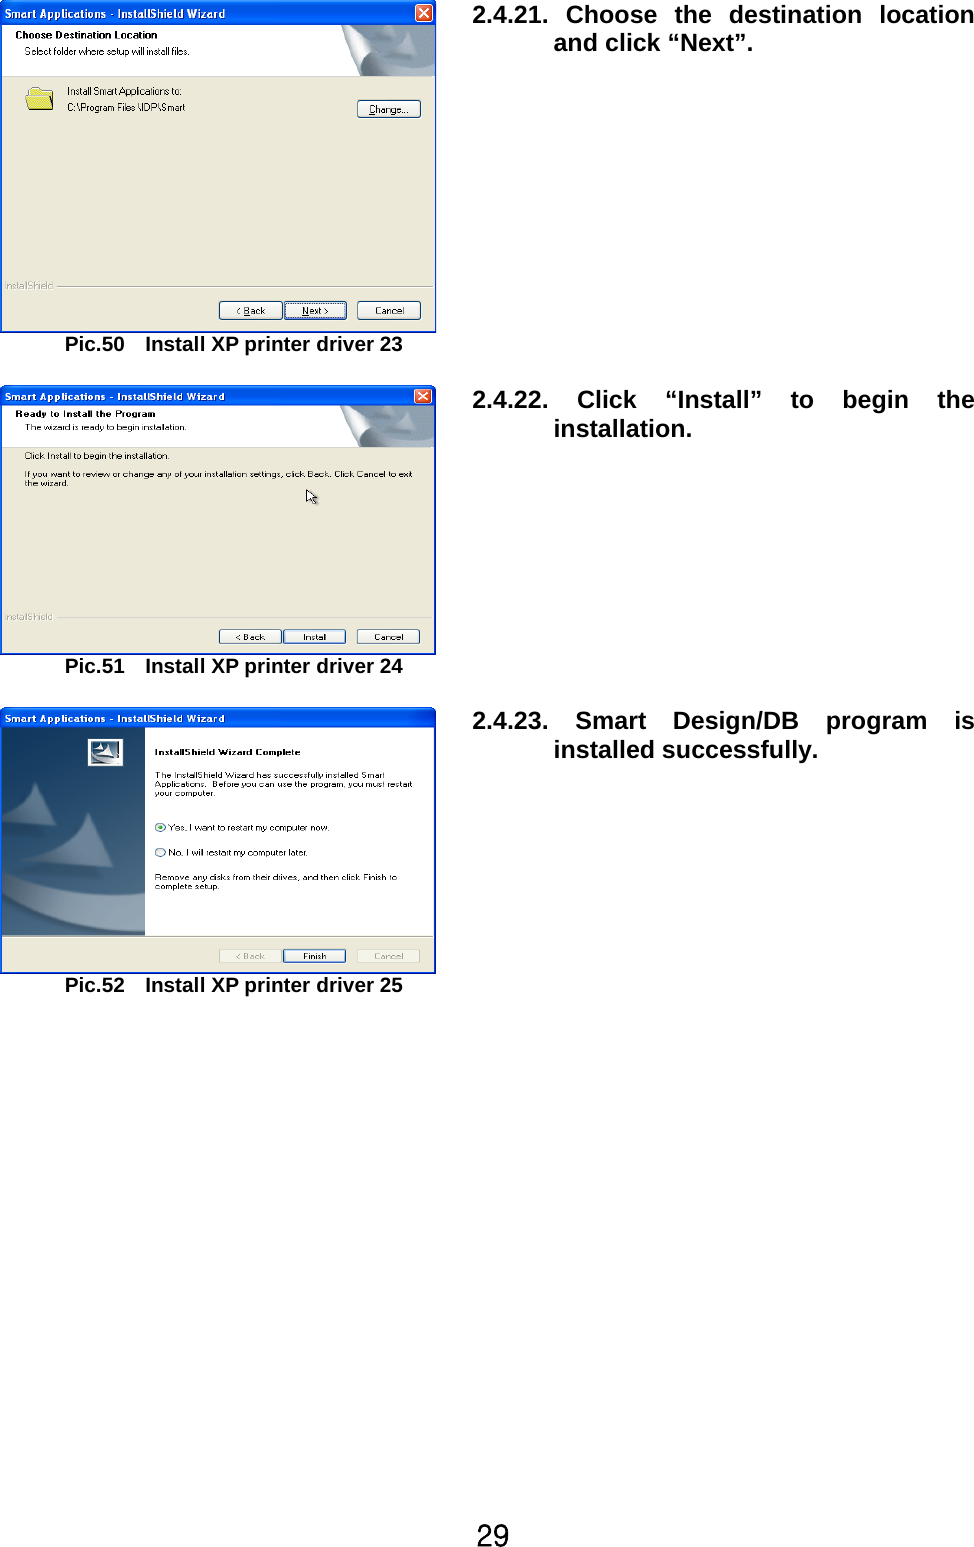
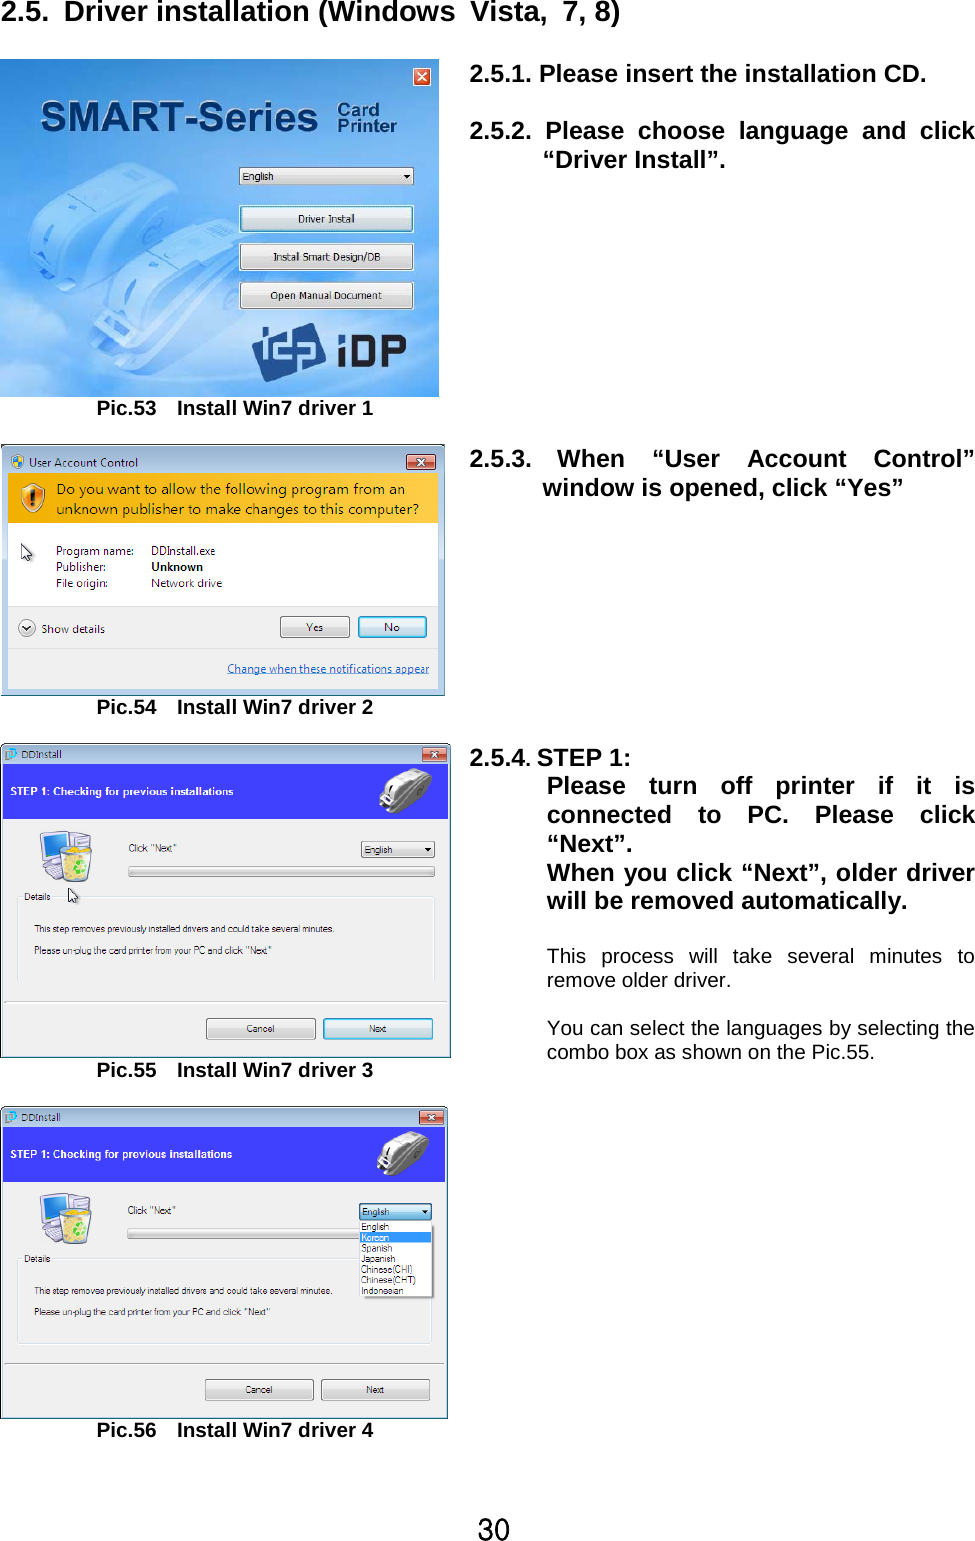
![Y]Pic.39 Install XP printer driver 122.4.10.Select“Install the softwareautomatically (Recommended)”andclick “Next”.Pic.40 Install XP printer driver 132.4.11. Click “Continue Anyway” inSoftware Installation window.Pic.41 Install XP printer driver 142.4.12. Click “Finish” in Completing theFound New Hardware Wizardwindow.Pic.42 Install XP printer driver 152.4.13.When the printer driver installationis completed. Click “Close”.](https://usermanual.wiki/IDP/SMART-30S/User-Guide-2065635-Page-26.png)
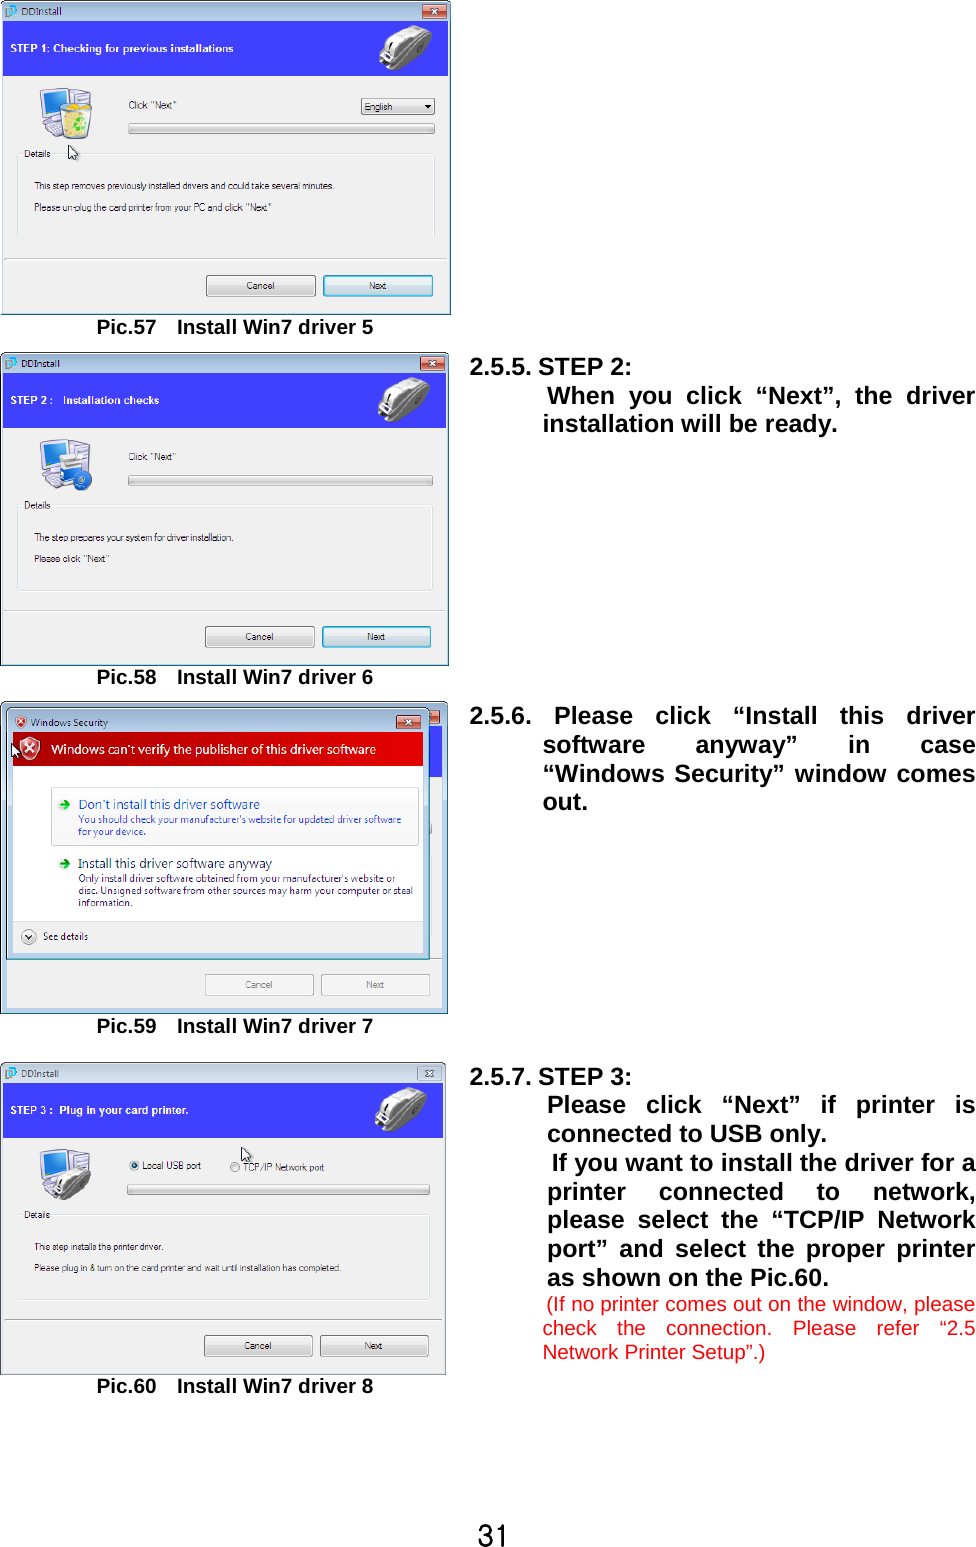
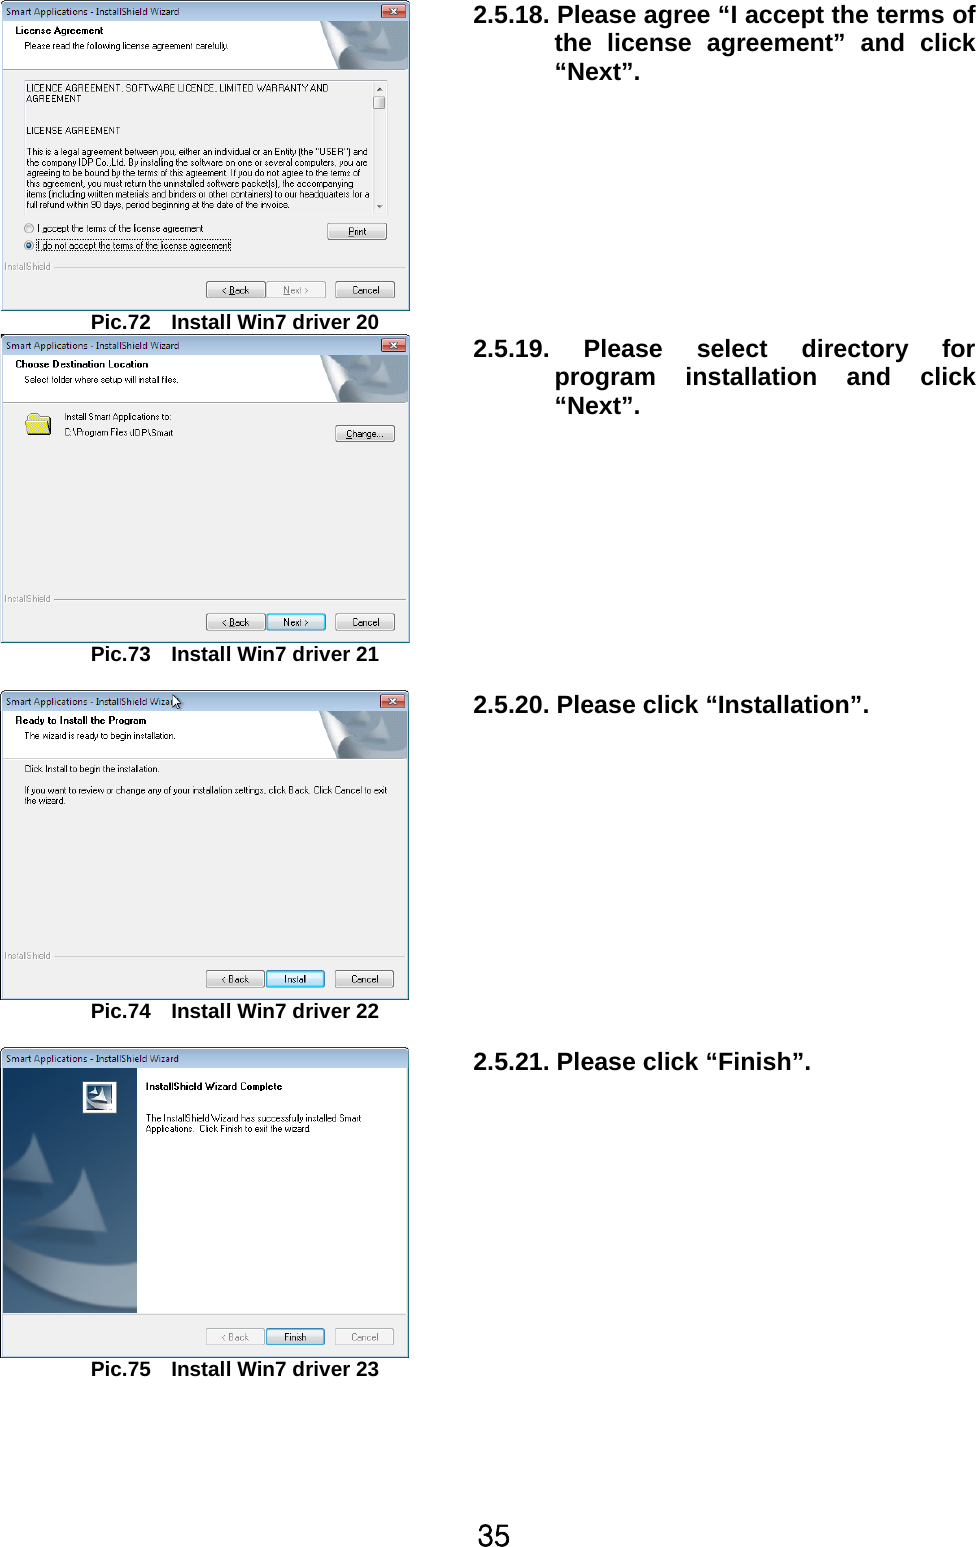
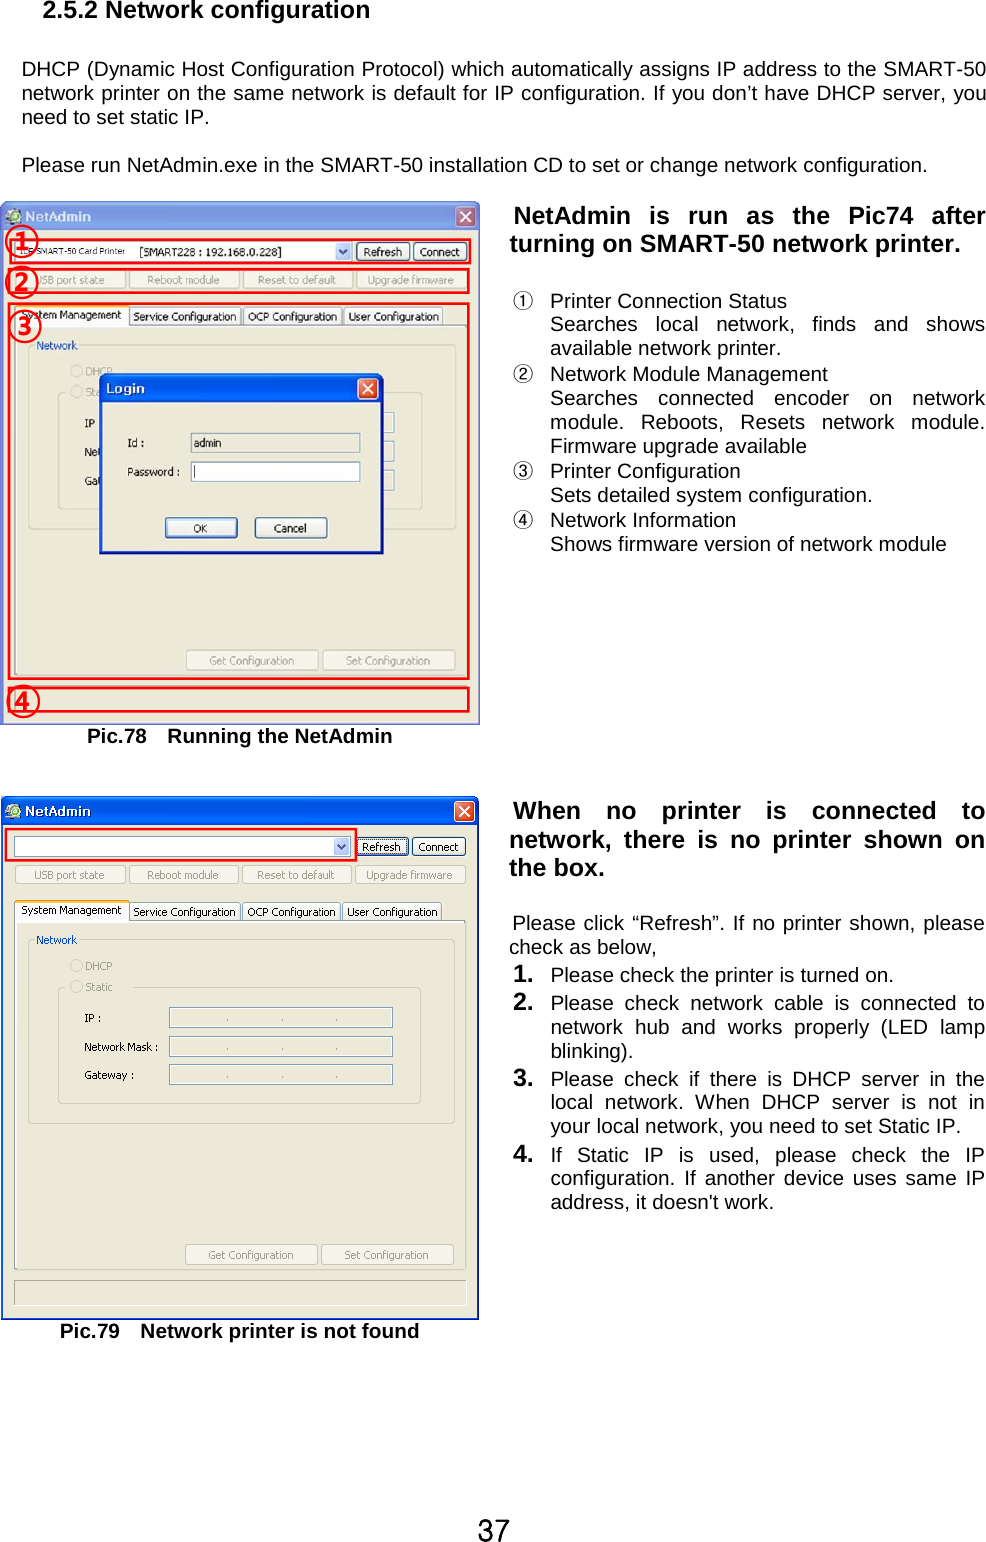
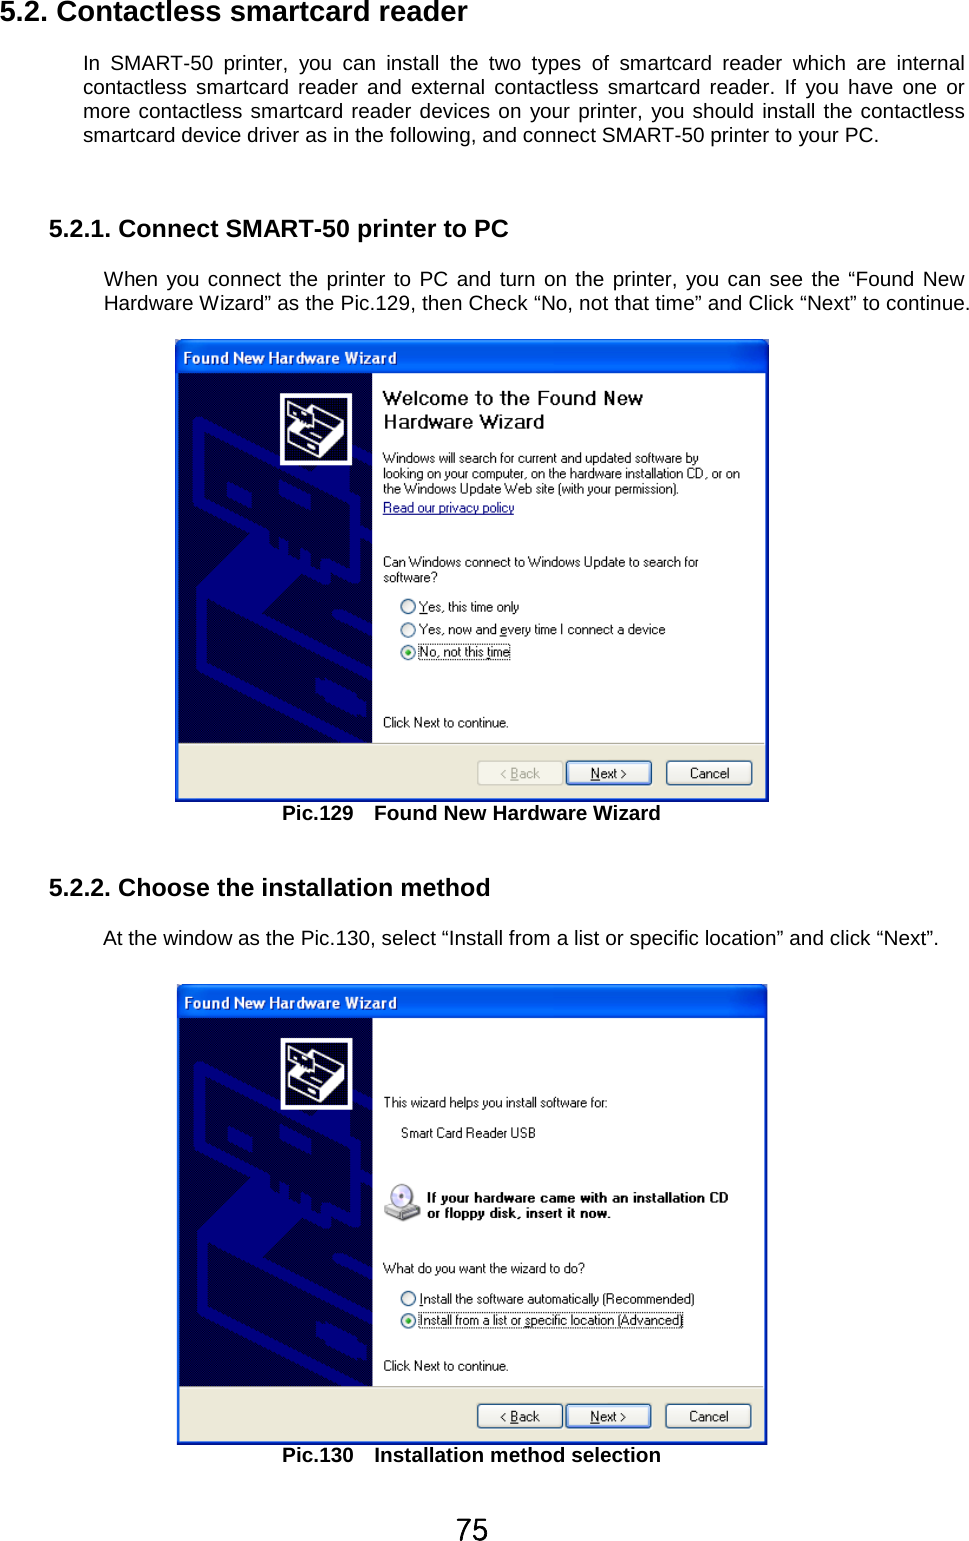
![Z]2.5. Network configuration2.5.1 Connecting network portPic.76 Rear view of SMART-50 printer 1The printer which installed withnetwork option has a port for networkconnection as shown in the Pic.76 - ྛ.ྙPower SwitchྚPower Supply ConnectorྛNetwork PortྜUSB PortPic.77 Rear view of SMART-50 printer 2Please connect networkcable (RJ45)to a printer.(Network cable is not supplied. Please asknetwork administrator for more questions.)¢£¤¥](https://usermanual.wiki/IDP/SMART-30S/User-Guide-2065635-Page-36.png)

![[]Pic.95 Layout3.2.1.1. Layout- You can select either horizontal or vertical printingdirection. To apply your selection, click “OK”.](https://usermanual.wiki/IDP/SMART-30S/User-Guide-2065635-Page-46.png)


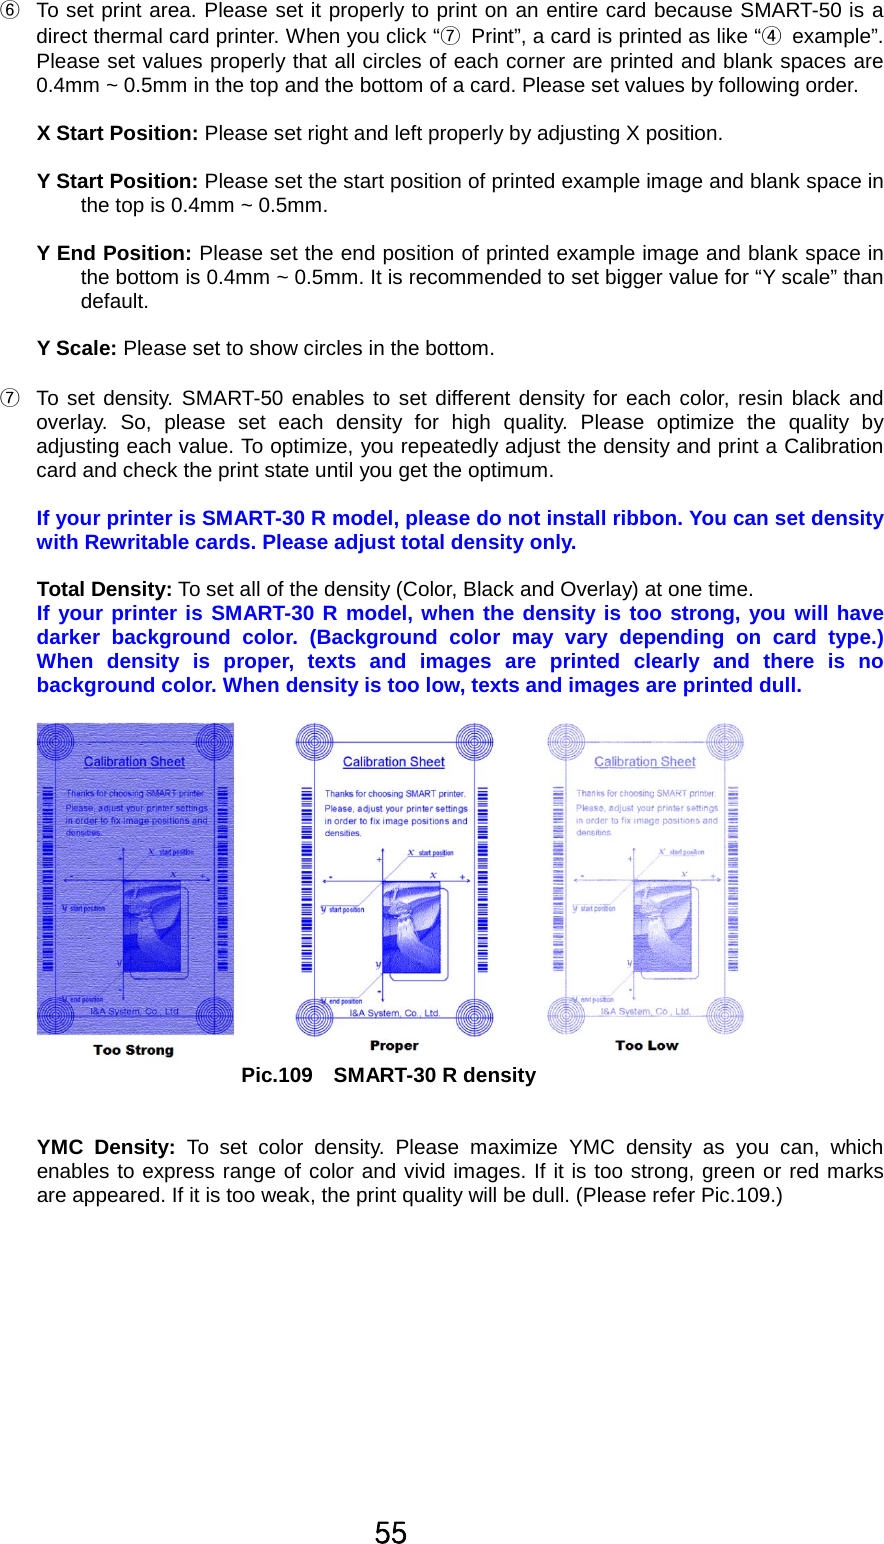
![\]Pic.110 Color densityBlack Density: To set resin black density. In Pic.111, barcode is printed to express density.When density is too strong, barcode is printed too thick. When density is too weak, barcodeis too thin. Please adjust resin black density to express clear barcode. Please referfollowing pictures.Pic.111 Resin Black densityOverlay Density: To set overlay density. Please set it when overlay is printed on surfaceregularly. If it is too strong, it is hazy and marks are appeared. If it is too weak, overlay panelis not printed edge areas. You can check it with printed card under the light.Pic.112 Overlay densityྠTo print calibration card.ྡTo show advanced Setup.(It is recommended not to set advanced setup.)ྡྷTo load or save values.Get Config.: to get values from current printer](https://usermanual.wiki/IDP/SMART-30S/User-Guide-2065635-Page-56.png)

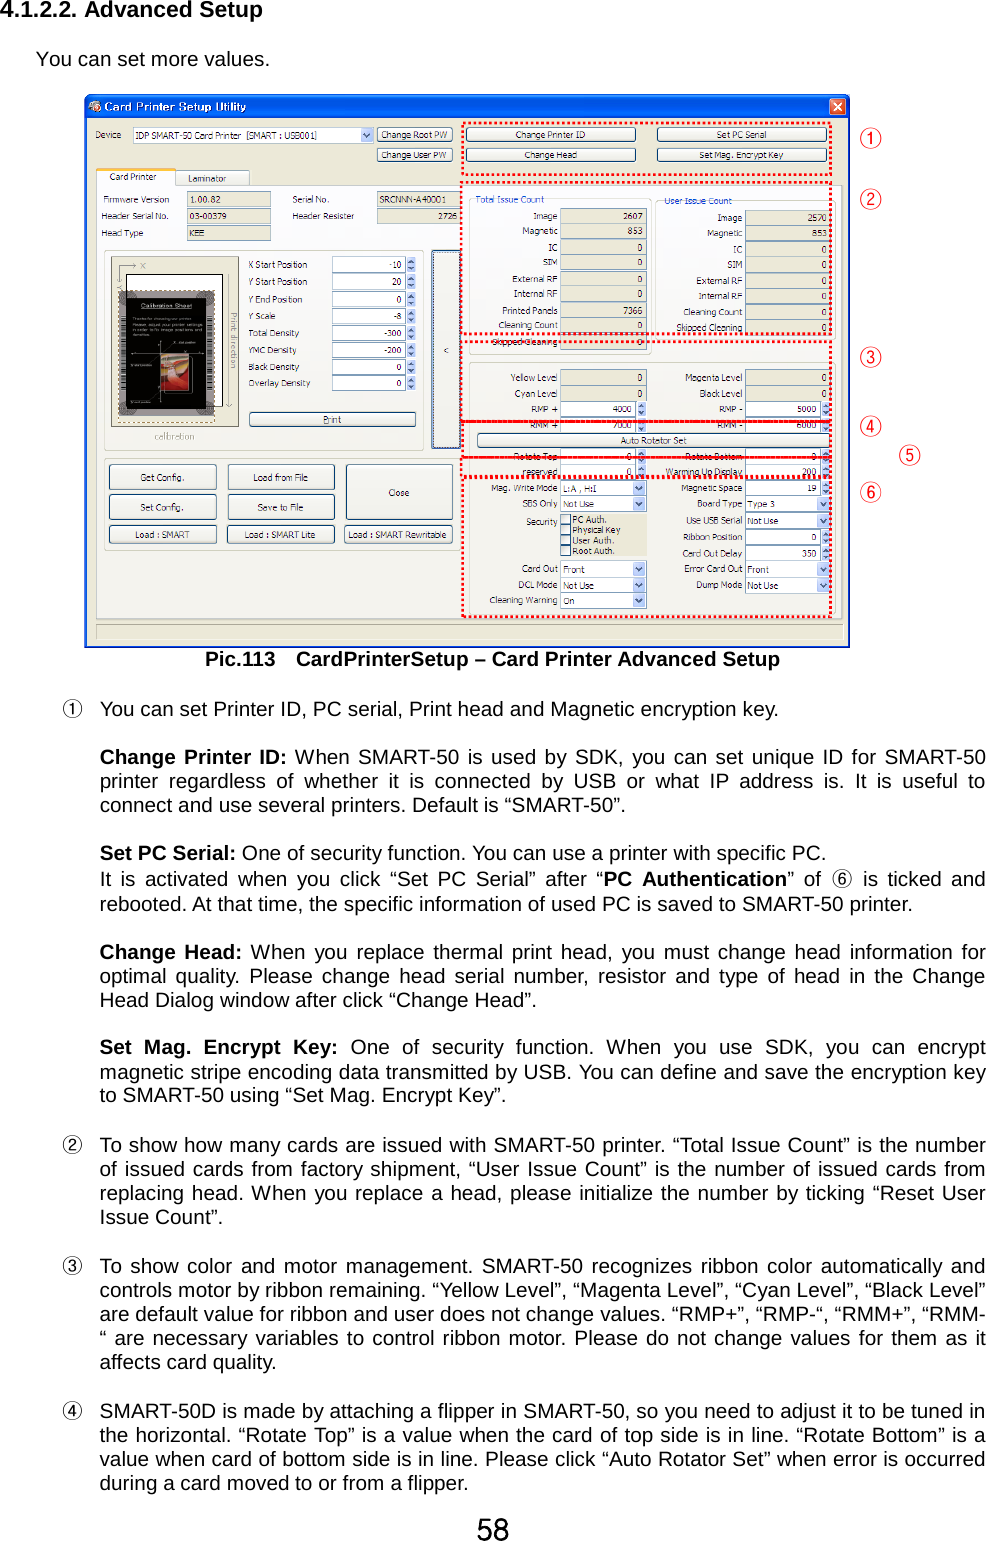
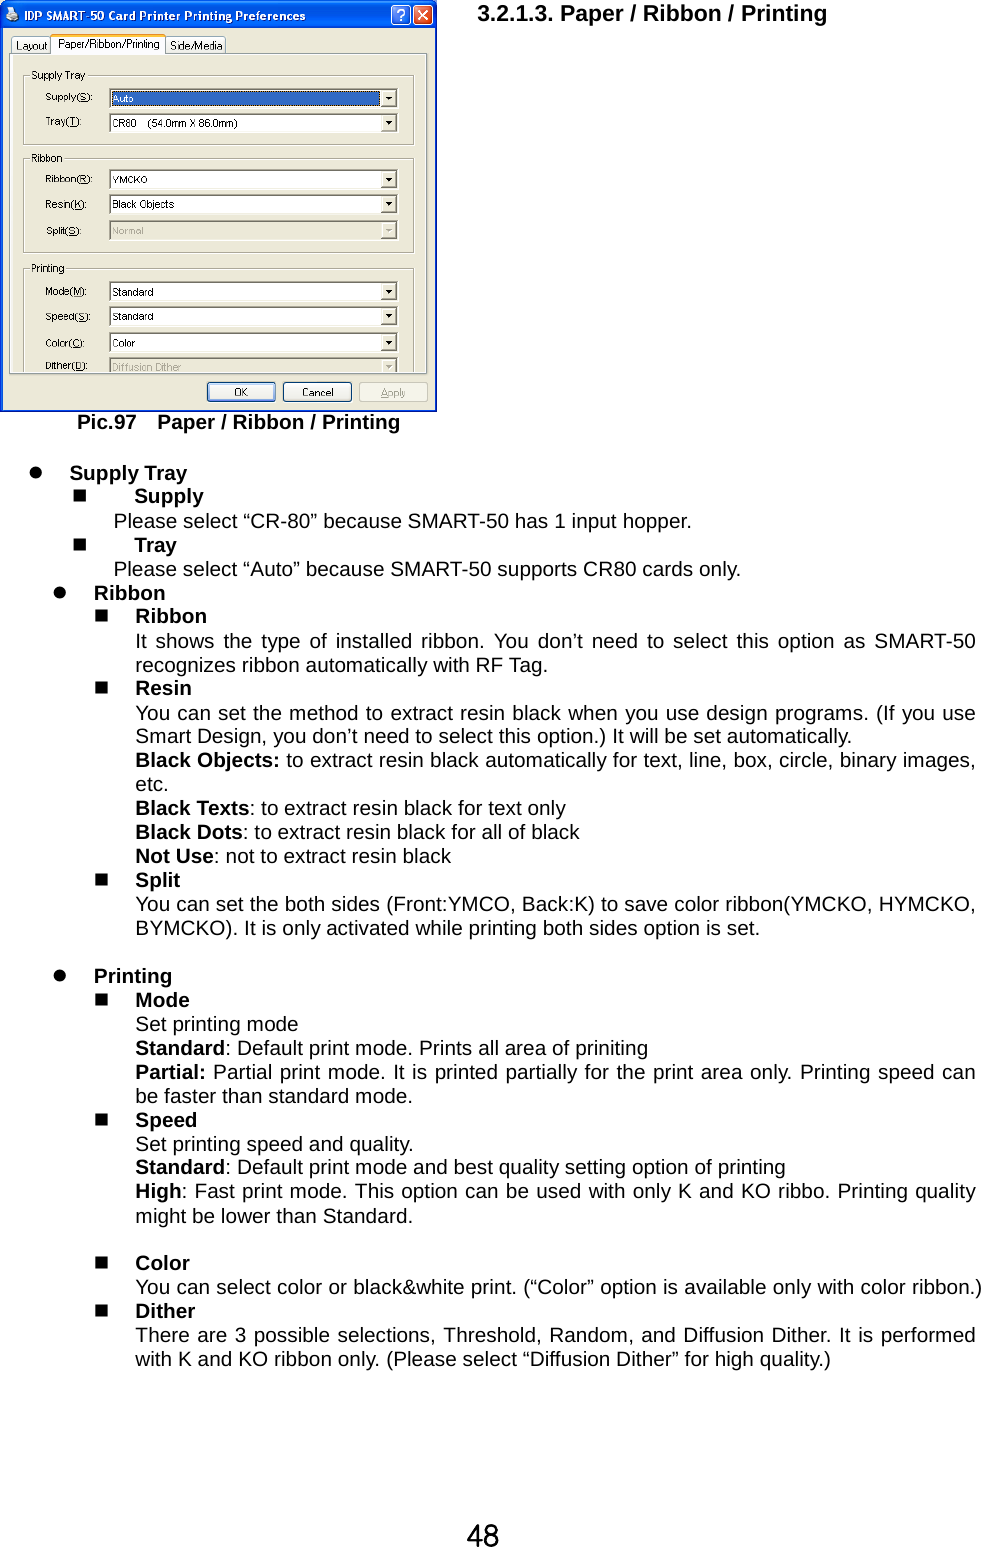
![]W4.1.3. Laminator4.1.3.1. Basic SetupPic.114 CardPrinterSetup – Laminator Basic SetupྙThe combo box shows connected printersྚClick Laminator Tap.ྛIt shows the information of installed laminator such as firm-ware version, serial number.If you click “Change Serial No.” button, you can change serial number.ྜThe fields show laminator film’s type, balance, code and laminator code.Film Type : It shows installed film’s type and vendor code.Film Remain : It shows installed film’s total number and balance.Laminator Code : It shows Laminator’s code, vendor and local code.Film Code : It shows installed film code, vendor and local code.ྜྷYou can change the values according to the installed film type.ᐭᐮᐯᐰᐱᐲᐳ](https://usermanual.wiki/IDP/SMART-30S/User-Guide-2065635-Page-60.png)
![]XHeater Temperature : It is for laminating temperature.Laminating PPS : Laminating speed.Laminating Move Pulse : The distance of laminating movement.Separation with Card : After laminating and removing film, the value changes thedistance of card movementSeparation with Film : After laminating and removing film, the value changes theDistance of film movement.Lami. Start Card Pos : The value is for laminating start position.Torque Laminating Max : Maximum torque of motor while laminating.Torque Laminating Min : Minimum torque of motor while laminating.Laminating with Pulse : The value is for change laminating width.Film Attribution : It changes film attribution.ྞIt shows “Advanced Setup” window.ྟ“Save” or “Load” the values.Get Config : Read the values from connected printer.Set Config. : Set the values to connected printer.Load from File : Load the values from saved file.Save to File : Save the values into a file.Close : Close the program.4.1.3.2. Advanced SetupPic.115 CardPrinterSetup – Laminator Advanced SetupྙIt shows total laminating count.ᐭᐮᐯ](https://usermanual.wiki/IDP/SMART-30S/User-Guide-2065635-Page-61.png)
![]YྚThe values are for setting motor torque of film movement.Torque Move Max : Change Maximum motor torqueTorque Move Min : Change Minimum motor torqueྛThe values are for setting motor torque of laminating.You can set the values of each section.ྜYou can set “Head” temperature of laminating.You can set the values of each section.ྜྷRotator position](https://usermanual.wiki/IDP/SMART-30S/User-Guide-2065635-Page-62.png)
![]Z4.2. Card Printer TestBasically Card Printer use standard printer device so you can be used same as general paper printer.In the case of magnetic stripe, contact, contactless encoder option, you will need to install appropriatedriver and operate individually. Encoding operation will be controlled by “CARD PRINTER SDK”. Youcan test all feature of printer by Card printer Test. Card Printer Test program is developed by using“SMART Printer SDK”4.2.1. CardPrinterTestWhen CardPrinterTest is run, all function can be tested individually.Pic.116 CardPrinterTestྙSelect Printer: select printer to test. In the Pic.116, “IDP SMART-50 Card Printer” is thePrinter name, SMART228 is the Printer ID, and USB001 is the connected port.ྚControl : To execute each step to testྛPrint: Print test with CSD file which is designed by Smart Design program.ྜBatch Start: Repeat selected encoding test by “ྜྷEncoding”ྜྷEncoding: Encode Magnetic Stripe, Contact Card, Contactless CardྞPrinter Status: Check printer status.ྟMessage: Description of status by log.ᐭᐮᐯᐰᐱ ᐲᐳ](https://usermanual.wiki/IDP/SMART-30S/User-Guide-2065635-Page-63.png)
![][4.2.2 Select printer and controlWhen you execute CardPrinterTest, it will search connected printers by USB and Networkautomatically and SMART-50 printer connected to USB has higher priority. Other printers could beselected by pull-down menu. You can test all function with connected printer.. Control is consisted by SBS(Step by Step), Move, Rotate, Etc. section and you can control printer byeach step.zSBSSBS is to operate SMART-50 printer in SBS(Step-By-Step) mode which you can control theprinter using commands. In SBS mode, after printing data transmission, printing a card will berun only by clicking “DoPrint”. It is the main difference between NORMAL mode and SBS mode.When you click “Start”, SMART-50 is operated in SBS mode, and existing spooled data will beeliminated. To exit SBS mode, click “Stop”.zCardCard is to bring a card into printer and eject a card. “In” is to move a card from input hopper toprinter and “Out” is to move a card from printer to output hopper. In case the flipper is installed,“Back” ejects a card to the back side.zMoveMove is to move a card to specific position in the inside of printer. “Print” is to move a card tothe printing position, and “Mag.” is to the magnetic encoding position, and “IC” is to the contactsmartcard encoding position, and “RF” is to the contactless smartcard encoding position. “ToRotator” is to move a card from printer to flipper and “From Rotator” is to move a card fromflipper to printer. “from In” is to move a card from the card in sensor to where you defineposition, and “from Out” is to move a card from the card out sensor to where you define position.zRotateRotator is to flip over a card in the printer installed flipper. “Auto” is to move a card from printerto flipper and flip over a card and move a card to the printing position automatically. “Batch” isto repeat “Auto” as many times as the number of set. “To Bottom” is to turn to the backside ofcard and “To Top” is to turn to the front side of card.zEtc“Cleaning Roller” is to clean the roller by cleaning card automatically. “Use Log” is to display login message space.4.2.3 PrintPrint can be done through the CSD file which is designed by Smart Design program. Following thesteps in this section.1. Click “…” button and select the CSD file.2. Click “Open” button to prepare CSD file to print.3. Click “Print” Button to move print data to spool. In the NORMAL mode, Click “Print” button toprint a card, but in the SBS mode, “Print” button to transmit a printing data from PC to printerand wait for printing. Therefore, you must click “DoPrint” to print in SBS mode. This function isfor detail control of printer.4. Click “Close” button to close CSD file.4.2.4. BatchBatch is to repeat encoding/decoding test continuously. In the Repeat, you input the number of repeatand click “Batch Start”, then the test is run as many times as the number of set. When you check“Include Card In/Out”, each time the printer bring a card from input hopper and perform an encoding](https://usermanual.wiki/IDP/SMART-30S/User-Guide-2065635-Page-64.png)
![]\test and eject the card. But if not, encoding test will be done only by one card. At that time, if there is nocard in the printer, the printer bring a card into the printer from input hopper and repeat the encoding teston the card, and if there is a card in the printer, the encoding test is performed on the card repeatedly.“Card Holding” is activated when “Include Card In/Out” is ticked. When “Card Holding” is ticked and therepeat number is set, the printer repeats the encoding test as many times as the number of set in the“Card Holding” without ejection. When it is completed, the printer ejects the card and brings a new cardinto the printer and starts testing.In the Setting, “Retry” is to retry the encoding test when the error occurred. “Prompt on Error”istodisplay Pop up Message when the error occurred. If not, Error number will be counted without message.The number of error is displayed at Error section.4.2.5. EncodingMagnetic: Magnet Stripe Encoding“Read” is to read and display the data from magnetic stripe card. It is composed of “Do Read”and “Read All Buffer” and runs “Do Read” and “Read All Buffer” sequentially.“Do Read” is to read the data from magnetic stripe card and store the data in the buffer.“Read All Buffer” is to transmit the date stored in the buffer to PC. If the track number is ticked,the data of the ticked track is only transmitted to PC.“Write” is to write the data to the magnetic stripe. It is composed of “Write All Buffer” and “DoWrite” and runs “Write All Buffer” and “Do Write” sequentially.“Write All Buffer” is to transmit the data to the buffer.“Do Write” is to write the data stored in the buffer to the magnetic stripe of card. You canchoose the magnetic foil type (LoCo or HiCo) and the track of magnetic stripe. “Random Fill” isto create a random magnetic encoding data for testing.Batch process repeats the following steps sequentially, Card “IN” ÆMove “Mag” ÆMagnetic“Random Fill” ÆMagnetic “Write” ÆMagnetic “Read” ÆCard “OUT”.Pic.117 Magnetic stripe encodingIC(PC/SC) : Contact Smartcard EncodingIn SMART-30 printer, a contact smartcard encoder can be installed and SMART-50 printersupports the contact smartcard encoder in the printer inside and the SIM encoder on the right offront side. “IC(PC/SC)” is to test a contact smartcard and SIM encoding.“Batch” is applied only to the contact smartcard encoding because SIM encoder is installedoutside and can’t move a card automatically.“ICH Contact” is to bring the encoder head into contact with the IC chip of smartcard physically.](https://usermanual.wiki/IDP/SMART-30S/User-Guide-2065635-Page-65.png)
![]]“ICH Discontact” is to separate the encoder head from the IC chip of smartcard physically.“Init” is to recognize and display the installed contact smartcard reader.The recognizedencoder will be displayed at the pull down control.“Contact” is to contact with the smartcard electrically and initialize.“Reset” is to finish the function electrically. After “Contact”, you can run “Get ATR”, “Read”,“Write” and “Clear”.“Get ATR” is to read the ATR data.“Read” and “Write” are to read and write the defined data (Name, Address and Phone). Thesecould not be applied to all cards.“Clear” is to clear the displayed data (ATR, Name, Address and Phone).In case the data is read and written using APDU, Read/Write can be done by APDU commands.“Load APDU” is to read the stored APDU commands.“Save APDU” is to save the displayed APDU commands.“Clear APDU” is to clear the APDU section.“Send APDU” is to run the APDU commands.Batch process repeats the following steps sequentially, Card “IN” ÆMove “IC” ÆIC “ICHContact” ÆIC “Init” ÆIC “Contact” ÆIC “Reset” ÆIC “ICH Dis-contact” ÆCard “OUT”.Pic.118 Contact smartcard encodingRF(PC/SC) : Contactless Smartcard EncodingIn SMART-30 printer, a contactless smartcard encoder can be installed and SMART-50 printerhas the internal and external contactless smartcard encoder. RF(PC/SC) is to read and write thecontactless smartcard. Using internal encoder, the printer brings a card into the printer from inputhopper and encodes a smartcard. Using external encoder, after putting a card on the top cover,you can encode because the antenna installed under the top cover is used. Therefore, “Batch” isapplied only to the internal contactless smartcard encoding.“Contact” is to contact with the contactless smartcard electrically and initialize.“Reset” is to finish the function electrically. After “Contact”, you can run “Read”, “Write” and“Clear”.“Get UID” is for getting Chip Serial Number(CSN)“Read” and “Write” are to read and write the defined data (Name, Address and Phone). Thesecould not be applied to all cards.](https://usermanual.wiki/IDP/SMART-30S/User-Guide-2065635-Page-66.png)
![]^“Clear” is to clear the displayed data (ATR, Name, Address and Phone).In case the data is read and written using APDU, Read/Write can be done by APDU commands.“Load APDU” is to read the stored APDU commands.“Save APDU” is to save the displayed APDU commands.“Clear APDU” is to clear the APDU section.“Send APDU” is to run the APDU commands.Batch process repeats the following steps sequentially, Card “IN” ÆMove “RF” ÆRF“Connect” ÆGet UIDÆRF “Discontact” ÆCard “OUT”Pic.119 Contactless smartcard encoding4.2.6. Printer status“Get Temperature” is to get and display the temperature of Thermal Print Head. When the “RealtimeCheck” is ticked, it displays the current temperature of Thermal Print Head in real time.“Get Status” is to get and display the printer status.Status Code#define SMSC_M_CARDIN 0x0000000000000001 // Card In#define SMSC_M_CARDOUT 0x0000000000000002 // Card Out#define SMSC_M_MOVE_PRINT 0x0000000000000004 // Move to print#define SMSC_M_MOVE_PRN2ROT 0x0000000000000008 // Move from printer to flipper#define SMSC_M_MOVE_ROT2PRN 0x0000000000000010 // Move from flipper to printer#define SMSC_M_MOVE_IC 0x0000000000000020 // Move to contact encode#define SMSC_M_MOVE_RF 0x0000000000000040 // Move to contactless encode#define SMSC_M_MOVE_MAG 0x0000000000000080 // Move to Magnetic encode#define SMSC_M_THUP 0x0000000000000100 // Thermal head up#define SMSC_M_THDOWN 0x0000000000000200 // Thermal head down#define SMSC_M_ICHUP 0x0000000000000400 // Contact head up#define SMSC_M_ICHDOWN 0x0000000000000800 // Contact head down#define SMSC_M_PRINT 0x0000000000001000 // Printing#define SMSC_M_MAGRW 0x0000000000002000 // Read/Write Magnetic data#define SMSC_M_SEEKRIBBON 0x0000000000004000 // Ribbon search#define SMSC_M_MOVERIBBON 0x0000000000008000 // Ribbon Move#define SMSC_M_ROTATORTOP 0x0000000000010000 // Rotate Card up](https://usermanual.wiki/IDP/SMART-30S/User-Guide-2065635-Page-67.png)
![]_#define SMSC_M_ROTATORBOTTOM 0x0000000000020000 // Rotate Card down#define SMSC_S_HOPPERHASCARD 0x0000000000040000 // Card in hopper#define SMSC_S_THUP 0x0000000000080000 // Thermal head up#define SMSC_S_CARDIN 0x0000000000100000 // Detect Card in#define SMSC_S_CARDOUT 0x0000000000200000 // Detect Card out#define SMSC_S_ROTATORTOP 0x0000000000400000 // Card front side up in Flipper#define SMSC_S_EQUIPROTATOR 0x0000000000800000 // Flipper installed#define SMSC_M_RECVPRINTDATA 0x0000000001000000 // Importing print buffer#define SMSC_S_HASPRINTBUFFER 0x0000000002000000 // Reserving print buffer#define SMSC_M_SBSRUNNING 0x0000000004000000 // Executing SBS Commands#define SMSC_S_SBSMODE 0x0000000008000000 // SBS mode#define SMSC_S_CASEOPEN 0x0000000010000000 // Case open#define SMSC_M_INIT 0x0000000020000000 // Initializing#define SMSC_S_TESTMODE 0x0000000080000000 // Test modeFrom card printer firm-ware version 1.00.60 , some values are changed like bellows from black colortexts to red color texts.#define SMSC_S_THUP 0x0000000000080000 // Thermal head up status#define SMSC_S_CLEANWARNING 0x0000000000080000 // Need cleaning of printer#define SMSC_S_ROTATORTOP 0x0000000000400000 // Front card up status in rotator#define SMSC_S_EQUIPLAMINATOR 0x0000000000400000 // Laminator is installedError Code#define SMSC_F_CARDIN 0x0000000100000000 // Error Card in#define SMSC_F_MOVETOPRINT 0x0000000200000000 // Card move Error#define SMSC_F_CARDOUT 0x0000000400000000 // Card out Error#define SMSC_F_MOVETOMAG 0x0000000800000000 // Card move Error (Magnetic)#define SMSC_F_MOVETOIC 0x0000001000000000 // Card move Error (Contact)#define SMSC_F_MOVETORF 0x0000002000000000 // Card move Error (Contactless)#define SMSC_F_MOVETOROTATOR 0x0000004000000000 // Card move Error (Printer to Flipper)#define SMSC_F_MOVEFROMROTATOR 0x0000008000000000 // Card move Error (Flipper to Printer)#define SMSC_F_THUP 0x0000010000000000 // Thermal head up Error#define SMSC_F_THDOWN 0x0000020000000000 // Thermal head down Error#define SMSC_F_ICHUP 0x0000040000000000 // Contact head up Error#define SMSC_F_ICHDOWN 0x0000080000000000 // Contact head down Error#define SMSC_F_ROTATORTOP 0x0000100000000000 // Card rotate up Error#define SMSC_F_ROTATORBOTTOM 0x0000200000000000 // Card rotate down Error#define SMSC_F_PRINT 0x0000400000000000 // Printing Error#define SMSC_F_MAGRW 0x0000800000000000 // Magnetic data Read/Write Error#define SMSC_E_SEEKRIBBON 0x0001000000000000 // Ribbon search Error#define SMSC_E_MOVERIBBON 0x0002000000000000 // Ribbon move Error#define SMSC_E_NOTH 0x0004000000000000 // Uninstalled Thermal head#define SMSC_E_THOVERHEAT 0x0008000000000000 // Overheat Thermal head#define SMSC_E_EMPTYRIBBON 0x0010000000000000 // No Ribbon#define SMSC_F_DATA 0x0020000000000000 // Data Error#define SMSC_F_CARDBACKOUT 0x0040000000000000 // Card out to back Error#define SMSC_F_CARDERASE 0x0080000000000000 // Cannot Remove data#define SMSC_F_INCORRECT_PW 0x0100000000000000 // Incorrect Password#define SMSC_F_MAGREADT1 0x0200000000000000 // Read data Error Mag. Track.1#define SMSC_F_MAGREADT2 0x0400000000000000 // Read data Error Mag. Track.2#define SMSC_F_MAGREADT3 0x0800000000000000 // Read data Error Mag. Track.3#define SMSC_F_LOCKED 0x1000000000000000 // Device Locked#define SMSC_F_SPOOLFULL 0x2000000000000000 // Exceed Printer Spool#define SMSC_F_SET 0x4000000000000000 // Recent motion failLaminator’s Status Code#define LMSC_M_HEATHDRLIFTUP 0x0000000000000001 // Heat-header is being lifted up#define LMSC_M_HEATHDRLIFTDOWN 0x0000000000000004 // Heat-header is being lifted down#define LMSC_M_CARDIN 0x0000000000000010 // Card In#define LMSC_M_MOVE_LAMINATE 0x0000000000000040 // Moving to laminate position#define LMSC_M_FRONTCARDOUT 0x0000000000000100 // Card is being moved out to front.#define LMSC_M_REARCARDOUT 0x0000000000000200 // Card is being moved out to rear.#define LMSC_M_ROTATE 0x0000000000000400 // Rotating#define LMSC_S_WAIT 0x0000000000000800 // Waiting#define LMSC_S_CMDRUN 0x0000000000002000 // Command is being executed.#define LMSC_M_HEATING 0x0000000000004000 // Heating Heat-header#define LMSC_S_CASEOPEN 0x0000000000008000 // Top cover is opened#define LMSC_M_LAMINATING 0x0000000000010000 // Laminating#define LMSC_S_CARDINSENSOR 0x0000000020000000 // Caught by card in sensor](https://usermanual.wiki/IDP/SMART-30S/User-Guide-2065635-Page-68.png)
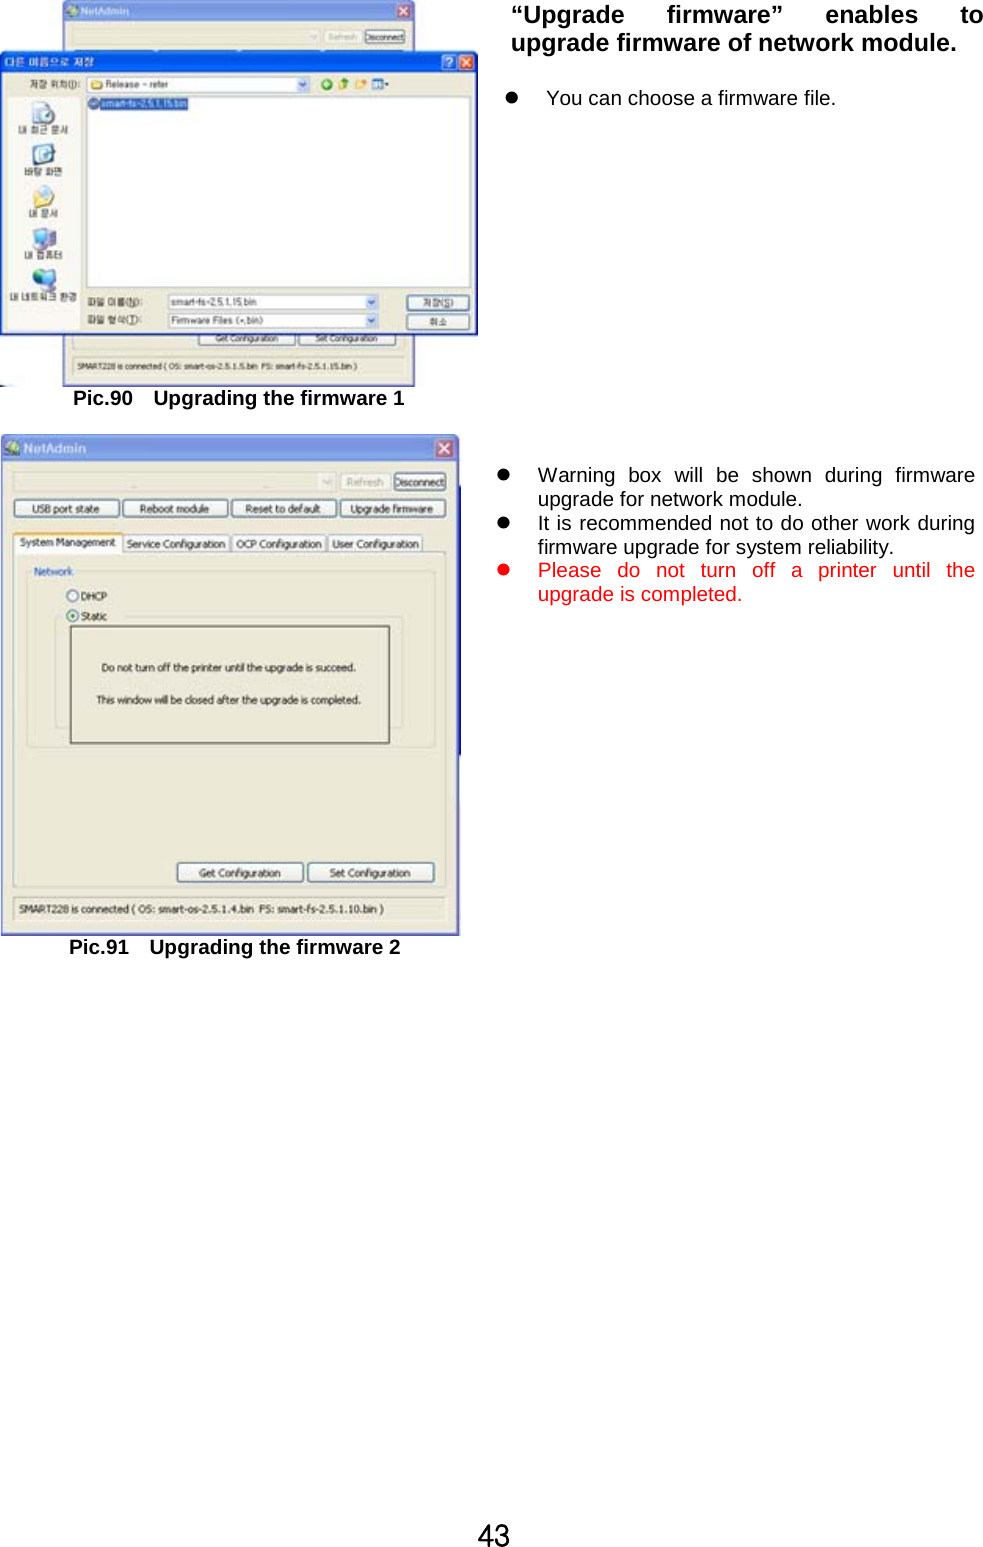
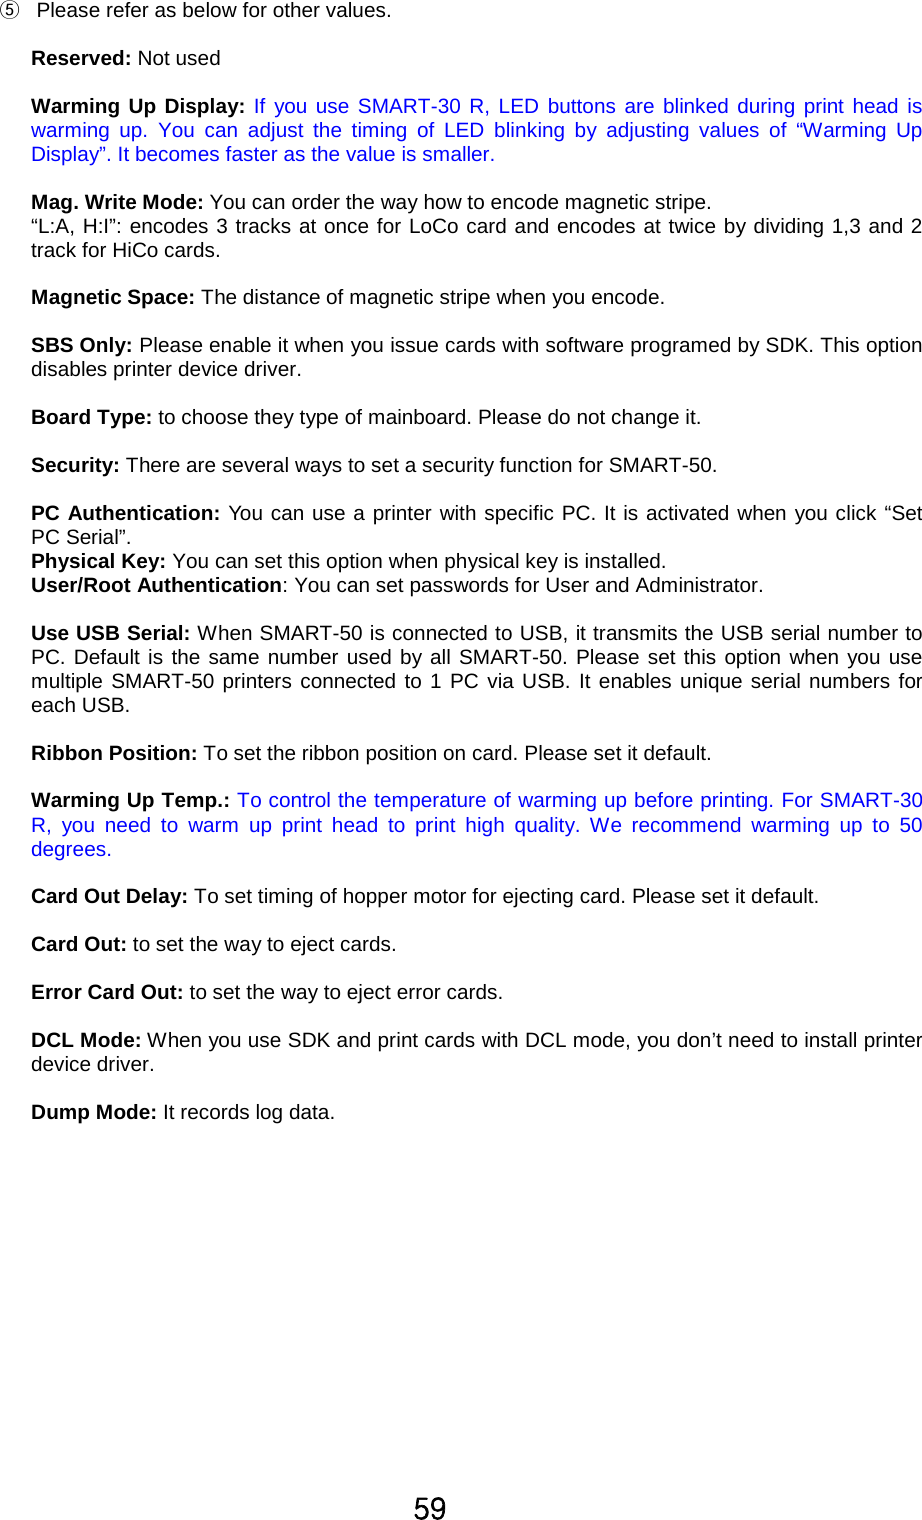
![]`#define LMSC_S_CARDOUTSENSOR 0x0000000040000000 // Caught by card out sensor#define LMSC_S_OUTDOORSENSOR 0x0000000080000000 // Caught by stacker open sensorLaminator’s Error Code#define LMSC_E_HEATHDRLIFTUP 0x0000000100000000 // Error while lifting up Heat-header#define LMSC_E_HEATHDRLIFTDOWN 0x0000000400000000 // Error while lifting down Heat-header#define LMSC_E_CARDIN 0x0000001000000000 // Error while moving card in#define LMSC_E_MOVE_LAMINATE 0x0000004000000000 // Error while moving to Laminate position.#define LMSC_E_FRONTCARDOUT 0x0000010000000000 // Error while front card out (printer side)#define LMSC_E_REARCARDOUT 0x0000020000000000 // Error while rear card out (stacker side)#define LMSC_E_ROTATE 0x0000040000000000 // Error while rotating#define LMSC_E_INIT 0x0000800000000000 // Error while initializing laminator#define LMSC_E_EMPTYFILM 0x0001000000000000 // Film remain count is 0.#define LMSC_E_NOFILM 0x8000000000000000 // No film is installed, or cannot4.3. Firmware upgradeWhen you run the CardPrinterFirmware, you can see the pop-up window as the Pic. 120.Device: Select the local printer that you want to upgrade.Card Printer / Laminator: Select the device you want upgrade.Device Version: Displays the current firmware version of selected printer.Binary File: Click “Browse” button and select new firmware file to update.Manual Update: It is used when you want to upgrade manually.Update: Upgrades automatically. In generally, we recommend upgrading automatically.Close: Exit.Message : It displays information of upgrading.Pic.120 Upgrading printer firmware](https://usermanual.wiki/IDP/SMART-30S/User-Guide-2065635-Page-69.png)
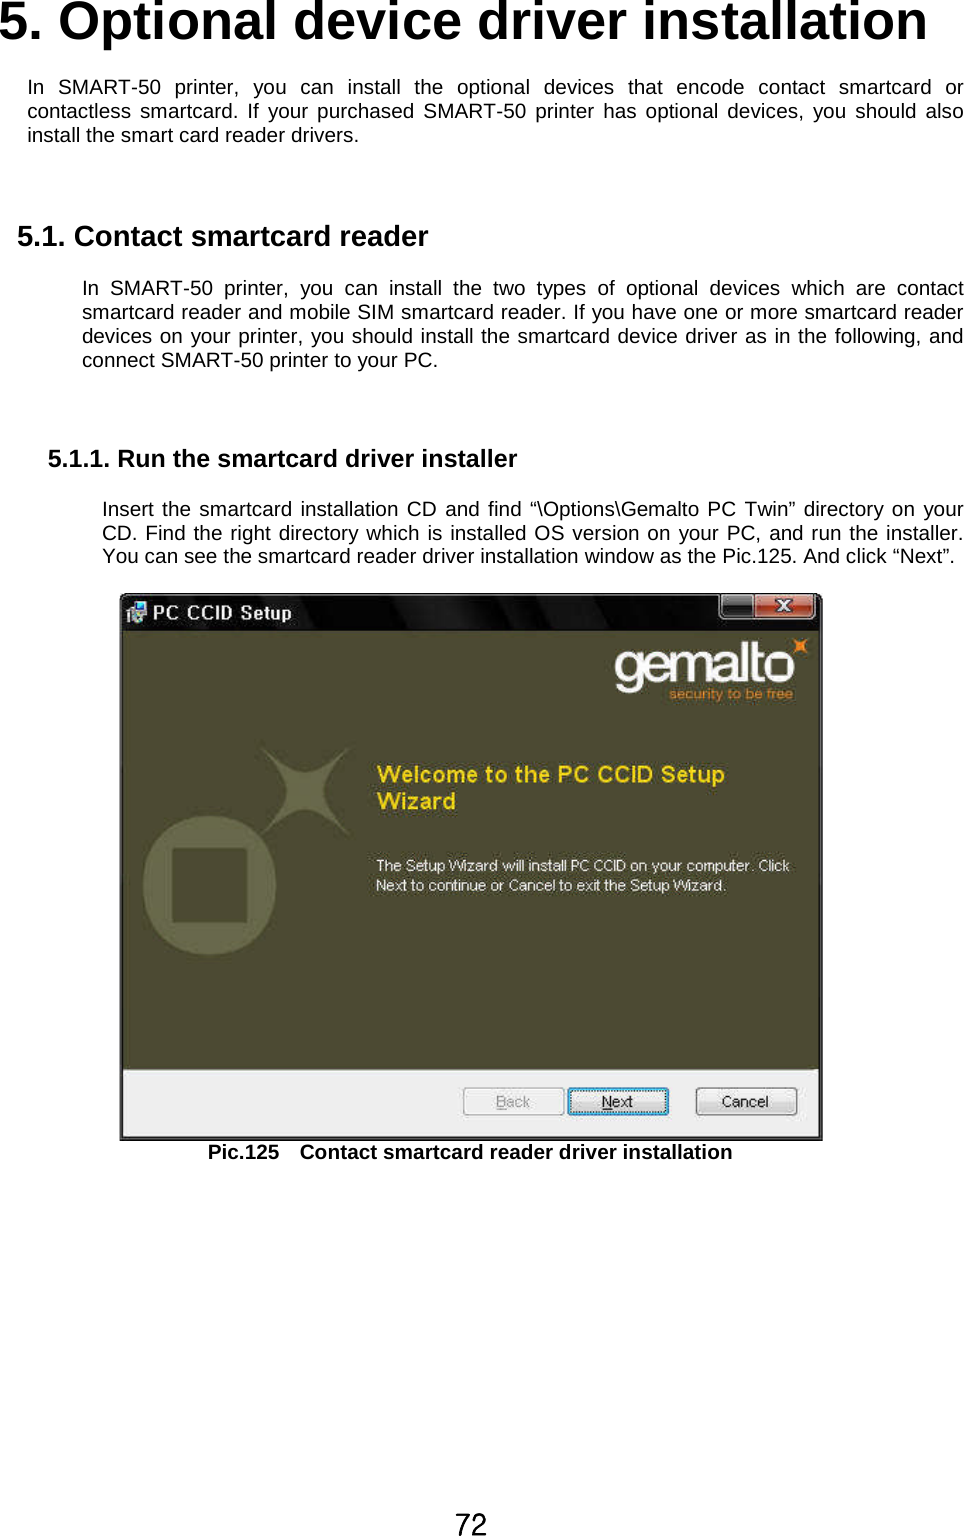
![^]5.2.3. Driver locationInsert the smartcard installation CD and find “\Options\ Omnikey 5121” directory on your CD.Find the right directory which is installed OS version on your PC, and select the directory asthe Pic.131, and click “Next”.Pic.131 Driver location5.2.4. Complete installationWhen the installation is completed, the window as the Pic121 is shown, click “Finish” tocomplete the installation steps.Pic.132 Completing the driver installation](https://usermanual.wiki/IDP/SMART-30S/User-Guide-2065635-Page-76.png)
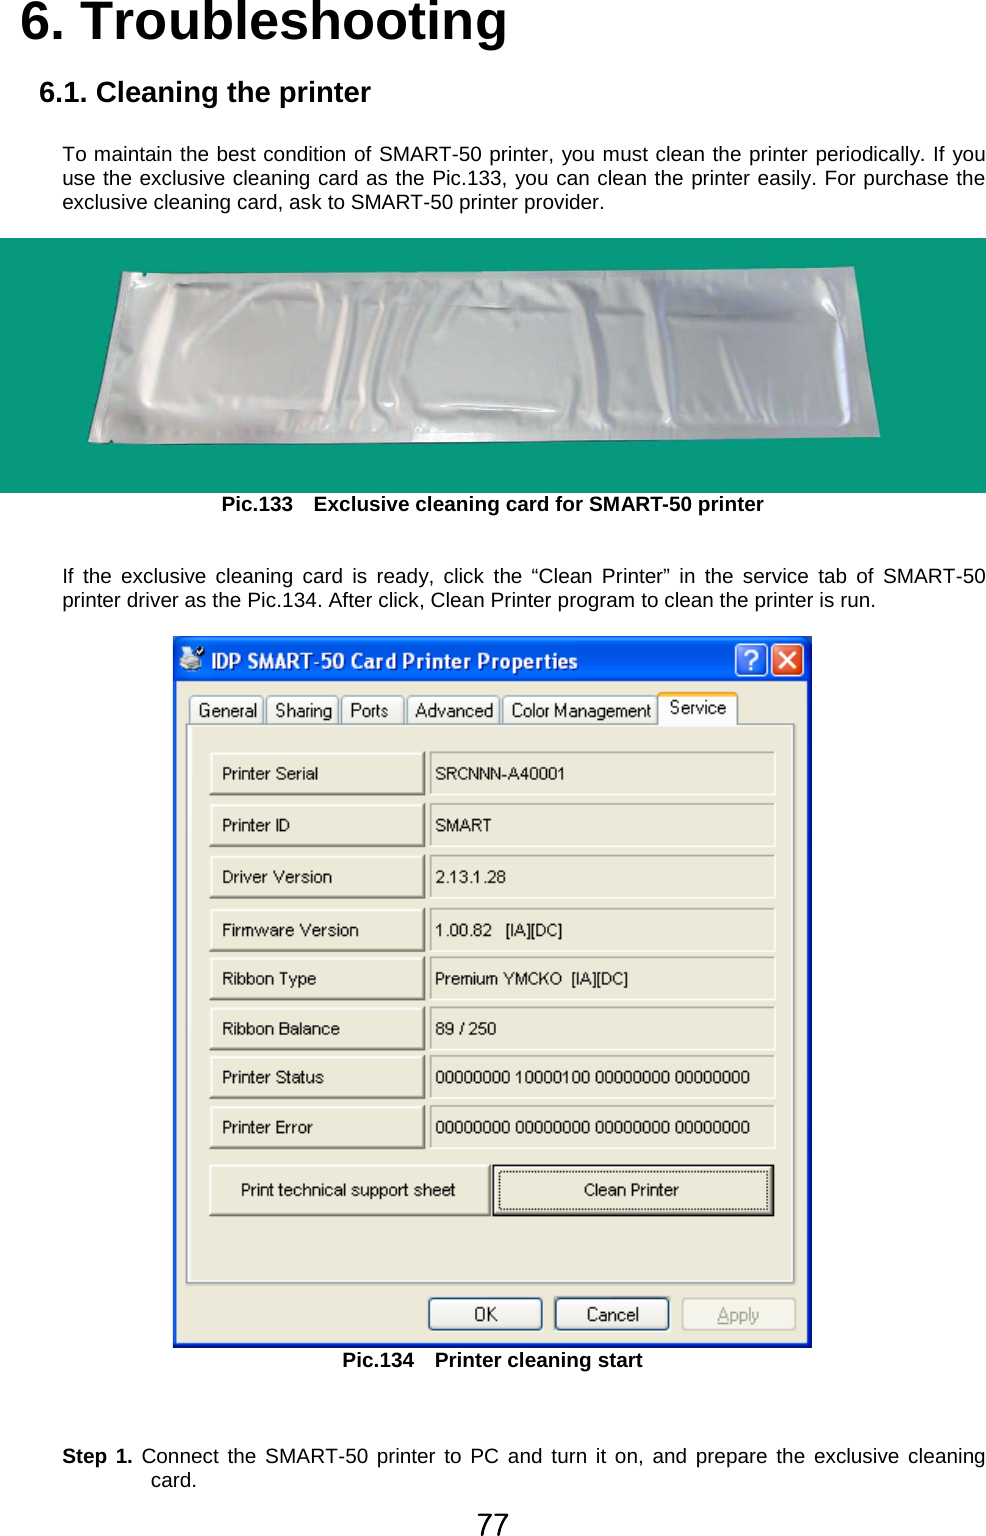
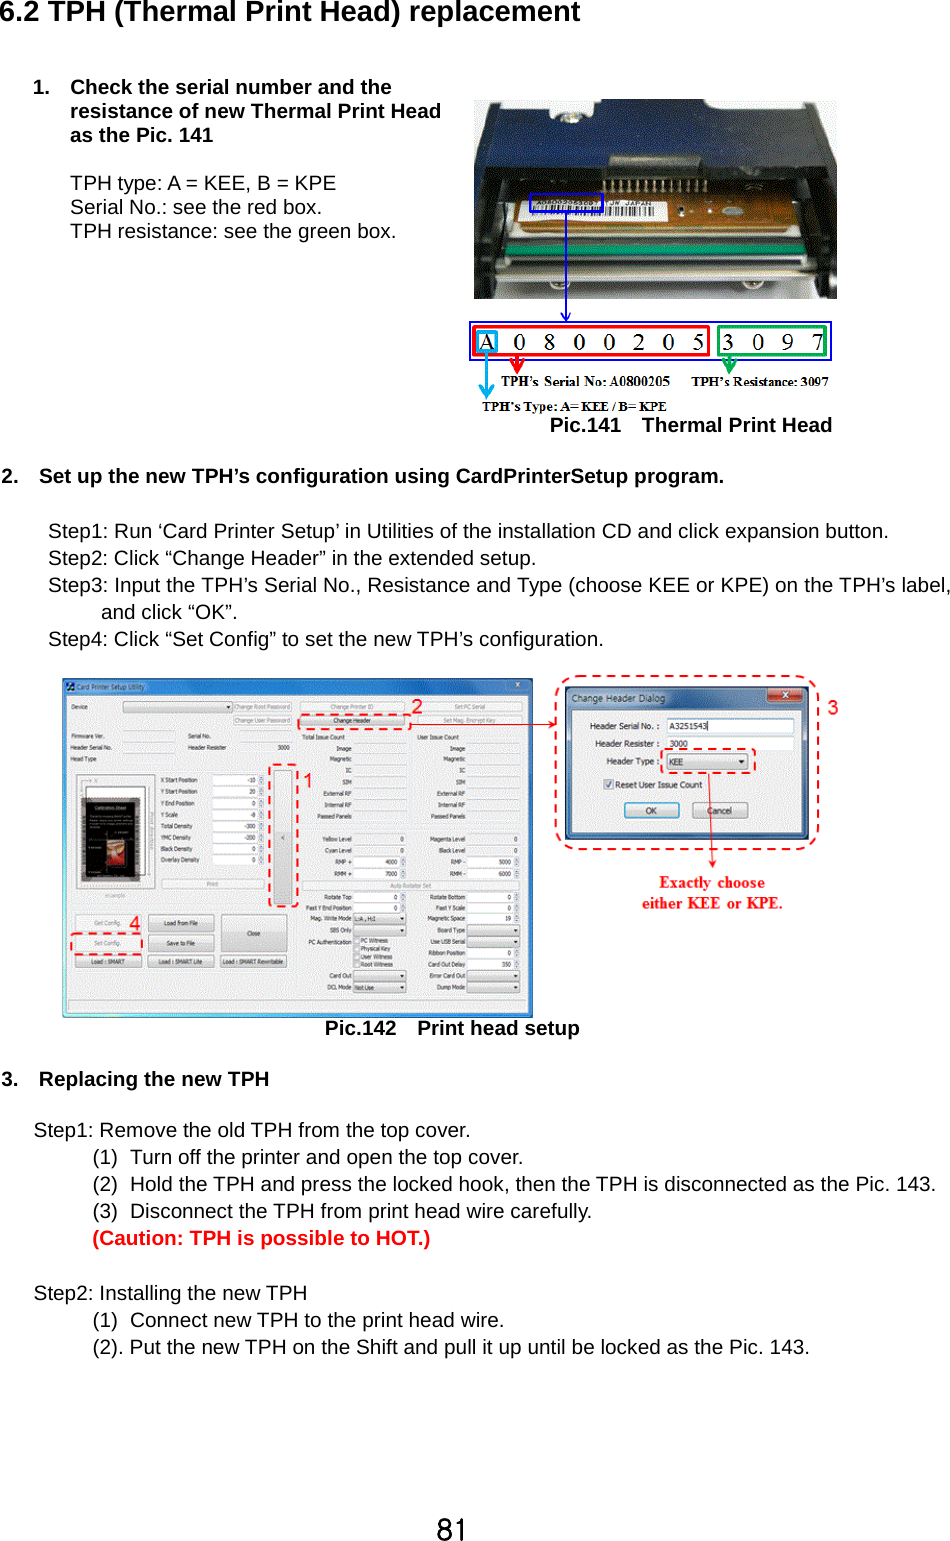

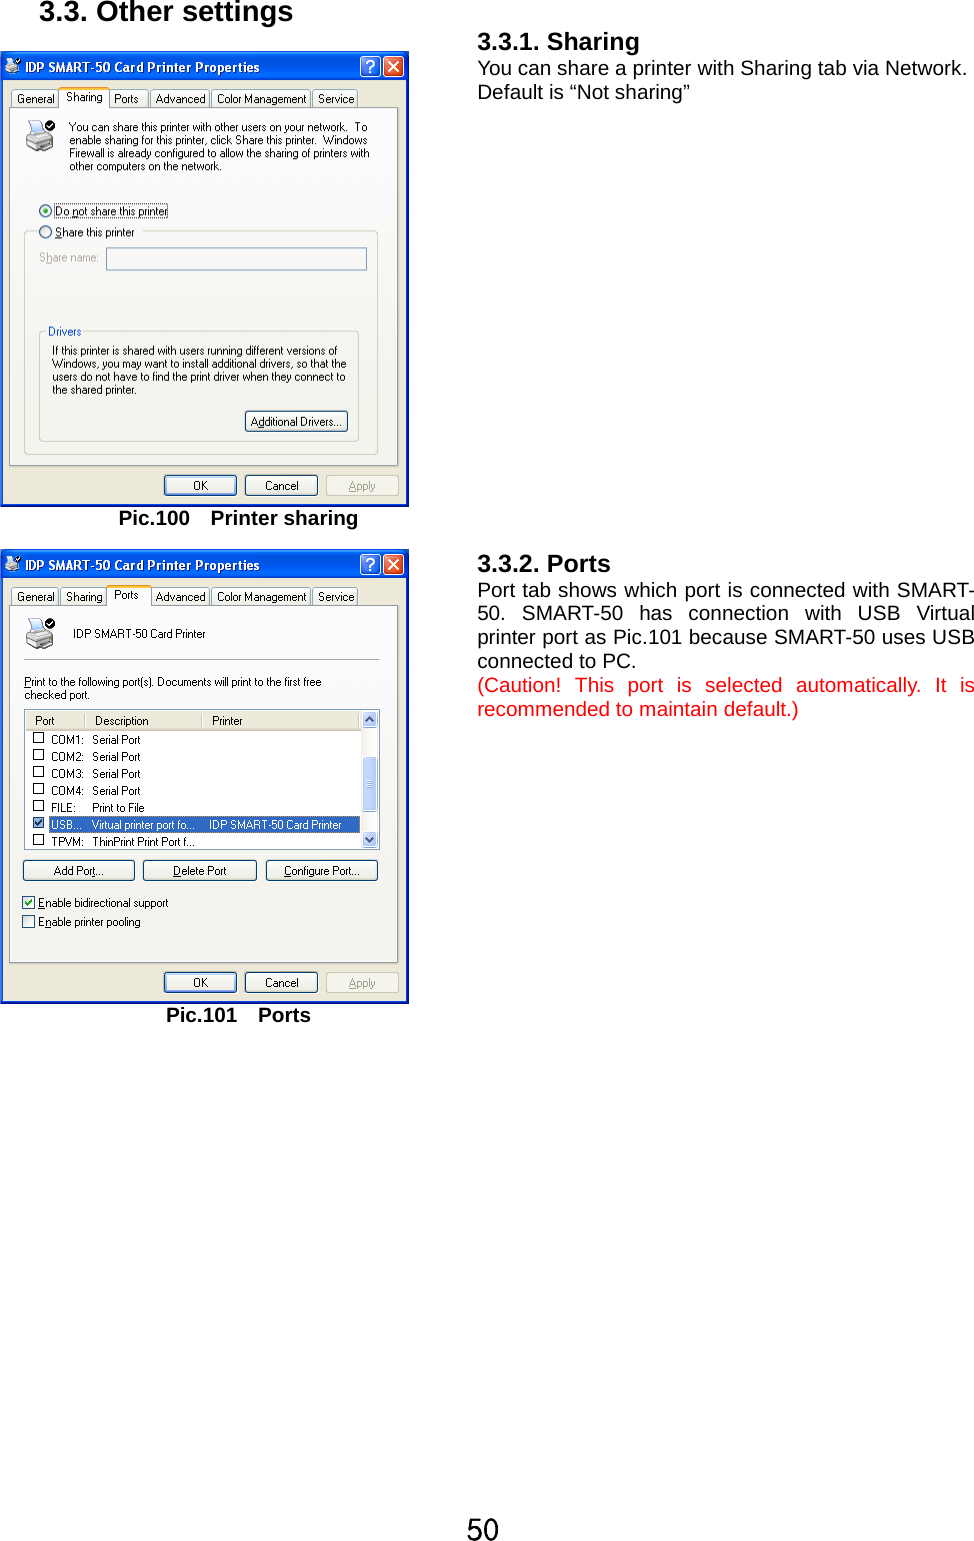
![_]7. Printer specificationProduct Specification SMART-30S SMART-30RPrint Type Dye-Sublimation / Resin Thermal Transfers Direct Thermal Printing & ErasingPrint AreaResolutionDual Side Printing Option -Card FeedingCard SizeCard ThicknessCard Type PVC, Composit PVC, PET Rewritable Thermochromic MaterialMonochrome 6 sec. (600 cards/hour) 20 sec (180 cards/hour) for Erase & WriteYMCKO 30 sec. (120 cards/hour) -YMCKOK - -Input HopperOutput HopperMonochrome Ribbon 1200 cards/roll TColor Ribbon YMCKO 250 cards/roll TMemoryControl Panel 1 LED Buttons 1 LED ButtonsSupported PlatformCommunicationsPower SupplyPower ConsumptionTemperature/HumiditySize(W x L x H) 172mm x 377mm x 190mm 172mm x 377mm x 190mmWeight 3.4Kg / 7.5lbs 3.1Kg / 6.8lbsMagnetic StripeContact Smart CardContactless Smart CardCertifications CE, FCC, KCCapacitySystem25 cardsMicrosoft Windows 2003, XP, Vista(32/64bit), 7(32/64bit), 8(23/64bit)DimensionsISO7816 (ID-1), SIM Type - ISO7816 (ID-000)USB, Ethernet(Option)EncodingMiFare, DesFire, ISO 14443(type A/B), ISO 15693, iClassFree Voltage (AC 100/220V, 50~60Hz)ISO7811 (Track ዜ,ዝ,ዞRead / Write), JISዝ, HiCo / LoCo45W15~35ఁ/ 20~80%Certifications300 dpiAutomatic64MBPrint Speed(Max.)80 cardsPrintingCardsISO CR-80 (54mm x 86mm / 2.12" x 3.38")0.38mm (15mil) ~ 0.76mm (30mil)Edge to EdgePic.150 Printer Specification 1](https://usermanual.wiki/IDP/SMART-30S/User-Guide-2065635-Page-86.png)