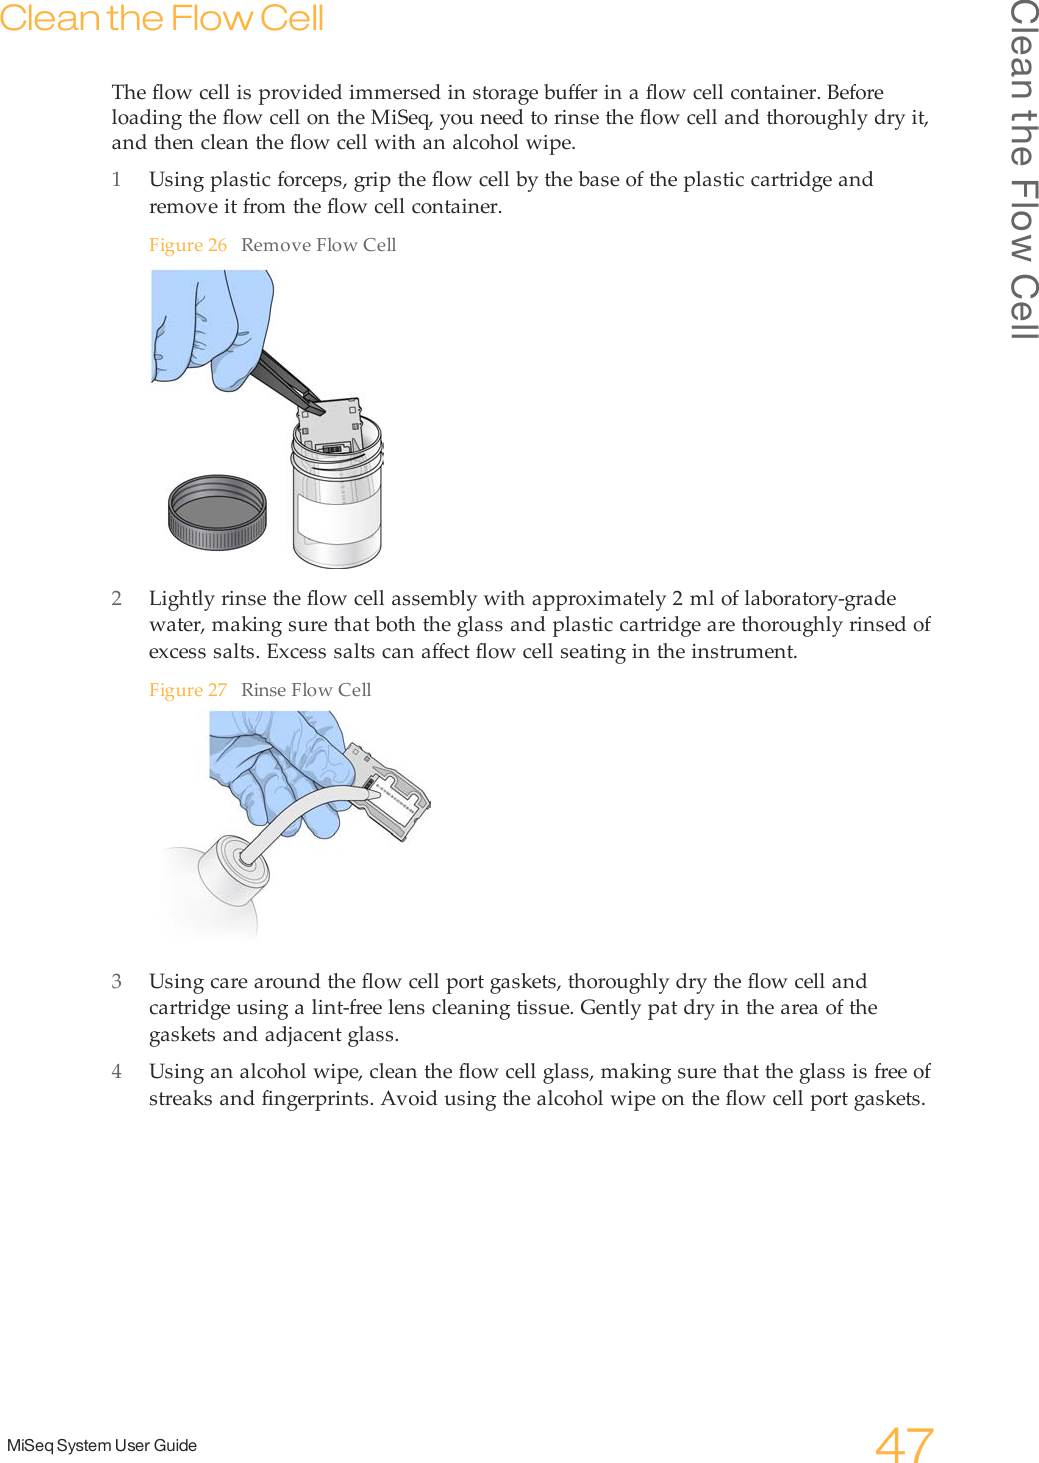
Illumina MISEQ MiSeq System User Manual My
Illumina, Inc. MiSeq System My
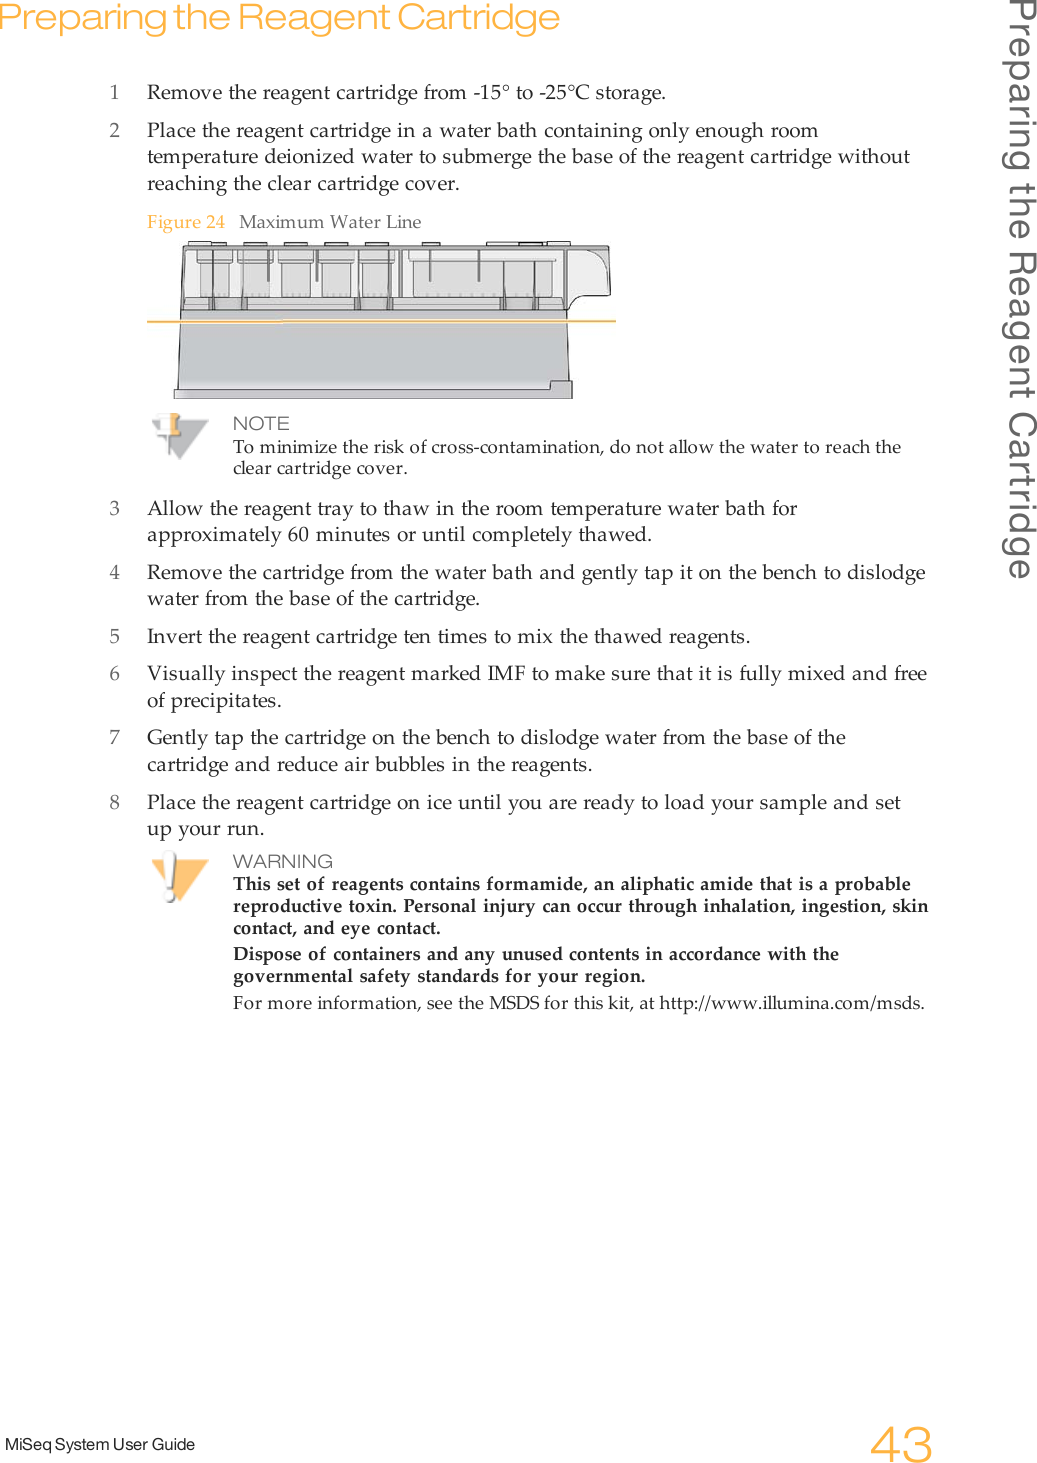
UserManual.wiki
>
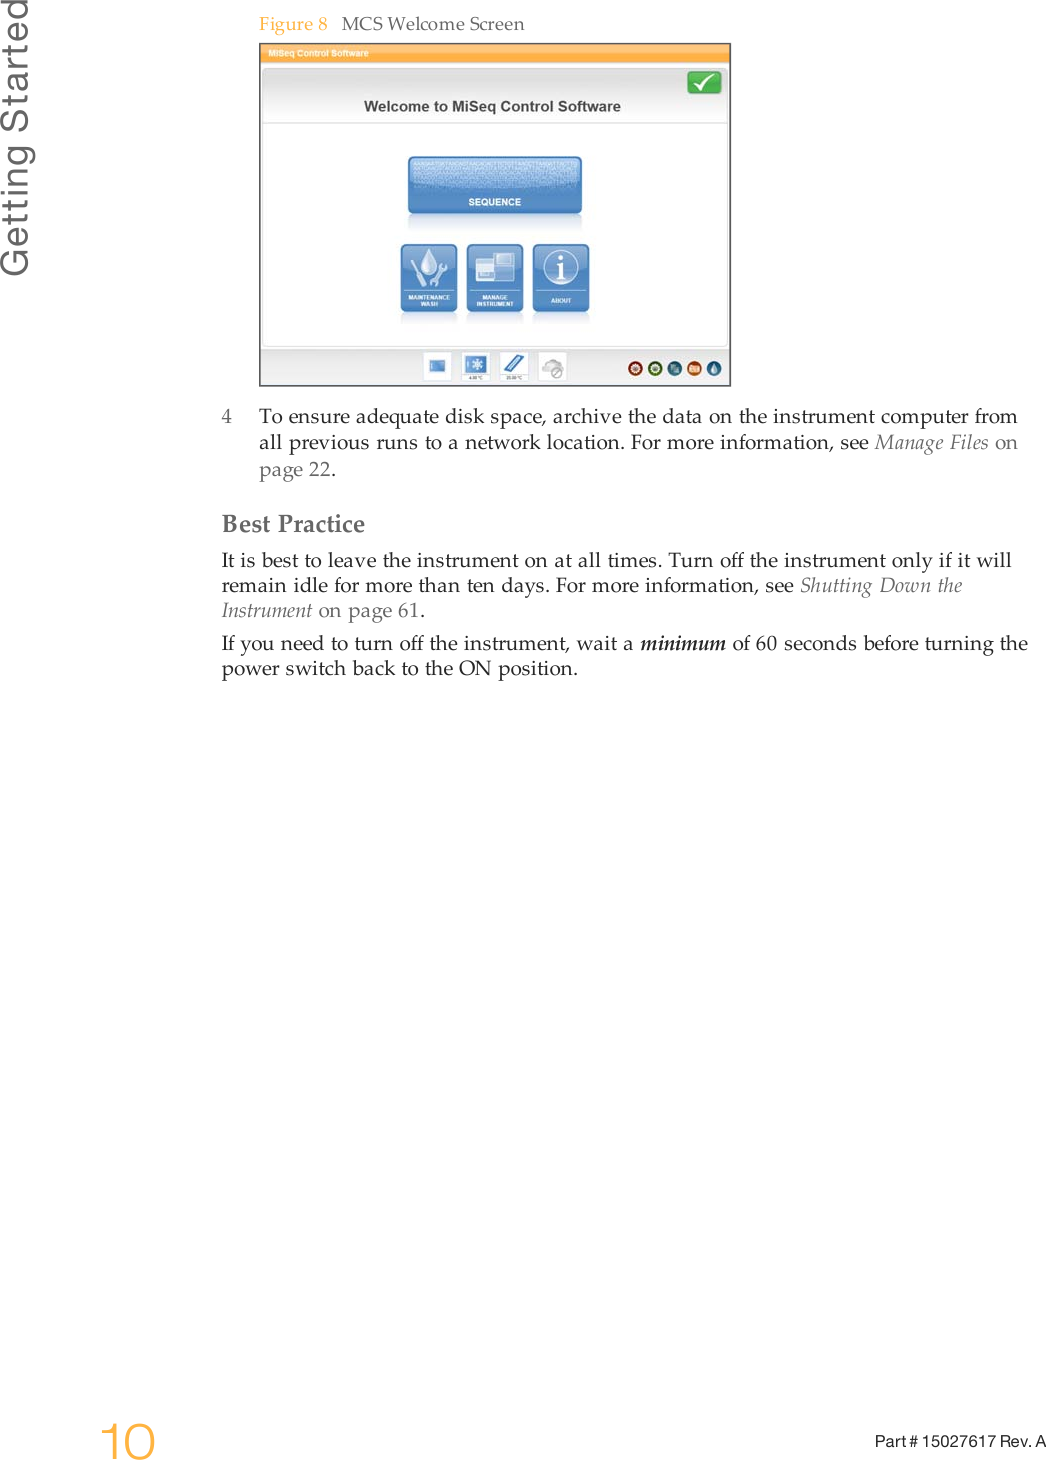
Illumina
>
MISEQ User Manual
>
MiSeq User Guide
Contents
1.
RF safety Compliance Manual
2.
MiSeq User Guide
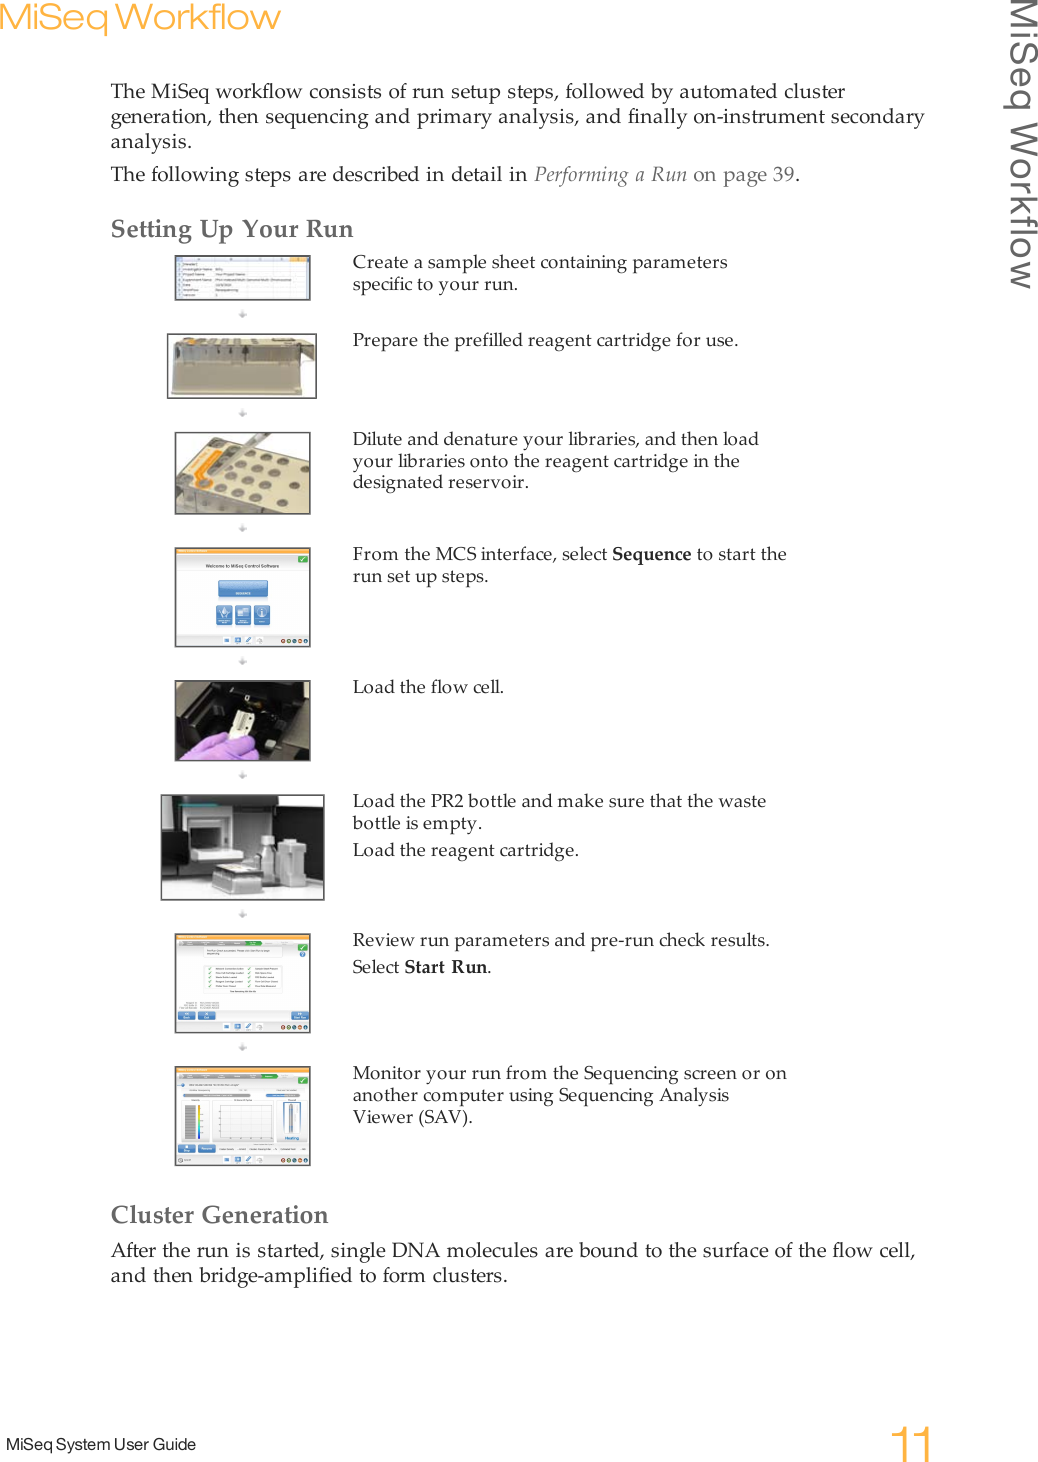
MiSeq User Guide
Navigation menu
Upload a User Manual
Namespaces
Wiki Guide
HTML
PDF
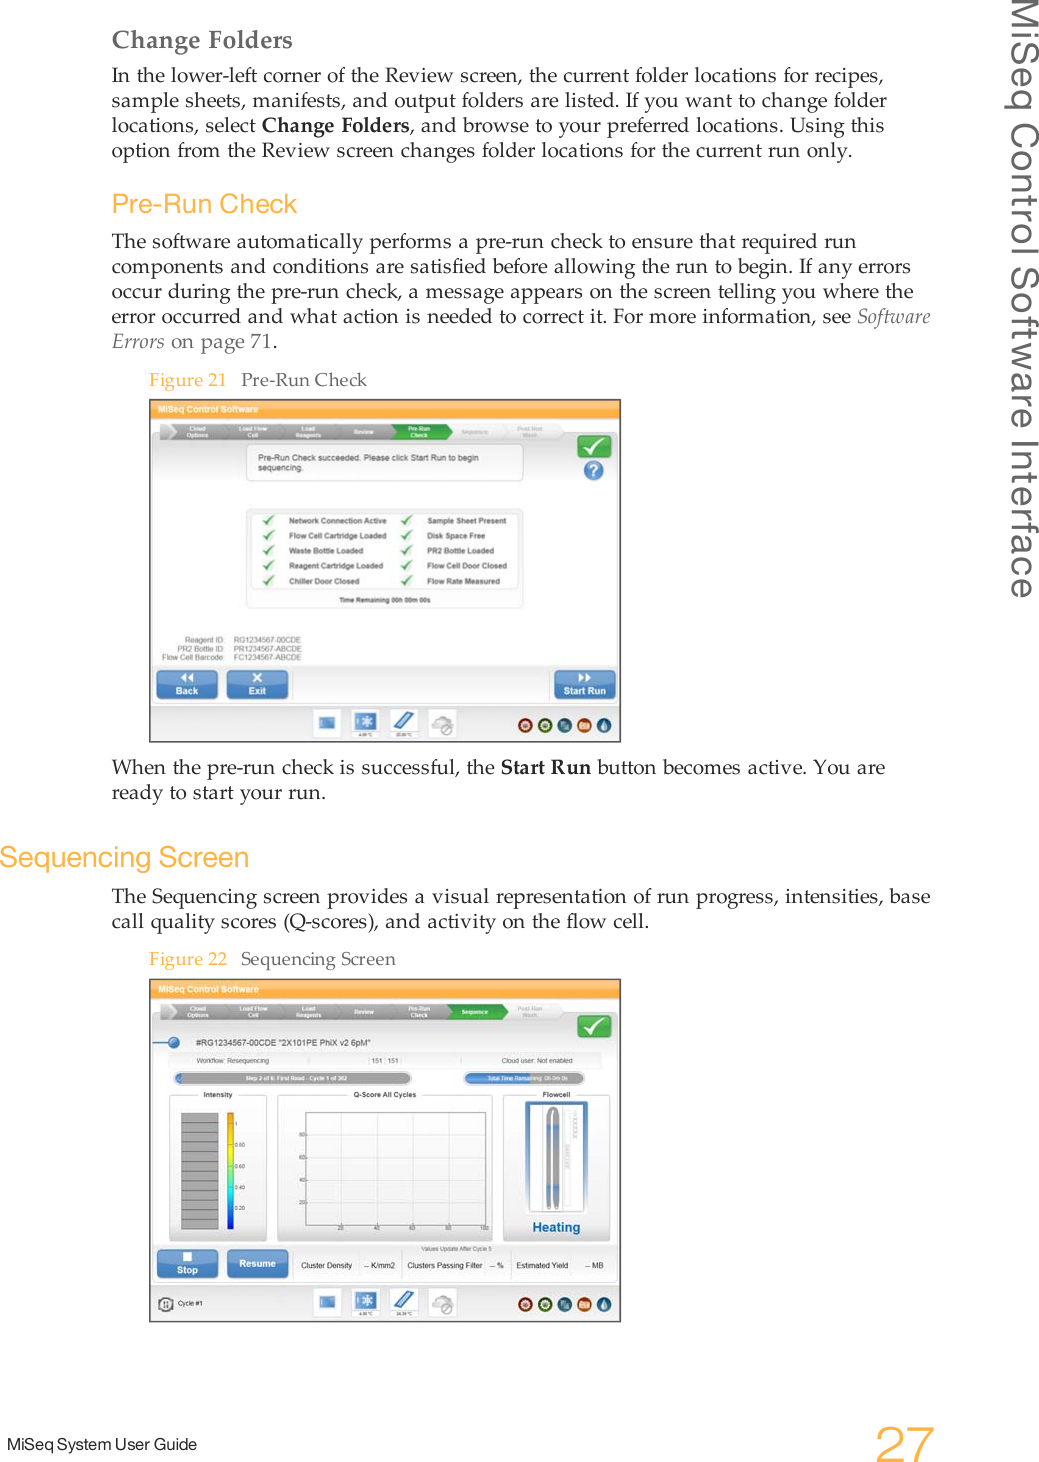
Info
Views
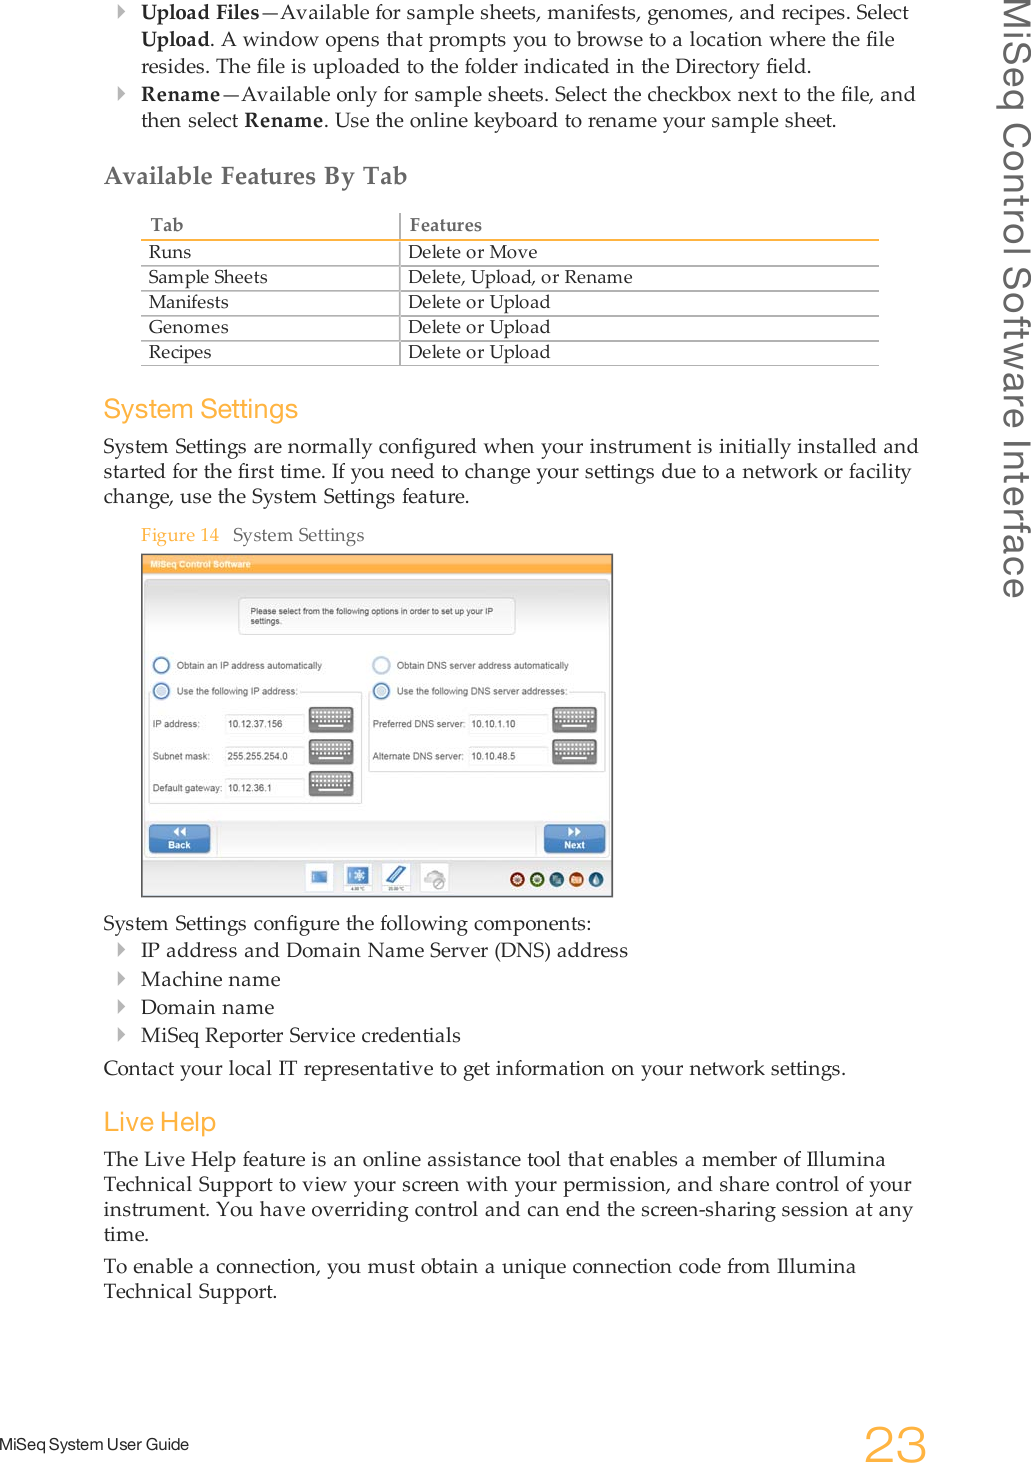
User Manual
Discussion / Help
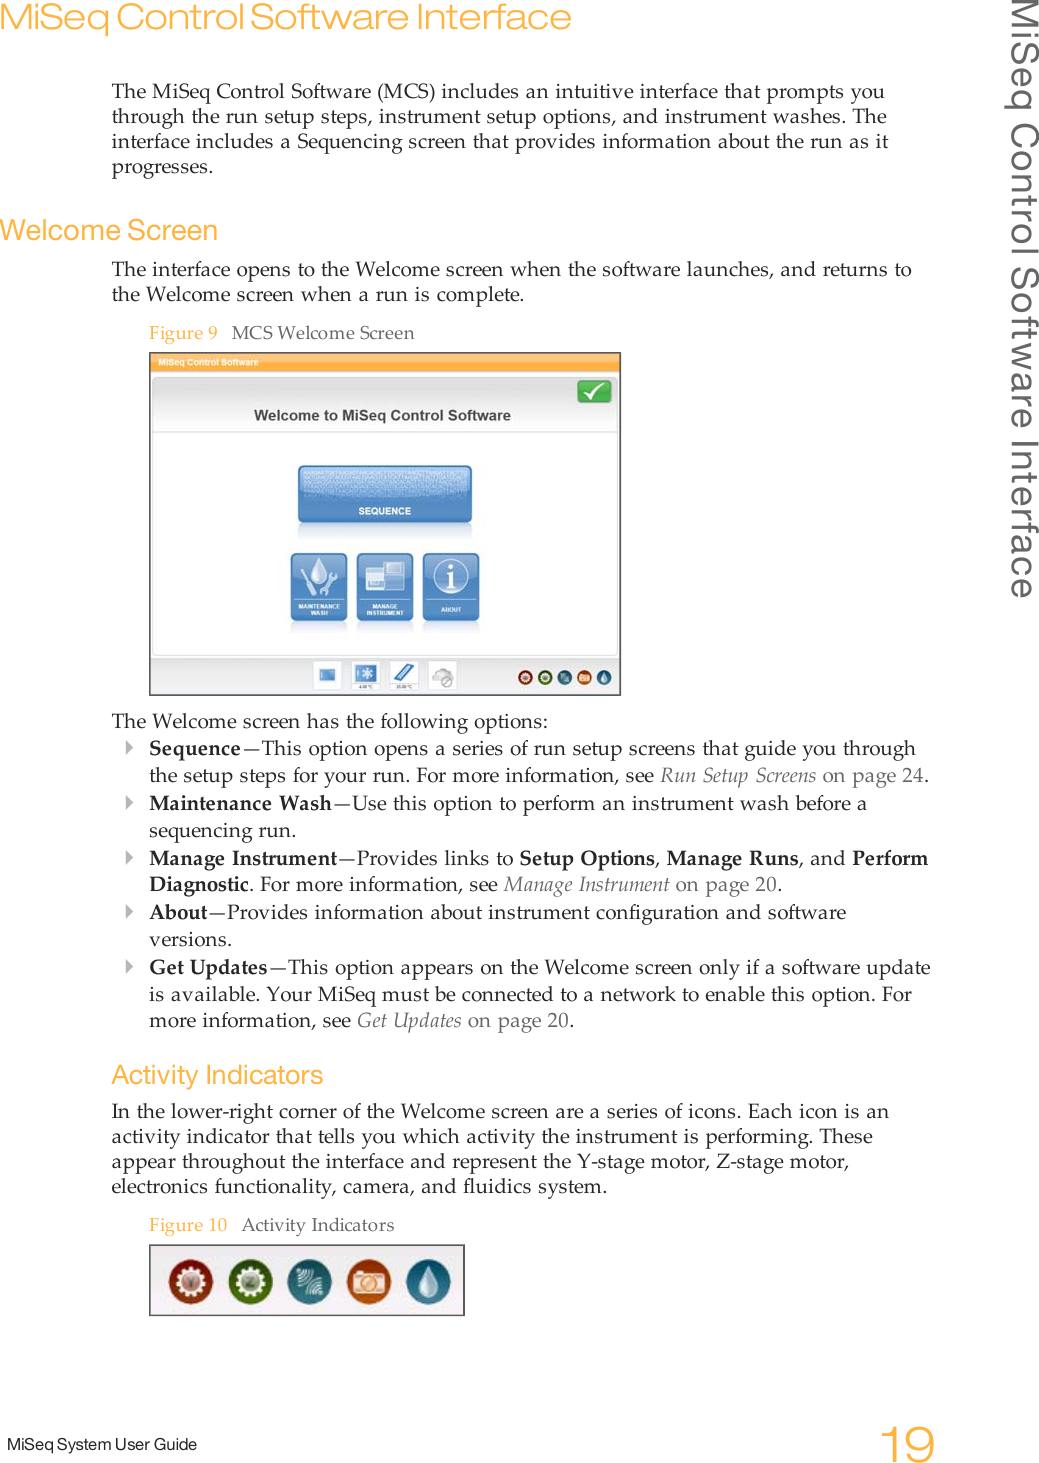
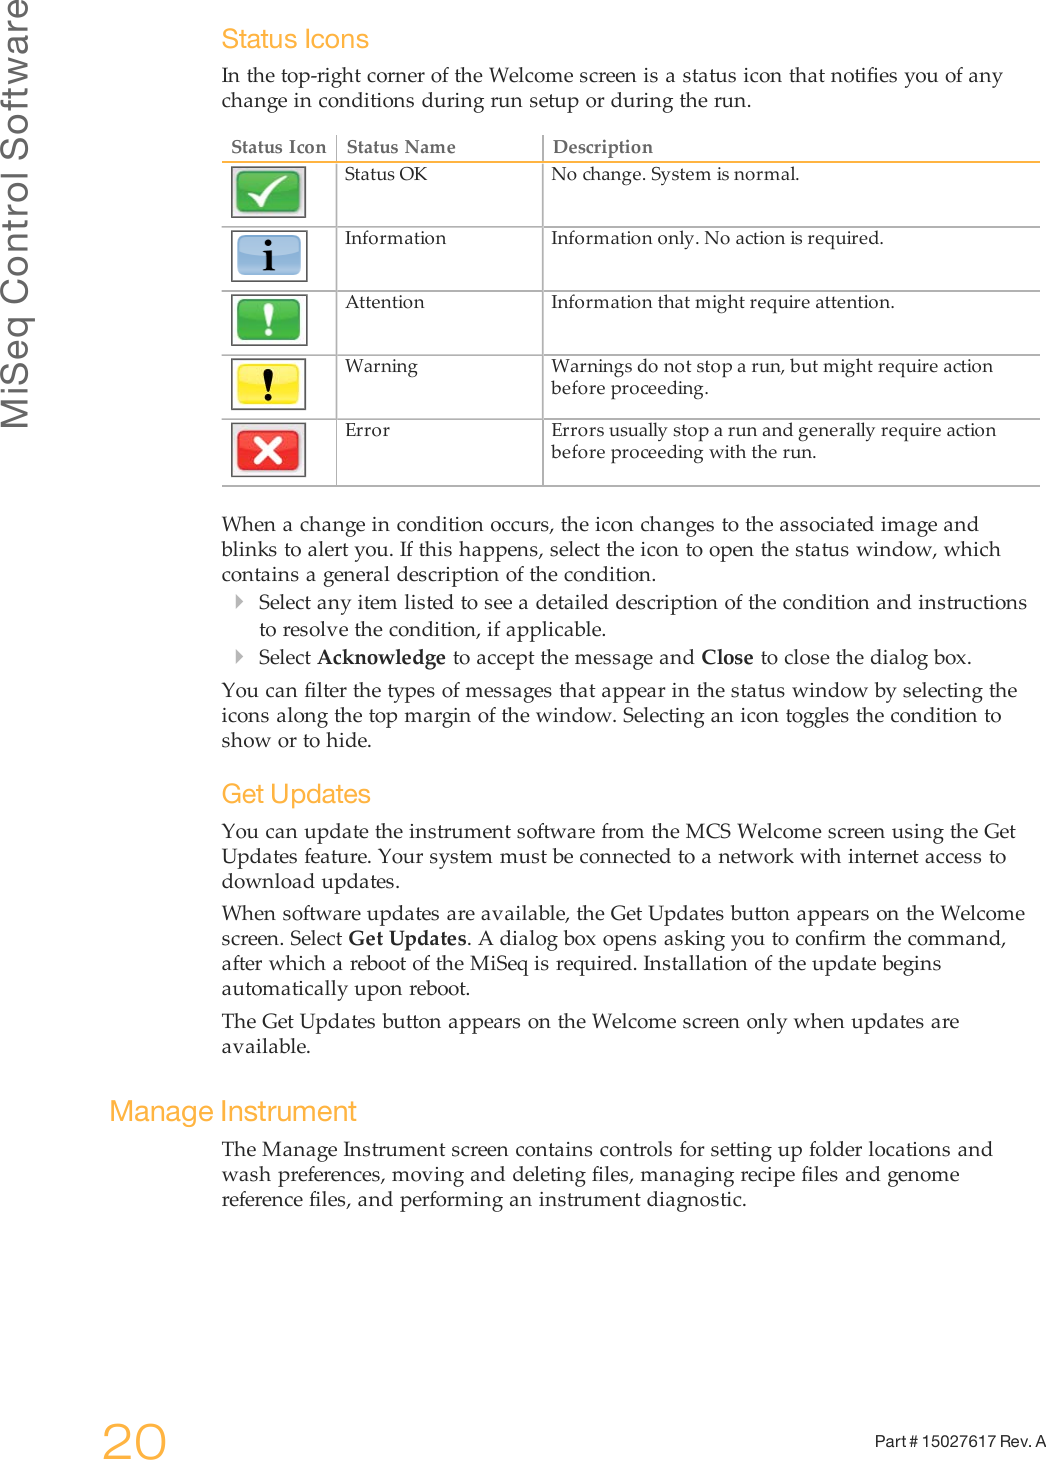
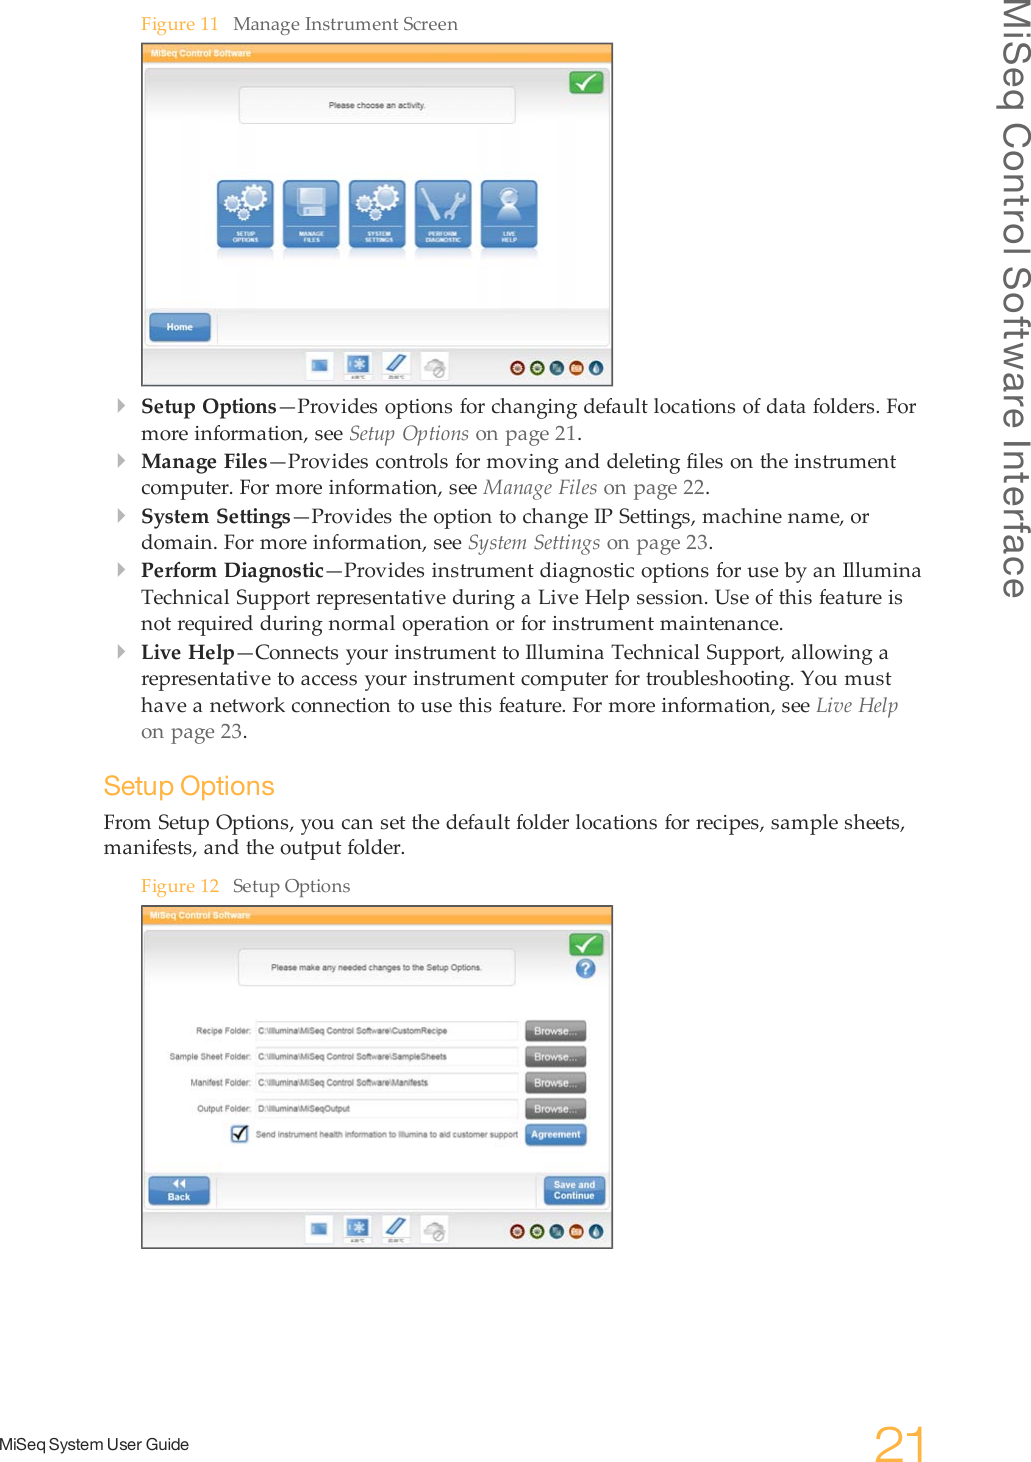
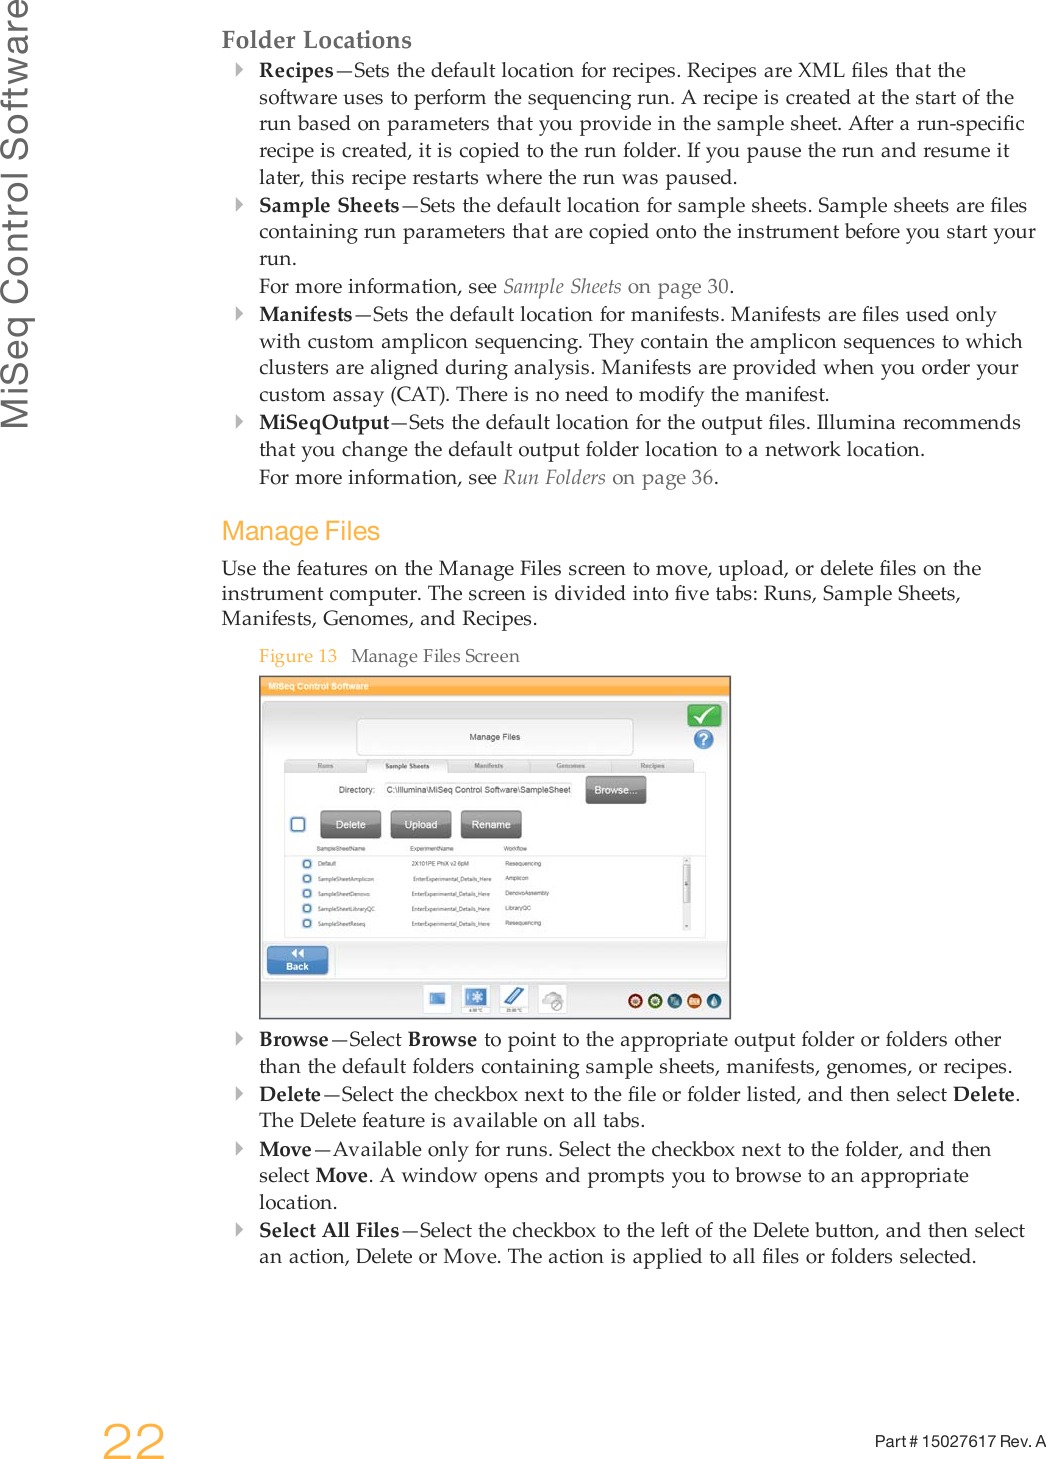
Navigation

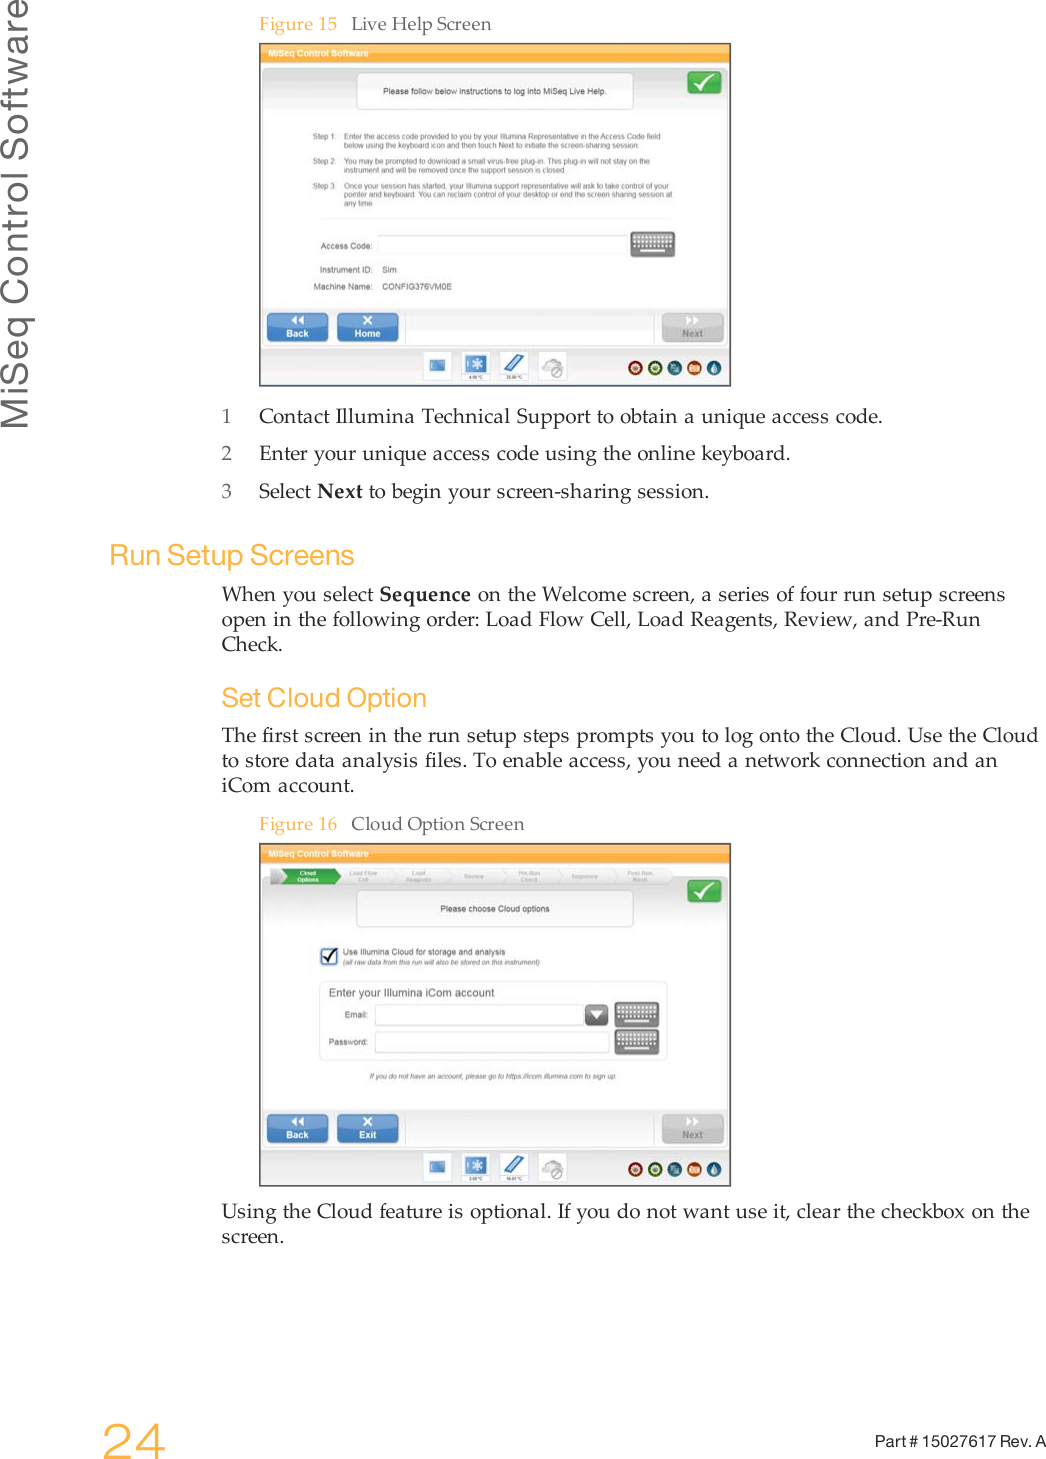

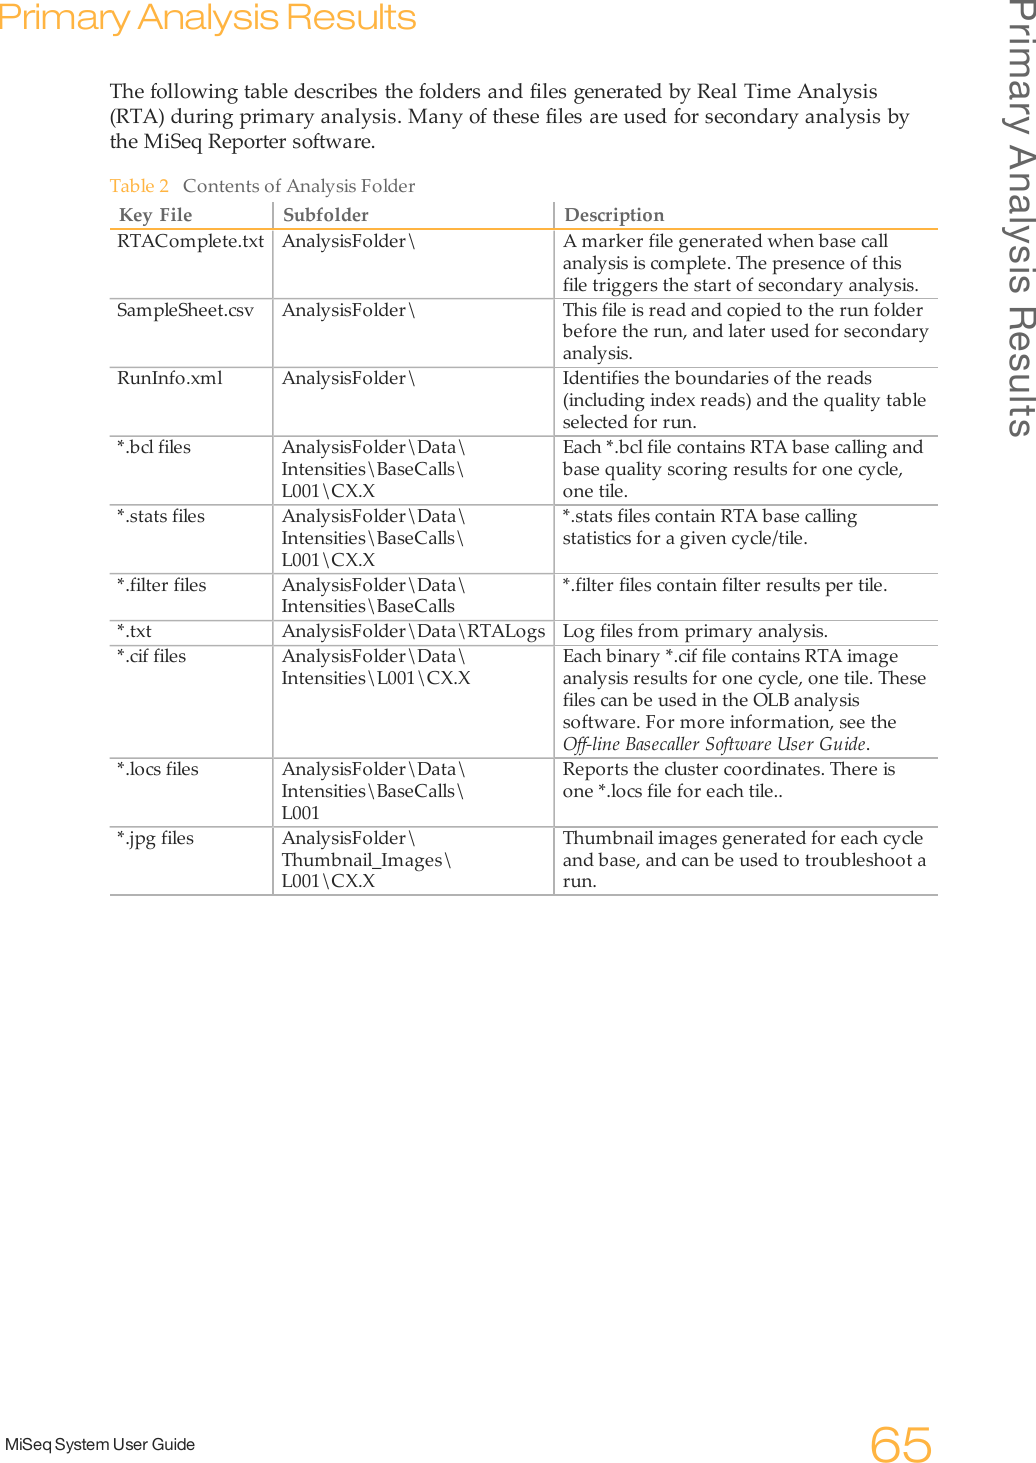
![MiSeq Control Software30 Part # 15027617 Rev. ASample SheetsThe sample sheet is a comma separated values (*.csv) file that stores much of theinformation needed to set up, perform, and analyze a sequencing run.During the run setup steps, the software automatically looks for a sample sheetassociated with reagent cartridge loaded onto the instrument in the previous run setupstep. Therefore, Illumina recommends that you name your sample sheet with thebarcode number of the reagent cartridge that you will use for your run, followed by *.csvextension. The barcode number is located on the cartridge label directly below thebarcode.Before starting your run, copy your sample sheet to the instrument computer or to thenetwork location indicated in Setup Options. When your run begins, the software copiesyour sample sheet to the root of your run folder.At the end of your run, the sample sheet is used for secondary analysis by the MiSeqReporter analysis software.Sample Sheet TemplateYou can open and edit the sample sheet template in Excel or in Notepad. A samplesheet template is available for download from the Illumina website athttp://www.illumina.com. Go to the MiSeq support page and click Downloads. AniCom account is required.NOTEDo not use commas within a field in the sample sheet. If a comma is includedwithin a field, your sample sheet will not be read correctly by the software.Illumina Experiment DesignerYou can use the Illumina Experiment Designer to create your sample sheet, a wizard-based application for creating the sample sheet. The Experiment Designer guides youthrough the steps to create your sample sheet based on the analysis workflow for yourrun.The Experiment Designer provides a feature for recording parameters for your sampleplate, such as sample ID, dual indices, and other parameters applicable to your 96-wellplate for Nextera, TruSeq DNA, TruSeq RNA, Small RNA, and Amplicon librarypreparation protocols. Using the Experiment Designer, you can import the sample plateparameters into your sample sheet. For more information, see the Experiment DesignerOnline Help integrated with the application.The Illumina Experiment Designer can be run on any Windows platform. You candownload the Experiment Designer from the Illumina website athttp://www.illumina.com. Go to the MiSeq support page and click Downloads. AniCom account is required.Sample Sheet ParametersThe sample sheet is organized by section text indicated by [ ] brackets, such as [Header],[Reads], [Manifests], and [Data]. Section text within brackets is case-sensitive. All otherfields are not case-sensitive.](https://usermanual.wiki/Illumina/MISEQ.MiSeq-User-Guide/User-Guide-1536960-Page-36.png)
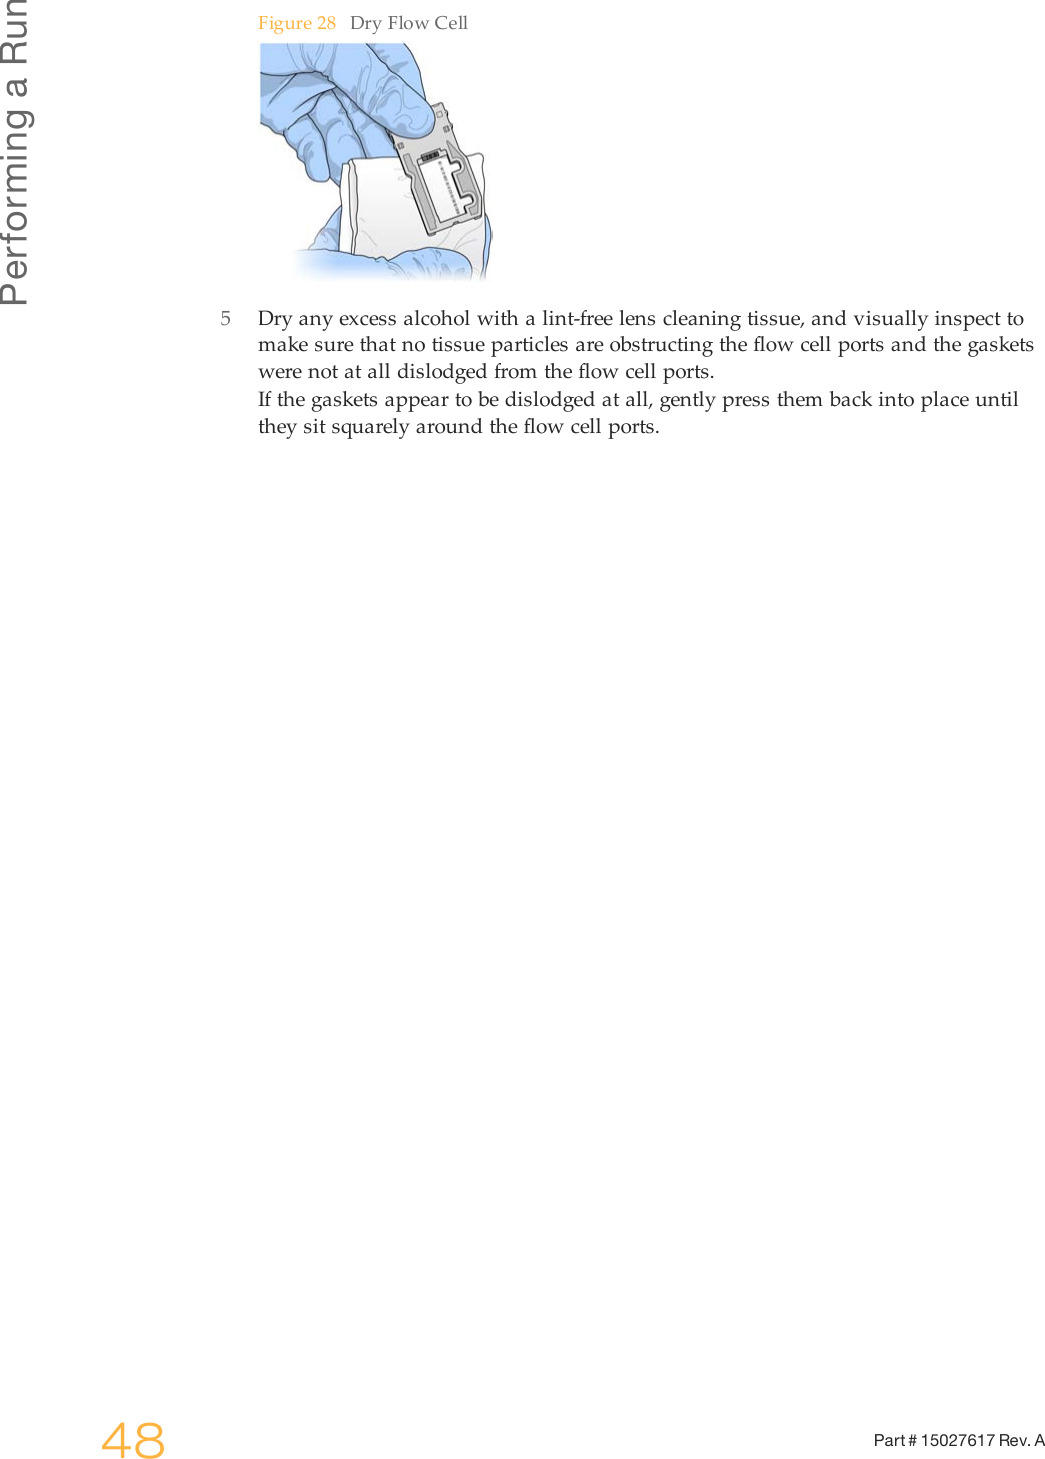
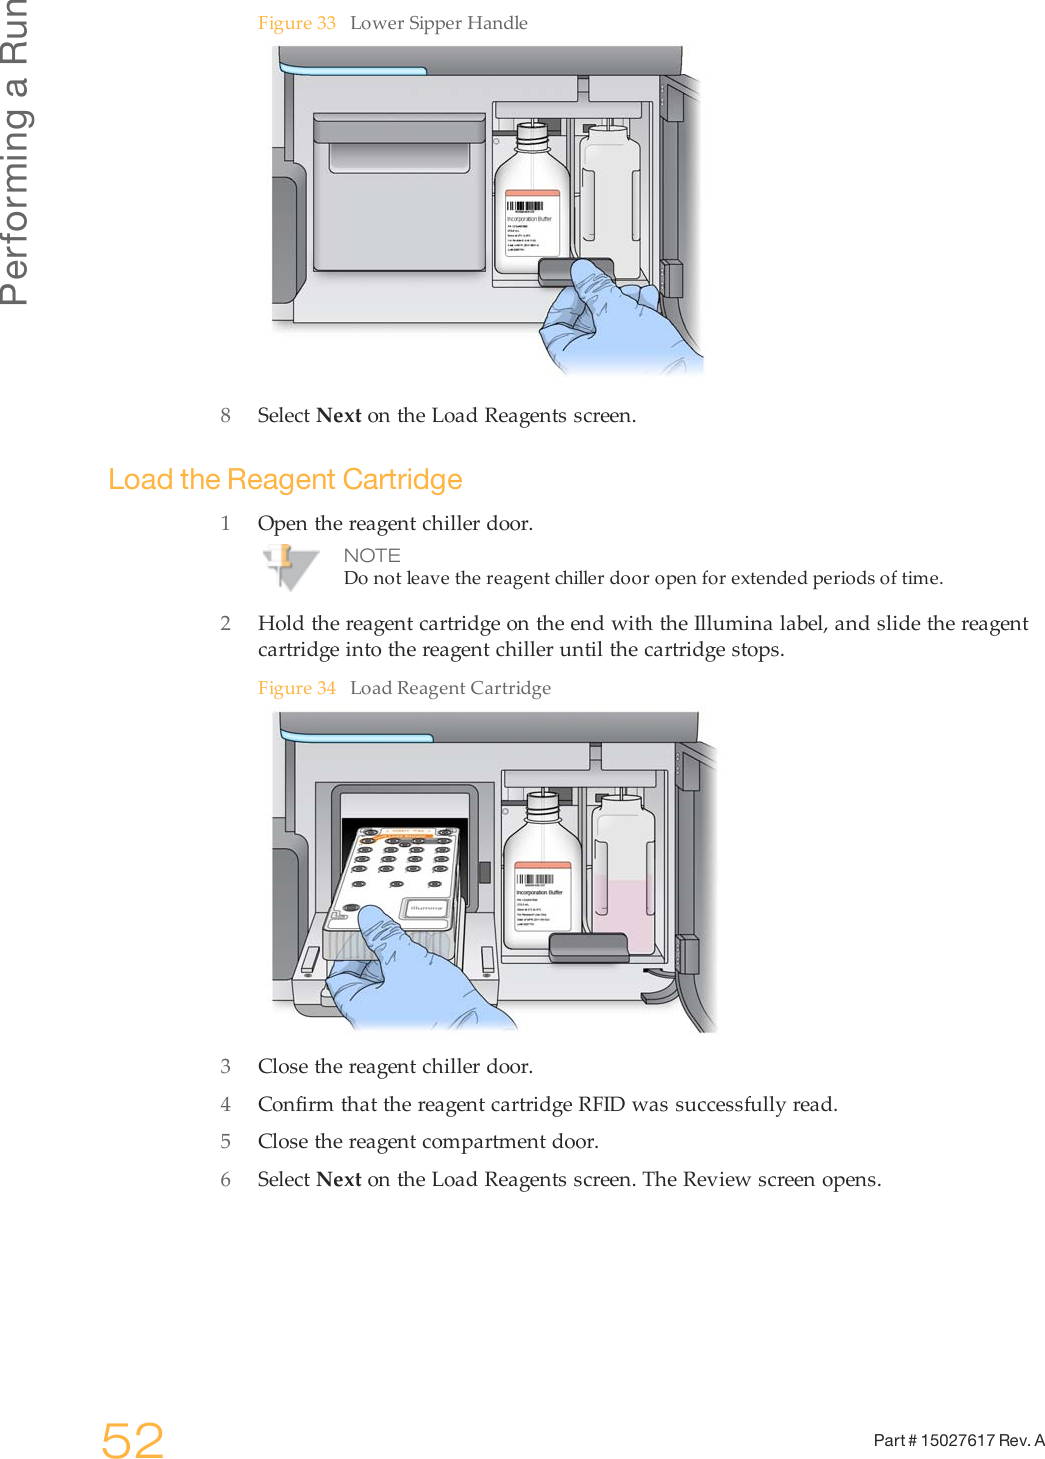
![Sample SheetsMiSeq System User Guide 31Figure 23 Sample Sheet Example in ExcelNot all sections of the sample sheet are applicable to every run. Applicable sectionsdepend on the analysis workflow used for your run.[Header]The Header section of the sample sheet contains information about your run. Extrafields are ignored.Parameter DescriptionInvestigator Name Your nameProject Name Project name of your preferenceExperiment Name Experiment name of your preferenceDate Date of your experimentWorkflow The analysis workflow for your run.You must type the analysis workflow name exactly as shown usingone of the following options: Resequencing, Amplicon,DenovoAssembly, SmallRNA, Metagenomics, or LibraryQC.If you are using the Experiment Designer, select your workflowfrom the drop-down menu.For more information, see Analysis Workflow on page 35.Chemistry The folder that contains recipe fragments used to build the recipe. Ifthis field is blank, the system uses the default recipe fragments.For TruSeq RNA or TruSeq DNA libraries, this field can be blankand use the default settings.For any workflows that use dual indexing, specifically Nextera andTruSeq Custom Amplicon, the chemistry field is required. Enter"amplicon" in this field.[Reads]Reads indicates the number of sequencing cycles in each read.Parameter DescriptionNumber of cycles forRead 1Read length of a target sequence.The number of cycles for the index read is indicated by the indexsequence the [Data] section.Number of cycles forRead 2Read length of a target sequence.](https://usermanual.wiki/Illumina/MISEQ.MiSeq-User-Guide/User-Guide-1536960-Page-37.png)
![MiSeq Control Software32 Part # 15027617 Rev. A[Manifests]This section of the sample sheet is mandatory for the Amplicon analysis workflow. Youdo not need to populate this section if you are using other analysis workflows.Parameter DescriptionName of manifest file Name of your manifest file provided by Illumina with your customassay (CAT). The manifest file must reside in the same folderlocation as the sample sheet.When you enter your manifest name, omit the file extension (*.txt).More than one manifest can be specified: one manifest for yourcustom CAT, and one manifest for the control CAT.[SiteReports]This section of the sample sheet is used by the Resequencing and Amplicon analysisworkflows.Parameter DescriptionName of SiteReport inputfileEach line in the SiteReports section is the name of a SiteReport inputfile. This file designates positions on a given chromosome to reportthe genotype found at that position.You can use more than one input file for a run. The SiteReport inputfile must reside in the same folder location as the sample sheet.The SiteReport input file is a comma-separated value (*.csv) formatfile that must adhere to the following format:•The first line are column names. Required columns are Positionand Chromosome.•Additional user-defined columns are appended to the resultinganalysis report for that position.When you enter your SiteReport input file name, omit the fileextension (*.csv).[Data]In this section, list sample information one sample per line. There must be at least onesample in this section. Each analysis workflow requires different columns in thissection. Column order is not important.Parameter DescriptionSampleID Required. This is usually a barcode but can have any value.Sample_Name Required. This is used in the reporting web page.Index Required for multi-sample assays.Nucleotide sequence in text format. Valid characters are A, C, G, T,and N, where N matches any base.Index2 Required for multi-sample assays with dual indexing.Nucleotide sequence in text format. Valid characters are A, C, G, T,and N, where N matches any base.Additional [Data] Columns for Resequencing WorkflowParameter DescriptionGenomeFolder Required.The reference genome folder containing the FASTA files to be usedin the alignment step.](https://usermanual.wiki/Illumina/MISEQ.MiSeq-User-Guide/User-Guide-1536960-Page-38.png)
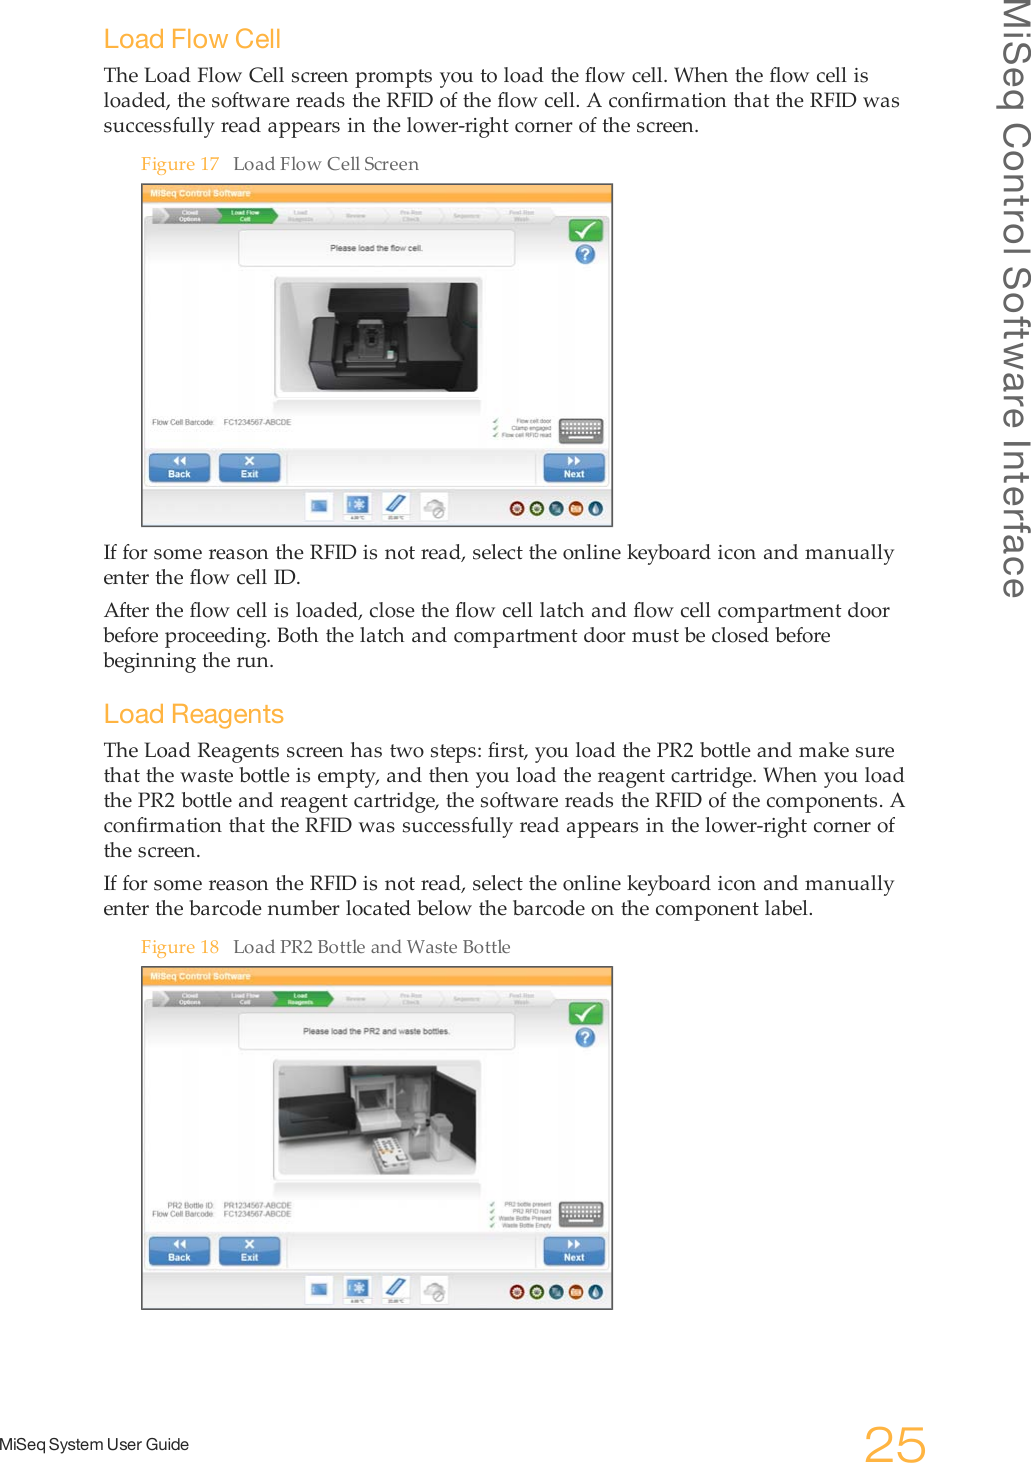
![Sample SheetsMiSeq System User Guide 33Additional [Data] Columns for Amplicon WorkflowParameter DescriptionGenomeFolder Recommended.It is used to provide variant annotations, if available, and to set thechromosome sizes in the *.bam file output.Additional [Data] Columns for DenovoAssembly WorkflowParameter DescriptionGenomeFolder(or Genome)Optional.If you populate this field, list the absolute path to the genome folder.•If the folder listed does not exist, MiSeq Reporter combines theGenomePath configuration setting with the genome string.•If the path does not exist, MiSeq Reporter stops processing.Additional [Data] Columns for SmallRNA WorkflowParameter DescriptionGenomeFolder Optional.A string identifier for the sample. This is usually a barcode but canhave any value. If provided, clusters are aligned against the fullreference genome.Contaminants String; required.The path to the folder containing the FASTA files of contaminants.miRNA Required.The path to the folder containing FASTA files of mature miRNAs.RNA Required.The path to folder containing FASTA files of small RNAs.Additional [Data] Columns for Library QC WorkflowParameter DescriptionGenomeFolder Required.The reference genome folder containing the FASTA files to be usedin the alignment step.[Settings]Settings are optional in the sample sheet. This section describes possible entries in theSettings section.Parameter DescriptionFilterPCRDuplicates Setting are 0 or 1. Default is 1, no filtering.If set to 0, PCR duplicates are filtered out from subsequent analysis.Duplicates are defined as paired-end reads where both reads havethe exact same alignment positions.MinQScore Specifies the Q-score threshold for variant calling.OnlyGenerateFastq Setting are 0 or 1. Default is 0.If set to 1, MiSeq Reporter generates FASTQ files and then exits theworkflow. This option is provided as a shortcut if you prefer to usethird-party tools to process FASTQ files.](https://usermanual.wiki/Illumina/MISEQ.MiSeq-User-Guide/User-Guide-1536960-Page-39.png)

![Setting Up the Sample SheetMiSeq System User Guide 41Setting Up the Sample SheetTo set up a run on the MiSeq, you first need to create the sample sheet for your run. Formore information, see Sample Sheets on page 30.When your sample sheet is ready, copy the sample sheet to a network locationconnected to your instrument. If your instrument is not connected to a network, you cancopy the sample sheet to the instrument using a USB flash drive.You can create the sample sheet using the sample sheet template or the IlluminaExperiment Designer, a wizard-based software application available for download fromthe Illumina website. For more information, see Illumina Experiment Designer on page 30.NOTEIllumina recommends that you name your sample sheet with the barcodenumber of the reagent cartridge that you will use for your sequencing run. Thebarcode number is located on the cartridge label.1Name your sample sheet with the reagent cartridge barcode number followed by*.csv extension.2Create your sample sheet off-instrument using the Illumina Experiment Designer orthe sample sheet template. Enter the following information:aEnter investigator name, project name, experiment name, and date.bEnter the appropriate analysis workflow (no spaces): Resequencing, Amplicon,DenovoAssembly, SmallRNA, Metagenomics, or LibraryQC.3Enter the number of cycles for each read. To add an Index Read, include an indexsequence for each sample in the [Data] section.4Complete the remaining sample sheet sections specific to your analysis workflow.AnalysisWorkflow[Manifests] [SiteReports] [Data]Resequencing NotapplicableOptional Required: SampleID, Sample_Name,GenomeFolderOptional: Index, Index 2Amplicon Required Optional Required: SampleID, Sample_NameOptional: Index, Index 2,GenomeFolderDenovoAssembly NotapplicableNotapplicableRequired: SampleID, Sample_NameOptional: Index, Index 2,GenomeFolderSmallRNA NotapplicableNotapplicableRequired: SampleID, Sample_Name,Contaminants, miRNA, RNAOptional: Index, Index 2,GenomeFolder](https://usermanual.wiki/Illumina/MISEQ.MiSeq-User-Guide/User-Guide-1536960-Page-47.png)
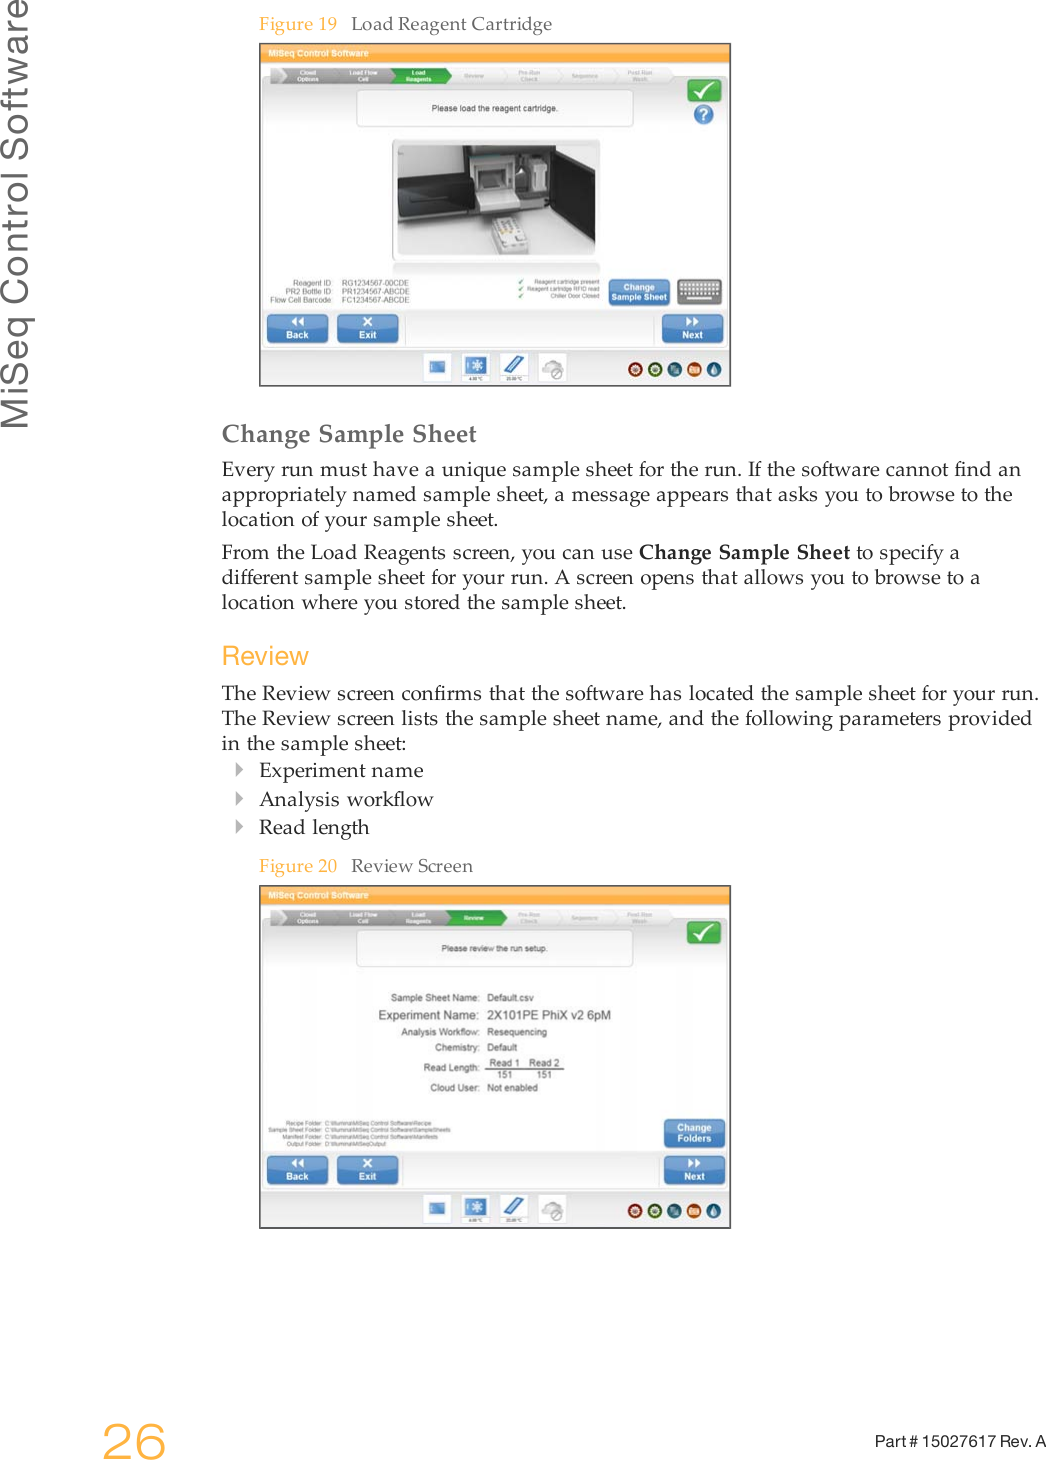
![Performing a Run42 Part # 15027617 Rev. AAnalysisWorkflow[Manifests] [SiteReports] [Data]Metagenomics NotapplicableNotapplicableRequired: SampleID, Sample_NameOptional: Index, Index 2LibraryQC NotapplicableOptional Required: SampleID, Sample_Name,GenomeFolderOptional: Index, Index 2NOTEFor TruSeq Custom Amplicon sample sheets, see the TruSeq Custom AmpliconLibrary Preparation Guide for the appropriate index sequences.For Nextera DNA sample sheets, see the Nextera DNA Sample Preparation Guidefor the appropriate index sequences.5Copy the sample sheet to the network location specified in Setup Options, or copy itto the instrument using a USB flash drive and the Manage Files feature accessiblefrom the Welcome screen.](https://usermanual.wiki/Illumina/MISEQ.MiSeq-User-Guide/User-Guide-1536960-Page-48.png)