L1 Identity Solutions 0B5000B B5000B IS A AUTHENTICATION SYSTEM WITH RFID SMART CARD CAPABILITY AND OPTIONAL FINGERPRINT READER User Manual
L1 Identity Solutions, Inc. B5000B IS A DOCUMENT AUTHENTICATION SYSTEM WITH RFID SMART CARD CAPABILITY AND OPTIONAL FINGERPRINT READER Users Manual
Users Manual


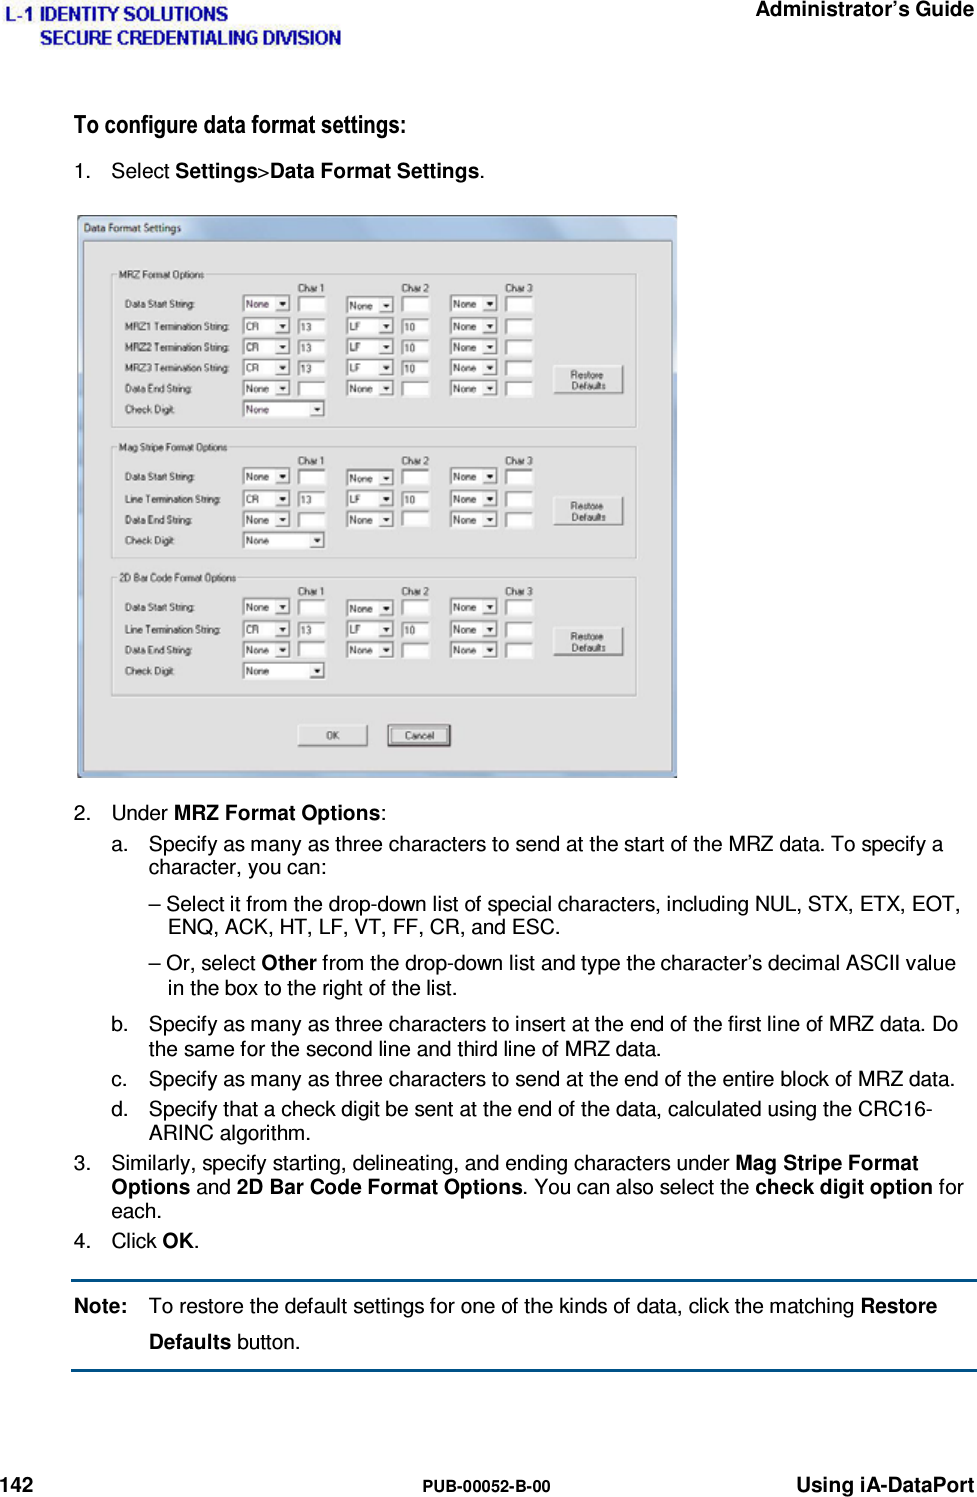
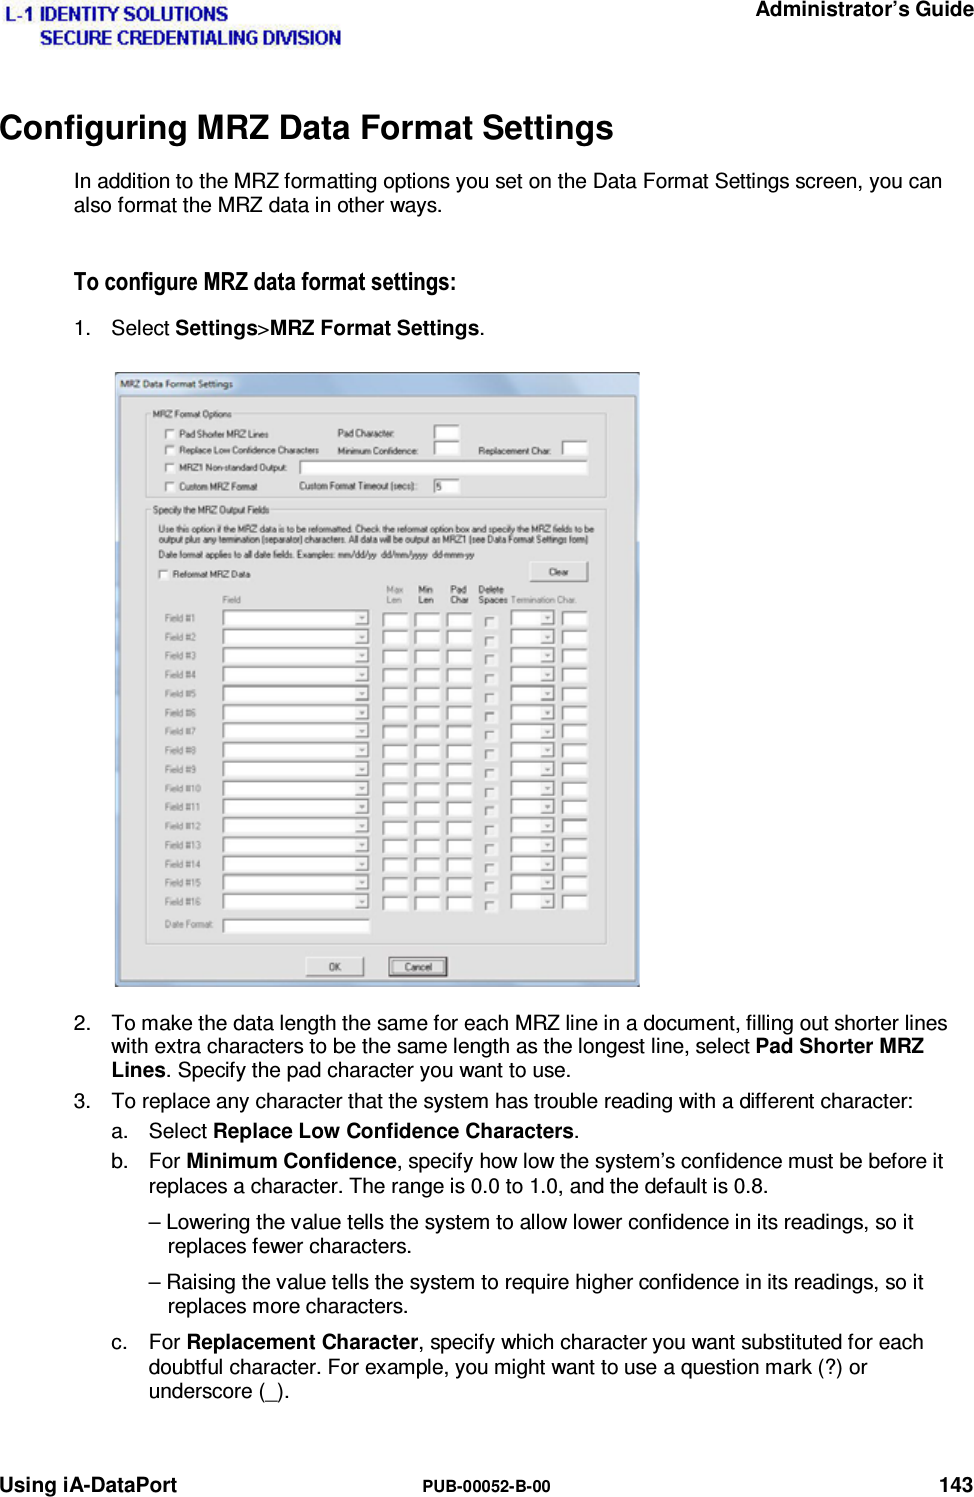
![Administrator’s Guide 144 PUB-00052-B-00 Using iA-DataPort 4. To send a notation or other text when the system is unable to automatically identify the document as a specific type (whether ICAO or non-ICAO), select MRZ1 Non-standard Output and enter the text you want to send. For example, you might want to send a notation such as [Unknown document]. 5. Leave Custom MRZ Format deselected unless you have created a custom MRZ-processing application in consultation with Customer Support. 6. To process the captured MRZ data and send it in a different format, select Reformat MRZ Data and then choose how you want to format each field, in order. For each field: a. Under Field, select the name of the field—for example, Surname. b. If you want the field to be no longer than a certain length when iA-DataPort sends it, specify that length under Max Len. iA-DataPort then truncates longer fields to this length. If you don’t want a long field truncated, leave Max Len blank. c. If you want the field to be at least a certain length when iA-DataPort sends it: – Under Min Len, specify the minimum number of characters the field should contain. – Under Pad Character, type the character you want to use to fill out a short field to the minimum length. The default is a space. If you don’t want the field padded to any minimum length, leave Min Len blank or enter 0 (zero). d. If you want all spaces in the field removed, select Delete Spaces. For example, VAN LIND would become VANLIND. e. Under Termination Char, specify the character to insert immediately after a variable-length field to mark its end. You can select various untypeable characters (such as NUL) from the drop-down list, or you can enter any typeable character (such as >) in the second box. Finally, specify the Date Format you want to use for sending dates. This determines the day-month-year order, the punctuation used between elements, the month format (number or abbreviation), and the year format (2 or 4 digits). For example, for August 14, 2003: This date format... Sends this data... mm/dd/yy 08/14/03 yyyy-mm-dd 2003-08-14 dd mmm yyyy 14 Aug 2003 7. Click OK. Notes: One field you can select is Pass/Fail. This is not MRZ data but an extra field for sending overall test results. Select this to send P when a document passes all tests, E when it fails only the expiration test, or F when it fails any other test. • Setting Max Len and Min Len to the same number results in a fixed-length field. • If you select Delete Spaces, iA-DataPort removes the embedded spaces before adjusting the field’s length using the Max Len and Min Len settings.](https://usermanual.wiki/L1-Identity-Solutions/0B5000B/User-Guide-1626415-Page-144.png)


![Solving Problems PUB-00052-B-00 171 'RFXPHQWRQWKH3ODWIRUP(UURUIf you get the startup error message There is a document on the platform. Please remove it and restart the application but there is definitely no document on the glass, this may be a hardware issue. Please contact Customer Support to return the unit for repair. For emergency purposes, the following temporary step can be taken to use the unit, but this is not a supported operating mode. 1. Open c:\BorderGuard\Config\BGScan.cfg. 2. In the [Document Detection] section, edit the DetectionModule parameter. Change from: DetectionModule=6 To: DetectionModule=4 3. Save the file. Smart Card Reader Errors 6PDUW&DUG'ULYHU,QVWDOODWLRQ3UREOHPV:LQGRZV;3To check and reinstall the smart card drivers if necessary: 1. Open Device Manager (right-click My Computer, choose Manage, and click Device Manager). 2. Look for OmniKey55x3 or USB Converter in the SmartCard Devices folder or the Other Devices folder. 3. If an exclamation point appears next to the icon, right-click the icon, select Properties, and select the Drivers tab. Click Update Driver and use the Have Disk path to locate the driver file specified in the table on page 168. 6PDUW&DUG'ULYHU,QVWDOODWLRQ3UREOHPV9LVWDDQG:LQGRZVTo check and reinstall the smart card drivers if necessary: 1. Open Device Manager (right-click My Computer, choose Manage, and click Device Manager). 2. Look for OmniKey55x3 Reader (USB) or USB Converter in either the SmartCard Readers or Other Devices folder. 3. If an exclamation point appears next to the icon, right-click the icon, select Properties, and select the Drivers tab. Click Update Driver Software and use the Have Disk path to locate the driver file specified in the table on page 168. 7HVWLQJWKH6PDUW&DUG5HDGHUThe following two procedures will check the smart card reader functionality. You can use either the iA-Examiner test or the OMNIKEY applet test. To test the smart card reader using iA-Examiner:](https://usermanual.wiki/L1-Identity-Solutions/0B5000B/User-Guide-1626415-Page-171.png)