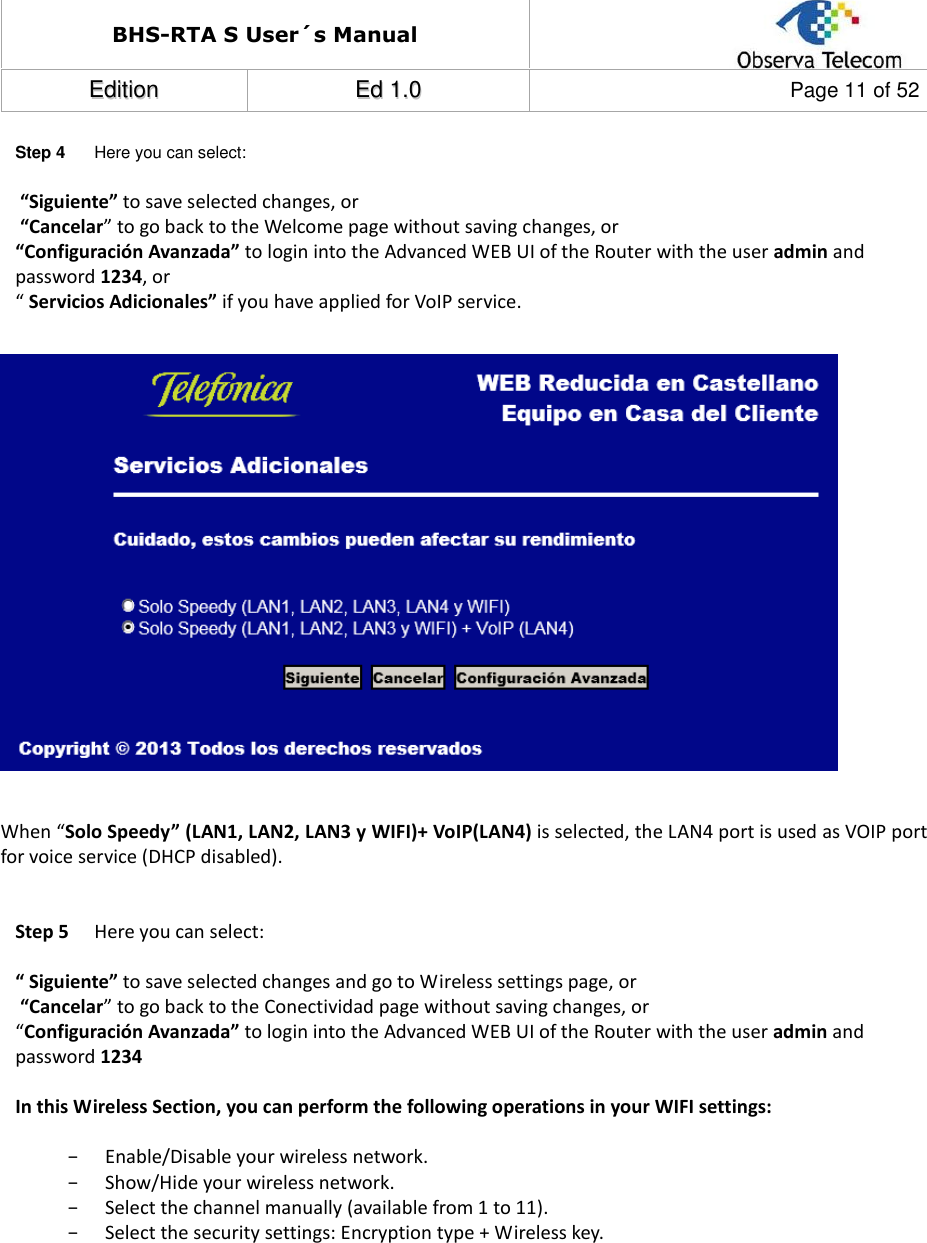
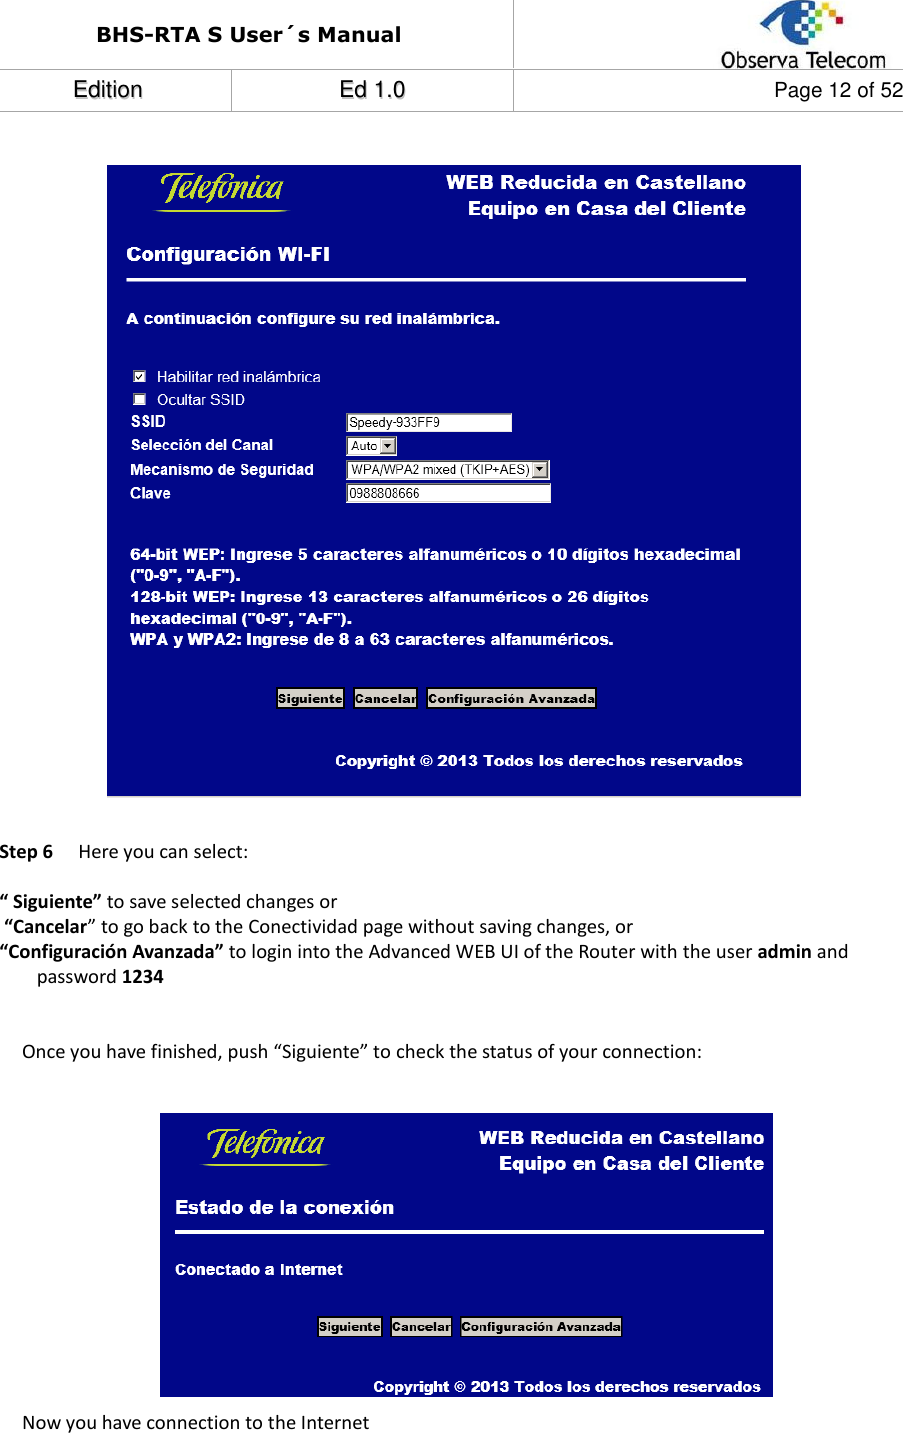
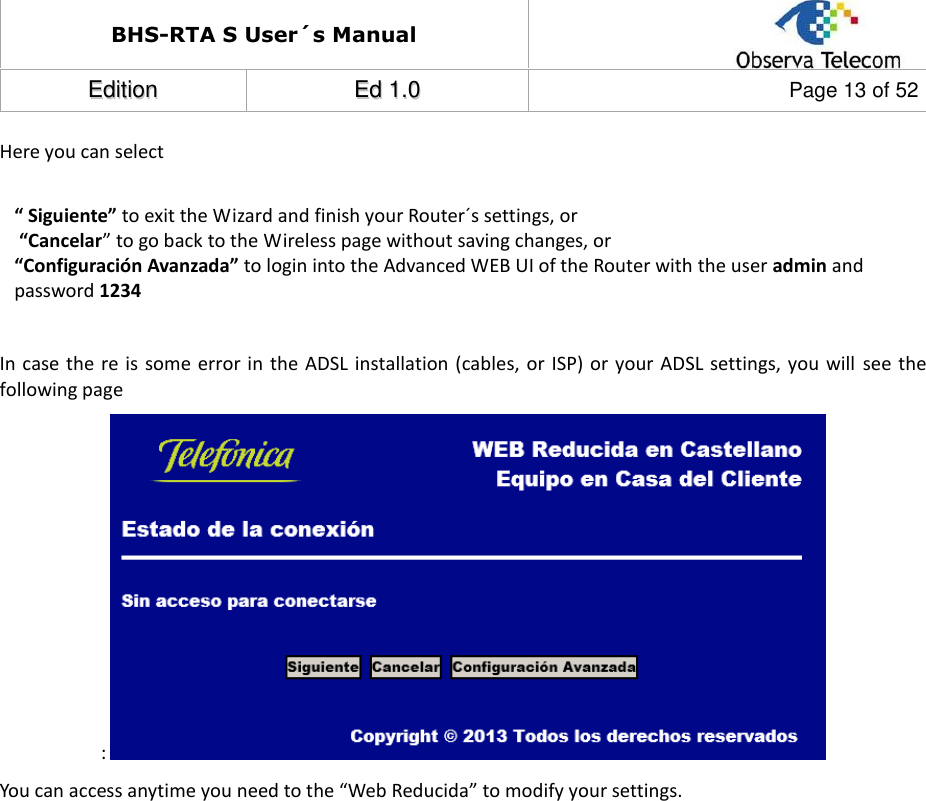
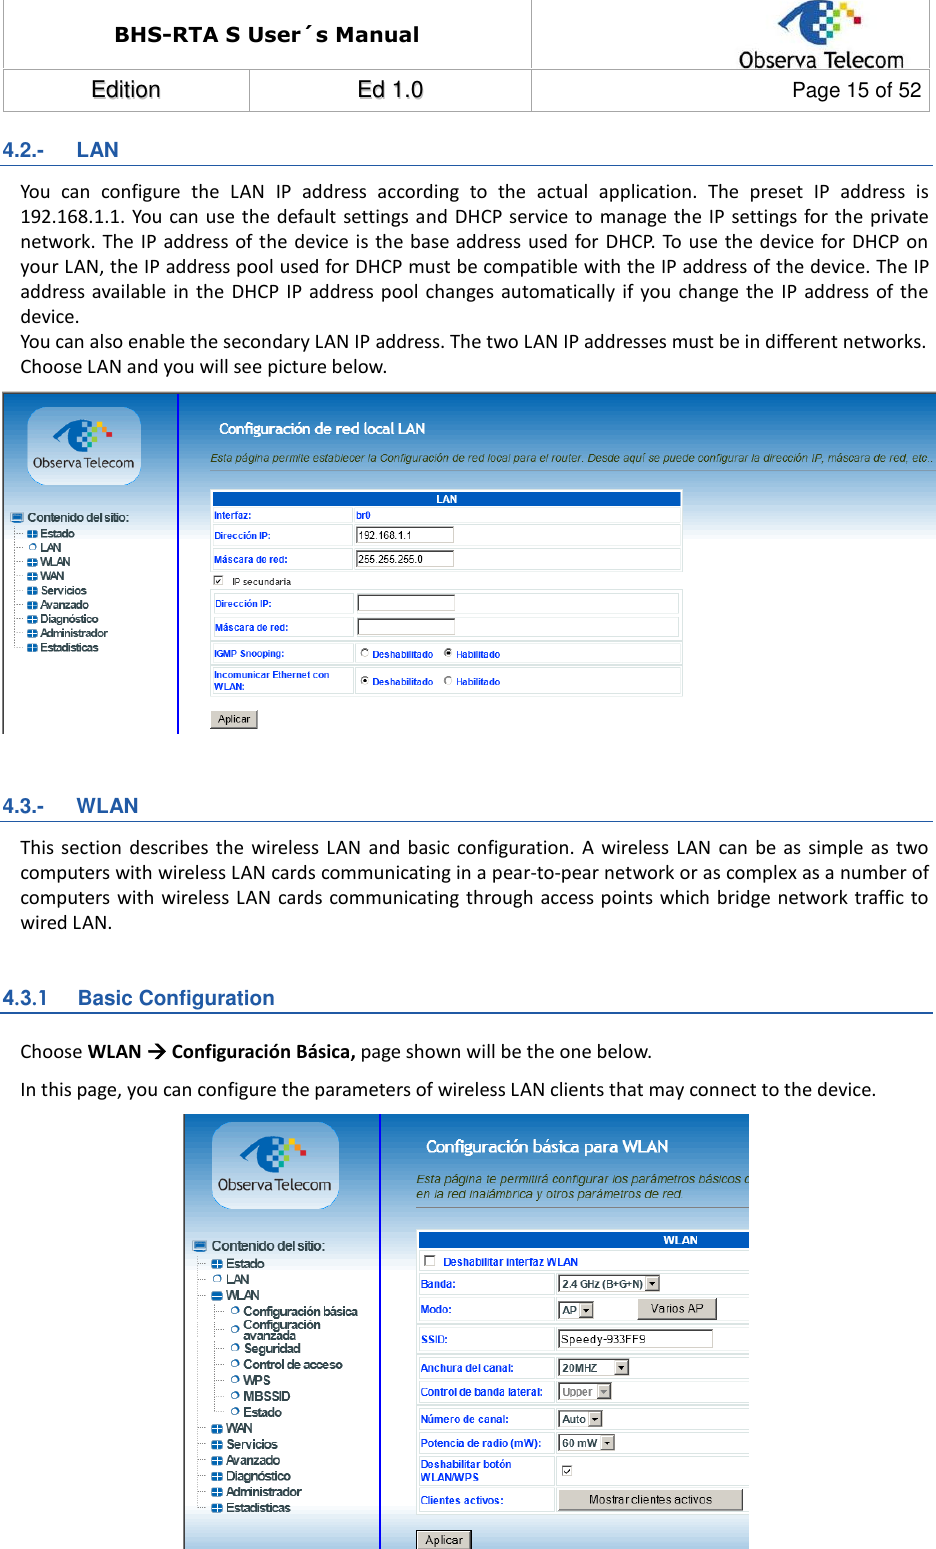
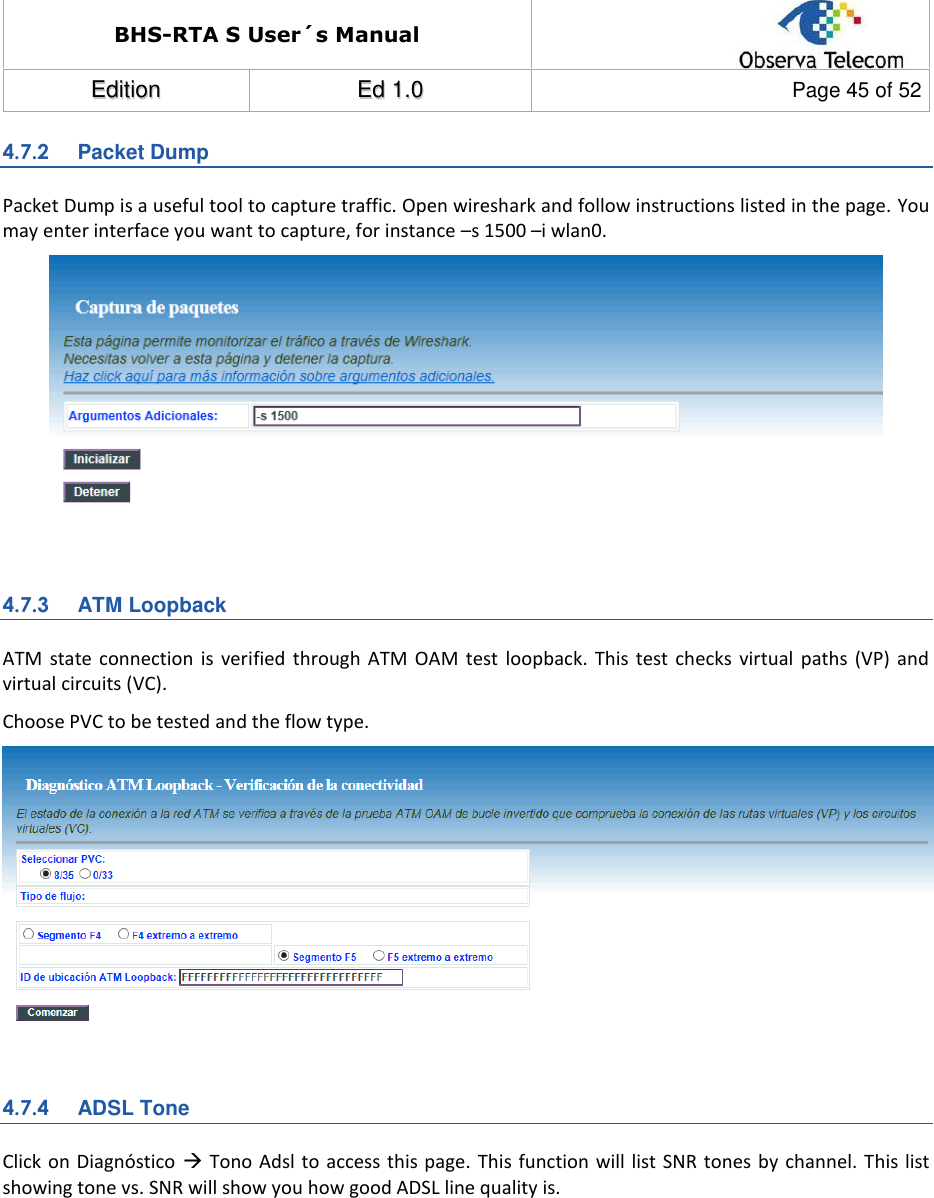
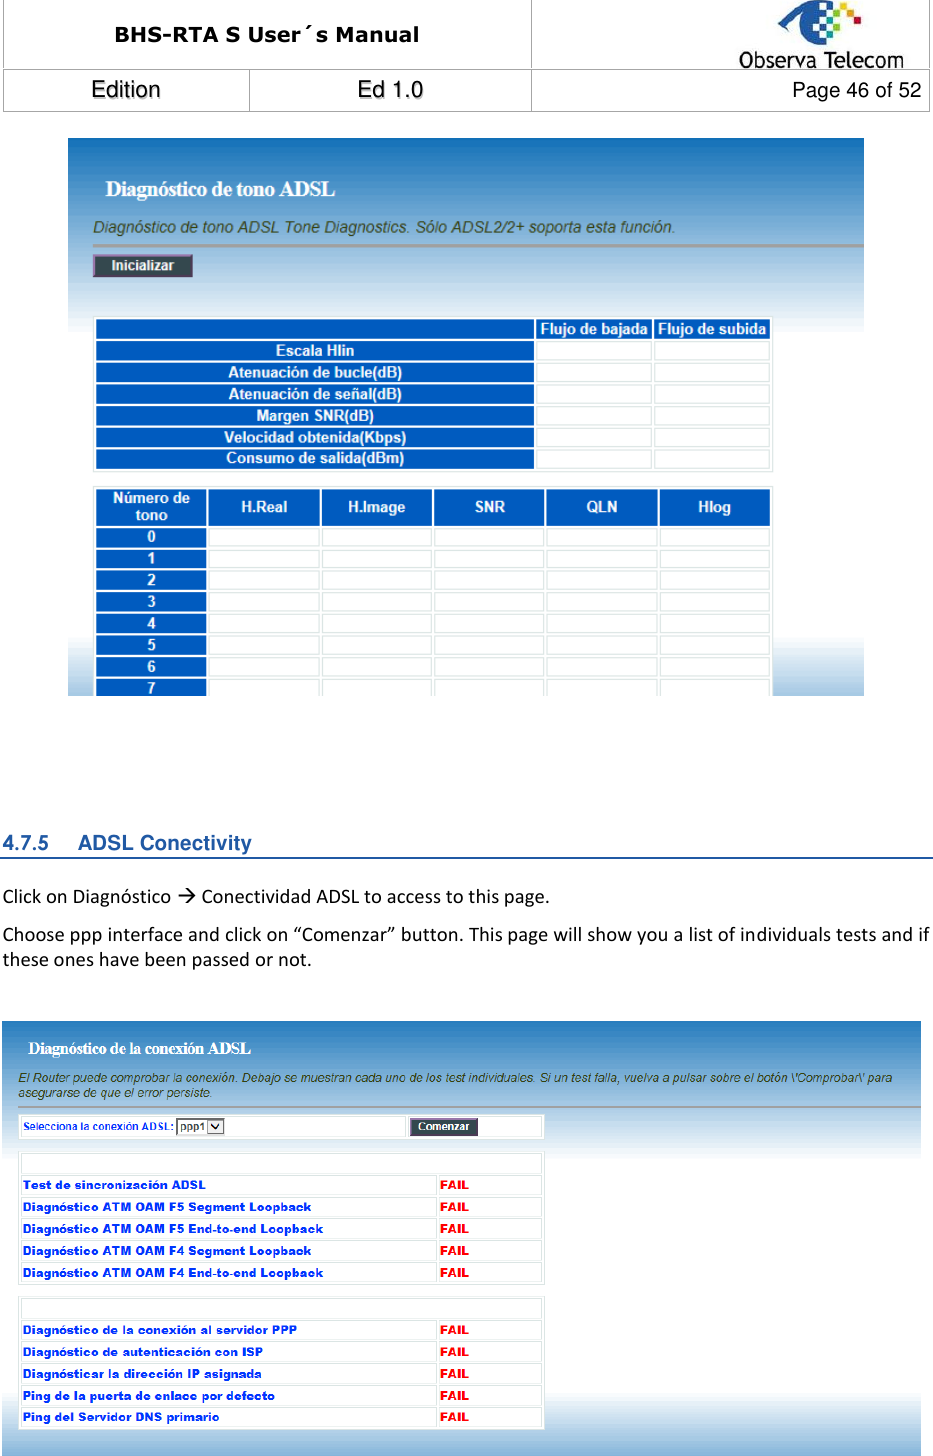
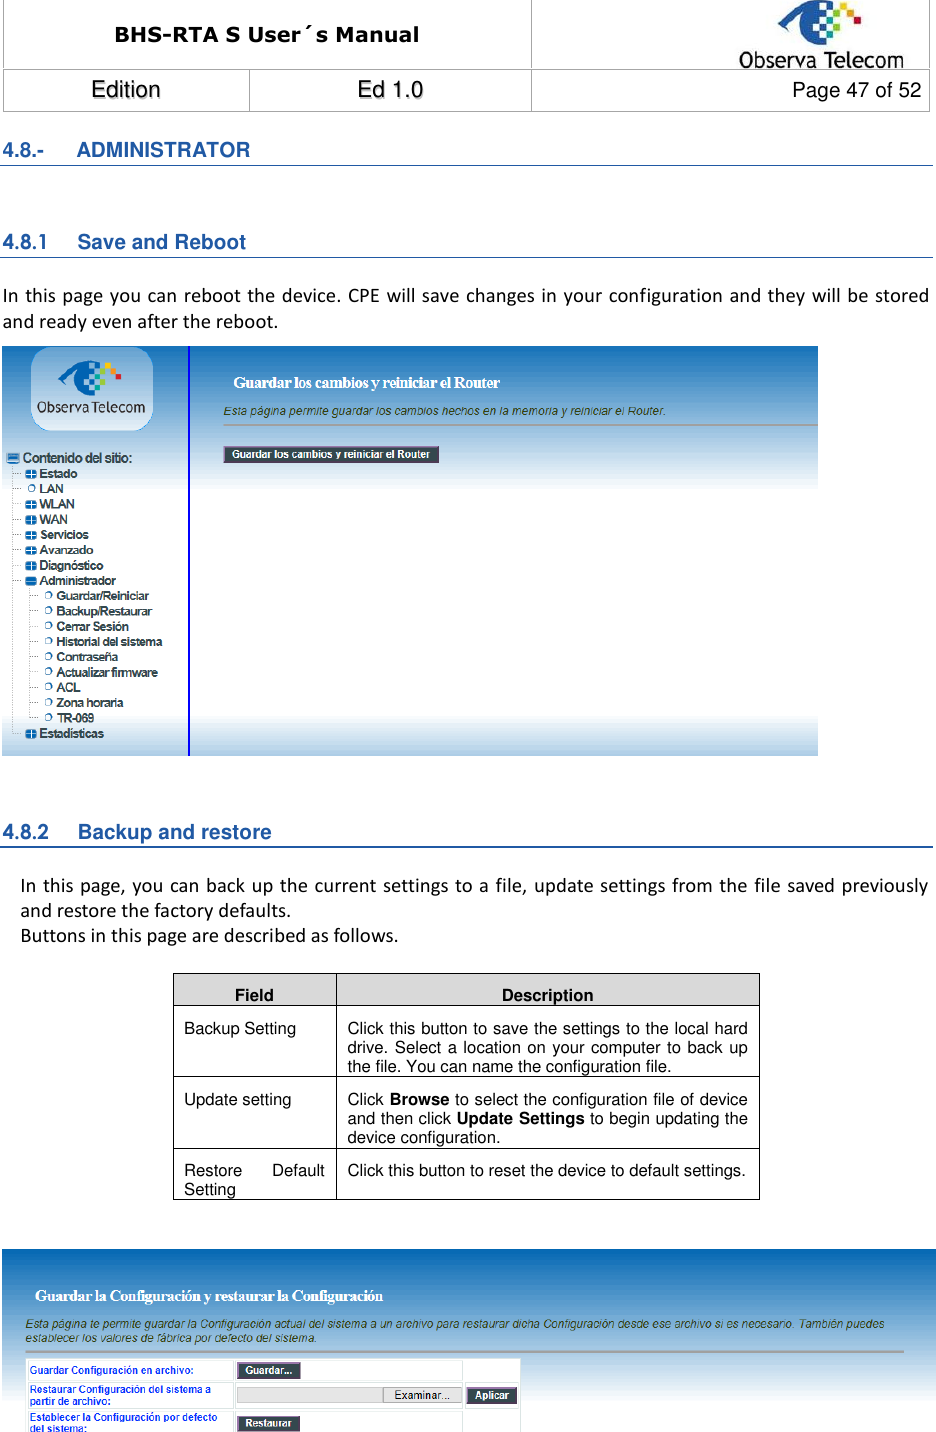
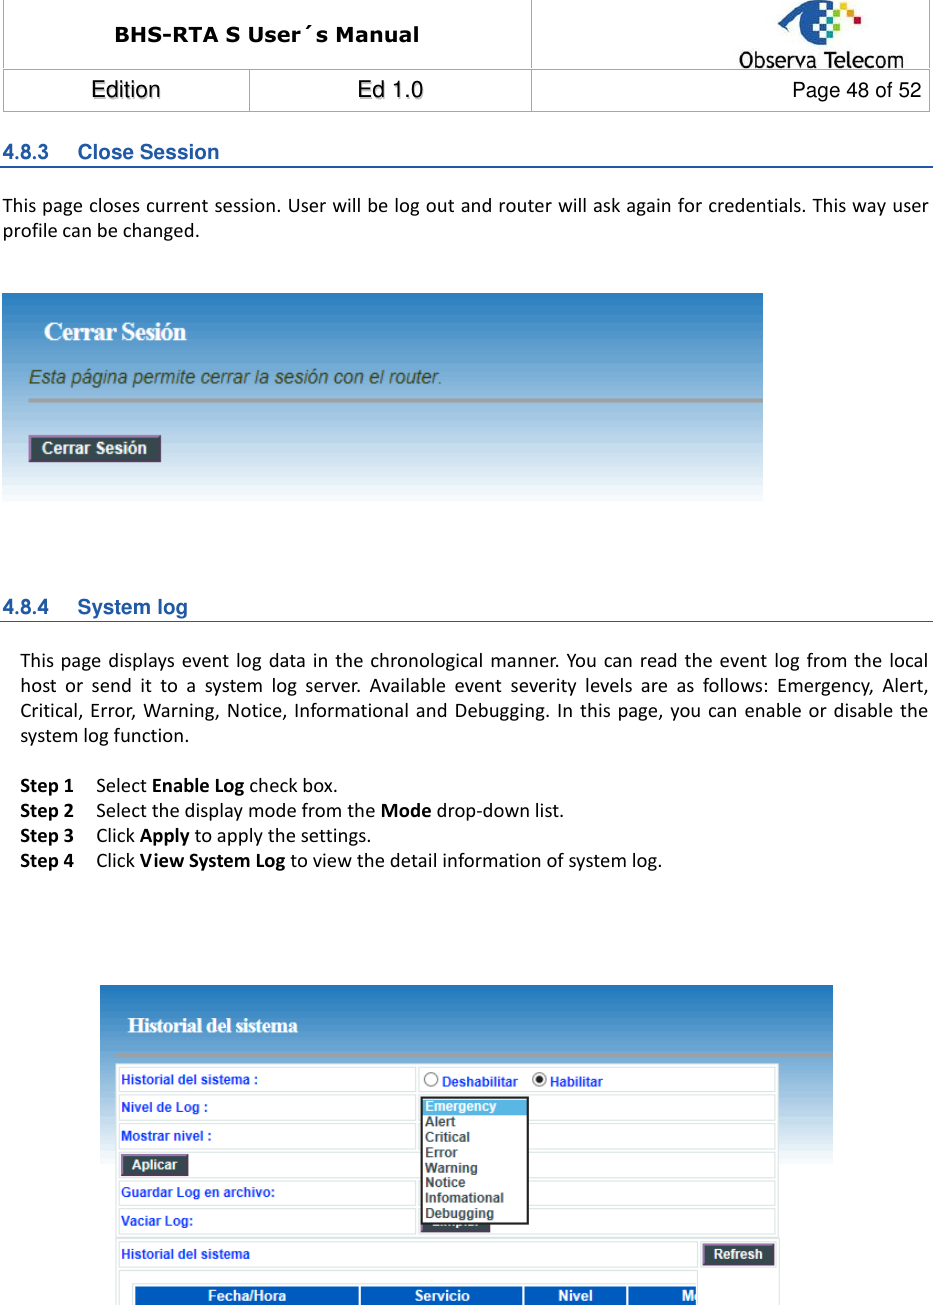
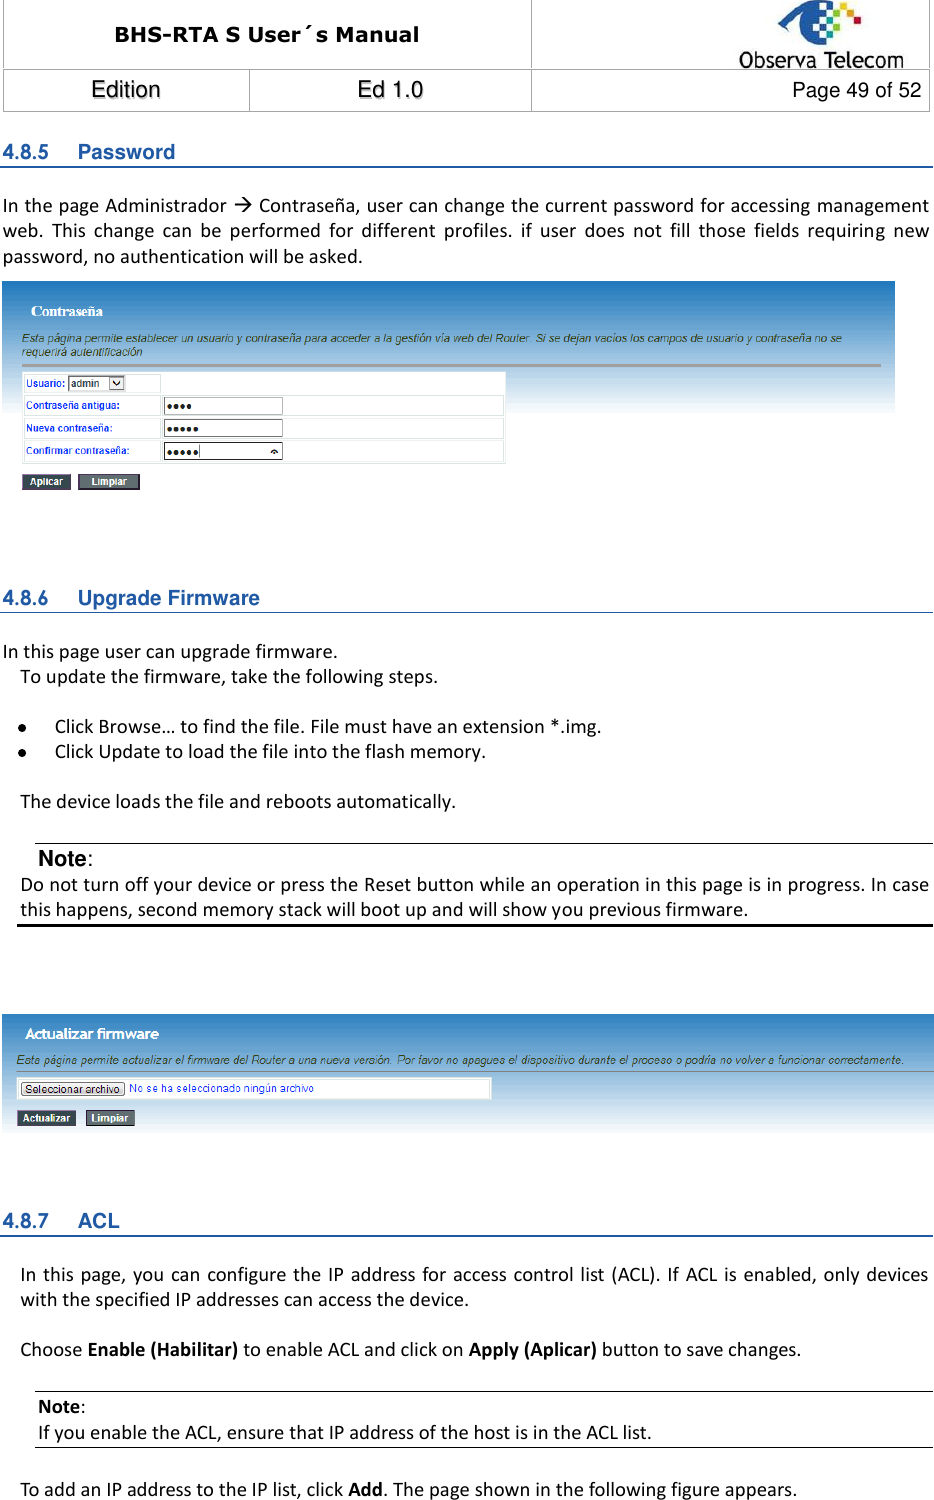
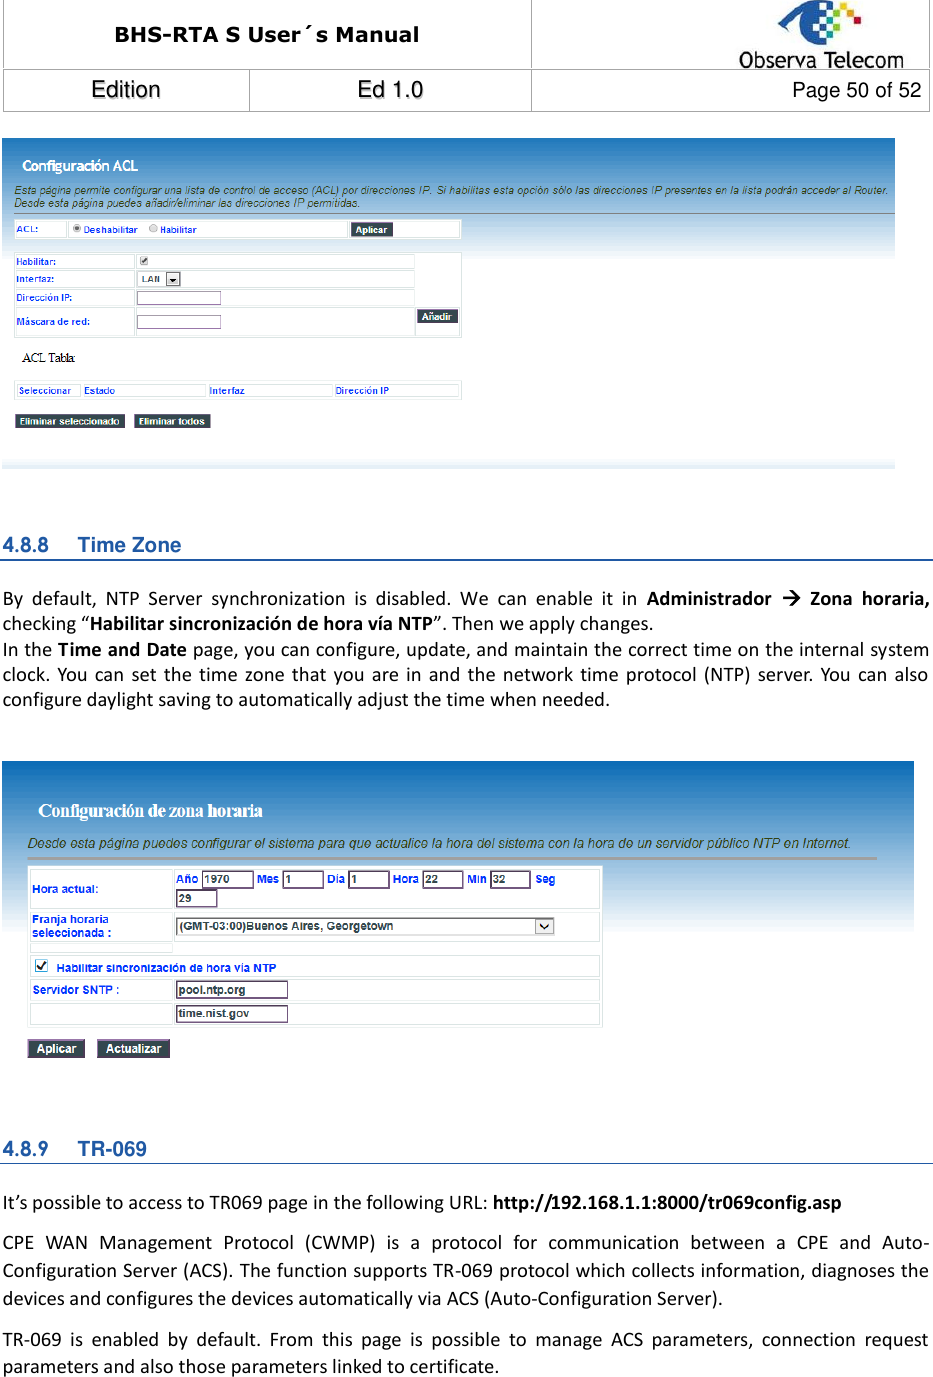
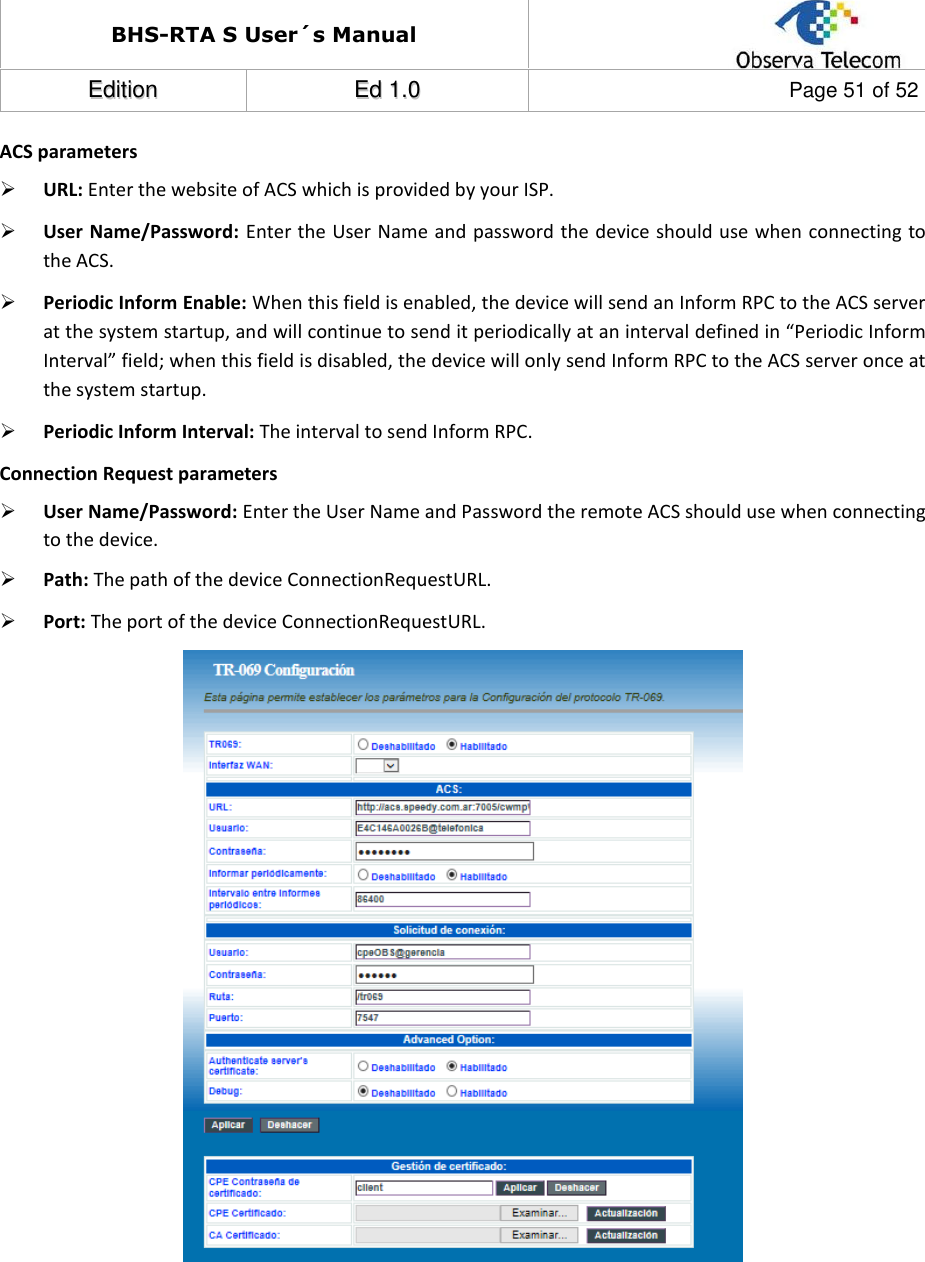
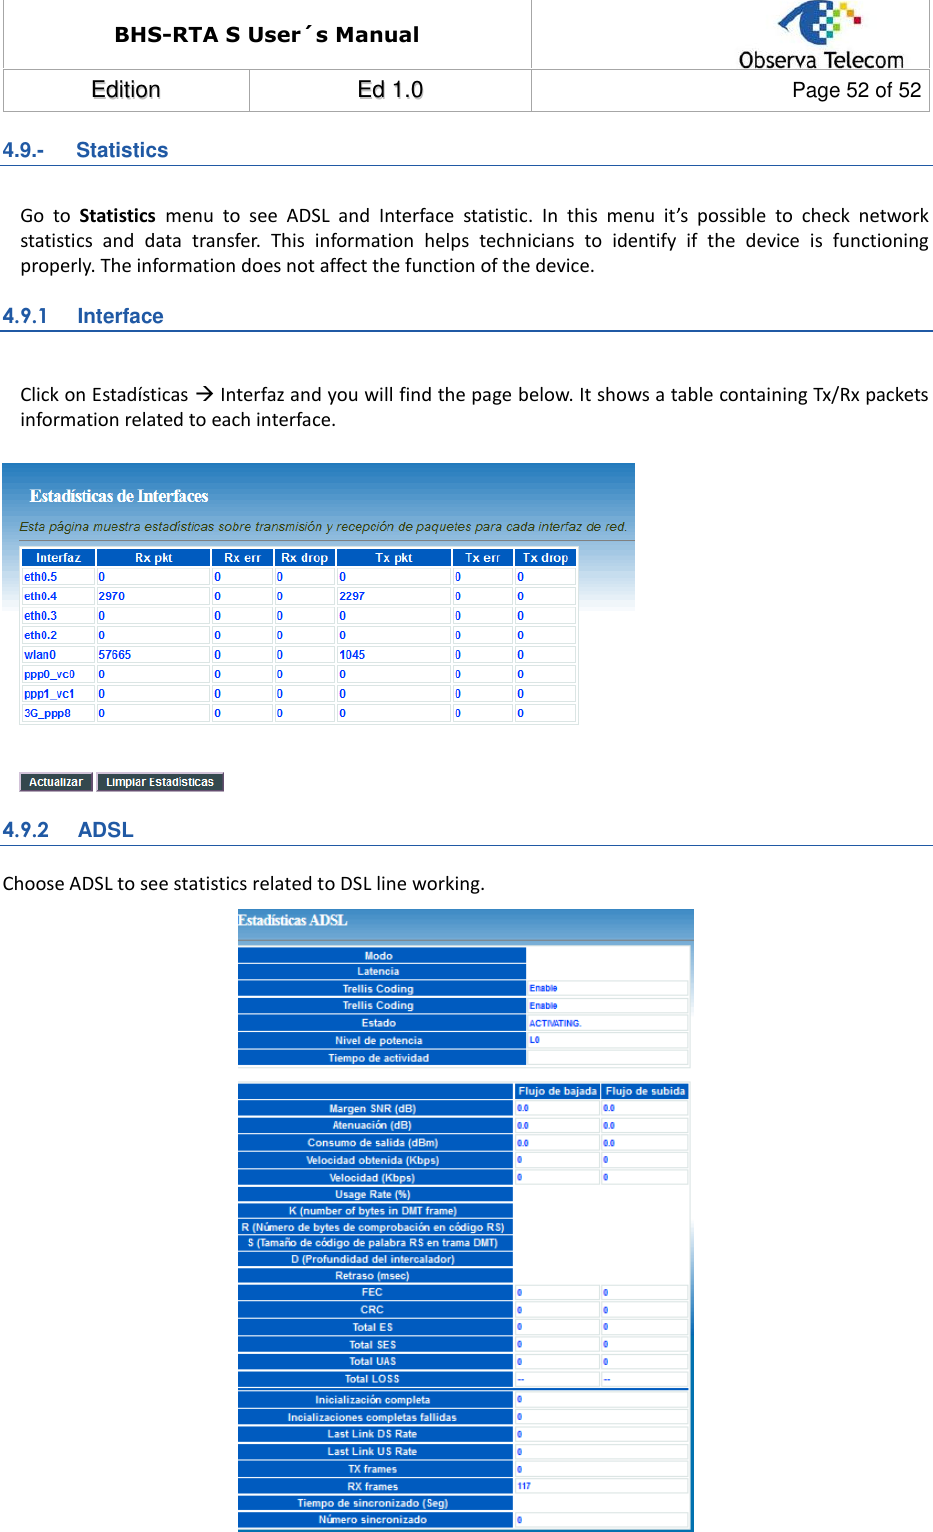
OBSERVA Telecom RTSA04NU ADSL Home Station User Manual COLOMBIA DEFAULT PARAMETERS TR069

OBSERVA Telecom ADSL Home Station COLOMBIA DEFAULT PARAMETERS TR069

Contents

Users Manual

  BHS-RTA S ADSL Home Station  User´s Manual (Ed.1.0)    OBJETIVOS Y SERVICIOS DE VALOR AÑADIDO S.L.    Made by: Name Arancha Gómez /Maribel Ferrer Charge Product Manager / SW Manager Date 18/07/2014
BHS-RTA S User´s Manual  EEddiittiioonn  EEdd  11..00  Page 2 of 52     REVISION LIST  EDITION CHANGES Ed. 1.0 18/07/2014: Initial Edition BHS-RTA S User´s Manual.
BHS-RTA S User´s Manual  EEddiittiioonn  EEdd  11..00  Page 3 of 52  CONTENT  1.- INTRODUCTION .......................................................................................................................... 5 1.1.- PACKING LIST ....................................................................................................................... 6 1.2.- SAFETY PRECAUTIONS .......................................................................................................... 6 1.3.- LEDS AND INTERFACES ......................................................................................................... 6 1.4.- SYSTEM REQUIREMENTS ....................................................................................................... 8 1.5.- FEATURES ............................................................................................................................ 8 2.- HARDWARE INSTALLATION ......................................................................................................... 9 3.- WIZARD ................................................................................................................................ 10 4.- ADVANCED WEB ................................................................................................................. 14 4.1.- STATUS ............................................................................................................................ 14 4.2.- LAN ................................................................................................................................... 15 4.3.- WLAN ................................................................................................................................ 15 4.3.1 Basic Configuration ....................................................................................................... 15 4.3.2 Advanced Configuration ............................................................................................... 16 4.3.3 Security ......................................................................................................................... 17 4.3.4 Access Control .............................................................................................................. 19 4.3.5 WPS .............................................................................................................................. 19 4.3.6 MBSSID ........................................................................................................................ 20 4.3.7 WLAN STATUS ............................................................................................................ 23 4.4.- WAN .................................................................................................................................. 23 4.4.1 DSL WAN ..................................................................................................................... 23 4.4.2 ATM CONFIGURATION ............................................................................................... 25 4.4.3 ADSL CONFIGURATION ............................................................................................. 25 4.4.4 3G configuration ........................................................................................................... 26 4.4.5 PIN CONFIGURATION ................................................................................................. 27 4.4.6 3G DRIVER .................................................................................................................. 27 4.4.6 3G DRIVER .................................................................................................................. 27 4.4.7 ETH/GRE ...................................................................................................................... 27 4.4.7 ETH/GRE ...................................................................................................................... 27 4.4.8 VPN: PPTP/L2TP ......................................................................................................... 28 4.5.- SERVICES ........................................................................................................................ 28 4.5.1 DHCP ............................................................................................................................ 28 4.5.2 DNS .............................................................................................................................. 28 4.5.3 Firewall.......................................................................................................................... 30 4.5.4 UPnP............................................................................................................................. 33 4.5.5 RIP ................................................................................................................................ 34 4.5.6 DMS .............................................................................................................................. 34 4.6.- ADVANCED ...................................................................................................................... 34 4.6.1 ARP Table .................................................................................................................... 34 4.6.2 Bridging ......................................................................................................................... 35 4.6.3 Routing.......................................................................................................................... 35 4.6.4 SNMP............................................................................................................................ 36 4.6.5 IP QoS .......................................................................................................................... 37 4.6.6 Remote access ............................................................................................................. 38 4.6.7 Printer ........................................................................................................................... 39 4.6.8 SAMBA ......................................................................................................................... 39
BHS-RTA S User´s Manual  EEddiittiioonn  EEdd  11..00  Page 4 of 52  4.6.9 Other configuration ....................................................................................................... 40 4.6.10 IPv6 ............................................................................................................................... 40 4.7.- DIAGNOSTICS ...................................................................................................................... 44 4.7.1 Ping ............................................................................................................................... 44 4.7.2 Packet Dump ................................................................................................................ 45 4.7.3 ATM Loopback .............................................................................................................. 45 4.7.4 ADSL Tone ................................................................................................................... 45 4.7.5 ADSL Conectivity .......................................................................................................... 46 4.8.- ADMINISTRATOR ............................................................................................................ 47 4.8.1 Save and Reboot .......................................................................................................... 47 4.8.2 Backup and restore ....................................................................................................... 47 4.8.3 Close Session ............................................................................................................... 48 4.8.4 System log .................................................................................................................... 48 4.8.5 Password ...................................................................................................................... 49 4.8.6 Upgrade Firmware ........................................................................................................ 49 4.8.7 ACL ............................................................................................................................... 49 4.8.8 Time Zone ..................................................................................................................... 50 4.8.9 TR-069 .......................................................................................................................... 50 4.9.- STATISTICS ......................................................................................................................... 52 4.9.1 Interface ........................................................................................................................ 52 4.9.2 ADSL............................................................................................................................. 52
BHS-RTA S User´s Manual  EEddiittiioonn  EEdd  11..00  Page 5 of 52  1.-  Introduction The device supports multiple line modes. With four 10/100 base-T Ethernet interfaces at the user end, the device provides high-speed ADSL broadband connection to the Internet or Intranet for high-end users like net bars and office users. It provides high performance access to the Internet with a downstream rate of 24 Mbps and an upstream rate of 1 Mbps. It supports 3G WAN, 3G backup, and Samba for USB storage. The  device  supports  WLAN  access,  such  as  WLAN  AP  or  WLAN  device,  to  the  Internet.  It  complies  with specifications of IEEE 802.11, 802.11b/g/n, WEP, WPA2, and WPA/WPA2 Mixed PSK security. The WLAN of the device supports 2T2R.   FCC STATEMENT  This equipment has been tested and found to comply with the limits for a Class B digital device, pursuant to  part  15  of  the  FCC  Rules.  These  limits  are  designed  to  provide  reasonable  protection  against  harmful interference  in  a  residential  installation.  This  equipment  generates,  uses  and  can  radiate  radio  frequency energy and, if not installed and used in accordance with the instructions, may cause harmful interference to radio  communications.  However,  there  is  no  guarantee  that  interference  will  not  occur  in  a  particular installation. If this equipment does cause harmful interference to radio or television reception, which can be determined by turning the equipment off and on, the user is encouraged to try to correct the interference by one or more of the following measures:  Increase the separation between the equipment and receiver.  Connect  the  equipment  into  an  outlet  on  a  circuit  different  from  that  to  which  the  receiver  is connected.   Consult the dealer or an experienced radio/ TV technician for help. This device complies with part 15 of the FCC Rules. Operation is subject to the following two conditions: 1) This device may not cause harmful interference. 2) This device must accept any interference received, including interference that may cause undesired operation. Any changes or modifications not expressly approved by the party responsible for compliance could void the user’s authority to operate the equipment.  Note:  The  manufacturer  is  not  responsible  for  any  radio  or  tv  interference  caused  by  unauthorized modifications  to  this  equipment.  Such  modifications  could  void  the  user’s  authority  to  operate  the equipment.  FCC RF Radiation Exposure Statement This equipment  complies with FCC  RF radiation exposure limits  set forth  for an uncontrolled environment. This device  and its  antenna must  not be  co-located or  operating in  conjunction  with any  other antenna or transmitter. “To  comply  with  FCC  RF  exposure  compliance  requirements,  this  grant  is  applicable  to  only  Mobile Configurations. The antennas used for this transmitter must be installed to provide a separation distance of at  least  20  cm  from  all  persons  and  must  not  be  co-located  or  operating  in  conjunction  with  any  other antenna or transmitter.”        FCC ID: XXXXXXXXXXXX
BHS-RTA S User´s Manual  EEddiittiioonn  EEdd  11..00  Page 6 of 52  1.1.-   Packing List  1 x ADSL Home Station (BHS-RTA S)  1 x PSU 12V-1A  1 x RJ11 telephone cable  1 x RJ45 Ethernet cable  1 x Quick Installation Guide  1.2.-   Safety Precautions Take  the  following  instructions  to  prevent  the  device  from  risks  and  damage  caused  by  fire  or  electric power:  Use the type of power marked in the volume label.  Use the power adapter in the product package.  Pay attention to the power load of the outlet or prolonged lines. An overburden power outlet or  damaged lines  or  plugs may  cause  electric shock  or  fire accidents.  Check  the power  cords regularly. If you find any damage, replace it at once.  Proper space left  for heat dissipation is necessary to  avoid  damage caused by overheating to the device. The long and thin holes on the  device are designed for heat dissipation to ensure that the device works normally. Do not cover these heat dissipation holes.  Do  not  put  this device  close  to a heat  source or  under  a  high  temperature occurs.  Keep  the device away from direct sunshine.  Do not put this device close to an overdamp or watery place. Do not spill fluid on this device.  Do  not  connect  this  device  to  a  PC  or  electronic  product  unless  instructed  by  our  customer engineer or your broadband provider. Wrong connection may cause power or fire risk.  Do not place this device on an unstable surface or support. 1.3.-   LEDs and Interfaces  Front Panel  The following table describes the LEDs of the device:  LED Color Status Description Power Red/Green Off Router powered off Blinking 2Hz Red Failure on power-on self-test Solid Green Router powered on correctly.  LAN4-LAN1 Green On Ethernet connection is available. Off Ethernet connection is unavailable. WLAN Green On Wi-Fi connection is available. Off Wi-Fi connection is unavailable. Blinking Green Negotiation or traffic on line. WPS Red/Green Solid Green WPS active Blinking 2Hz Green WPS negotiation open
BHS-RTA S User´s Manual  EEddiittiioonn  EEdd  11..00  Page 7 of 52  LED Color Status Description Solid  Red  (20 seconds) Problems on WPS registration USB Red/Green Blinking Green Negotiation Solid Green Up Quick Blinking Green Tx/Rx traffic on line Solid Red Authentication failed Off Traffic through broadband interface ADSL Green Off Router powered off Blinking 2Hz No line detected Blinking 4Hz Line  training Solid Line up Internet Red/Green Blinking Green PPP/DHCP negotiation Solid Green PPP/DHCP up Quick Blinking Green Tx/Rx traffice on line Solid Red Authentication failed  Rear Panel       The following table describes the interface of the device, from right to left:  Interface/Button Description  Interface connecting to the power adapter. The power adapter output is: 12V DC, 800mA On/Off Push to power on/off the device. WLAN/WPS   Press the button for more than 1 second to enable WLAN function.   Press the button for more than 5 seconds to enable WPS function. Reset Reset to the factory defaults. To restore factory defaults, keep the device powered on and push a paper clip into the hole. Press down the button for more than 5 seconds and then release. USB Connecting to a 3G data card or other USB storage device VoIP/LAN4 Ethernet RJ-45 interface connecting to the ATA  interface (VoIP service is optional). LAN3/LAN2/LAN1 Ethernet RJ-45 interfaces for connecting computer or ethernet devices. ADSL RJ-11 interface connecting to a telephone set through a telephone cable.
BHS-RTA S User´s Manual  EEddiittiioonn  EEdd  11..00  Page 8 of 52  1.4.-   System Requirements  A 10 baseT/100BaseT Ethernet card is installed on your PC.  A hub or switch (attached to several PCs through one of Ethernet interfaces on the device)  Operating  system:  Windows  Vista,  Windows  7,  Windows  8,  Windows  98SE,  Windows  2000, Windows ME or Windows XP  Internet Explorer V5.0 or higher, Netscape V4.0 or higher, or Firefox 1.5 or higher 1.5.-   Features  Various line modes  External PPPoE dial-up access  Internal PPPoE and PPPoA dial-up access  Leased line mode  1483B, 1483R, and MER access  Multiple PVCs (eight at most) and these PVCs can be isolated from each other  A single PVC with multiple sessions  Multiple PVCs with multiple sessions  Binding of ports with PVCs  802.1Q and 802.1P protocol  DHCP server  NAT and NAPT  Static route  Firmware upgrade: Web, TFTP, FTP  Reset to the factory defaults  DNS relay  Virtual server  DMZ  Two-level passwords and user names  Web user interface  Telnet CLI  System status display  PPP session PAP and CHAP  IP filter  IP QoS  Samba  Remote access control  Line connection status test  Remote management (telnet and HTTP, TR069)  Backup and restoration of configuration file  Ethernet interface supports crossover detection, auto-correction and polarity correction  UPnP  3G WAN and 3G Backup    Samba for USB storage
BHS-RTA S User´s Manual  EEddiittiioonn  EEdd  11..00  Page 9 of 52  2.-  Hardware Installation Step 1 Connect the ADSL port of the device and the Modem port of the splitter with a telephone cable (if Splitter is available).  Step 2  Connect the phone to the Phone port of the splitter through a telephone cable. Connect the incoming line to the Line port of the splitter. The splitter has three ports: − Line: Connect to a wall phone port (RJ-11 jack). − Modem: Connect to the DSL port of the device. − Phone: Connect to a telephone set. Step 3 Connect an Eth port of the device to the network card of the PC through an Ethernet cable (MDI/MDIX). Note: Use twisted-pair cables to connect the device to a Hub or switch. Step 4 Plug one end of the power adapter to the wall outlet and the other end to the Power port of the device.               Connection diagram (with telephone set before the splitter)  Step 4   If Splitter is not available, then plug the RJ11 cable to the ADSL port on the outer in one end, and to the ADSL socket on the other end.    Installing a telephone directly before the splitter may lead to failure of connection between the device and the  central  office,  or  failure  of  Internet  access,  or  slow  connection  speed.  If  you  really  need  to  add  a telephone set before the splitter, you must add a microfilter before a telephone set. Do not connect several telephones before the splitter or connect several telephones with the microfilter.
BHS-RTA S User´s Manual  EEddiittiioonn  EEdd  11..00  Page 10 of 52  3.-  REDUCED WEB - WIZARD The following is the detailed description of accesing the device for the first time. Step 1    Open the WEB Explorer (IE, Chrome, Firefox,Safari) browser and enter http://192.168.1.1 Step 2    The Welcome page is shown in the following figure.     Step  3  Click  “Siguiente”  to  configure  your  user’s  account  and  Wi-Fi  network  as  shown  in  the  following Connectivity page, or click “Configuración Avanzada” for more options.                    By  default,  the  user’s  name is  MAC@acs  and  password  is  the  MAC.  The  MAC  is  the  equipment’s  MAC Address in upper case.
BHS-RTA S User´s Manual  EEddiittiioonn  EEdd  11..00  Page 11 of 52  Step 4   Here you can select:   “Siguiente” to save selected changes, or   “Cancelar” to go back to the Welcome page without saving changes, or  “Configuración Avanzada” to login into the Advanced WEB UI of the Router with the user admin and password 1234, or  “ Servicios Adicionales” if you have applied for VoIP service.               When “Solo Speedy” (LAN1, LAN2, LAN3 y WIFI)+ VoIP(LAN4) is selected, the LAN4 port is used as VOIP port for voice service (DHCP disabled).   Step 5  Here you can select:    “ Siguiente” to save selected changes and go to Wireless settings page, or   “Cancelar” to go back to the Conectividad page without saving changes, or  “Configuración Avanzada” to login into the Advanced WEB UI of the Router with the user admin and password 1234  In this Wireless Section, you can perform the following operations in your WIFI settings:  − Enable/Disable your wireless network. − Show/Hide your wireless network. − Select the channel manually (available from 1 to 11). − Select the security settings: Encryption type + Wireless key.
BHS-RTA S User´s Manual  EEddiittiioonn  EEdd  11..00  Page 12 of 52                              Step 6 Here you can select:    “ Siguiente” to save selected changes or  “Cancelar” to go back to the Conectividad page without saving changes, or  “Configuración Avanzada” to login into the Advanced WEB UI of the Router with the user admin and password 1234  Once you have finished, push “Siguiente” to check the status of your connection:   Now you have connection to the Internet
BHS-RTA S User´s Manual  EEddiittiioonn  EEdd  11..00  Page 13 of 52  Here you can select  “ Siguiente” to exit the Wizard and finish your Router´s settings, or  “Cancelar” to go back to the Wireless page without saving changes, or  “Configuración Avanzada” to login into the Advanced WEB UI of the Router with the user admin and password 1234  In case the re is  some error in the ADSL installation (cables, or  ISP) or your ADSL settings,  you will  see the following page :  You can access anytime you need to the “Web Reducida” to modify your settings.
BHS-RTA S User´s Manual  EEddiittiioonn  EEdd  11..00  Page 14 of 52  4.-  ADVANCED WEB Click in Configuración Avanzada and you will obtain a login box. Credentials are admin as user and 1234 as password. If you log in successfully you will find the following page. 4.1.-   STATUS If user has followed all steps mentioned in wizard, there will be many parameters already configured. Now, we can complete setup from advanced web. First we can see device status from page Estado  Dispositivo. This  page  is  showing  information  about  System,  WAN,  LAN,  DSL  and  DNS.  Device  information  will  change depending  on  its  configuration.  This  page  will  auto  refresh  after  few  seconds,  although  there’s  a  refresh button that will update information immediately.  Following pictures are showing system information. In the first figure ADSL line is still down, we can see that firmware is still syncing as well. This device synchronizes both memory stacks after every reboot in order to have same image in both stacks. Second image is showing firmware it’s already synced and line is up.
BHS-RTA S User´s Manual  EEddiittiioonn  EEdd  11..00  Page 15 of 52  4.2.-   LAN You  can  configure  the  LAN  IP  address  according  to  the  actual  application.  The  preset  IP  address  is 192.168.1.1. You  can use the default  settings and  DHCP service to manage the IP settings for the  private network. The IP address of the device is the base address used for DHCP. To use  the device  for DHCP  on your LAN, the IP address pool used for DHCP must be compatible with the IP address of the device. The IP address available  in the  DHCP  IP  address pool  changes automatically if  you change  the IP  address of  the device. You can also enable the secondary LAN IP address. The two LAN IP addresses must be in different networks. Choose LAN and you will see picture below.   4.3.-   WLAN This  section  describes  the  wireless  LAN  and basic configuration.  A  wireless  LAN  can  be  as simple  as  two computers with wireless LAN cards communicating in a pear-to-pear network or as complex as a number of computers with  wireless LAN cards communicating through access points which  bridge network traffic to wired LAN.  4.3.1  Basic Configuration Choose WLAN  Configuración Básica, page shown will be the one below. In this page, you can configure the parameters of wireless LAN clients that may connect to the device.
BHS-RTA S User´s Manual  EEddiittiioonn  EEdd  11..00  Page 16 of 52   The following table describes the parameters in this page.  Field Description Deshabilitar interfaz WLAN (Disable Wireless)  Select this to turn Wi-Fi on or off. Banda Select the operational Band Mode: B, G, N, B+G, G+N, B+G+N,  Button ‘Varios AP’ Select this to open MultiAP isolation page and its options. SSID  (Wireless Network Name) The Wireless Network Name is a unique name that identifies a network. All devices on a network must share the same wireless network name in order to communicate on the network. If you decide to change the wireless network name from the default setting, enter your new wireless network name in this field. Anchura del canal (Band Width) Select the appropriate band of 20M, 40M or 20M/40M from the pull-down menu. Control de banda lateral (Control Sideband) Choose the channel selection mode as Upper or Lower. Número de canal (Wireless Channel) Select the wireless channel from the pull-down menu.  Deshabilitar botón WLAN/WPS (Disable WLAN/WPS button) It’s enabled by default. This avoids WLAN or WPS can be enable/disable from physical button. Clientes activos (Active clients) Click Mostrar clientes activos button to show the WMAC address of clients connected and come traffic statistics  4.3.2  Advanced Configuration  This  function  is  used  to  modify  the  standard  802.11  wireless  radio  settings.  It  is  suggested  not  to change  the  defaults,  as  incorrect  settings  may  reduce  the  performance  of  your  wireless  radio.  The  default settings provide the best wireless radio performance in most environments. From this page is also possible avoid Wireless network broadcast (Difusión SSID).
BHS-RTA S User´s Manual  EEddiittiioonn  EEdd  11..00  Page 17 of 52   4.3.3  Security Select WLAN  Seguridad. The page shown in the following figure appears. Wireless security is vital to your network to  protect the wireless communication among wireless stations, access points and  wired network. The available Wireless  security modes are: None, WEP 64&128, WPA2 (AES), WPA/WPA2 Mixed It is NOT recommended to leave Wireless security as None.   When it is selected WEP, you can choose the Key Length 64 or 128 bits, ASCII or HEX:   When  the  Security  Mode  is  set  as  WPA2  AES,  or  WPA/WPA2  Mixed,  you  can  enter  an  Hexadecimal    or alphanumeric Password:
BHS-RTA S User´s Manual  EEddiittiioonn  EEdd  11..00  Page 18 of 52    The following table describes the parameters of this page. For WEP: Field Description Longitud de la clave (WEP Key Length) Choose the WEP key length. You can Choose 64-bit or 128-bit. Formato de la clave (Key Format) Choose ASCII or Hexadecimal. Clave de cifrado             (WEP Key) The Encryption keys are used to encrypt the data. Both the modem and wireless stations must use the same encryption key for data transmission. An example for default key could be 8wlHK.   For other types of cyphering:  Field Description Cifrado (Security mode)  Configure the wireless encryption mode. You can choose None, WEP, WPA2 or WPA/ WPA2 Mixed.   Wired  equivalent  privacy  (WEP)  encrypts  data frames before transmitting over the wireless network.  Wi-Fi protected access (WPA)  is a  subset of the IEEE802.11i security specification draft.    WPA/WPA2  Mixed  is  the  collection  of  WPA  and WPA2  encryption  modes.  The  wireless  client establishes  the  connection  between  the  modem through WPA or WPA2. Key differences between WPA and WEP are user authentication and improved data encryption. Algoritmo de Cifrado WPA2 (WPA2 Encryption)  When WPA2 is selected, you can select WPA2 encryption as AES or TKIP+AES.  Modo de autentificación  (Authentification Mode)    Select  PSK  (Pre-Shared  Key),  enter  the  pre-shared key in the Pre-Shared Key field.   Select  Enterprise  (RADIUS),  enter  the  port,  IP
BHS-RTA S User´s Manual  EEddiittiioonn  EEdd  11..00  Page 19 of 52  Field Description address, and password of the Radius server. You need to enter the username and password provided by the Radius  server  when  the  wireless  client  connects  the modem. If the encrypton is set to WEP, the modem uses 802.1 X authentication, which is Radius authentication.   4.3.4  Access Control  From this page is possible to accept or deny several devices basing control on MAC Address.  Choose one of the modes (Disabled, Allowed customers, Non Authorized customers). Click apply to enable the mode  you want. Then add a  MAC address in the field below and click  Add button. List below named Lista actual de control, will show if devices are allowed or not.    4.3.5  WPS Click WPS link and  you will find the page below. WPS  is enabled by default,  but you cannot launch  it from physical button, until you enable it. You can do it in Basic Configuration (see Basic Configuration section).
BHS-RTA S User´s Manual  EEddiittiioonn  EEdd  11..00  Page 20 of 52          4.3.6  MBSSID This  page  can  be  used  for  enable  different  SSID.  Once  new  SSID  is  configured,  it’s  possible  to  change  its security  from  Security page,  choosing  the  proper  AP.  User  can  also  create  several  SSID’s  from  page  Basic Configuration, clicking on Varios AP button. Figure showing MBSSID page.  Field Description Deshabilitar WPS (Disable WPS) Choose to disable WPS function. By default WPS function is enabled, but can be only launched first time from SW page. Estado (Configuration State) When Configured state is selected, wireless parameters (for example, the encryption password) are provided by the CPE in WPS negotiation. When Unconfigured state is selected, wireless parameters are provided by the connecting user end (for example, PC).  Número PIN generado (PIN)  Insert this number is your PC is asking you for it. You can generate it and change its value. Inicializar configuración PBC (Push Button Configuration)  Press the button, the CPE will connect the station automaticlly. Número PIN de Cliente (Input Station PIN)  You need to enter a pin the station which mode is Enrollee Generate. Press the button to connect the other with the pin.
BHS-RTA S User´s Manual  EEddiittiioonn  EEdd  11..00  Page 21 of 52   In this page you can also configure a 2nd SSID to be used as tunnel GRE with remote peer. Figure showing how change security for SSID in the picture above (Movistar-Wi-fi)   Access to several SSID configuration through Varios AP button.
BHS-RTA S User´s Manual  EEddiittiioonn  EEdd  11..00  Page 22 of 52
BHS-RTA S User´s Manual  EEddiittiioonn  EEdd  11..00  Page 23 of 52  4.3.7  WLAN STATUS Click WLAN  Estado, you will find the page below.   4.4.-   WAN In this menu, user can manage all related to internet connection. 4.4.1  DSL WAN To configure internet click on WAN  DSL WAN, page shown is the one below.   This  page  contains  several  configurable  paramaters  in  order  to  configure  an  internet  connection.  Most important ones are listed below.
BHS-RTA S User´s Manual  EEddiittiioonn  EEdd  11..00  Page 24 of 52   Field Description PVC Settings VPI: The virtual path between two points in an ATM network, and its valid value is from 0 to 255. VCI: The virtual channel between two points in an ATM network, ranging from 32 to 65535 (0 to 31 is reserved for local management of ATM traffic). Protocol (Modo del canal) You can select from the drop-down list.  Encapsulation Mode Select the method of encapsulation provided by your ISP. You can select LLC or VCMUX.  Set  the  VPI  and  VCI.  Choose  if  the  Protocol  is  PPPoE,  PPPoA  …  as  shown  in  the  page  below.  In  table Configuración  PPP, it is also necessary enter user name and password, and connection kind. In the picture below connection is Continuous. To enable/disable default route there are three options:  Habilitar: default route will be enabled by default. Only one PVC can be configured like that.  Deshabilitar: default route will be disabled by default.  Auto: default route will be automatic and PVC will be up when DSL line matches. User can configure as much PVC’s as wanted in mode Auto.  In table below it’s possible to see how PVC’s are configured. In the example below there are two PPPoE PVC’s and one bridge. Both PPP connections are configured like Auto, but only one is up.
BHS-RTA S User´s Manual  EEddiittiioonn  EEdd  11..00  Page 25 of 52    4.4.2  ATM CONFIGURATION From this page is possible to configure ATM parameters for each PVC.                   4.4.3  ADSL CONFIGURATION This page allows configure ADSL modulation parameters.
BHS-RTA S User´s Manual  EEddiittiioonn  EEdd  11..00  Page 26 of 52  4.4.4  3G configuration  If you want to access the Internet through 3G connection, a 3G  USB data card is required. Connect the 3G data card to the USB interface of the Router and go to this page. 3G backup is enable by default, which means that if a 3G dongle is plugged and there is a fail in DSL line, 3G will be up and Internet will be served through 3G dongle.                               Field Description Enable 3G Backup You may choose to enable or disable 3G backup. Network type It’s possible to select 2G or 3Gby default is in Auto mode. APN Enter the access point. Dial_Number Enter the dial number. Account Enter the account. Password Enter the password. NAPT Enable or Disable. Connection Mode Continuous and On demand Inactivity Timeout Set the period without flow before disconnecting 3G connection. When 0 is set, 3G connection will always be connected regardless of flow.  Backup delay time Set the period before starting 3G dial after ADSL disconnection.
BHS-RTA S User´s Manual  EEddiittiioonn  EEdd  11..00  Page 27 of 52  4.4.5  PIN CONFIGURATION  Click  Pin  Configuration  to  enable  the  3G  PIN  code  as  shown  in  the  following  figure. Label  “Estado”  will inform you about dongle status, if PIN is needed or not, or if modem has been detected.                4.4.6  3G DRIVER  By default there is a list of dongles supported by HomeStation, but there will be some of them, that could be not supported. For this, Observa CPE allows to load new drivers in order to support new 3G dongles. If there is a restore to default settings, these loaded drivers will be removed.  Load new driver and reboot CPE in order to make effective the change. Also you can clean flash memory of these drivers by clicking on ‘Limpiar’ button.           4.4.7  ETH/GRE Use this section for configuring the settings of transparent Ethernet over GRE Tunnel:
BHS-RTA S User´s Manual  EEddiittiioonn  EEdd  11..00  Page 28 of 52  4.4.8  VPN: PPTP/L2TP Use this section for configuring the settings of VPN(PPTP or L2TP)                   4.5.-   SERVICES  4.5.1 DHCP  By  default,  Enable  DHCP  Server  is  selected  for  the  Ethernet  LAN  interface  of  the  device.  DHCP  service supplys IP settings to workstations configured to automatically obtain IP settings that are connected to the device through the Ethernet port.  When the device is used  for DHCP, it becomes the default gateway for DHCP client connected to it. If you change the IP address of the device, you must also change the range of IP addresses in the pool used for DHCP on the LAN. The IP address pool can contain up to 253 IP addresses.
BHS-RTA S User´s Manual  EEddiittiioonn  EEdd  11..00  Page 29 of 52  4.5.2 DNS By clicking on DNS  Servidor DNS we can configure manually or automatically DNS for ipv4 and ipv6. By default DNS are set automatically.       To configurate Dynamic DNS, click on DNS  DNS Dinámico The device supports dynamic domain name service (DDNS). The dynamic DNS service allows a dynamic public IP  address  to  be  associated  with  a  static  host  name  in  any  of  the  many  domains,  and  allows  access  to  a specified  host  from  various  locations  on  the  Internet.  Click  a  hyperlinked  URL  in  the  form  of hostname.dyndns.org and allow remote access to a host. Many ISPs assign public IP addresses using DHCP, so locating a specific host on the LAN using the standard DNS is difficult. For example, if you are running a public web server or VPN server on your LAN, DDNS ensures that the host can be located from the Internet even if the  public  IP  address changes.  DDNS  requires  that  an  account  be  set  up  with  one  of the  supported  DDNS service providers (DyndDNS.org or dlinkddns.com).
BHS-RTA S User´s Manual  EEddiittiioonn  EEdd  11..00  Page 30 of 52   4.5.3  Firewall ALG  Block IP or port Click on Servicios FirewallBloquear IP/Puerto to access this page.  To enable a rule is necessary to fill if the action is for outgoing/incoming traffic, choose Deny or Accept and click Apply. Then,  it’s possible to add the rule  based on  the  kind of traffic,  protocols, ip’s and ports. Rules added will be shown on the table “Tabla de filtro actual”.
BHS-RTA S User´s Manual  EEddiittiioonn  EEdd  11..00  Page 31 of 52    Bloquear MAC Click on Servicios  Firewall  Bloquear MAC to access to this page. In this page you can block the access depending  on  MAC  address.  In  this  configuration  page  it’s  possible  also  to  choose  if  the  restriction  is  for outgoing or incoming traffic and if the rule denies or accepts the traffic.    DNAT Click on Servicios  Firewall  DNAT to access to this page. Inputs on this table allows you to redirect those services required to the router from Internet, to those specific devices in your LAN using NAT.
BHS-RTA S User´s Manual  EEddiittiioonn  EEdd  11..00  Page 32 of 52    Bloquear URL Click  on  Servicios    Firewall    Bloquear  URL  to  access  this  page.  This  page  allows  user  to  block  domain name  FQDN  and  filter  by  words.  Page  is  divided  in  two  sections,  first  one  to  filter  by  domain  FQDN  and second one to filter by words.    Block domains Click on Servicios  Firewall  Bloquear Dominios to access to this page. From this page can configure those domains that are blocked, user can remove or add new domains.
BHS-RTA S User´s Manual  EEddiittiioonn  EEdd  11..00  Page 33 of 52    DMZ Click on Servicios  Firewall  DMZ to access this page. Since some applications are not compatible with NAT, the device supports the use of a DMZ IP address for a single host on the LAN. This IP address is not protected by NAT and it is visible to agents on the Internet with the correct type of software. Note that any client PC in the DMZ is exposed to various types of security risks. If you use the DMZ, take measures (such as  client-based  virus  protection)  to  protect  the  remaining  client  PCs  on  your  LAN  from  possible contamination through DMZ.   4.5.4 UPnP Click  on  Servicios    Upnp  to  access  this  page.  In  this  page,  you  can  configure  universal  plug  and  play (UPnP). The system acts as a daemon after you enable UPnP. UPnP is used for popular audio visual software. It allows automatic discovery of your device in the network. If you are concerned about UPnP security, you can disable it. Block ICMP ping should be enabled so that the device does not respond to malicious Internet requests. By default UPnp is  enabled for any interface, once Internet is up, UPnP will be linked automatically to that active interface unless user force the connection to another interface.
BHS-RTA S User´s Manual  EEddiittiioonn  EEdd  11..00  Page 34 of 52  4.5.5  RIP Click on Servicios  RIP to access to this page. This page is used to select the interfaces on your device that use RIP and the version of the protocol used. If you are using this device as a RIP-enabled device to communicate with others using the routing information protocol, enable RIP and click Apply to save the settings. Then, you can configure interface.    4.5.6  DMS Click on Servicios  DMS to enable disable “Servidor Digital Multimedia” or DLNA.   4.6.-   ADVANCED  Go to menu “Avanzado” to configure several advanced settings. 4.6.1  ARP Table Table ARP shows the list with MAC addresses known by the router.
BHS-RTA S User´s Manual  EEddiittiioonn  EEdd  11..00  Page 35 of 52   4.6.2  Bridging This  page  is  used  to  configure  bridge  parameters.  In  this  page,  you  can  change  the  settings  or  view  some information of the bridge and its attached ports. Click on Avanzado  Bridging to access to this page.   4.6.3  Routing Click on Avanzado  Encaminamiento to access to the Routing page.  This page is used to configure the routing information. In this page, you can add or delete IP routes.   Field Description Destination  Network  Address (Destino) The destination IP address of the router. Subnet Mask (Máscara de red) The subnet mask of the destination IP address. Next Jump (Siguiente salto) Next jump in the routing configuration. Metric Determine whether one particular route should be chosen over another Use Interface The interface name of the router output port.
BHS-RTA S User´s Manual  EEddiittiioonn  EEdd  11..00  Page 36 of 52   Click on button “Mostrar rutas” to see info below.  4.6.4  SNMP Click on Avanzado  SNMP to access this page. In this page, you can set SNMP parameters
BHS-RTA S User´s Manual  EEddiittiioonn  EEdd  11..00  Page 37 of 52  4.6.5  IP QoS Click on Avanzado  IP QoS, to get IP QoS configuration menu. There are two pages to configure it: Cola QoS and Clasificación. Cola QoS In this page it’s possible to see QoS queue list.    Clasificación Here is possible to configure QoS queue rules. Quality of service (QoS) allows you to configure the overall performance and priority given to each network service. First row can be used for enabling QoS on the router while choosing if the classifications rules will be based on the  IP precedence field  or 802.1p (VLAN) field. Rules for  specific  traffic can be configured  in the second  table  so  specific  traffic  can  be  marked  with  desired  values  for  IP  Type  of  Service  and  802.1p specification.
BHS-RTA S User´s Manual  EEddiittiioonn  EEdd  11..00  Page 38 of 52   4.6.6  Remote access  Click on Avanzado  Acceso Remoto to see this page. At  access  remote  page  you  can  choose  whether  services  are  accessible  or  not  via  LAN/WAN.  When  one service is enabled for WAN, user can enter an IP range in the table below:    An example of the working is explained here: For instance, if Telnet is accessible via WAN then:  Is there any IP range enabled for this service? o Yes telnet is accessible just for those IP’s set in the table. o No  then, telnet is accessible from any IP.
BHS-RTA S User´s Manual  EEddiittiioonn  EEdd  11..00  Page 39 of 52  4.6.7  Printer In  this  page  it’s  possible  to  see  what  is  the  url  assigned  to  the  printer.  Click  on  Avanzado    Servidor  de impresora, to access here.   4.6.8  SAMBA To enter this page, click on Avanzado  Servidor de Archivos.  Field Description Enable SAMBA Select the check box “Servidor de Archivos” to enable the samba service. By default is enabled. Access Route Enables/disables access via WAN or LAN by clicking on check box. Access mode Choose if access mode is Only read or Read/Write.  There is also a table showing information about the USB device plugged into the router. In order to access using  SAMBA  to  USB  device,  user  must  enter  \\192.168.1.1  in  an  explorer  window,  or //homestation/fileserver. Both url’s are valid.
BHS-RTA S User´s Manual  EEddiittiioonn  EEdd  11..00  Page 40 of 52  4.6.9  Other configuration  IP passthrough is an option for your DSL modem to turn into a "Bridge" or be just a simple modem - whatever comes  down  the  pipe  from  the  internet  goes  right  on  through  to  your  network  without  any  filtering  or routing   4.6.10  IPv6 This device supports IPv6, and there is a complete menu where user can configure main parameters for an IPv6 connection. To access to this menu go to Avanzado IPv6. Options available are:   IPv6 This page allows you enable/disable Ipv6 support.
BHS-RTA S User´s Manual  EEddiittiioonn  EEdd  11..00  Page 41 of 52  RADVD In this page you can configure router advertisement daemon, It sends Router Advertisement messages, to a local Ethernet LAN periodically and when requested by a node sending a Router Solicitation message. These messages are required for IPv6 stateless autoconfiguration.   DHCPv6 IPv6 hosts that  use stateless autoconfiguration  may require  information other than an IP  address. DHCPv6 can be used to acquire this information, even though it is not being used to configure IP addresses. DHCPv6  is  not  necessary  for  configuring  Domain  Name  System  servers—they  can  be  configured  using Neighbor Discovery Protocol, which is needed anyway for stateless autoconfiguration.
BHS-RTA S User´s Manual  EEddiittiioonn  EEdd  11..00  Page 42 of 52    Proxy MDL   MLD Snooping
BHS-RTA S User´s Manual  EEddiittiioonn  EEdd  11..00  Page 43 of 52  IPv6 Routing This page can be used to configure static routing for ipv6. From this page, user can add or remove new routes.
BHS-RTA S User´s Manual  EEddiittiioonn  EEdd  11..00  Page 44 of 52  Block IP/Port In  this  page,  it’s  possible  to  block  an  specific  IP  and  ports.  User  must  choose  between  outgoing/incoming traffic, protocol and accept or deny that traffic.   4.7.-   Diagnostics  From these pages, user can use many Diagnostic tools to know which the router state is. 4.7.1  Ping Click on Diagnóstico  Ping, then insert a destiny address and click “Comenzar” button. Router will show the response after a while, if ping has successed or failed.
BHS-RTA S User´s Manual  EEddiittiioonn  EEdd  11..00  Page 45 of 52  4.7.2  Packet Dump Packet Dump is a useful tool to capture traffic. Open wireshark and follow instructions listed in the page. You may enter interface you want to capture, for instance –s 1500 –i wlan0.   4.7.3  ATM Loopback ATM  state  connection  is  verified  through  ATM  OAM  test  loopback.  This test  checks  virtual  paths  (VP) and virtual circuits (VC). Choose PVC to be tested and the flow type.   4.7.4  ADSL Tone Click on  Diagnóstico   Tono Adsl to access this page.  This function  will list SNR tones by channel.  This list showing tone vs. SNR will show you how good ADSL line quality is.
BHS-RTA S User´s Manual  EEddiittiioonn  EEdd  11..00  Page 46 of 52      4.7.5  ADSL Conectivity Click on Diagnóstico  Conectividad ADSL to access to this page.  Choose ppp interface and click on “Comenzar” button. This page will show you a list of individuals tests and if these ones have been passed or not.
BHS-RTA S User´s Manual  EEddiittiioonn  EEdd  11..00  Page 47 of 52  4.8.-   ADMINISTRATOR  4.8.1  Save and Reboot In this page you can reboot the device. CPE will save changes in your configuration and they will be stored and ready even after the reboot.   4.8.2  Backup and restore In this page, you can back up the current settings to a file, update settings from the file saved previously and restore the factory defaults. Buttons in this page are described as follows.  Field Description Backup Setting Click this button to save the settings to the local hard drive. Select a location on your computer to back up the file. You can name the configuration file. Update setting Click Browse to select the configuration file of device and then click Update Settings to begin updating the device configuration. Restore  Default Setting Click this button to reset the device to default settings.
BHS-RTA S User´s Manual  EEddiittiioonn  EEdd  11..00  Page 48 of 52  4.8.3  Close Session This page closes current session. User will be log out and router will ask again for credentials. This way user profile can be changed.    4.8.4  System log This page displays event log data in  the chronological manner. You  can read the  event log from  the local host  or  send  it  to  a  system  log  server.  Available  event  severity  levels  are  as  follows:  Emergency,  Alert, Critical, Error,  Warning, Notice, Informational and  Debugging. In  this page, you can  enable or  disable the system log function.  Step 1 Select Enable Log check box. Step 2 Select the display mode from the Mode drop-down list. Step 3 Click Apply to apply the settings. Step 4 Click View System Log to view the detail information of system log.
BHS-RTA S User´s Manual  EEddiittiioonn  EEdd  11..00  Page 49 of 52  4.8.5  Password In the page Administrador  Contraseña, user can change the current password for accessing management web.  This  change  can  be  performed  for  different  profiles.  if  user  does  not  fill  those  fields  requiring  new password, no authentication will be asked.   4.8.6  Upgrade Firmware In this page user can upgrade firmware. To update the firmware, take the following steps.   Click Browse… to find the file. File must have an extension *.img.  Click Update to load the file into the flash memory.  The device loads the file and reboots automatically. Note: Do not turn off your device or press the Reset button while an operation in this page is in progress. In case this happens, second memory stack will boot up and will show you previous firmware.    4.8.7  ACL In this page, you can configure the IP  address for access control list (ACL). If  ACL is enabled, only devices with the specified IP addresses can access the device.  Choose Enable (Habilitar) to enable ACL and click on Apply (Aplicar) button to save changes. Note: If you enable the ACL, ensure that IP address of the host is in the ACL list. To add an IP address to the IP list, click Add. The page shown in the following figure appears.
BHS-RTA S User´s Manual  EEddiittiioonn  EEdd  11..00  Page 50 of 52    4.8.8  Time Zone By  default,  NTP  Server  synchronization  is  disabled.  We  can  enable  it  in  Administrador    Zona  horaria, checking “Habilitar sincronización de hora vía NTP”. Then we apply changes.  In the Time and Date page, you can configure, update, and maintain the correct time on the internal system clock.  You  can set  the time  zone that you  are in  and  the network  time protocol (NTP)  server.  You  can  also configure daylight saving to automatically adjust the time when needed.    4.8.9 TR-069 It’s possible to access to TR069 page in the following URL: http://192.168.1.1:8000/tr069config.asp CPE  WAN  Management  Protocol  (CWMP)  is  a  protocol  for  communication  between  a  CPE  and  Auto-Configuration Server (ACS). The function supports TR-069 protocol which collects information, diagnoses the devices and configures the devices automatically via ACS (Auto-Configuration Server). TR-069  is  enabled  by  default.  From  this  page  is  possible  to  manage  ACS  parameters,  connection  request parameters and also those parameters linked to certificate.
BHS-RTA S User´s Manual  EEddiittiioonn  EEdd  11..00  Page 51 of 52  ACS parameters  URL: Enter the website of ACS which is provided by your ISP.  User Name/Password: Enter the User Name and password the device should use when connecting to the ACS.  Periodic Inform Enable: When this field is enabled, the device will send an Inform RPC to the ACS server at the system startup, and will continue to send it periodically at an interval defined in “Periodic Inform Interval” field; when this field is disabled, the device will only send Inform RPC to the ACS server once at the system startup.  Periodic Inform Interval: The interval to send Inform RPC. Connection Request parameters  User Name/Password: Enter the User Name and Password the remote ACS should use when connecting to the device.  Path: The path of the device ConnectionRequestURL.  Port: The port of the device ConnectionRequestURL.
BHS-RTA S User´s Manual  EEddiittiioonn  EEdd  11..00  Page 52 of 52  4.9.-   Statistics  Go  to  Statistics  menu  to  see  ADSL  and  Interface  statistic.  In  this  menu  it’s  possible  to  check  network statistics  and  data  transfer.  This  information  helps  technicians  to  identify  if  the  device  is  functioning properly. The information does not affect the function of the device. 4.9.1  Interface  Click on Estadísticas  Interfaz and you will find the page below. It shows a table containing Tx/Rx packets information related to each interface.   4.9.2  ADSL Choose ADSL to see statistics related to DSL line working.

Navigation menu