Paradox Security Systems MG6060 MG-6060 User Manual Magellan EU01
Paradox Security Systems MG-6060 Magellan EU01
UserManual.wiki
>
Paradox Security Systems
>
MG6060 User Manual
>
User guide
Contents
1.
Installation guide with FCC warnings
2.
User guide
User guide
Navigation menu
Upload a User Manual
Namespaces
Wiki Guide
HTML
PDF
Info
Views
User Manual
Discussion / Help
Navigation

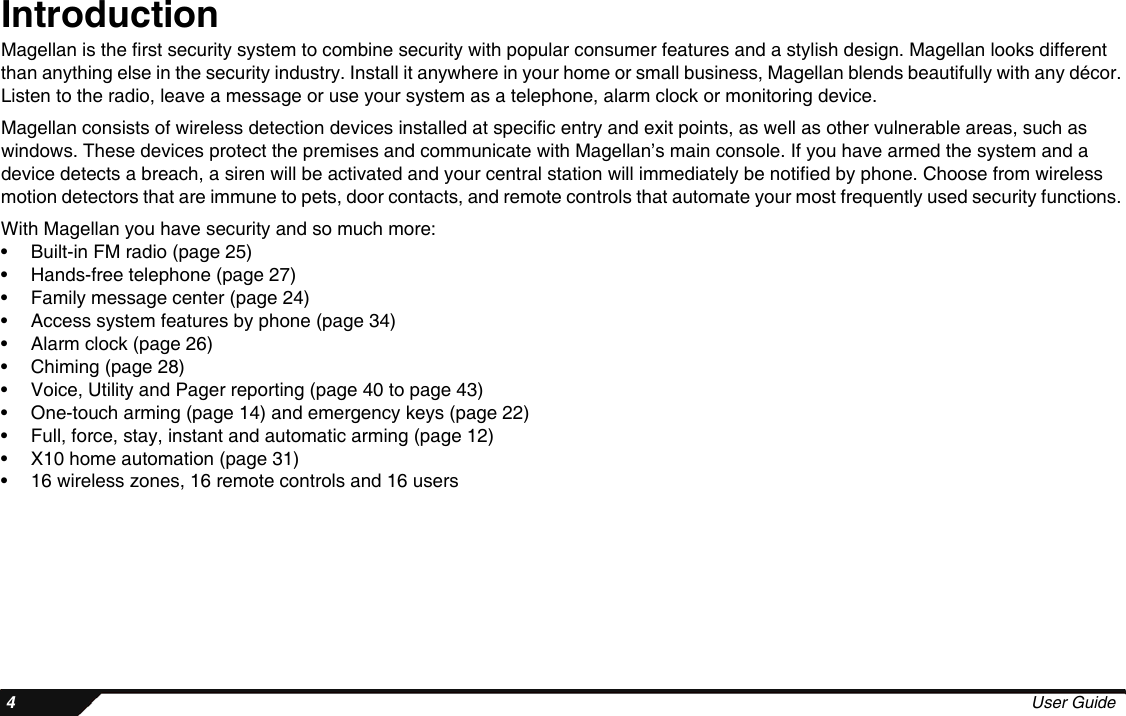
![Overview 5How to Use this GuideThis manual employs an icon-based instruction format to display the steps required to use Magellan’s features. The icon-based instructions are designed to be used in conjunction with the on-screen instructions being displayed on Magellan. In other words, as you are following the instructions shown in this guide, you should also be reading what is being displayed on the LCD screen. All the icons displayed in this guide are explained in Conventions on page 6.ExampleWhen setting the Magellan console’s time and date (page 29), the following will be displayed:This instruction set is explaining the following:A- Press the [MENU] action key (the right action key located under the right side of the LCD screen.B- Press the [3] key on the main keypad.C- Select the time format that Magellan will follow; press the [12HRS] action key (the left action key under the LCD screen) to select the 12-hour format or the [24HRS] action key (the center action key under the LCD screen) to select the 24-hour format.D- Program the desired time (following the time format selected before) and then the date.DCBAMenuEnter the time and date12Hrs 24HrsSelect the console’s time formator](https://usermanual.wiki/Paradox-Security-Systems/MG6060.User-guide/User-Guide-481306-Page-7.png)
![6User GuideConventionsIcon Definition Icon DefinitionReference to another manual or guide. Enter the System Master code on the main keypad.Warning or important information. Enter your user code on the main keypad.Reminder or suggestion. Enter a time value (such as when programming Magellan’s date and time) on the main keypad. [DATA]or[KEY]Type required data or press the designated key from either the main or center keypad.Enter numerical data for the specified feature on the main keypad.Record voice label when prompted or speak into the Magellan console when using Magellan’s Speakerphone feature (see page 27).Press a button on a remote control.Press the specified action key. See Figure 1 on page 7.Wait the specified amount of time before performing another action.Press specified key from the main keypad. See Figure 1 on page 7.Call Magellan through a standard touch-tone telephone.Press the specified function key. See Figure 1 on page 7.](https://usermanual.wiki/Paradox-Security-Systems/MG6060.User-guide/User-Guide-481306-Page-8.png)
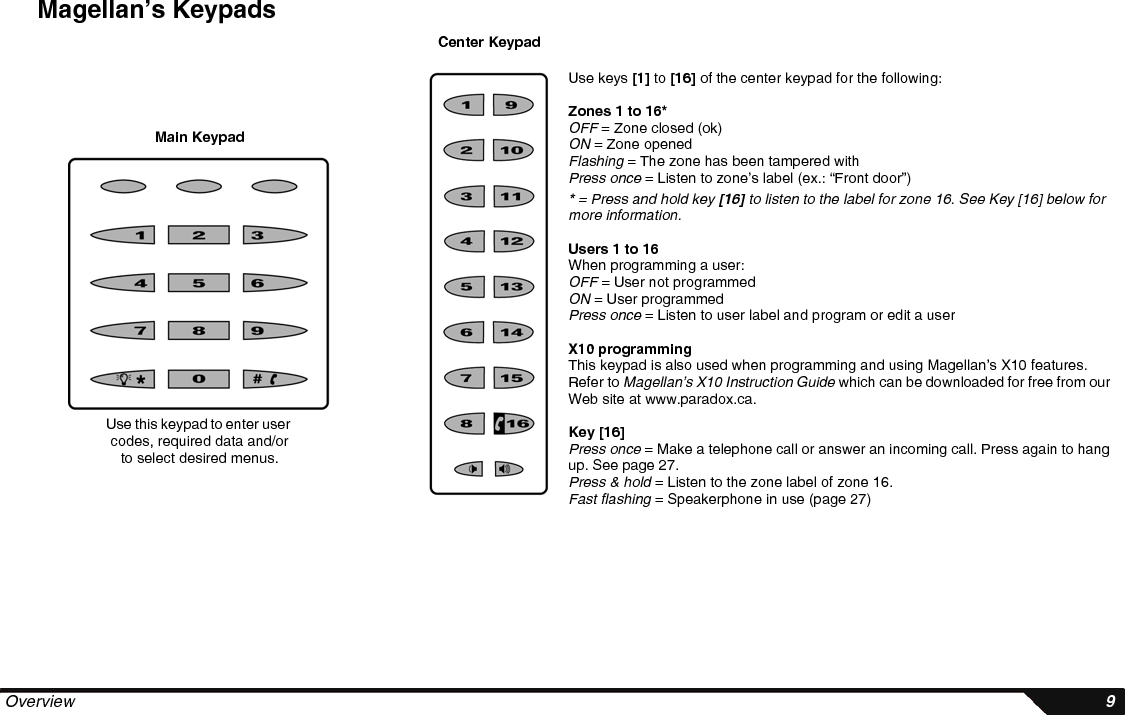
![Overview 9Magellan’s KeypadsUse this keypad to enter user codes, required data and/or to select desired menus.Main KeypadCenter KeypadUse keys [1] to [16] of the center keypad for the following:Zones 1 to 16*OFF = Zone closed (ok)ON = Zone openedFlashing = The zone has been tampered withPress once = Listen to zone’s label (ex.: “Front door”)* = Press and hold key [16] to listen to the label for zone 16. See Key [16] below for more information.Users 1 to 16When programming a user:OFF = User not programmedON = User programmedPress once = Listen to user label and program or edit a userX10 programmingThis keypad is also used when programming and using Magellan’s X10 features. Refer to Magellan’s X10 Instruction Guide which can be downloaded for free from our Web site at www.paradox.ca.Key [16]Press once = Make a telephone call or answer an incoming call. Press again to hang up. See page 27. Press & hold = Listen to the zone label of zone 16.Fast flashing = Speakerphone in use (page 27)](https://usermanual.wiki/Paradox-Security-Systems/MG6060.User-guide/User-Guide-481306-Page-11.png)
![14 User GuideBypass ProgrammingYou can bypass certain zones when you arm the system. When a zone is bypassed, it will be ignored the next time you arm the system. Once the system is disarmed, the system will “unbypass” the zone. Zones that can be bypassed are defined by your installer. To bypass a zone:Fire zones cannot be bypassed.One-Touch ArmingIf enabled by your installer, you can arm your system with the following arming methods simply by pressing and holding (for three seconds) the appropriate function key. You do not have to enter your User code. See Figure 1 on page 7 for the location of the function keys. Table 1 below shows what function keys can be used for one-touch arming.Table 1: One-touch Arming Keys* = To Instant arm your system using one-touch arming, press and hold the [STAY ARM] key and then during Exit Delay mode, press and hold the [STAY ARM] key once more.Function Key Arming Method key Stay arm (page 13) key Instant arm* (page 13) key Regular arm (page 12)Press until desired zoneThe light will turn ON whenever a zone or multiple zones are bypassed.menu next byp](https://usermanual.wiki/Paradox-Security-Systems/MG6060.User-guide/User-Guide-481306-Page-16.png)
![Consumer Features 25FM Radio FeatureThe Magellan console incorporates a radio built into the console itself. You can use this radio to listen to your favourite radio stations. You can also save up to 15 radio stations in memory.Using the RadioYou can use the main keypad to enter the 4-digit frequency of the desired radio station or the [UP] action key to advance to the next available radio station. If no action is performed after a few seconds, the console will revert to its standby screen. Press the [FM] action key to return to the radio tuner screen. To use the radio:Saving Radio Stations into MemoryMagellan can store up to 15 radio stations in memory. To store a radio station into memory:For example, you wish to assign a radio station to memory location M01. After accessing the radio station, press the [MEM] action key and then press the [1] key from the center keypad.ORupGo to desired stationPress a number key from [1] to [15] from the center keypad.ORupGo to desired stationmem This appears in the upper right corner to indicate that the station has been saved in memory.](https://usermanual.wiki/Paradox-Security-Systems/MG6060.User-guide/User-Guide-481306-Page-27.png)
![Consumer Features 27Setting the Alarm Clock TimeUsing the Alarm Clock FeatureAfter programming the alarm clock, the feature will be enabled and Magellan will play the selected tone at the programmed time. Please note the following:• When the alarm clock activates, press the [snooze] action key or press any button on the Magellan’s console to enable the snooze. The alarm clock will wait ten minutes before activating again.• Press and hold the key or press the [off] action key to disable the alarm clock. To enable the alarm clock again, press and hold the key. The alarm clock symbol will appear on the LCD screen.• Press the [stop] action key to turn OFF but not disable the alarm clock. The alarm clock will reactivate the following day at the programmed time.• If you have not activated the snooze or if you have not disabled the alarm clock, the alarm clock will stay ON for one hour if AC power is present.SpeakerphoneThe Magellan console comes with a feature that transforms the console into a speakerphone. Simply dial the desired telephone number and talk as you would on a normal telephone. You can also configure the ring tone and volume for incoming telephone calls. When the console’s speakerphone is being used, the console will emit a tone and key [16] from the center keypad will flash rapidly (see Magellan’s Keypads on page 9).Program timePress until desired tonemenu next okok](https://usermanual.wiki/Paradox-Security-Systems/MG6060.User-guide/User-Guide-481306-Page-29.png)
![28 User GuideMaking a Standard Telephone Call through the consoleAnswering an Incoming CallSetting the Ring Tone and VolumeChime ZonesYou can program the console to emit a tone whenever designated zones are opened. These zones are referred to as Chime zones.Dial telephone #*Tohang upUsing the center keypad: * When using the center keypad to dial the telephone number:Keys [1] to [9] = 1 to 9Key [10] = 0Key [11] = *Key [12] = #Tohang upUsing the center keypad:Program ring tonePress until desired toneProgram ring volumeUse the – or + action keys to increase or decrease the volumeormenu ok next ok ok - + okPress until desired zonePress until desired tonemenu next ok next ok](https://usermanual.wiki/Paradox-Security-Systems/MG6060.User-guide/User-Guide-481306-Page-30.png)


![34 User GuideAccess System Features by PhoneDue to Magellan’s voice-assisted remote features, any touch-tone telephone can be turned into a keypad. Arm/disarm Magellan, activate/deactivate Magellan’s PGM outputs, record/listen to messages and even turn Magellan into a speakerphone all via your telephone. Using detailed voice prompts to guide your way, remote access to your Magellan system is as easy as picking up the telephone.Please note the following:• The following instructions pertain to entering commands and/or data through your telephone’s keypad. Therefore, whenever you are instructed to perform an action and/or enter data, do so on your telephone’s keypad.• Magellan will automatically hang up if no action is performed after 2 minutes.• Press the [4] key at anytime to exit and have Magellan hang up.• When Magellan is in speakerphone mode, key [16] from the center keypad will flash rapidly.Step 1: Call Magellan from any touch-tone telephoneIf there is no answering service or machine, simply pick up your telephone and dial the number of the telephone line that your Magellan console is connected to (usually your home number). If the telephone line that Magellan is connected to is shared with an answering service or answering machine, you have to override the answering service or machine. To override the answering service or machine:Step 2: Enter your user codeUse the same user code that you use with the Magellan console. CallMagellan, wait one or two rings and then hang upWait 10 secondsCall Magellan again](https://usermanual.wiki/Paradox-Security-Systems/MG6060.User-guide/User-Guide-481306-Page-36.png)
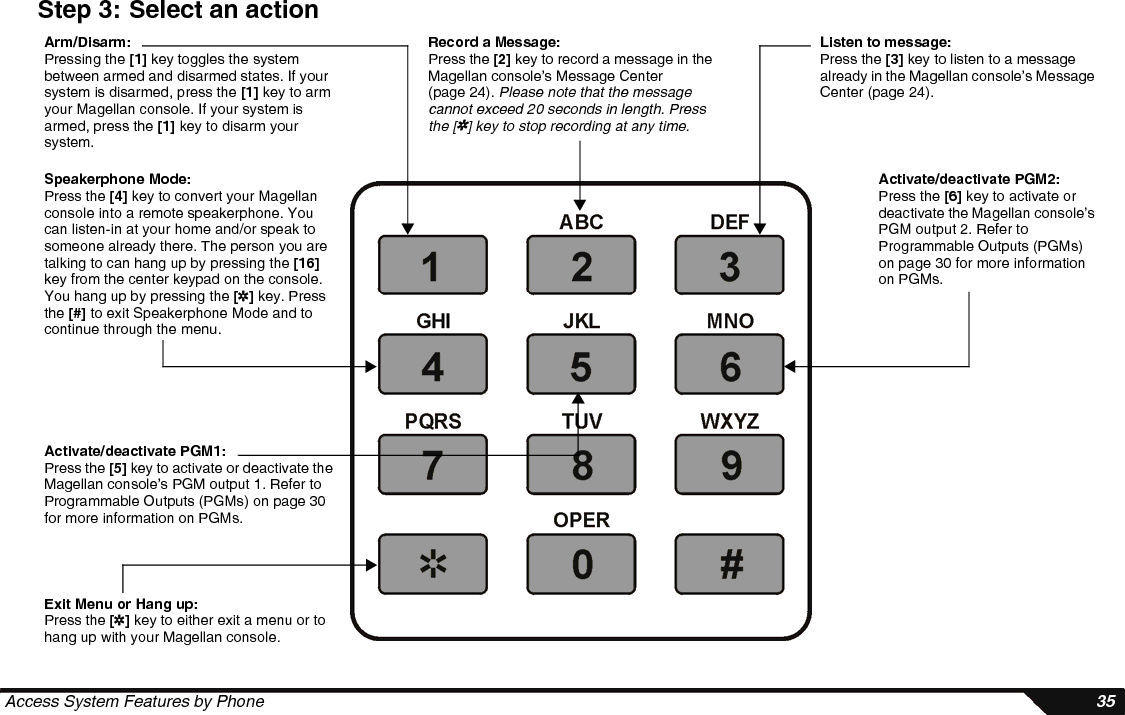
![Access System Features by Phone 35Step 3: Select an actionArm/Disarm:Pressing the [1] key toggles the system between armed and disarmed states. If your system is disarmed, press the [1] key to arm your Magellan console. If your system is armed, press the [1] key to disarm your system.Record a Message:Press the [2] key to record a message in the Magellan console’s Message Center (page 24). Please note that the message cannot exceed 20 seconds in length. Press the [4] key to stop recording at any time.Listen to message:Press the [3] key to listen to a message already in the Magellan console’s Message Center (page 24).Speakerphone Mode:Press the [4] key to convert your Magellan console into a remote speakerphone. You can listen-in at your home and/or speak to someone already there. The person you are talking to can hang up by pressing the [16] key from the center keypad on the console. You hang up by pressing the [4] key. Press the [#] to exit Speakerphone Mode and to continue through the menu.Activate/deactivate PGM1:Press the [5] key to activate or deactivate the Magellan console’s PGM output 1. Refer to Programmable Outputs (PGMs) on page 30 for more information on PGMs.Activate/deactivate PGM2:Press the [6] key to activate or deactivate the Magellan console’s PGM output 2. Refer to Programmable Outputs (PGMs) on page 30 for more information on PGMs.Exit Menu or Hang up:Press the [4] key to either exit a menu or to hang up with your Magellan console.](https://usermanual.wiki/Paradox-Security-Systems/MG6060.User-guide/User-Guide-481306-Page-37.png)
![40 User GuideSetting the LanguageBy default, Magellan is set to English. To change the language:Voice ReportingUse the Magellan console to call you or someone you choose on up to two different telephone numbers and play a personalized voice message (maximum 20 seconds in length) to announce that an alarm has occurred. After receiving the message, press the [#] key on the telephone to acknowledge that you have received the message which in turn will end the message. Press the [1] key on the telephone to use the speakerphone feature and to talk through the Magellan console. To program the Magellan console for voice reporting:Example: You programmed Magellan’s Voice Reporting feature to call your cellular phone and play your recorded message, “There is an alarm occurring at home.” Therefore, whenever an alarm occurs, Magellan will call you on your cellular phone and you will hear “There is an alarm occurring at home”. Press the [#] key on your cellular phone to acknowledge the message.Master codePressuntil desired languagemenu next okMaster userPressuntil desired telephone #Pressuntil RecordAlrm Mes?screenRecord your alarm messageEnter desired telephone #menu ok next ok ok next ok](https://usermanual.wiki/Paradox-Security-Systems/MG6060.User-guide/User-Guide-481306-Page-42.png)
![Advanced Features 41Utility ReportingCustomize what events and when these events will be reported to you by using the Utility Reporting menu. Program from one to four report types to have the Magellan console call you when certain conditions are met. With this feature programmed, Magellan will call up to two separate telephone numbers and play a personalized pre-recorded voice message. After receiving the message, press the [#] key on the telephone to acknowledge that you received the message which will in turn end the message. Press the [1] key on the telephone to use the speakerphone feature and to talk through the Magellan console. To program the Utility Reporting feature:Report TypesThere are four report types that can be used with Utility reporting:•Disarm with user: Use this report type to program the Magellan console to call you when specific users disarm the system. After entering the menu, select the desired user(s) that you wish reported. This feature is useful when you wish to know when specific people disarm the system. For example, you can program Magellan to call you whenever your children disarm your system thus informing you that they have arrived home.•System troubles: Use this report type to have the Magellan console call you when specific troubles occur. After entering the menu, select the desired trouble(s) you wish to be notified about. This feature can be used to inform you of a power failure.•Paramedic alarm: Use this report type to have the Magellan console call you when specific users require emergency assistance. When the programmed users presses the appropriate key on their remote controls (see Remote Controls on page 8), the MenuMaster userPress until desired telephone # and then press oknext OKPress until RecordAlrm Mes?screenOKRecord your alarm messageEnter desired telephone # and then press oknext nextPress until Utility Reporting screen and then press okPress untildesired report type and then press ok.See Report Types below for more info.next](https://usermanual.wiki/Paradox-Security-Systems/MG6060.User-guide/User-Guide-481306-Page-43.png)

![Advanced Features 43Pager ReportingTransmit personalized numerical messages from the Magellan console to a pager using this communicator format. To program the Magellan console with this communicator setting:Bell Cut-Off TimerAfter an audible alarm, Magellan’s built-in siren will stop upon disarming of the system or when the Bell Cut-off timer has elapsed, whichever comes first. To program the Bell Cut-off timer:System TestUse this menu to test your Magellan system. This menu will initiate tests for Magellan’s assigned zones, remote controls, reporting feature as well as some of Magellan’s hardware (lights, speaker and siren). This menu will also display any troubles that the system may be experiencing. Use the [NEXT] action key to scroll through the available system tests and then press the [OK] action key to access the desired test. Simply follow the on-screen instructions to perform the test. To access the System Test menu:Master code Enter desired numerical messageEnter desired pager #menu next ok ok ok ok oknextMaster code Enter delay time in minutesmenu next next next ok okMaster codeoknextmenuPress until desired testWARNING! When testing the hardware, the speaker and sirens will also be tested. Do not be in close proximity to the Magellan console when performing the hardware test to avoid any damage to your hearing.](https://usermanual.wiki/Paradox-Security-Systems/MG6060.User-guide/User-Guide-481306-Page-45.png)
![44 User GuideZone LabelsYou can record a custom voice label for one or all the available zones in your system. By default, each zone has a pre-recorded label that simply states the zone number. For example, zone 1’s default label is “zone one”. Use this menu feature to apply labels of your choosing for each available zone. You can use labels such as “Front Door” or “Basement”, etc. To record a zone label:Master userPressuntil desired zoneRecord zone labelyesoknextmenu Press [yes] to accept the label. Press [play] to listen to the label. Press [no] if you wish to re-record the label.](https://usermanual.wiki/Paradox-Security-Systems/MG6060.User-guide/User-Guide-481306-Page-46.png)