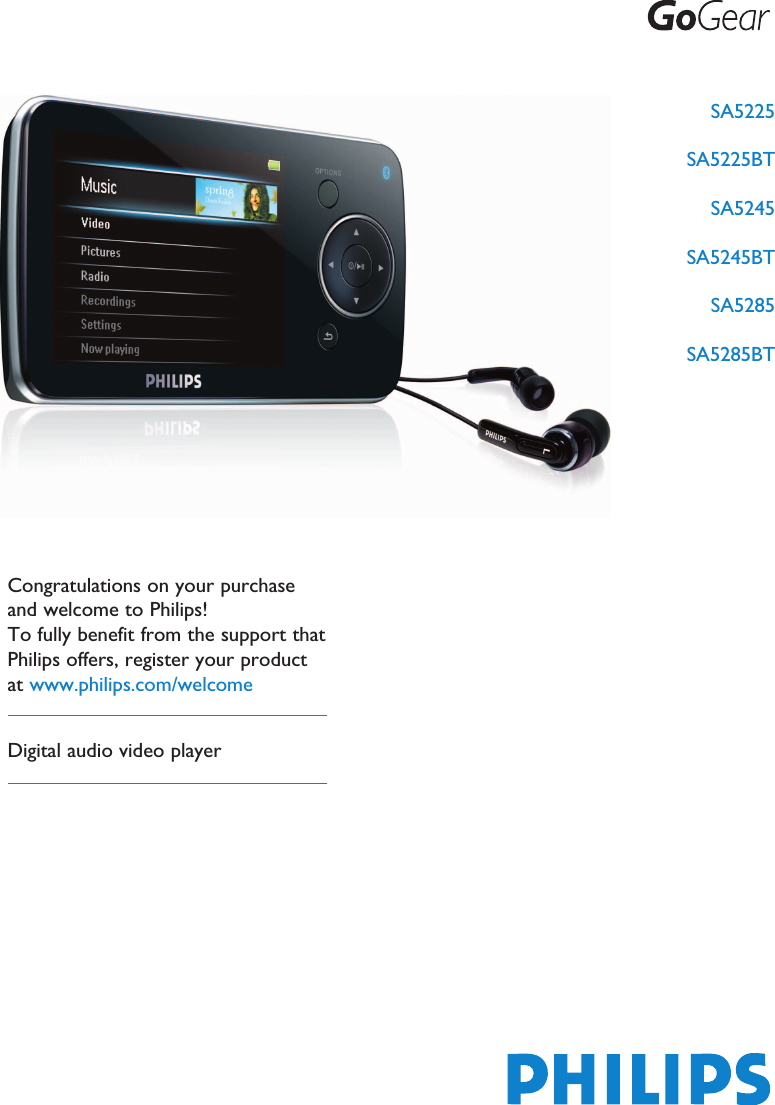
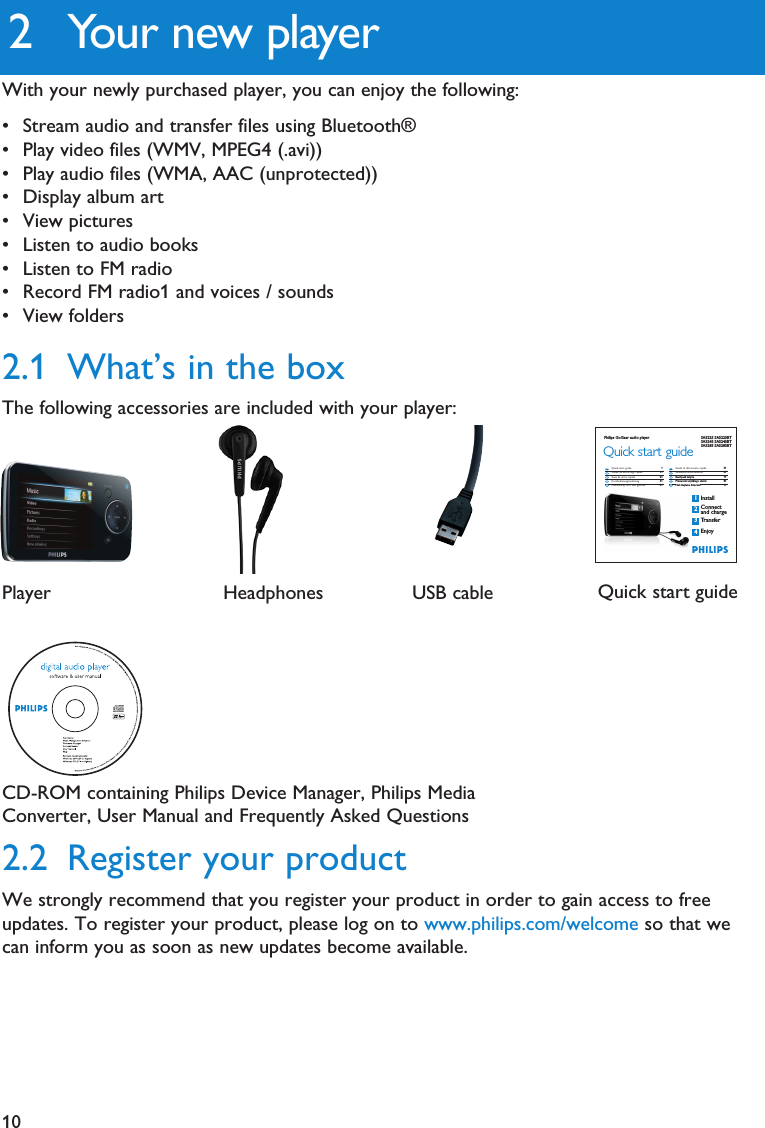
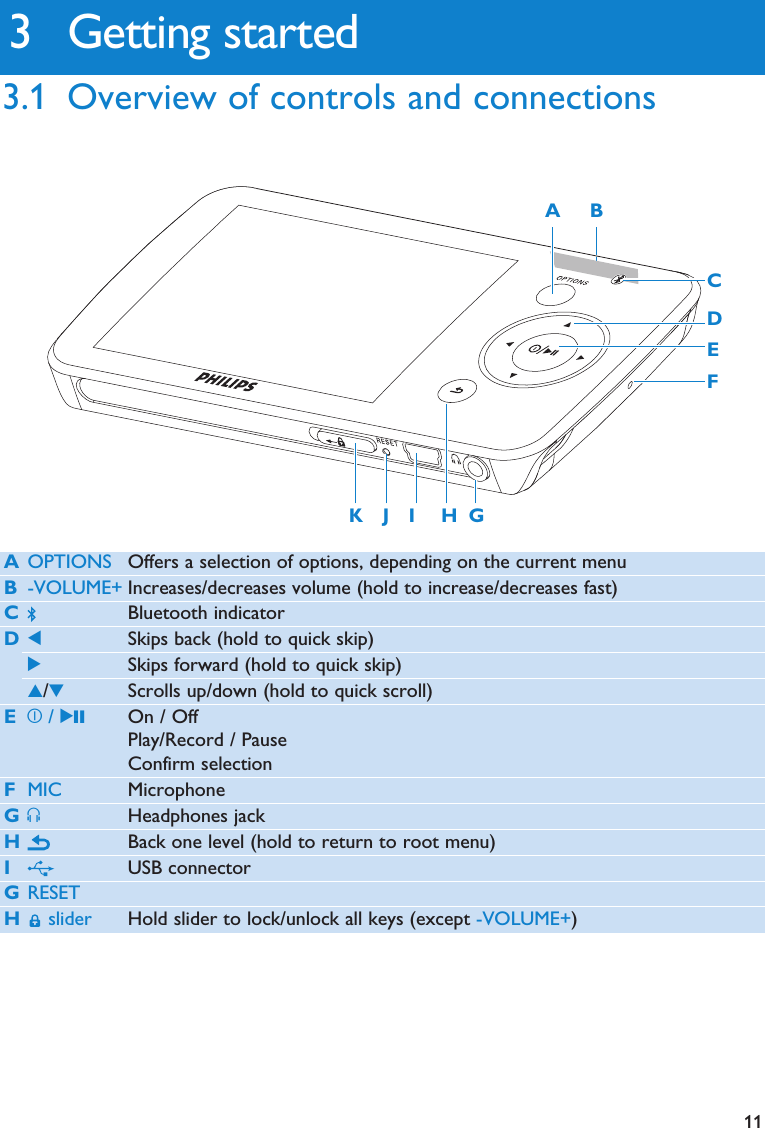
Philips Consumer Lifestyle SA5225BT Digital Audio Player User Manual SA52xx English

Philips Consumer Lifestyle Digital Audio Player SA52xx English

manual

SA5225SA5225BTSA5245SA5245BTSA5285SA5285BTCongratulations on your purchaseand welcome to Philips!To fully benefit from the support thatPhilips offers, register your productat www.philips.com/welcomeDigital audio video player
2Need help?Please visitwww.philips.com/welcomewhere you can access a full set of supporting materials such as user manual, thelatest software updates and answers to frequently asked questions.
31 Important safety information 52 Your new player 102.1 What’s in the box 102.2 Register your product 103 Getting started 113.1 Overview of controls and connections 113.2 Main menu 123.3 Install 123.4 Connect and charge 133.4.1 Use the supplied USB cable 133.4.2 Battery level indication 133.5 Transfer music and pictures 143.6 Transfer videos 143.7 Enjoy 153.7.1 Turn on and off 153.7.2 Navigate the menu 163.7.3 Connect Bluetooth headphones (or other Bluetooth devices) 163.7.4 Lock slider 164 Organize and transfer music and pictures withRhapsody Media Player 174.1 Install Rhapsody Media Player 174.1.1 View subscription status 174.2 Add Rhapsody Music2 to the player 174.3 Add Rhapsody Music Channels3 to the player 184.4 Transfer picture files to the player with Rhapsody MediaPlayer 185 Detail operation 195.1 Music mode 195.1.1 Control 195.1.2 Find your music 205.1.3 Find your Rhapsody4 channels 215.1.4 Rating the songs in your Rhapsody3 channels 215.1.5 Adding music from your Rhapsody3 channels to the player library 215.1.6 Limit the volume 215.1.7 Resume play (Now playing) 225.2 Picture library 235.2.1 View pictures 235.2.2 Adding pictures to folder ‘Favorites’ 235.2.3 Slideshow 23Contents
45.3 Listen to audio books 245.3.1 Select audio book by book title 245.3.2 Select audio book by author 245.3.3 Audiobook controls 245.3.4 Adjust audiobook play speed  255.3.5 Add a bookmark in an audiobook  255.3.6 Find a bookmark in an audiobook  255.3.7 Delete a bookmark in an audiobook  255.3.8 Delete an audiobook  265.4 Video 275.4.1 Transfer videos from a computer to the player 275.4.2 Video play 275.4.3 Fast forward / backward control 275.5 Radio 285.5.1 Automatic tuning of radio stations 285.5.2 Play a preset radio station 285.5.3 Manually tune a radio station 285.5.4 Manually save a radio station to a preset 295.5.5 Record from FM radio when the radio is playing 295.6 Recordings 305.6.1 Play recordings 305.6.2 Delete recordings 305.6.3 Upload recordings to the computer 315.7 Use your player to store and carry data files 316 Play and transfer music, videos, or audiobookswith Bluetooth 326.1 Play audio or video, or audiobooks on another Bluetoothoutput device 326.2 Transfer files to and from another Bluetooth device 336.2.1 Transfer files from a list 336.2.2 Transfer files while playing 346.2.3 Receive files  357 Settings 367.1 Equalizer custom settings 378 Update your player 388.1 Perform a software update 389 Technical data 3910 Frequently asked questions 41Contents
51 Important safety informationGeneral maintenanceTo avoid damage or malfunction:• Do not expose the player to excessive heat caused by heating equipment or directsunlight.• Do not drop your player or allow objects to fall on your player.• Do not allow your player to be submerged in water. Do not expose headphone socket orbattery compartment to water, as water entering the set may cause major damage.• Do not use any cleaning agents containing alcohol, ammonia, benzene, or abrasives asthese may harm the set.• Active mobile phones in the vicinity may cause interference.• Back up your files. Please ensure that you retain the original files you have downloaded toyour device. Philips is not responsible for any loss of data if the product becomes damagedor not readable / legible.• Manage (transfer, delete, etc.) your music files only with the supplied music software toavoid problems!About operating and storage temperatures•Operate in a place where temperature is always between 0 and 35ºC (32 to 95ºF)•Store in a place where temperature is always between -20 and 45ºC (-4 to 113ºF)•Battery life may be shortened in low temperature conditions.Replacement parts/accessoriesVisit www.philips.com/support to order replacement parts/accessories.Hearing SafetyListen at a moderate volume.• Using headphones at a high volume can impair your hearing. This product canproduce sounds in decibel ranges that may cause hearing loss for a normal person,even for exposure less than a minute. The higher decibel ranges are offered forthose that may have already experienced some hearing loss.• Sound can be deceiving. Over time your hearing “comfort level” adapts to higher volumesof sound. So after prolonged listening, what sounds “normal” can actually be loud andharmful to your hearing. To guard against this, set your volume to a safe level before yourhearing adapts and leave it there.To establish a safe volume level:• Set your volume control at a low setting.• Slowly increase the sound until you can hear it comfortably and clearly, without distortion.Listen for reasonable periods of time:• Prolonged exposure to sound, even at normally “safe” levels, can also cause hearing loss.• Be sure to use your equipment reasonably and take appropriate breaks.
6Be sure to observe the following guidelines when using your headphones.• Listen at reasonable volumes for reasonable periods of time.• Be careful not to adjust the volume as your hearing adapts.• Do not turn up the volume so high that you can’t hear what’s around you.• You should use caution or temporarily discontinue use in potentially hazardous situations.• Do not use headphones while operating a motorized vehicle, cycling, skateboarding, etc.; itmay create a traffic hazard and is illegal in many areas.Important (for models supplied with headphones):Philips guarantees compliance with the maximum sound power of its audio players asdetermined by relevant regulatory bodies only with the original model of providedheadphones. In case this one needs replacement, we recommend that you contact yourretailer to order a model identical to that of the original, provided by Philips.Copyright informationAll other brands and product names are trademarks of their respective companies ororganizations.Unauthorized duplication of any recordings whether downloaded from the Internet or madefrom audio CDs is a violation of copyright laws and international treaties.The making of unauthorized copies of copy-protected material, including computerprogrammes, files, broadcasts and sound recordings, may be an infringement of copyrightsand constitute a criminal offence. This equipment should not be used for such purposes.This product is protected by certain intellectual property rights of Microsoft Corporation.Use or distribution of such technology outside of this product is prohibited without a licensefrom Microsoft or an authorized Microsoft subsidiary.Content providers are using the digital rights management technology for Windows Mediacontained in this device (“WM-DRM”) to protect the integrity of their content (“SecureContent”) so that their intellectual property, including copyright, in such content is notmisappropriated. This device uses WM-DRM software to play Secure Content (“WM-DRMSoftware”). If the security of the WM-DRM Software in this device has been compromised,Microsoft may revoke (either on its own or upon the request of the owners of Secure Content(“Secure Content Owners”)) the WM-DRM Software’s right to acquire new licenses to copy,display and/or play Secure Content. Revocation may also prevent your device’s ability totransfer, store, copy, display and/or play Secure Content which you have previously stored onyour Device. Revocation does not alter the WM-DRM Software’s ability to play unprotectedcontent. A list of revoked WM-DRM Software is sent to your device whenever you downloada license for Secure Content from the Internet or from a PC. Microsoft may, in conjunctionwith such license, also download revocation lists onto your device on behalf of Secure ContentOwners, which may disable your device’s ability to copy, display and/or play Secure Content.
7In the event of revocation, Philips will attempt to make available software updates to restoresome or all of your device’s ability to transfer, store, access, copy, display and/or play SecureContent. However, the ability to make such updates available does not rest solely withPhilips. Philips does not guarantee that, after revocation, such software updates will beavailable. If such updates are not available, your device will not have the ability to transfer,store, copy, display and/or play Secure Content - even Secure Content which you havepreviously stored on your device.In addition, even if such software updates are available, they may not enable your Device totransfer, store, copy, display, and/or play Secure Content which was previously stored onyour Device. In some cases you may be able to transfer the content from the PC. In othercases, you may have to repurchase previously obtained Secure Content.To summarize - Microsoft, Secure Content Owners, and Secure Content distributors maydeny you access, or restrict your access, to Secure Content. They may also disable yourdevice’s ability to transfer, store, copy, display and/or play Secure Content even after youhave paid for and obtained it. Neither your consent nor the consent or approval of Philips isnecessary for any of them to deny, withhold or otherwise restrict your access to SecureContent or to disable your device’s ability to transfer, store, access, copy, display, and/or playSecure Content. Philips does not guaranty that you will be able to transfer, store, access,copy, display, and/or play Secure Content.The Windows Media and the Windows logo are registered trademarks of MicrosoftCorporation in the United States and/or other countries.Data loggingPhilips is committed to improving the quality of your product and enhancing the Philips userexperience. To understand the usage profile of this device, this device logs some info / datato the non-volatile memory region of the device. These data are used to identify and detectany failures or problems you as a user may experience while using the device. The datastored, for example, will be the duration of playback in music mode, duration of playback inturner mode, how many times battery low was encountered, etc. The data stored do notreveal the content or media used on the device or the source of downloads. The data storedon the device are retrieved and used ONLY if the user returns the device to the Philipsservice centre and ONLY to simplify error detection and prevention. The data stored shallbe made available to user on user’s first request.
8Disposal of your old productYour product is designed and manufactured with high quality materials andcomponents, which can be recycled and reused.When this crossed-out wheeled bin symbol is attached to a product, it means theproduct is covered by the European Directive 2002/96/EC.Please be informed about the local separate collection system for electrical and electronicproducts.Please act according to your local rules and do not dispose of your old product with yournormal household waste. The correct disposal of your old product will help prevent potentialnegative consequences to the environment and human health.The build-in rechargeable battery contains substances that may pollute the environment.Always hand the appliance in at an official collection point to remove the battery beforediscarding the appliance. Battery should be disposed of at an official collection point.ModificationsModifications not authorized by the manufacturer may void user authority to operate thisdevice.
9Notice for USANote:This equipment has been tested and found to comply with the limitsfor a Class B digital device, pursuant to part 15 of the FCC Rules.These limits are designed to provide reasonable protection againstharmful interference in a residential installation. This equipmentgenerates, uses, and can radiate radio frequency energy and, if not installed and used inaccordance with the instruction manual, may cause harmful interference to radiocommunications.However, there is no guarantee that interference will not occur in a particular installation. Ifthis equipment does cause harmful interference to radio or television reception, which canbe determined by turning the equipment off and on, the user is encouraged to try to correctthe interference by one or more of the following measures:- Relocate the receiving antenna.- Increase the separation between equipment and receiver.- Connect the equipment into an outlet on a circuit different from that to which thereceiver is connected.- Consult the dealer or an experienced radio/TV technician for help.Notice for CanadaThis Class B digital apparatus complies with Canadian ICES-003.The set complies with the FCC-Rules, Part 15 and with 21 CFR 1040.10. Operation is subjectto the following two conditions:• This device may not cause harmful interference, and• This device must accept any interference received, including interference that may causeundesired operation.Notice for the European UnionThis product complies with the radio interference requirements of the European Union.PhilipsSA5225 SA5225BTSA5245 SA5245BT
102 Your new playerWith your newly purchased player, you can enjoy the following:• Stream audio and transfer files using Bluetooth®• Play video files (WMV, MPEG4 (.avi))• Play audio files (WMA, AAC (unprotected))• Display album art• View pictures• Listen to audio books• Listen to FM radio • Record FM radio1 and voices / sounds• View folders2.1 What’s in the boxThe following accessories are included with your player: 2.2 Register your productWe strongly recommend that you register your product in order to gain access to freeupdates. To register your product, please log on to www.philips.com/welcome so that wecan inform you as soon as new updates become available.USB cable Quick start guideCD-ROM containing Philips Device Manager, Philips MediaConverter, User Manual and Frequently Asked QuestionsHeadphonesPlayerPhilips GoGear audio player1234InstallConnectand chargeTransferEnjoyQuick start guideQuick start guide 1Guide de démarrage rapide 11Guía de inicio rápido 21Kurzbedienungsanleitung 31Handleiding voor snel gebruik 41Guida di riferimento rapido 51Snabbstartsinstruktioner 61Быстрый запуск 71Przewodni szybkiego startu 8191Hızlı Başlama KılavuzuITSVRUPLTRENFRESDENLSA5225 SA5225BTSA5245 SA5245BTSA5285 SA5285BT
11AOPTIONS Offers a selection of options, depending on the current menuB-VOLUME+ Increases/decreases volume (hold to increase/decreases fast)CBluetooth indicatorD1Skips back (hold to quick skip)2Skips forward (hold to quick skip)3/4Scrolls up/down (hold to quick scroll)Ez/ 2; On / OffPlay/Record / PauseConfirm selectionFMIC MicrophoneGpHeadphones jackHBack one level (hold to return to root menu)IUSB connectorGRESETHslider Hold slider to lock/unlock all keys (except -VOLUME+)3 Getting started3.1 Overview of controls and connectionsIEFGJK HCA BD
123.3 InstallImportant Make sure to install the software provided in the supplied CD for musicand video transfer.System requirements:• Windows 2000, XP or Vista• Pentium III 800MHz processor or higher• 128MB RAM• 500MB hard disk space• Internet connection• Microsoft Internet Explorer 6.0 or later• CD-ROM• USB portImportant You need Windows XP Service Pack 2 to install and run this software. Incase you do not have this on your PC, you will be asked to install the Service Pack. Please doinstall this, complete the rest of your software installation and only then connect your device.This is critical to ensure the proper working of your player when connected to the PC.1Insert the CD supplied with your product into the CD ROM drive of your PC.22. Follow the on-screen instructions to complete the installation of Rhapsody MediaPlayer, Philips Device Manager and Philips Media Converter. The Philips MediaConverter converts video clips and JPEG pictures into suitable formats for the player.3If the installation program does not start automatically, browse the CD contents withWindows Explorer and double click on the file ending with .exe.Lost your CD? Don’t worry, you can download the CD contents fromwww.philips.com/support.Menu ToMusic Play digital music tracksRhapsody Demo Try out Rhapsody servicesRhapsody* Listen to Rhapsody Music ChannelsVideo Watch videosPictures View picturesRadio Listen to or record from FM radio1Recording Create or listen to recordingsFolders View folders2Settings Customize the settings of your playerNow playing Go to the play screenLast played Resume play3.2 Main menu* Only available after active Rhapsody Music Channel content is transferred to the player.
133.4.2 Battery level indicationThe approximate power levels of your battery are indicated as follows:Full Two-thirds full Half full Low Empty1Rechargeable batteries have a limited number of charge cycles. Battery life and number ofcharge cycles vary by use and settings.3.4 Connect and chargeWhen you connect the player to the PC, it automatically charges.3.4.1 Use the supplied USB cable1Before you use the player for the first time, charge it for at least 5 hours.> The battery2has a 100% charge after 4 hours and an 80% charge after 2 hours.2Connect the supplied USB cable to the mini USB port at the bottom of the player, theother end to your PC.> The player will start to charge as soon as it is connected to your PC.Note The player is fully charged when the charging animation stops and  isdisplayed. Your fully charged player will allow up to 30 hours1of music playback.Note When the batteries are almost empty, the low battery screen  blinks. Theplayer saves all settings and unfinished recordings and switches off in less than 60 seconds.
14Note Video conversion and transfer is usually a long process and dependent on your PCconfiguration.3.5 Transfer music and picturesYou can transfer music and picture files to your player using Rhapsody Media Player. SeeOrganize and transfer pictures and music with Rhapsody Media Player section of this usermanual for more details.3.6 Transfer videosImportant Play DRM protected videos once in Windows Media Player on your PC,before you transfer them with MediaConverter for Philips.Use MediaConverter for Philips to convert the video files to the correct screensize and transfer videos from your PC to your player. This application will convertyour video files to the right format and resolution before transferring them to your player sothat they are guaranteed to playback on your player without any problems.1Use the supplied USB cable to connect your player to the PC.2Click on the  icon on your desktop, to start the MediaConverter for Philips.> All the converted files are transferred to the player.3In the option Convert to: at the bottom of the screen, select Current Device.4Press the Add Media button and locate the files on the PC.5Click OPEN to add the selected file.You can add multiple files.6Press Convert.> All the converted files will be transferred to the player.643
15Tip You can also select the files in Windows Explorer and then drag and drop theminto the MediaConverter for Philips screen.Note If needed, the files will first be converted to a format that can be played on theplayer.Tip If the player is in stop mode and no button is pressed for 10 minutes, it switchesoff automatically.> The progress of conversion and transfer is shown.3.7 Enjoy3.7.1 Turn on and offTo turn on, press z/2; until the display shows the Philips logo.To turn off, press and hold z/2; until the display shows ‘Bye’.
16Goal ActionReturn to previous menu Press Return to main menu Press and hold Browse through menus Press 2; or Scroll through a list Press 3or 4Select an option Press 2;3.7.4 Lock sliderThe player has a lock switch to prevent any accidental operation.1To lock the buttons when you play, move the lock slider to position  .> All buttons except -VOL+ are locked and the display shows  .2To unlock the buttons again, move the lock slider to position 3.7.3 Connect Bluetooth headphones (or other Bluetooth devices)You can connect any kind of Bluetooth headphones as well as home or car audio systems.The following steps explain how to connect the player to a new device:1On the Home menu, select Settings.2Press the OPTIONS key.3Press 3or 4and 2; to select the option Bluetooth.4Select Bluetooth On to activate the Bluetooth feature of the player.5Press 3or 4and 2; to select Connect to°K.> The list shows option New Device as well as already paired devices. 6Press 3or 4and 2; to select New Device.> The player searches and then displays the list of found devices. 7Select the device you want to connect to.8Enter the passkey of the other device if necessary.> A confirmation message appears upon successful connection.3.7.2 Navigate the menuYour player has an intuitive menu navigation system to guide you through various settingsand operations.TipYou can also connect to a Bluetooth device and transfer music while playing music: Referto chapter Play and transfer music or videos with Bluetooth.When you tick the box Show Device to Others in the Bluetooth settings menu, youmake the player discoverable to other Bluetooth devices.
174.2 Add Rhapsody Music2to the playerDepending on the type of Rhapsody account you hold, you can add Rhapsody Music to theplayer using. For more information visit www.Rhapsody.com.1Connect the player to the computer.2Launch the Rhapsody Media Player.3In the Sources window on the left hand side of the screen, select the tab RhapsodyMusic Guide.4In the main window, click on the +icon to add a title to My Library.5In the Sources window, select My Library.6From the main window, drag and drop your channels to the player in the Sources window.Tip You can also check the status of your Rhapsody account on the Internet atwww.Rhapsody.com.4 Organize and transfer music andpictures with Rhapsody MediaPlayer4.1 Install Rhapsody Media PlayerInstall the Rhapsody Media Player from the supplied software CD. (See section 3.3 Installfor more details).4.1.1 View subscription statusYou can view your Rhapsody subscription status at the bottom of the display, next to thebattery level indicator:Currently licensed Rhapsody accountRhapsody account subscription expires in 7 daysRhapsody account subscription expires in 2 daysNo Rhapsody account subscription (or subscription is invalid / expired)2This feature is available only for music that you purchased through Rhapsody.
184.3 Add Rhapsody Music Channels3to the playerDepending on the type of Rhapsody account you hold, you can add Rhapsody Music Channelsto the player using. For more information visit www.Rhapsody.com1Connect the player to the computer.2Launch the Rhapsody Media Player.> The player is shown in the Sources window on the left hand side of the screen.3In the Sources window, select the tab Channel Guide.4In the main window, click on the +icon to add a channel to My Channels.5In the Sources window, select My Channels.6Drag and drop your channels to the player in the Sources window.4.4 Transfer picture files to the player withRhapsody Media PlayerYou can transfer picture files to your player using Rhapsody Media Player.1Connect the player to the computer.2Launch the Rhapsody Media Player.> The player is shown in the Sources window on the left hand side of the screen.3In the Sources window, select My Library.4In the main window, click on a tab to select Photos.5Click on the Add Photos icon.6In the Add Media to My Library pop-up window, select the source you want tobrowse for media files.7Click Import.8Drag and drop the files from the main window to the player in the Sources window.3This feature is available only if you subscribe to Rhapsody Music Channels.
195 Detail operation5.1 Music mode (also play mode for recordings)Your player supports MP3 and WMA formats.5.1.1 ControlThe player offers the following music mode options:Goal ActionPlay / Pause music Press 2;Skip to next audio file Press 2Return to previous audio file Press 1Fast forward Press and hold 2Fast rewind Press and hold 1Return to browsing menu Long/short press Increase volume Press VOL +Decrease volume Press VOL -Access options menu Press OPTIONS
202Press 3or 4to scroll through the list.3Press 2; to select or press  to return to previous level.4Press 2; to play.5.1.2 Find your music1From the main menu, select  to enter music mode.The player offers the following menu options:1All songs Alphabeticallylisted tracksArtists Alphabeticallylisted artistsAlphabeticallylisted albumsTracks listed inalbum orderAlbum art Alphanumericallylisted album artAlbums Alphanumericallylisted albumsTracks listed inalbum orderGenres Alphanumericallylisted genresAlphanumericallylisted artistsAlphanumericallylisted albumsTrackslisted inalbum orderRating4Tracks listed indescending orderof ratingPlaylists Numerically listed'Playlists on the go'Tracks listed inplay orderAlphanumericallylisted playlistsTracks listed inplay orderAudiobooks Alphanumericallylisted book titlesAlphanumericallylisted authorsAlphanumericallylisted book titles4This feature is only available for some versions.
5Rhapsody mode is available only if you hold an active Rhapsody account. (See section Organizeand transfer music and pictures using Rhapsody Media Player in this user manual formore information.) 215.1.3 Find your Rhapsody4channels1From the main menu, select  to enter Rhapsody mode.2Press 3or 4to scroll through the list of items that are available to you.3Press 2to select or press  to return to previous level.4Press 2; to play.5.1.4 Rating the songs in your Rhapsody3channels1While playing music from your Rhapsody channel, press OPTIONS to see the options menu.2Press 3or 4, then 2; to select Rate Track.3Press 1or 2to either 'ban' the track or to give a star rating from one to five.5.1.5 Adding music from your Rhapsody3channels to the playerlibrary1While playing music from your Rhapsody channel, press OPTIONS to see the optionsmenu.2Press 3or 4, then 2; to select Add to Library.> The currently playing music is added to the player library.5.1.6 Limit the volumeListening to loud sounds for longer than a moment can be harmful to the listener. You canset the volume level of the player to suit your preferences:1From the main menu, select Settings > Sound Settings > Volume Limit > Set.2Press Vol- or Vol+ to adjust the level.3Press 2; to set.> When you set a volume limit, you can no longer exceed the set volume, even if you press theVol+ button.To enable maximum volume again, set the volume limit back to maximum or turn off,select Settings > Sound settings > Volume limit > Off.
225.1.7 Resume play (Now playing)While playing, when you navigate away from the play screen, you can return to the playscreen anytime.In any menu except the main menu:1Press OPTIONS.2Press 3or 4, then 2; to select Now playing [current track name].In the main menu:1Press 3or 4, then 2; to select Now playing.
235.2 Picture library5.2.1 View picturesThe player supports JPEG graphics and provides a slide show function.1From the main menu, select  to enter Picture mode.2Press 3or 4to browse through picture thumbnails.3Press 2; to see the picture in full view.4During full screen browsing, press 3or 4to move to next or previous picture.5.2.2 Adding pictures to folder ‘Favorites’1While viewing a picture, press OPTIONS to see the options menu.2Press 3or 4, then 2; to select Add to Favorites.> The currently displayed picture is added to the folder Favorites.5.2.3 SlideshowA slideshow displays all pictures in full view. It moves to the next picture at a specifiedinterval.To start a slideshow in thumbnails or full screen browse mode, press 2;.To cancel the slideshow, press  .1
245.3 Listen to audio booksThe player supports books in audio format. The use of this feature requires that youdownload the plug-in software from audible.com. You can manage the digital content of youraudiobooks with the Windows Media Player 11.Tip You can resume play after navigating away from audiobooks (see section Resumeplay (Now playing) in this user manual).5.3.1 Select audio book by book title1From the main menu, select  to enter music mode.2Press 3or 4, then 2; to select Audiobooks.3Press 3or 4, then 2; to select option Book titles.4Press 3or 4to select title, then 2; to play.5To exit, press  .5.3.2 Select audio book by author1From the main menu, select  to enter music mode.2Press 3or 4, then 2; to select Audiobooks.3Press 3or 4, then 2; to select option Authors.4Press 3or 4, then 2; to select author.5Press 3or 4to select title, then 2; to play.6To exit, press  .5.3.3 Audiobook controlsThe player offers the following audiobook mode controls:Goal ActionPlay / Pause Press 2;Skip forward to beginning of new section/chapter Press 2Skip back to beginning of current section/chapter Press 1Fast skip forward through audiobook Press and hold 2Fast skip back through audiobook Press and hold 1Access options menu Press OPTIONSReturn to browsing menu Long/short press Increase volume Press VOL +Decrease volume Press VOL -
255.3.4 Adjust audiobook play speed 1In audiobook mode, press OPTIONS.2Press 3or 4, then 2; to select Playback speed.3Press 3or 4, then 2; to select Slower, Normal, or Faster.4To exit, press  .5.3.5 Add a bookmark in an audiobook 1In audiobook mode, press OPTIONS.2Press 3or 4, then 2; to select Bookmarks.3Press 3or 4, then 2; to select Add bookmark.> The display shows a confirmation screen.4To exit, press  .5.3.6 Find a bookmark in an audiobook 1In audiobook mode, press OPTIONS.2Press 3or 4, then 2; to select Bookmarks.3Press 3or 4, then 2; to select Go to bookmark.4Press 3or 4to select the bookmark in the list.5Press 2; to go to the selected bookmark.6To exit, press  .5.3.7 Delete a bookmark in an audiobook 1In audiobook mode, press OPTIONS.2Press 3or 4, then 2; to select Bookmarks.3Press 3or 4, then 2; to select Delete bookmark.4Press 3or 4to select the bookmark in the list.5Press 2; to delete the selected bookmark.6To exit, press  .
265.3.8 Delete an audiobook 1In audiobook mode, press OPTIONS.2Press 3or 4, then 2; to select Delete audiobook.3Press  2; to confirm the deletion of the current audiobook.> The display shows a confirmation screen.4To exit, press  .TipYou can play and send audiobooks via Bluetooth (see section Play and transfer music,videos, or audiobooks with Bluetooth in this user manual).You can download audiobooks, magazines, and news in audio format at audible.com.
275.4 Video5.4.1 Transfer videos from a computer to the playerPlease see section Transfer videos in this user manual.5.4.2 Video playYou can play video clips that are stored on the player.1From the main menu, select  to enter Video mode.> A list of video files stored on the player is displayed.2Press 3or 4to select the file and press 2; to play.3Short press  to go back to the previous menu, and long press  to return to themain menu.5.4.3 Fast forward / backward controlThe player enables you to scan videos in fast forward / backward mode.Fast forward / backward1Long press 2to select 4x normal speed.> Press 2; anytime to resume normal speed play.2While in 4x normal speed mode, press 2to cycle through the following speed options:8x normal speed > 16x normal speed > 4x normal speed…1Note Videos that you have transferred through Rhapsody are available for play only inthe Rhapsody library.
285.5 RadioFrom the main menu, select  to enter radio mode.Connect the headphonesThe supplied headphones serve as a radio antenna. Ensure you connect the headphonesproperly for an optimal reception.5.5.1 Automatic tuning of radio stationsNoteThe Autotune function saves the frequencies of found radio stations under presets andoverwrites existing presets.When there are no frequencies saved under presets, the radio feature prompts you tostart Autotune.Start a new Autotune session1While in radio mode, press OPTIONS to see the options menu.2Press 3or 4to select the Autotune, then 2; to start.> The frequencies of found radio stations are saved to presets.The radio can store up to 20 radio stations to presets.5.5.2 Play a preset radio station1While in radio mode, press OPTIONS to see the options menu.2Press 3or 4to select the Select radio preset, then 2; to begin play.3Press 1/2to change to another preset.5.5.3 Manually tune a radio station1While in radio mode, press 3or 4to manually tune to a radio station:> To fine tune frequency, quick press 3/4.To search for the next stronger signal, long press 3/4.
295.5.4 Manually save a radio station to a preset1While playing a radio station, press OPTIONS to see the options menu.2Press 3or 4to select the Save to preset, then 2; to save.5.5.5 Record from FM radio when the radio is playing1While in radio mode, press OPTIONS to see the options menu.2Press 3or 4to select the Start radio recording, then 2; to start.3Press 2; to pause.4Press  to stop and save the recording.> Your recordings are saved in the Recordings library on the player.5You can find you radio recordings files under  > Recordings Library > Radiorecordings.
305.6 RecordingsYou can record audio with the player. The section Overview of controls andconnections shows you the location of the microphone. 1From the main menu, select  .2While in recordings mode, press OPTIONS to see the options menu.3Press 3or 4to select the Start voice recording, then 2; to start.4Press 2; to pause.5Press  to stop and save the recording.> Your recordings are saved in the Recordings library on the player. 6You can find the voice recordings file under  > Recordings Library > Voicerecordings.1Note To record FM radio, see section Radio.5.6.1 Play recordings1From the main menu, select  > Recordings Library > Voice recordings or Radiorecordings2Press 3or 4to select the recording you want to hear.3Press 2; to play.5.6.2 Delete recordingsYou can delete one or all of the recordings.1From the main menu, select  > Recordings Library > Voice recordings or Radiorecordings2Press 3or 4to select the recording you want to delete.3Press OPTIONS to see the options menu.4Press 3or 4to select Delete or Delete all.5Press 2; to confirm.
315.6.3 Upload recordings to the computer1Connect the player to your computer.2Select the player in Windows Explorer.3Select Recordings > Voice or FM radio.4Copy and paste the recordings to any desired location on the computer.5.7 Use your player to store and carry data filesYou can use your player to store and carry data files by copying data files into your playerwith Windows Explorer.
326 Play and transfer music, videos, oraudiobooks with BluetoothYou can stream music, videos, or audiobooks to other Bluetooth enabled output devices,such as headphones or a car stereo system. You can also transfer music, videos, oraudiobooks to a Bluetooth enabled device, such as another player.6.1 Play audio or video, or audiobooks onanother Bluetooth output deviceYou can choose to play either on a 'new device' or on an 'already paired device'. A newdevice is a device that has not yet been paired with the player. A device that has beenpreviously paired with the player can be directly selected from the list. This chapter explainsthe two different methods:New Device:1Ensure that the other Bluetooth device is turned on.2Ensure that the other Bluetooth device is in pair mode.3While playing music, video, or audiobook press OPTIONS.4Press 3or 4and 2; to select the option Play via Bluetooth.5Press 3or 4and 2; to select the output device.6Press 3or 4and 2; to select New Device.> The player searches and then displays the list of found devices. 7Select the device you want to connect to.8Enter the passcode of the other device if necessary. (Consult the user manual of theother device.)> A confirmation message appears upon successful connection.
33Already paired device:1Ensure that the other Bluetooth device is turned on.2Ensure that the other Bluetooth device is in pair mode.3While playing music, video, or audiobook press OPTIONS.4Press 3or 4and 2; to select the option Play via Bluetooth.5Press 3or 4and 2; to select the output device.6Select the device you want to connect to.> A confirmation message appears upon successful connection.6.2 Transfer files to and from another BluetoothdeviceYou can choose to transfer either to a new device or to an already paired device. Anew device is a device that has not yet been paired with the player. A device that has beenpreviously paired with the player can be directly selected from the list. This chapter explainsthe two different methods:6.2.1 Transfer files from a listNew Device:1Ensure that the other Bluetooth device is turned on.2Ensure that the other Bluetooth device is in pair mode.3While in a list, press 3or 4to mark the file you want to transfer.4Press OPTIONS, to enter the options menu.5Press 3or 4and 2; to select the option Send via Bluetooth.6Press 3or 4and 2; to select the destination device.7Press 3or 4and 2; to select New Device.8The player searches and then displays the list of found devices. 9Select the device you want to transfer to.10 Enter the passcode of the other device if necessary. (Consult the owner of the otherdevice, as this passcode can be customized.)> A confirmation message appears upon successful transfer.
34Already paired device:1Ensure that the other Bluetooth device is turned on.2Ensure that the other Bluetooth device is in pair mode.3On the player, while in a list, press 3or 4to mark the file you want to transfer.4Press OPTIONS, to enter the options menu.5Press 3or 4and 2; to select the option Send via Bluetooth.6Press 3or 4and 2; to select the destination device.7Select the device you want to transfer to.> A confirmation message appears upon successful transfer.6.2.2 Transfer files while playingNew Device:1Ensure that the other Bluetooth device is turned on.2Ensure that the other Bluetooth device is in pair mode.3On the player, while playing music, video, or audiobook press OPTIONS.4Press 3or 4and 2; to select the option Send via Bluetooth.5Press 3or 4and 2; to select the destination device.6Press 3or 4and 2; to select New Device.> The player searches and then displays the list of found devices. 7Select the device you want to transfer to.8Enter the passcode of the other device if necessary. (Consult the owner of the otherdevice, as this passcode can be customized.)> The play pauses during file transfer and resumes after the transfer is complete.A confirmation message appears upon successful transfer.Already paired device:1Ensure that the other Bluetooth device is turned on.2Ensure that the other Bluetooth device is in pair mode.3On the player, while playing music, video, or audiobook press OPTIONS.4Press 3or 4and 2; to select the option Send via Bluetooth.5Press 3or 4and 2; to select the destination device.6Select the device you want to transfer to.> The play pauses during file transfer and resumes after the transfer is complete.A confirmation message appears upon successful transfer.
356.2.3 Receive files When another Bluetooth device sends a file to the player, you can accept or decline receiptof the file. 1Press 3or 4and 2; to select Yes or No.> You can find the file in the My Received files folder in the Folder view menu.You can open the file upon receipt:1Press 3or 4and 2; to select Yes.> The player opens the file in the appropriate mode.
367 SettingsYou can set preferences in your player to suit your needs.1Press and select .2Press 3or 4to select an option.3Press 2; to go to next level or  to return to previous level.4 Press 2; to confirm your selection.5Press  to exit the Settings menuIn the Settings menu, the following options are available:Settings Options Further OptionsPlay mode Shuffle all On / OffRepeat  Off / Repeat 1 / Repeat allSound settings Volume limite Off / SetFullSound On / OffEqualizer Off / Rock / Pop / Jazz / Classical / Dance /Electronica / Lounge / RnB / Hip Hop /Spoken Word / CustomBacklight Always on / 10 seconds / 30 seconds / 60 secondsBrightness slider (5 stages)Sleep timer Off / 15 minutes / 30 minutes / 60 minutesLanguage English (default) / French / German / Spanish / Italian / (Br)Portuguese / Portuguese (European) / Dutch / Swedish / Norwegian/ Finnish / Hungarian / Polish / Chinese Simplified / ChineseTraditional / Japanese / Korean / Thai (for version /97 only) /TurkishBluetooth Off / OnConnect to… New device / Paired device (list)Show Device toOthers Off / OnDevice Information Device name / Device profilesRhapsody Rhapsody Account Information1
377.1 Equalizer custom settingsYou can customize the equalizer settings:11. From the main menu, select  .2While in settings mode, press OPTIONS to see the options menu.3Press 3or 4, then 2; to select Sound settings.4Press 3or 4, then 2; to select Equalizer.5Press 3or 4, then 2; to select Custom.6Press 1or 2to select equalizer band:B= bass, L= low, M= mid, H= high, T= treble7Press 3or 4to adjust level.> Bar indicator shows current level.8Press 2; to confirm your selection.> Press  to cancel the adjustments.9Press  to exit the Settings menu.Settings Options Further OptionsDemo Mode Off / OnScreensaver Off / OnTime and Date Time Settings Set time format 12 hrs / 24 hrsSet time Hour / Minute /AM/PMDate Settings Set date formatSet date Day / Month / YearDisplay in Header Off / OnSkins dark / Light / RedRestore FactorySettingsConfirm Confirmation feedbackInformation Memory  Capacity / Available free spaceFirmware versionSupport website
388 Update your playerYour player is controlled by an internal program called the firmware. Newer versions of thefirmware may have been released after you have purchased your player.A software program called Philips Device Manager checks for firmware updates that areavailable on the Internet.Install Philips Device Manager from the supplied CD or download the latest version fromwww.philips.com/support.8.1 Perform a software updateAttention This procedure will erase the content of the player.1Copy the content of the player to the computer as a back-up.2Disconnect the player from the computer.3Turn off your player.4Ensure the computer is connected to the Internet.5Click Start > Programs > Philips Digital Audio Player > SA52XX > PhilipsSA52XX Device Manager to launch the Philips Device Manager.6On the player, hold the volume "+" button while you connect the player to thecomputer. > The Device Manager enters recovery mode.7Click OK to continue.8When the display indicates that the process is finished, disconnect the player from thecomputer.> The display shows Updating firmware.9Wait until the update process is completed on the player. > The player restarts and is ready for use again.10 Reconnect the player to the computer.11 Transfer the back-up content to the player.
399 Technical dataPower• Power supply880mAh Li-polymer internal rechargeablebattery*Display• White backlight LCD, 320 x 240 pixels,262K colorsSound• Channel separation: 45dB• Equalizer setting:Off / Rock / Pop / Jazz / Classical / Dance /Electronica / Lounge / RnB / Hip Hop /Spoken Word / Custom• Frequency response: 20-18000Hz• Signal to noise ratio: > 84dB• Output Power (RMS): 2x3mWAudio playback• Compression format: MP3 (8-320kps andVBR, Sample rates: 8, 11.025, 16, 22.050,24, 32, 44.1, 48kHz), WMA (5-192kbps,Sample rates: 8, 11.025, 16, 22.050, 24, 32,44.1, 48kHz)• Play time: 30 hours*• ID3-tag supportVideo playback• .SMV format (other formats to besupported by provided Media Converter)• 30 frames per sec., 320 x 240 pixels• Play time: 6 hours*Media converter• Support format:.bmp, jpg, .wmv.Recording• Audio Capturing: Build-in microphone(Mono)• FM radioStorage media• Built-in memory capacity:SA522x 2GB NAND Flash+SA524x 4GB NAND Flash+SA528x 8GB NAND Flash+Connectivity• Headphone 3.5mm, USB 2.0++Music and picture transfer• Via RhapsodyVideo transfer• Via Philips Media ConverterData transfer• Via Windows ExplorerSystem requirements• Windows® XP (SP2 or above), Vista• Pentium III 800MHz processor or higher• 128MB RAM• 500MB hard disk space• Internet connection• Microsoft Internet Explorer 6.0 or later• Video display card• Sound card• CD-ROM• USB port
40* Rechargeable batteries have a limited number of charge cycles. Battery life and number ofcharge cycles vary by use and settings.+ 1MB = 1 million bytes; available storage capacity will be less.1GB = 1 billion bytes; available storage capacity will be less.Full memory capacity may not be available as some memory will be reserved for the player.Storage capacity based on 4 minutes per song and 64kbps WMA encoding.++ Actual transfer speed may vary based on your operating system and software configuration.
41My player cannot power on.• You may have failed to press and hold 2; long enough. Press and hold 2; until the Philipswelcome screen appears on display.• Your device battery may be out of power due to long period of non-usage. Please chargeyour player.If none of the above works, then you may have to use the Device Manager torecover your player:1Launch the Philips Device Manager at Start > Programs > Philips Digital AudioPlayer > SA52XX > Philips SA52XX Device Manager on your PC.2Press and hold the VOL+ button while your player is connecting to the PC. 3Keep holding the key until the Philips Device Manager acknowledges your player andgoes into recovery mode.4Click the repair button and follow the instructions given by the Device Manager.5After the player has been repaired, disconnect it from your PC and re-start.There is no music on my player after transfer.Are your songs in MP3, AAC or WMA format?Other formats will not playback on the player.There is no picture on my player after transfer.Are your pictures in JPEG, BMP or GIF format? Pictures in other formats cannot be transferred to your player.There is no video on my player after transfer.Make sure you use the media converter (provided in the CD Rom) to convert the video clipsinto the readable format to the player.10 Frequently asked questionsIf you encounter problems with your player, go through the following points listed in thenext section. Please also check out FAQs at www.philips.com/support for further help andother troubleshooting tips.Consult your dealer or service center if you are unable to find a solution by following thesehints.Warning Under no circumstances should you try to repair the set yourself, as this willinvalidate the warranty.
422If nothing happens, recharge the battery for at least 4 hours and try to power on or resetagain. If this does not work, you might have to repair your player with Philips DeviceManager. There is no sound.Make sure your headphones are inserted all the way into the headphones jack.Some songs do not show up or playback on the player.• The audio file might be corrupted, try to playback the file on your PC first. If it does notplay, rip the song again.My player hangs.1In the unlikely event that your player hangs, do not panic. Insert a small pin or othersharp object into the reset hole located at the bottom of the player. Hold until the playershuts down.Note The existing contents on your player will not be erased.
43PHILIPS reserves the right to make design and specification changes for product improvementwithout prior notice.
Specifications are subject to change without notice.Trademarks are the property of Koninklijke PhilipsElectronics N.V. or their respective owners© 2008 Koninklijke Philips Electronics N.V. All rights reserved.www.philips.comPrinted in Chinawk8083abc
                 Page 67 Philips Consumer Electronics Company Digital Audio Player    FCC ID:BOUSA5225BT     IC ID :135M-SA5225BT     NOTE:  THE MANUFACTURER IS NOT RESPONSIBLE FOR ANY RADIO OR TV       INTERFERENCE CAUSED BY UNAUTHORIZED MODIFICATIONS TO THIS EQUIPMENT. SUCH MODIFICATIONS COULD VOID THE USER’S AUTHORITY TO OPERATE THE EQUIPMENT.

Navigation menu