REFCO 4687787 TAP (TAP Pressure gauge) User Manual
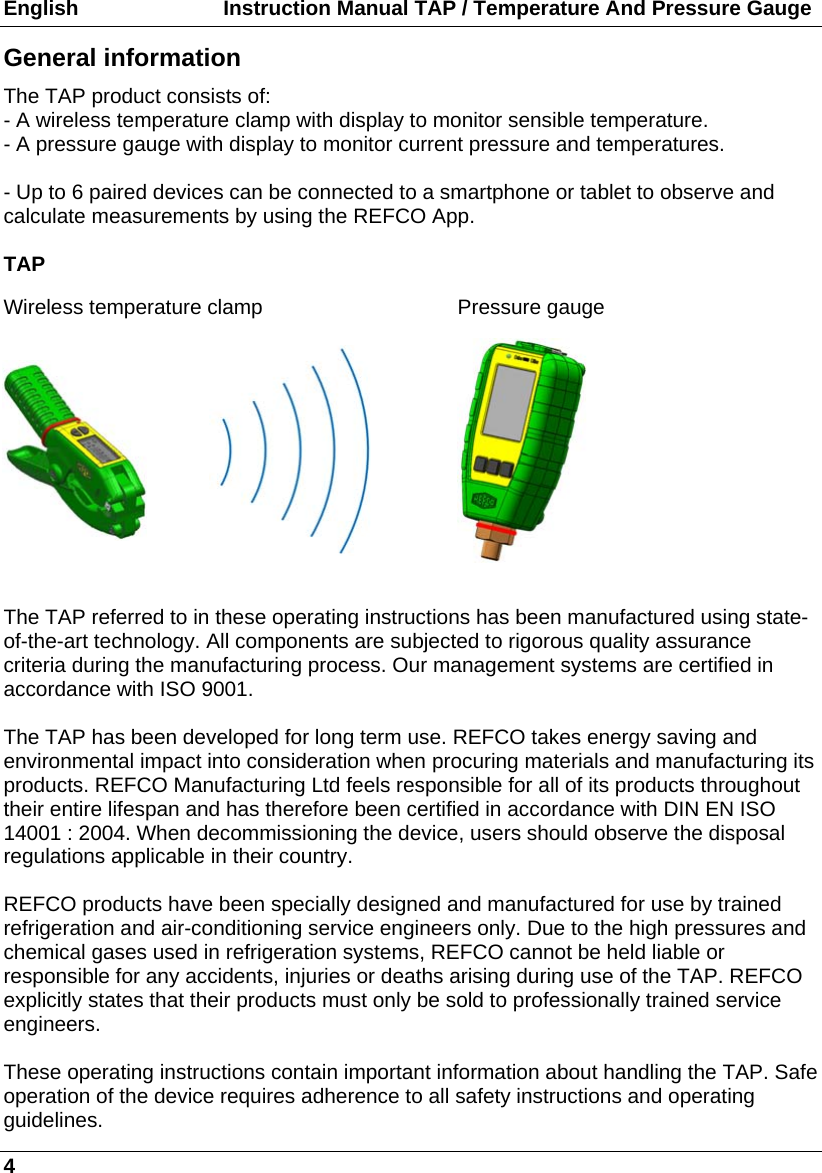
REFCO Manufacturing Ltd. TAP (TAP Pressure gauge)
UserManual.wiki
>
REFCO
>
4687787 User Manual
User Manual
Navigation menu
Upload a User Manual
Namespaces
Wiki Guide
HTML
PDF
Info
Views
User Manual
Discussion / Help
Navigation
![Instruction Manual TAP, TAP-CLAMP / Temperature And Pressure Gauge English 5 - The local accident prevention regulations applicable to the area in which the TAP is being used should also be adhered to, along with general safety guidelines. - The operating instructions are part of the product and must be stored in close proximity to the TAP where they should be readily accessible to qualified personnel at all times. - The qualified personnel must have carefully read and understood the operating instructions prior to operating the device. - The manufacturer shall not be liable for any damage whatsoever arising through improper use, failure to comply with these operating instructions, assignment of inadequately qualified personnel, or unauthorised modification of the TAP. - The General Terms and Conditions as set out in the sales documentation shall apply. Symbols and writing standards Illustration Explanation Warning: Seriuos physical injury can occur Caution: Slight physical injury can occur Damage to the equipment may occur TAP Temperature and Pressure measuring device (Temperature clamp + pressure gauge) [OK] Control key of the instrument "OK" Expressions and readouts Important safety notice Before working with the TAP, please read the instruction manual carefully. This manual provides important information regarding the smooth operation, maintenance and disposal of the TAP. The TAP must not be used with pressures higher than 60 bar / 870 psi / 6000 kPa. Protective goggles and gloves should always be worn when using the TAP. The TAP must not be used with the refrigerant (NH3 / R-717) ammonia.](https://usermanual.wiki/REFCO/4687787/User-Guide-3431975-Page-6.png)
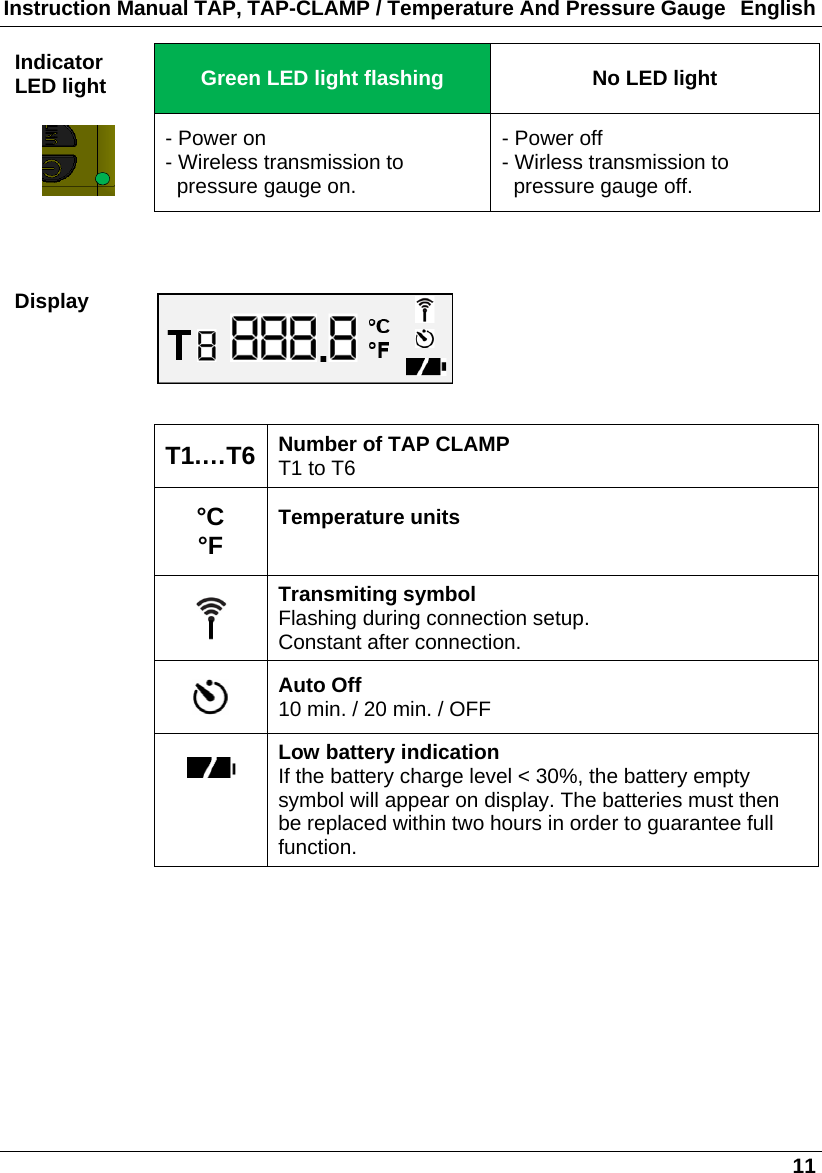
![English Instruction Manual TAP / Temperature And Pressure Gauge 10 Buttons and functions of TAP CLAMP ON / OFF UNIT ON / OFF ON by short pressing < 1 sec. OFF by pressing 1 sec. - Backlight on - Start image on (Backlight shuts off after 1 min.) - Display shows "OFF" - Backlight off - Display off Backlight ON/OFF Only in system On-mode by pressing [ON] < 1 sec. (Backlight shuts off after 1 min.) Auto Off - Factory default auto off time = 20 min (configurable) UNIT UNIT by short pressing < 1 sec. UNIT by pressing 1 sec. - °C appears - °F appears (Once set, setting remains) - No function - To escape from last set menu ON / OFF + UNIT By pressing [ON/OFF] + [UNIT] button same time <1 sec. the following mode is activated: - Set number of temperature clamp. Scroll from T1 to T6 by pressing [UNIT] button < 1 sec. (once set, setting remains) By pressing [ON/OFF] + [UNIT] button same time >1 sec. the following mode is activated: - Set Auto Off as required. 10 min / 20 min / OFF. (Factory default value is 20 min.) Scroll from 10 / 20 / OFF by pressing [UNIT] button < 1 sec. (once set, the setting remains)](https://usermanual.wiki/REFCO/4687787/User-Guide-3431975-Page-11.png)
![English Instruction Manual TAP / Temperature And Pressure Gauge 12 Buttons and functions on TAP Pressure Gauge ON / OFF Scroll UPMENU Scroll DOWNSET ON / OFF ON by short pressing < 1 sec. OFF by pressing 1 sec. - Backlight on - Start image on (Backlight shuts off after 1 min.) - Display shows "OFF" - Backlight off - Display off Backlight ON/OFF - Only in system On-modus by short pressing [ON] < 1 sec. (Backlight shuts off after 1 min.) Auto Off - Factory default auto off time = 20 min. UP / MENU UP by short pressing < 1 sec. MENU by pressing 1 sec. - To scroll up - To enter menu mode - To escape from last set menu DOWN / SET DOWN by pressing < 1 sec. SET by pressing 1 sec. - To scroll down - To confirm selection](https://usermanual.wiki/REFCO/4687787/User-Guide-3431975-Page-13.png)
![English Instruction Manual TAP / Temperature And Pressure Gauge 16 Setup and operation TAP CLAMP Set-up TAP CLAMP Insert 3 x 1.5 V (AAA) batteries in the battery compartment of the TAP CLAMP. Ensure the batteries are inserted observing the correct polarities. Do not leave dead batteries in the battery compartment. If you will not be using the TAP CLAMP for a long period of time, remove the batteries from the battery compartment. Switch on - Press [ON/OFF] button, to switch on device. After start image, display appears Set TAP CLAMP ID - Press [ON/OFF] + [UNIT] button same time < 1 sec. to enter set mode. - Scroll from T1 to T6 by pressing [UNIT] button < 1 sec. - Press [ON/OFF] button 1 sec. to confirm and return to main display. Note: Chosen ID will be transmitting to pressure gauge and is shown on display.](https://usermanual.wiki/REFCO/4687787/User-Guide-3431975-Page-17.png)
![Instruction Manual TAP, TAP-CLAMP / Temperature And Pressure Gauge English 17 Set Auto Off - Press [ON/OFF] + [UNIT] button same time >1 sec. to enter set mode. - When Auto Off mode is activated timer symbol appears. - Scroll from 10 / 20 / OFF by pressing [UNIT] button <1 sec. - Press [ON/OFF] button 1 sec. to confirm and return to main menu. Note: Factory default Auto Off is set to 20 min. Subsequent the symbol and the auto off time disappear from display. Set unit - Press [UNIT] button < 1sec. - Switch between °C and °F by using [UNIT] button <1 sec. TAP Pressure Gauge Set-up TAP Insert 4 x 1.5 V (AAA) batteries in the battery compartment on the back side of the TAP. Ensure the batteries are inserted observing the correct polarities. Do not leave dead batteries in the battery compartment. If you will not be using the TAP pressure gauge for a long period of time, remove the batteries from the battery compartment. Switch on - Press [ON] button to switch on device. After start, REFCO-logo appears on display.](https://usermanual.wiki/REFCO/4687787/User-Guide-3431975-Page-18.png)
![English Instruction Manual TAP / Temperature And Pressure Gauge 18 Set TAP ID - Press [MENU] button 1 sec. to activate selection mode. TAP ID menu is selected. - Press [SET] button 1 sec. to enter TAP ID menu. - Choose a TAP ID number by pressing [UP] or [DOWN] button < 1 sec. - Press [SET] button 1 sec. to confirm selected ID. - Press [MENU] button 1 sec. to return to main display. Note: Number for P1 to P6 is always concurrent with the TAP number. Set refrigerant To change current refrigerant setting: - Press [MENU] button 1 sec. to activate selection mode. - Press [DOWN] button 1 sec. to scroll down to the refrigerant menu. - Press [SET] button 1 sec. to enter refrigerant menu. - Press [UP] or [DOWN] button 1 sec. to scroll to the desired field refrigerant type entry. - Press [SET] button 1 sec. to confirm. - Press [MENU] button 1 sec. to return to main display. Note: The first 6 refrigerants can be favorites. Following are all known refrigerants from library.](https://usermanual.wiki/REFCO/4687787/User-Guide-3431975-Page-19.png)
![Instruction Manual TAP, TAP-CLAMP / Temperature And Pressure Gauge English 19 Note on R000: Additional function to select from table of refrigerant: If use entry „R000“ it means „Pressure only“. No readouts from chart. It gives the possibility to measure only pressure and temperature without any refrigerant chart temperatures shown. Set favorites - Press [MENU] button 1 sec. to activate selection mode. - Press [DOWN] button 1 sec. to scroll down to the refrigerant menu. - Press [SET] button 1 sec. to enter refrigerant menu. - Press [UP] or [DOWN] button 1 sec. to scroll to the desired refrigerant. - Press [ON/OFF] button < 1 sec. to add refrigerant to favorites. Note: New favorite is placed at first of column. Last of the 6 entries drops out. Set pressure unit - Press [MENU] button 1 sec. to activate selection mode. - Press [DOWN] button 1 sec. to scroll down to the pressure unit menu. - Press [SET] button 1 sec. unit field will flash. - Press [UP] or [DOWN] button 1 sec. to select pressure unit. - Press [SET] button 1 sec. to confirm. - Press [MENU] button 1 sec. to return to main display. ](https://usermanual.wiki/REFCO/4687787/User-Guide-3431975-Page-20.png)
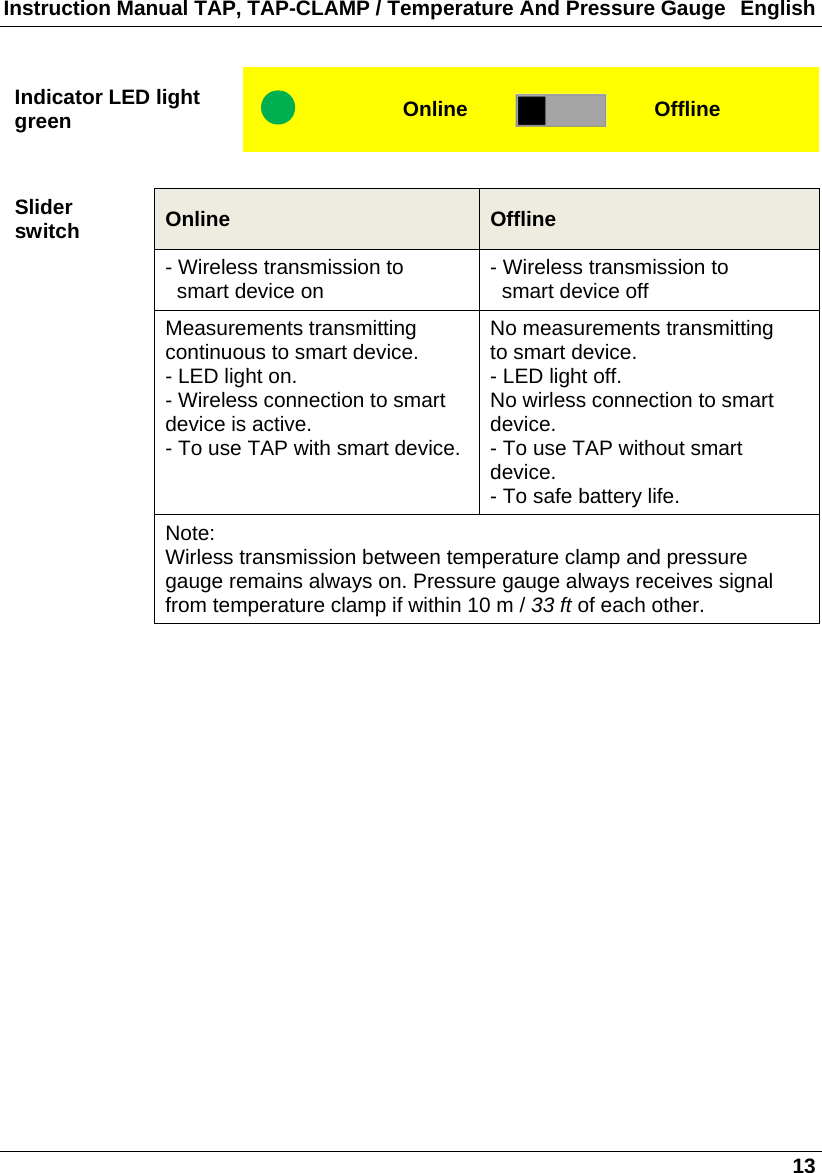
![English Instruction Manual TAP / Temperature And Pressure Gauge 20 Set temperature unit - Press [MENU] button 1 sec. to activate selection mode. - Press [DOWN] button 1 sec. to scroll down to the temperature unit menu. - Press [SET] button 1 sec. unit field will flash. - Press [UP] or [DOWN] button 1 sec. to select temperature unit. - Press [SET] button 1 sec. to confirm. - Press [MENU] button 1 sec. to return to main display. Pairing -Ensure the distance between the devices is less than 5 meters. - Ensure TAP CLAMP(S) which shall be paired with TAP pressure gauge are switched on. - Ensure TAP pressures gauge is on. - Press [MENU] button 1 sec. on TAP pressure gauge to activate selection mode. - Press [DOWN] button 1 sec. of TAP pressure gauge to scroll down to the field "T". - Press [SET] button 1 sec. to start scanning. Display of TAP pressure gauge shows "Scan…" Note: If no device can be found, "No Signal" appears on display before return to menu. - If device be found, display shows a list of found TAP CLAMP ID(s). - Select desired TAP CLAMP ID by pressing [UP] or [DOWN] button 1 sec. - Press [SET] button 1 sec. to start pairing. During pairing procedure, display shows " Connect…".](https://usermanual.wiki/REFCO/4687787/User-Guide-3431975-Page-21.png)
![Instruction Manual TAP, TAP-CLAMP / Temperature And Pressure Gauge English 21 If pairing was successful, display shows "END". Paired TAP CLAMP is recognised on TAP display with T and relevant number (1 to 6). - If pairing was not successful, display shows "ERROR“. If this happens, repeat steps above and try again. Change Settings - Press [MENU] button 1 sec. to activate selection mode. - Press [UP] button 1 sec. to scroll up to the setting field . - Press [SET] button 1 sec. to enter settings menu. - Press [UP] or [DOWN] button 1 sec. to scroll to the desired field. Available fields: Auto Off Update Version SD Mode P-Zero - Press [SET] button 1 sec. to confirm. Auto Off - Press [UP] or [DOWN] button 1 sec. to choose the auto shutoff option. (10 min. / 20 min. / Off) - Press [SET] button 1 sec. to confirm. Update Updating refrigerants. See in chapter maintenance. Version Current version of refrigerant chart is shown.](https://usermanual.wiki/REFCO/4687787/User-Guide-3431975-Page-22.png)
![English Instruction Manual TAP / Temperature And Pressure Gauge 22 SD Mode This function is used in combination for update. See in chapter maintenance. P-Zero Resetting pressure sensor. See in chapter maintenance / Resetting pressure sensor Maintenance A visual inspection of the connections and hoses must be carried out before each use to check for mechanical damage. Do not use aggressive cleaning agents or solvents to clean the device. Gentle household cleaners and soapy water should be used instead. TAP seals are subject to mechanical and age-related wear. Therefore, the TAP should be regularly tested by the user for leaks. Resetting pressure sensore on TAP pressure gauge The TAP pressure sensor can be reset in order to avoid incorrect measurement values. P-Zero To obtain a correct measurement value on the display, the TAP should not be reset when pressurised. 1. Ensure TAP pressure gauge is switched on. 2. Press [MENU] button 1 sec. to activate selection mode. 3. Press [UP] button 1 sec. to scroll up to the setting field . 4. Press [SET] button 1 sec. to enter settings menu. 5. Press [UP] or [DOWN] button 1 sec. to scroll to the "P-Zero" field. 6. Enter "P-Zero" by pressing [SET] button 1 sec. 7. Display shows 0.0psi 8. Press [SET] button 1 sec. for confirmation. 9. Display shows setting menu. 10. Press [MENU] button 1 sec. to quit.](https://usermanual.wiki/REFCO/4687787/User-Guide-3431975-Page-23.png)
![Instruction Manual TAP, TAP-CLAMP / Temperature And Pressure Gauge English 23 Updating of refrigerants on TAP pressure gauge via Micro USB The TAP pressure gauge supports updates of refrigerant data via Micro USB. The latest refrigerant charts can be found at www.refco.ch Updating refrigerants 1. Ensure TAP pressure gauge is switched on. 2. Press [MENU] button 1 sec. to activate selection mode. 3. Press [UP] button 1 sec. to scroll up to the setting field . 4. Press [SET] button 1 sec. to enter settings menu. 5. Press [UP] or [DOWN] button 1 sec. to scroll to the "SD Mode" field. 6. Enter "SD Mode" , select "USB MSC". 7. Connect TAP to computer by USB connection; the device shown on computer. 8. Copy the file "Refriger .bin" to the folder "Refriger" which is under the device. 9. Disconnect the TAP from computer. 10. Enter "SD Mode" , select "SD FAFS" 11. Enter "Update" (MENU) to update the refrigerant data.](https://usermanual.wiki/REFCO/4687787/User-Guide-3431975-Page-24.png)
![Instruction Manual TAP, TAP-CLAMP / Temperature And Pressure Gauge English 25 2. Turn off the clamp. 3. While holding [UNIT], press [ON / OFF] until display shows "CALL" 4. Release both buttons, the display shows "00" 5. Press [UNIT] button < 1 sec. to adjust the number to "06" 6. Press [ON / OFF] button < 1 sec., the display shows "00 °C" 7. Press [UNIT] button < 1 sec. to show a code of temperature 8. Put the K – thermocouple (plate) into 0 °C ice water. 9. Wait the temperature code reading to be steady, press [UNIT] button < 1 sec. 10. The display shows the ambient temperature. 11. Press [UNIT] button < 1 sec. to quit the temperature calibration. Room temperature calibration 1. Turn off the clamp. 2. Place the clamp at constant temperature at 25 3 °C condition for 2 hrs. to ensure the temperature of the K – thermocouple to be even. 3. While holding [UNIT], press [ON / OFF] until display shows „CALL“ 4. Release both buttons, the display shows „00“ 5. Press [UNIT] button < 1 sec. to adjust the number to „09“ 6. Press [ON / OFF] button < 1 sec. to show a code of temperature. 7. Wait the temperature code reading to be steady, press [ON / OFF] button < 1 sec. 8. The display shows the ambient temperature. 9. Press [ON / OFF] button < 1 sec. to quit the temperature calibration.](https://usermanual.wiki/REFCO/4687787/User-Guide-3431975-Page-26.png)
![English Instruction Manual TAP / Temperature And Pressure Gauge 26 Calibration of pressure gauge Pressure calibration 1. Turn off the TAP. 2. While holding [UP / MENU] button, press [ON / OFF] button, the display shows „P-CALL“ 3. Press [DOWN / SET] button until the display shows „Password 00“ 4. Press [UP / MENU] button shortly to adjust the number to „Password 8“ 5. Press [DOWN / SET] button until the display shows a reading which is presenting the unload pressure. (i.e. 0.0 psi) 6. Press [DOWN / SET] awhile to enter calibration Ensure all the refrigerant is exhausted from TAP valve or connected hoses before performing calibration. The accuracy will be affected due to the remaining refrigerant. 7. While entering calibration, the display shows „400.0 psi“. The default pressure of calibration standard is 400 psi. 8. Press [UP / MENU] button shortly to select the calibration standard. The inlet pressure must be equal to the calibration standard pressure. 9. Press [DOWN / SET] awhile for calibration standard confirmation; the display shows the reading of unloaded pressure. 10. Wait until the reading of unload pressure ist stable, pressuirze 400 psi (the inlet pressure must be equal to the calibration standard pressure). The display shows the corresponding pressure value (i.e. 400.0 psi) 11. When the reading is stable, press [DOWN / SET] for confirmation. Now the display shows „END“ 12. Press [DOWN / SET] awhile to quit the pressure calibration.](https://usermanual.wiki/REFCO/4687787/User-Guide-3431975-Page-27.png)