Ricoh MFSP204SFN1 Printer User Manual
Ricoh Company Ltd Printer
UserManual.wiki
>
Ricoh
>
MFSP204SFN1 User Manual
User Manual
Navigation menu
Upload a User Manual
Namespaces
Wiki Guide
HTML
PDF
Info
Views
User Manual
Discussion / Help
Navigation
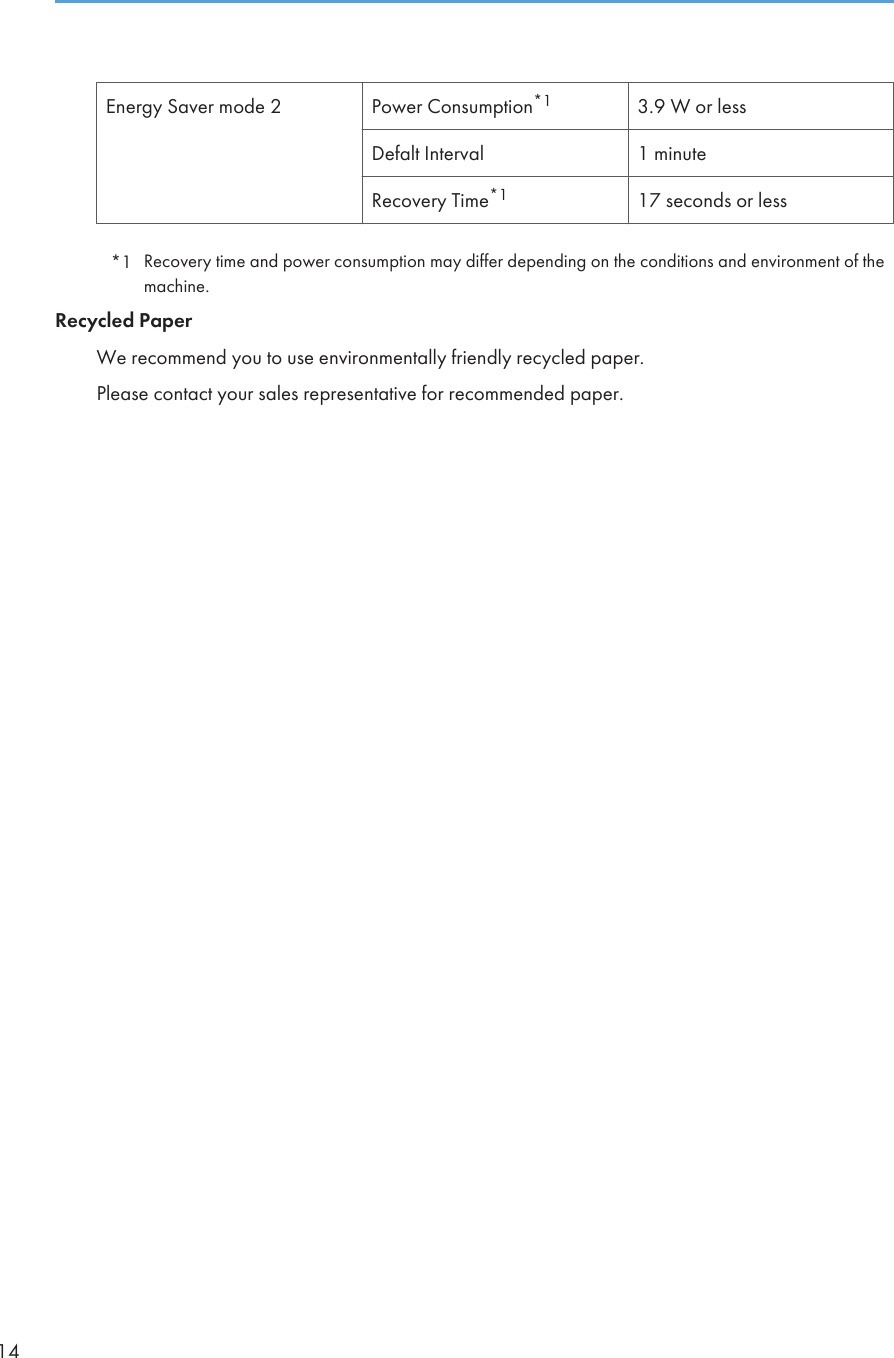
![InteriorCTT06511. Print CartridgeA replacement consumable that is required to make prints on paper. It needs to be replaced afterapproximately every 1,500 or 2,600 pages printed. For details about replacing the cartridge, see page 143"Replacing the Print Cartridge".Control Panel• The actual control panel may look different from the illustration below, depending on the country ofuse.• Depending on the model, the position of the keys may differ.• Type 1 models do not have the [Scanner] key.• Type 3 models do not have the [Facsimile] key and [Speed Dial] key.• Type 3 models have the [ID Card Copy] key instead of the [ID Card Copy/On Hook Dial] key.123 4 5 6 7 891011121314CTT1331. [Facsimile] KeyUse this key to switch the machine to fax mode.Guide to Components17](https://usermanual.wiki/Ricoh/MFSP204SFN1/User-Guide-1901762-Page-19.png)
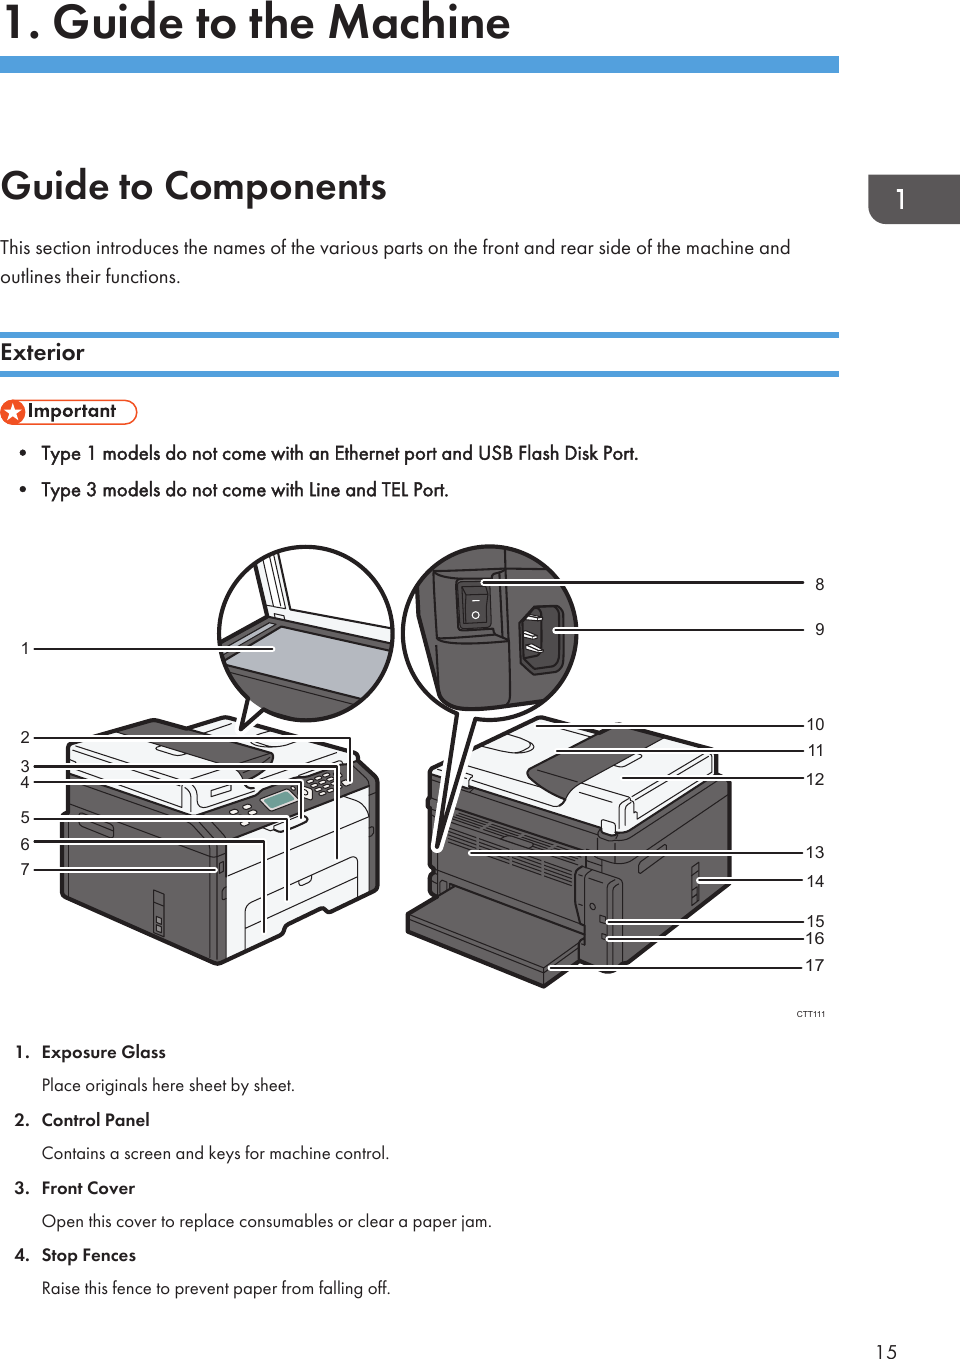
![2. [Copy] KeyUse this key to switch the machine to copier mode.3. [Speed Dial] KeyUse this key to send a fax using a registered speed dial number.4. [ID Card Copy/On Hook Dial] KeyWhen the machine is in copier mode, use this key to perform an ID copy or modify ID copy settings.When the machine is in fax mode, use this key to perform on-hook dialing.5. [User Tools] KeyPress to display the menu for configuring the machine's system settings.6. [OK] KeyUse this key to confirm settings and specified values, or move to the next menu level.7. [Stop/Clear] KeyUse this key to cancel or stop a print job, document copying, scanning, fax transmission/reception, and otheractions in progress.8. [Start] KeyUse this key to start fax transmission/reception, scan or copy.9. [Scanner] KeyUse this key to switch the machine to scanner mode.10. Power IndicatorThis indicator lights up blue when the machine is turned on. It flashes when a print job is received and whileprinting, scanning, or fax transmission/reception is in progress.11. ScreenDisplays current status and messages.12. Alert IndicatorThis indicator lights up red when the machine runs out of paper or consumables, when the paper settings donot match the settings specified by the driver, or when other errors occur. It flashes slowly when the machine isrunning out of toner.13. Scroll KeysPress these keys to move the cursor in each direction.14. Number KeysUse to enter numerical values when specifying settings such as fax numbers and copy quantities, or enterletters when specifying names.1. Guide to the Machine18](https://usermanual.wiki/Ricoh/MFSP204SFN1/User-Guide-1901762-Page-20.png)
![Initial SetupWhen you turn this machine on for the first time, you must set the following items. Select each settingusing the [ ], [ ], or number keys, and then press the [OK] key.• [Language]• [Country Code]• [Year]• [Month]• [Day]• Date format• Time format• [Hour]• [Minute]• The Type 3 model does not have the Initial Setup function.Initial Setup19](https://usermanual.wiki/Ricoh/MFSP204SFN1/User-Guide-1901762-Page-21.png)
![Configuring Network SettingsThis section describes configuring the settings required to use the machine on a network.Configuring the IP Address Settings Using the Control PanelThe procedure for configuring network settings differs depending on whether IP address information isassigned automatically by the network (DHCP), or manually.The IP address can also be configured via Web Image Monitor. For details about configuring the IPaddress, see page 127 "Using Web Image Monitor".Setting the machine to receive an IPv6 address automatically• A DHCP server is required on the network for the machine to receive an IPv6 addressautomatically.• Make sure [DHCPv6] is set to [Enable] in [IPv6] in Web Image Monitor. For information about howto launch Web Image Monitor, see page page 127 "Using Web Image Monitor".1. Press the [User Tools] key.2. Press the [ ] or [ ] key to select [Network Settings], and then press the [OK] key.3. Press the [ ] or [ ] key to select [Machine IPv6 Address], and then press the [OK] key.4. Press the [ ] or [ ] key to select [Use IPv6], and then press the [OK] key.5. Press the [ ] or [ ] key to select [On], and then press the [OK] key.After a setting has been changed, the machine automatically reboots itself.Assigning the machine's IPv6 address manually• The IPv6 address assigned to the machine must not be used by any other device on the samenetwork.• Make sure [DHCPv6] is set to [Disable] in [IPv6] in Web Image Monitor. For information abouthow to launch Web Image Monitor, see page page 127 "Using Web Image Monitor".Configuring Network Settings21](https://usermanual.wiki/Ricoh/MFSP204SFN1/User-Guide-1901762-Page-23.png)
![1. Press the [User Tools] key.CTT1292. Press the [ ] or [ ] key to select [Network Settings], and then press the [OK] key.3. Press the [ ] or [ ] key to select [Machine IPv6 Address], and then press the [OK] key.4. Press the [ ] or [ ] key to select [Use IPv6], and then press the [OK] key.5. Press the [ ] or [ ] key to select [On], and then press the [OK] key.If this setting is changed, the machine will reboot automatically before the procedure is complete.When this happens, wait for the reboot to finish, repeat Steps 1 to 3, and then proceed to the nextstep.6. Press the [ ] or [ ] key to select [Manual Config. Add.], and then press the [OK] key.7. Press the [ ] or [ ] key to select [IP Address], and then press the [OK] key.8. Enter the machine’s IPv6 address using the number keys.9. Enter the values in all fields, and then press the [OK] key.If this setting is changed, the machine will reboot automatically before the procedure is complete.When this happens, wait for the reboot to finish, repeat Steps 1 to 3, and then proceed to the nextstep.10. Press the [ ] or [ ] key to select [Prefix Length], and then press the [OK] key.11. Enter the prefix length using the number keys, and then press the [OK] key.After a setting is changed, the machine automatically reboots itself.• Install the driver after configuring the IP address. For details about installing the driver, see theSoftware Installation Guide.• For details about configuring the IPv4 address, see the Software Installation Guide.1. Guide to the Machine22](https://usermanual.wiki/Ricoh/MFSP204SFN1/User-Guide-1901762-Page-24.png)
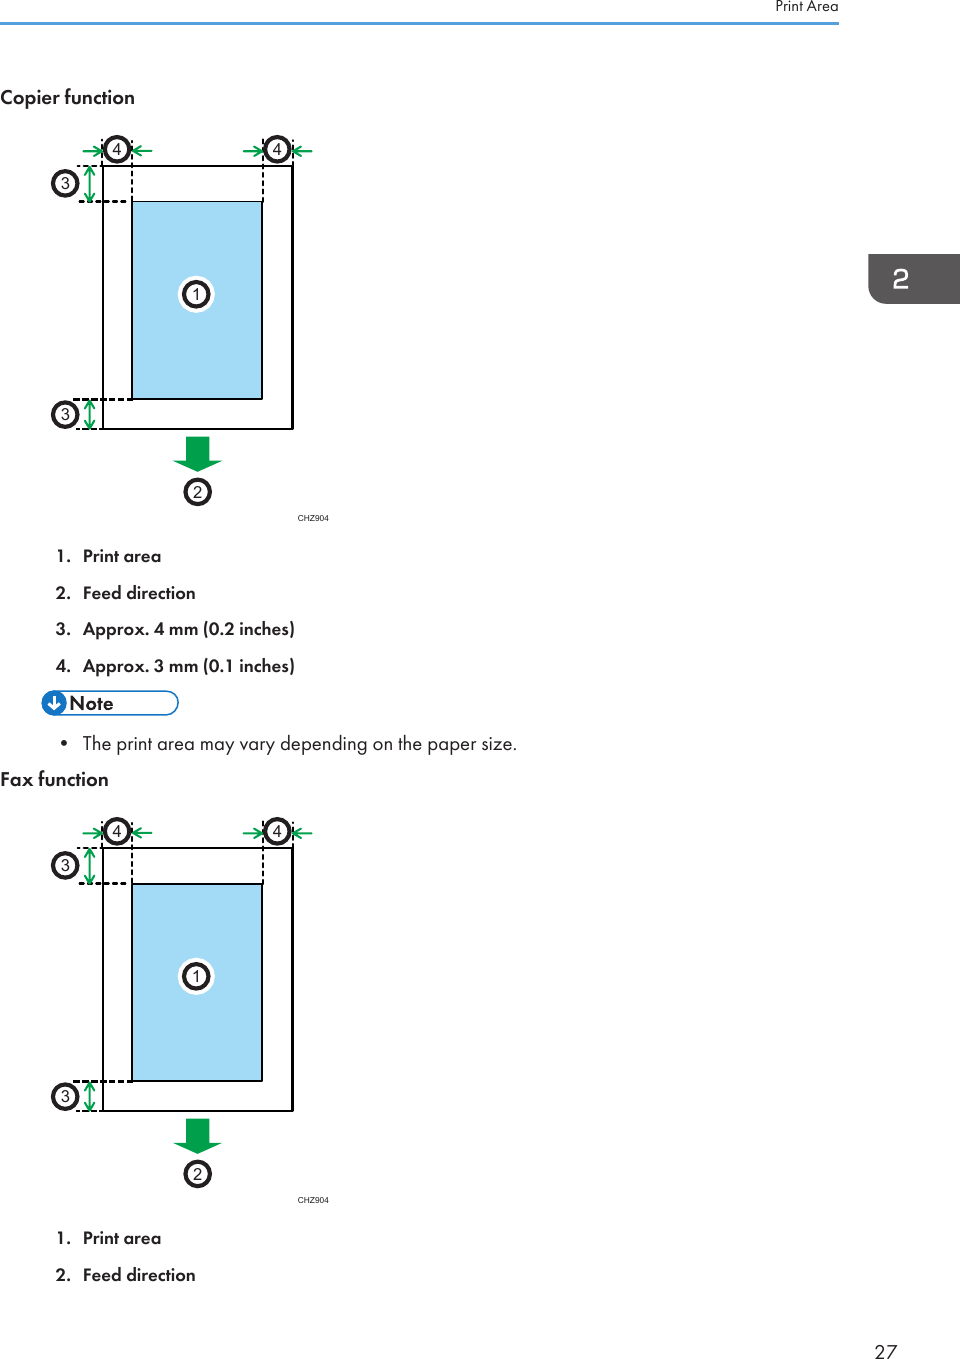
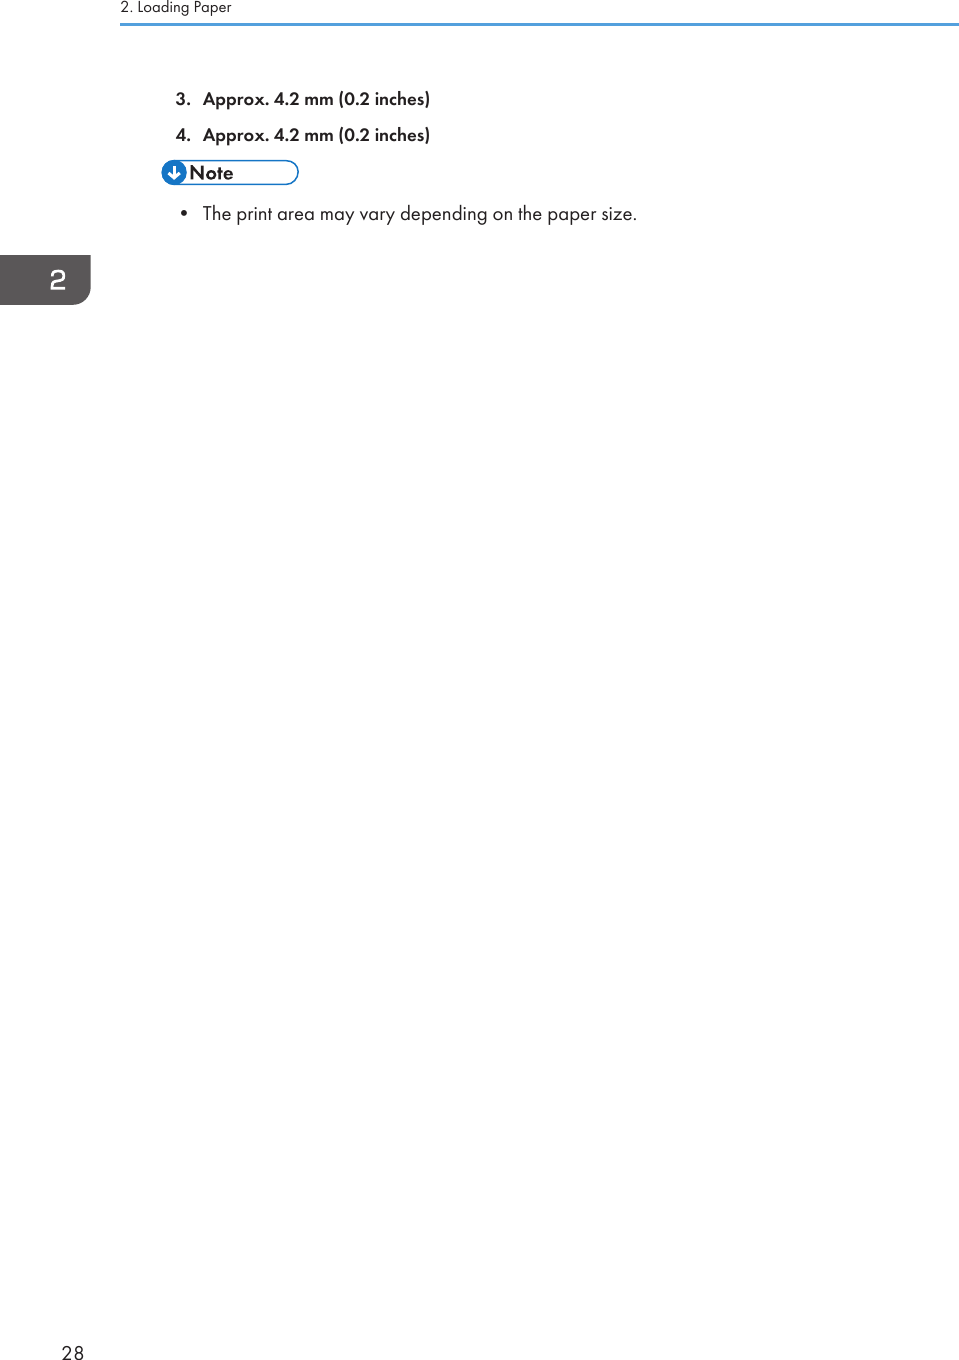
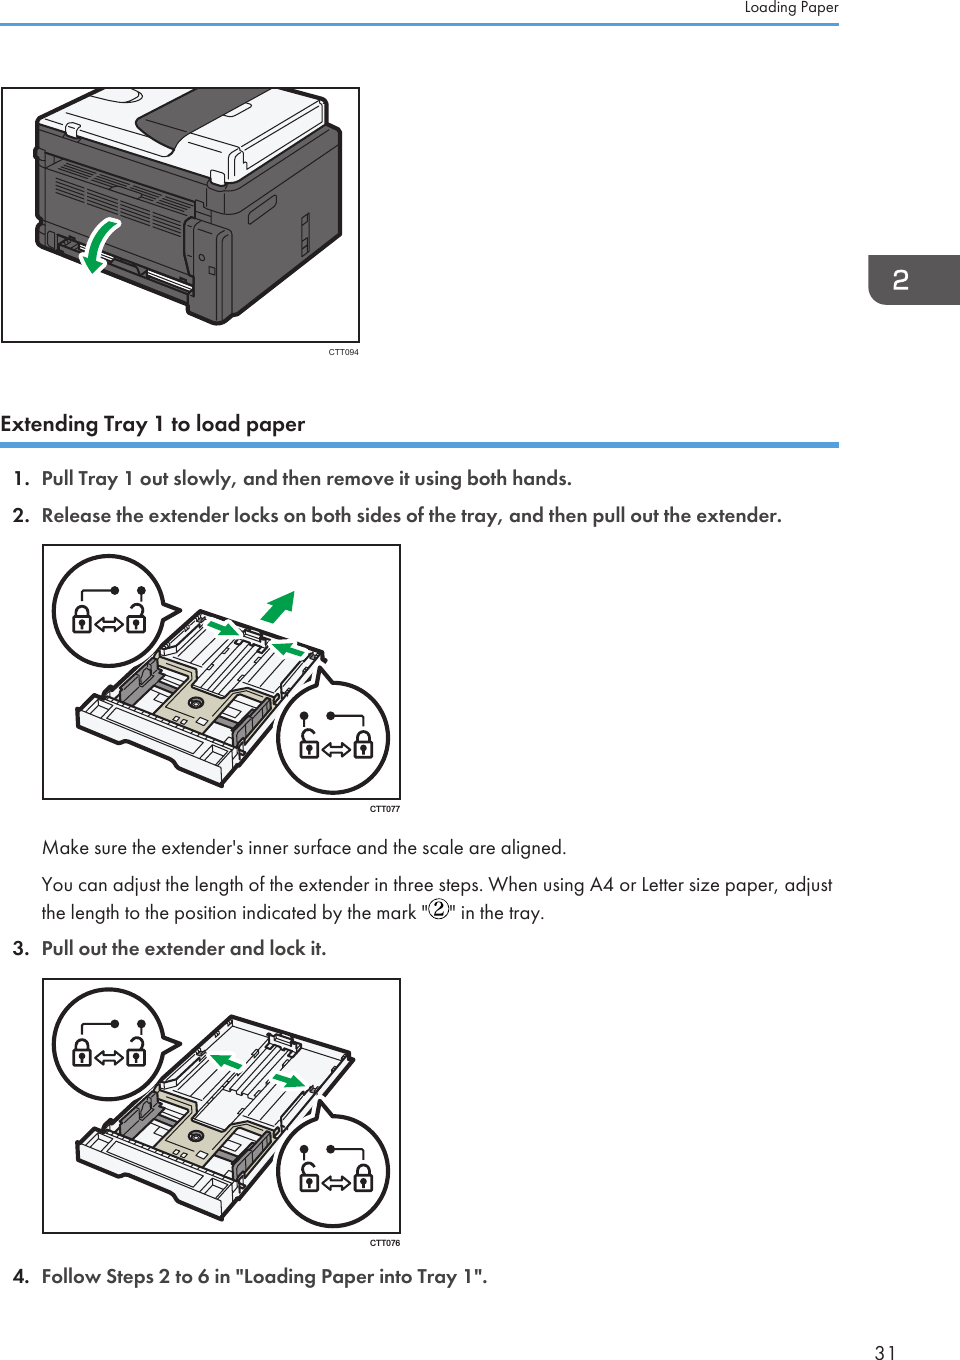
![Print AreaThe diagram below shows the area of the paper that the machine can print on.From the printer driverCHZ9042331441. Print area2. Feed direction3. Approx. 4.2 mm (0.2 inches)4. Approx. 4.2 mm (0.2 inches)• The print area may vary depending on the paper size and printer driver settings.• Adjust the print position by specifying [Registration] in [System Settings].2. Loading Paper26](https://usermanual.wiki/Ricoh/MFSP204SFN1/User-Guide-1901762-Page-28.png)
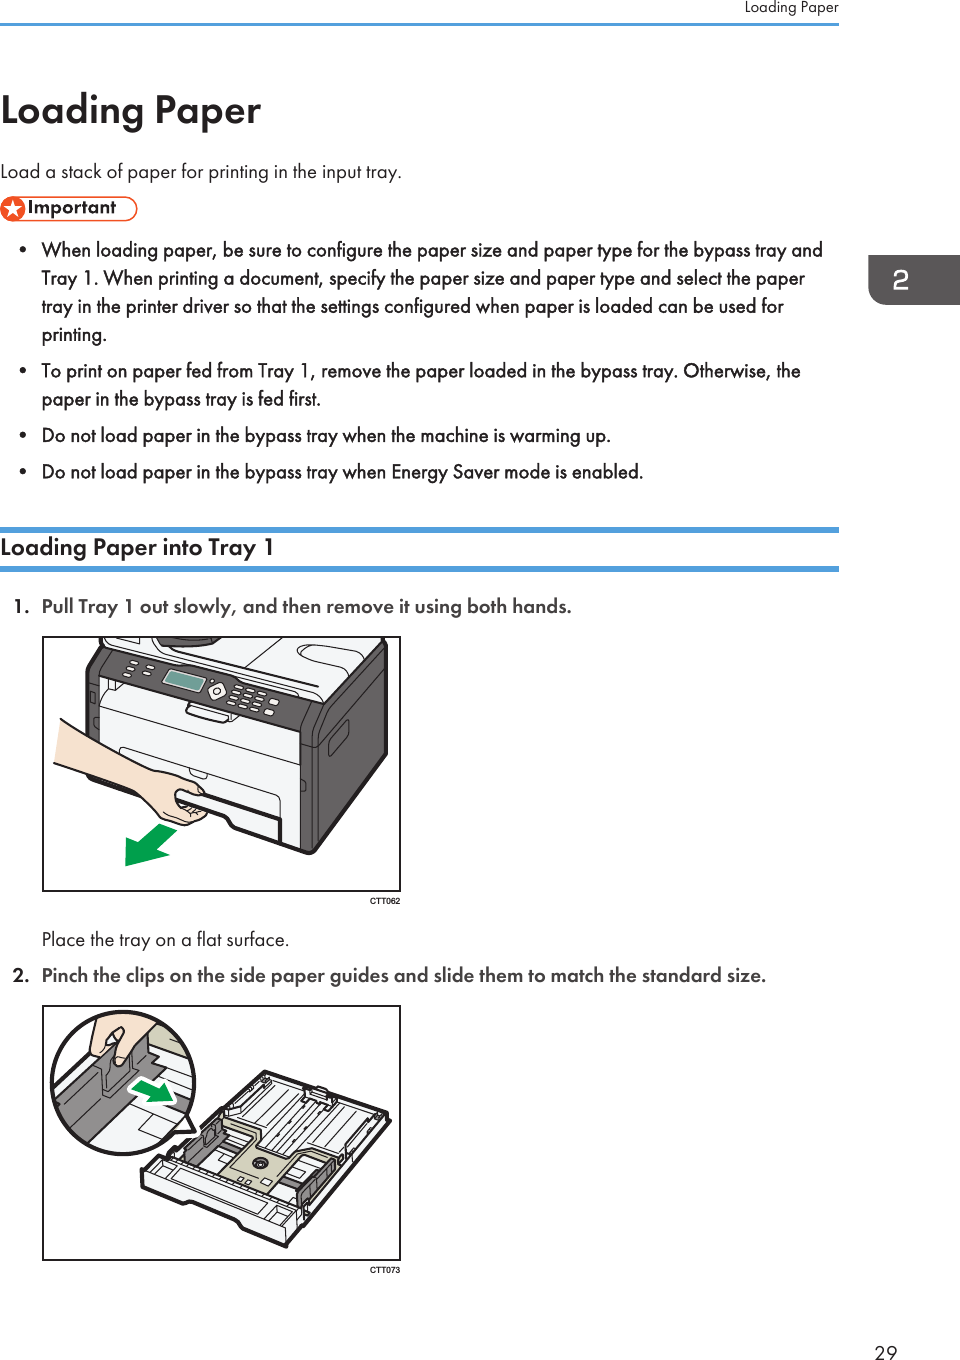
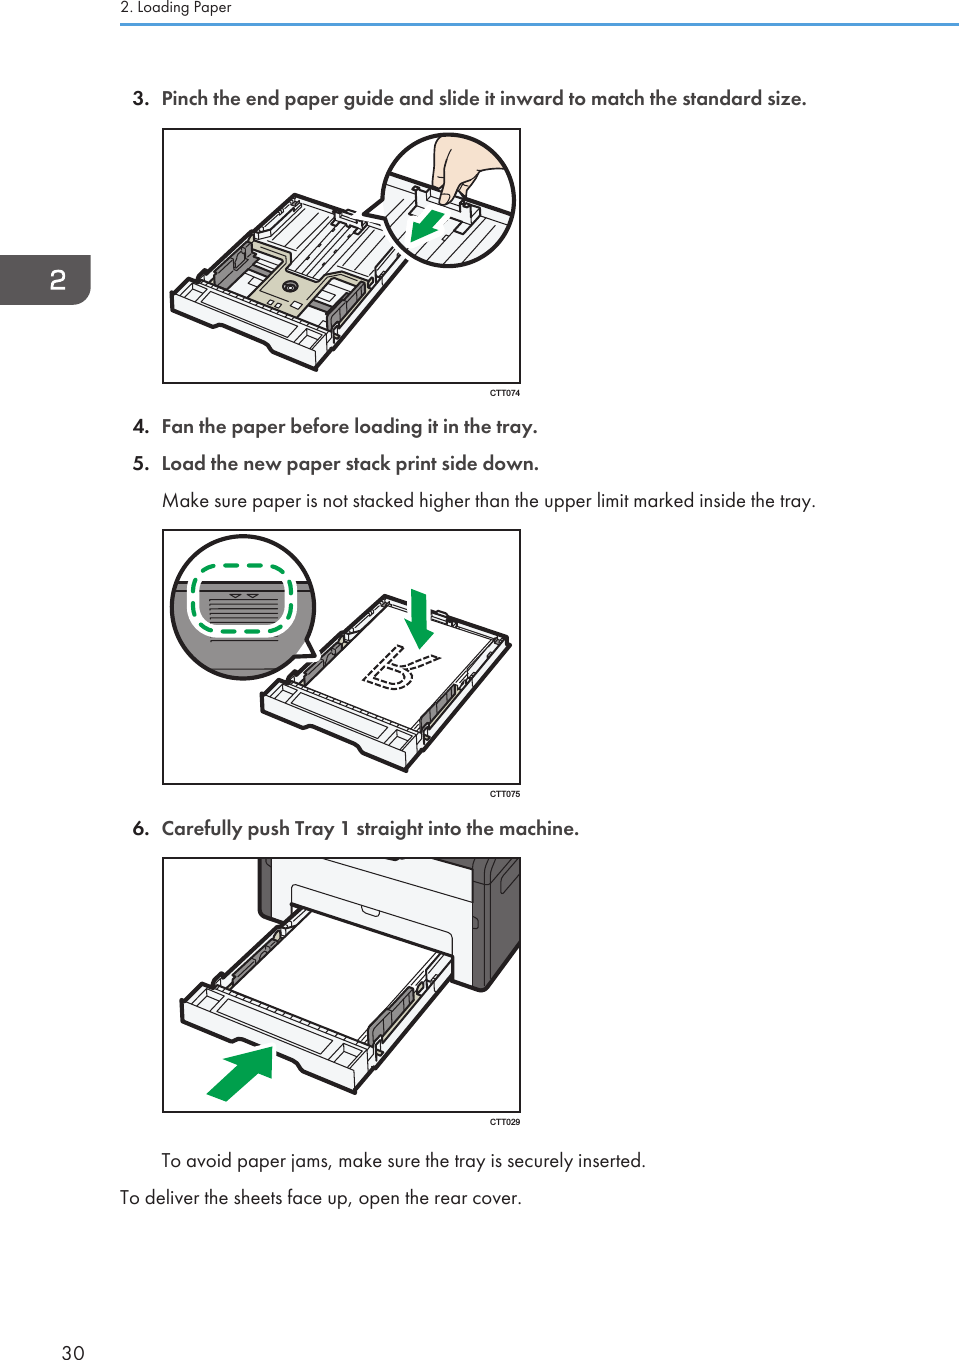
![3. Adjust the side guides to the paper width.CTT033To deliver the sheets face up, open the rear cover.CTT094Specifying Paper Type and Paper Size Using Control PanelSpecifying the paper type1. Press the [User Tools] key.CTT129Loading Paper33](https://usermanual.wiki/Ricoh/MFSP204SFN1/User-Guide-1901762-Page-35.png)
![2. Press the [ ] or [ ] key to select [System Settings], and then press the [OK] key.To specify the type of paper in the bypass tray, select [Copier Features], and then press the [OK]key.3. Press the [ ] or [ ] key to select [Tray 1 Ppr Settings], and then press the [OK] key.To specify the type of paper in the bypass tray, select [Bypass Ppr Settings], and then press the[OK] key.4. Press the [ ] or [ ] key to select [Paper Type], and then press the [OK] key.5. Press the [ ] or [ ] key to select the paper type, and then press the [OK] key.6. Press the [User Tools] key to return to the initial screen.Specifying the standard paper size1. Press the [User Tools] key.CTT1292. Press the [ ] or [ ] key to select [System Settings], and then press the [OK] key.To specify the size of paper in the bypass tray, select [Copier Features], and then press the [OK]key.3. Press the [ ] or [ ] key to select [Tray 1 Ppr Settings], and then press the [OK] key.To specify the size of paper in the bypass tray, select [Bypass Ppr Settings], and then press the[OK] key.4. Press the [ ] or [ ] key to select [Paper Size], and then press the [OK] key.5. Press the [ ] or [ ] key to select the paper size, and then press the [OK] key.6. Press the [User Tools] key to return to the initial screen.2. Loading Paper34](https://usermanual.wiki/Ricoh/MFSP204SFN1/User-Guide-1901762-Page-36.png)
![Specifying a custom paper size1. Press the [User Tools] key.CTT1292. Press the [ ] or [ ] key to select [System Settings], and then press the [OK] key.To specify the size of paper in the bypass tray, select [Copier Features], and then press the [OK]key.3. Press the [ ] or [ ] key to select [Tray 1 Ppr Settings], and then press the [OK] key.To specify the size of paper in the bypass tray, select [Bypass Ppr Settings], and then press the[OK] key.4. Press the [ ] or [ ] key to select [Paper Size], and then press the [OK] key.5. Press the [ ] or [ ] key to select [Custom], and then press the [OK] key.6. Press the [ ] or [ ] key to select [mm] or [inch], and then press the [OK] key.7. Press the [ ] or [ ] key to specify the width, and then press the [OK] key.8. Press the [ ] or [ ] key to specify the length, and then press the [OK] key.9. Press the [OK] key.10. Press the [User Tools] key to return to the initial screen.Specifying Paper Type and Paper Size Using Smart Organizing MonitorThe procedure in this section is an example based on Windows 7. The actual procedure may varydepending on the operating system you are using.Specifying the paper type and paper size1. On the [Start] menu, click [All Programs].2. Click [Smart Organizing Monitor for SP xxx Series].3. Click [Smart Organizing Monitor for SP xxx Series Status].Loading Paper35](https://usermanual.wiki/Ricoh/MFSP204SFN1/User-Guide-1901762-Page-37.png)
![4. If the machine you are using is not selected, click [Select Device...], and then select themachine's model.5. Click [OK].6. On the [Status] tab, click [Change...].7. Select the paper type and paper size, and then click [OK].8. Click [Close].Changing the custom paper size1. On the [Start] menu, click [All Programs].2. Click [Smart Organizing Monitor for SP xxx Series].3. Click [Smart Organizing Monitor for SP xxx Series Status].4. If the machine you are using is not selected, click [Select Device...], and then select themachine's model.5. Click [OK].6. On the [User Tool] tab, click [Printer Configuration].7. On the [System] tab, select [mm] or [inch] in the [Measurement Unit:] list.8. In the [Horizontal: (100 to 216 mm)] box, enter the width.9. In the [Vertical: (148 to 356 mm)] box, enter the length.10. Click [OK].11. Click [Close].• You cannot specify the settings of the paper in the bypass tray via Smart Organizing Monitor.2. Loading Paper36](https://usermanual.wiki/Ricoh/MFSP204SFN1/User-Guide-1901762-Page-38.png)

![3. Printing DocumentsBasic OperationUse the printer driver to print a document from your computer.1. After creating a document, open the [Printing Preferences] dialog box in the document'snative application.2. Change any print settings if necessary.The following print settings can be specified using the printer driver:• Printing multiple pages on a sheet• Splitting a single page across multiple sheets• Printing on both sides of sheets• Not having blank pages printed• Having prints sorted• Saving printer driver settings as a file• Recalling and deleting saved printer properties settings• Printing on a custom size paper• Printing a large paper size document on smaller size paper• Reducing and enlarging a document size• Changing the print resolution• Saving on toner when printing• Changing the dithering pattern• Having text stamped on printsFor details about each setting items, click [Help].41](https://usermanual.wiki/Ricoh/MFSP204SFN1/User-Guide-1901762-Page-43.png)
![3. When setting changes are completed, click [OK].4. Print the document using the print function in the document's native application.• If a paper jam occurs, printing stops halfway. Open the front cover, remove the print cartridge, andthen remove the jammed paper. If the paper cannot be removed in this way, remove it by openingthe fusing cover. Printing will resume automatically once the cover is closed.Printing on Both Sides of Sheets• This function cannot be available with the bypass tray.1. After creating a document, open the [Printing Preferences] dialog box in the document'snative application.2. On the [Setup] tab, in the [Duplex:] list box, select how you want to open the boundoutput.3. After making any additional settings, click [OK].4. Start printing.The machine prints only the one sides of pages first, and then displays on Smart OrganizingMonitor screen a message to reload the outputs turned over.5. Take out all of the prints from the output tray and place them in Tray 1.To print on the reverse side of the prints, turn them over so that the blank side faces down andplace them in Tray 1.PortraitCTT0093. Printing Documents42](https://usermanual.wiki/Ricoh/MFSP204SFN1/User-Guide-1901762-Page-44.png)
![LandscapeCTT0106. Press the [Start] key.• If the rear cover is open, the paper is delivered face up from the rear. Rearrange the printed sheetsin the correct order.Canceling a Print JobYou can cancel print jobs using either the machine's control panel or your computer, depending on thestatus of the job.Canceling a print job before printing has started1. Double-click the printer icon on the task tray of your computer.2. Select the print job you want to cancel, click the [Document] menu, and then click[Cancel].• If you cancel a print job that has already been processed, printing may continue for a few pagesbefore being canceled.• It may take a while to cancel a large print job.Basic Operation43](https://usermanual.wiki/Ricoh/MFSP204SFN1/User-Guide-1901762-Page-45.png)
![Canceling a print job while printing1. Press the [Stop/Clear] key.CTT1302. Press the [1] key.To cancel printing, press the [1] key (1: Yes). To continue printing, press the [2] key (2: No).3. Printing Documents44](https://usermanual.wiki/Ricoh/MFSP204SFN1/User-Guide-1901762-Page-46.png)
![If a Paper Mismatch OccursIf the paper size or type does not match the print job's settings, the machine reports an error. There aretwo ways to resolve this error:Continue printing using mismatched paperUse the form-feed function to ignore the error and print using mismatched paper.Reset the print jobCancel printing.Continuing Printing Using Mismatched PaperIf the paper is too small for the print job, the printed image will be cropped.1. If the error message is displayed, press the [Start] key.CTT131Resetting the Print Job1. If the error message is displayed, press the [Stop/Clear] key.CTT130If a Paper Mismatch Occurs45](https://usermanual.wiki/Ricoh/MFSP204SFN1/User-Guide-1901762-Page-47.png)

![4. Copying OriginalsCopier Mode ScreenStandby mode screen• First line:Displays the function and paper size specified on the machine. The following five functions areavailable:• Copier, ID Card Copy, Sort, 2 Sided Copy, 2 Sided/Sort• Second line:Displays the copy magnification ratio or combine setting ([2 on 1] or [4 on 1]), documenttype, and the number of copies.Settings that can be specified for the current jobBy pressing the [ ] or [ ] key in the Standby mode screen, you can specify the following settingsfor the current job.• Tray Paper Settings (paper size)• Sort• Original Type• Density• Reduce/Enlarge• Combine• 2 Sided Copy• The start-up mode can be specified in the [Function Priority] setting under [System Settings].• If paper is loaded in the bypass tray, the paper size specified in [Bypass Ppr Settings] appears(except for Sort and 2 Sided Copy).47](https://usermanual.wiki/Ricoh/MFSP204SFN1/User-Guide-1901762-Page-49.png)
![Basic Operation• The original in the ADF takes precedence over the original on the exposure glass if you placeoriginals both in the ADF and on the exposure glass.• To print on paper fed from Tray 1, remove the paper loaded in the bypass tray. Otherwise, thepaper in the bypass tray is fed first.• [Sort] and [2 Sided Copy] cannot be used with the bypass tray.• When making multiple copies of a multi-page document, you can select whether copies are outputin collated sets, or in page batches in the [Sort] setting under [Copier Features].1. Press the [Copy] key.CTT1242. Place the original on the exposure glass or in the ADF.3. To make multiple copies, enter the number of copies using the number keys.4. Press the [Start] key.CTT131• If a paper jam occurs, printing stops halfway. Open the front cover, remove the print cartridge, andthen remove the jammed paper. If the paper cannot be removed in this way, remove it by openingthe fusing cover. Printing will resume automatically once the cover is closed.4. Copying Originals48](https://usermanual.wiki/Ricoh/MFSP204SFN1/User-Guide-1901762-Page-50.png)
![• If there is a paper jam in the ADF, open the ADF cover, and then remove the jammed paper.Specify the copy setting again from the page where the paper jammed.Canceling a CopyIf copying is canceled while scanning an original placed on the exposure glass, copying is canceledimmediately and there is no printout. If copying is canceled while scanning a multiple-page originalplaced in the ADF, scanning stops halfway at the current page.1. Press the [Stop/Clear] key.CTT1302. Press the [1] key.To cancel printing, press the [1] key (1: Yes). To continue printing, press the [2] key (2: No).Basic Operation49](https://usermanual.wiki/Ricoh/MFSP204SFN1/User-Guide-1901762-Page-51.png)
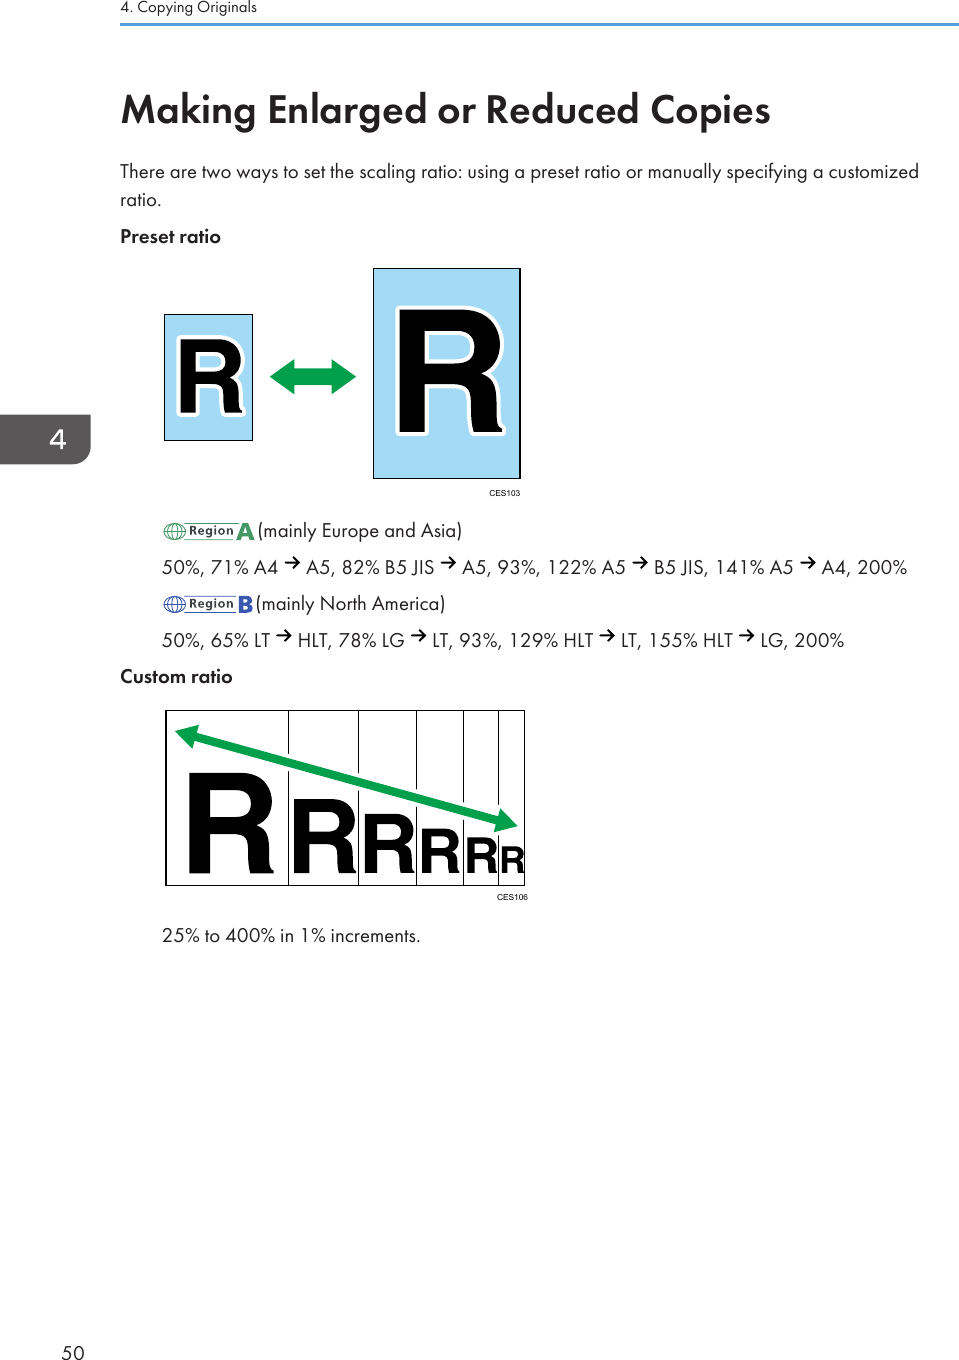
![Specifying Reduce/Enlarge1. Press the [Copy] key.CTT1242. Press the [ ] or [ ] key in the standby mode screen to select [Reduce/Enlarge], and thenpress the [OK] key.3. Press the [ ] or [ ] key to select the ratio, and then press the [OK] key.If [Zoom: 25-400%] has been selected, enter the ratio using the number keys, and then press the[OK] key.4. Press the [ ] key to return to the initial screen.• To apply the specified setting to all jobs, specify [Reduce/Enlarge] in [Copier Features].Making Enlarged or Reduced Copies51](https://usermanual.wiki/Ricoh/MFSP204SFN1/User-Guide-1901762-Page-53.png)

![CES036• Landscape: L to RCES037• Landscape: T to BCES038Specifying Combine for Copying1. Press the [Copy] key.CTT1242. Press the [ ] or [ ] key in the standby mode screen to select [Combine], and then pressthe [OK] key.3. Press the [ ] or [ ] key to select [2 on 1] or [4 on 1], and then press the [OK] key.4. Press the [ ] or [ ] key to select the printout format, and then press the [OK] key.5. Press the [ ] key to return to the initial screen.Combining Multiple Pages53](https://usermanual.wiki/Ricoh/MFSP204SFN1/User-Guide-1901762-Page-55.png)
![6. Place the original on the exposure glass or in the ADF.7. To make multiple copies, enter the number of copies using the number keys.8. Press the [Start] key.CTT131When you place the original on the exposure glass, perform the following steps to scan thesubsequent pages of the original.9. When the current page is scanned, place the next page on the exposure glass, and thenpress the [Start] key.10. Repeat Step 9 until all the pages of the original are scanned.• To apply the specified setting to all jobs, specify [Combine] in [Copier Features].4. Copying Originals54](https://usermanual.wiki/Ricoh/MFSP204SFN1/User-Guide-1901762-Page-56.png)
![Copying Both Sides of an ID Card onto OneSide of PaperThis section describes how to copy the front and back sides of an ID card or other small documents ontoeither side of a sheet of paper.When copying onto A4 paper, you can copy documents that are smaller than A5. Likewise, whencopying onto Letter size paper, you can copy documents that are smaller than Half Letter size.• To use this function, the paper size used for printing copies must be set to A6, A5, A4, Half Letter orLetter.CES165Copying an ID Card1. Press the [Copy] key.CTT124Copying Both Sides of an ID Card onto One Side of Paper55](https://usermanual.wiki/Ricoh/MFSP204SFN1/User-Guide-1901762-Page-57.png)
![2. Press the [ID Card Copy/On Hook Dial] key.CTT1263. To make multiple copies, enter the number of copies using the number keys.4. Place the original front side down with the top to the rear of the machine on the exposureglass.CTT169The location to place the original depends on the paper size.A4, A5, A6Position the card so that it is centered at the intersection. (The same position applies to both thefront and back of the ID card.)A4A5A6CTT2064. Copying Originals56](https://usermanual.wiki/Ricoh/MFSP204SFN1/User-Guide-1901762-Page-58.png)
![Letter, Half LetterPosition the card so that it is centered at the intersection.(The same position applies to both thefront and back of the ID card.)CTT1945. Press the [Start] key.CTT1316. Within 30 seconds, place the original back side down with the top to the rear of themachine on the exposure glass, and then press the [Start] key.• In the ID card copy screen, you can press the [ ] or [ ] key to change the paper size.Copying Both Sides of an ID Card onto One Side of Paper57](https://usermanual.wiki/Ricoh/MFSP204SFN1/User-Guide-1901762-Page-59.png)
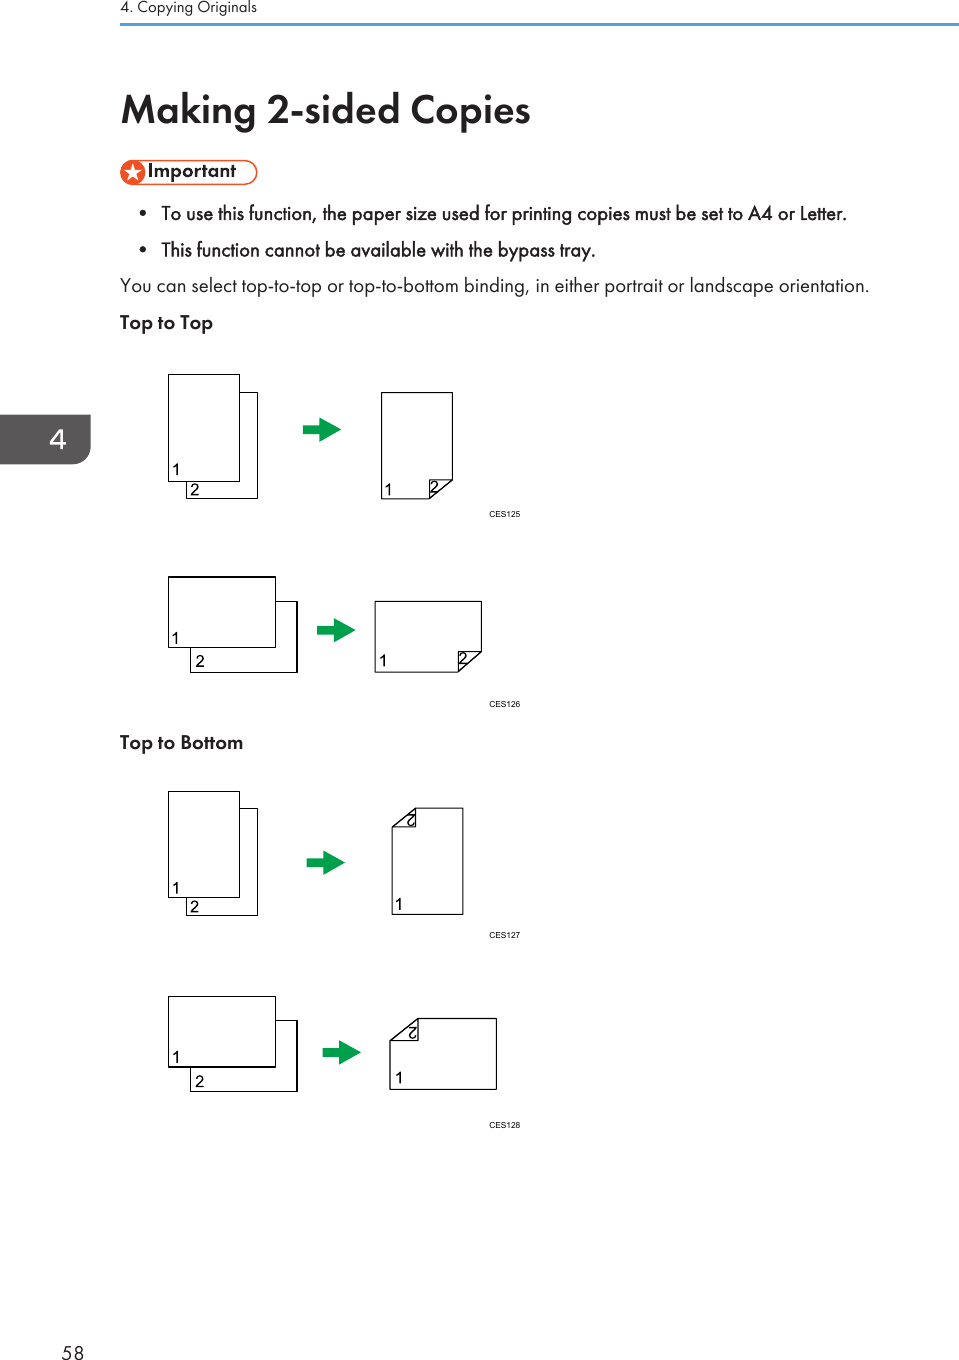
![Specifying 2 Sided Copying1. Press the [Copy] key.CTT1242. Press the [ ] or [ ] key in the standby mode screen to select [2 Sided Copy], and thenpress the [OK] key.3. Press the [ ] or [ ] key to select [Top to Top] or [Top to Bottom], and then press the [OK]key.4. Press the [ ] or [ ] key to select the orientation, and then press the [OK] key.5. Press the [ ] key to return to the initial screen.6. Place the original on the exposure glass or in the ADF.7. To make multiple copies, enter the number of copies using the number keys.8. Press the [Start] key.CTT131When you place the original in the ADF, all the pages are automatically scanned and then only thepages on one side are copied sequentially. Proceed to Step 10.When you place the original on the exposure glass, perform the following steps to scan thesubsequent pages.9. When the current page is scanned, place the next page on the exposure glass, and thenpress the [Start] key.Making 2-sided Copies59](https://usermanual.wiki/Ricoh/MFSP204SFN1/User-Guide-1901762-Page-61.png)
![10. Take out all of the prints from the output tray and place them in Tray 1.To print on the reverse side of the prints, turn them over so that the blank side faces down andplace them in Tray 1.PortraitCTT009LandscapeCTT01011. Press the [Start] key.• If the rear cover is open, the paper is delivered face up from the rear. Rearrange the printed sheetsin the correct order.• To apply the specified setting to all jobs, specify [2 Sided Copy] in [Copier Features].4. Copying Originals60](https://usermanual.wiki/Ricoh/MFSP204SFN1/User-Guide-1901762-Page-62.png)
![Specifying the Scan SettingsThis section describes how to specify image density and scan quality for the current job.Adjusting Image DensityThere are five image density levels. The higher the density level, the darker the printout.1. Press the [Copy] key.CTT1242. Press the [ ] or [ ] key in the standby mode screen to select [Density], and then press the[OK] key.3. Press the [ ] or [ ] key to select the density level, and then press the [OK] key.4. Press the [ ] key to return to the initial screen.• To apply the specified setting to all jobs, specify [Density] in [Copier Features].Selecting the Document Type According to OriginalThere are three document types:TextSelect this when the original contains only text and no photographs or images.PhotoSelect this when the original contains only photographs or images. Use this mode for the followingtypes of original:• Photographs• Pages that are entirely or mainly composed of photographs or images, such as magazinepages.Specifying the Scan Settings61](https://usermanual.wiki/Ricoh/MFSP204SFN1/User-Guide-1901762-Page-63.png)
![Text/PhotoSelect this when the original contains both text and photographs or images.Specifying the Original Type1. Press the [Copy] key.CTT1242. Press the [ ] or [ ] key in the standby mode screen to select [Original Type], and thenpress the [OK] key.3. Press the [ ] or [ ] key to select the document type, and then press the [OK] key.4. Press the [ ] key to return to the initial screen.• To apply the specified setting to all jobs, specify [Original Type] in [Copier Features].4. Copying Originals62](https://usermanual.wiki/Ricoh/MFSP204SFN1/User-Guide-1901762-Page-64.png)
![5. Scanning OriginalsScanner Mode ScreenStandby mode screen• First line:Displays the current machine status.• Second line:Displays a message prompting you to enter the destination.Settings that can be specified for the current jobBy pressing [ ] or [ ] on the screen that appears after entering the destination, you can specify thefollowing settings for the current job:• Resolution• Original Size• Density• The start-up mode can be specified in the [Function Priority] setting under [System Settings].63](https://usermanual.wiki/Ricoh/MFSP204SFN1/User-Guide-1901762-Page-65.png)
![Registering the Scan DestinationRegistering the Scan DestinationUse this procedure to register scan destinations from Smart Organizing Monitor.1. On the [Start] menu, click [All Programs].2. Click [Smart Organizing Monitor for SP xxx Series].3. Click [Smart Organizing Monitor for SP xxx Series Status].4. If the machine you are using is not selected, click [Select Device...], and then select themachine's model.5. Click [OK].6. On the [User Tool] tab, click [Printer Configuration].7. On the [Scanner] tab, select the number you want to register, and then click [Modify...].8. In [Name:], register the name.9. From the [Type:] List, select [Scan to E-mail], [Scan to Folder], or [Scan to FTP].10. In [Address:], specify entries for using Scan to E-mail, Scan to Folder, and Scan to FTP.To use the Scan to E-mail function, enter the destination e-mail address.To use the Scan to Folder function, enter the SMB server's IP address, host name, or computername.To use the Scan to FTP function, enter the FTP server's IP address or host name.11. Specify other settings if necessary, and then click [OK].When using Scan to E-mail, specify [Title:], [Sender Name:], [E-mail Address:], and [E-mailNotification].• [Title:]Enter the subject of the e-mail.• [Sender Name:]Enter the name of the sender.• [E-mail Address:]Enter the e-mail address of the sender or the e-mail address for [E-mail Notification].• [E-mail Notification]If [E-mail Notification] is selected, the scan result is sent to the sender specified in [E-mailAddress:].When using Scan to Folder, specify [User Name:], [Password:], and [Directory:].• [User Name:]5. Scanning Originals64](https://usermanual.wiki/Ricoh/MFSP204SFN1/User-Guide-1901762-Page-66.png)
![Enter the user account name for accessing the SMB server or shared computer.• [Password:]Enter the password for accessing the SMB server or shared computer.• [Directory:]Enter the path to the shared folder.When using Scan to FTP, specify [User Name:], [Password:], [Directory:], [E-mail Address:], and[E-mail Notification].• [User Name:]Enter the login user name for accessing the FTP server.• [Password:]Enter the password for accessing the FTP server.• [Directory:]Enter the path to the FTP server.• [E-mail Address:]Enter the e-mail address of the sender or the e-mail address for [E-mail Notification].• [E-mail Notification]If [E-mail Notification] is selected, the scan result is sent to the sender specified in [E-mailAddress:].[Scan Mode:], [Resolution:], [File Format:], [Density:], and [Document Size:] can be specified.12. To use Scan to E-mail, click [Server Properties...], specify the [SMTP], [POP before SMTP],[SNTP], and [POP3] settings, and then click [OK].13. Click [Apply].14. Click [OK].15. Click [Close].• If you are using Scan to Folder, create the destination folder on the computer's hard drive andmake it a shared folder. For details, see your operating system's documentation.Modifying or deleting scan destination1. On the [Start] menu, click [All Programs].2. Click [Smart Organizing Monitor for SP xxx Series].3. Click [Smart Organizing Monitor for SP xxx Series Status].4. If the machine you are using is not selected, click [Select Device...], and then select themachine's model.Registering the Scan Destination65](https://usermanual.wiki/Ricoh/MFSP204SFN1/User-Guide-1901762-Page-67.png)
![5. Click [OK].6. On the [User Tool] tab, click [Printer Configuration].7. On the [Scanner] tab, select the number you want to register, and then click [Modify...].To delete a destination, select its registration number, and then click [Delete].8. Modify the destination, and then click [OK].To delete a destination, and then click [Yes].9. Click [Apply].10. Click [OK].11. Click [Close].5. Scanning Originals66](https://usermanual.wiki/Ricoh/MFSP204SFN1/User-Guide-1901762-Page-68.png)
![Basic OperationScanning using the control panel allows you to send scanned files via e-mail (Scan to E-mail), to an FTPserver (Scan to FTP), to the shared folder of a computer on a network (Scan to Folder), or to a USB flashdisk (Scan to USB).The Scan to E-mail, Scan to FTP, and Scan to Folder functions are available only through a networkconnection. No network connection is required for the Scan to USB function; you can send scanned filesdirectly to a USB flash disk inserted into the front of the machine.Scan to E-mail/FTP/Folder• When using the Scan to E-mail, Scan to FTP or Scan to Folder function, you must first register thedestination.• To use the Scan to E-mail function, it is necessary to specify [Server Properties...] in SmartOrganizing Monitor. For details, see the Smart Organizing Monitor Help.• Mac OS X 10.7 does not support the Scan to Folder function. Also, Mac OS X does not supportthe function that is used in an IPv6 environment.1. Press the [Scanner] key.CTT1282. Place the original on the exposure glass or in the ADF.3. Using the number keys, enter the number of a registered scan destination.For details, see page 64 "Registering the Scan Destination".4. Press the [OK] key.5. Press the [Start] key.• When using the exposure glass, place the next original on the exposure glass, and then pressthe [1] key. Repeat this step until all originals are scanned.When all originals have been scanned, press the [2] key to start sending the scanned file.Basic Operation67](https://usermanual.wiki/Ricoh/MFSP204SFN1/User-Guide-1901762-Page-69.png)
![• If you are using Scan to Folder, create the destination folder on the computer's hard drive andmake it a shared folder. For details, see your operating system's documentation.• To cancel scanning, press the [Scanner] key, and then press the [Stop/Clear] key.Basic Operation for Scan to USB• This machine does not support the use of USB flash drives connected to external USB hubs. Insertyour USB flash drive directly into the USB flash drive port located at the top left corner of themachine.1. Press the [Scanner] key.2. Insert your USB flash drive into the USB flash drive port.CTT112The message "To USB Memory" appears on the display.3. Place the original on the exposure glass or in the ADF.4. Press the [Start] key.• To cancel scanning, press the [Stop/Clear] key.• When using the exposure glass, place the next original on the exposure glass, and then pressthe [1] key. Repeat this step until all originals are scanned.When all originals have been scanned, press the [2] key to start sending the scanned file.5. Confirm that "Sending..." appears on the display.The scanned file is created in the root directory of the USB flash drive.6. Remove the USB flash drive from the machine.5. Scanning Originals68](https://usermanual.wiki/Ricoh/MFSP204SFN1/User-Guide-1901762-Page-70.png)
![Specifying the Scan SettingsSpecifying the Scanning Size According to the Size of the Original1. Press the [Scanner] key.CTT128If you are using Scan to USB, proceed to Step 4.2. Using the number keys, enter the number of a registered scan destination.For details, see page 64 "Registering the Scan Destination".3. Press the [OK] key.4. Press the [ ] or [ ] key to select [Original Size], and then press the [OK] key.5. Press the [ ] or [ ] key to select the original size, and then press the [OK] key.6. Press the [ ] key to return to the initial screen.Adjusting Image DensityThere are five image density levels. The higher the density level, the darker the scanned image.1. Press the [Scanner] key.CTT128Specifying the Scan Settings69](https://usermanual.wiki/Ricoh/MFSP204SFN1/User-Guide-1901762-Page-71.png)
![If you are using Scan to USB, proceed to Step 4.2. Using the number keys, enter the number of a registered scan destination.For details, see page 64 "Registering the Scan Destination".3. Press the [OK] key.4. Press the [ ] or [ ] key to select [Density], and then press the [OK] key.5. Press the [ ] or [ ] key to select the density level, and then press the [OK] key.6. Press the [ ] key to return to the initial screen.Specifying ResolutionThere are three resolution settings. The higher the resolution, the higher the quality but greater the filesize.1. Press the [Scanner] key.CTT128If you are using Scan to USB, proceed to Step 4.2. Using the number keys, enter the number of a registered scan destination.For details, see page 64 "Registering the Scan Destination".3. Press the [OK] key.4. Press the [ ] or [ ] key to select [Resolution], and then press the [OK] key.5. Press the [ ] or [ ] key to select [150 × 150dpi], [300 × 300dpi] or [600 × 600dpi], andthen press the [OK] key.You can select [600 × 600dpi] only if the original type is set to B&W.6. Press the [ ] key to return to the initial screen.5. Scanning Originals70](https://usermanual.wiki/Ricoh/MFSP204SFN1/User-Guide-1901762-Page-72.png)
![Scanning from a ComputerScanning from a computer (TWAIN scanning and WIA scanning) allows you to operate the machinefrom your computer and scan originals into your computer directly.CTT1741. Your Computer (TWAIN driver already installed)Instruct the machine to start scanning the original that is set on the machine.2. This MachineThe original that is set on the machine is scanned, and its data is sent to a client computer.Using TWAIN scannerThis section describes the preparations and procedure for using the TWAIN scanner.• To use the TWAIN scanner, you must install the TWAIN driver, which is on the supplied CD-ROM.• To use the TWAIN scanner, a TWAIN-compliant application must be installed.To use the machine as a TWAIN scanner, first do the following:• Install the TWAIN driver.• Install a TWAIN-compliant application.TWAIN ScanningTWAIN scanning is possible if your computer is running a TWAIN-compatible application.1. Place the original.2. Open the properties dialog box for this machine using a TWAIN-compatible application.3. Configure the scan settings as required, and then click [Scan].Scanning from a Computer71](https://usermanual.wiki/Ricoh/MFSP204SFN1/User-Guide-1901762-Page-73.png)
![Settings you can configure in the TWAIN dialog boxCTT177123467581. Select ModeUp to ten scan settings can be saved. The default value is applied when [Default] is selected.2. Scan Mode:Select from [Full Color], [Grayscale], [Photo], [Text], or [Text/Photo].3. Resolution:Select a resolution from the list.If [Text], [Text/Photo], or [Photo] is selected in [Scan Mode:], the scan resolution cannot be set 1200 dpi ×1200 dpi or higher.4. Original Size:Select the scanning size. If you select [Custom Size...], enter the scanning size directly in the edit box.5. Interface Type...You can select the type of interface.6. Original TypeAccording to your original, select a setting from the list of options detailed below.• [Standard] (Auto change to Full color, 200dpi × 200dpi)• [Photo] (Auto change to Full color, 600dpi × 600dpi)• [Filing] (Auto change to Text, 200dpi × 200dpi)• [OCR] (Auto change to Text, 400dpi × 400dpi)5. Scanning Originals72](https://usermanual.wiki/Ricoh/MFSP204SFN1/User-Guide-1901762-Page-74.png)
![7. Original Scan MethodSpecify the method to scan originals.If [ADF] is selected in [Original Scan Method], specify the orientation of the original.8. Image Quality AdjustmentYou can adjust the image quality. The scan settings that can be adjusted are as follow: Rotation, Brightness/Contrast, Sharpness, Curves, Levels, Color Balance, and Hue/Saturation. When [Auto] is selected, the defaultvalues will be applied to all settings. When [Manual] is selected, all settings can be adjusted as required.• For details, see the TWAIN driver help.Basic Operation for WIA Scanning1. Place the original.2. On the [Start] menu, click [Devices and Printers].3. Right-click the icon of the printer model you want to use, and then click [Start scan].4. Configure the scan settings as required, and then click [Scan].5. Click [Import].Scanning from a Computer73](https://usermanual.wiki/Ricoh/MFSP204SFN1/User-Guide-1901762-Page-75.png)
![6. Sending and Receiving a FaxFax Mode ScreenStandby mode screen• First lineDisplays the current machine status, month, and date.• Second lineDisplays the current resolution settings and time.Settings that can be specified for the current jobBy pressing the [ ] or [ ] key in the Standby mode screen, you can specify the following settingsfor the current job.• Resolution• Density• The start-up mode can be specified in the [Function Priority] setting under [System Settings].75](https://usermanual.wiki/Ricoh/MFSP204SFN1/User-Guide-1901762-Page-77.png)
![Setting the Date and Time1. Press the [User Tools] key.2. Press the [ ] or [ ] key to select [System Settings], and then press the [OK] key.3. Press the [ ] or [ ] key to select [Set Date/Time], and then press the [OK] key.4. Press the [ ] or [ ] key to select [Set Date], and then press the [OK] key.5. Enter the current year using the number keys, and then press the [OK] key.6. Enter the current month using the number keys, and then press the [OK] key.7. Enter the current day using the number keys, and then press the [OK] key.8. Press the [ ] or [ ] key to select date format, and then press the [OK] key.9. Press the [ ] key.10. Press the [ ] or [ ] key to select [Set Time], and then press the [OK] key.11. Press the [ ] or [ ] key to select the time format, and then press the [OK] key.If you have selected [24 hours], proceed to Step 13.12. Press the [ ] or [ ] key to select [AM] or [PM], and then press the [OK] key.13. Enter the current hour using the number keys, and then press the [OK] key.14. Enter the current minute using the number keys, and then press the [OK] key.15. Press the [User Tools] key to return to the initial screen.6. Sending and Receiving a Fax76](https://usermanual.wiki/Ricoh/MFSP204SFN1/User-Guide-1901762-Page-78.png)
![Entering CharactersTo enter characters, use keys as follows:To enter a digitPress a number key.To delete a characterPress the [ ] key for one second.To enter a fax number• To enter a numberUse the number keys.• To enter characters other than digits" ": Press the [ ] key." ": Press the [ ] key."P"(Pause): Press the [ID Card Copy/On Hook Dial] key.To enter a nameLetters, numbers, and symbols can be entered using the number keys.To enter two characters that use the same number key successively, press the [ ] key after enteringthe first character.CHZ903Space: Press the [ ] key for one second.Entering Characters77](https://usermanual.wiki/Ricoh/MFSP204SFN1/User-Guide-1901762-Page-79.png)
![Registering Fax DestinationsThis section describes how to register fax destinations in the Address Book using the control panel.The Address Book can also be edited using Smart Organizing Monitor. For details, see the SmartOrganizing Monitor Help.• The Address Book data may become damaged or lost unexpectedly. The manufacturer shall not beheld responsible for any damages resulting from such data loss.Registering Fax Destinations1. Press the [User Tools] key.CTT1292. Press the [ ] or [ ] key to select [Address Book], and then press the [OK] key.3. Press the [ ] or [ ] key to select [Fax Speed Dial Dest.], and then press the [OK] key.4. Press the [ ] or [ ] key to select the Speed Dial number, and then press the [OK] key.5. Enter the fax number using the number keys, and then press the [OK] key.6. Enter the fax name using the number keys, and then press the [OK] key.7. Press the [User Tools] key to return to the initial screen.6. Sending and Receiving a Fax78](https://usermanual.wiki/Ricoh/MFSP204SFN1/User-Guide-1901762-Page-80.png)
![Modifying or Deleting Fax Destinations1. Press the [User Tools] key.CTT1292. Press the [ ] or [ ] key to select [Address Book], and then press the [OK] key.3. Press the [ ] or [ ] key to select [Fax Speed Dial Dest.], and then press the [OK] key.4. Press the [ ] or [ ] key to select the Speed Dial number, and then press the [OK] key.5. Modify the fax number using the [ ], [ ], and number keys, and then press the [OK] key.To delete the fax destination, use the [ ] key to delete all numbers, and then press the [OK] key.Proceed to Step 7.6. Modify the fax name using the [ ], [ ], and number keys, and then press the [OK] key.7. Press the [User Tools] key to return to the initial screen.Configuring Fax Destinations Using Smart Organizing Monitor1. On the [Start] menu, click [All Programs].2. Click [Smart Organizing Monitor for SP xxx Series].3. Click [Smart Organizing Monitor for SP xxx Series Status].4. If the machine you are using is not selected, click [Select Device...], and then select themachine's model.5. Click [OK].6. On the [User Tool] tab, click [Printer Configuration].7. Click the [Fax] tab.8. To add a fax destination, specify [No.: (00 to 99)], [Destination:], and [Fax Number:],and then click [Apply] in the [Speed Dial] area.9. To modify a fax destination, select the destination in [Speed Dial Destination List:], andthen modify [Destination:] or [Fax Number:]. To apply the changes, click [Apply] in the[Speed Dial] area.Registering Fax Destinations79](https://usermanual.wiki/Ricoh/MFSP204SFN1/User-Guide-1901762-Page-81.png)
![10. To delete a fax destination, select the destination in [Speed Dial Destination List:], andthen click [Delete].11. Click [Apply] located in the lower part of the window.12. Click [OK].13. Click [Close].6. Sending and Receiving a Fax80](https://usermanual.wiki/Ricoh/MFSP204SFN1/User-Guide-1901762-Page-82.png)
![Sending a Fax• It is recommended that you call the receiver to inquire if they received the fax you send importantdocuments.A fax number can contain 0 to 9, pause, " ", and " ".If necessary, insert a pause in the fax number. The machine pauses briefly before it dials the digitsfollowing the pause. You can specify the length of the pause time in the [Pause Time] setting under faxtransmission settings.To use tone services on a pulse-dialing line, insert " " in the fax number. " " switches the dialing modefrom pulse to tone temporarily.If the machine is connected to a telephone network through a PBX, be sure to enter the outside lineaccess number specified in [PBX Access Number] before the fax number.• No separator characters or spaces can be entered before the fax number.Selecting Transmission ModeThere are two transmission modes: Memory Transmission and Immediate Transmission.Memory TransmissionIn this mode, the machine scans several originals into memory and sends them all at once. This isconvenient when you are in a hurry and want to take the document away from the machine. In thismode, you can send a fax to multiple destinations.In Memory Transmission mode, a single job can contain up to 10 pages, and the maximum of 5jobs (include PC Fax job) can be stored in the machine.Immediate TransmissionIn this mode, the machine scans the original and faxes it simultaneously, without storing it inmemory. This is convenient when you want to send an original quickly. In this mode, you can onlyspecify one destination.Sending a Fax81](https://usermanual.wiki/Ricoh/MFSP204SFN1/User-Guide-1901762-Page-83.png)
![1. Press the [User Tools] key.CTT1292. Press the [ ] or [ ] key to select [Fax Features], and then press the [OK] key.3. Press the [ ] or [ ] key to select [TX Settings], and then press the [OK] key.4. Press the [ ] or [ ] key to select [Immediate TX], and then press the [OK] key.5. Press the [ ] or [ ] key to select [Off], [On], or [Next Fax Only], and then press the [OK]key.For Memory Transmission, select [Off].For Immediate Transmission, select [On] or [Next Fax Only].6. Press the [User Tools] key to return to the initial screen.Basic Operation for Sending a Fax1. Press the [Facsimile] key.CTT1252. Place the original on the exposure glass or in the ADF.3. Enter the fax number using the number keys.If the machine is connected to a telephone network through a PBX, be sure to enter the outside lineaccess number specified in [PBX Access Number] before the fax number.6. Sending and Receiving a Fax82](https://usermanual.wiki/Ricoh/MFSP204SFN1/User-Guide-1901762-Page-84.png)
![4. Press the [Start] key.CTT131Depending on the machine's settings, you may be prompted to enter the fax number again if youmanually entered the destination fax number. If the fax numbers do not match, go back to Step 3.When you place original on the exposure glass and Memory Transmission mode is enabled,perform the following steps to scan the subsequent pages of the original.5. If you have more originals to scan, press the [1] key within 60 seconds, place the nextoriginal on the exposure glass, and then press the [OK] key. Repeat this step until alloriginals are scanned.6. When all originals have been scanned, press the [2] key to start sending the fax.• When using the exposure glass for Immediate Transmission, you can only send one page at a time.• If Memory Transmission mode is enabled, the machine's memory may become full while scanningthe originals. If this happens, the screen prompts you to cancel the transmission or to send only thepages that have been scanned successfully.Canceling a faxFollow the procedure below to cancel sending a fax.When in Memory Transmission modeIf you cancel sending a fax while the machine is scanning the original, the machine will not sendthe document.If you cancel sending a fax during transmission, the fax transmission process is canceledimmediately. In this case, an error is displayed on the other party's machine.When in Immediate Transmission modeIf you cancel sending a fax while the machine is scanning the original, the fax transmission processis canceled immediately. In this case, an error is displayed on the other party's machine.Sending a Fax83](https://usermanual.wiki/Ricoh/MFSP204SFN1/User-Guide-1901762-Page-85.png)
![1. Press the [Stop/Clear] key.CTT1302. Press the [1] key.To cancel sending a fax, press the [1] key (1: Yes). To continue sending a fax, press the [2] key (2:No).• If you cancel sending a fax while broadcasting, only the fax to the current destination is canceled.The fax will be sent to the subsequent destinations as normal.• Using [Del. TX Standby File] in [Fax Features], you can delete files waiting to be sent. Select [DeleteFile] to delete the corresponding file. Select [Delete All Files] to delete all files waiting to be sent.This will not affect the file currently being sent.Specifying the Fax DestinationOther than entering the destination fax number using the number keys, you can specify destinationsusing the following functions:• Using Speed Dial• Using the Redial function• Using the Broadcast function6. Sending and Receiving a Fax84](https://usermanual.wiki/Ricoh/MFSP204SFN1/User-Guide-1901762-Page-86.png)
![Specifying the destination using Speed Dial1. Press the [Facsimile] key.CTT1252. Place the original on the exposure glass or in the ADF.3. Press the [Speed Dial] key.CTT1274. Enter the Speed Dial number using the number keys, and then press the [OK] key.5. Press the [Start] key.CTT131When you place original on the exposure glass and Memory Transmission mode is enabled,perform the following steps to scan the subsequent pages of the original.Sending a Fax85](https://usermanual.wiki/Ricoh/MFSP204SFN1/User-Guide-1901762-Page-87.png)
![6. If you have more originals to scan, press the [1] key within 60 seconds, place the nextoriginal on the exposure glass, and then press the [OK] key. Repeat this step until alloriginals are scanned.7. When all originals have been scanned, press the [2] key to start sending the fax.Specifying the destination using the redial functionThis function saves time when you are sending to the same destination repeatedly, as you do not have toenter the destination each time.1. Press the [Facsimile] key.CTT1252. Place the original on the exposure glass or in the ADF.3. Press the [ ] or [ ] key to select [Redial], and then press the [OK] key.4. Press the [Start] key.CTT131Specifying the destination using the broadcast functionYou can send a fax to multiple destinations simultaneously.6. Sending and Receiving a Fax86](https://usermanual.wiki/Ricoh/MFSP204SFN1/User-Guide-1901762-Page-88.png)
![1. Press the [Facsimile] key.CTT1252. Place the original on the exposure glass or in the ADF.3. Add a destination by using one of the following methods:To add a Speed Dial destination1. Press the [Speed Dial] key.CTT1272. Select a destination using the number keys, and then press the [OK] key.3. Press the [OK] key.To add a manually-specified destination1. Enter the destination fax number using the number keys.2. Press the [OK] key.4. Go back to Step 3 to add further destinations.5. Press the [Start] key.Useful Sending FunctionsYou can check the status of the other party's machine easily before sending a fax by using the On HookDial function. If you have an extra telephone, you can talk and send a fax in one call.Sending a Fax87](https://usermanual.wiki/Ricoh/MFSP204SFN1/User-Guide-1901762-Page-89.png)
![Sending a fax using On Hook DialThe On Hook Dial function allows you to check the destination's status while listening to the tone from theinternal speaker. This function is useful when you want to ensure that the fax will be received.• To send faxes using the exposure glass, be sure to first remove any originals loaded in the ADF.1. Press the [Facsimile] key.CTT1252. Place the original on the exposure glass or in the ADF.3. Press the [ID Card Copy/On Hook Dial] key.CTT1264. Add a destination by using one of the following methods:To add a Speed Dial destination1. Press the [Speed Dial] key.6. Sending and Receiving a Fax88](https://usermanual.wiki/Ricoh/MFSP204SFN1/User-Guide-1901762-Page-90.png)
![CTT1272. Select a destination using the number keys, and then press the [OK] key.To add a manually-specified destination1. Enter the destination fax number using the number keys.5. If you hear a high pitched tone, press the [Start] key.CTT1316. If the original is placed on the exposure glass, press the [1] key (1: TX).Sending a fax after a conversationAn external telephone or handset allows you to send a fax after finishing your conversation, withouthaving to disconnect and redial. This function is useful when you want to ensure that the fax will bereceived.• To send faxes using the exposure glass, be sure to first remove any originals loaded in the ADF.1. Place the original.2. Pick up the handset of the external telephone.3. Specify the destination using the external telephone.4. When the other party answers, ask them to press their fax start button.Sending a Fax89](https://usermanual.wiki/Ricoh/MFSP204SFN1/User-Guide-1901762-Page-91.png)
![5. Press the [Start] key.CTT1316. If the original is placed on the exposure glass, press the [1] key (1: TX).7. Replace the handset.Specifying the Scan SettingsAdjusting image densityThere are five image density levels. The darker the density level, the darker the printout.1. Press the [Facsimile] key.CTT1252. Press the [ ] or [ ] key in the standby mode screen to select [Density], and then press the[OK] key.3. Press the [ ] or [ ] key to select the density level, and then press the [OK] key.4. Press the [ ] key to return to the initial screen.• To apply the specified setting to all jobs, not just the current one, specify [Density] in [Fax Features].6. Sending and Receiving a Fax90](https://usermanual.wiki/Ricoh/MFSP204SFN1/User-Guide-1901762-Page-92.png)
![Specifying the resolutionStandardSelect this when the original is a printed or typewritten document with normal-sized characters.DetailSelect this when the original is a document with small print.PhotoSelect this when the original contains images such as photographs or shaded drawings.1. Press the [Facsimile] key.CTT1252. Press the [ ] or [ ] key in the standby mode screen to select [Resolution], and then pressthe [OK] key.3. Press the [ ] or [ ] key to select the resolution settings, and then press the [OK] key.4. Press the [ ] key to return to the initial screen.Sending a Fax91](https://usermanual.wiki/Ricoh/MFSP204SFN1/User-Guide-1901762-Page-93.png)
![Using the Fax Function from a Computer (PCFAX)This section describes how to use the fax function of the machine from a computer.You can send a document directly from a computer through this machine to another fax machine,without printing the document.Basic Operation for Sending Faxes from a ComputerThis section describes the basic operation for sending faxes from a computer.You can select a destination from the PC FAX address book or enter a fax number manually. You cansend faxes to up to 100 destinations at one time. (However, if [Attach a Cover Sheet] on the [CoverSheet] tab is checked and [Use Address Book] in the [To:] list is selected, you can send faxes to up tofive destinations at a time.)The procedure in this section is an example based on Windows 7.• Using PC FAX, you can send up to ten pages (including the cover sheet) at a time.1. Open the file you want to send.2. On the [File] menu, click [Print...].3. Select the PC FAX driver as the printer, and then click [Print].4. Specify a destination.• To specify a destination from the PC FAX address book:You can click the [Address Book] tab and select from three previously-used address books inthe [Address Book File Path:] list. Also, you can click [Browse...] to download the addressbook (CSV file). Select a destination in the [Address List:], and then click [Set as Destination].Repeat this step to add more destinations.• To enter a fax number directly:Click the [Specify Destination] tab, and enter a fax number (up to 40 digits) in [Fax Number:],and then click [Set as Destination].Repeat this step to add more destinations.5. If you want to attach a fax cover sheet, click [Cover Sheet] tab.6. Click [Send].• For details, see the PC FAX driver help.6. Sending and Receiving a Fax92](https://usermanual.wiki/Ricoh/MFSP204SFN1/User-Guide-1901762-Page-94.png)
![• A fax number can contain 0 to 9, "P" (pause), "T" (tone), " ", and " ".• To use tone services on a pulse-dialing line, insert "T" in a fax number. "T" switches the dialingmode from pulse to tone temporarily.• To delete an entered destination, select the destination in [List of Destinations:], and then click[Delete from List].Canceling a faxYou can cancel sending a fax using either the machine's control panel or your computer, depending onthe status of the job.Canceling a fax using the computerIf the machine is shared by multiple computers, be careful not to cancel the fax of another user.1. Double-click the printer icon on the task bar of your computer.2. Select the print job you want to cancel, click the [Document] menu, and then click[Cancel].Canceling a fax using the control panelCancel the fax using the control panel.1. Press the [Facsimile] key.2. Press the [Stop/Clear] key.3. Press the [1] key.To cancel sending a fax, press the [1] key (1: Yes). To continue sending a fax, press the [2]key (2: No).Configuring Transmission SettingsThis section describes how to configure transmission settings in the PC FAX driver's properties.Properties are set separately for each application.1. On the [File] menu, click [Print...].2. Select the PC Fax driver as the printer, and then click a button such as [Preferences].PC FAX driver properties dialog box appears.3. Configure settings as necessary, and then click [OK].Using the Fax Function from a Computer (PC FAX)93](https://usermanual.wiki/Ricoh/MFSP204SFN1/User-Guide-1901762-Page-95.png)
![Configuring the PC FAX Address BookThis section describes the PC FAX address book. Configure the PC FAX address book on the computer.The PC FAX address book allows you to specify PC FAX destinations quickly and easily.The PC FAX address book can contain up to 100 entries, including individual destinations and groups ofdestinations.Opening the PC FAX address bookThis section describes how to open the PC FAX address book.1. On the [Start] menu, click [Devices and Printers].2. Right-click the PC FAX driver icon, and then click [Printing Preferences...].3. Click [Edit Address Book...].Registering destinationsThis section describes how to register destinations in the PC FAX address book.1. Open the PC FAX address book.2. Enter the destination information.You must enter a contact name and fax number.3. Click [Add].The destination is added to the destination list.To change the registered information, select the destination you want to change, and then changethe information. After this, click [Update].4. Click [OK].5. If you make changes to a destination, a confirmation message appears. To save thechanges, click [Yes].Registering groupsThis section describes how to register groups of destinations.A group can contain up to 100 individual destinations.1. Open the PC FAX address book.2. Click [Edit Group...].3. Click [New...].6. Sending and Receiving a Fax94](https://usermanual.wiki/Ricoh/MFSP204SFN1/User-Guide-1901762-Page-96.png)
![4. Enter the group name, and then click [OK].Select the destination you want to include in the group from the [Address List:] area, and then click[Add to Group].To delete a destination from a group, select the destination you want to delete from [GroupMembers List:], and then click [Delete Member].5. Click [OK].6. Click [OK].7. If you make changes to a destination, a confirmation message appears. To save thechanges, click [Yes].Editing a Fax Cover SheetThis section describes how to edit a fax cover sheet in the PC FAX driver's properties.1. On the [File] menu, click [Print...].2. Select the PC FAX driver as the printer, and then click [Print].3. Click [Cover Sheet] tab.4. Configure settings as necessary.Using the Fax Function from a Computer (PC FAX)95](https://usermanual.wiki/Ricoh/MFSP204SFN1/User-Guide-1901762-Page-97.png)
![1. Press the [User Tools] key.CTT1292. Press the [ ] or [ ] keys to select [Fax Features], and then press the [OK] key.3. Press the [ ] or [ ] keys to select [RX Settings], and then press the [OK] key.4. Press the [ ] or [ ] keys to select [Switch RX Mode], and then press the [OK] key.5. Press the [ ] or [ ] keys to select the reception mode, and then press the [OK] key.6. Press the [User Tools] key to return to the initial screen.Receiving a fax in Manual mode• To receive faxes, be sure to first remove any originals loaded in the ADF.1. Pick up the handset of the external telephone to answer the call.2. When you hear a fax calling tone or no sound, switch to fax mode using the [Facsimile]key, and then press the [Start] key.CTT1313. Press the [3] key.To receive a fax, press the [3] key. (3: RX)4. Replace the handset.Receiving a Fax97](https://usermanual.wiki/Ricoh/MFSP204SFN1/User-Guide-1901762-Page-99.png)
![Receiving a fax in Auto modeWhen the reception mode is set to Auto mode, the machine automatically answers all incoming calls infax reception mode.• You can specify the number of times the machine rings before answering a call in the [Number ofRings] setting under [Fax Features].• You can answer the call before the machine switches to the fax reception mode by picking up theexternal phone's handset while the phone is ringing. If you hear a fax calling tone or no sound,receive the fax manually.6. Sending and Receiving a Fax98](https://usermanual.wiki/Ricoh/MFSP204SFN1/User-Guide-1901762-Page-100.png)
![7. Configuring the Machine Using theControl PanelBasic Operation• Type 1 models do not have [Scanner Features] and [Network Settings].• Type 3 models do not have [Fax Features] and [Address Book].• With certain models, some settings do not appear.1. If you want to configure the machine's system settings, press the [User Tools] key.CTT1292. Press the [ ] or [ ] key to select the settings you want to use.The machine’s default settings are grouped into the following eight categories:• [System Settings], [Printer Features], [Copier Features], [Fax Features], [Address Book], [PrintList/Report], [Scanner Features], [Network Settings]3. To confirm setting items and values displayed, press the [OK] key.4. To go back to the previous item, press the [ ] key.• To return to the initial screen, press the [ ] key the same amount of times as the number of selecteditems, or press the [User Tools] key once.101](https://usermanual.wiki/Ricoh/MFSP204SFN1/User-Guide-1901762-Page-103.png)
![Copier Features SettingsSortConfigures the machine to sort the output pages into sets when making multiple copies of a multi-page document (P1, P2, P1, P2...).Default: [Off]• On• OffOriginal TypeSpecifies the original type to optimize the copy quality.Default: [Text/Photo]• TextSelect this when the original contains only text and no photographs or images.• PhotoSelect this when the original contains photographs or images. Use this mode for the followingtypes of original:• Photographs• Pages that are entirely or mainly composed of photographs or images, such asmagazine pages.• Text/PhotoSelect this when the original contains both text and photographs or images.DensitySpecifies the image density for photocopying.Default: • (Lightest)•••• (Darkest)Reduce/EnlargeSpecifies the percentage by which copies are enlarged or reduced.Default: [100%] (mainly Europe and Asia)7. Configuring the Machine Using the Control Panel102](https://usermanual.wiki/Ricoh/MFSP204SFN1/User-Guide-1901762-Page-104.png)
![50%, 71% A4 A5, 82% B5 JIS A5, 93%, 122% A5 B5 JIS, 141% A5 A4, 200%,Zoom: 25-400% (mainly North America)50%, 65% LT HLT, 78% LG LT, 93%, 129% HLT LT, 155% HLT LG, 200%, Zoom:25-400%CombineSelect this to photocopy two or four pages of an original onto a single sheet of paper.Default: [Off]• Off• 2 on 1• Portrait• Landscape• 4 on 1• Portrait: L to R• Portrait: T to B• Landscape: L to R• Landscape: T to BFor details, see page 52 "Combining Multiple Pages".2 Sided CopySets the machine to make 2-sided copies by copying single-sided documents onto the front andback sides of each sheet.Default: [Off]• Off• Top to Top• Portrait• Landscape• Top to Bottom• Portrait• LandscapeFor details, see page 58 "Making 2-sided Copies".Toner SavingReduces toner consumption when printing. When this setting is enabled, print quality may bedegraded.Default: [Off]Copier Features Settings103](https://usermanual.wiki/Ricoh/MFSP204SFN1/User-Guide-1901762-Page-105.png)
![• Off• OnBypass Ppr SettingsPaper SizeSpecifies the paper size.Default: (mainly Europe and Asia)[A4] (mainly North America)[LT (81/2 × 11)]• A4, B5 JIS, A5, B6 JIS, A6, LG (81/2 × 14), LT (81/2 × 11), HLT (51/2 × 81/2), EXE(71/4 × 101/2), 16K (197 × 273mm), 16K (195 × 270mm), 16K (184 × 260mm),CustomPaper TypeSpecifies the paper type.Default: [Plain Paper]• Plain Paper, Recycled Paper, Thick Paper, Thin Paper7. Configuring the Machine Using the Control Panel104](https://usermanual.wiki/Ricoh/MFSP204SFN1/User-Guide-1901762-Page-106.png)
![Fax Features SettingsTX SettingsImmediate TXSets the machine to send a fax immediately when the original is scanned.Default: [Off]• OffSelect this when using Memory Transmission.• OnSelect this when using Immediate Transmission.• Next Fax OnlySelect this when using Immediate Transmission for the next transmission only.ResolutionSpecifies the resolution to use for scanning originals.Default: [Standard]• StandardSelect this when the original is a printed or typewritten document with normal-sizedcharacters.• DetailSelect this when the original is a document with small print.• PhotoSelect this when the original contains images such as photographs or shaded drawings.DensitySpecifies the image density to use for scanning originals.[Erase Background] is not available, when [Resolution] is set to [Photo].Default: [Erase Background]• (Lightest)•••• (Darkest)• Erase BackgroundFax Features Settings105](https://usermanual.wiki/Ricoh/MFSP204SFN1/User-Guide-1901762-Page-107.png)
![Pause TimeSpecifies the length of pause time when a pause is inserted between the digits of a faxnumber.Default: 3 seconds• 1 to 15 seconds, in 1 second incrementsAuto RedialSets the machine to redial the fax destination automatically when the line is busy or atransmission error occurs.Default: [On]• Off• OnPrint Fax HeaderSets the machine to add a header to every fax you send. The header includes the current dateand time, user fax name and number, Session number, and page information.Default: [On]• Off• OnRX SettingsSwitch RX ModeSpecifies the reception mode.Default: [Auto]• AutoThe machine automatically answers all incoming calls in fax reception mode.• ManualThe machine rings when it receives incoming calls. The machine receives faxes onlywhen you manually operate the machine to receive faxes.Auto ReductionSets the machine to reduce the size of a received fax if it is too large to print on a single sheetof paper.Note that the machine only reduces the size down to maximum by 74%. If further reduction isrequired to fit the fax on a single sheet, it will be printed on separate sheets without beingreduced.Default: [On]• Off• On7. Configuring the Machine Using the Control Panel106](https://usermanual.wiki/Ricoh/MFSP204SFN1/User-Guide-1901762-Page-108.png)
![Number of RingsSpecifies how many times the external telephone or handset must rings before the machinestarts to receive a fax when [Switch RX Mode] is set to [Auto].Default: 3 times• 3 to 5 times, in increments of 1If you have set [Country Code] to [Japan], you can specify it from 1 to 5 times. The default is1 times.Add FooterSets the machine to add a footer to every fax you receive.Default: [On]• Off• OnDel. TX Standby FileDeletes unsent fax jobs remaining in the machine's memory.This function is only performed when selected.• Delete FileTo delete a fax job, select the job you want to delete.• Delete All FilesTo delete all fax jobs.Comm. SettingsECM TransmissionSets the machine to automatically resend parts of the data that are lost during transmission.Default: [On]• Off• OnECM ReceptionSets the machine to automatically receive parts of the data that are lost during reception.Default: [On]• Off• OnDial Tone DetectSets the machine to automatically detect a dial tone before dialing the destination.• Detect• Do not DetectFax Features Settings107](https://usermanual.wiki/Ricoh/MFSP204SFN1/User-Guide-1901762-Page-109.png)
![The default depends on the [Country Code] setting.Transmission SpeedSpecifies the transmission speed for the fax modem.Default: [33.6 Kbps]• 33.6 Kbps• 14.4 Kbps• 9.6 Kbps• 7.2 Kbps• 4.8 Kbps• 2.4 KbpsReception SpeedSpecifies the reception speed for the fax modem.Default: [33.6 Kbps]• 33.6 Kbps• 14.4 Kbps• 9.6 Kbps• 7.2 Kbps• 4.8 Kbps• 2.4 KbpsDial/Push PhoneSpecifies the line type of the telephone line.To configure this setting, contact your telephone company and select the setting based onyour telephone line. Selecting the wrong setting may result in transmission errors.If you have set [Country Code] to [Australia], [New Zealand] or [Singapore], [Dial/PushPhone] does not appear because the default is [Push Phone].Default: [Push Phone]• Push Phone• Dial Phone (10PPS)• Dial Phone (20PPS)[Dial Phone (20PPS)] appears only if [Country Code] is set to [Japan] or [Thailand].PSTN / PBXSets the machine to connect to a public switched telephone network (PSTN) or a privatebranch exchange (PBX).Default: [PSTN]7. Configuring the Machine Using the Control Panel108](https://usermanual.wiki/Ricoh/MFSP204SFN1/User-Guide-1901762-Page-110.png)
![• PSTN• PBXPBX Access NumberSpecifies the dial number to access the external line when the machine is connected to a PBX.Make sure that this setting matches your PBX settings. Otherwise, you may not be able to sendfaxes to external destinations.Default: 9• 0 to 999Fax No. ConfirmationIf this setting is enabled, when trying to send a fax by manually entering a fax number, theuser will be prompted to re-enter the number for confirmation. If the numbers do not match,the fax cannot be sent.Default: [Off]• Off• OnReport Print Set.TX Status ReportSets the machine to print a transmission report automatically after a fax transmission.Default: [Error: With Image]• Error OnlyPrints a report when a transmission error occurs.• Error: With ImagePrints a report with an image of the original when transmission error occurs.• Every TXPrints a report for every fax transmission.• EveryTX: With ImagePrints a report with an image of the original for every fax transmission.• Do not PrintFax JournalSets the machine to print a fax journal automatically for every 100 fax jobs (both sent andreceived).Default: [Auto Print]• Auto Print• Do not Auto PrintFax Features Settings109](https://usermanual.wiki/Ricoh/MFSP204SFN1/User-Guide-1901762-Page-111.png)
![PC FAX Error ReportSets the machine to print PC FAX error reports automatically.Default: [Auto Print]• Auto Print• Do not Auto Print7. Configuring the Machine Using the Control Panel110](https://usermanual.wiki/Ricoh/MFSP204SFN1/User-Guide-1901762-Page-112.png)
![Scanner Features SettingsScanning ModeSelect a scan type for the original. This setting is only applied to Scan to USB.Default: [Color : Text/Photo]• B&W : Text• B&W : Text/Photo• B&W : Photo• Gray Scale• Color : Text/PhotoResolutionSpecifies the resolution for scanning the original. This setting is only applied to Scan to USB.Default: [300 × 300dpi]• 150 × 150dpi• 300 × 300dpi• 600 × 600dpiOriginal SizeSpecifies the scanning size according to the size of the original. This setting is only applied to Scanto USB.Default: (mainly Europe and Asia)[A4] (mainly North America)[LT (81/2 × 11)]• A4, B5 JIS, A5, A6, LG (81/2 × 14), LT (81/2 × 11), HLT (51/2 × 81/2), EXE (71/4 ×101/2), CustomDensitySpecifies the image density for scanning originals. This setting is only applied to Scan to USB.Default: • (Lightest)•••• (Darkest)Scanner Features Settings111](https://usermanual.wiki/Ricoh/MFSP204SFN1/User-Guide-1901762-Page-113.png)
![File FormatSetting File format for B&W and Grayscale/ Color. This setting is only applied to Scan to USB.• B&WDefault: [Multi-page: TIFF]• Single Page: TIFF• Single Page: PDF• Multi-page: TIFF• Multi-page: PDF• Gray Scale/ ColorDefault: [Multi-page: PDF]• Single Page: TIFF• Single Page: JPEG• Multi-page: PDFIf [File Format] is set to [Multi-page: TIFF] or [Multi-page: PDF], [Divide & Send Email] will remain[Off] even if you set it to [On (per page)].CompressionYou can select the data compression method from [MH], [MR], or [MMR].Default: [MH]• MH• MR• MMRMaximum Email SizeSpecifies the maximum size of a file that can be sent by e-mail.Default: [No Limit]• 1 MB• 2 MB• 3 MB• 4 MB• 5 MB• No LimitDivide & Send EmailSelect whether or not an image exceeding the size specified in [Maximum Email Size] should bedivided and sent using more than one e-mail.Default: [Off]7. Configuring the Machine Using the Control Panel112](https://usermanual.wiki/Ricoh/MFSP204SFN1/User-Guide-1901762-Page-114.png)
![System SettingsTray 1 Ppr SettingsPaper SizeSpecifies the paper size.Default: (mainly Europe and Asia)[A4] (mainly North America)[LT (81/2 × 11)]• A4, B5 JIS, A5, B6 JIS, A6, LG (81/2 × 14),LT (81/2 × 11), HLT (51/2 × 8 1/2), EXE(71/4 × 101/2), 16K (197 × 273mm), 16K (195 × 270mm), 16K (184 × 260mm),CustomPaper TypeSpecifies the paper type.Default: [Plain Paper]• Plain Paper, Recycled Paper, Thick Paper, Thin PaperAdjust Sound VolumeSpecifies the volume of the sounds produced by the machine.Select the setting for each item from [Off], [Low], [Middle], or [High].Panel Key SoundSpecifies the volume of the beep sound when a key is pressed.Default: [Middle]Alarm VolumeSpecifies the volume of the alarm sound when an operation error occurs.Default: [Middle]On Hook ModeSpecifies the volume of the sound from the speaker during On Hook mode.Default: [Middle]Copy Job End ToneSpecifies the volume of the beep sound when a copy job is complete.Default: [Off]Copy Job Error ToneSpecifies the volume of the beep sound when a copy job error occurs.System Settings115](https://usermanual.wiki/Ricoh/MFSP204SFN1/User-Guide-1901762-Page-117.png)
![Default: [Middle]Print Job End ToneSpecifies the volume of the beep sound when a print job is complete.Default: [Off]Print Job Error ToneSpecifies the volume of the beep sound when a print job error occurs.Default: [Middle]Scan Job End ToneSpecifies the volume of the beep sound when a scan job is complete.Default: [Off]Scan Job Error ToneSpecifies the volume of the beep sound when a scan job error occurs.Default: [Middle]Fax TX End ToneSpecifies the volume of the beep sound when a fax transmission is complete.Default: [Middle]Fax TX Error ToneSpecifies the volume of the beep sound when a fax transmission error occurs.Default: [Middle]Fax RX End ToneSpecifies the volume of the beep sound when a fax reception is complete.Default: [Middle]Fax RX Error ToneSpecifies the volume of the beep sound when a fax reception error occurs.Default: [Middle]Set Date/TimeSet DateSets the date of the machine’s internal clock.• Year: 2000 to 2099• Month: 1 to 12• Day: 1 to 31• Date Format: YYYY/MM/DD, MM/DD/YYYY, or DD/MM/YYYY7. Configuring the Machine Using the Control Panel116](https://usermanual.wiki/Ricoh/MFSP204SFN1/User-Guide-1901762-Page-118.png)
![Set TimeSets the time of the machine’s internal clock.• Time format: 12-hour Format, 24-hour Format• AM/PM stamp: AM, PM (for 12-hour Format)• Hour: 0 to 23 (for 24-hour Format), or 1 to 12 (for 12-hour Format)• Minute: 0 to 59Program Fax Info.Specifies the user information for sending a fax.• Own Fax NumberSpecifies the fax number of the machine using up to 20 characters, including 0 to 9, space,and "+".• Own NameSpecifies the name of the machine using up to 20 characters.Function PrioritySpecifies the mode that is activated when the power is turned on.Default: [Facsimile]• Copier• Facsimile• Scanner[Copier] is the default for Type 3 models.Energy Saver ModeSets the machine to enter Energy Saver Mode, Energy Saver Mode 1 or Energy Saver Mode 2, toreduce power consumption. The machine recovers from Energy Saver Mode when it receives aprint job, prints a received fax, receives TWAIN scan directions from the computer, or when anykey is pressed.Energy Saver Mode 1The machine enters Energy Saver Mode 1 if the machine has been idle for about 30 seconds.It takes less time to recover from Energy Saver Mode 1 than from power-off state or EnergySaver Mode 2, but power consumption is higher in Energy Saver Mode 1 than in EnergySaver Mode 2.Default: [Off]• Off• OnSystem Settings117](https://usermanual.wiki/Ricoh/MFSP204SFN1/User-Guide-1901762-Page-119.png)
![Energy Saver Mode 2The machine enters Energy Saver Mode 2 after the period of time specified for this setting haspassed. The machine consumes less power in Energy Saver Mode 2 than in Energy SaverMode 1, but it takes longer to recover from Energy Saver Mode 2 than from Energy SaverMode 1.Default: [On] (1 minute)• On (1 to 240 minutes, in 1 minute increments)• OffLanguageSpecifies the language used on the screen and in reports.Default: [English]• English, German, French, Italian, Spanish, Dutch, Swedish, Norwegian, Danish, Finnish,Portuguese, Czech, Hungarian, Polish, Russian, Portuguese (BR), TurkishCountry CodeSelects the country in which the machine is used. The country code you specify determines the timeand date display format and the default values of the fax transmission-related settings.Make sure to select the country code correctly. Selecting a wrong country code may cause failuresin fax transmissions.Default: [USA]Fixed USB PortSpecifies whether the same driver can be used for multiple machines or not under USB connection.Default: [Off]• OnThe same driver you have installed on your computer can be used with any machine otherthan the one originally used for installation as long as the machine is the same model.• OffYou must install the driver separately for individual machines, because a machine that is notthe original will be recognized as a new device upon USB connection.Print CartridgeDisplays information about consumables. This information is displayed only if [Toner End Option]has been set to [Stop Printing].• (New)•••7. Configuring the Machine Using the Control Panel118](https://usermanual.wiki/Ricoh/MFSP204SFN1/User-Guide-1901762-Page-120.png)
![•• (Needs replacing)If [Toner End Option] is set to [Continue Printing], "**" is displayed instead of the indicator above.Low Humidity ModeWhen the machine is used in a low humidity environment, black stripes with a few millimeters widthmay appear. Selecting [On] should prevent such black stripes from appearing.Default: [Off]• On• OffRegistrationAdjusts the position of the input tray. Adjust the value by using the [ ] or [ ] key.To check the registration, print a test page.Tray 1Adjusts the position of Tray 1.Default: [0]• Horizontal (-6 to +6 mm, in 1 mm increments)• Vertical (-6 to +6 mm, in 1 mm increments)Bypass TrayAdjusts the position of the bypass tray.Default: [0]• Horizontal (-6 to +6 mm, in 1 mm increments)• Vertical (-6 to +6 mm, in 1 mm increments)Adjust Image DensityAdjusts the density of printing.Default: • (Lightest)•••••• (Darkest)System Settings119](https://usermanual.wiki/Ricoh/MFSP204SFN1/User-Guide-1901762-Page-121.png)
![Toner End OptionThis setting is used to monitor the toner level.Default: [Stop Printing]• Stop PrintingMonitoring the toner level is enabled. The remaining toner level can be checked in the controlpanel and on the Smart Organizing Monitor.• Continue PrintingThe machine no longer monitors the toner level. Even when the toner runs out, printing willcontinue and no messages will be displayed.• [Continue Printing] is the default for Type 3 models.• For details about print cartridge and toner, see page 177 "Notes About the Toner".Reset Settings• Reset All SettingsResets all settings to the factory default, except for the language, date and time, and faxSpeed Dialing settings.• Clear Address BookDeletes all fax speed dial entries.7. Configuring the Machine Using the Control Panel120](https://usermanual.wiki/Ricoh/MFSP204SFN1/User-Guide-1901762-Page-122.png)
![Printing Lists/ReportsPrinting the Configuration Page1. Press the [User Tools] key.CTT1292. Press the [ ] or [ ] key to select [Print List/Report], and then press the [OK] key.3. Press the [ ] or [ ] key to select types of report, and then press the [OK] key.Types of Report• Reports other than the test page are printed using the paper loaded in Tray 1. The test page can beprinted using the paper loaded in the bypass tray.• When printing the test page, set the paper size to A4 or Letter. When printing other reports, set thepaper size to A4, Letter, or Legal.Configuration PagePrints the machine’s general information and current configuration.Test PageChecks the results of print position adjustment.Fax JournalPrints a fax transmission and reception journal for the last 100 jobs.TX Status ReportPrints the latest transmission report.TX Standby File ListPrints a list of unsent fax jobs remaining in the machine's memory.Printing Lists/Reports121](https://usermanual.wiki/Ricoh/MFSP204SFN1/User-Guide-1901762-Page-123.png)
![Printer Features SettingsI/O TimeoutTimeout: USBSpecifies how many seconds the machine waits for print data if the data is interrupted whilebeing sent from the computer via USB. If the machine does not receive any data within thespecified time, the machine only prints the data it has received.Default: [60 sec.]• Off• 15 sec.• 60 sec.• 300 sec.Auto ContinueSets the machine to ignore errors on paper size or type and continue printing. The printing stopstemporarily if an error is detected, and resumes automatically after the specified time, dependingon the settings specified in the control panel.Default: [0 sec.]• Off• 0 sec.• 10 sec.• 30 sec.Sub Paper SizeSets the machine to print onto paper of another size if the specified paper is not loaded in the tray.Alternative sizes are preset to A4 and Letter.Default: [On]• On• OffPrinter Features Settings123](https://usermanual.wiki/Ricoh/MFSP204SFN1/User-Guide-1901762-Page-125.png)
![Network SettingsMachine IPv4 Address• DHCP ActivatedSets the machine to receive its IPv4 address, subnet mask, and default gateway addressautomatically from a DHCP server.When DHCP is used, you cannot specify the IPv4 address, subnet mask, or default gatewayaddress manually.Default: [On]• On• Off• IP AddressSpecifies the machine's IPv4 address when DHCP is not used.Use this menu to check the current IP address when DHCP is used.Default: 192.0.0.192• Subnet MaskSpecifies the machine's subnet mask when DHCP is not used.Use this menu to check the current subnet mask when DHCP is used.Default: 255.255.255.0• Gateway AddressSpecifies the machine's default gateway address when DHCP is not used.Use this menu to check the current default gateway address when DHCP is used.Default: 192.0.0.192Machine IPv6 Address• Use IPv6Select whether to enable or disable IPv6.Default: [Off]• On• Off• Link-local AddressDisplays the IPv6 link local address.• Stateless Address 0-4Displays the IPv6 stateless addresses obtained from a Router Advertisement.• Stateful Address7. Configuring the Machine Using the Control Panel124](https://usermanual.wiki/Ricoh/MFSP204SFN1/User-Guide-1901762-Page-126.png)
![132CTT1351. Menu areaIf you select a menu item, its content will be shown.2. Header areaThe dialog box for switching to the user mode and administrator mode appears, and each mode's menuwill be displayed.Click [Refresh] button at the upper right in the work area to update the machine information. Click theWeb browser's [Refresh] button to refresh the entire browser screen.3. Basic Information areaDisplays the basic information about of the machine.• If you use an older version of a supported Web browser or the Web browser has JavaScript andcookies disabled, display and operation problems may occur.• If you are using a proxy server, configure the Web browser settings as necessary.• The previous page may not appear even if the back button of the Web browser is clicked. If thishappens, click the refresh button of the Web browser.Changing the Interface LanguageSelect the display language you want use, and then click [Switch].MenuThis section explains the items in the Web browser menu.Guest ModeIn the guest mode, machine status, and settings can be viewed, but the machine settings cannot bechanged.8. Configuring the Machine Using Utilities128](https://usermanual.wiki/Ricoh/MFSP204SFN1/User-Guide-1901762-Page-130.png)
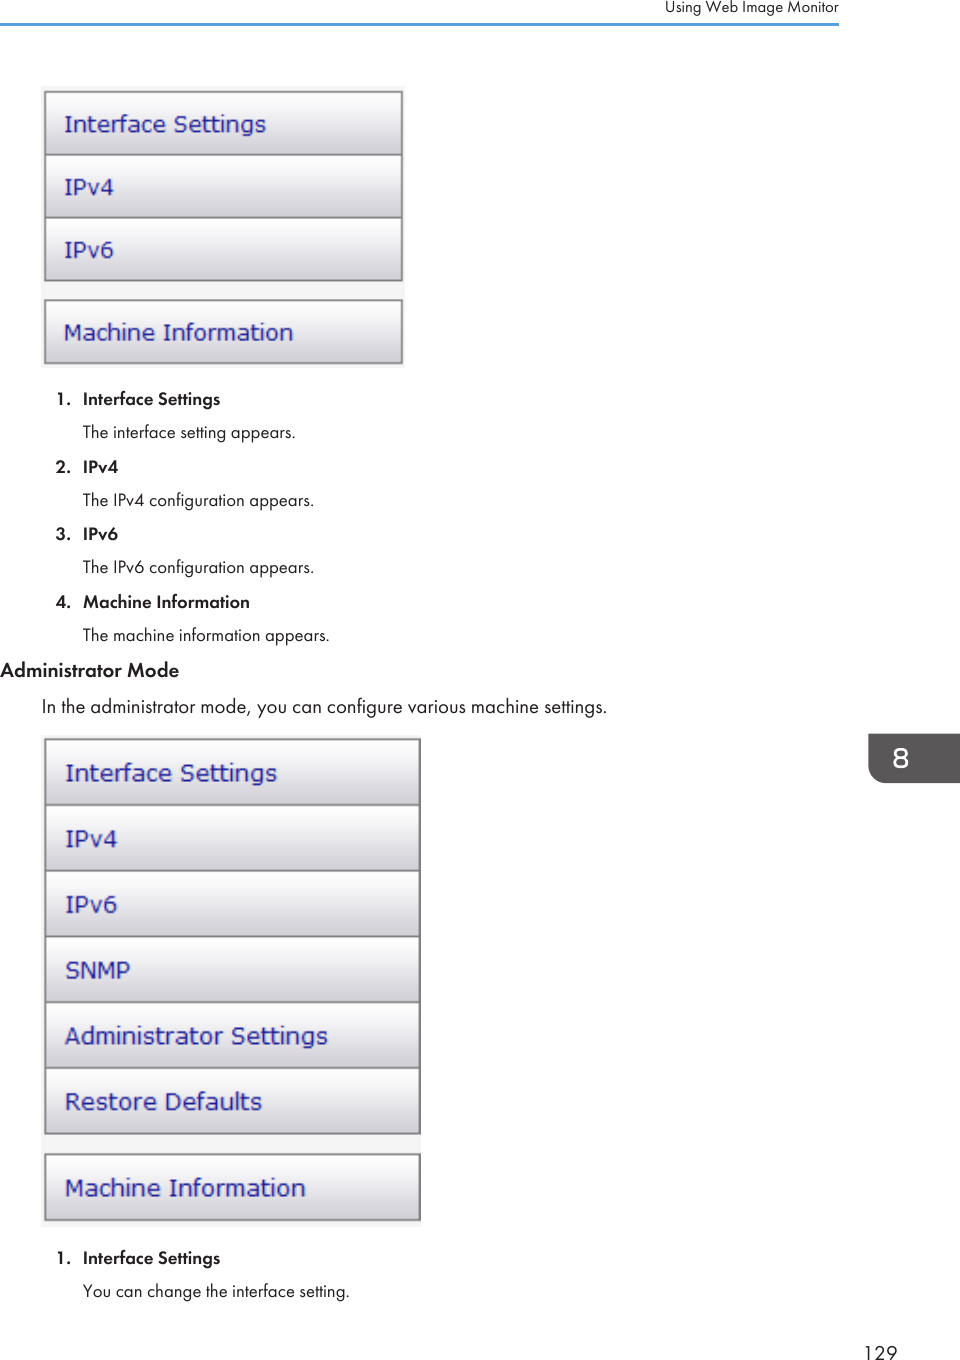
![2. IPv4You can change the IPv4.3. IPv6You can change the IPv6.4. SNMPYou can change the SNMP.5. Administrator SettingsYou can change the administrator password.6. Restore DefaultsYou can reset the administrator password and other network settings.7. Machine InformationThe machine information appears.Changing the Machine SettingsTo change the machine settings, log in to the machine as the administrator.• The control panel cannot be used during log in.1. Launch the Web browser.2. In the address bar, enter "http://(machine's IP address)/".3. Click [Log in].4. Enter the administrator password, and then click [Log in].If you are logging in for the first time, enter "admin133" as the password.5. In the menu area, select the setting you wish to specify.6. Specify the machine settings.7. Click [OK].The specified settings are transmitted to the machine.Settings ListThis section explains the Web Image Monitor settings.8. Configuring the Machine Using Utilities130](https://usermanual.wiki/Ricoh/MFSP204SFN1/User-Guide-1901762-Page-132.png)
![Checking the System InformationOn the top page, you can check the current system information such as the device information, papertray status, toner status, and total counter.Item DescriptionStatus Displays the icon indicating the device status.Toner Displays the remaining toner level.Total Counter Displays the total counter.Paper Displays the size and type of paper loaded in Tray 1 and the bypass tray.Configuring the Interface SettingsClick [Interface Settings] to display the page for configuring the interface settings.Item DescriptionNetwork Displays Ethernet operation status.MAC Address Displays the MAC address (Media Access Control Address) of the networkinterface board.Using Web Image Monitor131](https://usermanual.wiki/Ricoh/MFSP204SFN1/User-Guide-1901762-Page-133.png)
![Item DescriptionI/O timeout(Network)Select whether or not to apply a timeout limit if the machine takes longer than aspecified time to process a job.Ethernet Speed Ethernet communication speed. For normal use, select Auto Select. This allowsthe device to select the optimum speed.If communication with the device fails, select 10Mbps Full Duplex, 10MbpsHalf Duplex, 100Mbps Full Duplex, or 100Mbps Half Duplex.Configuring the IPv4 settingsClick [IPv4] to display the page for configuring the IPv4 settings.IPv4Item DescriptionIPv4 Indicates that IPv4 is enabled.EthernetItem DescriptionHost Name Enter the host name you want to set for the network interface board, using up to63 characters. The default is RNP, followed by the MAC address of the activeinterface board. If you change the name to other than the default, the new namecannot begin with "RNP" or "rnp".DHCP Select [Enable] to automatically configure the network settings using the DHCPserver. Select [Disable] to manually configure the network settings.8. Configuring the Machine Using Utilities132](https://usermanual.wiki/Ricoh/MFSP204SFN1/User-Guide-1901762-Page-134.png)
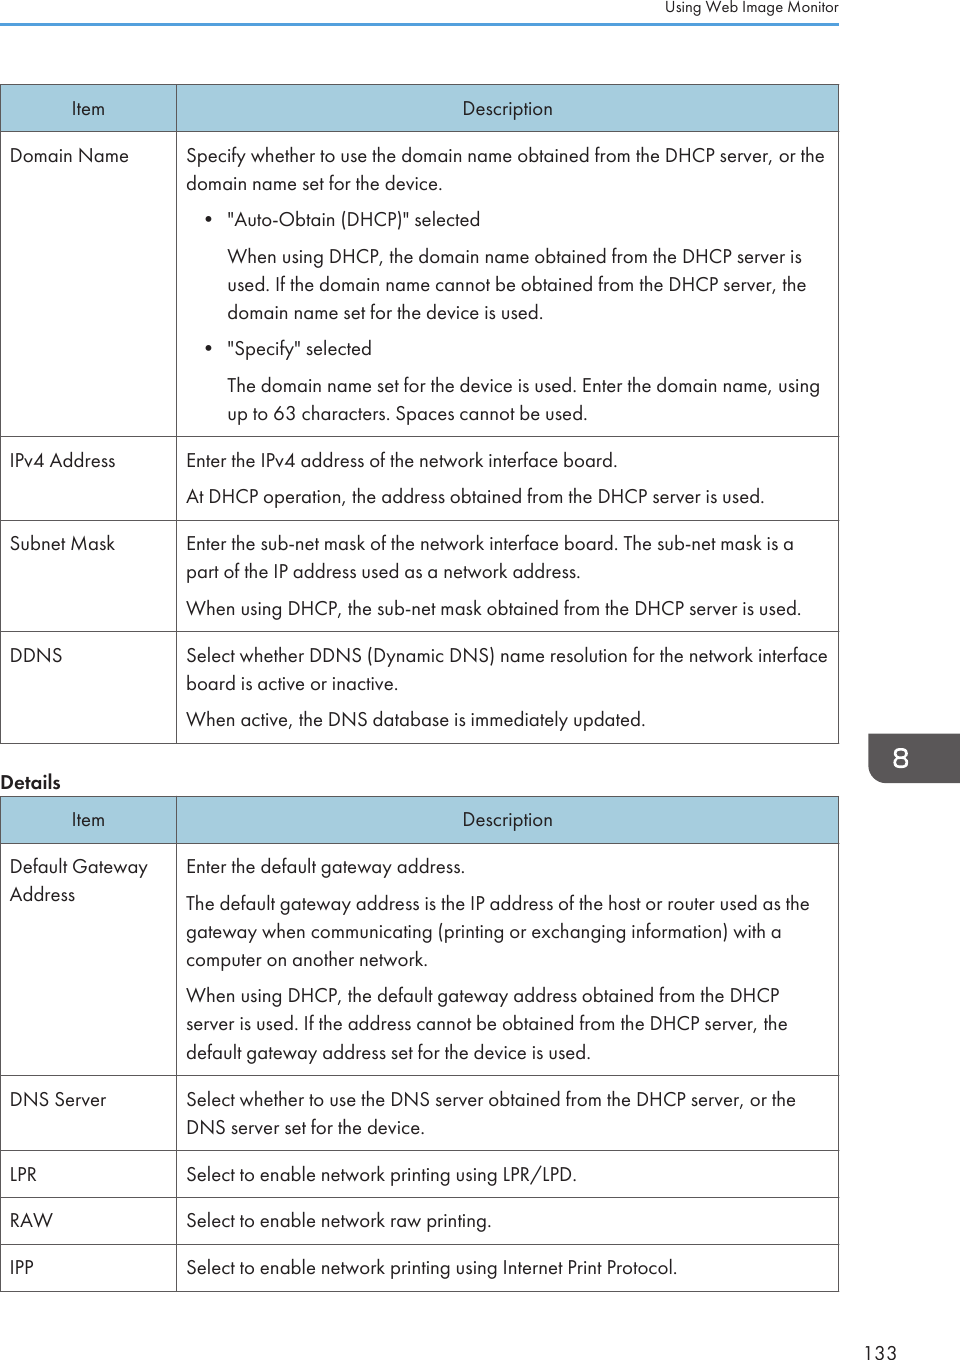
![Configuring the IPv6 settingsClick [IPv6] to display the page for configuring the IPv6 settings.IPv6Item DescriptionIPv6 Select whether IPv6 is active or inactive.EthernetItem DescriptionHost Name Enter the host name you want to set for the network interface board, using up to63 characters. The default is RNP, followed by the MAC address of the activeinterface board. If you change the name to other than the default, the new namecannot begin with "RNP" or "rnp".Domain Name Enter the name of the domain to which the device belongs, using up to 63alphanumeric characters.Link-local Address Displays the link-local address of the network interface board.The link-local address applies only within the local network (local segment) andbegins with "fe80::", followed by an identifier generated from the MAC addressof the active interface board.Stateless Address Displays the stateless address for router.ManualConfigurationAddressIn the left box, enter the IPv6 address assigned for the network interface board.In the right box, enter the prefix length of the IPv6 address, using a valuebetween 0 and 128. The default is 64.• The following addresses cannot be set:Link-local addresses, multicast addresses, loopback addresses, IPv4-compatible addresses, and IPv4-mapped addresses8. Configuring the Machine Using Utilities134](https://usermanual.wiki/Ricoh/MFSP204SFN1/User-Guide-1901762-Page-136.png)
![Item DescriptionDHCPv6 Select [Enable] to use the DHCPv6 server to automatically configure thenetwork settings. Select [Disable] to manually configure the network settings.DDNS Select whether DDNS (Dynamic DNS) name resolution for the network interfaceboard is active or inactive.When active, the DNS database is immediately updated.DetailsItem DescriptionDefault GatewayAddressEnter the default gateway address.The default gateway address is the IP address of the host or router used as thegateway when communicating (printing or exchanging information) with acomputer on another network.When using DHCP, the default gateway address obtained from the DHCPserver is used. If the address cannot be obtained from the DHCP server, thedefault gateway address set for the device is used.DNS Server Select whether to use the DNS server obtained from the DHCP server, or theDNS server set for the device.DHCPv6 Mode Select an operation mode for DHCPv6.• DHCPv6Operates in DHCPv6 mode.Obtains the IPv6 address and other parameters.• DHCPv6-liteOperates in DHCPv6-lite mode.Obtains parameters except the IPv6 address.IAID IAID is ID to identity IPv6 address and it is needed for acquiring reserved IPv6address.LPR Select to enable network printing using LPR/LPD.RAW Select to enable network raw printing.IPP Select to enable network printing using Internet Print Protocol.Using Web Image Monitor135](https://usermanual.wiki/Ricoh/MFSP204SFN1/User-Guide-1901762-Page-137.png)
![Configuring the SNMP SettingsClick [SNMP] to display the page for configuring the SNMP settings.SNMPItem DescriptionSNMP Select whether SNMP is active or inactive for the interface board(s).SNMPv1,v2 SettingItem DescriptionSNMPv1 TrapCommunicationSelect whether to send SNMPv1 trap.SNMPv2 TrapCommunicationSelect whether to send SNMPv2 trap.CommunityItem DescriptionCommunity Name Enter the name of the community to which the network interface board belongs,using up to 15 characters. If the community name is different from that of thehosts, requests from the hosts will not be accepted.8. Configuring the Machine Using Utilities136](https://usermanual.wiki/Ricoh/MFSP204SFN1/User-Guide-1901762-Page-138.png)
![Item DescriptionAccess Type In the list, select the access rights to the community.• Not AccessibleNo access permitted.• read-onlyYou can read the information, but not edit it.• read-writeYou can read and edit the information.• trapNotifies the manager with information about errors. Enter the recipient ofthe error notification in the Manager Address box.Protocol, Active/InactiveConfigure settings for each protocol used by the community.Manager Address Enter the host computer's address according to the protocol in use.Configuring the Administrator PasswordClick [Administrator Settings] to specify the administrator password.Administrator SettingsItem DescriptionCurrent Password Enter the current administrator password. The default is "admin133".New Password Enter the new administrator password. You can enter it using three to eightcharacters.Confirm Password Enter the same password again, to confirm.Using Web Image Monitor137](https://usermanual.wiki/Ricoh/MFSP204SFN1/User-Guide-1901762-Page-139.png)
![Resetting the Machine’s SettingsClick [Restore Defaults] to reset the network settings and administrator password.Checking the Machine InformationClick [Machine Information] to display machine information.Machine InformationItem DescriptionFirmware Version Displays the version of firmware installed on the machine.Engine FW Version Displays the version of the firmware for the machine engine.Machine ID Displays the serial number of the machine.Total Memory Displays the total memory installed in the machine.8. Configuring the Machine Using Utilities138](https://usermanual.wiki/Ricoh/MFSP204SFN1/User-Guide-1901762-Page-140.png)
![Using Smart Organizing Monitor• To use Smart Organizing Monitor, install the printer driver.Checking the Status InformationCTT01412341. Image areaDisplays the status of this machine with an icon.2. Status area• Paper SizeDisplays the paper size configured on the machine.• Paper TypeDisplays the paper type configured on the machine.• TonerThe remaining toner level is displayed in ten levels, when [Toner End Option] has been set to [StopPrinting]. If [Toner End Option] has been set to [Continue Printing], however, "**" is displayed becausethe remaining toner level is not monitored.• CounterDisplays the number of pages that have been printed by the machine.3. Select Device areaDisplays the name of the selected model.Using Smart Organizing Monitor139](https://usermanual.wiki/Ricoh/MFSP204SFN1/User-Guide-1901762-Page-141.png)
![4. Message areaDisplays the status of this machine with a message.For details about error messages, see page 173 "Error and Status Messages Appear on the SmartOrganizing Monitor".Configuring the Machine SettingsSmart Organizing Monitor is used to modify the machine’s settings.1. On the [Start] menu, click [All Programs].2. Click [Smart Organizing Monitor for SP xxx Series].3. Click [Smart Organizing Monitor for SP xxx Series Status].4. If the machine you are using is not selected, click [Select Device...], and then select themachine's model.5. Click [OK].6. On the [User Tool] tab, click [Printer Configuration].7. Change the settings if necessary.8. Click [OK].9. Click [Close].Tab SettingsThis section provides a tab-by-tab overview of the machine settings that can be modified using SmartOrganizing Monitor. For more information on each setting item, see the Smart Organizing MonitorHelp.System tab• Register custom paper sizes.• Adjust the printing position or density to improve the printing quality when printed results arenot satisfactory.• Enable or disable Energy Saver Mode, and specify the amount of time that will elapse beforeswitching to it.• Update the machine firmware.Fax tab• Specify the fax name and number of the machine.• Register, edit, and delete speed dial entries.Scanner tab• You can edit the server's properties.8. Configuring the Machine Using Utilities140](https://usermanual.wiki/Ricoh/MFSP204SFN1/User-Guide-1901762-Page-142.png)
![• You can register, edit, and delete scan destinations.Printing the Configuration Page• When printing the test page, set the paper size to A4 or Letter. When printing other reports, set thepaper size to A4, Letter, or Legal.1. On the [Start] menu, click [All Programs].2. Click [Smart Organizing Monitor for SP xxx Series].3. Click [Smart Organizing Monitor for SP xxx Series Status].4. If the machine you are using is not selected, click [Select Device...], and then select themachine's model.5. Click [OK].6. On the [User Tool] tab, select [Test Page] or [Configuration Page] in the [List / Test:] list.7. Click [Print].Updating the Firmware• In no event shall the company be held liable to customers for damages of any kind resulting fromuse or loss of use of this software.• The company shall also not be held liable for any disputes between the customer and third partiesresulting from any use or loss of use of this software.• To make sure that a firmware update has successfully completed, print the configuration pagebefore and after the update.• Make sure to never disconnect the USB cable or Ethernet cable during a firmware update.• Disconnect any unnecessary cables from the machine when running a firmware update.• If necessary, modify power management settings on your computer in advance so that thecomputer will not enter standby or sleep mode during a firmware update.• Download the firmware from the manufacturer's Web site.To update the firmware, use the Smart Organizing Monitor from Windows.1. On the [Start] menu, click [All Programs].2. Click [Smart Organizing Monitor for SP xxx Series].3. Click [Smart Organizing Monitor for SP xxx Series Status].Using Smart Organizing Monitor141](https://usermanual.wiki/Ricoh/MFSP204SFN1/User-Guide-1901762-Page-143.png)
![4. If the machine you are using is not selected, click [Select Device...], and then select themachine's model.5. Click [OK].6. On the [User Tool] tab, click [Printer Configuration].7. On the [System] tab, click [Printer Firmware Update...].8. Click [OK].9. Specify the location of the DWN file, and then click [Open].10. After a message is displayed on the Smart Organizing Monitor to indicate that thefirmware update has completed, turn the machine's power Off and then On again.8. Configuring the Machine Using Utilities142](https://usermanual.wiki/Ricoh/MFSP204SFN1/User-Guide-1901762-Page-144.png)
![9. Maintaining the MachineReplacing the Print Cartridge• If "Out of Toner" / "Print Cartridge" is displayed in the control panel, replace the print cartridge byfollowing the procedure described below. However, this message will not be displayed if [TonerEnd Option] has been set to [Continue Printing]. Replace the print cartridge if the printed imagebecomes pale or blurred.• Store print cartridges in a cool dark place.• Actual printable numbers vary depending on image volume and density, number of pages printedat a time, paper type and size, and environmental conditions such as temperature and humidity.Toner quality degrades over time.• For good print quality, the manufacturer recommends that you use genuine toner from themanufacturer.• The manufacturer shall not be responsible for any damage or expense that might result from the useof parts other than genuine parts from the manufacturer with your office products.1. Open the front cover, and then carefully lower it.2. Carefully pull out the print cartridge horizontally, holding its center.CTT0453. Take the new print cartridge out of the box, and then take it out of the plastic bag.4. Hold the print cartridge and shake it from side to side five or six times.Shake the print cartridge horizontally in the direction. The first few printed pages may appearblurred or smeared if the cartridge has not been shaken properly.143](https://usermanual.wiki/Ricoh/MFSP204SFN1/User-Guide-1901762-Page-145.png)
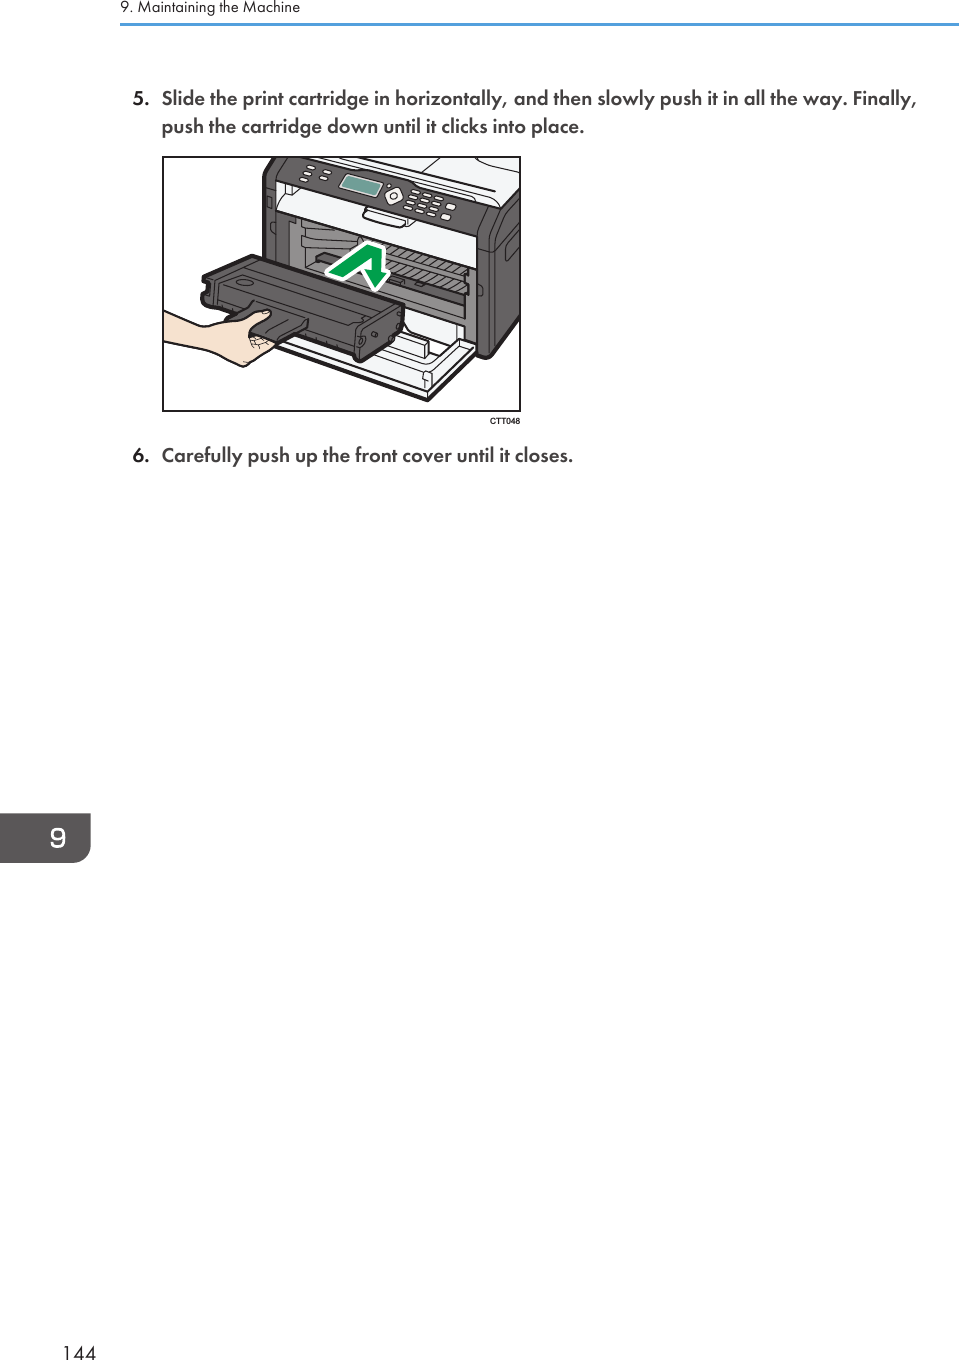
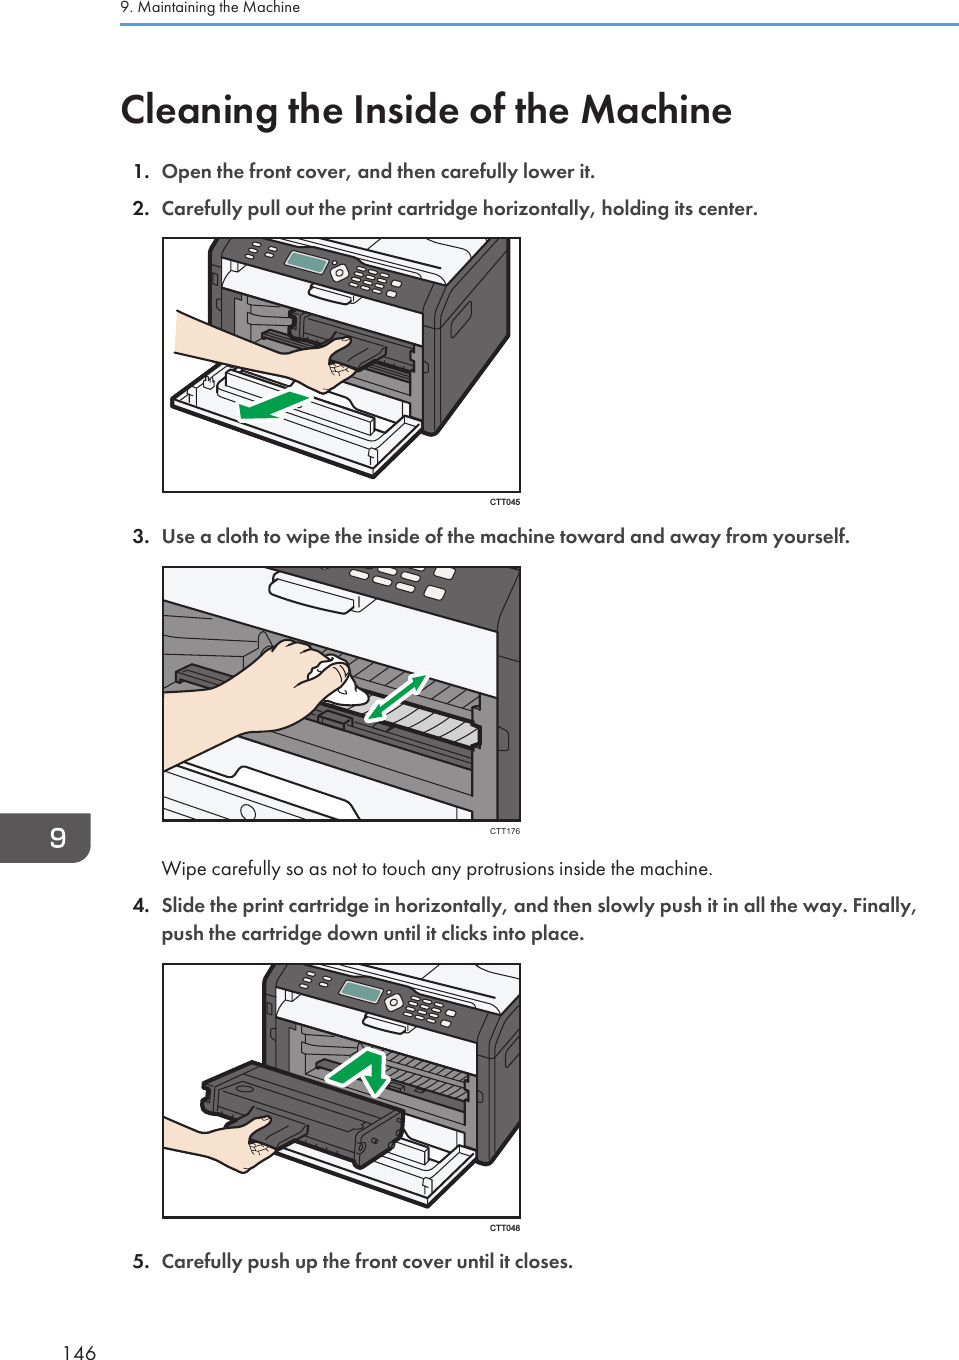
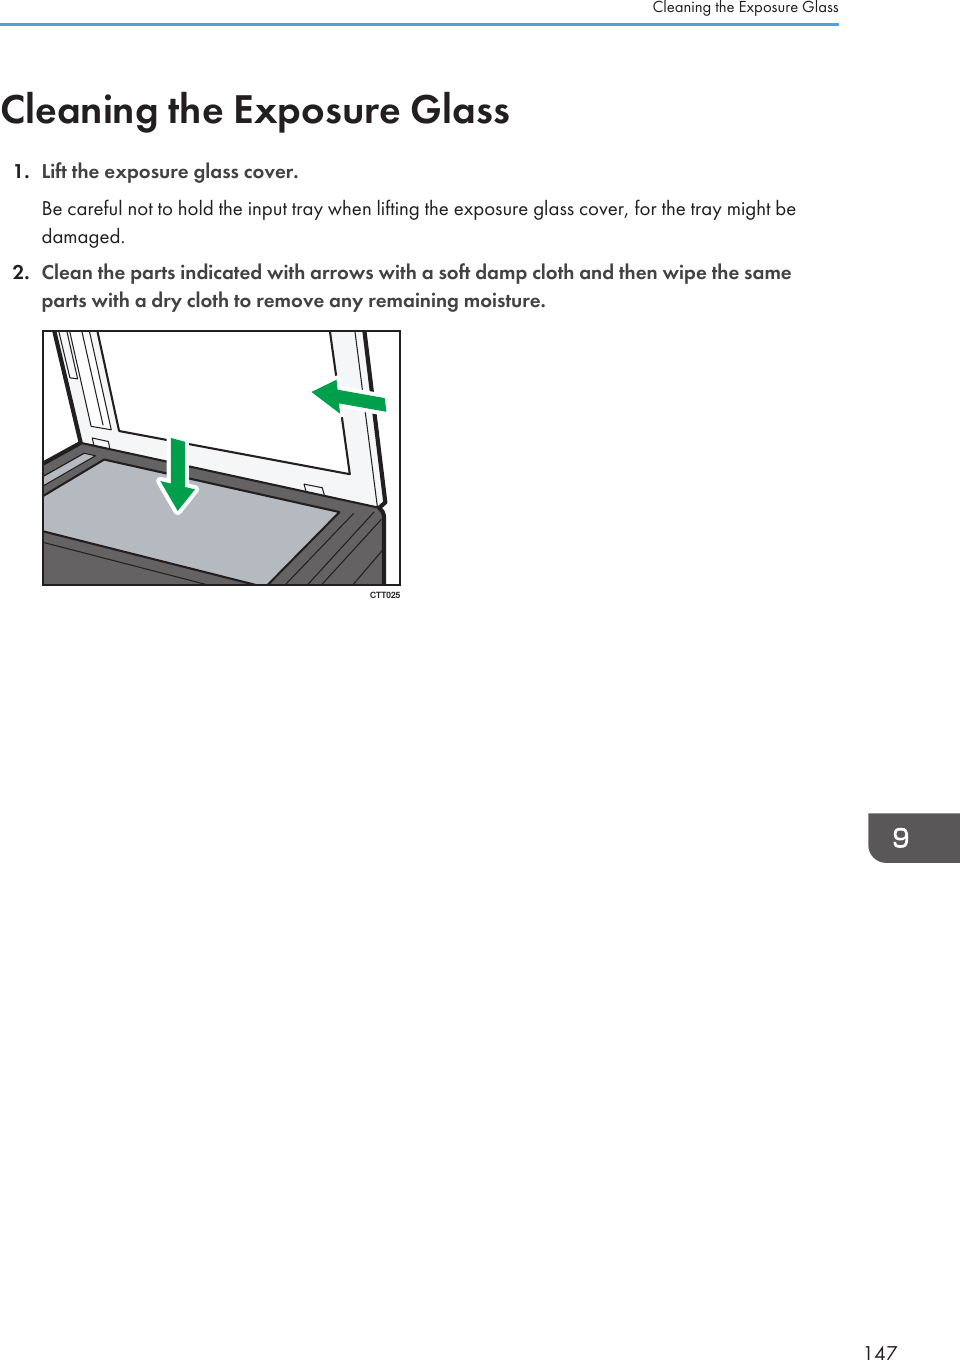

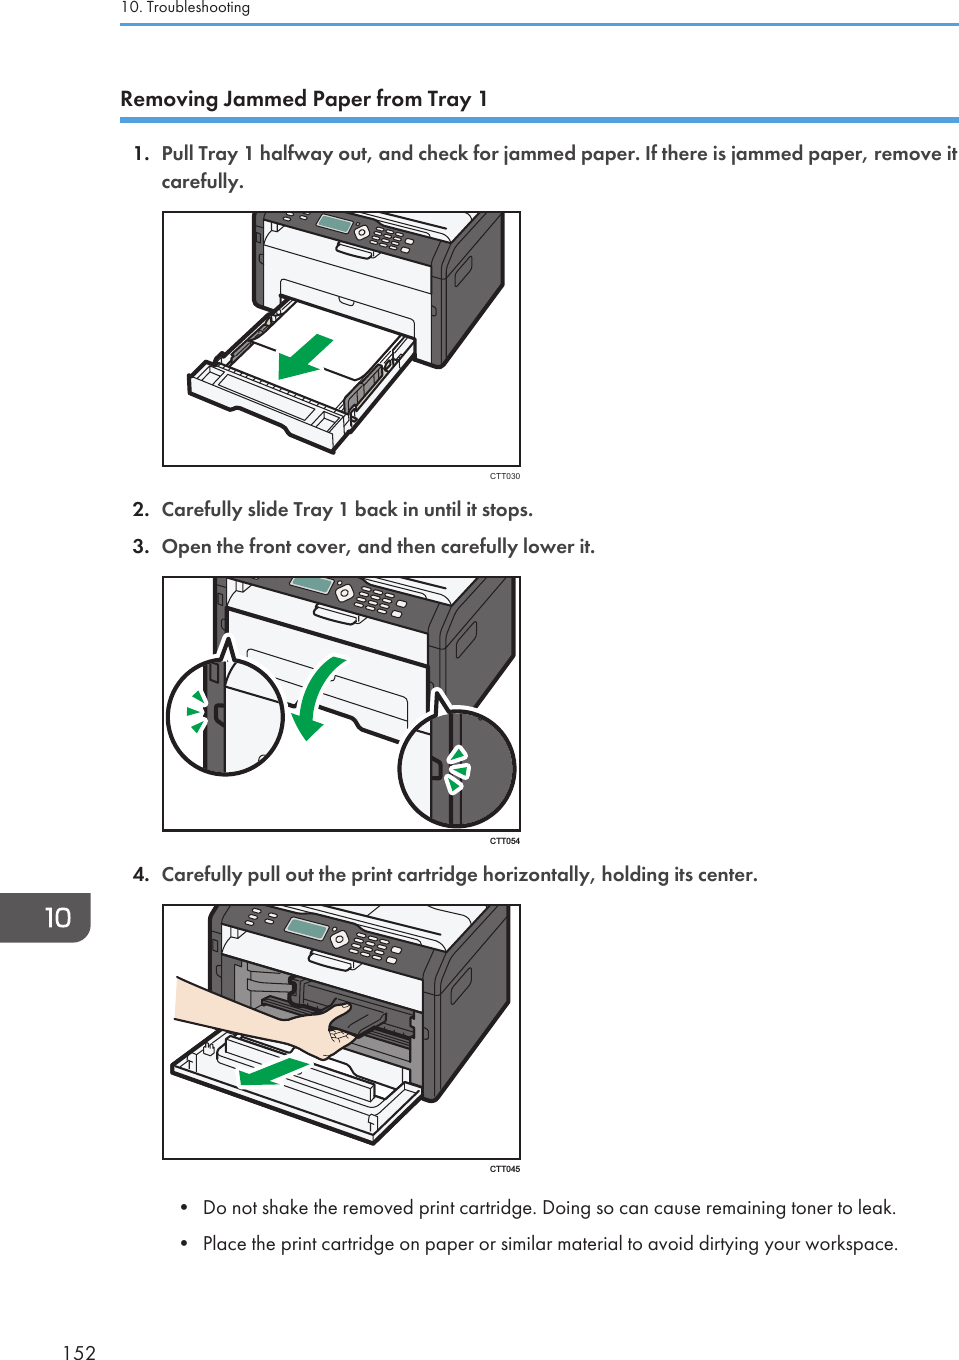
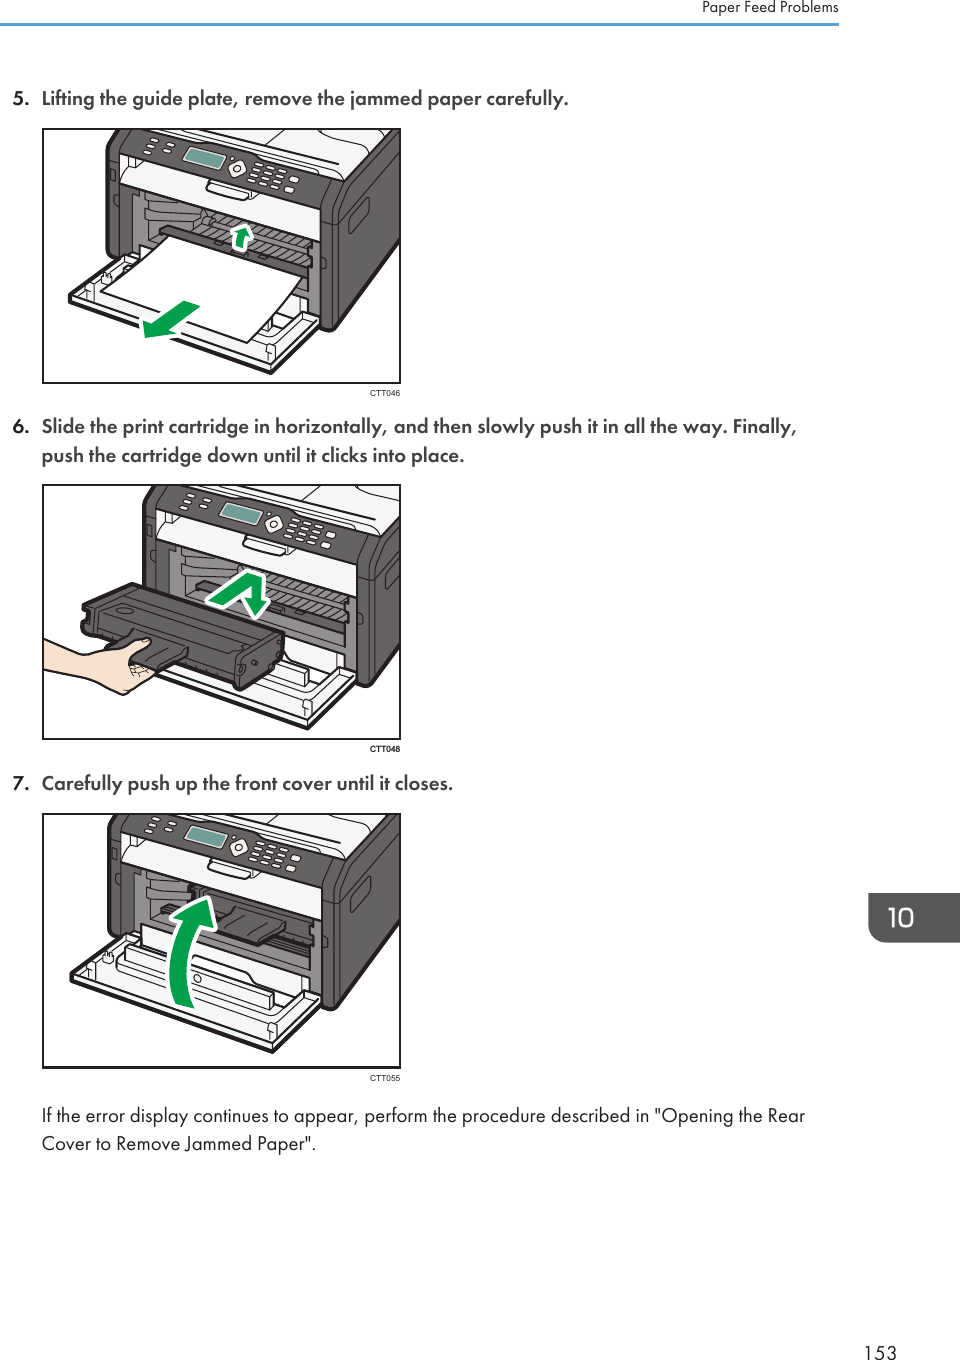
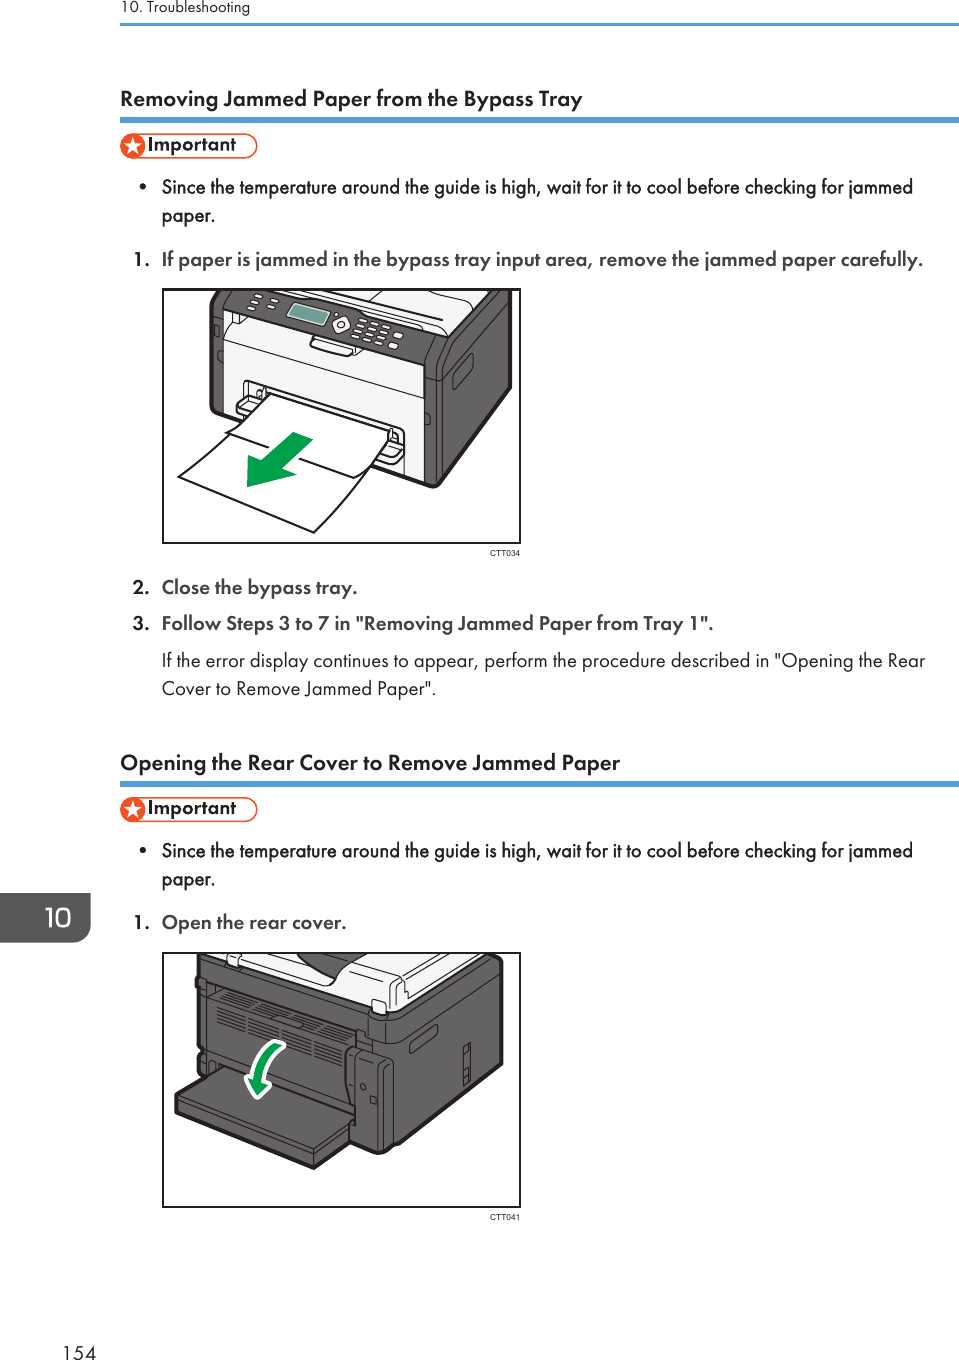
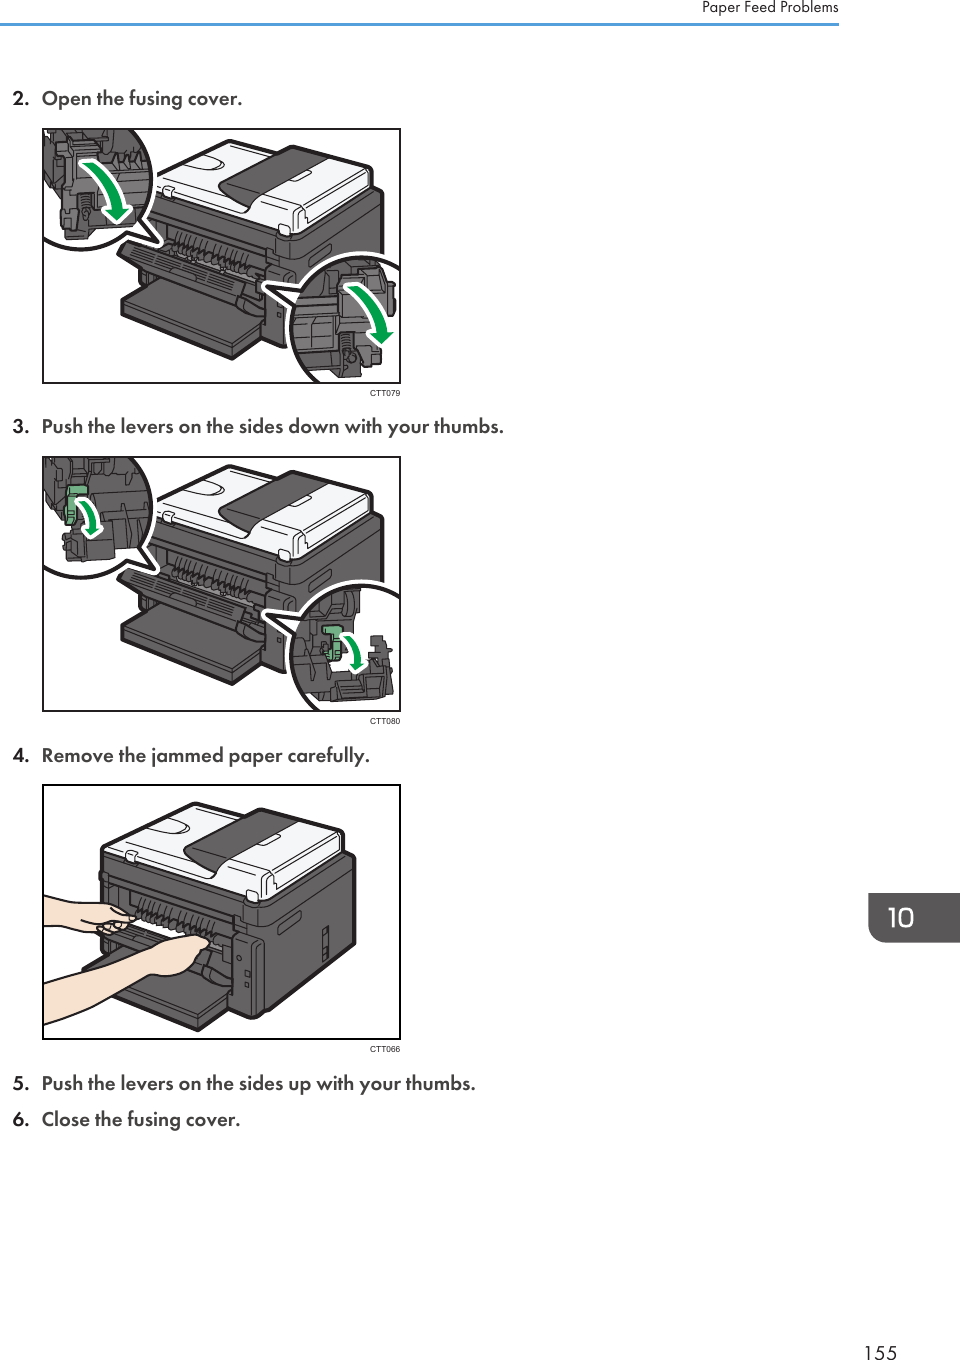
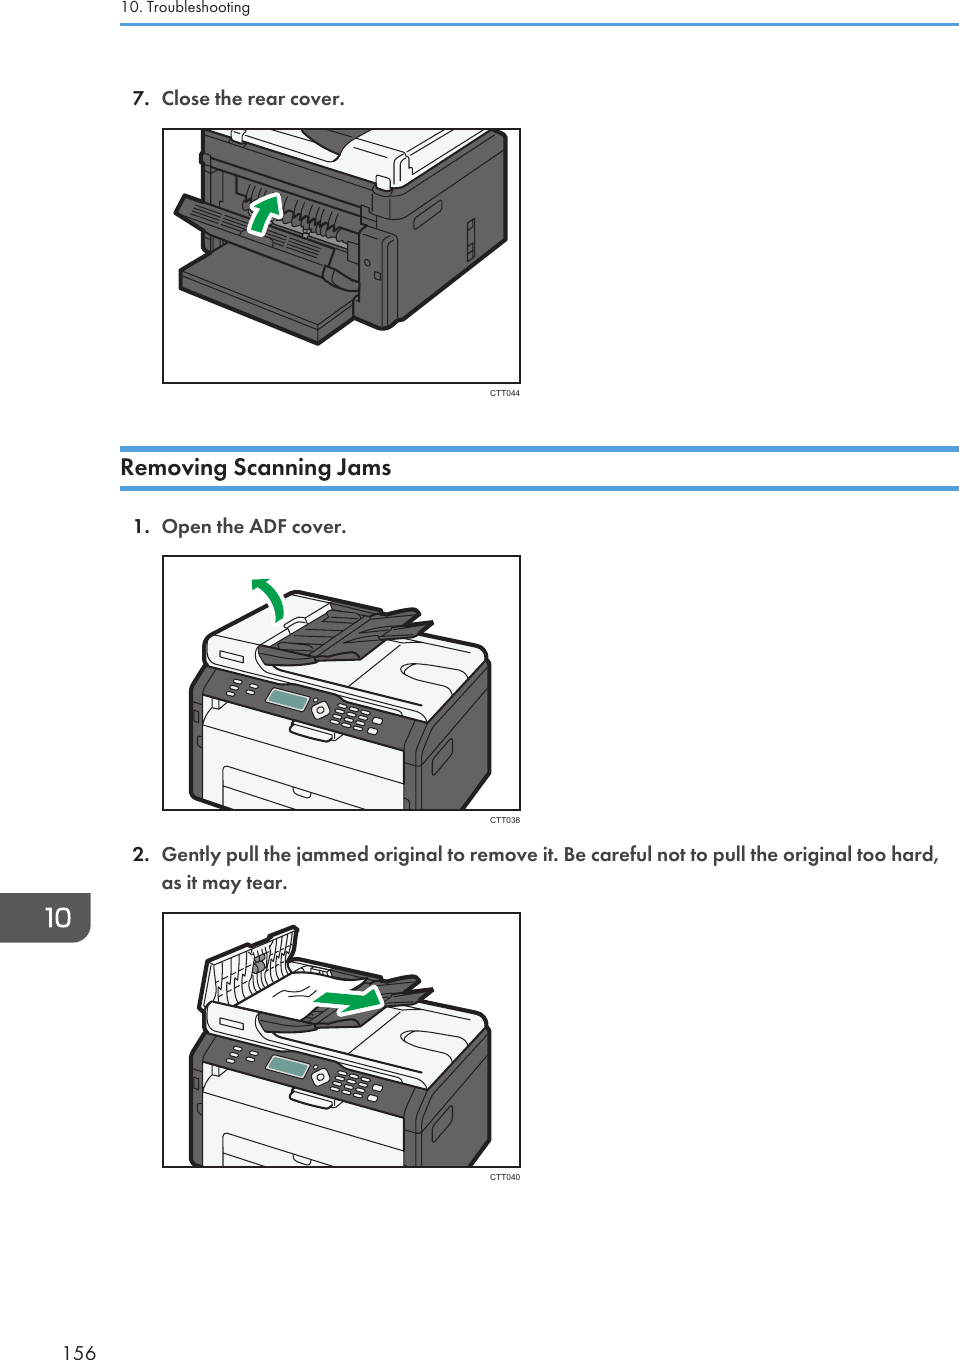

![Printer ProblemsProblem SolutionAn error occurs.If an error occurs when printing, change the computer orprinter driver settings.• Check the printer icon name does not exceed 32alphanumeric characters. If it does, shorten it.• Check whether other applications are operating.Close any other applications, as they may be interferingwith printing. If the problem is not resolved, closeunneeded processes too.• Check that the latest printer driver is being used.A print job is canceled. • Set I/O Timeout to a larger value than the currentsettings.There is considerable delay betweenthe print start command and actualprinting.• Processing time depends on data volume. High volumedata, such as graphics-heavy documents, take longer toprocess. Wait for a while.• To speed up printing, reduce the printing resolution usingthe printer driver.The whole printout is blurred.• Paper is damp. Use paper that has been stored properly.See page 23 "Supported Paper".• If you enable [Toner Save:], printing is generally lessdense.• Condensation may have collected. If rapid change intemperature or humidity occurs, use this machine onlyafter it has acclimatized.Cannot print properly when using acertain application, or cannot printimage data properly.Some characters are printed faintlyor not printed.• Change the print quality settings.The print position is misaligned. Specify [Registration] in [System Settings] to adjust the printposition.Printer Problems159](https://usermanual.wiki/Ricoh/MFSP204SFN1/User-Guide-1901762-Page-161.png)
![Copier ProblemsProblem SolutionPhotocopied paper is blank. The original was placed with the front and back reversed.See page 37 "Placing Originals".Copied pages are too dark or toolight. Adjust the image density.Copied pages do not look the sameas the originals. Select the correct scan mode according to the type of original.Black spots appear whenphotocopying a photographic print.The original may have stuck to the exposure glass due to highhumidity.Place the original on the exposure glass, and then place twoor three sheets of white paper on top of it. Leave the exposureglass cover open when copying.A moire pattern is produced. The original probably has heavily lined or dotted areas.Switching the setting for image quality between [Photo] and[Text/Photo] may eliminate the moire pattern.Photocopied paper is dirty.• Image density is too high.Adjust the image density.• Toner on the printed surface is not dry.Do not touch printed surfaces immediately after copying.Remove freshly printed sheets one by one, taking carenot to touch printed areas.• The scanning part is dirty.• Before placing originals on the exposure glass, makesure that toner or correction fluid is dry.When copying from the exposureglass, the print area of the copy isout of alignment with the original.Place the original copy side down, making sure that it isaligned to the rear left corner and pressed flat against theexposure glass.The paper size setting does notmatch the paper loaded.Check whether the paper size specified on the machinematches that of the loaded paper.Copier Problems161](https://usermanual.wiki/Ricoh/MFSP204SFN1/User-Guide-1901762-Page-163.png)
![Fax ProblemsWhen an error code appears on the fax journal or TX status reportThe table below describes the meaning of error codes that appear under "Status" on the fax journalor TX status report, and what to do when a particular error code appears.TX Status ReportError Code SolutionErr:1)The line was not connected correctly. The fax transmissiondid not finish successfully. There was a problem with eitherthe transmission or reception.• Check that the telephone line is properly connected tothe machine.• Disconnect the telephone line from the machine, andconnect a standard telephone in its place. Check thatyou can make calls using the telephone. If you cannotmake calls this way, contact your telephone company.• If the problem persists, contact your sales or servicerepresentative.Dial tone could not be detected.• Set [Dial Tone Detect] to [Do not Detect].Err:2)Err:3)Err:4)Dial fails when trying to send faxes.• Check that the fax number you dialed is correct.• Check that the destination is a fax machine.• Check that the line is not busy.• You may need to insert a pause between dial digits.Press the [ID Card Copy/On Hook Dial] key after, forexample, the area code.• Check that [PSTN / PBX] under [Fax Features] is setproperly for your connection method to the telephonenetwork. See page 105 "Fax Features Settings".Err:5)The [Stop/Clear] key has been pressed while transmitting/receiving faxes. Send the fax again. When the errorreoccurs even if the [Stop/Clear] key has not beenpressed, consult your service representative.Fax Problems163](https://usermanual.wiki/Ricoh/MFSP204SFN1/User-Guide-1901762-Page-165.png)
![Message Causes SolutionsCannot Print ReportChange Paper SizeAn appropriate size paper forprinting Report is not loaded.Load A4, Letter or Legal size paper in Tray1.Not SetPrint CartridgeThe print cartridge has not beeninstalled.Reinstall the print cartridge. See page 143"Replacing the Print Cartridge".Out of TonerPrint CartridgeThe machine has run out of thetoner.Replace the print cartridge. See page 143"Replacing the Print Cartridge".Toner Almost EmptyPrint CartridgeThe print cartridge is almostempty. Prepare a new print cartridge.On Hook The machine has been off-hookfor an extended period of time. Replace the handset.Cannot PrintRemove BypassPaperIf you attempt to print on paperfed from Tray 1 when there ispaper loaded in the bypasstray, printing will not bepossible.Remove the paper loaded in the bypasstray.Connection Failed The line could not be connectedcorrectly.• Check that the telephone line isproperly connected to the machine.• Disconnect the telephone line fromthe machine, and connect a standardtelephone in its place. Check that youcan make calls using the telephone. Ifyou cannot make calls this way,contact your telephone company.Dial Failed The fax could not be sent.• Confirm that the fax number youdialed is correct.• Confirm that the destination is a faxmachine.• Confirm that the line is not busy.• You may need to insert a pausebetween dial digits. Press the [IDCard Copy/On Hook Dial] key after,for example, the area code.Error and Status Indicate on the Control Panel167](https://usermanual.wiki/Ricoh/MFSP204SFN1/User-Guide-1901762-Page-169.png)
![Message Causes SolutionsTX Comm. ErrorA transmission error occurred,and the fax could not betransmitted correctly.• If the [Auto Redial] setting is enabled,the machine will redial the numberand try again. If all attempts fail, or ifthe machine is in ImmediateTransmission mode, the fax will notbe transmitted. Try the operationagain.RX Comm. ErrorA reception error occurred, andthe fax could not be receivedcorrectly.• If possible, contact the sender of thefax and ask them to resend it.Memory Overflow1: TX 2: Cancel• If this occurs on the firstpage:The machine's memoryreached capacity whilestoring a fax in memorybefore transmission.• If this occurs on the secondor a later page:Memory has reachedcapacity while scanningthe second or later pagesof the original when tryingto send a fax in MemoryTransmission mode.• If this occurs on the first page:Resend the fax in parts as severalsmaller individual faxes, or send at alower resolution.• If this occurs on the second or a laterpage:Press the [1] key (TX) to send only thepages that have been scanned inmemory, or press the [2] key(Cancel) to cancel.RX MemoryOverflowThe memory has become full orthe maximum number ofreceivable files has beenreached during fax reception.• The received fax was too large. Askthe sender to resend the document inparts as several smaller individualfaxes, or to send at a lowerresolution.• If an error has occurred because of aproblem such as lack of paper, paperjamming, or toner running out, correctthe problem, and then finish printingthe outstanding files.• If there is a file waiting to be sent,complete the transmission or deletethe file.10. Troubleshooting168](https://usermanual.wiki/Ricoh/MFSP204SFN1/User-Guide-1901762-Page-170.png)
![Message Causes SolutionsMemory Data Lost Data in the memory was deleteddue to a memory fault.The machine prints Power Failure Reportand recovers from the error automatically.Cancel PrintingI/O TimeoutThe timeout period set in [I/OTimeout] expires when printingis frequently interrupted by datafrom other ports, or when theprint job is large and takes timefor processing.Set [I/O Timeout] to a larger value thanthe current setting. For details, seepage 123 "Printer Features Settings".Cannot PrintMemory OverflowThe data is too large orcomplex to print.Select [600 x 600dpi] in [Resolution:] toreduce the size of data. For details, see thePrinter Driver Help.Size Mismatch:Tray1Press Start or StopThe specified paper size of thefile does not match that of thepaper loaded in Tray 1.Press the [Start] key to begin printing, orpress the [Stop/Clear] key to cancel thejob.SizeMismatch:BypassPress Start or StopThe specified paper size of thefile does not match that of thepaper loaded in the bypasstray.Press the [Start] key to begin printing, orpress the [Stop/Clear] key to cancel thejob.Type Mismatch:Tray1Press Start or StopThe specified paper type of thefile does not match that of thepaper loaded in Tray 1.Press the [Start] key to begin printing, orpress the [Stop/Clear] key to cancel thejob.Scan DisconnectedThe USB cable or Ethernet cablewas disconnected whilescanning from a computer.Reconnect the USB cable or Ethernet cableproperly, and then try the operation again.Cannot Connect#### ServerThe connection with the FTP,SMTP, POP3, SMB, SNTP, orDNS server was lost whilesending or receiving data.If the problem involves the FTP/SMBserver, check the [Edit Network ScanDestination] setting in Smart OrganizingMonitor.If the problem involves the SMTP/POP3/SNTP server, check the [ServerProperties...] setting in Smart OrganizingMonitor.If the problem involves the DNS server,check its configuration using Web ImageMonitor.Error and Status Indicate on the Control Panel169](https://usermanual.wiki/Ricoh/MFSP204SFN1/User-Guide-1901762-Page-171.png)
![Message Causes SolutionsCannot Obtain IP#### ServerThe machine cannot obtain anIP address from the FTP, SMTP,POP3, or SNTP server.If the problem involves the FTP server,check the [Edit Network Scan Destination]setting in Smart Organizing Monitor.If the problem involves the SMTP/POP3/SNTP server, check the [ServerProperties...] setting in Smart OrganizingMonitor.Communication Error####The connection with the FTPserver, SMTP server, SMBserver, SNTP server, or USBmemory device was lost whilesending or receiving data.If the problem involves the FTP/SMBserver, check the [Edit Network ScanDestination] setting in Smart OrganizingMonitor.If the problem involves the SMTP/SNTPserver, check the [Server Properties...]setting in Smart Organizing Monitor.If the problem involves the USB flash drive,check that it is a supported model, andthen reinsert it.Invalid Password#### ServerThe password entered to accessthe FTP, SMTP, POP3, or SMBserver is invalid.For future reference, make a note of thecorrect password and keep it safe.Failed To Connect####A connection with the FTPserver, SMTP server, POP3server, SMB server, SNTPserver, or USB memory devicehas failed.If the problem involves the FTP/SMBserver, check the [Edit Network ScanDestination] setting in Smart OrganizingMonitor.If the problem involves the SMTP/POP3/SNTP server, check the [ServerProperties...] setting in Smart OrganizingMonitor.If the problem involves the USB flash drive,check that it is a supported model, andthen reinsert it.10. Troubleshooting170](https://usermanual.wiki/Ricoh/MFSP204SFN1/User-Guide-1901762-Page-172.png)
![Message Causes SolutionsFile OverThe assigned file names rangefrom SIG000101 toSIG999901. If the file nameassignment passes SIG999901,the naming starts over fromSIG000101. If the name of thenew is the same as an existingfile for the same destination, thenew file cannot be stored.Remove or rename the existing file of thesame name.Page Over You can only scan up to 99pages at a time. Set the number of pages to 99 or fewer.#### Server ErrorData sent from the machine hasnot been stored on the FTPserver and SMB server.Check the [Edit Network Scan Destination]setting in Smart Organizing Monitor.SMTP Server FullThe SMTP server's memoryreached capacity during e-mailtransmission.Check the SMTP server setting.Reduce the number of pages or send thefile at a lower resolution.Memory Overflow1: TX 2: CancelThe machine's memory becamefull while scanning. Send the file at a lower resolution.USB Flash Disk FullThe Scan to USB function failedbecause there was not enoughmemory on the USB flash disk.Use a USB flash disk with enough memory.Fax Job MemoryOverThe number of fax jobs inmemory has reached the limit,so new jobs cannot be stored.Wait until pending jobs have beentransmitted.Error and Status Indicate on the Control Panel171](https://usermanual.wiki/Ricoh/MFSP204SFN1/User-Guide-1901762-Page-173.png)
![Error and Status Messages Appear on theSmart Organizing MonitorMessage Causes SolutionsPrinter Power Off(CommunicationError)• The power cable of themachine is not plugged in.• The power of the machineis not turned ON.• The USB cable or Ethernetcable is not connected.• Check the printer power cord.• Check the printer power switch is on.• Check the USB cable or Ethernetcable is properly connected.Out of Paper: Tray 1 Tray 1 has run out of paper. Load paper into Tray 1. See page 29"Loading Paper".Out of Paper: BypassTrayThe bypass tray has run out ofpaper.Load paper into the bypass tray. Seepage 29 "Loading Paper".Misfeed: Inner/OuterA paper jam has occurred in themachine.Remove the jammed paper. See page 150"Paper Feed Problems".Paper Size MismatchThe paper size specified on themachine and the size specifiedin the printer driver do notmatch.For details about specifying the paper sizesetting on the machine, see page 29"Loading Paper". For details aboutchanging the paper size setting in theprinter driver, see the printer driver Help.Paper TypeMismatchThe paper type specified on themachine and the type specifiedin the printer driver do notmatch.For details about changing the paper typesetting of the machine, see page 29"Loading Paper". For details aboutchanging the paper type setting in theprinter driver, see the printer driver Help.Memory Overflow The data is too large orcomplex to print.Select [600 x 600 dpi] in [Resolution:] toreduce the size of data. For details, see theprinter driver Help.Print Cartridge NotDetectedThe print cartridge has not beeninstalled.Reinstall the print cartridge. See page 143"Replacing the Print Cartridge".Error and Status Messages Appear on the Smart Organizing Monitor173](https://usermanual.wiki/Ricoh/MFSP204SFN1/User-Guide-1901762-Page-175.png)
![Error and Status Messages Appear in the PCFAX WindowMessage Causes SolutionsPC FAX has alreadybeen launched.Cannot launch itagain.The [PC FAX] dialog box isalready open.Quit PC FAX once, and then start it upagain.Reached maximumnumber ofdestinations.The number of destinationsspecified exceeds the maximumpossible.The maximum number of destinations thatcan be specified at one time is 100.When the setting"Attach a CoverSheet" is on and "UseAddress Book" isselected, themaximum number ofdestinations cannotbe larger than 5.If [Attach a Cover Sheet] on the[Cover Sheet] tab is selectedand [Use Address Book] in the[To:] list are selected, you cansend faxes to up to fivedestinations at a time.• Specify five or less destinations.• Change the item selected in the [To:]list to something other than [UseAddress Book].• Clear [Attach a Cover Sheet].Cannot send morethan 10 pages.You can send up to ten pagesincluding the cover sheet, at atime.Reduce the number of pages to ten orfewer.Error and Status Messages Appear in the PC FAX Window175](https://usermanual.wiki/Ricoh/MFSP204SFN1/User-Guide-1901762-Page-177.png)
![11. AppendixNotes About the Toner• Proper operation cannot be guaranteed if any third-party toner is used.• Depending on printing conditions, there are cases where the printer cannot print the number ofsheets indicated in the specifications.• When operating the machine for the first time, use the print cartridge supplied with this machine. Ifthis cartridge is not initially used, the following problems may occur:• "Out of Toner" will be displayed before the toner runs out.• "Out of Toner" will not be displayed when the toner runs out, but instead the printed imagesuddenly becomes pale or blurred.• To continue printing after "Out of Toner" is displayed, set [Toner End Option] to [Continue Printing].However, since any trouble caused by using this setup is outside of the scope of the manufacturer'swarranty, this setup should be used with care. For details about [Toner End Option], see page 115"System Settings".• If [Toner End Option] is first set to [Continue Printing] and then to [Stop Printing], be sure to use anew print cartridge. If a used print cartridge is installed, there will be a discrepancy between theremaining toner level displayed and the actual remaining toner, and accordingly, "Out of Toner"will not be displayed at the appropriate timing.• The lifetime of the photo conductor, which is built into the print cartridge, is taken into account indisplaying "Out of Toner". If the photo conductor stops working before the toner runs out, "Out ofToner" may be displayed.177](https://usermanual.wiki/Ricoh/MFSP204SFN1/User-Guide-1901762-Page-179.png)