Ringway Tech TB688 ELECTRONIC KEYBOARD User Manual 10505907 V2 0
Ringway Tech(Jiangsu) Co.,Ltd. ELECTRONIC KEYBOARD 10505907 V2 0
UserManual.wiki
>
Ringway Tech
>
TB688 User Manual
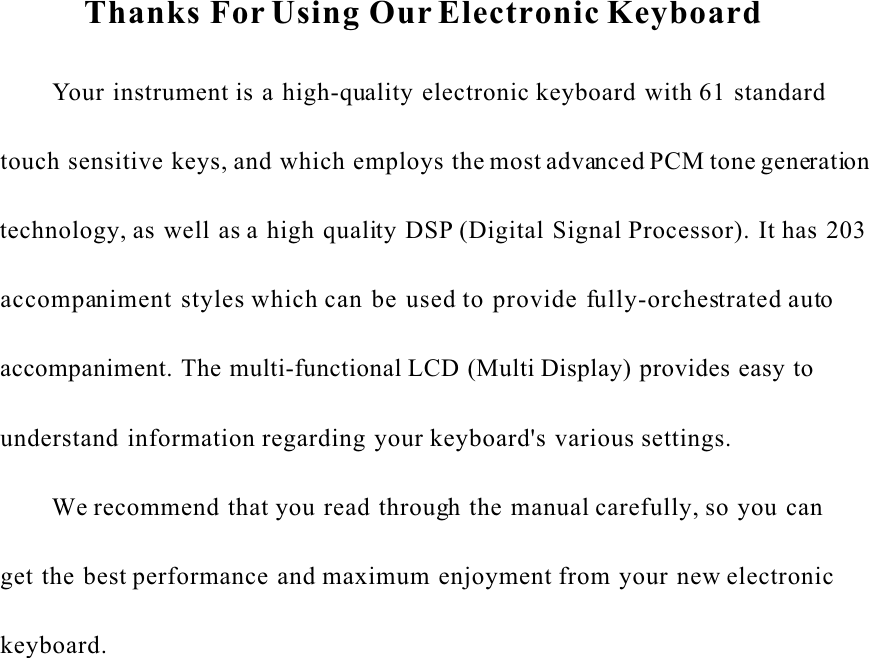
Users Manual
Navigation menu
Upload a User Manual
Namespaces
Wiki Guide
HTML
PDF
Info
Views
User Manual
Discussion / Help
Navigation
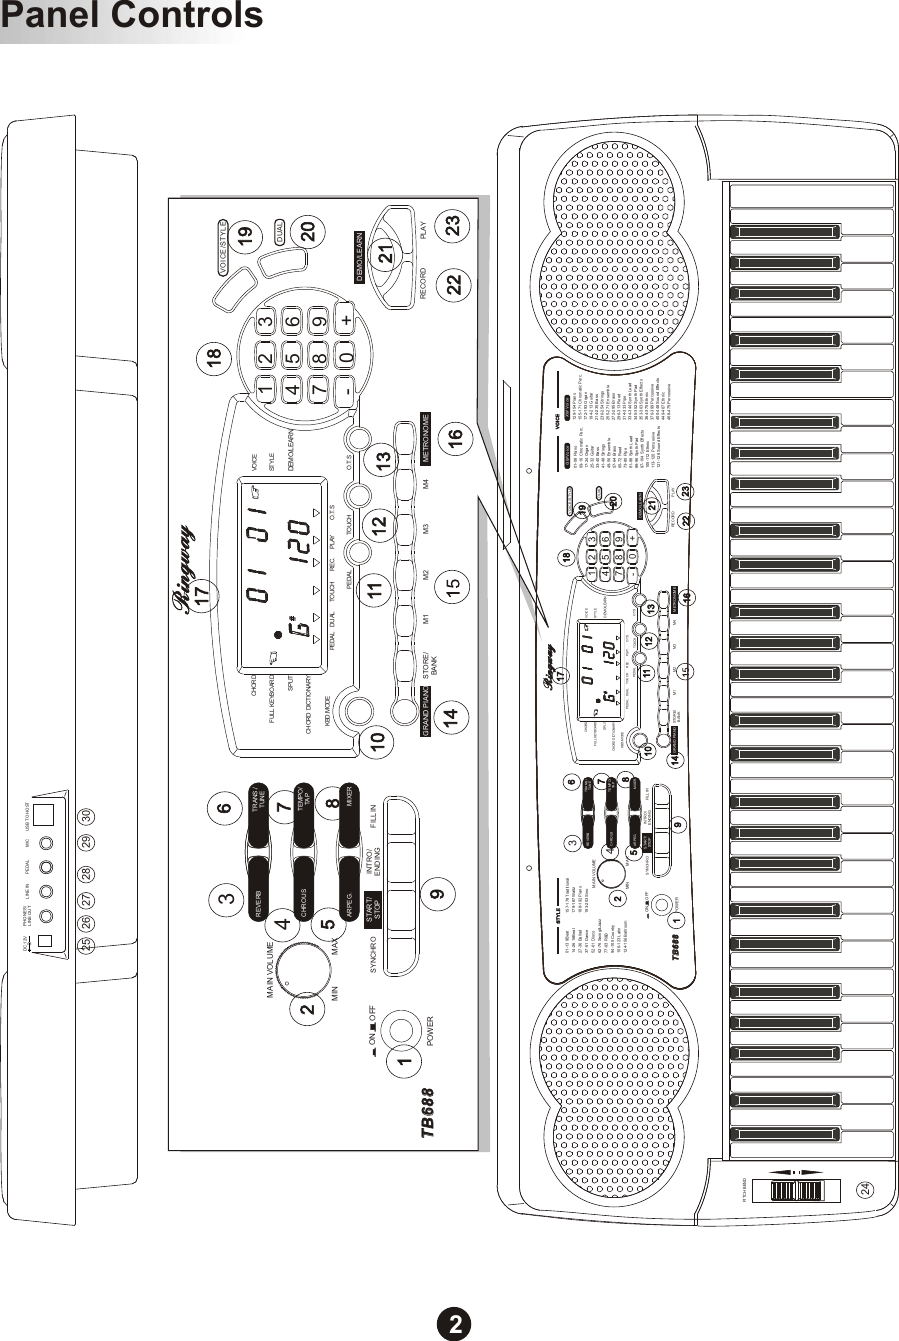
![1.POWER[POWER ON/OFF]2.MASTER VOLUME3.[REVERB] Button4.[CHORUS] Button5.[APREG.] Button6.[TRANS./TUNE] Button7.[TEMPO/TAP] Button8.[MIXER] Button9.ACCOMPANMENT CONTROL [SYNCHRO] Button [START/STOP] Button [INTRO/ENDING] Button [FILL IN] Button10. [KBD.MODE] Button11. [PEDAL] Button12. [TOUCH] Button13. [O.T.S] Button14. [GRAND PIANO] Button15.REGESTRATION MEMORY [STORE/BANK] Button [M1]-[M4]Button16.[METRONOME] Button17.MULTI LCD DISPLAY18. + - Buttons 0 - 9 Number Buttons19.[VOICE/STYLE ]Button20.[DUAL] Button21.[DEMO/LEARN] Button22.[RECORD] Button23.[PLAY] ButtonRear Panel Controls24.Pitch Bend 25.DC 12V In Jack26.Phones/Line Out Jack27.Line In Jack28.Pedal Jack29.Mic Jack30.USB To Host Top Panel ControlsPanel Controls1](https://usermanual.wiki/Ringway-Tech/TB688/User-Guide-2361921-Page-5.png)
![Basic Operation Turn On the Power 1. Ensure the keyboard is turned off when connecting and disconnecting the power, and turn the volume switch to reach the minimum level. 2. Connect the adaptor into the AC wall outlet and the cord into the unit, then turn the power on.NOTE: When the keyboard is not in use or in the time of thunderstorm, please disconnect the power for safety purpose.PHONES/LINE OUT Plug a set of stereo headphone into the [PHONES/LINE OUT] jack, and the internal speaker system is automatically shut off when the headphone is plugged. The [PHONES/LINE OUT] jack can be used to deliver the output of the piano to a keyboard amplifier, stereo sound system, mixing console or tape recorder.Phones/Line Out jackLine In jack The audio output from other sound system connected to the LINE IN jack on the rear panel can be mixed with the sound of the unit. This function is convenient when you want to play along with a favourite song.3](https://usermanual.wiki/Ringway-Tech/TB688/User-Guide-2361921-Page-7.png)
![Line In StereoSystem PEDAL PEDAL A foot switch can be plugged into the rear-panel [PEDAL] jack. The Pedal is a damper pedal controlling sustain function. Press the pedal you can sustain the notes after the keys are released. Pedal Jack MICA Micphone can be plugged into the rear-pannel [MIC] jack .Mic Jack USB To Host Jack Connect PC or other USB to host devices that support USB audio with a standard USB cable. For devices with USB cable, after the driver is installed and initialization is finished, you can choose USB audio device in the device menu of the software to transfer midi data.USB TO HOSTBasic Operation4](https://usermanual.wiki/Ringway-Tech/TB688/User-Guide-2361921-Page-8.png)
![There are 5 preset demo songs and 100 learning songs that you can play individually. Here's how you can select and play the demo songs . 1. Press [DEMO/LEARN] button and the LCD display : play the demo songs in sequence. d0 .Then your instrument will Demo SongsMAIN VOLUMEMIN MAX Adjust the Main Volume Use [MAIN VOLUME] control to adjust the volume to your desired level. 2. Use the [+] [-] button or number button to select a demo song. Press the [TEMPO/TAP]button and then press [+] [-] button to change the tempo. 3.Press [DEMO/LEARN] button again to stop playing.CHORDSPLITFULL KEYBOARDCHORD DICTIONARYKBD.MODESTYLEVOICEDEMO/LEARNPEDAL DUAL TOUCH REC. PLAY O.T.SRECORD PLAYDEMO/LEARNBasic Operation5](https://usermanual.wiki/Ringway-Tech/TB688/User-Guide-2361921-Page-9.png)
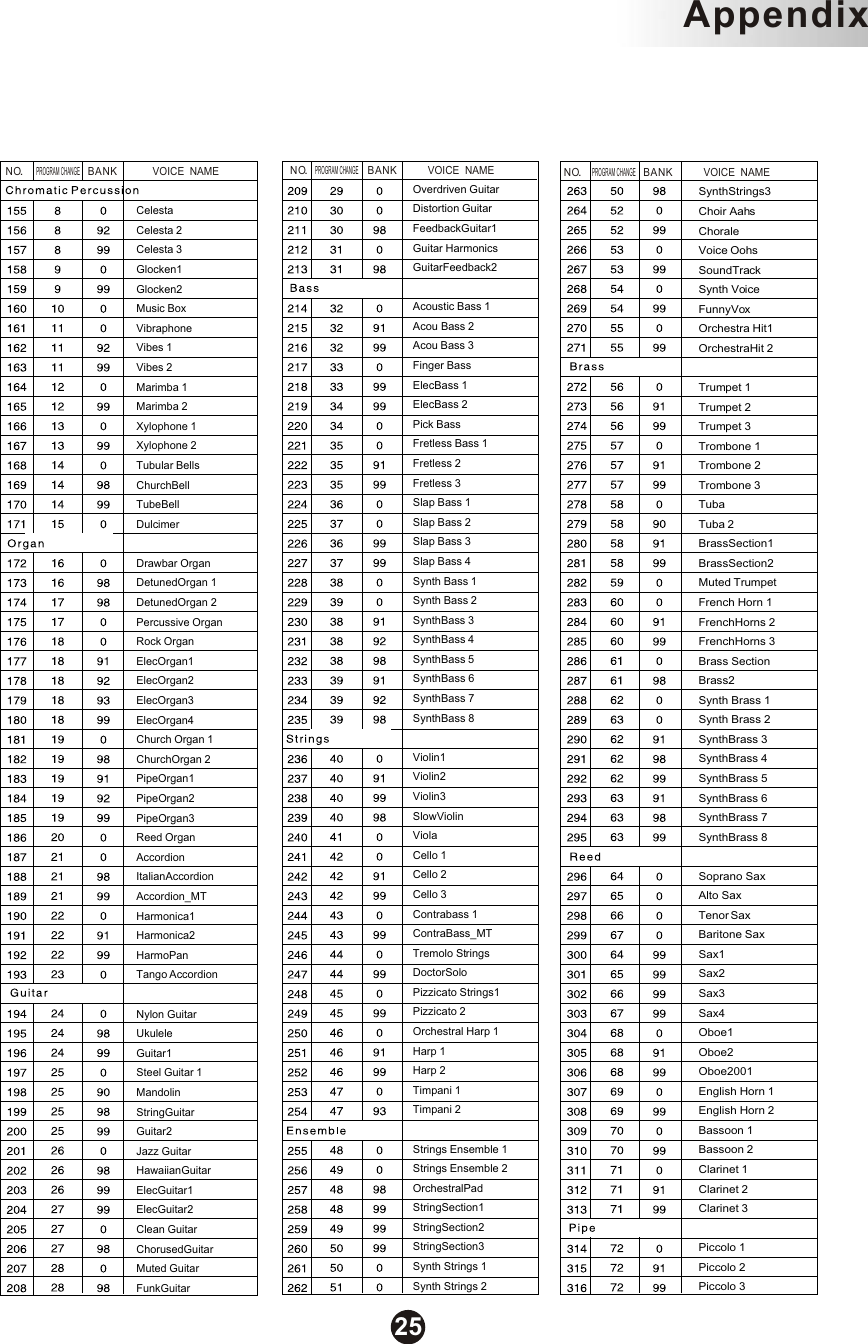
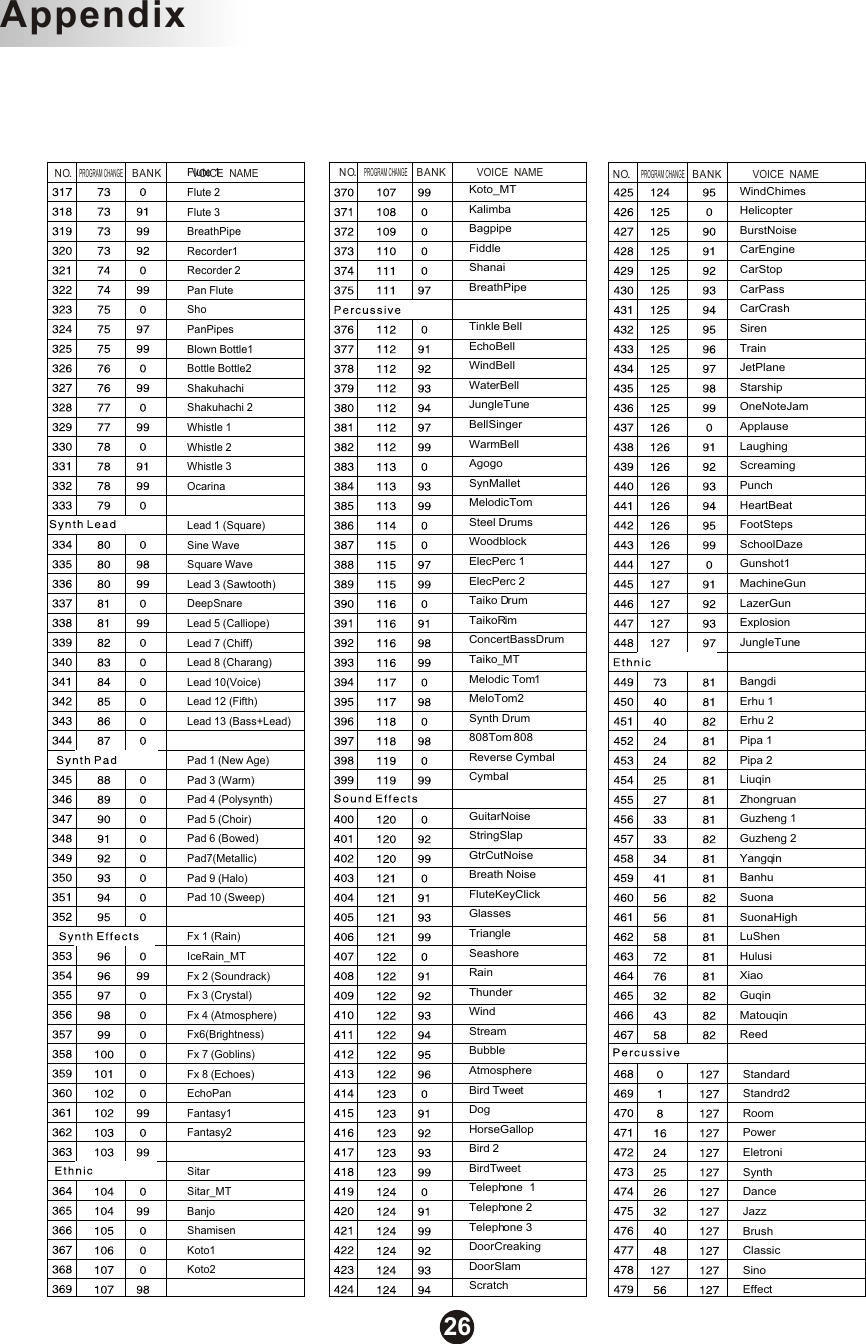
![Play the Electronic KeyboardYour instrument has 479 voices that you can select and play. Select a Voice. Press the [VOICE/STYLE] button to let the cursor point to "VOICE". The voice number will appear on the LCD display.CHORDSPLITFULL KEYBOARDCHORD DICTIONARYSTYLEVOICEDEMO/LEARNPEDAL DUAL TOUCH REC. PLAY O.T.S.Select a Main Voice NumberVOICE/STYLEDUAL.Select a Split Voice Number Use the [+] / [-] buttons or the number buttons to select the required voice number (01-479). Press the [+] button briefly to increment the value, or the [-] button to decrement. If you hold the [+] or [-] button down , the value will increment or decrement continuously -simply release the button when the desired value has been reached. In Voice Mode the main voice number will appear on the LCD.1~9 voice: press 01~09. 10~99 voice: press 10~99. 100~479 voice: hold the [1] button till the LCD displays: 1_ _ , then enter the tens digit and single digits. Your keyboard can be split into two sections which means different voices can be played with the left and right hands at the same time. Press [KBD.MODE] button so that the cursor points to SPLIT to turn Split modeON. The split voice number will appear on the MULTI DISPLAY. Use the [+] and [-] buttonsor the number buttons to select the desired split voice number (01 through 479). There is a horizontal line behind the 33 when the LCD display the voice of left hand area. If you want to change the voice of right hand area, press the [VOICE/STYLE] button, then the horizontal line will disappear, you can use the [+] and [-] buttons or the number 6buttons to select desired voice and the LCD will display the number of the right hand area.](https://usermanual.wiki/Ringway-Tech/TB688/User-Guide-2361921-Page-10.png)
![CHORDSPLITFULL KEYBOARDCHORD DICTIONARYSTYLEVOICEDEMO/LEARNPEDAL DUAL TOUCH REC. PLAY O.T.SPEDAL TOUCH O.T.SVOICE/STYLEDUALPedal Press [PEDAL] button to turn on/off the function. Press the [PEDAL] button and then press the pedal ,the cursor will point to [PEDAL]. CHORDSPLITFULL KEYBOARDCHORD DICTIONARYSTYLEVOICEDEMO/LEARNPEDAL DUAL TOUCH REC. PLAY O.T.SPEDAL TOUCH O.T.S 1.Multi-function pedal This function allows you to set the function of the pedal plugged into the pedal jack on the back board. Your instrument has 7 different pedal functions. Press the [PEDAL] button. Then use [+] and [-] buttons to select your desired pedal function among PE1-PE7 .7CHORDSPLITFULL KEYBOARDCHORD DICTIONARYSTYLEVOICEDEMO/LEARNPEDAL DUAL TOUCH REC. PLAY O.T.SPEDAL TOUCH O.T.SOverall ControlPlay the Electronic Keyboard](https://usermanual.wiki/Ringway-Tech/TB688/User-Guide-2361921-Page-11.png)
![2.Detail Instructions Sustain Pedal (Switch-type Pedal) If your pedal is a switch-type pedal, connect the pedal to your piano, then the pedal is ready to use. The default pedal function is PE1 , sustainer pedal function.. PE1------ It performs the same function as the damper pedal on an actual acoustic piano, letting you sustain the sound of the voices even after releasing your fingers from the keys. PE2------It performs the same function as the soft pedal on an actual acoustic piano, the volume of the whole keyboard will decrease when you play the TB688 keys and depress the soft pedal. PE3------If you play a note or chord on the keyboard and press the sostenuto pedal whilst the notes are held, those notes will be sustained as long as the pedal is held, but all subsequently played notes will not be sustained. PE4------You can change the volume of the keyboard by the pedal. PE5------This function is the same as the [START/STOP] button on the front panel. Switches the rhythm on/off whenever you press the Left Foot-switch. PE6------This function is the same as the [FILL 1] button on the front panel. Let you add dynamic variations and breaks in the rhythm of the accompaniment. PE7------Anytime you store to a REGISTRATION MEMORY button, all settings previously stored in that button will be erased and replaced by the new settings. PEDALCHORDSPLITFULL KEYBOARDCHORD DICTIONARYSTYLEVOICEDEMO/LEARNPEDAL DUAL TOUCH REC. PLAY O.T.S Note: If PE4 is selected while you are using the sustain pedal, the pedal can only be used to turn on or off the keyboard volume.8 Volume Pedal(AD-type Pedal) If your pedal is a volume pedal, you have to preset it. Press the [REVERB], [TRANSPOSE] and [POWER ] button at the same time to enter the Pedal Setting Mode. Press the [+] (or [-]) button before stepping the pedal. Then step the pedal and press the [-] (or [+]) button. Then the LCD will show two values between 0 and 255. Press the button to save your redefined parameters. Note: If your instrument is restored, it will restore the current setting. [STORE/BANK] Play the Electronic Keyboard](https://usermanual.wiki/Ringway-Tech/TB688/User-Guide-2361921-Page-12.png)
![POWERKBD.MODECHORDSPLITFULL KEYBOARDCHORD DICTIONARYSTYLEVOICEDEMO/LEARNPEDAL DUAL TOUCH REC. PLAY O.T.SPEDAL TOUCH O.T.SKBD.MODESTORE/BANKPITCH BEND The PITCH BEND wheel is located on the left side of your keyboard that can be used to tune the pitch of the keyboard. Push the wheel upward, the keyboard pitch will be increased and pull wheel downward will decreased the keyboard pitch. Push the wheel to the top position for about 2 seconds, LCD will display the pitch range (pitch sensitivity). You can use the [+] and [-] or the number [0]-[9] buttons or the digital dial to set the pitch sensitivity: 1~ 12 semitones. When the power is turned ON, the preset sensitivity is +/- 2 semitones.PITCH BENDCHORDSPLITFULL KEYBOARDCHORD DICTIONARYSTYLEVOICEDEMO/LEARNPEDAL DUAL TOUCH REC. PLAY O.T.SPEDAL TOUCH O.T.STRANS./TUNEREVERB PEDALON OFF9KBD.MODECHORDSPLITFULL KEYBOARDCHORD DICTIONARYSTYLEVOICEDEMO/LEARNPEDAL DUAL TOUCH REC. PLAY O.T.SPEDAL TOUCH Touch Press [TOUCH] button, you can turn ON/OFF the touch function. When the Touch function is ON, the volume will be varied according to how hard you play on the keyboard.O.T.SPlay the Electronic Keyboard](https://usermanual.wiki/Ringway-Tech/TB688/User-Guide-2361921-Page-13.png)
![KBD.MODECHORDSPLITFULL KEYBOARDCHORD DICTIONARYSTYLEVOICEDEMO/LEARNPEDAL DUAL TOUCH REC. PLAY O.T.SPEDAL TOUCH O.T.STrans/Tune Hold down LCD will display the value of Reverb depth then you can use [+]/[-] buttons or number button to set the value:00-63(default:18). the [REVERB] button Press the [REVERB] button and then use the [+][-]buttons to select the Reverb types(10). Reverb Press the [Trans/Tune] button until the LCD display , it possible to shift the pitch of this instrument up or down in semitone intervals up to a maximum of 12 semitones ( total one octave). his function makes it possible to tune the pitch of your instrument to match other instruments. Tune can be accomplished over 50 cents range (that's 100 cents total, or one semitone) in 128 (-64~63) steps (approximately 0.8 cents per step).Press the [Trans/Tune] button until the LCD display , tKBD.MODECHORDSPLITFULL KEYBOARDCHORD DICTIONARYSTYLEVOICEDEMO/LEARNPEDAL DUAL TOUCH REC. PLAY O.T.SPEDAL TOUCH O.T.STRANS./TUNEREVERBTRANS./TUNEREVERB10 Press the [CHORUS] button and then use the [+]/[-]buttons to select the Chorus types (8). the [CHORUS] buttonHold down LCD will display the value of Chorus depth, then you can use [+]/[-] buttons or number button to set the value:00-63(default:18). ChorusPlay the Electronic Keyboard](https://usermanual.wiki/Ringway-Tech/TB688/User-Guide-2361921-Page-14.png)
![KBD.MODECHORDSPLITFULL KEYBOARDCHORD DICTIONARYSTYLEVOICEDEMO/LEARNPEDAL DUAL TOUCH REC. PLAY O.T.SPEDAL TOUCH O.T.SArpeggio RAn Arpeggio, also called broken chord , is a group of notes played in sequence from the lowest to the highest note or from the highest to the lowest note. It is a musical technique usually used in practicing songs. An arpeggio may be a melody part of songs and may be written with a squiggly vertical line in front of the chord. Arpeggio is divided into the Tonic Triad, Diminished Seventh Chords and Dominant Seventh Chord.Press the [ARPEGGIO] button and the LCD will show P1 , indicating the Arpeggio function is enabled. When P1 is selected, hold one key or several keys and you will hear the note played from the lowest to the highest. When P2 is selected, hold one key or several keys and you will hear the note played from the highest to the lowest. epeatedly press the [ARPEGGIO] button to turn off the Arpeggio function.Mixer This function can set Accompaniment Volume, Main Volume, Split Volume, DualVolume and Metronome Volume.TEMPO/TAP CHORUSKBD.MODECHORDSPLITFULL KEYBOARDCHORD DICTIONARYSTYLEVOICEDEMO/LEARNPEDAL DUAL TOUCH REC. PLAY O.T.SPEDAL TOUCH O.T.SMIXERARPEG.11 Press the [MIXER] button repeatedly to select , then use buttons to set the Accompaniment Volume. Range: 00~15. Default: 12 [+]/[-] buttons or number Accompaniment VolumePlay the Electronic Keyboard](https://usermanual.wiki/Ringway-Tech/TB688/User-Guide-2361921-Page-15.png)
![KBD.MODECHORDSPLITFULL KEYBOARDCHORD DICTIONARYSTYLEVOICEDEMO/LEARNPEDAL DUAL TOUCH REC. PLAY O.T.SPEDAL TOUCH O.T.SDual Volume Press the [MIXER] button repeatedly to select , then use to set the Dual Volume. Range: 00~127. Default: 75. [+]/[-] buttons or number buttons Press the [MIXER] button repeatedly to select , then use to set the Split Volume. Range: 00~127. Default: 127. [+]/[-] buttons or number buttonsS. Volume Press the [MIXER] button repeatedly to select , then use to set the Main Volume. Range: 00~127. Default: 127. [+]/[-] buttons or number buttons M. VolumeKBD.MODECHORDSPLITFULL KEYBOARDCHORD DICTIONARYSTYLEVOICEDEMO/LEARNPEDAL DUAL TOUCH REC. PLAY O.T.SPEDAL TOUCH O.T.SKBD.MODECHORDSPLITFULL KEYBOARDCHORD DICTIONARYSTYLEVOICEDEMO/LEARNPEDAL DUAL TOUCH REC. PLAY O.T.SPEDAL TOUCH O.T.SMIXERARPEG.MIXERARPEG.MIXERARPEG.12Play the Electronic Keyboard](https://usermanual.wiki/Ringway-Tech/TB688/User-Guide-2361921-Page-16.png)
![Grand Piano GRAND PIANODual Press the [GRAND PIANO] button. This convenient function allows you to instantly call up the Grand Piano voice.Metronome Volume Press the [MIXER] button repeatedly to select , then use to set the Metronome Volume. Range: 00~127. Default: 127. [+]/[-] buttons or number buttons This function is capable of enhancing the delicacy of your music by playing two voices of musical instruments simultaneously; new combinations of voices and music could be created then. Press [+]/[-] buttons or number button to select your desired voice. Press [DUAL] button again to turn off the dual voice When the cursor is stop flashing, you can select the main voices. .KBD.MODECHORDSPLITFULL KEYBOARDCHORD DICTIONARYSTYLEVOICEDEMO/LEARNPEDAL DUAL TOUCH REC. PLAY O.T.SPEDAL TOUCH O.T.SKBD.MODECHORDSPLITFULL KEYBOARDCHORD DICTIONARYSTYLEVOICEDEMO/LEARNPEDAL DUAL TOUCH REC. PLAY O.T.SPEDAL TOUCH O.T.SKBD.MODECHORDSPLITFULL KEYBOARDCHORD DICTIONARYSTYLEVOICEDEMO/LEARNPEDAL DUAL TOUCH REC. PLAY O.T.SPEDAL TOUCH O.T.SMIXERARPEG.VOICE/STYLEDUALMIXERARPEG.13Play the Electronic Keyboard](https://usermanual.wiki/Ringway-Tech/TB688/User-Guide-2361921-Page-17.png)
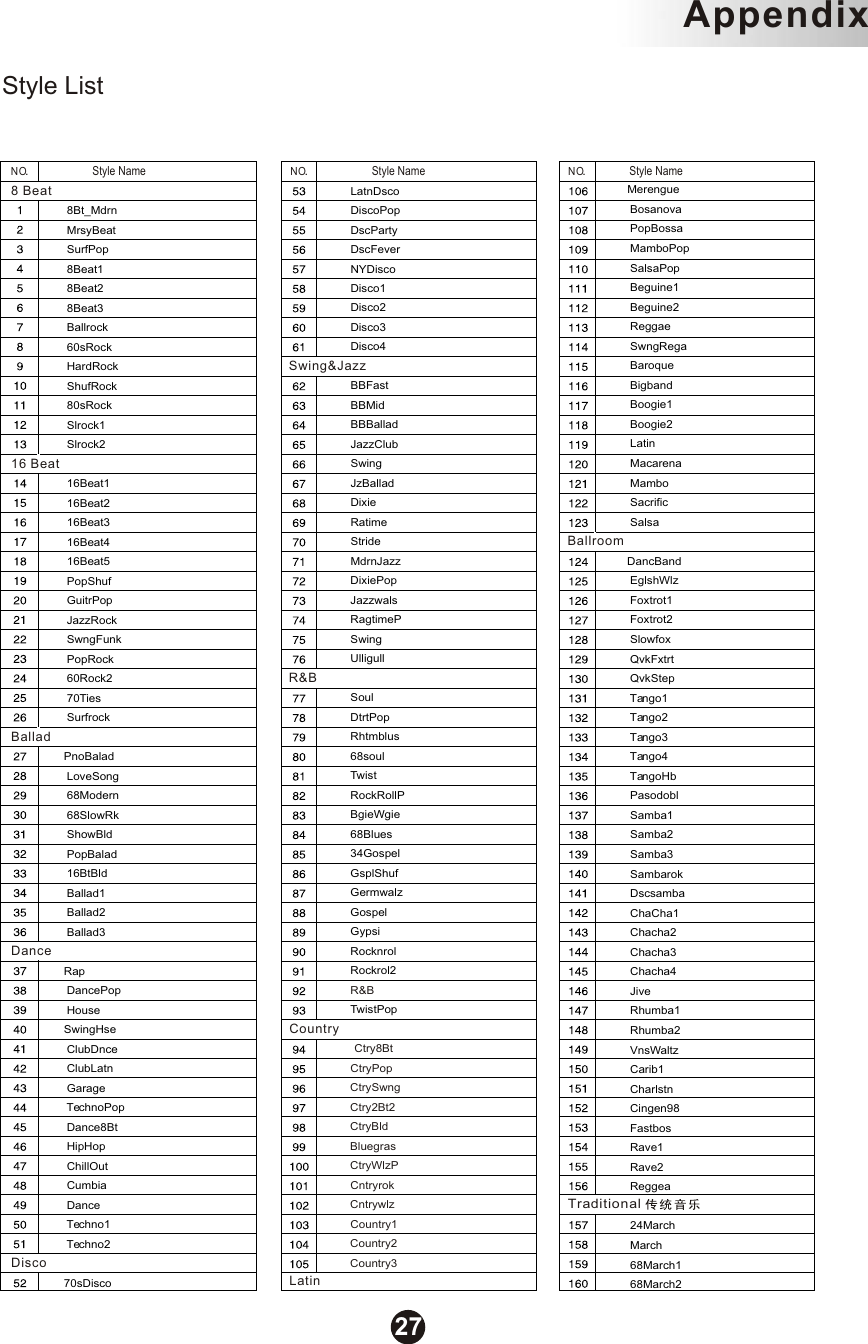
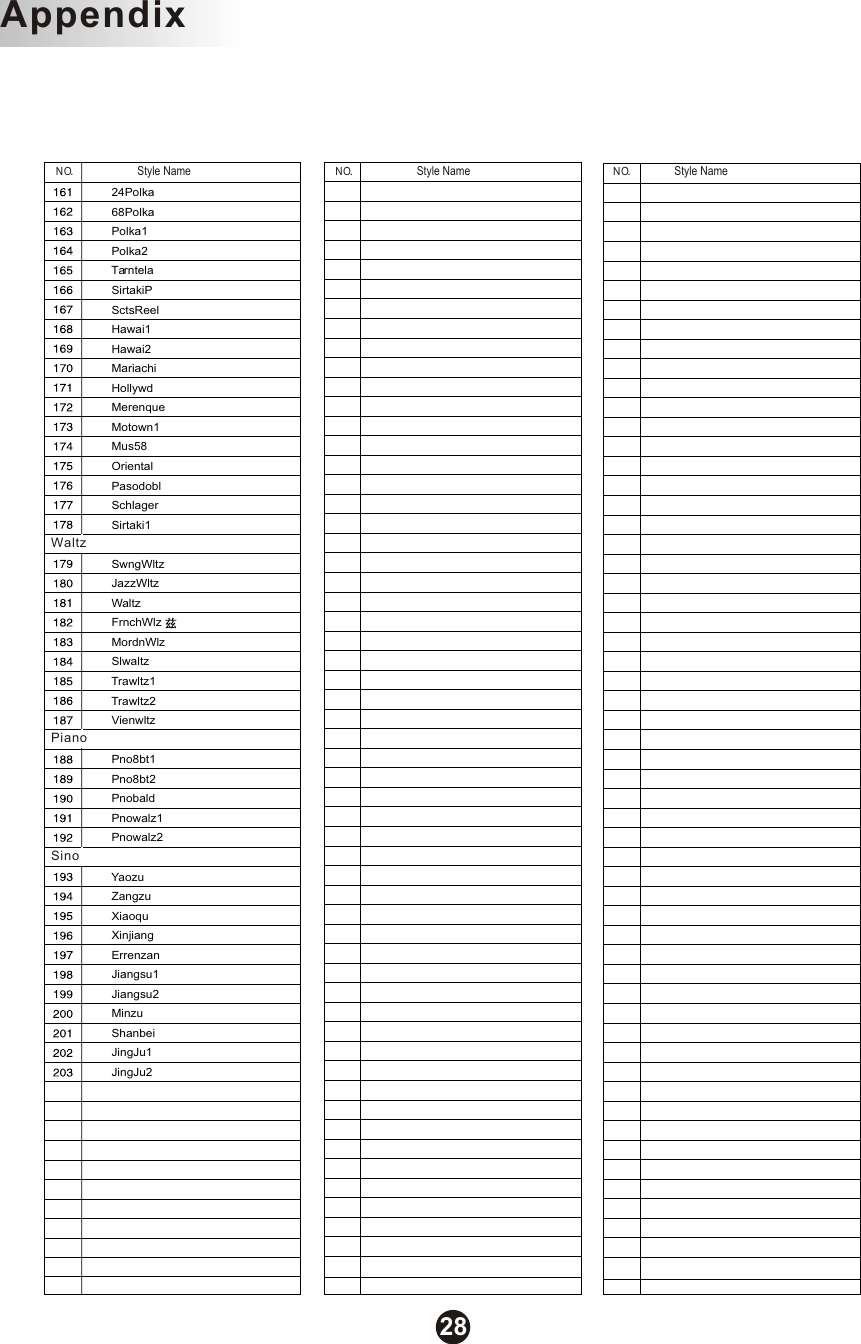
![Press the [VOICE/STYLE] button to let the Active Input Arrow point to string STYLE . The style number will appear on the MULTI DISPLAY. You can use the [+] and [-] buttons or the number buttons to select the required style number(00 through 203). You can use [+]/[-] buttons or number buttons to select the desired style. 1~9 style: press 01~09. 10~99 style: press 10~99. 100~203 style: hold the [1] button till the LCD displays: 1_ , then enter the tens digit and single digits. The keyboard has a total of 203 accompaniment styles which can be used to provideFully-orchestrated Auto Accompaniment. When the Auto Accompaniment function is turned on, , bass and chord accompaniment Auto Accompaniment section of the keyboard (i.e. all keys to the left of the Auto Accompaniment split point). The right-hand section of the keyboard is available for normal playing.The default Auto Accompaniment split point is the key. The Auto Accompaniment section of the keyboard consists of all keys to its left.this instrument creates fully-orchestrated rhythmbased on chord s that you play with the left hand, in the F 2Turn Chord On/Off Press the [KBD.MODE] button repeatedly to select CHORD and its Active Input Arrow lights. The specified left-hand section of the keyboard becomes the Auto Accompaniment section,and chords played in this section are automatically detected and used as a basis for fully automatic accompaniment with the selected style. Auto AccompanimentKBD.MODECHORDSPLITFULL KEYBOARDCHORD DICTIONARYSTYLEVOICEDEMO/LEARNPEDAL DUAL TOUCH REC. PLAY O.T.SPEDAL TOUCH O.T.SVOICE/STYLEDUAL14Selecting a Style](https://usermanual.wiki/Ringway-Tech/TB688/User-Guide-2361921-Page-18.png)
![Full Keyboard This function detects chord in entire key range. Chords are detected in a way similar to fingered, even if you split the notes between your left and right hands. For example: playing a bass note with your left hand and a chord with you right, or by playing a chord with your left hand and a melody note with your right. Press [FULL KEYBOARD] button to enter the Full Keyboard mode. FULL KEYBOARD signal appears in the display. Press [SYNCHRO] button to enter the sync start waiting mode, play the keyboard to start the accompaniment. Press [KBD.MODE] repeatedly to turn off the full keyboard function and the cusior will disappear.Auto AccompanimentKBD.MODECHORDSPLITFULL KEYBOARDCHORD DICTIONARYSTYLEVOICEDEMO/LEARNPEDAL DUAL TOUCH REC. PLAY O.T.SPEDAL TOUCH O.T.SKBD.MODECHORDSPLITFULL KEYBOARDCHORD DICTIONARYSTYLEVOICEDEMO/LEARNPEDAL DUAL TOUCH REC. PLAY O.T.SPEDAL TOUCH O.T.S15](https://usermanual.wiki/Ringway-Tech/TB688/User-Guide-2361921-Page-19.png)
![START/STOP INTRO/ENDING SYNCHRO START/STOP INTRO/ENDING SYNCHRO START/STOP INTRO/ENDING FILL INSYNCHRO The [START/STOP] button starts the selected accompaniment style immediately. Selecting the Chord mode(Reference:Turn chord on/off P.14) . The left hand section of the keyboard becomes the Auto Accompaniment section, and chords played in this section are automatically detected and used as a basis for fully automatic accompaniment with the selected style.Accompaniment Control Any of your instrument accompaniment patterns can be started with an appropriate introduction by pressing the [INTRO/ENDING] button directly. If you press the [SYNCHRO] button and then the [INTRO/ENDING] button, the accompaniment will start from the introduction as soon as a chord is detected in the AUTO ACCOMPANIMENT section of the keyboard.Metronome Press the [FILL IN] button at any time while the accompaniment is playing to add a one-measure fill-in. If you hold the [FILL IN] button , the fill-in pattern will repeat until the button is released , then the MAIN section will play from the beginning of the next measure. Press the [SYNCHRO] button, then the accompaniment will start when you play the first chord on the AUTO ACCOMPANIMENT section of the keyboard. The metronome sound may be alternately turned on and turned off by pressing the [METRONOME] button. Time signature: 2/2,1/4, 2/4, 3/4, 4/4, 5/4,6/4, 3/8, 6/8, 7/8,9/8,12/8. 4/4Hold the [METRONOME] button to enter the page for selecting the time signature. Then use the [+] /[-] buttons to select your desired time signature.(Default: )Auto AccompanimentSTART/STOP INTRO/ENDING SYNCHRO 16FILL INFILL IN](https://usermanual.wiki/Ringway-Tech/TB688/User-Guide-2361921-Page-20.png)
![Overall ControlTempo O.T.S METRONOMETEMPO/TAPCHORUS This function is actually a convenient feature to automatically select a suitable voice to match your selected style. Press the [O.T.S] button to enter this mode and the arrow point strings to O.T.S . Press the [O.T.S] button repeatedly to turn on or turn off One Touch Setting function.In addition, various panel settings (such as voice, effect, Tempo, etc.) that match the selected style can be recalled with just a single button [O.T.S]. If you want to set the tempo before starting rhythm, you have to tap the button 4 times. This function allows you to set the rhythm tempo by tapping in tempo on [TEMPO/TAP] button. Tap on the button 2 times while rhythm is playing, The rhythm tempo are set as your desired speed.Auto AccompanimentKBD.MODECHORDSPLITFULL KEYBOARDCHORD DICTIONARYSTYLEVOICEDEMO/LEARNPEDAL DUAL TOUCH REC. PLAY O.T.SPEDAL TOUCH O.T.SKBD.MODECHORDSPLITFULL KEYBOARDCHORD DICTIONARYSTYLEVOICEDEMO/LEARNPEDAL DUAL TOUCH REC. PLAY O.T.SPEDAL TOUCH O.T.SKBD.MODECHORDSPLITFULL KEYBOARDCHORD DICTIONARYSTYLEVOICEDEMO/LEARNPEDAL DUAL TOUCH REC. PLAY O.T.SPEDAL TOUCH O.T.S17](https://usermanual.wiki/Ringway-Tech/TB688/User-Guide-2361921-Page-21.png)
![STORE/BANK M1 M2 M3 M4 / M1 M2 M3 M4 Your instrument REGISTRATION MEMORY can be used to store 4 sets of VOICE and AUTO ACCOMPANIMENT settings that can be recalled during you playing at the touch of one single button. The main voice number (right hand), split voice number (left hand), sustain and touch status, tempo value, transpose value, Auto Accompaniment volume (ACC VOL) Chord and split status can be restored to REGISTRATION MEMORY.Memorizing the settings The panel settings listed above can be stored to any one of the 4 registration memory buttons by pressing the button [M1] ,[M2] , [M3] or [M4] while holding the [STORE/BANK] button . The [S-1]-[S-4] will appear on the LCD display. Press the [STORE/BANK] button repeatedly to change the banks:1-8. The defalut bank is :1. Recalling the settings The settings stored to a REGISTRATION MEMORY button can be recalled simply by pressing the [M1]-[M4] button. The [E-1]-[E-4] will appear on the LCD display.Registration Memory KBD.MODECHORDSPLITFULL KEYBOARDCHORD DICTIONARYSTYLEVOICEDEMO/LEARNPEDAL DUAL TOUCH REC. PLAY O.T.SPEDAL TOUCH O.T.SSTORE/BANKKBD.MODECHORDSPLITFULL KEYBOARDCHORD DICTIONARYSTYLEVOICEDEMO/LEARNPEDAL DUAL TOUCH REC. PLAY O.T.SPEDAL TOUCH O.T.S18](https://usermanual.wiki/Ringway-Tech/TB688/User-Guide-2361921-Page-22.png)
![Play Press [PLAY] button, you can enjoy the song you have recorded. Now you can follow the song by playing the keyboard and change the tempo of the song by press [TEMPO/TAP]button. Press [PLAY] button again, the playing will be ended.Record and Play Your instrument allows you to record and playback what you have played on the keyboard include part panel operation. Record Press the [RECORD] button to start recording and the arrow point to RECORD. Press this [RECORD] button again to stop recording.KBD.MODECHORDSPLITFULL KEYBOARDCHORD DICTIONARYSTYLEVOICEDEMO/LEARNPEDAL DUAL TOUCH REC. PLAY O.T.SPEDAL TOUCH O.T.SKBD.MODECHORDSPLITFULL KEYBOARDCHORD DICTIONARYSTYLEVOICEDEMO/LEARNPEDAL DUAL TOUCH REC. PLAY O.T.SPEDAL TOUCH O.T.SRECORD PLAYDEMO/LEARNRECORD PLAYDEMO/LEARN19](https://usermanual.wiki/Ringway-Tech/TB688/User-Guide-2361921-Page-23.png)
![C mM7 M7 M DBC#/Db D#/EbEFF#/GbGG#/AbAA#/BbM6m(9)6m7(9)m7m7b5m7M(9)M The Chord Dictionary function allows you to look up chords. When you want to quickly learn how to play a certain chord, the Dictionary function will help you to look up the individual notes of the chord.Chord Dictionary Press the [KBD.MODE] Button repeatedly to select Chord Dictionary, the arrow point to Chord Dictionary. Select the Chord RootPress the root note of the Chord you want to look up. This needs to be in the Chord Root section of the keyboard. For example:Select the Chord TypeAfter pressing the Chord Root, select the Chord Type you want to look up in the Chord Type section of the keyboard. The Chord Type includes Major Triad, Minor Triad and Seventh Chord. Then the LCD will display the Chord Type and key position you currently want to look up. If you press the correct key as the notes shown on the LCD, the beep will sound. Exit the Chord DictionaryPress the [KBD.MODE] button again to exit the function.Chord DictionaryKBD.MODECHORDSPLITFULL KEYBOARDCHORD DICTIONARYSTYLEVOICEDEMO/LEARNPEDAL DUAL TOUCH REC. PLAY O.T.SPEDAL TOUCH O.T.S20](https://usermanual.wiki/Ringway-Tech/TB688/User-Guide-2361921-Page-24.png)
![Teaching Function Hold down the [DEMO/LEARN] button to enter the Learn mode and the LCDwill display . You can use[+] [-] button or number button to select lean songs and then press [PLAY] button to start learning function. When you on the keyboard, the teaching song will be layed note by note. Making it L1play a keyeasy and fun for you to learn. Your instrument has a teaching function which can teach a beginner how to play a song. learn by playing There are three teaching steps for you to the songs step by step. After playing the learning song two seconds ,it will stop learning state, you can press until the screen does not display the "L" to exit this function. [DEMO/LEARN] button repeatedly After playing the learning song two seconds ,it will stop learning state, you can press until the screen does not display the "L" to exit this function. [DEMO/LEARN] button repeatedly Hold down the [DEMO/LEARN] button to enter the Learn mode and press [DEMO/LEARN] button repeat to select . You can use[+] [-] button or number button to select lean songs and then press [PLAY] button to start learning function. The learning song will until you play the correct key on the keyboard. L2continue You can quickly master these songs in a very short time.Learn 2Learn 1KBD.MODECHORDSPLITFULL KEYBOARDCHORD DICTIONARYSTYLEVOICEDEMO/LEARNPEDAL DUAL TOUCH REC. PLAY O.T.SPEDAL TOUCH O.T.SKBD.MODECHORDSPLITFULL KEYBOARDCHORD DICTIONARYSTYLEVOICEDEMO/LEARNPEDAL DUAL TOUCH REC. PLAY O.T.SPEDAL TOUCH O.T.SRECORD PLAYDEMO/LEARNRECORD PLAYDEMO/LEARN21](https://usermanual.wiki/Ringway-Tech/TB688/User-Guide-2361921-Page-25.png)
![After playing the learning song two seconds ,it will stop learning state, you can press until the screen does not display the "L" to exit this function. [DEMO/LEARN] button repeatedly Hold down the [DEMO/LEARN] button to enter the Learn mode and press [DEMO/LEARN] button repeat to select . You can use[+] [-] button or number button to select lean songs and then press [PLAY] button to start learning function. You can play the song with the instrumentation playing. L3Now you can play this song by yourself.Learn 3Teaching FunctionKBD.MODECHORDSPLITFULL KEYBOARDCHORD DICTIONARYSTYLEVOICEDEMO/LEARNPEDAL DUAL TOUCH REC. PLAY O.T.SPEDAL TOUCH O.T.SRECORD PLAYDEMO/LEARN22](https://usermanual.wiki/Ringway-Tech/TB688/User-Guide-2361921-Page-26.png)
![30SpecificationsDC12V, Phones/Line Out, Line In, Pedal, Mic, USB To Host Keyboard: Display: Number Buttons: Voices: Polyphony: Voice Control: Auto accompaniment: Accompaniment Control: Keyboard Modes: Setup: Registration Memory: DEMO: Recording: Dimensions(W x D x H): Weight: Interface:61 standard-size touch sensitivity keys(C1 through C6) Multi-Function LCD [0]-[9],[+],[-]47932Sustain, Transpose, Pitch Bend, Touch, Mixer203 StylesSynchro, Start/Stop, Intro/Ending, Fill In, Tempo/Tap, Accompaniment Volume, MetronomeFullkeyboard, Split, ChordPower(ON/OFF), Master Volume(MIN-MAX)Store, M1-M4Demo Songs: 5,Learning Songs:100Record, Play 950mm x 350mm x 130mm6kgsAppendix](https://usermanual.wiki/Ringway-Tech/TB688/User-Guide-2361921-Page-34.png)