Samsung Electronics Co SGHM919 Multi-band WCDMA/GSM/EDGE/LTE Phone with WLAN, Bluetooth and RFID User Manual T Mobile SGH M919 Samsung Galaxy S 4
Samsung Electronics Co Ltd Multi-band WCDMA/GSM/EDGE/LTE Phone with WLAN, Bluetooth and RFID T Mobile SGH M919 Samsung Galaxy S 4
Contents
Users Manual 3


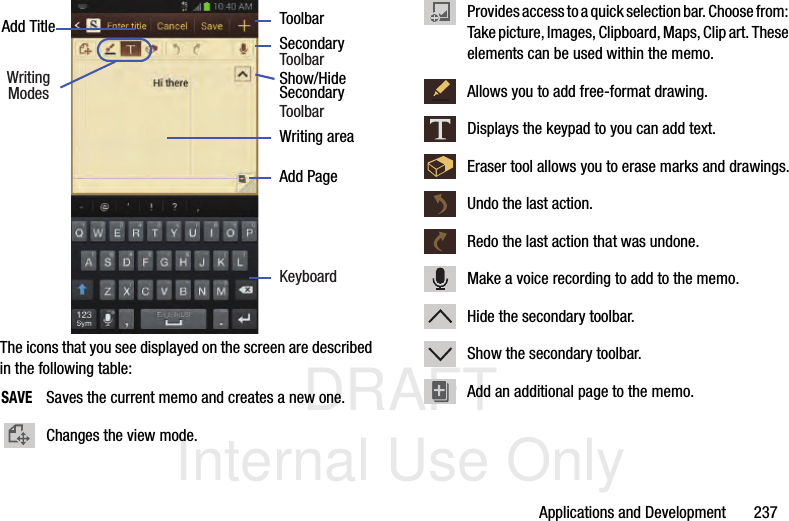
![DRAFT Internal Use OnlyApplications and Development 207Section 9: Applications and DevelopmentThis section contains a description of each application that is available in the Applications Menu, its function, and how to navigate through that particular application. If the application is already described in another section of this user manual, then a cross reference to that particular section is provided.Note: This manual only addresses applications that have been loaded on your [device/computer/tablet] as of the date of purchase. Information concerning third party applications that you may choose to download from the Google Play Store or otherwise should be obtained from the application provider directly.Tip: To open applications quickly, add the icons of frequently-used applications to one of the Home screens. For more information, refer to “Customizing the Screens” on page 60.You can also add an application icon as a Primary Shortcut that will display on all Home screens. If you add an application as a primary shortcut, the application icon will not be displayed in the Applications menu. ApplicationsThe Applications list provides quick access to all the available applications on the phone. CalculatorUsing this feature allows you to use your device as a calculator. The calculator provides the basic arithmetic functions; addition, subtraction, multiplication, and division. You can also use this as a scientific calculator.1. From the Home screen, tap (Apps) ➔ (Calculator). 2. Enter the first number using the numeric keys.3. Enter the operation for your calculation by tapping the Plus, Minus, Multiplication, or Division key.4. Enter the next number.5. To view the result, tap the = (equals) key.6. Repeat steps 1 to 4 as many times as required.Note: Place the screen in Landscape mode to reveal additional scientific functions.](https://usermanual.wiki/Samsung-Electronics-Co/SGHM919.Users-Manual-3/User-Guide-1933697-Page-17.png)

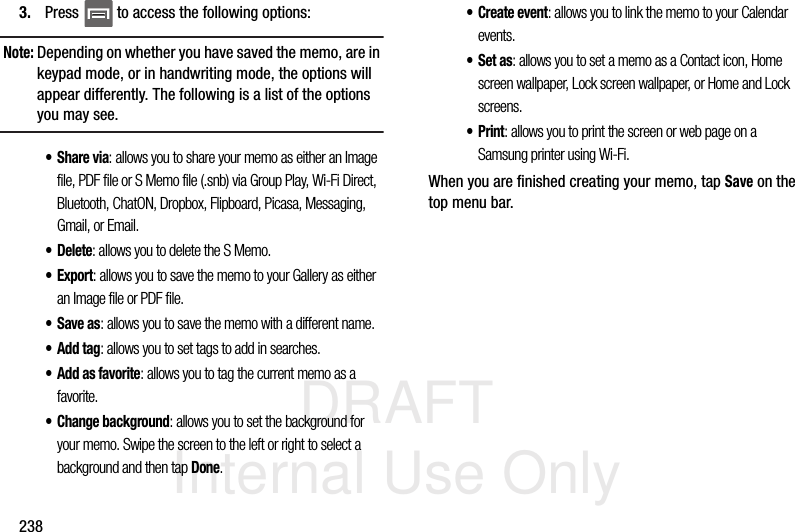
![DRAFT Internal Use OnlyApplications and Development 221InternetOpen the browser to start surfing the web. The browser is fully optimized and comes with advanced functionality to enhance the Internet browsing feature on your phone. From the Home screen, tap (Apps) ➔ (Internet).For more information, refer to “Internet” on page 254.LocalLocal (formerly known as Google Places) displays company logos on a layer of Google Maps. When viewing an area you can quickly locate a business or person, find out more information about the business, see coupons, public responses, and more.1. From the Home screen, tap (Apps) ➔ (Local).2. Tap (Search) and then use the Search Maps field to manually enter a desired place or choose from among the various categories. Matches are filtered by those closest to your current location.3. Locate and tap one of the listed places (Restaurants, Cafes, Bars, Attractions, [user added searches], RECOMMENDATIONS, or IN THIS AREA a list of places within this category displays.4. Tap the Maps icon to launch the related maps feature.5. Press and then tap Add a search. The functions adds additional search shortcuts to the places screen.](https://usermanual.wiki/Samsung-Electronics-Co/SGHM919.Users-Manual-3/User-Guide-1933697-Page-31.png)