Shin Chuan Computer SC600PDT-BWG Portable Data Terminal User Manual SC600 SC620 FCC comment rev070410

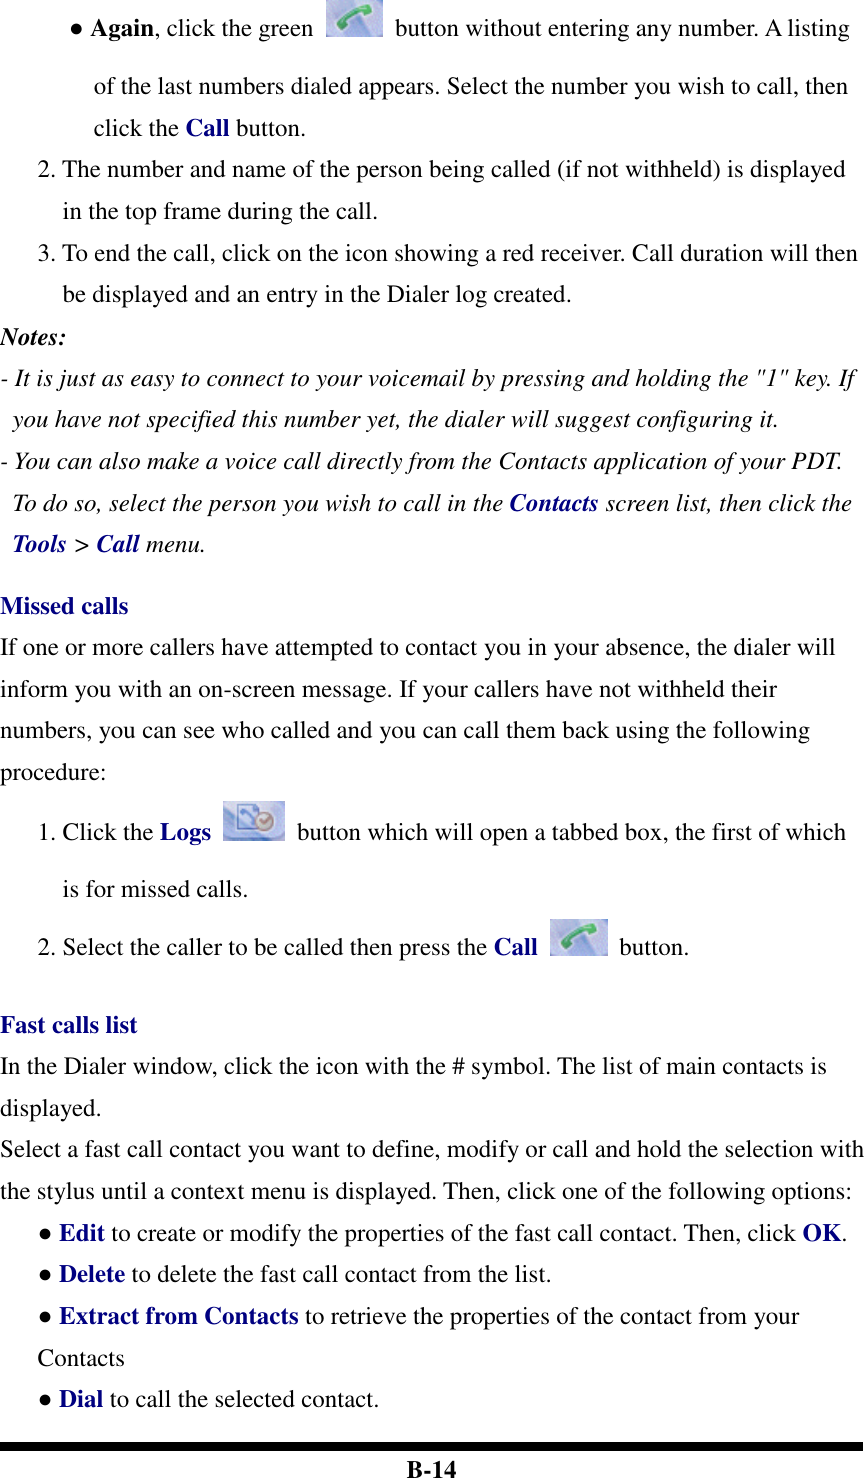
Shin Chuan Computer Co., Ltd. Portable Data Terminal SC600 SC620 FCC comment rev070410

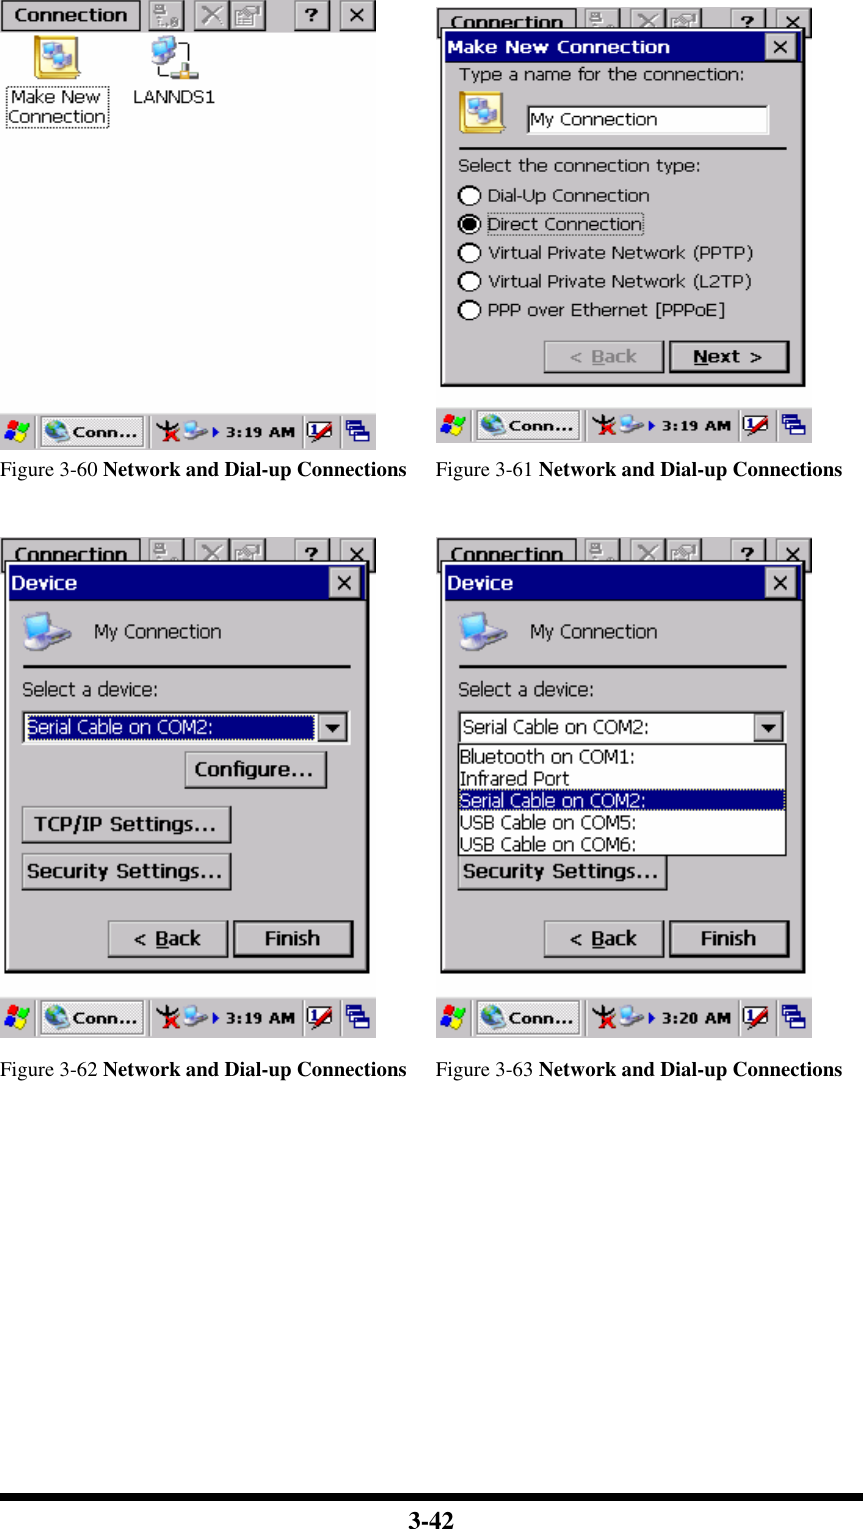
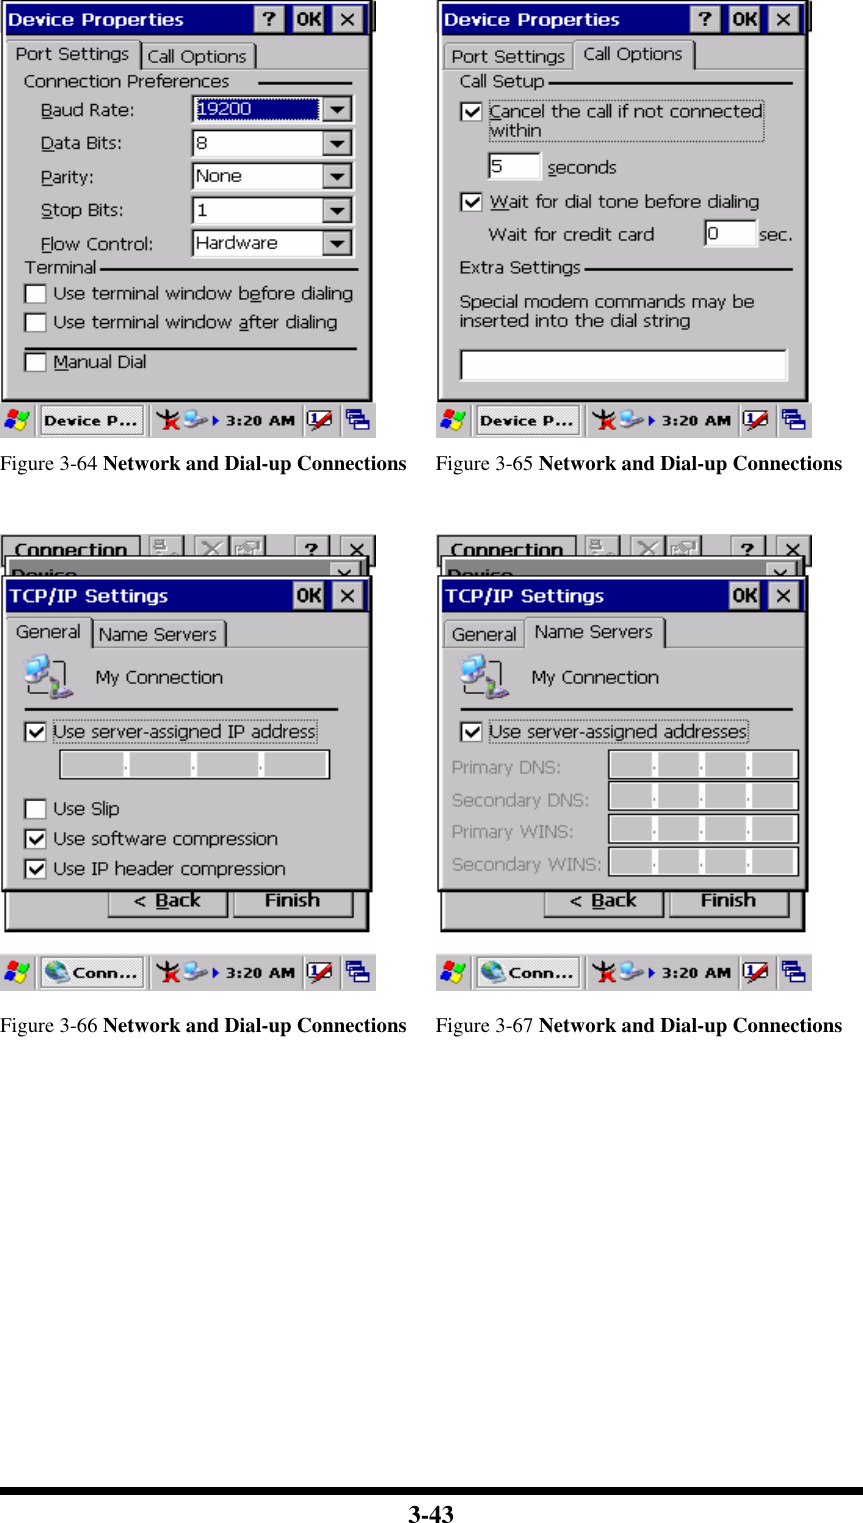
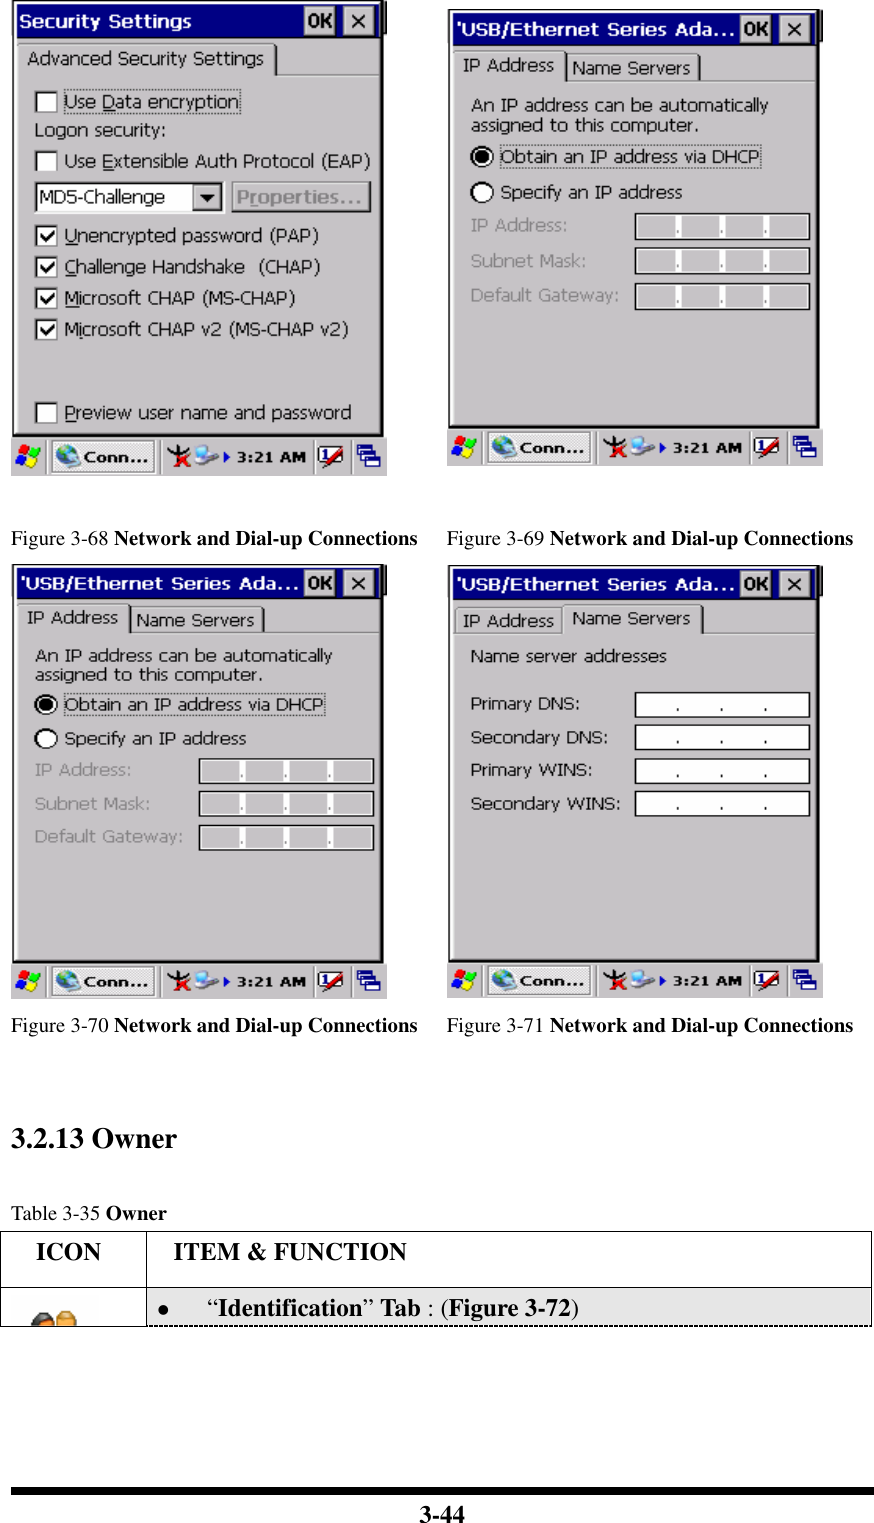
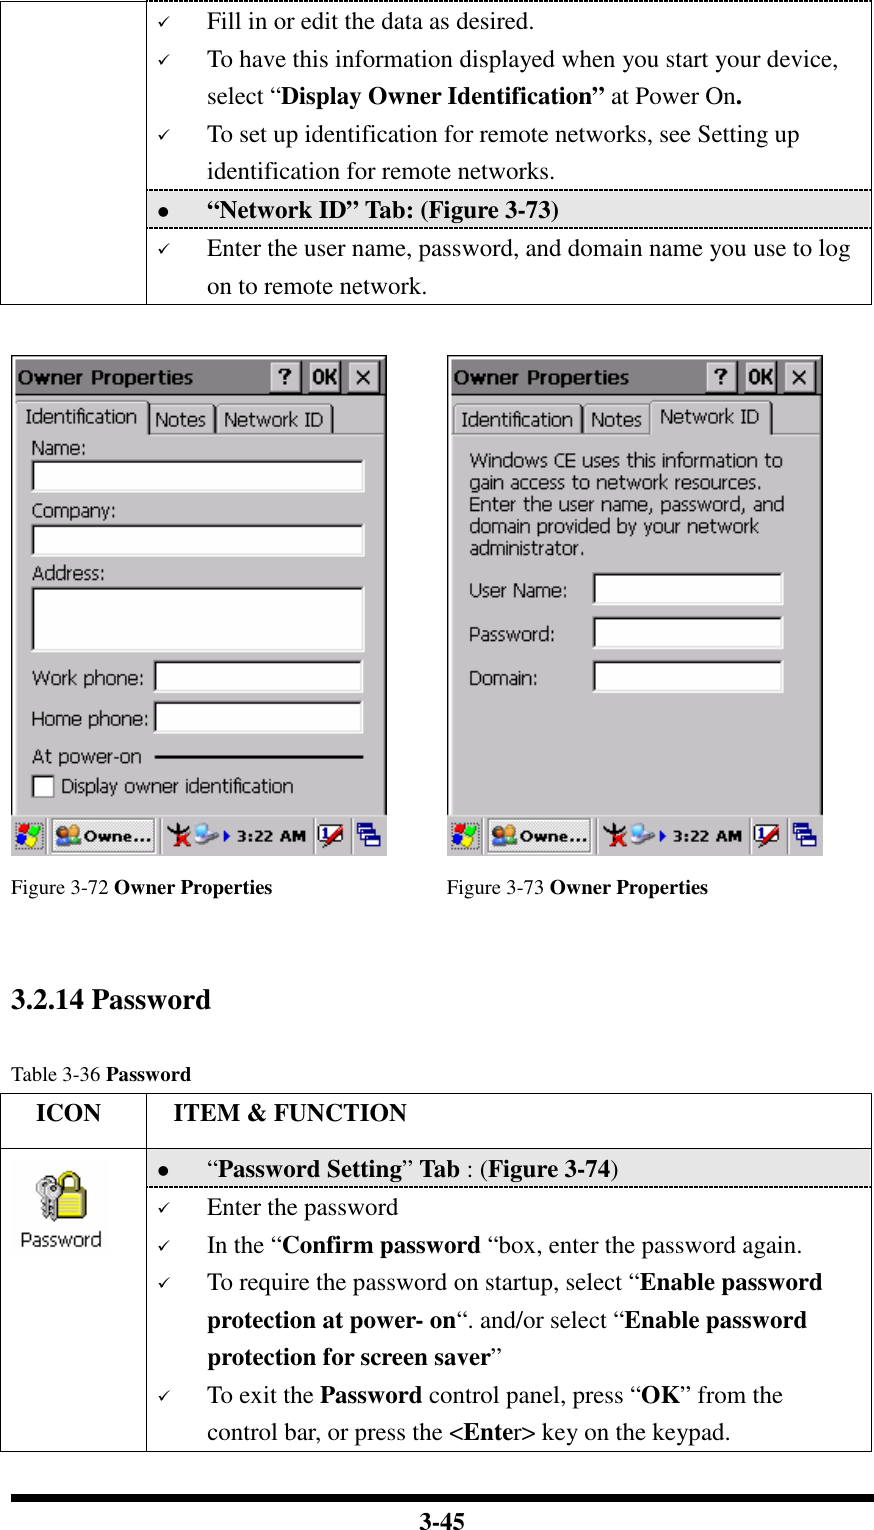
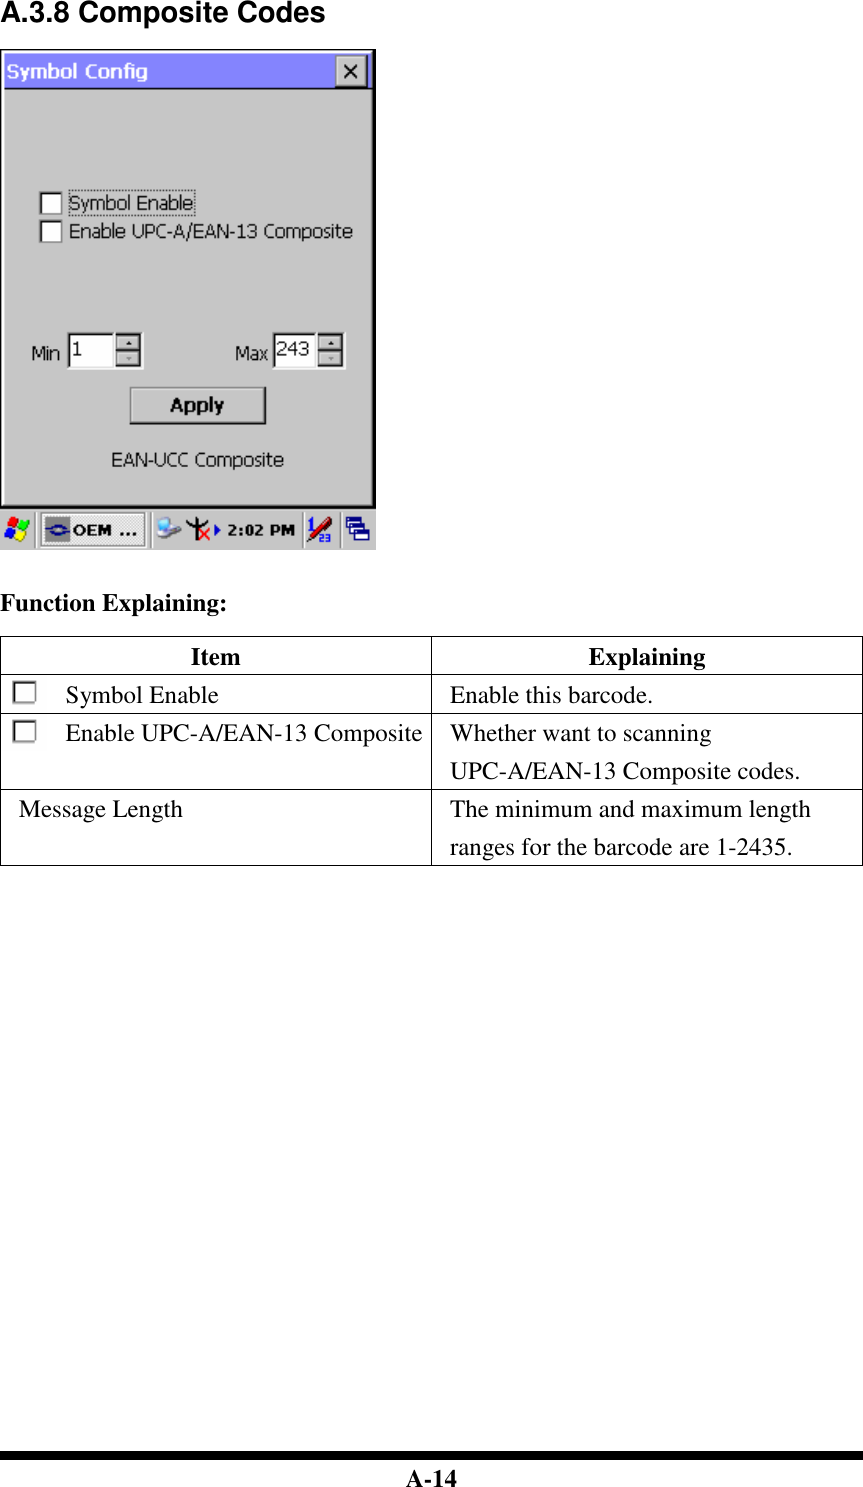
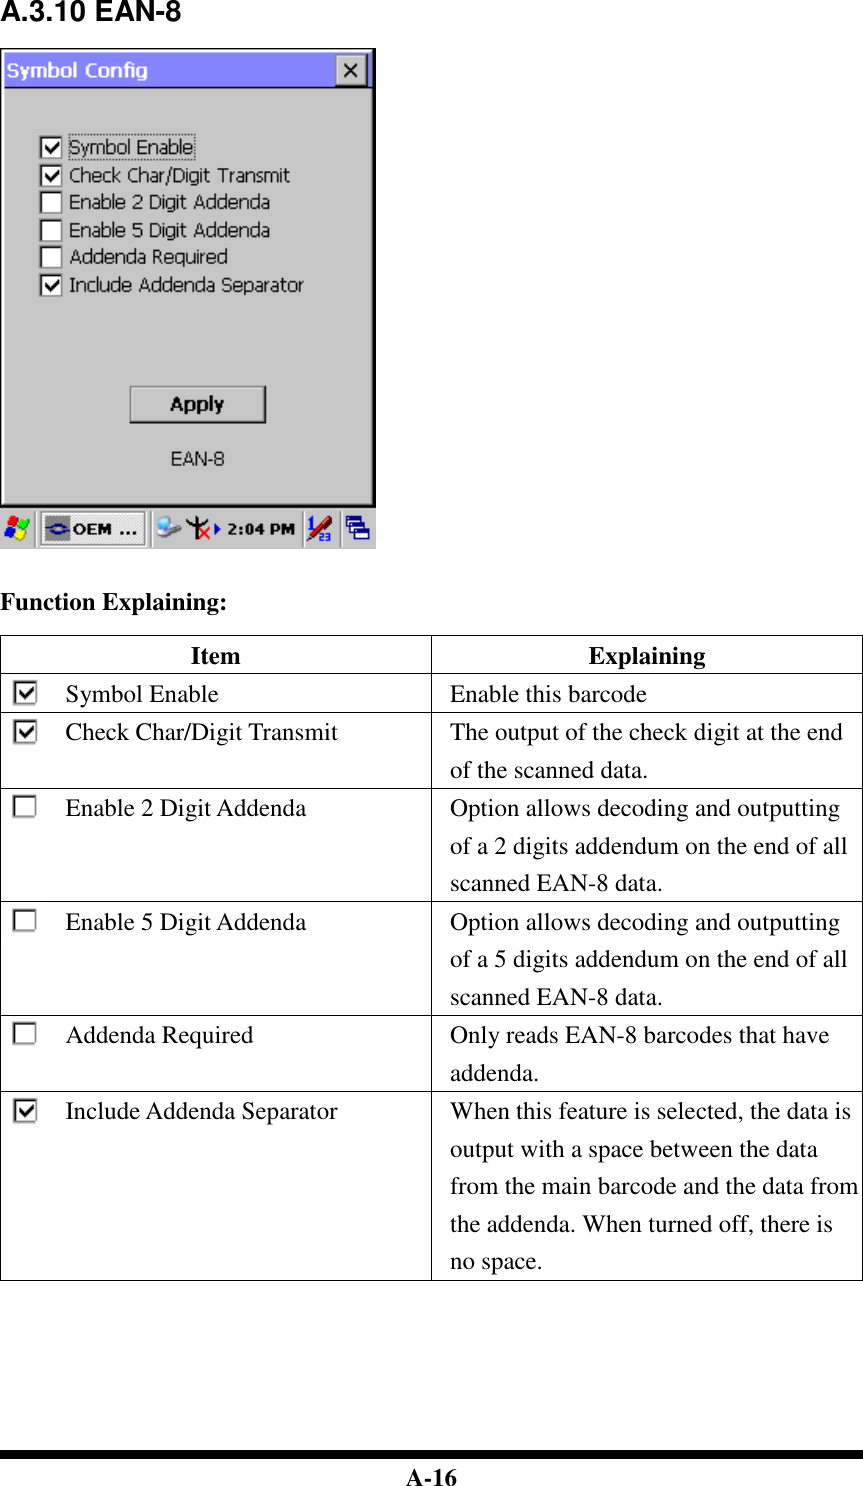
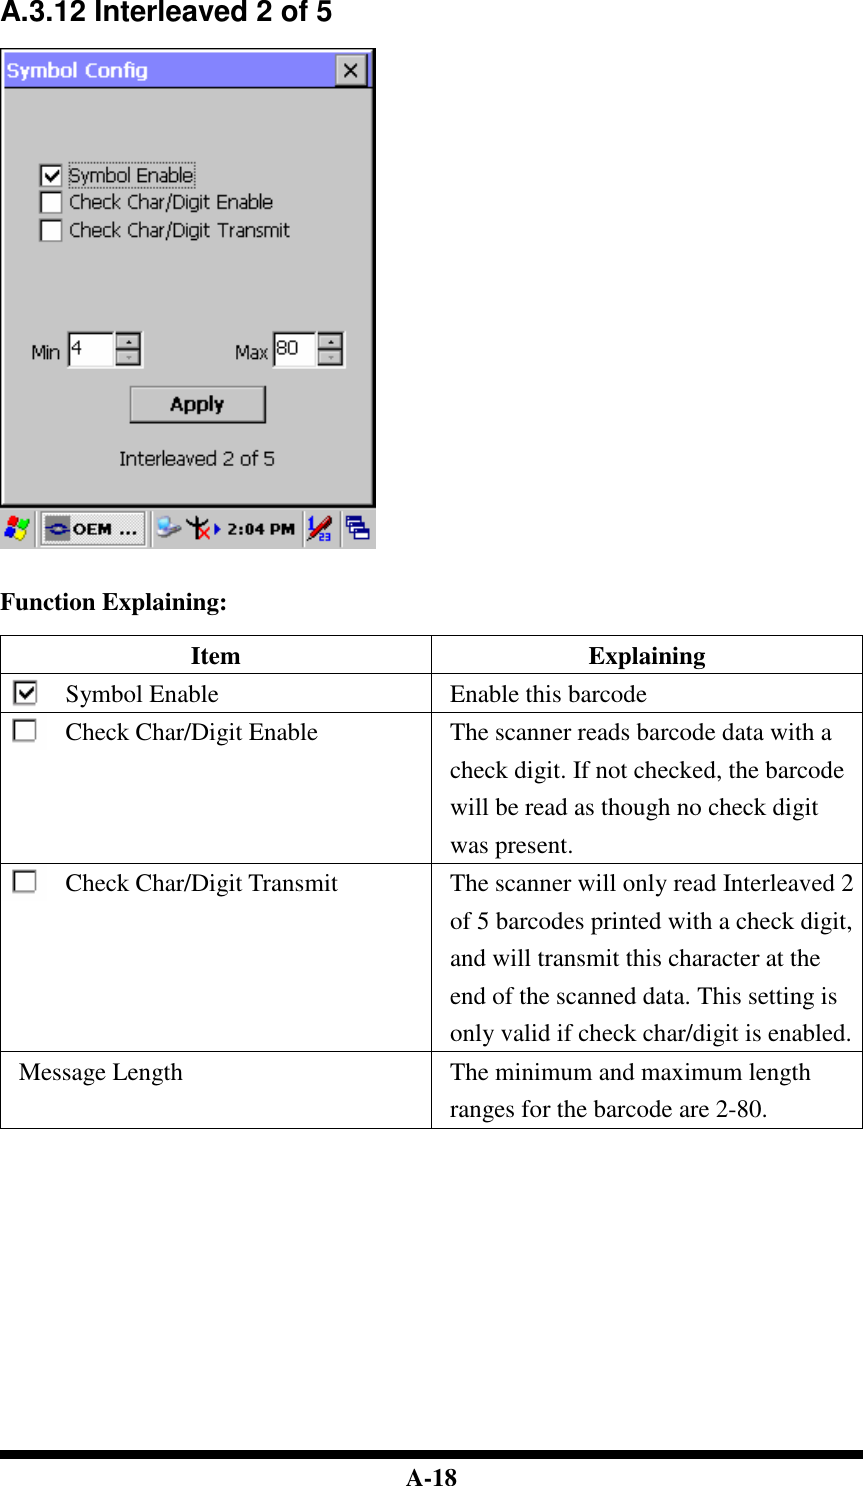
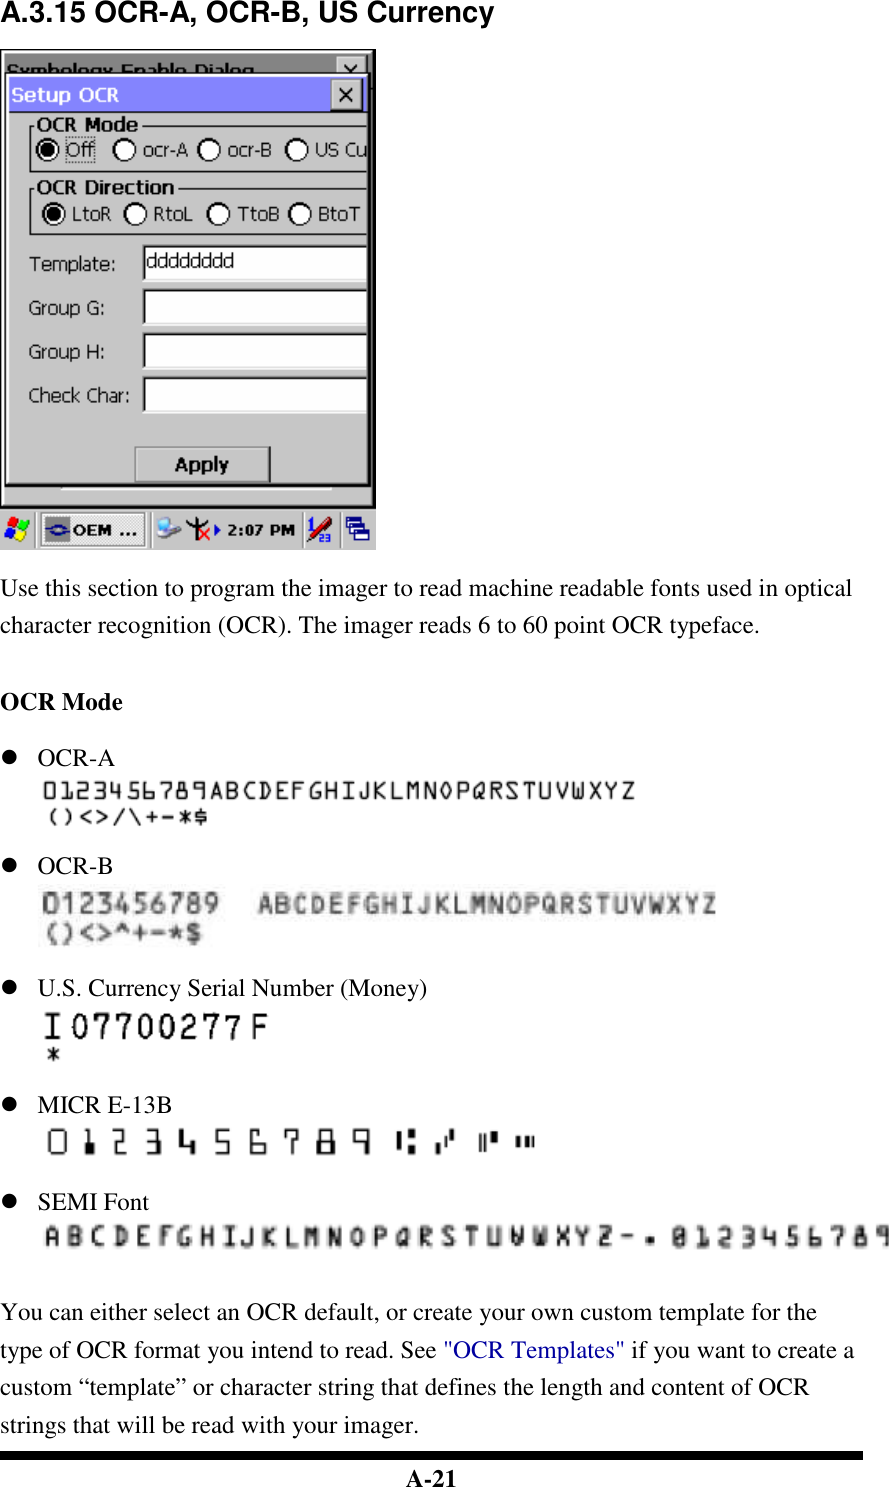
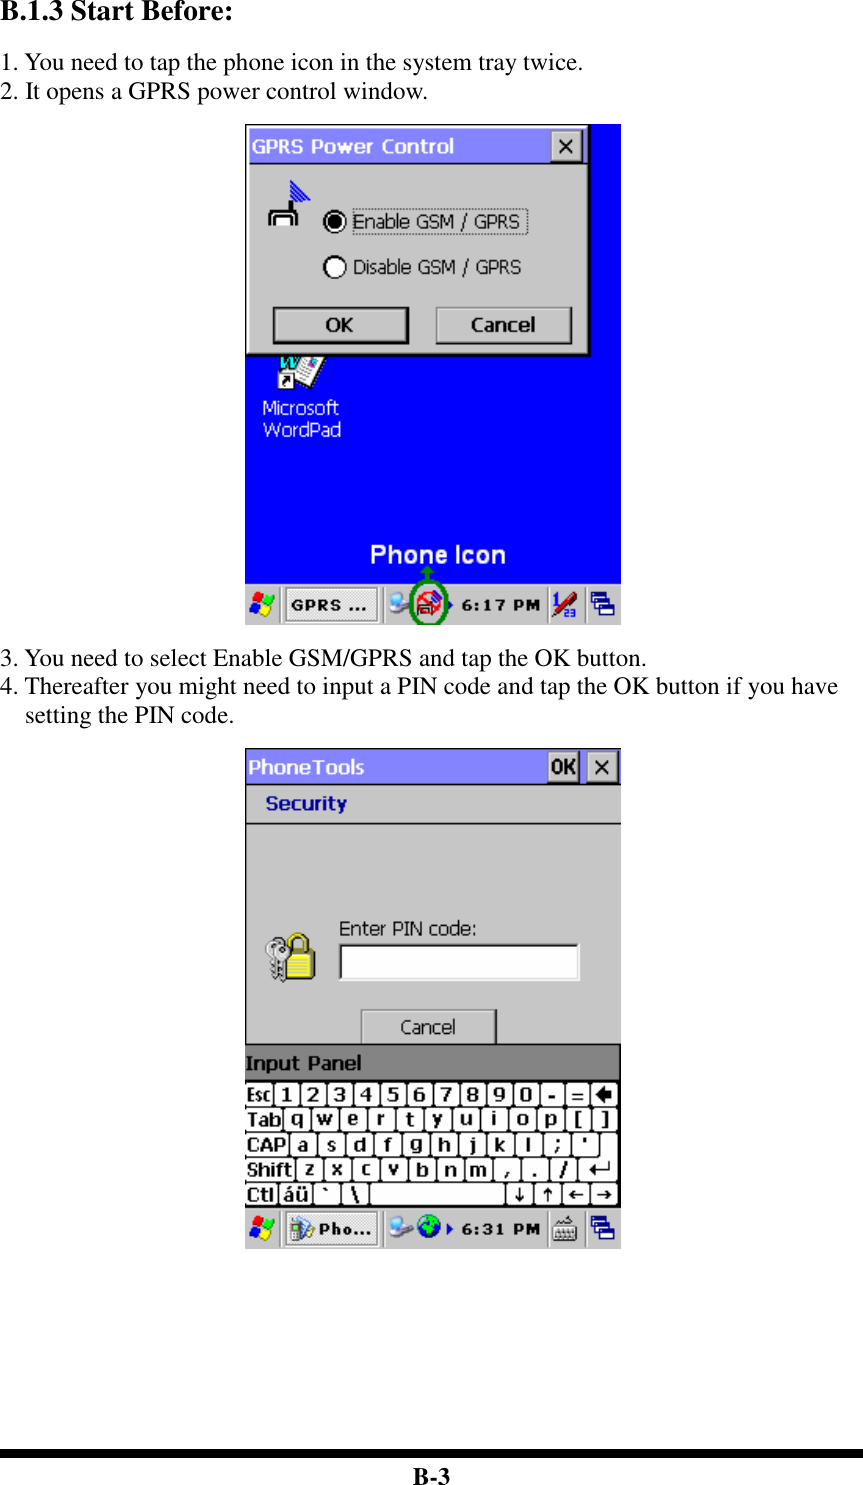
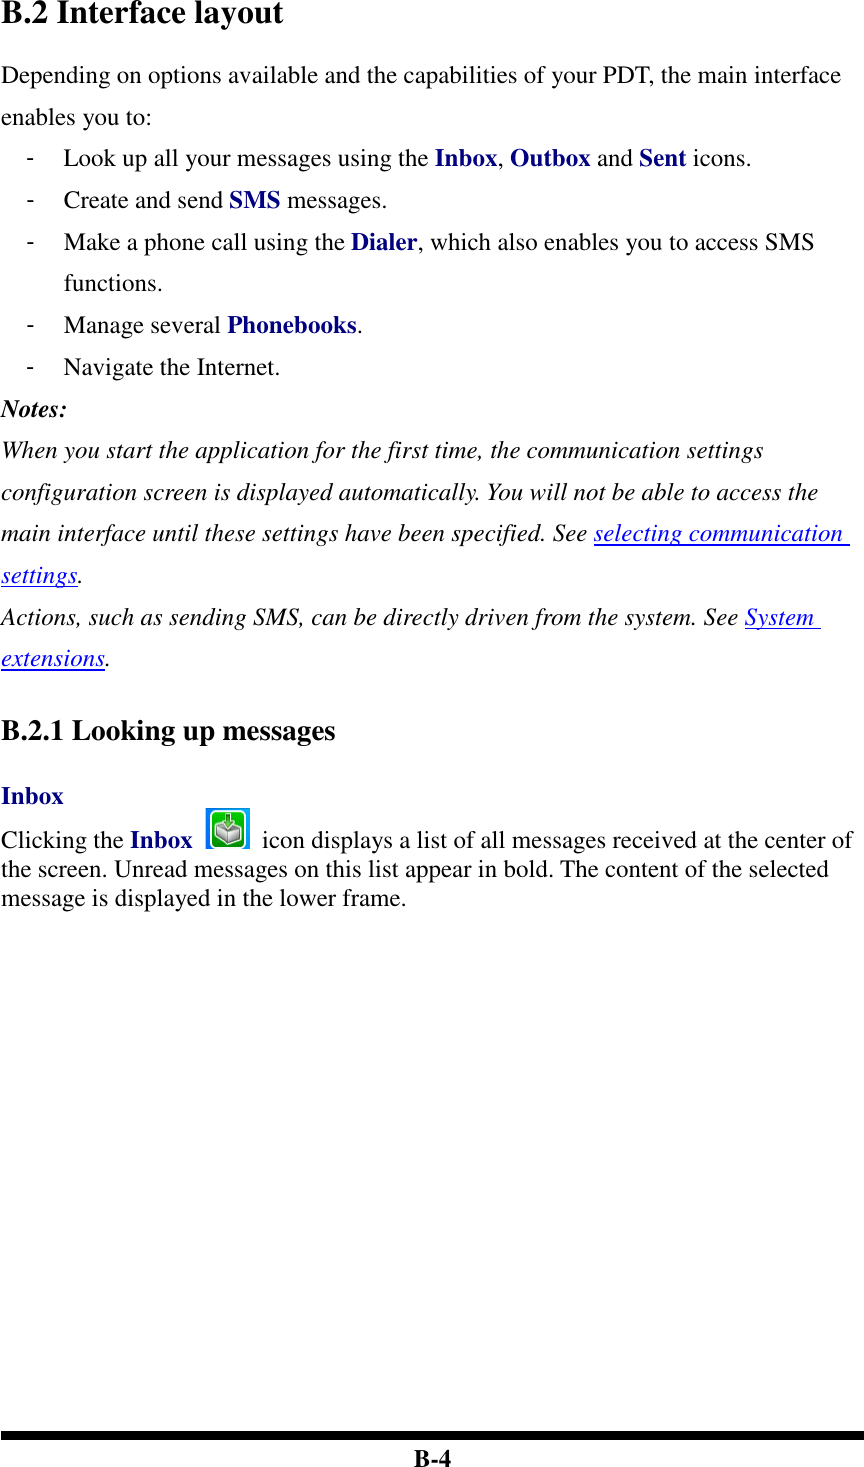
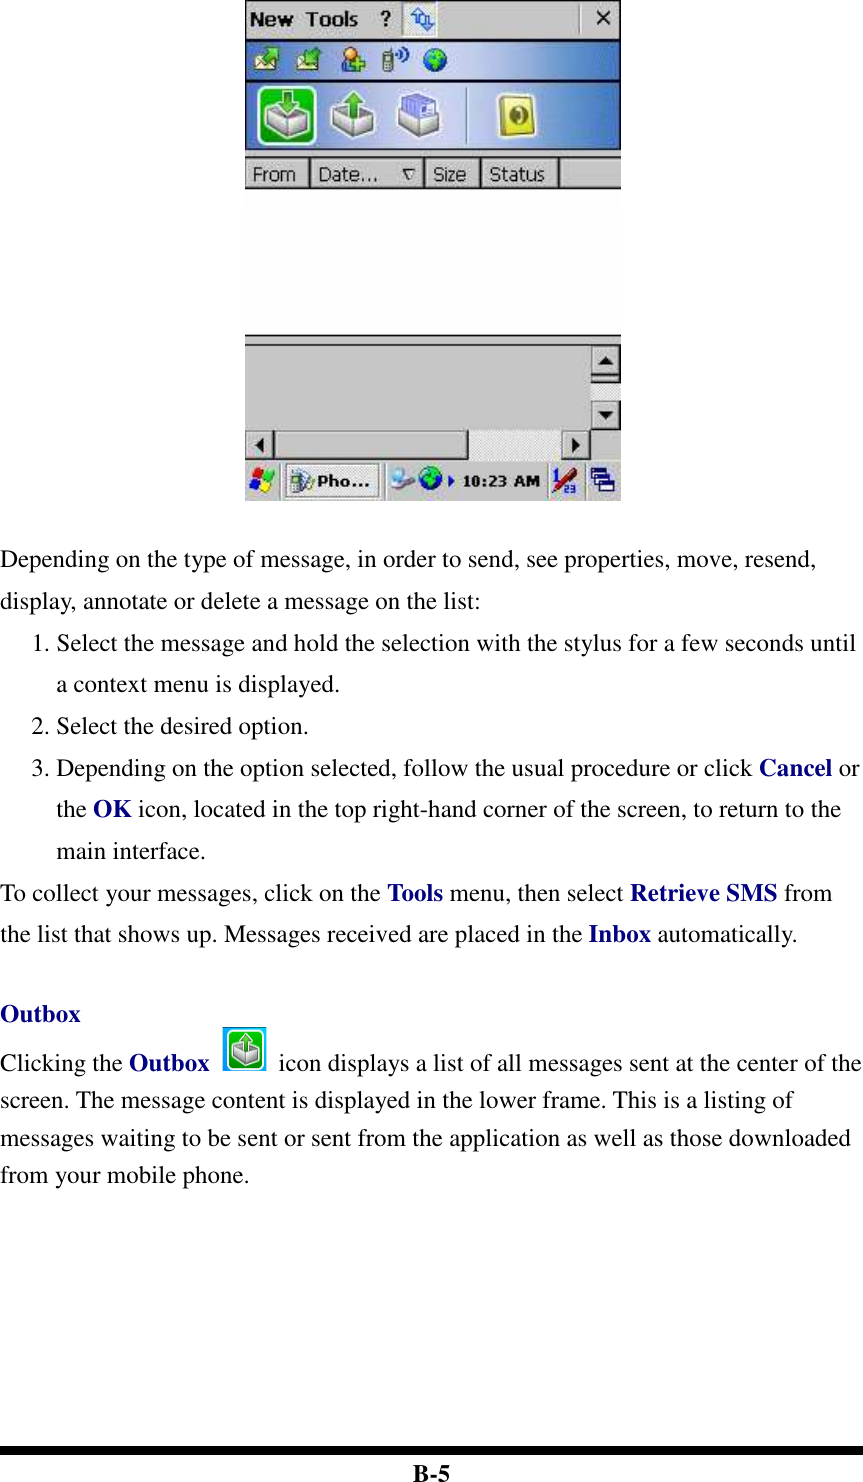
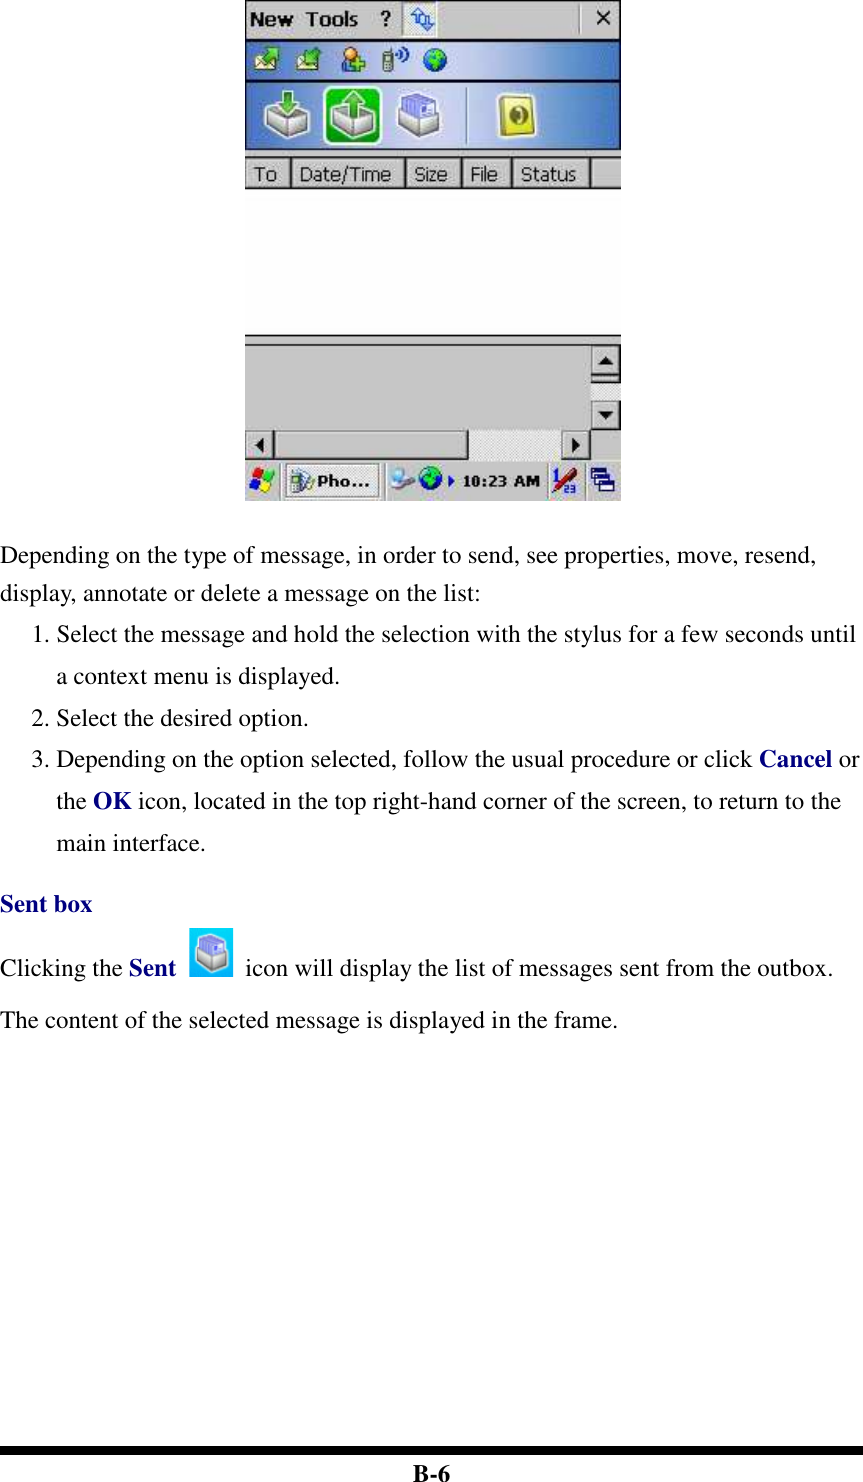
Revised manual 2 of 2

 3-25      Figure 3-27 Bluetooth Error Windows  Figure 3-28 Bluetooth Manager Windows      Figure 3-29 Bluetooth Enter PIN Windows  Figure 3-30 Bluetooth Manager Windows  Note: If the device to which the mobile computer is bonding does not appear in the list, ensure it is turned on, in discoverable mode, and within range (30 feet / 10 meters) of the mobile computer.  Table 3-21 Bluetooth Icon Icon Description  Unknown device icon  Device is not defined  Locked icon  Device is locked and cannot be bonded to.  Not locked icon  Device is not locked and can be bonded to.  Bluetooth device icon  Bluetooth device  Bonded device icon  Bonded Bluetooth device
 3-26 Icon Description  Mobile device icon  Device is a mobile device  Phone icon  Device is a phone.  Printer icon  Device is a printer  Network icon  Device is a network.  Linked icon  Device is linked.   3.2.4 Certificates  Certificates are used by some applications for establishing trust and for secure communications. Certificates are signed and issued by certificate authorities and are valid for a prescribed period of time. Windows CE manages multiple certificate stores.  Table 3-22 Certificates     ICON  ITEM & FUNCTION  “Store” Tab ( Figure 3-31) :   In the Stores tab, select the certificate store you wish to view or modify from the drop-down list (Figure 3-32).   The “Trusted Authorities “store lists the top-level certificates for authorities you trust.( Figure 3-33 , Figure 3-34)   The “My Certificates “store contains your personal certificates, which you use to identify yourself.   Intermediate certificate authorities that help establish a chain of trust are stored in the “Other Authorities” store.  “Store” Tab :    To add a certificate or associated private key to the selected store, select “Import” (Figure 3-35).  To view more details of the selected certificate, such as the expanded name or expiration date, choose “View”.  To delete the selected certificate from the store, choose “Remove”.
 3-27   Figure 3-31 Certificates  Figure 3-32 Certificates   Figure 3-33 Certificates Figure 3-34 Certificates   Figure 3-35 Certificates
 3-28   3.2.5 Control Center The Control Center includes four AP, listed the following ......  Figure 3-36 Control Center   3.2.5.1 Information  Table 3-23 Information ICON  ITEM & FUNCTION  “Information” Tab :    Provide Software version, MAC address, Bluetooth ID, Serial No. and Configuration No.
 3-29 3.2.5.2 Brightness  Table 3-24 Brightness ICON  ITEM & FUNCTION LCD Brightness Tune the LCD brightness by tapping right-arrow & left-arrow. Can also tune the LCD brightness by pressing right-direction key or left-direction key of keypad. Amounts 7 steps: Every step have corresponding picture of self. 1. 2. 3. 4.  5. 6. 7.  Enable Keypad Brightness Open keypad brightness or not. Backlight Timeout Save battery life by automatically turning off the backlight when not used. The table must disable when its item is not marked. Battery Power, turn off backlight after The table has 15 seconds, 30 seconds, 1 minute, 2 minutes and 5 minutes. The table must disable when its item is not marked. AC Power, turn off backlight after The table has 15 seconds, 30 seconds, 1 minute, 2 minutes and 5 minutes.  Dim backlight after 20 seconds of idleness. Save battery life functionally of idleness mode, open it or not.
 3-30   Figure 3-37 Brightness    3.2.5.3 Backup Restore  Table 3-25 Backup Restore ICON  ITEM & FUNCTION  1. You can backup/restore system to/from flash disk or inserted memory card. (A. Disk on Chip, B. CF Card, C. SD Card) ( Figure 3-38) 2. When you launch this AP, it must check backup file in DOC first. And if you select other storage, it will check again. 3. Then if it has the file, appeared its date behind “Last backup date:”; if not, disable “Restore Now” Button. 4. When you press the Backup/Restore Button will be a warning dialog pop up. ( Figure 3-39) 5. When system backup/restoring finished will be a message dialog will pop up. (A. Backup: Figure 3-40, B. Restore: Figure 3-41)
 3-31    Figure 3-38 Backup Restore Figure 3-39 Backup & Restore Start   Figure 3-40 Backup OK Figure 3-41 Restore OK    3.2.5.4 Fn-key Settings  Table 3-26 Fn-Key     ICON  ITEM & FUNCTION  Fn-Key Setting (Figure 3-42) Fn Key  The Application Program of default setting F1  Internet Explorer F2  Microsoft WordPad F3  Inbox F4  My Computer F5  Barcode Settings F6  Media Player  F7  Calculator Only for SC620
 3-32 F8  Information  To assign your favorite application program to Hot Keys.  Choose one of Hot Keys from pull-down list.(Figure 3-43)  To tap “Browse…” inside “Assign program” applet.  Select one application program you want from program list, then, choose “OK”. (Figure 3-43)  To tap “Default” to return back to default setting. (Figure 3-42)    Figure 3-42 Fn-Key Settings  Figure 3-43 Fn-Key Settings    3.2.6 Date/Time  Table 3-27 Date/Time     ICON  ITEM & FUNCTION  “Date/Time” Tab :( Figure 2-14)    Please see the detail information of 2.5.1 Setting Time and Date on P.2-21
 3-33 3.2.7 Dialing Properties  Table 3-28 Dialing properties     ICON  ITEM & FUNCTION  “Dialing Properties” Tab :( Figure 3-44)   In the When dialing from list, select the “Location” where you want to change settings.(Figure 3-45)  To create a new location, select “New”. Enter the name of the location, and then select “OK”.(Figure 3-46)  Enter or edit the area code and local country code as needed.  In Dial using, select “Tone dialing” or “Pulse dialing”. Most phone lines are tone.  To automatically disable call waiting, select “□□□□  Disable call waiting by dialing”, select the appropriate number sequence in the list, or enter a new sequence.    Editing dialing patterns (Figure 3-47)  Using the codes listed in the topic; revise the dialing patterns as needed. Notes:  If you need to use character other than the ones listed here, use manual dialing.  Hyphens and spaces in dialing strings are ignored.  Some modems may not respond to the following characters, even though your device lets you add them to the dial string.
 3-34   Figure 3-44 Dialing Properties  Figure 3-45 Dialing Properties       Figure 3-46 Dialing Properties  Figure 3-47 Dialing Properties
 3-35 3.2.8 Display Properties  Table 3-29 Display properties     ICON  ITEM & FUNCTION  “Background” Tab :( Figure 3-48)   From the “Image” list, select an image you want as the background of the desktop.(Figure 3-49)  To locate an image in another folder, select “Browse”.(Figure 3-50)  To have the image cover the entire background, select “  □□□□Tile image on background”  “Appearance” Tab(Figure 3-51)    Change the color scheme :( Figure 3-52)  From the” Scheme” list, select a scheme.  View your choice in the preview box. If you like the scheme, select “Apply”.  Create a custom color scheme:  From the “Item” list, select a display item.  From the “Basic colors” list, select a color, and select “OK”.  View your color selection(s) in the Preview box.  To save the scheme, select “Save”.  In the “Save this color scheme as” box, enter a name for the scheme, and select “OK”.  Select “Apply”.       Figure 3-48 Display properties  Figure 3-49 Display properties
 3-36    Figure 3-50 Display properties  Figure 3-51 Display properties      Figure 3-52 Display properties    3.2.9 Input Panel  Table 3-30 Display properties     ICON  ITEM & FUNCTION  “Input panel” Tab :( Figure 3-53)    Select the input method you want to change.  To change the Soft Keyboard Options , tap “Option” (Figure 3-54) .
 3-37  “Options” Tab :   Change the soft keyboard options as desired, selecting from:  Large or small keys  Using gestures for space, black-space shift, and enter.  To exit the soft keyboard Options, press “OK” on the control bar, or press the <Enter> key on the keypad.  To exit the Input Panel, press “OK” on the control bar, or press the <Enter> key on the keypad. .     Figure 3-53 Input Panel Properties  Figure 3-54 Input Panel Properties   3.2.10 Internet Options  Table 3-31 Internet Options     ICON  ITEM & FUNCTION  “General” Tab :( Figure 3-55)   Type in the URL of desired start page and the desired search engine. You also change the Cache Size, clear the Cache and Clear the History..  “Connection” Tab :( Figure 3-56)    Modify the network access setting as desired.
 3-38  “Security” Tab (Figure 3-57)  Modify the security settings as desired. You can enable any of the following by tapping the checkbox:  Allow cookies  Allow TLS 1.0 security  Allow SSL 2.0 security  Allow SSL 3.0 security  Warm when switching across secure and insecure areas.  “Advanced” Tab (Figure 3-58)  Modify the security settings as desired. You can enable any of the following by tapping the checkbox:  Display Image in pages  Play sounds in pages  Enable scripting  Display a notification about every script error  Underline links- ○ Never ○ Always ○ Hover     Figure 3-55 Internet Settings  Figure 3-56 Internet Settings
 3-39   Figure 3-57 Internet Settings Figure 3-58 Internet Settings   3.2.11 Keyboard  Table 3-32 Keyboard     ICON  ITEM & FUNCTION  “Repeat” Tab :( Figure 3-59)    To change the amount of time between depressions before repetition starts, adjust the Repeat delay slider  To change the repeat rate, adjust the Repeat rate slider.  Test your new setting.  Tap “ OK” to exit the “Keyboard” Tab.
 3-40  Figure 3-59 Keyboard Properties   3.2.12 Network and Dial-up Connections  Table 3-33 Network and Dial-up Connections     ICON  ITEM & FUNCTION  “Connection” Tab :    To create a “Dial-up Connection”:  Double-tap the “Make New connection”.  In the “Make New Connection” dialog box, enter a name for the connection.  Select “Dial-Up Connection”.  Select the “Next” button.  Select the modem you want use.  Select “Configure”  Under “Connection Reference”, use the default settings provided. If you can’t connect using these settings, see your ISP or network administrator for specific information. If you want to always enter a phone number before connecting, Select “Manual Dial”. Select “OK”.
 3-41  Select “TCP/IP Settings”. In the “General” tab, ensure “Use Server-assigned IP address” is selected. In the “Name Servers” tab, ensure “Use Server-assigned addresses” is selected, and select “OK”. If you are unable to connect with these default settings, see your ISP or network administrator for specific TCP/IP information.  Select the “Next” button and type the telephone number.  Select the “Finish” button. The connection you just created appears as an icon in the “Network and Dial-up Connections” folder.       Set up a point-to-Point Protocol(PPP) account with an ISP and obtain the following information:  Access telephone number  User name  Password Once you have established an account, create a new connection on your device. When creating this connection, you should be able to use all of the default TCP/IP settings provided in the Make New Connection Wizard. If you can’t connect using the default settings, contact your ISP or access your ISP’s Web site for specific TCP/IP information as well as primary and secondary DNS address.  Modify connection setting  Select Start > Settings > Network and Dialup Connections  Select the icon for connection settings you want to modify.  Select File > Properties, or double- tap the appropriate icon.  Select desired options. There may be additional settings that depend on the connection. To modify, select the icon and select the icon and select Advanced Settings… from the menu.
 3-42   Figure 3-60 Network and Dial-up Connections Figure 3-61 Network and Dial-up Connections       Figure 3-62 Network and Dial-up Connections Figure 3-63 Network and Dial-up Connections
 3-43    Figure 3-64 Network and Dial-up Connections Figure 3-65 Network and Dial-up Connections       Figure 3-66 Network and Dial-up Connections Figure 3-67 Network and Dial-up Connections
 3-44    Figure 3-68 Network and Dial-up Connections Figure 3-69 Network and Dial-up Connections   Figure 3-70 Network and Dial-up Connections Figure 3-71 Network and Dial-up Connections   3.2.13 Owner    Table 3-35 Owner     ICON  ITEM & FUNCTION  “Identification” Tab : (Figure 3-72)
 3-45  Fill in or edit the data as desired.  To have this information displayed when you start your device, select “Display Owner Identification” at Power On.  To set up identification for remote networks, see Setting up identification for remote networks.  “Network ID” Tab: (Figure 3-73)  Enter the user name, password, and domain name you use to log on to remote network.     Figure 3-72 Owner Properties  Figure 3-73 Owner Properties   3.2.14 Password    Table 3-36 Password     ICON  ITEM & FUNCTION  “Password Setting” Tab : (Figure 3-74)   Enter the password  In the “Confirm password “box, enter the password again.  To require the password on startup, select “Enable password protection at power- on“. and/or select “Enable password protection for screen saver”  To exit the Password control panel, press “OK” from the control bar, or press the <Enter> key on the keypad.
 3-46    Figure 3-74 Password Properties   3.2.15 PC Connection    Table 3-37 PC Connection     ICON  ITEM & FUNCTION  “PC Connection” Tab : (Figure 3-75)   Select the first checkbox to enable direct connections to the desktop computer. (Figure 3-75)  Tap the “Change Connection…” button to modify the connection method from USB or Serial. (Figure 3-76)  To exit the “Change Connection” dialog, press “OK” from the control bar, or press the <Enter> key on the keypad.  To exit the “PC Connection” properties control panel, press “OK” from the control bar, or press the <Enter> key on the keypad.
 3-47   Figure 3-75 PC Connection  Figure 3-76 PC Connection   3.2.16 Power  Table 3-38 Power     ICON  ITEM & FUNCTION  “Battery” Tab : (Figure 3-77)  Provide change level indicators for Main battery and Backup battery.  Provide remaining power capacity of main battery.  If a “Main Batteries very Low” warning message shows, the remaining battery life is around 30 minutes to SC600 shuts down. ( Figure 3-81)  The PDT will shutdown during the main batteries capacity is around 0%  To exit Battery control panel, press “OK” from the command bar, or press <Enter> key on keypad.   “ Schemes” Tab: (Figure 3-78)
 3-48  The Scheme Tab allows you to determine the time to switch state to Suspend mode when using either Battery Power or AC Power.  Select Battery Power or AC Power as the power scheme from the pull-down list.( Figure 3-78)  Select the time to suspend mode from the pull-down list. ( Figure 3-79)  “Device Status” Tab: ( Figure 3-80) Provide power level of device – The power level ranges from “ High(D0)” which means the device is at the highest power level to “Off(D4)” which means the device is at the lowest power level. Note:  This ICON inside the Task Bar shows that AC adapter provides power to the PDT  The ICON inside the Task Bar shows that Main Batteries provides the power to the PDT.  The ICON inside the Task Bar shows that AC adapter provides the power to the PDT and is charging the main batteries..    Figure 3-77 Power  Figure 3-78 Power
 3-49   Figure 3-79 Power  Figure 3-80 Power      Figure 3-81 Power    3.2.17 Regional Settings  Table 3-39 Regional Settings     ICON  ITEM & FUNCTION  “Region” Tab : (Figure 3-82)   Select the desired location/language.  Review the Appearance samples in the bottom half of the screen.  Select the Tab at the top for any settings you wish to change, Options to modify include Number, Currency, Time, and Date.
 3-50   Figure 3-82 Regional Settings   3.2.18 Remove Programs  Table 3-40 Remove Programs     ICON  ITEM & FUNCTION  “Remove Programs” Tab :    Only user installed programs can be removed.  Select the program you wish to remove from the list and press “remove” button.
 3-51 3.2.19 Storage Manager  Table 3-41 Storage Manager     ICON  ITEM & FUNCTION  “Storage Manager” Tab : (Figure 3-83)   To change Storage properties control panel default settings: Insert. Compact Flash(CF) or Secure digital (SD) storage card into the unit.  Select Start > Settings > Control Panel > Storage Properties  From the “Storage Info” pull-down list, select the desired storage device.  You can also format, dismount, and create partitions on storage devices using this control panel.  To save and exit the Storage Properties control panel, press “OK” from the control bar, or press the <Enter> key on the keypad. Caution: Dismounting or formatting the DiskOnChip will erase all files and program stored in Flash Memory       Figure 3-83 Storage Manager
 3-52 3.2.20 Stylus  Table 3-42 Stylus     ICON  ITEM & FUNCTION  “Double-Tap” Tab : (Figure 3-84,Figure 3-85)  Double-tap the checkerboard grip at a comfortable speed.  Double-tap clapboard to test your settings  The function is OK if the figures are changed from Figure 3-84 to Figure 3-85.  To tap “OK” to exit the Stylus Properties.  “Calibration”: (Figure 3-86, Figure 3-87)   In the Welcome Wizard, you tapped a target with the stylus to set the amount of pressure needed for the screen to respond to your stylus taps.  Please also see 2.4.3 Calibration of the touch Screen     Figure 3-84 Stylus Properties  Figure 3-85 Stylus Properties
 3-53    Figure 3-86 Stylus Properties  Figure 3-87 Stylus Properties   3.2.21 System  Table 3-43 System     ICON  ITEM & FUNCTION  “General” Tab : (Figure 3-88)  To show:  Firmware information   Information about Processor type, Memory size, Expansion card  “Memory”: (Figure 3-89)  Move the slider to adjust memory allocation. Default storage memory is normally is normally set to about 8MB with the reminder assigned to Program memory.  Press the “OK” key on the Keypad.  Note: the difference is occupied by OS between the RAM size in Information properties and total memory size of storage memory and program memory   “Device Name” Tab : (Figure 3-90)   Your device uses this information to identify itself to other computers.  The input panel will open to facilitate data entry.
 3-54  To close the Device Name, press the “OK” button, or press the <Enter> key on keypad.  “Copyrights” Tab: (Figure3-91)  Refer to this tab for specific copyright data. As a user, you are responsible to read this statement.     Figure 3-88 System Properties  Figure 3-89 System Properties    Figure 3-90 System Properties  Figure 3-91 System Properties
 3-55 3.2.22 Volume & Sounds Properties  Table 3-44 Volume & Sound     ICON  ITEM & FUNCTION  “Volume” Tab : (Figure 3-92)  The factory default for Volume is the forth level. You can adjust the volume to your environment and comfort.   Set the volume by adjusting the slider from Soft to Loud, or press Right or Left edge of Navigation keys  “Sounds ” Tab: (Figure3-93)   Enable the desired sounds for key clicks, screen taps, notifications, and applications.    Figure 3-92 Volume & Sound  Figure 3-93 Volume & Sound
 3-56 3.3 Taskbar and Start Menu Table 3-45 Taskbar and Start menu     ICON  ITEM & FUNCTION  “General” Tab :   In this tab, You can change the position of the Taskbar and Start menu   Is always on top or not  Auto hide or not  Show Clock or not  “Advanced ” Tab:  Taskbar and Start Menu  Tap the “Clear” button to remove the contents of the Documents Menu.  Enable “□□□□  Expand Control Panel”””” to list all icons of Control Panel from top to bottom.
 4-1 Chapter 4. Communication 4.1 Installing & Setting Up Microsoft ActiveSync  4.1.1 Installing Microsoft ActiveSync on the Host PC Microsoft ActiveSync is a file transfer tool to synchronize the files on a PC with the files on your PDT.     To install Microsoft ActiveSync, complete the following steps on the PC: 1. Go to the Microsoft Windows CE.NET website and download the latest current version of ActiveSync: http://www.microsoft.com/mobile/pockeypc/downloads/ .     2. Install the latest version of Microsoft ActiveSync on the host PC. 3. Open ActiveSync. 4. Select File > Communication Settings from AtiveSync’s menu bar. 5. Go to “Using ActiveSync” on page 4-1 to continue using ActiveSync.  4.1.2 Connecting PDT to Host PC 1. You can use either the USB/Serial (RS232) port of Single Dock or a USB/Serial (RS232) cable to connect the PDT to the Host PC.  To use the dock, you must first insert the PDT into the slot, making sure that the unit is firmly seated the dock.  To use the cable, connect the USB/Serial cable to the PDT.  2. Connect the USB/Serial dock or cable to the Host PC’s serial port or USB port.   3. Connect the dock or PDT to the power adapter and power source.    4.2 Using ActiveSync Use ActiveSync to transfer and synchronize files between the PDT and the Host PC.  4.2.1 Setting up a Partnership During the Microsoft ActiveSync installation, you were prompted to create a partnership with your mobile device. When you set up a partnership, you select synchronization and file conversation settings, which are contained in a file on your desktop computer. This file enables your desktop computer to recognize your device.
 4-2 Only devices that have a partnership with a desktop computer can synchronize information between the two computers. For more information on partnerships, please refer to your Microsoft ActiveSync documentation or help file.    Transferring Files: To transfer files, complete the following steps on the host PC:  Select Start> Programs >Communication > (Serial, or USB) Activesync.  Double-click on the selected ActiveSync icon  After you have established a connection with PDT, tap the “Explore” button at the top of the ActiveSync window (or select Explore from the File menu).  Navigate to the target directory on your PDT and copy the desired file by using the Copy/paste method or dragging and dropping the desired file(s) into the folder.   Figure 4-1 Communication
 4-3 4.2.2 ActiveSync File Synchronization   ActiveSync files synchronization requires an ActiveSync partnership between the PDT and the Host PC. Refer to “Setting up a Partnership”, above:  Select the files in the synchronization configuration for the PDT partnership.  Select Tools > Options from the ActiveSync command bar to configure the synchronization options.  Place the file to be synchronized in the Synchronization folder created you’re My Documents directory. Defaults to the desktop. During the ActiveSync connection, all files in the Synchronization folder will be synchronized to the \My Documents directory on the PDT.    Figure 4-2 Connected   4.3 Networking     Please see the 3.2.14 Owner, Table 3-33 Owner on page 3-45 for setting up the network ID. And see the 2.5.6 Setting Up Wireless LAN RF to setup the 802.11b Wireless LAN for RF connecting.
 5-1 Chapter 5. Software Applications 5.1 Introduction The PDT includes Calculator, Inbox,….. You can switch to any software program by tapping the Start Menu.   5.2 Software Applications  5.2.1 Calculator  It can process the basic numeric calculation with “+”, “-“ “*” and “/“.  Procedure:  Tap numeric number   Tap one operator “+”, “-“, “*” or “/”   Then, tap another numeric number  Tap another operator or numeric number if needed  Tap “=” to get result  Button Function:  “MC” – Clear memory    “MS” – Store the displayed numeric number to memory  “MR” – Read the newest stored numeric number  “M+” – Add stored numeric number into the displayed numeric number.  “Backspace” – Same as “ backspace” key  “CE” – Clear current keying numeric number. Same as “ Delete” key  “C” – Clear the current calculation. Same as “ESC” key.   5.2.2 Inbox    Use Inbox to send and receive e-mail messages in the following ways:  Synchronize e-mail messages with Microsoft Exchange or Outlook on the Host Computer.  Send and receive e-mail messages by connecting directly to an e-mail server through an Internet server provider (ISP) or a network.
 5-2 To setup “Inbox”:  Select Start> Programs> Inbox to open it.  Select Service> Options from the command bar. Drag the dialog to show the right edge to configure e-mail.  Select “Add…” (Note 1)  In the “Service Type” list, select POP3 Mail or IMAP4 Mail. (POP3 is the most common mail protocol for ISPs).Enter a unique name for e-mail service in the “Service name” field. This name cannot be changed later.  Select “OK”.  The Mail Service Setup wizard appears after you add a service. If you are adjusting the setting of an existing service, select Service> Options, select the service you are using, and then Properties. In the Service Definition dialog box, complete the following entries as needed:  Connection: Select the name of the connection you created to connect to the mail server. If you are receiving e-mail through a network(Ethernet) connection, select Network Connection. If you want Inbox to use your current connection, select (none). If you have not created a connection, select Create new connection. Double-tap the “Make new Connection” icon, and follow the instructions in wizard. When finished, select Inbox in the Taskbar and continue setting up Inbox.  POP3 Host(POP3 only): Enter the name of the mail server you use to receive and send messages.  Server(IMPA4 only): Enter the name of he mail server you use to receive and send messages.  User ID: Enter the user name or mailbox ID assigned to you.  Password: Enter the password you use to access this mail account. If you do not want to be prompted to enter the password each time you connect, select “Save password”.  Domain(Windows NT): Enter your Windows NT domain name. This name is required only when connecting to networks, such as a corporate network, that use Windows NT domain security. This is not required for most ISP accounts. If you have trouble connecting, try clearing this box.  SMTP Host: If your mail service uses a separate server for SMTP, enter the name in the box. If you’re setting up a POP3 Mail service with an ISP, the ISP must use an SMTP mail gateway.  Return Address: By default, the return address is set to username@POP3host or username@Servername. Depending on the service you are using. If this is not your e-mail address, enter the correct
 5-3 address in the box.  Set general preferences: If you are adjusting the setting of an existing service, select Service> Options, select the service you are using, select Properties, and then select Next. In the General Preferences dialog box, choose any of the following setting settings, all of which are optional:  Disconnect service after actions are performed: Select to automatically disconnect from the server upon completion of all pending actions. This option minimizes connect time and cost.  Check for new messages every: select the time interval(in minutes) at which you want the device to check for new mail. If this option is turned off, you must check for new mail manually by selecting Services> Send/Receive Mail.  Display a message box when new mail arrives (POP3 only): Select to be informed that new mail has arrived.  Display a message box when new mail arrives (IMAP4 only): Select to be informed that new mail has arrived.  Send using MIME format (POP3 only): Select to send messages with extended characters.  Only display messages from last 3 days: Select how many day’s messages  you want downloaded.  Set inbox preferences If you are adjusting the settings of an existing service, select Services> Options, select the service you are using, select Properties, and then select New twice. In the Inbox Preferences dialog box, choose any of the following options:  Get message headers only: Select to save storage space and time by downloading only headers. You can download a full copy of the message later by selecting the message and then Services> Get Full Copy.  Include <number> lines: Select to set the message length (approximate number of lines) that you want to download.  Get Full Copy of messages: Select to receive a full copy of all messages. In addition to the message body, any options you select in When getting full copy will be downloaded. Selecting this option increases the amount of time needed to download messages.  Only synchronize folder hierarchy under Inbox (IMAP4 only): Select to speed download time by preventing the complete downloaded of the folder list every time you connect.  Get meeting requests (POP3 only): Select to download and store copies of
 5-4 meeting requests when getting full copies of messages. This setting applies whether you have chosen to download full copies of messages by default, or you selectively download full copies of messages by opening the message and selecting Services> Get Full Copy Limitations apply.  Get file attachments (POP3 only): Select to download and save message attachments when getting full copies of messages. This option may use significant RAM and slow download time. This setting applies whether you have chosen to download full copies of messages by default, or if you selectively download full copies of messages and selecting Services> Get Full Copy.  Get file attachments and meeting requests (IMAP4 only): Select to download and store meeting requests and message attachments when getting full copies of messages. This setting applies you have chosen to download full copies of messages by default, or if you selectively download full copies of messages by opening the message and selecting Services> Get Full Copy Limitations apply.  Only if small than (IMAP4 only): Select to restrict the size of the attachments you download. Set to 10K if you want to receive meeting requests only.    Include the original message in a reply:  Select Services> Options> Compose tab.  Under Reply, select Include Body. This setting will place a copy of the original message beneath your response text.  To indent the original message, select Indent.  To add leading characters (such as>) to the original message lines, select Add leading character, and enter the character you want.   Save copies of sent messages: By default, sent messages are not saved on your device.  Select Services> Options> Compose tab.  Select Keep copy of sent mail in Sent folder.  Set the action to follow deleting, moving, or responding to a message:  Select Services> Options > Read tab.  Select desired options.  Delete a message: Select the message and select File> Delete. Messages are moved to Deleted (local) folder and deleted according to the option you have selected in Services> Options> Delete tab:  On connect/disconnect: Deletes messages when you connect or disconnect
 5-5 from your mail service or exit Inbox.  Immediately: Deletes messages as soon as you select File> Delete.  Manual: Deletes messages when you select File> Empty Deleted (local) Note: If you are working offline, messages that have been deleted from the device the next time you connect.  Empty the Deleted (local) folder:  Select File> Empty Deleted (local). This permanently deletes messages in the Deleted (local) folder.  To check or adjust the current settings for deleting messages, select Services> Options> Delete tab.   Move or copy a message:     Caution: When you move a message that you have received through POP3 or synchronization to a folder you created on your device, the copy of the message on the server is deleted. This prevents duplicate copies of messages. Although the complete message is moved, message attachments will be deleted if you have not selected the option to download attachments. Once the message is moved, you will be able to access the message only from your device.   Select the message  Select File> Move To or File> Copy To.  Select the destination folder. If you are working offline, the message will be moved or copied from the server the next time you connect.  Folder-  Create a folder:  Select File> Folder> New Folder  Type a name for the folder.  Delete a folder:  Select the folder you want to delete  Select File> Delete  Designate a folder as offline: Only IMAP4 folders can be designated as offline. All IMAP4 default folders, such as Inbox, are automatically designated as offline. Messages in offline folders can be viewed when you are disconnected from your mail server. If a folder is not designated as offline, you will be able to read and respond to messages in that folder only when connected to the server.  To designate a folder as offline, select the folder and then select Service > Offline Folder.
 5-6  Rename a folder:  Select the folder you want to rename.  Select File> Folder> Rename Folder.  Type the new name for the folder.     Notes:  Default folders, such as Inbox, can’t be renamed.  Folders you create for IMAP4 mail servers can’t be renamed.   Synchronize folders while connected: When you synchronize folders, the contents of your device folders and mail server folders are compared and updated. New mail messages are downloaded, and messages in your device Outbox folder are sent. The synchronization behavior depends on how you connect to your mail server.  When you connect to a POP3 server, the Inbox and Outbox folders on your device are synchronized with the corresponding folders on the mail server. To synchronize after the initial connection, select Services> Send/Receive Mail.  When you connect to an IMAP4 server, Inbox, Outbox, and all folders marked as offline are synchronized. To synchronize all folders after the initial connection, select Services> Synchronize Folders. To synchronize just the selected folder and the Outbox folder, select Services> Send/Receive Mail.  Compose and send a message:  In list view, select Compose> New Message  Enter the address of one or more recipients, separating them with a semicolon. If the recipient is listed in the Address Book, enter a few letters of the recipient’s name and select Compose> Check Name. If there is only one match, the e-mail address is inserted. If there is more than one match, select the correct address from the Choose E-mail Recipients dialog box. If there is no match then add a new e-mail address through Choose E-mail Recipients.  To attach a file, select File> attachments> Add Attachment.  Select File> Send. If you are working offline, the message is moved to the Outbox folder and will be sent the next time you connect.     Tip: to see more header information, select the triangle in the lower-right corner of the header area. Select the triangle again to collapse the header area.  Save a message:  Select File> Save to save the message you are composing or editing.
 5-7         The message is not sent and is saved in the inbox folder of the active service.  Reply to or forward a message:  Open the message, and then select Compose> Reply to Sender, Reply to All, or Forward.  Enter your response.  Select File> Send. Tips:  Selections in the Options dialog box determine whether the original text is included.  To see more header information, select the inverted triangle in the lower-right corner of the header area. Select the triangle again to collapse the header area.   Check Inbox status:  In list view, select Compose> Status. You can view details such as the number of messages to be sent, deleted, and copied, and the number of attachments to be downloaded.  Download message from the server: When you download messages, you need to create two connections: a remote connection and a mail server connection. The remote connection connects you and your ISP or network. The mail server connection downloads messages from your mail server to Inbox on your device. When you select Services> Connect in Inbox, Inbox starts a remote connection using the connection you specified when setting up the current mail service. If you are already connected through a remote connection other than the one you specified in the service, you will be asked if you want to use the current connection. If you choose not to, you will need to disconnect from the current connection before you can check for new messages.  Select the Services menu and make sure that the service you want to use is selected (the selected service has a bullet next to it.)  Select Services> Connect. The messages on your device and mail server are synchronized: new messages are downloaded to the device Inbox folder, messages in the device Outbox folder are sent, and messages that have been deleted on the server are removed from the device Inbox. Double-tap a message list to open it.  If you read a message and decide that you need the full copy, select File> Get Full Copy while in the message window or Services> Get Full Copy while in list view. This will also download message attachments and meeting requests if you have those options selected in the Inbox Preferences dialog box. You can also choose to download
 5-8 full copies of messages by default.  When finished, select Services> Connect to disconnect. You also need to disconnect your dial-up connection by double-tapping the icon in the status bar and selecting Disconnect.     Notes:  Receiving entire messages consumes storage memory.  The size column in the Inbox list view displays the local size and server size of a message. Even when a message has been downloaded fully, these numbers may differ because the size of a message can very between the server and the device.  When using IMAP4 to get Outlook + data, you will see the contents of your Journal folder. File editing transactions and documents (such as Task items, e-mail message, and Word documents) attached using drag and drop will appear as shortcuts on the device. A copy of the document will not be moved to your device, and the shortcut on the device cannot be used to access the documents associated with a journal entry to the device, attach the document to the entry rather than dragging and dropping it. Also, be sure to set your IMAP4 service to receive full copies of messages, attachments, and meeting requests. For more information on using Journal, see the Help for the desktop version of Outlook.  Working with Message Attachments:  If you receive messages through a remote mail server, in Inbox on the device, select the Get file attachments and meeting requests (IMAP4) or Get meeting requests (POP3) setting in the Inbox Preferences dialog box. For more information, see Set Inbox preferences. Notes:  Embedded images and OLE objects cannot be received as attachments   Embedded messages can be viewed as an attachment when using IMAP4 to receive e-mail. However, this features does not work if TNEF is enabled so that you can receive meeting requests.  Check attachments status:  An attachment sent with an e-mail message, whether it has been downloaded or not, will appear as an icon at the bottom of the message in its own window pane. If you don’t see this pane, select File> Attachments> Show Attachments. If TNEF is turned on so you can receive meeting requests, you will not see attachments until they are fully downloaded.  To mark an attachment for downloading in a POP3 or IMAP4 service, double-click it. The attachment will be downloaded the next time you
 5-9 connect. You can also set Inbox to download attachments automatically when you get a full copy of a message. For more information, see Receive attachments.        Open an attachment:  With the message open, double-tap the attachment’s icon at the bottom of the message. If you don’t see this pane, select File> Attachments> Show Attachments.  Store an attachment:  Select Service> Options> Storage tab.  Select to store attachments on internal RAM or a storage card.  If you use more than one storage card, select it from the list. Note: Once you make the above selection, all attachments will be moved to the selected card.  Delete an attachment:  To delete an attachment from a message you are sending, select the attachment, and then select Edit> Clear or press the DEL key on the keypad.  To delete an attachment you have received, delete the message.  Attach a file to a message:  With the message open, select File> Attachments> Add Attachment.  Select the file you want to attach. Note:      OLE objects cannot be attached to Inbox messages. Note 1: To add a mail service, select “Add”, To remove a mail service, select the service from the Installed service box and select “Remove”. To view a mail service’s properties, select the service from the Installed service box and then select Properties.
 5-10  Figure 5-1 Inbox   5.2.3 Internet Explorer With Internet Explorer, you can view Web or intranet Web pages on your device. You will need to use a modem or WLAN to connect to an Internet server provider (ISP) or network. 5.2.3.1 Connect to the Internet     Before you can view Web pages, you must set up a remote connection to your ISP or network. 5.2.3.2 Start Internet Explorer  Open Internet Explorer by selecting Start > Programs > Internet Explorer.  To get default home page, navigate to the desired default web page.  Select View > Internet Options from the command bar.  Enter the desired URL in the Start page field.  Press the OK button. Figure 5-2 Internet Explorer  5.2.3.3 Navigation Control Internet Explorer uses sliding menus for application and navigation control. Tap and drag the sliding menus to the left or right to see the hidden menu items and toolbars.
 5-11 To achieve more screen real estate in Internet Explorer, you can hide the Status bar and View menu. From the top menubar, go to View > Hide Toolbars. Once it is hidden, you must cold reset to access these features again. Refer to 2.7.2 “Cold Reset “for more information.  5.2.3.4 Set up a proxy server Proxy servers are often used when connecting to the Internet through a local network, such as a corporate network, for added security.  Select View > Internet Options > Connection Tab.  Select Access the Internet using a proxy server.  Enter the proxy server address and port. For more information, see your administrator.  To bypass the proxy server for local address, such as corporate intranet pages, select Bypass proxy for local address.  5.2.3.5 Enable Cookies A cookie file contains information about your identity and preferences so that a Web site can tailor information to your needs. The Web site sends the file and it is stored on your mobile device.  Select View > Internet Options > Security Tab.  Select Allow cookies.  5.2.3.6 Search for an Internet Site  Select View > Go > Search to search the web.  5.2.3.7 Go to an Internet address  Select Address Bar, if necessary to display the Address bar  Enter the address  Press “ENTER” key. 5.2.3.8 View previously visited sites  Tap the Arrow button at the right site of Address Bar  Select the Web Address you want to view.   5.2.3.9 Add and view Favorites  Go to the page you want add  Select Favorites > Add To Favorites.  If necessary, locate the folder you want.  Confirm or change the name.
 5-12  To view your favorite Web sites, select Favorites and the Web site you  want to view.     Note:     To organize your Favorites list, select Favorites > Organize Favorites.  5.2.3.10 Browse Web pages  To move to a page you have previously view, select View > Back  To move to the next page (provided you have viewed it previously), Select View > Forward.  To return to your Home page, select View > Go > Home.  5.2.3.11 Refresh current page  Select View > Refresh.  5.2.3.12 Stop loading a page  Select View > Stop.  5.2.3.13 View current page    Select View > Internet Options   To view the protocol, page type, size, and address, selects the General tab.  To view security information about the page, select the Security tab.  5.2.3.14 View HTML source code  While viewing the page, select File > Save As and save the file as .txt file.  Open the file in a word processing program, such as WordPad.  5.2.3.15 Change home and search page settings  Open the page you want to use as your home or search page.  Select View > Go > Home or Search. 5.2.3.16 Save a copy of current page You can save Web pages and view them later when you’re disconnected from the Internet or Intranet without using cached memory.  Select File > Save As  Specify a folder location and give the file name.  5.2.3.17 Copy a Web page to a document  Select all or part of the Web page you want to copy.  Select Edit > Copy.
 5-13  Go to the document where you want to place the information and select the location.  Select Edit > Paste.  5.2.3.18 Select security Options  Select View > Internet Options > Security tab  Select the security protocols you want.  5.2.3.19 Change the font size  Select View > Text Size and select the desired size.   5.2.4 Media Player  The PDT comes with Media Player for Windows CE.NET installed.  Open Media Player by selecting Start > Programs > Media Player from the desktop.  Select File > Open to open a new media file.  Please refer to www.microsoft.com for additional information and help with your Microsoft Windows Media Player.   Figure 5-3 Media Player   5.2.5 Messenger The Windows CE Messenger client application in Windows CE.NET allows you to communicate real-time using text-based messaging, VOIP, and more.  See who’s online. See when your colleagues are online. You can also post your presence information to a list of watchers that you define.  Talk instead of type Stop typing Talk with a colleague anywhere in the world using the microphone and speakers on your device. Windows Messenger supports high-quality voice calling r Windows CE device.
 5-14  Communicate using Session Initiation Protocol (SIP) or Hotmail contacts Windows Messenger supports. Communication with your colleagues in the enterprise with a SIP based communications service. You can also talk to your Hotmail contacts using the .NET Messenger.   5.2.6 Microsoft WordPad You can create and edit documents and templates in WordPad, using buttons and menu commands that are similar to those used in the desktop version of Microsoft Word. You can work with files Normal or Outline view. WordPad documents are usually saved as .pwd files, but you can also save documents in other file formats, such as .rtf or .doc.  5.2.6.1 Selecting and Editing Text  Select text  To select  Do this Any amount of text Drag the stylus over the text. A word  Double-tap the word. A single paragraph  Triple-tap within the paragraph. An entire document  Select Edit > Select All An picture  Tap the picture   Find text  To search for text in one part of a document, select that part. Otherwise, the whole document is searched.  Select Edit > Find  Enter the text you want to find. For a paragraph, enter ^p. For a tab stop, enter ^t.  Select the search options you want.  To continue searching, select Edit > Find > Next.    Replace text  To replace text in one part of document, select that part. Otherwise, the whole document is searched.  Select Edit > Replace.  Enter the text you want to find and the text you want to replace it with. For
 5-15 a paragraph, enter ^p. For a tab stop, enter ^t.  Select the replacement options you want.  Select Find Next.  On the Find/Replace toolbar, select the appropriate button.   Move, copy, or delete text  Select the text you want to move, copy, or delete.  To move or delete text, select the Cut button. To copy the text, select the Copy button.  To paste the information, move the insertion point to the desired location, and select the Paste button. Notes:  To undo an action, select Edit > Undo.  To restore the action, select Edit > Redo.  5.2.6.2 Formatting Text  Create bulleted and numbered lists  Select the Bullets or Numbering button.  Type the first item.  Press ENTER, type the next item, and repeat as needed.  Select the button again to end list formatting. Note: To change the number style for the selected list, select Format > Paragraph, In the Format list, select the style you want.   Set the default font  Select Format > Font.  Select the font you want.  Select Set As Default  To confirm that your changes will be applied to subsequent documents you create, select Yes. Note: To apply the default font and stylus to selected text, select Apply Default.  Select a different font  Select the text you want to change. To select all text, select Edit > Select All.  From the Font list, select the font you want.  From the Font Size list, select a size. Note: To see more formatting options, select Format > Font.   Change font formatting
 5-16  Select desired text.  Select the Bold, Italic, or Underline button.  To change the color, select Format > Font and select the color you want from the Color list.  Adjust the paragraph alignment  Select the paragraph you want to align.  Select the Align Left, Center, or Align Right button. Note: To see more formatting options, select Format > Paragraph.   Indent a paragraph  Select the paragraph you want to indent.  Select Format > paragraph.  Adjust the indentation settings as needed.   Set tabs  Select Format > Tabs.  Change the tab settings as needed.  5.2.6.3 Adjusting the Display  Wrap text in the window  Select View > Wrap to Window.   Display the document using the full screen  Select View > Full Screen.  To exit Full Screen view, select Restore.  To move the Restore button, drag the bar on the left side.   Display or hide scroll bars  Select View > Horizontal Scroll Bar or Vertical Scroll Bar.   Zoom in or out  Select View > Zoom, and select the desired percentage. Note: For Custom, enter the exact percentage and select OK.  5.2.6.4 Working in Outline View  Switch between Normal and Outline views  Select View > Normal or Outline.
 5-17  Assign and change outline levels  Select View > Outline.  Select the appropriate buttons on the toolbar.  5.2.6.5 Inserting Symbols  Place the insertion point where you want to insert the symbol.  Select Tools > Insert Symbols.  Select the symbol you want, and then select Insert.  Tips:    If you select a different font ( or subset of a font), a different set of Symbols will be displayed.  5.2.6.6 Printing a Document  Select File > Print.  Select the printing options you want. Tips:  Port list the available printer ports  If Network is selected from the Port list, enter the path to the network printer to the Net Path box.   5.2.6.7 Setting a password for a Document  Select File > password.  Type and verify the password.  You must save the document (File > Save) to return the password.  5.2.6.8 Converting Documents  About document conversion If an e-mail program is installed on your device and you receive an attached Word document or template created in Word version 6.0 or later, WordPad will convert the file on your device. To view the document, simply open the attachment in your e-mail program or open the file in the WordPad.  During conversion, some formatting attributes may be changed or lost. To avoid losing these attributes permanently, close the file after viewing it rather saving the file on your device. If you save the file, save with a different file name. For more information about conversion performed on your device, see the following topics.
 5-18   Changes caused by Word document conversion  Formatting  Borders and Shading Borders and shading are not displayed in WordPad, but are restored when converted back to a Word document. Shading is not restored when used in a table, but simple borders are restored.  Character formatting Bold, italic, strikethrough, superscript, subscript, and hidden text are retained and displayed. Other effects are changed or removed.  Colors Colors are retained and mapped to colors available on your device.  Fonts and font sizes Fonts not supported by your mobile device are mapped to the closest font available in WordPad.  Page Formatting Headers, footers, footnotes, columns, pages setup information, and style sheets are removed during conversion to WordPad. WordPad supports built-in headings.  Paragraph formatting Tabs, alignment, bullets, indentation, simple numbered lists, and paragraph spacing are retailed and displayed in WordPad.   Pictures Pictures are removed during conversion.   Table of Contents Table of Contents text and some formatting are preserved. However, any text set at right-aligned tab stops may wrap to the next line.   Index Index text and some formatting are preserved.   Tables Tables appear as tab-delimited text. Cells containing wrapped text, tabs, or paragraph markers may be difficult to read. Simple tables are displayed accurately and restored when you convert the WordPad file back to a WordPad document.
 5-19   OLE Objects OLE Objects are removed during conversion.   Revisions marks, annotations, and comments Revision marks are visible but cannot be changed. Annotations and documents are removed during conversion.   5.2.7 Remote Connection  Using Remote Desktop Connection, you can log on to Windows Terminal Server and use all programs installed on this server. For example, instead of running Microsoft Pocket Word, you can run the desktop version of Microsoft Word.  5.2.7.1 Connecting to Terminal Server  Select Start > Programs > Remote Connection, or run ‘CETSC’ from the command prompt.  In the Server box, type or select a Terminal Server name or TCP/IP address, or select a server in the drop-down list.  Select Connect.  In the Remote Connection window, type your user name, password, and domain(if required), and then select OK.                                        Figure 5-4 Remote Connected  5.2.7.2 Disconnecting Without Ending a Session  In the Remote Connection window, select Start > Shutdown.  Select Disconnect > OK. Note: If you previously disconnected from a Terminal Server without ending the session, the Terminal Server will continue to execute any running processes and Remote Connection can later reconnect to this same session(if your administrator has configured Remote Connection to reconnect to disconnected sessions).
 5-20 5.2.7.3 Disconnecting and Ending a Session  In the Remote Connection window, select Start > Shutdown.  Select Log Off > OK.   5.2.8 Windows Explorer Windows Explorer works almost the same on your PDT as it does on your PC. See the topics below for information about the difference in Windows Explorer on your device.  5.2.8.1 Navigating in File View  Go forwards and Back  To go to the previous folder, select Go > Back.  To go to the next folder (which you have just viewed), select Go > Forward.                                        Figure 5-5 Windows Explorer  Use the Go menu  To quickly access the My Documents folder, select Go > My Documents  To see all of the folders you have accessed, select Go > History. Double-tap a folder to return to it.  5.2.8.2 Viewing Files as Icons Lists  To view icons, select View > Large Icons or Small Icons.  To view a list, select View > Details.  5.2.8.3 Working with Files and Folders  Create a new folder  If necessary, open the folder where you want the new folder to reside.  Select File > New Folder.  Add a folder to your Favorites list  Open the folder  Select Favorites > Add to Favorites.  In the Name box, type the shortcut name.
 5-21     Tips:  To open a favorite file or folder, select Favorites and then select the folder.  To organize your favorites, select Favorites > Organize Favorites.  Transfer a file using infrared  To send a file, select it, line up the infrared ports, and select File > Send To > Infrared Recipient.  To receive a file, line up the infrared ports, and select File > Receive.  5.2.8.4. Creating Desktop Shortcuts  Display the file or Web page for which you want to create a Shortcut.  Select File > Send to.  Select Desktop as Shortcut.  5.2.8.5 Switch to Internet  Type a URL in the Address bar.      5.3 DiskOnChip  The DiskOnChip let the application or a data file can be stored into the Flash Memory. Note: The DiskOnChip storage memory persists all reset (warm/cold reboot) conditions and software/firmware updates. We strongly recommends installing all applications, applets, programs, and important data files to the DiskOnChip Flash location.  Caution:   If an application or a data file is only installed or saved in RAM, a hard reset will result in the loss of that application or data file.  5.3.1 Saving to Flash To save an application or data to the Flash Memory, from your current application, select File > Save As > navigate to the DiskOnChip location and save it.
 5-22 5.3.2 DiskOnChip Location To access the contents of DiskOnChip storage:  Double-tap the My Computer icon on the desltop.  Double-tap the DiskOnChip icon to view DiskOnChip.       Figure 5-6 DiskOnChip   5.3.3 DiskOnChip Size The size of the DiskOnChip will vary, depending on the size of system firmware.  Inside the DiskOnChip directory, tap File > Properties.  The DiskOnChip Properties dialog: The number following Free is the amount of memory currently available on your device.                                                   Figure 5-7 DiskOnChip Size
 A-1 Appendix A   2D Barcode Setting   A.1 Setup Tab    Function Explaining:  Item  Function Explaining Symbology Setup Selecting the Symbology Setup menu item causes the symbology setup dialog to be displayed. This dialog consists of a symbology drop down list, plus four buttons and a message box. Decoder Setup  Selecting the decode menu item displays the decode options dialog box. Options  Selecting the Options Menu item displays the Setup dialog box Save Current Config to File The application has the ability to save the Config file. The Config file that is saved when this item is selected depends on the Config that is active. You will be presented with a "Rea ..." dialog where you are asked to select the name of the file to save. The default file extension matches the current active Config. Saving a Config file this way is independent from the Config Format option of the Imager menu. In this case, the
 A-2 Item  Function Explaining Config file is saved as it appears on the screen instead of how it was received. Restore Config From File This selection restores the Config from any file. The Config file is full size, uncompressed, and unprocessed. Exit  Selecting Exit shuts down the Application Program.     A.1.1 Symbology Setup Selecting the Symbology Setup menu item causes the symbology setup dialog to be displayed. This dialog consists of a symbology drop down list, plus four buttons and a message box.     Function Explaining:  Item  Function Explaining Default Symbol  Causes the current symbology shown in the drop down list to be set to internal defaults. Default All Symbologies  Defaults all symbology options for all symbologies to internal defaults. Enable All Symbologies  Enables all symbologies, but does not change other symbol options. Disable All Symbologies  Disables all symbologies without affecting other symbol options.
 A-3    A.1.2 Decoder Setup     Function Explaining:  Item  Function Explaining No Read Timeout Maximum time (in milliseconds) that the imager will attempt to decode before declaring a “No Decode” condition. If attempting to decode using the trigger key, the imager quits decode attempts even if the trigger key remains depressed. You will not be able to start a new decode using the trigger until after the trigger is released. The timeout also applies to the decode operation of the imaging technology. The Timeout range is 0 meaning no timeout (i.e., infinite) to 300,000. Multiple Symbols Mode Enables/Disables multiple symbols decoding. Normally the imager stops attempting to decode when a bar code symbol is decoded. In multiple symbols mode, the imager will not stop until the trigger is released or a “No Decode” timeout occurs. The same bar code will not read again until current decoding stops. Aimers During Capture Enables/Disables aimers during decoding. Center Window Decode Enable A decoded symbol is returned only if it intersects a rectangle specified by the center window.
 A-4 Item  Function Explaining Center Window  Center Window indicates the percent-age of width and height of the center decode rectangle, relative to the entire image. The limits are 0-100%. The defaults are20x20 (128x96 pixels). Display Symbol Information The Display Symbol Information option enables/disables display of decoded symbol information, which includes the AIM ID, SymID (Code ID), and symbol modifier. Display No Decode Message Enables/Disables display “No Decode” message if no bar code symbol is decoded by either a timeout or trigger release.     A.1.3 Options     Function Explaining:  Item  Function Explaining Trigger Timeout  Select  the  scanning  timeout  duration  (in  seconds)  from  this pull-down list. <3 ~ 10 sec, Default: 6> None  After showing barcode, do not action. CRLF  After showing the barcode, jump to next row. Space  After showing the barcode, jump one unit. Termination Code Tab  After showing the barcode, jump a section. Beep after data collect Select the time of beep tone after data collect. Auto Scan  Disable  Disable this functionality.
 A-5 Item  Function Explaining 1 ~5 sec  Alternate second number of Continuous Scan. Prefix  Type the desired label prefix in this text box Label Suffix  Type the desired label suffix in this text box     A.2. Update Tab     Function Explaining:  Item  Function Explaining Firmware Revision When this item is selected, the imager is queried for the current firmware version information. The version information is then displayed in the text window. Flash New Firmware This item allows new engine firmware to be installed into the imager. When Flash New Firmware is selected; you are prompted to select the firmware file. The file, which must have the extension ".bin", must reside on the PDT. The firmware file can be copied to the PDT using Microsoft Explorer as long as the PDT is linked to the PC via Microsoft's Active Sync. The default search location is the My Documents folder. Once you select a file, the file is transferred to the engine. The engine then writes the new firmware into flash memory and re-initializes. The flashing of the firmware and subsequent
 A-6 Item  Function Explaining restart takes approximately 30 seconds. The application insures that the unit will not enter suspend mode during that time.  Note: It is very important that the device remains awake during this time. Failure to do so can cause the scan engine to become unusable.     A.3. Symbologies List   A.3.1 Aztec     Function Explaining:  Item  Explaining Symbol Enable  Enable this barcode Enable Aztec Runes  If you are scanning Aztec Runes, which are the smallest type of Aztec Code symbol with the ability to encode a very short license plate message. Message Length  The minimum and maximum length ranges for the barcode are 1-3750.
 A-7   A.3.2 Codabar     Function Explaining:  Item  Explaining Symbol Enable  Enable this barcode Check Char/Digit Enable  The scanner reads barcode data with a check digit. If not checked, the bar code will be read as though no check digit was present. Check Char/Digit Transmit  The scanner will only read Codabar bar codes printed with a check digit, and will transmit this character at the end of the scanned data. This setting is only valid if check char/digit is enabled. Start/Stop Transmit Start/Stop characters identify the leading and trailing ends of the barcode. Message Length  The minimum and maximum length ranges for the barcode are 2-60.
 A-8   A.3.3 Code 11     Function Explaining:  Item  Explaining Symbol Enable  Enable this barcode. Check Char/Digit Enable  This option sets whether 1 or 2 check digits are required with Code 11 barcode. Message Length  The minimum and maximum length ranges for the barcode are 1-80.  Check Digits Required Default = Two Check Digits.
 A-9   A.3.4 Code 128     Function Explaining:  Item  Explaining Symbol Enable  Enable this barcode Message Length  The minimum and maximum length ranges for the barcode are 0-80.
 A-10   A.3.5 Code 39     Function Explaining:  Item  Explaining Symbol Enable  Enable this barcode Check Char/Digit Enable  The scanner reads barcode data with a check digit. If not checked, the barcode will be read as though no check digit was present. Check Char/Digit Transmit  The scanner will only read Code 39 barcode printed with a check digit, and will transmit this character at the end of the scanned data. This setting is only valid if check char/digit is enabled. Start/Stop Transmit Start/Stop characters identify the leading and trailing ends of the barcode.
 A-11 Item  Explaining Append Mode Enable  If this box is checked, the scanner can append the data from several Code 39 barcode together before transmitting them to the host computer. When this function is enabled, the scanner stores those Code 39 barcode that start with a space (excluding the start and stop symbols), and doesn’t immediately transmit the data. The scanner stores the data in the order in which the barcode are read, deleting the first space from each. The scanner transmits the appended data when it reads a Code 39 bar code that starts with a character other than a space, or when it reads a barcode that is not Code 39. Full ASCII Translation  If Full ASCII Code 39 decoding is turned on, certain character pairs within the barcode symbol will be interpreted as a single character.   Message Length  The minimum and maximum length ranges for the barcode are 0-48.
 A-12 A.3.6 Code 49     Function Explaining:  Item  Explaining Symbol Enable  Enable this barcode Message Length  The minimum and maximum length ranges for the barcode are 1-81.
 A-13 A.3.7 Code 93     Function Explaining:  Item  Explaining Symbol Enable  Enable this barcode Message Length  The minimum and maximum length ranges for the barcode are 0-80.
 A-14 A.3.8 Composite Codes     Function Explaining:  Item  Explaining Symbol Enable  Enable this barcode. Enable UPC-A/EAN-13 Composite Whether want to scanning UPC-A/EAN-13 Composite codes. Message Length  The minimum and maximum length ranges for the barcode are 1-2435.
 A-15 A.3.9 Data Matrix     Function Explaining:  Item  Explaining Symbol Enable  Enable this barcode Message Length  The minimum and maximum length ranges for the barcode are 1-1500.
 A-16 A.3.10 EAN-8     Function Explaining:  Item  Explaining Symbol Enable  Enable this barcode Check Char/Digit Transmit  The output of the check digit at the end of the scanned data. Enable 2 Digit Addenda  Option allows decoding and outputting of a 2 digits addendum on the end of all scanned EAN-8 data. Enable 5 Digit Addenda  Option allows decoding and outputting of a 5 digits addendum on the end of all scanned EAN-8 data. Addenda Required  Only reads EAN-8 barcodes that have addenda. Include Addenda Separator  When this feature is selected, the data is output with a space between the data from the main barcode and the data from the addenda. When turned off, there is no space.
 A-17 A.3.11 EAN-13     Function Explaining:  Item  Explaining Symbol Enable  Enable this barcode Check Char/Digit Transmit  The output of the check digit at the end of the scanned data. Enable 2 Digit Addenda  Option allows decoding and outputting of a 2 digits addendum on the end of all scanned EAN-13 data. Enable 5 Digit Addenda  Option allows decoding and outputting of a 5 digits addendum on the end of all scanned EAN-13 data. Addenda Required  Only reads EAN-13 barcodes that have addenda. Include Addenda Separator  When this feature is selected, the data is output with a space between the data from the main barcode and the data from the addenda. When turned off, there is no space.
 A-18 A.3.12 Interleaved 2 of 5     Function Explaining:  Item  Explaining Symbol Enable  Enable this barcode Check Char/Digit Enable  The scanner reads barcode data with a check digit. If not checked, the barcode will be read as though no check digit was present. Check Char/Digit Transmit  The scanner will only read Interleaved 2 of 5 barcodes printed with a check digit, and will transmit this character at the end of the scanned data. This setting is only valid if check char/digit is enabled. Message Length  The minimum and maximum length ranges for the barcode are 2-80.
 A-19 A.3.13 MaxiCode     Function Explaining:  Item  Explaining Symbol Enable  Enable this barcode Message Length  The minimum and maximum length ranges for the barcode are 1-150.
 A-20 A.3.14 MicroPDF417     Function Explaining:  Item  Explaining Symbol Enable  Enable this barcode Message Length  The minimum and maximum length ranges for the barcode are 1-366.
 A-21 A.3.15 OCR-A, OCR-B, US Currency    Use this section to program the imager to read machine readable fonts used in optical character recognition (OCR). The imager reads 6 to 60 point OCR typeface.   OCR Mode   OCR-A    OCR-B    U.S. Currency Serial Number (Money)    MICR E-13B    SEMI Font    You can either select an OCR default, or create your own custom template for the type of OCR format you intend to read. See "OCR Templates" if you want to create a custom “template” or character string that defines the length and content of OCR strings that will be read with your imager.
 A-22  Note: Setting the template and check character options are essential for OCR reading.  OCR Off turns off all OCR capability in the scanner, so the scanner will be able to scan linear, stacked, matrix, and composite bar codes, but not OCR fonts. In addition, any OCR templates you have created are erased. The 8 digit default templates are reinstated for any future use of the OCR-A, OCR-B, or U.S. Currency fonts. If you select OCR-A, OCR-B, or U.S. Currency you can scan characters in that font. The default setting allows you to scan any 8 digit combination. If you have created an OCR template, character combinations that fit the template can be scanned (see Creating an OCR Template).  OCR Direction The OCR Direction setting can be used to prevent misreads of character strings that could be interpreted differently in different orientations when you know the orientation of the characters that are being read in relation to the imager (e.g., 80086996 could read as 80086996 or 96698008). Default = Left-to-Right (LtoR)    OCR Templates You can create a custom “template”, or character string that defines the length and content of OCR strings that will be read with your imager. There are several choices when creating a custom template for your application. You can create a template for a single format, you can string together several formats, and you can create a template for a user-defined variable. These choices are described in detail below.  Creating an OCR Template A single template allows you to program the imager to read any combination of characters in the order you specify. Refer to examples that follow the Template Characters table below.  Template Characters\ a  represents any alphanumeric character (digit or letter) c  represents a check character position d  represents any digit e  represents any available OCR character g  represents character from user-defined variable “g” h  represents character from user-defined variable “h” l  represents any uppercase letter t  marks the start of a new template
 A-23 r  multi row indicator All other characters represent themselves. Spaces can be used. Note: In MICR E13 B templates, TOAD characters (capital letters T, O, A, and D), represent Transit, On Us, Amount, and Dash.  Note: OCR templates default to eight digits, no check character.  To Add an OCR Template 1. Turn on the OCR font you want to read. 2. Begin building the template. Scan the Enter OCR Template symbol. 3. Scan the characters for the string. Use the Template Characters chart above to determine what characters you need to create your format. Use the OCR Programming Chart (after the Sample Codes in the back of this manual) to scan the characters for your template.  Example: You need to read any combination of eight digits. The template would be:   To create this template, you would enable the OCR-A font. Scan the Enter OCR Template symbol, and then scan the d from the OCR Programming Chart in the back of this manual eight times. Scan Save OCR Template. This would let you read any string of eight digits, for example:   Character Match Sequences On the ASCII Conversion Chart (Code Page 1252), page A-4, find the Hex value that represents the character(s) you want to match. Use the Programming Chart (inside the back cover) to scan the numbers that represent these characters.  Example: You need to read three digits, three specific characters (ABC), three digits. The template would be:   To create this template, you would enable the OCR-A font. Scan the Enter OCR Template symbol. Scan the d from the OCR Programming Chart in the back of this manual three times. Then scan 414243 from the inside back cover (the hex characters for “A,” “B,” and “C”), and scan the d three more times. Scan Save
 A-24 OCR Template. This would let you read any string of three digits, “ABC,” then any string of three digits, for example:   Adding Spaces You may also need to put spaces in your template.  Example: You need to read three digits, space, three specific characters (ABC), space, three digits. The template would be:   To create this template, you would enable the OCR-A font. Scan the Enter OCR Template symbol. Scan the d from the OCR Programming Chart in the back of this manual three times, and then scan 2041424320 from the Programming Chart on the inside back covers (the hex characters for “space,” “A,” “B,” “C,” “space”). Scan the d three more times, and then scan Save OCR Template. This would let you read any string of three digits, space, “ABC,” space, and then any string of three digits. For example:  Note: If using Quick*View to program, use the space bar to designate a space and not the hex value of 20.  4. Exit OCR Template Editor Scan Save OCR Template to save your entries. Discard OCR Template exits without saving any OCR Template changes.  Stringing Together Multiple Formats (Creating “Or” Statements) You may want to program the imager to accept many OCR formats. To do this, you would string together each format with a “t.” This tells the imager to read optical characters that match any one of the formats in the template.  Example: You need to read any combination of eight digits, or a combination of four digits, two uppercase letters, and two digits. The template would be:   To create this template, you would enable the OCR-A font. Scan the Enter OCR Template symbol. Scan the d from the OCR Programming Chart in the back of this manual eight times, then scan the t to create the “or” statement. Then you would scan the characters for the second template. Scan d four times, scan l two times, then scan
 A-25 d two more times. Scan Save OCR Template. This would let you read either type of format, for example:   You can string together as many templates as you need.   OCR Template Codes Note: Reading more than three rows of OCR is not recommended. Contact the factory if you have an application that requires reading four or more rows of OCR.   † One or more two-digit numbers and Save are required after reading this programming symbol. Refer to the Programming Chart on the inside the back cover of this manual.  Exit Selections
 A-26 ASCII Conversion Chart (Code Page 1252)
 A-27 ASCII Conversion Chart (Code Page 1252)
 A-28 OCR Programming Chart
 A-29 Programming Chart
 A-30
 A-31 A.3.16 PDF417      Function Explaining:  Item  Explaining Symbol Enable  Enable this barcode Message Length  The minimum and maximum length ranges for the barcode are 1-2750.
 A-32 A.3.17 Postnet     Function Explaining:  Item  Explaining Symbol Enable  Enable this barcode Check Char/Digit Transmit  The scanner will only read US Postnet bar codes printed with a check character, and will transmit this character at the end of the scanned data.
 A-33 A.3.18 QR Code     Function Explaining:  Item  Explaining Symbol Enable  Enable this barcode Message Length  The minimum and maximum length ranges for the barcode are 1-3500.
 A-34 A.3.19 Reduced Space Symbology     Function Explaining:  Item  Explaining RSS Expanded Enable  Enable RSS Expanded code RSS Limited Enable  Enable RSS Limited code RSS 14 Enable  Enable RSS 14 code Message Length  The minimum and maximum length ranges for the barcode are 4-74.
 A-35 A.3.20 UPC-A     Function Explaining:  Item  Explaining Symbol Enable  Enable this barcode Check Char/Digit Transmit  The output of the check digit at the end of the scanned data. Enable 2 Digit Addenda  Option allows decoding and outputting of a 2 digits addendum on the end of all scanned UPC-A data. Enable 5 Digit Addenda  Option allows decoding and outputting of a 5 digits addendum on the end of all scanned UPC-A data. Addenda Required  Only reads UPC-A barcodes that have addenda. Include Addenda Separator  When this feature is selected, the data is output with a space between the data from the main barcode and the data from the addenda. When turned off, there is no space. Send Number System  If you want the numeric system digit of a UPC symbol transmitted.
 A-36 A.3.21 UPC-E     Function Explaining:  Item  Explaining Symbol Enable  Enable this barcode Check Char/Digit Transmit  The output of the check digit at the end of the scanned data. Enable 2 Digit Addenda  Option allows decoding and outputting of a 2 digits addendum on the end of all scanned UPC-E data. Enable Expanded UPC-E  Enable UPC-E Expanded code Enable 5 Digit Addenda  Option allows decoding and outputting of a 5 digits addendum on the end of all scanned UPC-E data. Addenda Required  Only reads UPC-E barcodes that have addenda. Include Addenda Separator  When this feature is selected, the data is output with a space between the data from the main barcode and the data from the addenda. When turned off, there is no space. Send Number System  If you want the numeric system digit of a UPC-E symbol transmitted.
 A-37 A.3.22 UPC-E1     Function Explaining:  Item  Explaining Symbol Enable  Enable this barcode Check Char/Digit Transmit  The output of the check digit at the end of the scanned data. Enable 2 Digit Addenda  Option allows decoding and outputting of a 2 digits addendum on the end of all scanned UPC-E1 data. Enable Expanded UPC-E  Enable UPC-E Expanded code Enable 5 Digit Addenda  Option allows decoding and outputting of a 5 digits addendum on the end of all scanned UPC-E1 data. Addenda Required  Only reads UPC-E1 barcodes that have addenda. Include Addenda Separator  When this feature is selected, the data is output with a space between the data from the main barcode and the data from the addenda. When turned off, there is no space. Send Number System  If you want the numeric system digit of a UPC-E1 symbol transmitted.
 A-38 A.3.23 ISBT    Function Explaining:  Item  Explaining Symbol Enable  Enable this barcode   A.3.24 British Post    Function Explaining:  Item  Explaining Symbol Enable  Enable this barcode
 A-39  A.3.25 Canadian Post     Function Explaining:  Item  Explaining Symbol Enable  Enable this barcode
 A-40  A.3.26 Australian Post     Function Explaining:  Item  Explaining Symbol Enable  Enable this barcode Send Bar Width Data  Australian Post is a 4-state symbology that was designed with a non-defined user area. The user can define how that area field is interpreted. Most systems have dedicated decoders that don’t know how to decode a symbology that is not defined. If you select the Send Bar Width Data, the bar levels will be outputted (0-3 for the four states) so that the receiving device can then decode appropriately.
 A-41 A.3.27 IATA 2 of 5     Function Explaining:  Item  Explaining Symbol Enable  Enable this barcode Message Length  The minimum and maximum length ranges for the barcode are 1-48.
 A-42 A.3.28 Codablock F     Function Explaining:  Item  Explaining Symbol Enable  Enable this barcode Message Length  The minimum and maximum length ranges for the barcode are 1-2048.
 A-43 A.3.29 Japanese Post     Function Explaining:  Item  Explaining Symbol Enable  Enable this barcode
 A-44 A.3.30 Planet Code     Function Explaining:  Item  Explaining Symbol Enable  Enable this barcode Check Char/Digit Transmit  The scanner will only read Planet barcodes printed with a check character, and will transmit this character at the end of the scanned data.
 A-45 A.3.31 KIX (Netherlands) Post     Function Explaining:  Item  Explaining Symbol Enable  Enable this barcode
 A-46 A.3.32 MSI     Function Explaining:  Item  Explaining Symbol Enable  Enable this barcode Check Char/Digit Transmit  The scanner will only read MSI barcodes printed with a check character, and will transmit this character at the end of the scanned data. Message Length  The minimum and maximum length ranges for the barcode are 4-48.
 A-47 A.3.33 TCIF Linked Code 39     Function Explaining:  Item  Explaining Symbol Enable  Enable this barcode
 A-48 A.3.34 Mayrix 2 of 5     Function Explaining:  Item  Explaining Symbol Enable  Enable this barcode Message Length  The minimum and maximum length ranges for the barcode are 1-80.
 A-49 A.3.35 Korean Post     Function Explaining:  Item  Explaining Symbol Enable  Enable this barcode Message Length  The minimum and maximum length ranges for the barcode are 2-80.
 B-1 Appendix B   Phone Tools (GSM/GPRS)  B.1 Using the Phone Features Use the PDT to make and receive telephone calls and send and receive SMS (Short Message Service) messages. Your mobile phone service provider may provide other useful services such as voice mail. The phone can also be used to connect to an Internet Service Provider (ISP) or work network so you can browse the Web and read e-mail. You can connect to the Internet or work network over GPRS (General Packet Radio Service), or you can use GSM (Global System for Mobile Communications) for dial-up access.    B.1.1 SIM Card A SIM (Subscriber Identity Module) card is required to operate the phone features on your PDT. The SIM card is a plastic card embedded with a computer chip that stores and transacts data. After the SIM card is activated by your mobile phone service provider, the computer chip will contain information about your phone number, service, registration information, and contacts, as well as memory to store speed dial numbers and text or SMS messages that you receive. With the exception of emergency calls, the SIM card must be inserted into the SIM slot under the battery on the back of the PDT in order for voice/data calls to work. To dial an emergency number, from the Phone keypad, tap the emergency number appropriate for your region, and then tap Talk or Send. Note: See your local telephone directory for emergency numbers used in your area.    B.1.2 Inserting a SIM Card  Note: If the battery is already installed, you must remove it before inserting the SIM card.  To insert the SIM card into the PDT: 1. Remove the 4 screws from the GSM End Cap with a screw driver, Torx type and size 8 (T8). And then remove the GSM End Cap.
 B-2   2. Insert the SIM card (with the gold side facing the inside of the slot) into the SIM slot.    3. Using 4 ~ 4.5 kgf-cm torque to fix the screws for GSM End Cap.  Note: Repeat the same steps to remove the SIM card from the SIM tray.
 B-3 B.1.3 Start Before:  1. You need to tap the phone icon in the system tray twice. 2. It opens a GPRS power control window.    3. You need to select Enable GSM/GPRS and tap the OK button. 4. Thereafter you might need to input a PIN code and tap the OK button if you have setting the PIN code.
 B-4 B.2 Interface layout Depending on options available and the capabilities of your PDT, the main interface enables you to: -  Look up all your messages using the Inbox, Outbox and Sent icons. -  Create and send SMS messages. -  Make a phone call using the Dialer, which also enables you to access SMS functions. -  Manage several Phonebooks. -  Navigate the Internet. Notes:   When you start the application for the first time, the communication settings configuration screen is displayed automatically. You will not be able to access the main interface until these settings have been specified. See selecting communication settings. Actions, such as sending SMS, can be directly driven from the system. See System extensions.   B.2.1 Looking up messages  Inbox Clicking the Inbox    icon displays a list of all messages received at the center of the screen. Unread messages on this list appear in bold. The content of the selected message is displayed in the lower frame.
 B-5   Depending on the type of message, in order to send, see properties, move, resend, display, annotate or delete a message on the list: 1. Select the message and hold the selection with the stylus for a few seconds until a context menu is displayed. 2. Select the desired option.   3. Depending on the option selected, follow the usual procedure or click Cancel or the OK icon, located in the top right-hand corner of the screen, to return to the main interface. To collect your messages, click on the Tools menu, then select Retrieve SMS from the list that shows up. Messages received are placed in the Inbox automatically.  Outbox Clicking the Outbox    icon displays a list of all messages sent at the center of the screen. The message content is displayed in the lower frame. This is a listing of messages waiting to be sent or sent from the application as well as those downloaded from your mobile phone.
 B-6   Depending on the type of message, in order to send, see properties, move, resend, display, annotate or delete a message on the list: 1. Select the message and hold the selection with the stylus for a few seconds until a context menu is displayed. 2. Select the desired option.   3. Depending on the option selected, follow the usual procedure or click Cancel or the OK icon, located in the top right-hand corner of the screen, to return to the main interface.  Sent box Clicking the Sent    icon will display the list of messages sent from the outbox. The content of the selected message is displayed in the frame.
 B-7   To send, see properties, transfer, and display, annotate or delete a message from the list: 1. Select the message and hold the selection with the stylus for a few seconds until a context menu is displayed. 2. Select the desired option.   3. Depending on the option selected, follow the usual procedure or click Cancel or the OK icon, located in the top right-hand corner of the screen, to return to the main interface.  Phonebooks Folder Clicking the Phonebooks    icon displays a drop-down list containing the phonebooks you have created or imported. Select the one you wish to look up or edit from the list.
 B-8   If the drop-down list is empty and you would like to import contacts from your mobile phone, select the Tools > Retrieve phonebook menu.   B.2.2 Icons and menus  Display icons Clicking the    icon located at the bottom of the screen and which symbolizes two arrows on a blank page, displays the fast access icons for available functions (which are as follows, from left to right: send and receive SMS messages, add a new contact in your Phonebook, Dialer, Internet connection). Click this icon again to hide them.  Display numeric keypad Clicking the    icon located in the bottom right-hand corner of the screen and which symbolizes a keypad displays the keypad. Click this icon again to hide the keypad.  Drop-down menus The New and Tools drop-down menus have several functions, depending on the context and options available:
 B-9 New menu Click on the New menu at the bottom of the screen, then select: - SMS: To create and send an SMS message.   - Phonebook: To create a phonebook. - Phonebook Contact: To add a contact to your phonebook.    Tools menu Click on the Tools menu at the bottom of the screen, then select: - Retrieve SMS: The application collects the SMS messages and places them in the Inbox. - Retrieve phonebook: To download a phonebook: the one in your mobile phone or the one in your SIM card, or both.   - Check cellular status....   - Settings...: To configure the application's communication settings. See selecting communication settings. - Dialer: To make a call directly from the application. - Internet connection: To access the Internet. - Logs: To access the different logs: Data counters, Data sessions log, SMS counters, Calls missed, Calls received, Outgoing calls, Voice counters. - About...: To access information about the application. - Close: To close the application.    B.3 Selecting communication settings Before using the communication features, make sure that the communication port and the equipment you are using are correctly declared.  General Setup Menu Click the Tools > Settings to access the General Setup menu, which have different functions available depending on the type of your equipment. Select:   -  Communications device: to configure your equipment and type of connection used. -  Network operator: to define your operator settings. -  Internet connection: to create, modify or delete internet connections.
 B-10 -  SMS: to configure the SMS transmission and reception options. -  My text: to record words or sentences you frequently use so they can quickly be added to a SMS message. -  Dialer: to define the dialer settings. -  Advanced settings: to configure Log events and the 'Close' option in the Tools menu. -  Security: to modify the PIN code of your SIM card.      First launch 1. At the first launch, the communication settings configuration screen is displayed. Click Yes and follow the different step to specify the communication settings.   2. Depending on the type of connection, your mobile phone and your operator will automatically be detected. (If not, follow the instructions detailed in the next section.) Click the OK icon located at the top right-hand corner of the screen to save the settings. 3. A confirmation pop-up is displayed. Click Yes to save the defined settings.  Communications device tab 1. Select Tools > Settings > Communications device.   2. Select the Manufacturer and the Model of your equipment (modem or telephone).
 B-11 3. Select Connection type being used.   4. Click the OK icon located at the top right-hand corner of the screen to confirm.    The Terminal button enables you to dialog directly with the modem via AT commands (like with Microsoft Hyper Terminal).   The Status button returns information on your equipment.   B.3.1 System Extensions PhoneTools system extensions are specific extensions for the Contacts application and the Today screen. Actions can be driven from the system and the PhoneTools Inbox status is available from the Today screen of your PDT.    Today screen extension From the Today screen of your PDT, click: ● The PhoneTools Inbox status to directly launch PhoneTools. The application opens displaying the Inbox. ● The New > SMS menu to create a SMS.     Contacts menu extension From your Contacts screen (Start > Contacts), select a contact from the list. You can either hold the click until a context menu is displayed or click the Tools menu, and then select:
 B-12 ● Call: to make a phone call to the selected contact. ● Copy to the SIM: to copy the properties of the selected contact into your SIM phonebook. ● Send SMS: to send a SMS to the selected contact.    B.4 Dialer The Dialer module simulates the operation of a mobile phone in your personal assistant. It enables you to: ● make calls in various ways: -  by directly selecting an entry in the Contacts folder of your digital assistant. -  by selecting from a Fast calls list you will have pre-programmed. -  by entering a number directly using the keyboard. -  by redialing one of the last 10 numbers dialed. -  using the missed calls log if the caller has not withheld his/her number.   ● receive calls showing, where possible, the last and first names of your caller and playing a tune identifying the Contacts category to which your caller belongs. ● reject incoming calls. ● save outgoing, incoming as well as missed calls in call logs. ● send digits with the call to enable navigation across most voice servers.   ● save the number of your message system for fast calls. ● check microphone and speaker volume for certain equipment. ● send and receive SMS messages. ● send and receive faxes. ● access the Internet using a single button. ● directly read signal strength and battery level of your mobile in cases involving external equipment or of your assistant in cases involving an internal card. ● request dialer to be called automatically on starting up the application. Warning! Certain dialer functionalities can be disabled due to incompatibility with the communications equipment.
 B-13 B.4.1 Accessing the dialer ● Starting from the main interface, select the Tools menu then the Dialer option. The dialer initializes your communications equipment then displays signal strength and battery level, as well as the name of your service provider. The keyboard will be enabled once the initialization stage is complete.     B.4.2 Making a voice call 1. Access the dialer and use one of the following methods: ● Direct entry, dial the number using the keys on the numeric keypad. To delete or correct the last digit displayed, click on the    icon showing an arrow pointing to the left and a C. To make the call, click the    icon showing a green receiver. ● From Phonebook, click the Contacts    icon to retrieve the number you are calling. If more than one number is assigned to the person being called, a new window will open enabling you to select the number to be called. Click OK next to make the call. ● Fast call, click the icon with the #    symbol. The list of the fast call contacts you pre-defined is displayed. Click the one you want to call.
 B-14 ● Again, click the green    button without entering any number. A listing of the last numbers dialed appears. Select the number you wish to call, then click the Call button. 2. The number and name of the person being called (if not withheld) is displayed in the top frame during the call. 3. To end the call, click on the icon showing a red receiver. Call duration will then be displayed and an entry in the Dialer log created. Notes:   - It is just as easy to connect to your voicemail by pressing and holding the "1" key. If you have not specified this number yet, the dialer will suggest configuring it. - You can also make a voice call directly from the Contacts application of your PDT. To do so, select the person you wish to call in the Contacts screen list, then click the Tools > Call menu.  Missed calls If one or more callers have attempted to contact you in your absence, the dialer will inform you with an on-screen message. If your callers have not withheld their numbers, you can see who called and you can call them back using the following procedure: 1. Click the Logs    button which will open a tabbed box, the first of which is for missed calls. 2. Select the caller to be called then press the Call    button.  Fast calls list In the Dialer window, click the icon with the # symbol. The list of main contacts is displayed. Select a fast call contact you want to define, modify or call and hold the selection with the stylus until a context menu is displayed. Then, click one of the following options:   ● Edit to create or modify the properties of the fast call contact. Then, click OK.   ● Delete to delete the fast call contact from the list. ● Extract from Contacts to retrieve the properties of the contact from your Contacts ● Dial to call the selected contact.
 B-15   B.4.3 Receiving a call  Ringer The dialer issues a ringing sound to alert you to a caller trying to reach you. The tune played at this time can depend on how the caller is recorded in your Contacts folder. You can in fact specify contacts in your folder (Work, Friends, Family, etc.) and list your callers in one of them. Refer to the user manual for your digital assistant for further information on this subject.   The application may be configured to play different tunes depending on the category of the caller.   If this is the case, the application searches in the Contacts folder for an entry associated with the number, it then determines its category and, having done so, plays the tune you have configured for it. Warning! This will only work if the caller does not withhold his or her number.  Information If the caller's number has not been withheld and if the caller is listed in Contacts, the dialer will display his or her name. If he or she is not listed, only the number will be displayed. If the caller's number has been withheld, the dialer will then display Number Withheld.   Accepting / Rejecting a call Click the green    button to accept the call and click the red    button to reject it.  Receiving SMS messages SMS messages are downloaded automatically as soon as your communications equipment informs the application that messages have been received. If the message received has high priority, its content is displayed automatically; otherwise you have to operate the Envelope button to read it.
 B-16 B.4.4 Logs The application records dates, durations and caller identifiers as the dialer is used, dividing them into three categories: missed calls, received calls and outgoing calls. You can look up details of these lists by pressing the Logs button. This will take you to a tabbed box listing the calls logged by category and, under the Voice counters tab, the various cumulative totals recorded, with a facility for resetting the counters.     B.5 Internet connection The Internet connection    button enables connections to be made to Internet and to start up applications associated with it (see connections). Warning! On most equipment, the fact of connecting to the Internet prevents the dialer from being used.  Use the red    button to disconnect the Internet access session.    B.5.1 Configuration  Accessing configuration ● Before configuring the application's dialer function, select the communications equipment and the mobile telephony service provider using the Settings command on the Tools menu. Next, access dialer configuration by clicking the Dialer command in the General Setup window.  Configuring the answering machine ● You can add the number of your answering machine in the Operator settings selection dialogue box (Tools > Settings menu). It will be dialed automatically if you leave the stylus resting on the "1" key of the dialer.  Configuring a ringer 1. Starting from the main interface, select the Tools > Settings menu. 2. Click on the Dialer link. You can specify the various tunes to be played according to the categories to which the callers belong in the window displayed.
 B-17 3. Select the type of call to which a ringer is to be assigned in the first drop-down menu in the Events field: Incoming call, or Receive an SMS. 4. If you have selected Incoming call, a second drop-down list will be displayed listing the various categories specified in Contacts. Select the category to which you would like to associate a tune. 5. Select the ringer in the Associated sound drop-down menu. 6. Use the Play and Stop buttons to test the selected ringer. Once you are satisfied with a ringer, click OK to confirm. 7. Repeat these steps for each type of call to which you would like to assign a ringer.  Calling the dialer automatically on application start-up. 1. Starting from the main interface, select the Tools > Settings menu. 2. Click the Dialer link. 3. Check the On when loaded box in the window that shows up.     B.6 SMS  What is the 'Short Message Service' (SMS)? The Short Message Service enables you to send messages in text format (160 characters maximum) over a mobile phone network. This service requires a specific subscription.   Short messages are first sent to the SMS Center, which is part of the mobile phone network, which then forward them to the recipients. Received messages are stored in the memory. You cannot receive any more new messages once this memory is full. For this reason, ensure you delete them regularly or configure the application so it transfers them to your assistant.   Configuring  Configuring the service center 1. Starting from the main interface, select Tools > Settings and click the Network Operator link. 2. Select your country and mobile telephony operator. The number of the default
 B-18 Service Center is displayed. If it is not the number sent by your network operator, you can change it manually. 3. You can also use the Automatic detection button for the application to interrogate your equipment and configure these settings. 4. Enter the number for the answering machine suggested by your network operator. It will be used by the dialer. 5. Click OK to confirm.    Configuring SMS messages 1. Starting from the main interface, select Tools > Settings and click the SMS link. Sending: Validity period: if your message cannot be delivered immediately, the service center can record it and resend it later. This list specifies for how long your message will be repeated. Message type: to be used in very specific cases, this option configures the message format in line with the service center and the recipient.
 B-19   Receiving: Transferring SMS messages received: they may be either copied or moved from the communications equipment to the digital assistant. If you opt for the "copy" mode (option unchecked), messages received will accumulate in the communications equipment until it fills up and you risk losing messages to come. In this case you can always delete them from the application's inbox. 2. Click OK to confirm.    Configuring templates If you frequently use the same words or sentences in your messages, you can record them in a list so they can be quickly added to your message. To do this: 1. Starting from the main interface, select Tools > Settings and click the My text link. 2. Select an entry to be edited from the upper list and click the Edit button (arrow pointing downwards) for the entry to be copied to the editing area.   3. Once your sequence has been entered, click the Change button (arrow pointing upwards) to record it.  Sending an SMS message 1. Starting from the main interface, select New > SMS or click . 2. Enter the recipients' numbers using one of the following methods:   ● Direct entry: if you have a single recipient, enter the number directly then click
 B-20 the Next button. If you have more than one recipient, enter their numbers then press the Add button (arrow pointing downwards) to add them to the list.   ● From Phonebook: if your message recipients are recorded in the Contacts folder of your assistant, click the Contacts button and select your recipients and their numbers. Click OK next to add them to the Recipient list. 3. Enter the text of the message in the frame displayed. A character and SMS counter displays the relevant sizes as entry proceeds. A typical message contains up to 160 characters but the application can send content longer than this by linking more than one message together. You can insert pre-recorded passages of text in your message using the My text menu. 4. The default setting is for transmission requests not to be carried out immediately. This enables you to prepare your message off-line and to send it later on (to do this, select it in the Outbox, and select Tools > Send). Check the desired options: ● Send now: to send your message immediately. ● High priority: to display the content of your message directly on the recipient's mobile phone screen. ● Request return receipt: to receive a return receipt. ● UCS2 format: to ensure compatibility with non-European language PDTs. 5. Click OK. Note: You can also send SMS from outside the application, such as follow: ● From the Contacts folder of your PDT assistant, select the contact to whom you want to send the SMS. You can either hold the click until a context menu is displayed and select the Send SMS option, or click the Tools > Send SMS menu. ● From the Today screen of your PDT assistant, click the New > SMS menu.    Downloading received SMS messages Select Tools > Retrieve SMS. If you have received SMS messages on your mobile phone, they will be automatically copied or transferred to the Inbox. Unread messages appear in bold. A single click on a message is enough to read it.  Viewing an SMS message 1. Select the SMS message you wish to view.   2. Select the Tools > View menu or hold the click until a context menu is displayed and select the View option on it. The content of the SMS message, as well as the
 B-21 sender, date and time of sending are displayed. If the inbox contains a number of messages, it is possible to go directly from one to the next from the same dialog box. 3. Click OK to return to the main screen.   Note: Unread messages appear in bold. Click a message to read it.  Replying to an SMS message 1. In the Inbox, select the message you want to answer.   2. Hold the selection until a context menu is displayed in which to select the Reply option, otherwise select Tools > Reply. The SMS transmission screen is displayed. The Phone Number and, if applicable, Name and Company fields are already filled in.   3. Click Next.   4. Enter the message text.   5. The default setting is for transmission requests not to be carried out immediately. This enables you to prepare your message off-line and to send it later on (to do this, select it in the Outbox, and select Tools > Send). Check the desired options referring to the following heading: SMS Transmission options 6. Click OK.    Resending an SMS message 1. In the Sent folder, select the SMS message you want to send again.   2. Select Tools > Resend and refer to the steps listed under the Sending an SMS message heading.   SMS transmission options on composing them. - Send now: check this box for the transmission request to be executed as soon as you click Send. Otherwise, the transmission request will be left pending in the Outbox of the main interface. To send your message, you need to select it, then select Tools > Send. - High priority: check this box to display the content of your message directly on the recipient's mobile phone screen. - Request return receipt: to receive a return receipt. - UCS2 format: check this box to ensure compatibility with non-European language PDTs.
 B-22    B.6 Phonebook management   PhoneTools enables you to create phonebooks, import contacts recorded in your mobile phone (memory + SIM card) and thus bring your various phonebooks into line.   Creating a phonebook 1. Select New>Phonebook. 2. Enter the phonebook name. 3. Click OK.    Adding a contact 1. Click the Phonebooks    icon then select from the drop-down list the phonebook to which you wish to add a contact.   2. Select New > Phonebook Contact or click . The Cell phonebook entry window is displayed. 3. Enter the contact's Name and Number. The entry will have an automatic Entry position in the phone book if you do not specify this field.   4. Click the Contacts icon to import contacts you created in the PDT Contacts application into the current PhoneTools phonebook. The PDT Contacts list is displayed. Select the contact you want to import. Then click OK. The properties of this contact are automatically filled.   5. Click OK.
 B-23   Managing the phonebooks 1. Click the Phonebooks icon then select the Phonebook management button (> sign) next to the phonebook drop-down list. The Phonebook management window opens displaying the list of all your phonebooks.   2. Click one of the following buttons, depending on what you wish to do :   ● Create : to create a phonebook. ● Delete : to delete the selected phonebook. The confirmation pop-up is displayed. Click Yes.   ● Rename : to rename the selected phonebook. Enter the changes in the Enter Phonebook name field. Then click OK.   3. Click OK to get back to the Phonebook window.   Changing a contact 1. Click the Phonebooks icon then select the phonebook to be changed from the drop-down list displayed. 2. Select the contact you wish to change. 3. Select Tools > Modify. 4. Enter your changes in the Name, Phone Number and Entry position fields. 5. Click OK.  Downloading your mobile phonebook 1. Select the Phonebooks folder by clicking on the Phonebooks icon.
 B-24 2. Select Tools>Retrieve phonebook. 3. When prompted by the program, select the memory where the phonebook you want to download is stored.   4. Click OK. Your phonebook is downloaded.  Transferring a phonebook to your mobile phone 1. In the Phonebooks folder (click the Phonebooks icon), select the phonebook to be transferred. 2. Select Tools>Transfer to cellular.   3. When prompted by the application, select the memory to which the phonebook is to be transferred. 4. Click OK. Your phonebook is transferred.      B.7 Internet connections  Configuring Network operator The application assists the user when configuring internet access. Since this configuration relates to the network operator, you must set it before anything else.  Configuring the network operator 1. Starting from the main interface, select Tools > Settings and click the Network operator link. 2. Select your country and mobile telephony operator. The Automatic detection button suggests searching your network operator automatically and configuring the application.   The Roaming Settings button allows you to detect and select a wireless operator when you are abroad and outside the reach of your Home Network.
 B-25     Creating and changing access configurations  Accessing the connections list 1. Starting from the main interface, select Tools > Settings. 2. Click the Internet connection link. The dialog box displays a list of network access configurations handled by the application. From this list you will be able to create, change and delete your configurations.  Creating an access configuration 1. Access the connections list. 2. Select the New option from the list. The first box appears, enabling the name to be assigned to your configuration to be entered. 3. Click the Next button. The application will then list software that can be run while this connection is live. This choice is optional. 4. Click the Next button. If your network operator handles different types of network (UMTS, GPRS, GSM, etc.), the application will prompt you to select the one to be used. Warning! Using "high speed" networks such as GPRS or UMTS is subject to subscription options. 5. Select a Context ID. Certain telephone devices offer connection profiles
 B-26 containig all parameters for use over "high speed" networks, such as GPRS. In order to avoid overwriting a pre-programmed configuration on your mobile, select a free storage profile using its context ID.   6. If your network operator is recognized by the application, the Use standard settings box is checked by default. Uncheck it if you want to specify the settings manually and click Next :   - Specify the APN or number, Name and Password settings as required. Click Next and repeat for subsequent screens for IP address, DNS and QOS. 7. Click Next. The following dialog box enables a backup configuration to be created for your high-speed connection to be applied if it is unsuccessful. If you request a backup configuration to be created, the application will display the entry screens shown previously for "standard" connection.  Changing an access configuration 1. Access the connections list. 2. Click the connection to be changed or display the context menu by holding the stylus on the connection to be changed and select the Modify option. 3. Follow the Creating access configurations steps.  Deleting 1. Access the connections list. 2. Display the context menu by holding the stylus on the connection to be changed and select the Delete option.  Connecting You can set up or access the connection from the main interface, from the Tools > Internet connection menu or by clicking on  . ● You will be shown a list if more than one access is configured. ● If no access has been configured, the application will prompt you to access the Setup program to create one.

Navigation menu