Tinno Mobile Technology T300A MOBILE PHONE User Manual

SHENZHEN TINNO MOBILE TECHNOLOGY CO., LTD. MOBILE PHONE Users Manual

Users Manual

  Table of Contents 1.For your Safety ..............................................................2 2.Mobile Phone Profile.....................................................3 3.Preparation before Use..................................................4 4.General Instructions for Mobile Phone .......................8 5.Basic operation ............................................................12 6.Use Menu Functions....................................................15 7.English Editor Operation............................................42 8.Use USB........................................................................42 9.Appendix 1 ...................................................................43 10.Appendix 2 .................................................................45 11. Appendix 3.................................................................45   2  1.For your Safety For your safety and for proper use of the mobile phone, please read the following guidelines carefully:   ¾ Do not switch the mobile phone on when close to chemicals, gas stations or other explosive materials. ¾ During driving, please use the headset for safety purpose; otherwise in cases of emergency, always stop the car by the roadside to have a call conversation.   ¾ Because the use of the mobile phone can cause interference in the aircraft, never use the mobile phone in aircraft. The use of the mobile phone is dangerous and illegal; do switch off the mobile phone before boarding.   ¾ Pay special attention to the use of the mobile phone near heart pacemakers, deaf-aids and other medical equipments, because the mobile phone can cause interference with them.   ¾ Use of uncertified accessories and parts will void the guaranty.   ¾ Do not dismantle the mobile phone without permission. In case of failure, please contact the supplier as soon as possible.   ¾ Do not plug the charger into the mobile phone and charge without battery. Always power off the mobile phone when taking out the battery; otherwise the memory of the phone may be damaged.   ¾ When charging the mobile phone, always keep it in the place with good ventilation, heat sink and away from flammable and explosive objects.   ¾ In order to avoid demagnetization, always keep the mobile phone away from magnetic objects such as CDs, credit cards etc.  ¾ Ensure that the mobile phone does not come in contact with any liquid; if it does occur, remove the battery and contact the supplier immediately.   ¾ Do not use the mobile phone in the environments with
 3  extreme temperatures, never expose the mobile phone to strong sunlight or a wet environment. The suitable temperature for the phone and accessories is 0℃-40℃. The height to use the phone shall be less than 2,000m. ¾ Do not use liquid or wet cloth with strong cleanser to clean the mobile phone. ¾ This mobile phone has Bluetooth, Image viewer, Audio player, radio, Schedule radio record and Melody composer functions, which shall be used as per the related laws and regulations. ¾ Always keep the mobile phone out of children’s reach. Do not throw or vibrate the mobile phone because violent treatment to the mobile phone may damage the inner circuits and precise structures. ¾ Please do not discard the waste battery into general household garbage. Please deal with the waste battery according to provisions where they are definitely made. Warning: We will not be bear any responsibility for any incompliance with the above guidelines or improper use of the mobile phone. Our company keeps the right to make modifications to any of the content here in this user guide without public announcement in advance. The content of this manual may vary from the actual content displayed in the mobile phone. In such case, the latter shall govern. 2.Mobile Phone Profile The mobile phone has 17 keys on the keypad. In addition, it is inbuilt with one vibration motor, one charger/data common transmission port.     (Below is the front of the mobile phone)    4             (Below is the side of the mobile phone)                  (Below is the back of the mobile phone)   Screen Receiver Send/Dail key Number keySwitch on/off/end key     Left soft key Right soft key Navigation key   Headset/charger/data cable
 5               3.Preparation before Use Install SIM Card When registering mobile phone number, you can apply for phone numbers, mobile phone network service providers and thus obtain SIM (Subscriber Identification Module) card.   With SIM card, you can use all functions of your mobile phone. The SIM card save the parameters needed for communications and personal data, including PIN (Personal Identification Number) code, phonebook, short message and other extra system services.   Warning: Do not distort or scratch the SIM card nor let it contact static, dust or moisture. If it is lost, please contact immediately with your network operator for help.   Before SIM card installation, please switch off the mobile phone. Battery CoverSpeaker  Camera FM quick key FM quick key FM quick key  6  The SIM card is installed on the back of the mobile phone.   Follow the following diagram to install the SIM card.      Note: As the SIM card is small object, keep it out of children’s touch or prevent children gulping it!   Install Memory card As the mobile phone does not have enough storage space, to use some functions, you need to install a memory card (This mobile phone use T-FLASH card.)   Install T-FLASH card: Open the back cover to take off the battery, insert the T-Flash card into its slot, and then put back the battery restarting the mobile phone. The LCD will give the note that the T-flash card has been detected.   SIM card Memory card
 7  Note: As the T-FLASH card is small object, keep it out of children’s touch or prevent children gulping it! Install Battery   The mobile phone is suitable for original battery and accessories. When the battery is idle, it is recommended to put it into the protection box.             Follow the following diagram to install the battery.     Note: Do install the battery as per the diagram so as prevent the battery contact patch being damaged.   Charge Battery   The new battery cannot reach the optimal efficiency unless it has undergone several continuous complete charges and discharges. When the battery is used up, charge it in time. Over-discharge can damage the battery.   After the battery is charged full, cut off the connection of charger with the AC power supply and then the connection with the mobile  8  phone.  Follow the following diagram to connect the charger.                           During charging, the battery capacity icon on the screen flickers from the right to the left. After the battery is charged full, the icon is full of bars. Slight heat during charging is normal.   Warning: When a travel charger and its accessories are used to charge the battery, please firstly check if they are original or recognized by the original manufacturer. The use of other accessories may damage your mobile phone and cause risks! Always use them indoor and in dry places.  Notices on using the battery The performance of the battery is affected by many factors, including radio barrier network settings, signal strength, work temperature, chosen and used functions or settings as well as phone accessories, tone, data or other applications. For optimal performances, please follow the rules below:   ¾ New battery or the battery having been idle for long need charging for long. The standard voltage scope for the battery is 3.6V-4.2V.  ¾ During charging, keep the battery at room temperature or similar temperature. ¾ With time passing by, the battery will gradually be worn and Headset/Charger Interface
 9  thus need longer time to charge. This is normal. However, after normal charging, if call duration decreases but charging time increases, you need to buy another battery from the original manufacturer or authorized by the original manufacturer. The battery of interior quality can damage your mobile phone and cause danger! ¾ If the phone is overused at low battery when charging, there might need a longer time for the charge indicator to be shown on the screen. Note: Please dispose the battery according to the local regulations. Try to recycle the battery as possible. Do not treat the waste battery as common waste. Warning: Do not throw the battery into fire so as to prevent fire. The broken battery may cause explosion. Warning  Charging the mobile phone by improper means can cause to explosion. Always refer to the related regulations for the disposal of the battery.    PIN Code:It is the personal identification number used to enter SIM card and able to prevent others using SIM card without permission. If the mobile phone has activated the PIN code protection, when the mobile phone is switched on, the screen will display “Input PIN”. In the process of inputting PIN code, the screen will use “*” to represent the input content.  PUK Code (8-digit) To change the locked PIN code, you need to use PUK (Personal Unblocking Key) code. If PUK code is not provided together with the SIM card, ask the local service provider for them.   Warning: If the PIN code is input wrongly for successively three times, the SIM card will be locked. Please contact the network operator immediately for help. Attempting to unlock the code may make the  10  SIM card ineffective forever!   4.General Instructions for Mobile Phone Dial key   It is used to have call (when the phone number is input or in phonebook state) and receive incoming call. In standby state, press this key to display the latest calls (all received calls, missed calls, and dialed calls, at most 60 phone numbers). In standby state, press this key twice successively to dial out the latest call number.   Switch-on/off key /End key In call state, it is used to interrupt a call; in call conversation state, it is used to end a call or exit from the current menu and back to the standby state. Hold this key for 4~5s to switch on/off the mobile phone.   Left/Right soft key Press the left/right soft key to have the functions indicated in the bottom row of the main screen of the mobile phone.   Navigation key   This mobile phone has four navigation keys, with the left, right, up and down control functions. These four navigation keys can be set with shortcut functions, in default state: press the up key to Messages, the down key to enter SIM service, the left key to Phonebook and the right key to enter Games. Shortcut keys can be active only in standby state and their function definitions can be set by yourself with the procedures as: enter the phone settings menu, choose dedicated key function to reedit the navigation keys.     Standard keypad On the keypad, you can see 0-9 number keys, * key and # key, totally 12 keys.   Press these keys to input phone number, password, English letters,
 11  symbols etc, or choose menus. Note: In standby state, hold “1” key long to call the voice inbox service center. The number for the voice inbox should be preset.  In different states or different functional menus, * key and # key have different functions:    Press “#” key long to start or exit from the silence mode.    Continuously press shortly or press long * key to input “P”, "+" or "W" , among which, “P” and “W” are used for extension calls while “+” for international calls.  In music player state, * and # are used to adjust volume.   Tip: The difference between “W” and “P” is that “P” will directly send DTMF after 3s pause while “W” will eject a window asking whether the user to send DTMF.   Keypad lock   When in standby interface, if the mobile phone is idle for certain time, it will be locked automatically. Press the right soft key to release and press * key again to unlock. After the mobile phone is locked, the keypad cannot be activated easily; in case of incoming call, likewise, press the answer key to receive it; after that, the keypad will be locked automatically.  Icons in Standby State  Antenna;   Activate the alarm clock.    SMS  Battery power capacity indication Vib. then ring Ring only Vib. only Vib. and ring Missed Calls Keypad Lock  MMS  12   PUSH Inbox  GPRS  All calls diverted Language and Input Mode   The mobile phone has defaulted English and Spanish input mode.   Services  Services are provided with SIM kit. The mobile phone support service function. The detailed menu items depend on SIM card and the network. When the network provides such function and your SIM card supports such function, the service menu will automatically be posted in the services of the mobile phone.   Caller groups   The callers group in the mobile phone includes Friends, Family, VIP, Business and Others etc. You can set different call tone and photo for different caller group.   Term Description   Dial domestic calls    The simplest method to dial a domestic call is to input phone number via the number keypad, then press dial key to dial call. To change phone number, press “Clear” key. During dialing, the screen will display a cartoon. When the other party is connected, the screen will display the corresponding information.    Press end key to end the call.    To dial a domestic call, input area code + phone number and then press the dial key.   Dial international calls  If you want to make an international call, you can press * key continuously until the international dialing prefix “+” is seen on the screen. This will allow you make an international call from any country without knowing the dialing prefix (for example, +1 represents America).  After inputting the prefix, you need to input the Country number
 13  and complete telephone number. You can input the Country number according to the common practice, such as, 49 for Germany, 44 for British, 46 for Sweden, etc.  Dial international telephone number as following: “+” Country number +Complete telephone number + Dial key. Dial fixed-line telephone extension  Some fixed-line telephone extension may not directly get through, so you need to connect to the switchboard at first then put through extension number. The mobile phone can automatically dial extension number if you input “P” between the switchboard and extension number. Method for input “P” as following: hold press or continually short press three times “*” key (“P” will be shown on the display).  Dial fixed-line telephone extension as following: phone number + “P” + extension number + dialing key Emergency calls If your phone is under the network coverage (you can know this by checking the signal bar at the up left corner on the screen), you can make emergency calls. If your network supplier does not provide roaming service in this area, Emergency will be shown on the screen. That means you can only make this kind of calls. If your phone is under the network coverage, you can even make emergency calls without the SIM card. * In some areas, 112 (emergency call) service is provided by the network operator. In case of failure, consult the network operator.   IMEI   International Mobile Equipment Identity number. Switch off the mobile phone and take off the battery, then you will see the label with such number on the back of the mobile phone. Also, this number is saved in the mobile phone. After switch on, in standby state, input “*#06#” to display it.    14  5.Basic operation Switch on Press the switch-on/off key to start the mobile phone, then the screen will display switch-on image.   After insert SIM card, the mobile phone will automatically check the SIM card availability, and then it will be shown information as following on the display by sequence: 1. “Input phone lock code”——If you have set the password.   2. “Input PIN” —— If you set SIM card password.       3. “No service”—Indicates fail to make register and cannot make any calls. 4. “Emergency calls only”—indicates has registered to other network and only can make call to 112. 5. “Searching”—the mobile phone is searching network until find appropriate network. 6. “Operator name”—Indicates network successfully registered. Note:  If you do not know PIN code, please contact the network service provider.   The defaulted phone password “1122” Switch off   To switch off the mobile phone, press the end key. When the screen displays switch-off cartoon.Do not take out the battery to switch off the mobile phone. If so, the SIM card can be damaged easily and some data will be lost.   Dial a Call  With the number keypad, you can enter phone numbers (if wrong characters are input, press the clear key to delete them). Press the dial key to dial the phone number. To end a call, press the end key; or to cancel a dial, press the Cancel key or the switch-on/off key. After the call is connected, you can see the
 15  call timer on the screen.    Dial a call via phonebook: Enter the phonebook and search the desired name/phone number, and then press dial key to dial call.  Redial latest dialed number: In standby state, press dial key to view the list of the latest dialed phone numbers or names. Roll to the desired phone number or name and press dial key to dial call.   Adjust Receiver Volume In call conversation, press the up navigation key or down navigation key to adjust the volume of the receiver.   Answer a Call   When there is a call, as per the settings of the mobile phone, you will be alerted with ring only, vibration only, vibration and ring, vibration then ring.   To receive a call, press Dial/Call Key.   To refuse a call, press Switch-on/off key or the end key directly.   If the CLI (Call Line Identity) is opened, the phone number of the caller will occur on the screen. If this number has been saved in the phonebook, the name corresponding to this number will be displayed on the screen. Send DTMF Signal   When this function is set, in call conversation, press the desired number key and * key and # key to send DTMF signals to the other party. If such function is inactive, then extension call will become impossible.  Dial Hold   If you have applied for dial hold, in the call conversation process, press “Options” to have the following function menus:    Hold single call: Pause the current call but with the line keeping connected.    End single call: End the current call conversation.    16   New Call: Enter the dial interface, dial another call.    Phonebook: Enter the directory of the phonebook.    Call history: Enter the directory of the call history.    Messages: Enter the directory of SMS.    Sound recorder: While having call conversation, you can record the call.    Mute: You can activate/inactivate the speaker.    DTMF: You can set whether to send DTMF signals.   Note: Some menu items need the support of the local network or can occur in special cases, such as Conference and New Call. Consult the local network operator for details.   Fast Read SMS When the user receives unread SMS, the screen will display an icon of unread SMS. Press Read to enter and read the SMS.   Missed Calls   When there have a missed call incoming, the screen will display a missed call icon. And press Read to enter and read missed call.   Connect to Voice mail   The mobile phone allows connecting the incoming call into the voice mail and then you can receive a notice about voice message. (The voice mail number must be preset).   6.Use Menu Functions [Games] This phone provides four kinds of games: Copter,Puzzle,Robot, concrete operations could see the Game Help of these games. Games settings:  BGM: Set the background sound effect of the game On/Off.  Sound Effect: Set the sound effect On/Off.
 17   Vibration: Set the vibration effect On/Off  [Messages] SMS SMS is a kind of network service that cannot be used to send and receive short messages until you apply to the network operator. The SMS is sent to the SMS center of the network and then sent by the network to the target user (GSM user). If the user does not switch on the mobile phone or the mobile phone cannot receive the SMS (the memory is full), the network will save the SMS temporarily. The duration of storage depends on sender’s settings and network service provider.   With this function, the mobile phone can send and receive chain text messages, which may affect the message fees. For more information, please consult the service provider.   When the SMS capacity is full, there will be an SMS icon flickering on the standby interface. The full capacity can affect SMS reception. Delete some SMS to solve the problem.   If the other party has received SMS, you will hear the alert sound from the mobile phone (if such alert function is set as ON). Note: When sending SMS via the SMS network, the mobile phone may display “Message sent”. It indicates that the SMS has been sent to the SMS center inbox set in the mobile phone but does not mean the receiver has received the SMS. For more information, please consult the service provider. Inbox  You can see the SMS in the inbox.    Reply: You can reply to the received SMS.    Delete: Delete the current SMS.  Edit: You can edit the current SMS or send it after editing.    Forward: You can directly forward this SMS to others.    18   Call sender:Send a call to she sender.  Move to phone: You can move the entries in SIM card onto the phone.  Copy to phone: You can copy the entries in SIM card onto the phone.  Chat: You can chat with the sender after set a chat room.  Delete all: You can delete all SMS in inbox.  Copy all: You can have two options, i.e. copy all entries on the SIM card in the inbox onto the phone.    Move all: You can have two options, i.e. move all entries on the SIM card in the inbox onto the phone.  Use number: You can extract the number in the SMS and save it or dial a call.  Use URL: You can link to the website contained in the received SMS.   Use Email address:You can extract the Email address in the SMS . Outbox While sending SMS, if choosing “Save and send”, you can save the SMS into the Outbox. You can directly save the edited SMS into the Outbox, in such case, the Outbox will display “No number”, i.e. no target number. If you fail to send the SMS, it will be saved in the Outbox. Also, you can have such operations as Send, Edit, Delete, Copy to phone ,Move to phone, Delete all, Copy all, Move all, Use number, Use URL, Use Email address. Write Message You can write message in this menu.   Every SMS can contain 160 word length English characters. To write SMS, press “#” key to switch input modes, “*” key to select Symbol; press “Clear” key to clear one character before the cursor, long press “Clear” key to delete all characters; press the end key to back to the standby interface, press the upper and down direction key to choose characters.
 19  The mobile phone can send the chain SMS more than 160 characters (limit for common text messages). If the SMS contains more than 160 characters, then the SMS will be split into 2pcs or more. You can insert Picture, My picture, Predefined animation, My animation, Melody, My melody, Predefined sound into SMS. However, the SMS will not be received and displayed unless the network and the receiving mobile phone support.   You can enter the phone number or choose a number from the phonebook to send the SMS.   Templates  With it, you can pre-edit some common phrases, which is convenient for quick SMS editing.   SMS settings   You can set some parameters of the SMS in the menu.    Profile settings:The SMS center number is provided by the network operator.    Common settings  Delivery report: The network will inform you whether the other party has received the SMS and what the time is.    Reply path: You can send the reply path to the network terminal. This function needs the support from the SMS center.   Memory status: You can view the capacity of the SIM card and the phone.    Preferred storage: You can set the storage position (SIM or phone) for SMS.    Prefered connection:You can set the preferred connection(Prefer GPRS,Prefer GSM,GSM only) for SMS. MMS   MMS can contain words, sound and photos. If the MMS is out of the limit, the mobile phone will be unable to receive the MMS. If the  20  SMS contains photos, the mobile phone will adjust photos so as to display them on the screen completely. The display effect of MMS depends on reception devices.   Note: You cannot use photo messages unless the network operator or service provider supports to do so. You cannot receive and display MMS unless the mobile phone has the compatible MMS or e-mail function.  Write message To/ Cc/ Bcc  Add Number-- Input the number of the receiver.    Add Email-- Input the e-mail of the receiver. Subject: You can edit the subject of the MMS. Edit content Press Edit key to have the following options:    Add picture: You can insert you desired picture.  Add audio: You can insert your desired audio.    Add video: You can insert your desired video.    Add attachment: You can insert your desired attachment.  Add bookmark text:You can add your desired bookmark.  Add slide before: You can add a slide before the current            page.  Add slide after: You can add a slide after the current page.  Preview: You can preview the editing effect of the   current MMS.  Slid timing: You can set the play time of every slide. After editing, you can press “Done” key to finish the MMS, in this option you can send the MMS as following methods: send only, save and send, save to drafts or save as template, you can also set functions including : Validity period, Delivery report, Read report, Priority. Inbox  You can see the MMS in the inbox and have the following
 21  operations:   View: You can view the MMS and save photos, audio and annex.    Reply: Reply the sender with MMS Reply by SMS: Reply the sender with SMS.  Reply all: If the MMS you received has been sent to many receivers by the sender, with such function, you can send a reply MMS to the same receivers.    Forward: You can directly forward this MMS to others.      Delete: Delete the current MMS.  Delete all: You can delete all MMS in inbox.  Save as template: You can save the MMS as template.  Properties: View the detailed information of the current message.  Use details: You can extract the number in the MMS and save it or dial a call. You can also use the URL in the MMS.   Outbox  You can view the MMS send and saved in the Outbox and failed and have such operations as View, Send, Delete and Delete all, Save as template, Properties and Use details.   Drafts  You can save the edited MMS into the drafts, and also you can have such operations as View, Send, Edit, Delete and Delete all, Save as template, Properties and Use details on the MMS in the drafts.   Template There will be the templates which user defined.   MMS settings: You can set some parameters of the MMS in the menu.   Compose:   Creation mode-- "Free" and “Restricted ".  Picture resizing-- You can reduce the size of the inserted photo, including: 160*120,320*240 and Off.  Best slide duration-- You can set On or Off to activate such function.  Auto Signature-- You can set On or Off to activate such  22  function.   Signature-- You can edit the content of the automatic signature.  Send:   Validity period-- You can set the time to save in the MMS service center and send, including Maximum,1hour, 6hours, 12hours, 1day, 1week.    Delivery report--You can On or Off to activate such function.   Read report-- You can On or Off to activate such function.  Priority-- Including Medium, High, Low.  Slide timing-- You can set the interval of the receiver to see the MMS, defaulted as 5s    Delivery time --Immediate, 1hour later, 12 hours later and 24 hours later.   Retrieve:   Home network—Immediate and Rejected, Delayed.    Roaming -- The same as to the main network, including and As home, Delayed and Rejected,.    Read report—On request, Send, Never send    Delivery report—You can set On or Off to activate such function.  Filter:   Anonymous -- Allow and Reject.    Advertisement-- Allow and Reject. Server profile:   After choosing Settings, you can have the following settings:    Activate account.  Edit account: You will edit the Account name, MMSC address, Data account, Connection type, User name and Password of the account.
 23   Delete account Memory Status:   You can see the utilization rate of the mobile phone, including the used space and the usable space. The sub menu should show SMS capacity in Numbers . Chat       You can have a chat in the chat room which you had selected or preset its information such as my nickname, destination num. Email 由于目前软件版本中功能混乱,无法对其编写说明 Voice mail server This is a kind of network service, which cannot be used until you apply to the network operator or open it. Please consult the local service provider for more details and voice mail number.   ¾ Call voice mail: You can dial the voice mail number saved in the voice mail number function list. If you have two phone numbers, they will have their own voice mail number.   ¾ Edit: You can edit the voice mail name and the voice mail number. Press the OK key to save the number.   Tip: In standby state, after the voice mail number is set, press 1 key to call the voice mail.   Broadcast Message Cell broadcast is a kind of information service such as weather report, traffic etc that the network operator sends to the GSM users within certain area.   ¾ Receive mode: You can ON/OFF to activate such function. ¾ Read message: You cannot read the received information until you open such function.   ¾ Languages: You can set the language for the received information. The defined is All languages. ¾ Channel settings: You can Select, Add and Edit and Delete channel number.  24  [STK] The mobile phone support service function. The detailed menu items depend on SIM card and the network. When the network provides such function and your SIM card supports such function, the service menu will automatically be posted in the services of the mobile phone.   [Phonebook] The mobile phone is provided with the business card folder type phonebook. The information of every contact saved on the mobile phone include three phone numbers (mobile phone, home phone and office phone), company name, e-mail address, office number, fax number, birthday, associate picture, associate sound, caller group (Five types: none, family, VIP, business and others). Every contact saved into SIM card include name and number. The mobile phone supports 500 numbers. Quick search         Input the first several letters to be searched, all the records related will be display on the screen.       Search contact Input the name to be searched, press “Search” in the phonebook, then you can find the matching name.   Add new contact You can save phone numbers to SIM card or phone. On SIM card, one entry has only name and phone number. On the phone, one contact can include Name, Number, Home Number, Company Name, E-mail Address, Office Number, Fax Number, Birthday, Associate Picture, Associate Sound and Caller Group.   Tip: If one contact is set with photo link, tone link and callers group at the same time, then the caller group function will be inactive. Multi operation         目前多笔操作功能混乱无法对其进行说明
 25  Caller Groups You can set call tone, photo and members for five caller groups. Caller groups’ member can only come from the number saved on the phone.  Extra numbers You can set owner number.And the default SOS number are 060,911, 112. Settings  Memory Status: You can view the current use status of the phonebook, including SIM card and phone memory. The display format is “Used/Total”.    Preferred Storage: You can choose the storage path for the current number.    Fields: You can choose the display items in the phonebook and the display items in the Add Contact interface.    Name list filter:      My vCard: You can edit and send my business card.        vCard version: You can choose the vCard version: vCard 2.1 or vCard 3.0. Caller picture       目前功能混乱无法对其进行说明 Caller ringtone     [Browser] Bluetooth The mobile phone supports the Bluetooth function. You can use Bluetooth wireless technology to set wireless connection with other compatible devices, including mobile phone, computer, headset etc. With Bluetooth function, you can send photo, video segment, audio segment, personal business card and memo. You can also establish wireless connection with the compatible PC to transmit files.    26  As the device supporting Bluetooth wireless technology performs communications via wireless wave, you don’t need keeping the device opposite to other devices but keep the distance between them not more than 10m (about 33). However, Bluetooth connection can be affected by wall or other electronic equipments etc. To ensure mutual operation between this device and other devices supporting Bluetooth wireless technology, consult the manufacturer to confirm whether the device by it is compatible with this device. Do not use Bluetooth function in hospital and aircraft etc. Bluetooth Menu   Power: Before using Bluetooth function, you need to activate this option. When Bluetooth function or other functions are being used, allowing this function to operate in the back desk will consume more power. It is recommended to close this function when it is idle.   Inquiry audio device: With this function, you can inquiry audio device. For other devices, enter My Devices to search.   My device: After entering this option, you will see the Bluetooth devices compatible with the mobile phone.   Active devices: With this function, you can see all devices connected with the mobile phone and their link service type. You can interrupt the specified link service.   Settings: Before using Bluetooth function, enter this menu to have corresponding settings. If your mobile phone’s Bluetooth function is not activated, you can have activation confirmation.    Visibility: After this option is activated, other peripheral devices supporting Bluetooth wireless technology can see your device and its name via search. After the step audio play service is activated, this device will be unable to be searched.  Change device name: You can edit my device name.    Authentication: After this option is activated, matching is needed when peripheral device accesses my device via Bluetooth (for matched devices as well). After closing the option,
 27  no matching is needed for the matched devices.  Audio path: You can leave the audio in phone or forward to other hand-free devices via Bluetooth. If using Bluetooth to have a call, set this path as head-set devices.  Block list: You can view the block list if you set.  Storage: Select Phone or Memory card as default storage place.  BIP Settings: You can set the file directory shared by my device. About:  Here, you can see the name of my device, device address and the Bluetooth services supported by my device.   Tip: When searching Bluetooth devices, make sure that the peripheral Bluetooth devices are within the signal cover range and can be searched. To match the searched devices, you need to discuss with the user of this device about a pair of matching passwords. To match the hand-free device, you must input its matching password. After matching, this device will be saved in my device .   Use Bluetooth to Receive/Send Data:   1. Open the applications needed to save the content to be sent. For example, to send photos to another compatible device, you should enter the album or file management.   2. Choose the content to be sent, and then choose Options->Send->To Bluetooth. The screen will display the device supporting Bluetooth wireless technology and within the signal coverage. To disconnect search, choose “Cancel”.   3. Choose the device to be connected with.   4. If another device requires matching before data transmission, the device will send hint and require inputting matching password.   5. After the connection is established, the mobile phone will display data transmission speed. 6. When other Bluetooth devices send data to my service, the mobile phone will hint and ask whether to receive the data. The received data will be stored in the initially set received folder.    28  Tip:    You can set the storage position to receive files as other folders or the folders on T-flash card. After setting, the file received via Bluetooth will be automatically saved to the specified folder.   Tip:   Before using Bluetooth headset for calls, please go to the menu settings to confirm that the audio path has been set as hand-free device. Use the following methods to disconnect:    Close the activated Bluetooth to disconnect all devices.    Enter online devices and disconnect the specified online service.    Enter my devices and delete the matched devices to disconnect other devices with my device.    The connection with the devices out of the signal coverage will be ineffective. WAP Homepage-- Start the website chosen in the connection settings file.   Bookmarks--Ideas Telcel,Correo iTelcel,Buscador Ideas,Ideas Music Store,Ideas Musica,Ideas juegos,Ideas Imagenes. ¾ Go to: Log into the chosen website.   ¾ Edit: Edit the chosen bookmark name and website.   ¾ Send: Send the bookmark as text message or multimedia message. ¾ Delete: Delete the chosen bookmark.   ¾ Delete all: Delete all bookmarks.   ¾ Add bookmark: Add new bookmarks.   Recent pages: Record the latest 10 web pages browsed.   Offline pages: You can view these pages when you offline. Input address: Input the website to be logged in.   Service Inbox: The mobile phone can receive the service information (“Recommended” information) sent by the service provider. For example, the service information can be the notice of related news headlines, which can include one piece of news or a service website.
 29  Settings:  ¾ Edit account:    Ideas Telcel  Activate account    Edit account: You will edit the Account name, Homepage, Data account, Connection type, User name and Password of the account. Note: The setting method of other WAP settings files is the same as that of Ideas Telcel.   ¾ Browser options-- You set whether to display images during waiting time and when browsing webpages.   ¾ Service message settings-- You can choose ON or OFF to enable the push or not and you can choose the disable or always in the Trust settings. Set SL settings functions as follow: Never, confirm, without confirm.  Add new trust list including: number, IP address, Domain name.     ¾ Clear cache-- You can clear cache. When the data of the cache are excessive, network surfing speed can be affected.   ¾ Clear cookies-- You can clear personal data. ¾ Trusted certificates--Entrust.net WAP CA (c)1999 Limited liability. See www.entrust.net/wapcps; US VeriSign, Inc. Class 3 Public, primary certification authority. Data account GSM Data:You can edit the Account name,Number,user name,pass-word,Line type,Speed,DNS by each account. GPRS-- The Account Name, APN, User Name , Password, Auth type .of GPRS data will be provided. Note: For related charging standard and detailed settings, please consult the local network service operator. Different network service providers provide different services. Consult the local network operator.  Connection manager: View the connection status.  30   [Multimedia](由于多媒体菜单目前存在严重的功能混乱,以下说明是根据其他项目的说明书修改的) 
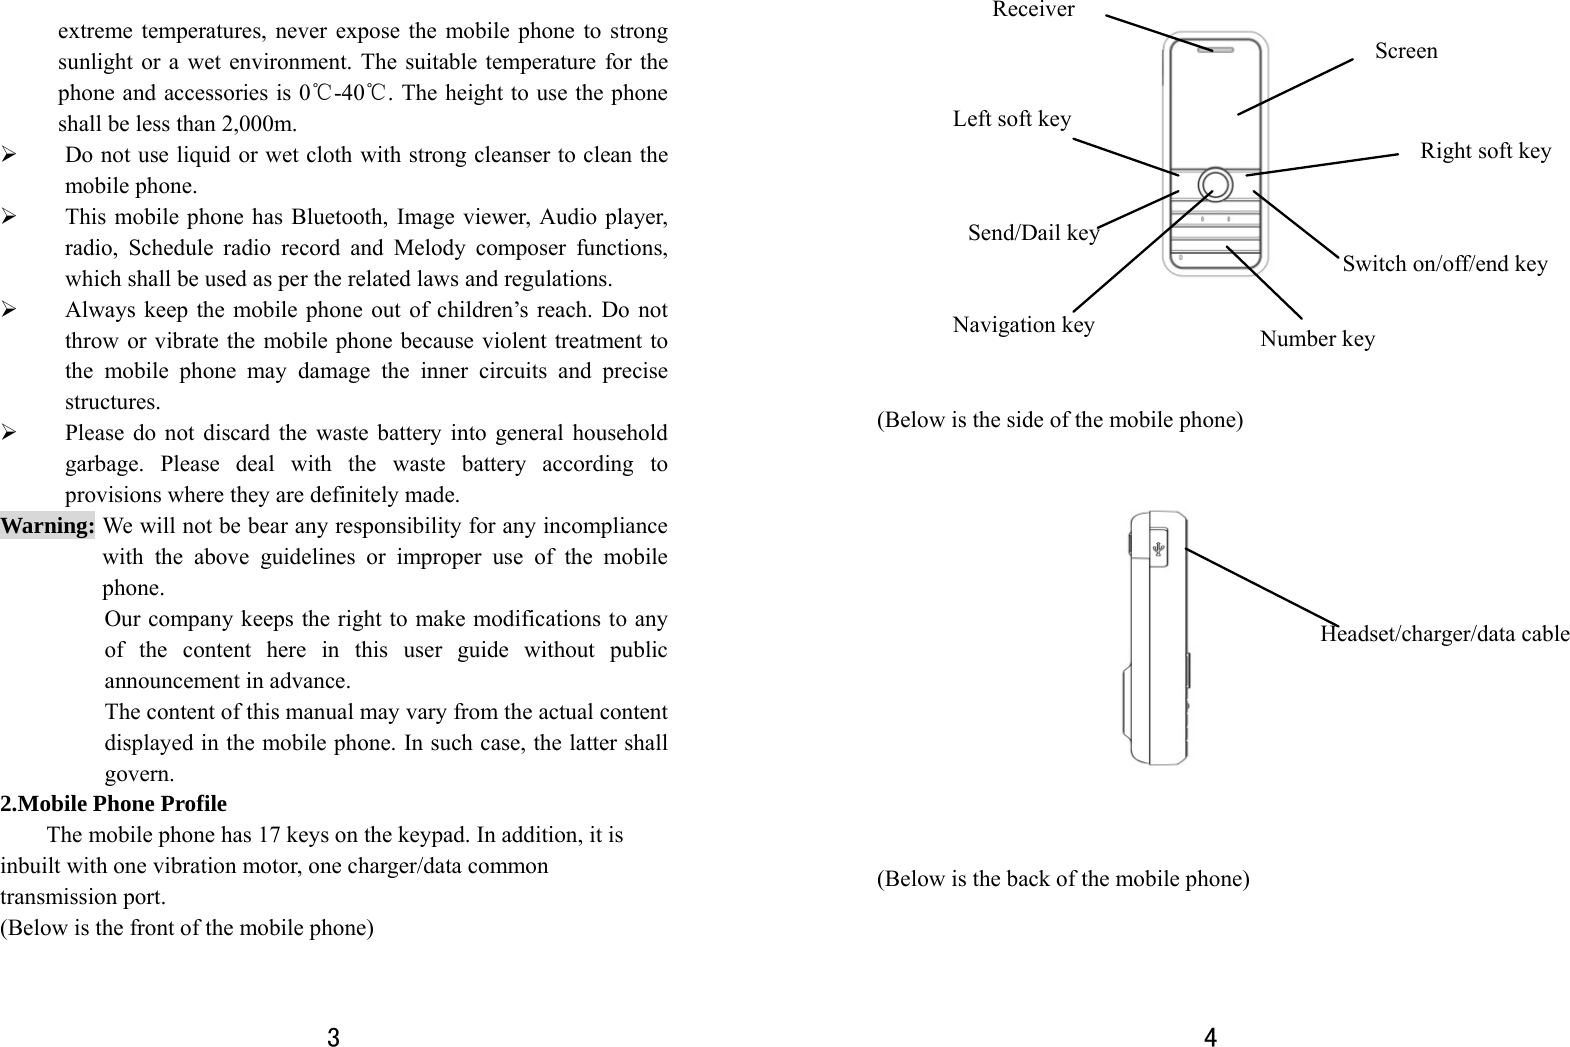
Camera With this function, you can use the inbuilt camera to take photos. The lens of the camera is located on the back of the slide and the screen is used as the viewing window. All photos taken are in JPG form. After downloading the photos onto PC, you need some software to view them.  If the storage space of the mobile phone is insufficient to store the taken photos, it is necessary to delete some old photos or other files in “File Management” function list to release more space.   Description of Mobile Phone Options:   Options Description  Photos  To view the saved photos.   Banding: 60Hz(default), 50Hz Delay Time: 5s, 10s, 15s or Off.   Camera setting  Cont Shot: Oneor Off.   Size: 128*96,352*288. Image Settings  Image quality: Normal, High, Low Scene Mode  Auto, Night Storage  Phone ,Memory Card Restore Default  You can restore the recorder to factory settings. Image viewer: All photos taken are saved in the album.   Options   Description  View  You can view the selected photos.   Browse Style  There are two browse styles, i.e. list and matrix.   send  You can send photo to MMS and Bluetooth. Rename  You can rename the selected photo.   Delete  You can delete the selected photo.   Delete All files You can delete all photos in the album.   Storage   You can choose photos storage path (to phone or
 31  memory card).   Video recorder: Press the OK key to start video recording. The duration of recording depends on the time limit set and file management capacity. Entering the options, you can have the following settings:   Options   Description  Night Mode: On, Off Camcorder settings  Banding: 50Hz ,60Hz Storage  You can store the video in Phone or Memory card. Restore default  You can restore the recorder to factory settings. Video player: It supports the videos in AVI .In such mode, you can have the following operations to the specified file in AVI. Options of the player Options   Description  Play  You can view the selected video.   send  You can send video to MMS and Bluetooth. Rename  You can rename the selected video.   Delete  You can delete the selected video.   Delete All files  You can delete all videos in the video folder   Storage  You can store the video in Phone or Memory card. Audio player: If the operation system is Windows 2000 above, no driver needs installing. To download music, you must insert the T-Flash card into the mobile phone, switch off the mobile phone, connect the mobile phone and PC with USB cable, then the PC will detect the new hardware and create a new mobile HD. Download the chosen MP3 file to under "My Music" of the mobile disk rather than in such folders as Audio, Images and Photos; otherwise, the file cannot be played. (Only the music in MP3, AMR and MIDI supportable).   Description of audio player options:   Options   Description  Play    Play the current chosen music.    32  Details   View file name, Channel, Quality, Size, Time, etc.  Add to ringtonesAdd the chosen music into the ring base.   Refresh list Enter the track list and update it (e.g. the deleted music in the file management will not disappear until update is conducted.   Settings  Play Settings: Track list path, automatic track list, repeat, shuffle and background play.   Radio: To use this function, you need to insert headset. It supports radio played out via phone speaker. (1)Function key introduction OK key: enter the options of radio. Up direction key: turn on radio record. Down direction key: switch on/off the radio. Left/Right direction key: when in the research mode, Press the left direction key once forward by 0.05MHz(FM state)and the right direction key backward by 0.05MHz(FM state) to search the desired channel. 1-9 number key: when you preset auto search, the channel which are searched will be list, then you can press the 1-9 number key to listen the radio channel saved in the list one by one. Short press: you can roll to choose the desired channel or press any of number keys 1-9 to choose the corresponding channel. Long press: save current channel to this key. *,# key: Adjust volume. (2)Option menu   Channel list: according current FM channel to show corresponding channel list.   Manual input: You can edit the specified radio frequency band. The frequency of the radio is between 87.5mHz and 108.0mHz.   Preset Auto Search: You can have automatic search and save the
 33  searched channels into the list.   Settings: You can set background play, loud speaker,Record format,Audio quality and Record storage.   Record: You can record current radio sounds through this function. Append: Select a radio record file to keep going to record radio program, all programs will add into the original file. File list: Show all voice files.   Schedule Radio Recorder:  Set the start time and end time etc for the recording, thus when the start time is reached, the radio recording will start automatically.   You can also set the repeat as: once,everyday, days, weekly, monthly and set the channel list then select it. Channel settings: You can select the channel on the list directly or manual input the channel. Record settings: functions as following: record format (AMR/WAV), Audio quality (High/Low), storage (Phone/ Memory card), Record file(New file/Append file). Melody compose: The mobile phone provides custom ring tones of different musical instruments, and add them into profiles or SMS ring base. When compose a music, you can play it with different speed and musical instruments, then save it. File Manager You can manage photos, MP3 and folders in phone and memory card. Memory Card ¾ Open: You can open the files in the memory card. ¾ New folder: Under the root directory, you can create a new folder to save more detailed files. ¾ Format: You can format all files in the memory card.    34   [Settings] User profiles Your mobile phone is provided with multiple profiles so that you can customize some settings in different cases for different events. Firstly, as per your personal hobby, have individualized settings on profile and then activate it. You can have such profiles as General, Meeting, Outdoor, Indoor, Headset and Bluetooth.   The content can be edited at every profiles mode as following: ¾ Tone setup: Include Incoming Call, Power on, Power off, Message tone and Keypad tone. ¾ Volume: Set the volume of Ringtone and Key tone. ¾ Alert type: You can choose any one from Ring only, Vibration only, Vibration and ring, Vibration then ring as the current ring mode. ¾ Ring type: You can choose any one from Single, Repeat, Ascending as the current ring type. ¾ Extra tone: You can have Select/Cancel settings on Warning, Error, Camp on and Connect so as to have corresponding tone tips. ¾ Answer mode: You can choose whether to use any key to answer. After individualized settings, choose “Activate” in “Select” to start profiles.   Note: After the headset is inserted into the mobile phone, the mobile phone will automatically change into headset profile. Unplug the headset to return to the previous profile. After the Bluetooth is connected with the mobile phone and used as headset or handsfree, the mobile phone will automatically change into Bluetooth profile. Disconnect with Bluetooth to return to the previous profile. In standby state, press # key for several seconds to switch to silence profile and again to the previous profile.
 35  Phone Setup In such menu, you can set phone language, standby wallpaper, time etc.   ¾ Time and date: With this function, you can set home city, time and date format and the time of specific place.    Set Home City: You can set different cities.     Note: This option must be used together with auto update of time and date. Auto update of time and data cannot be conducted unless the network supports.    Set Time and Date: You can set the current time and date.  Set Format: You can set the display format for time and date.   Note: If the battery is taken from the mobile phone or the battery is used up for long time, when switching on the mobile phone after reinstalling the battery or charging the battery, you need to reset the time and date.   ¾ Schedule power on/off: You can set the time for schedule power on/off.  ¾ Language: You can choose the desired language for phone display.  ¾ Display characteristics: You can set standby menu display as wallpaper, screen saver, power on display, power off display, whether to show date and time and owner number (if set in the phonebook). ¾ Greeting text: You can set the greeting text displayed on the main screen. ¾ Shortcuts: You can set the shortcuts menu and then this option must be used together with Navigation key. ¾ Navigation key: You can have corresponding settings on the up, down, left and right keys.   ¾ Auto update of date and time: To set the mobile phone to  36  automatically update time and date according to the current time zone, choose “Activate”. Auto update of time and date will not affect the alarm clock, calendar or alarm clock memo setting time, which will be subject to the time and date when created. However, auto update of time and date may make some set alarm clocks out of date.   ¾ Flight mode: ¾ Misc. Settings: You can adjust the brightness and time of LCD backlight.  Call Setup ¾ Call setting:  ■ Caller ID: Including Set by network, Hide ID and Send ID.  Set by network: While having a call conversation, you can send my caller ID in the form preset by the system.  Hide ID: While having a call conversation, you will not send my caller ID. If the system does not support such function, call may fail.    Send ID: While having a call conversation, you can send my caller ID to the system.     Note: This function needs network support.   ■ Call waiting: You can set this function Activate ,Deactivate or Query status. The call hold and multi-party call cannot be active unless this function is activated. This needs network support.   ■ Call divert: This is a kind of network function, which cannot be used unless you apply to the network operator for it. With this function, you can divert calls meeting the conditions to another number. ■ Call barring:  Outgoing calls:   1. All calls: You can bar all outgoing calls.   2. International calls: You can bar international calls.   3. International calls except to home PLMN: When
 37  abroad, you can dial the calls of the current country and the original country (the service providers allows to do so).    Incoming calls:   1. All calls: You can bar all incoming calls. 2. When roaming: You can bar all calls except the calls of the local service area.  Cancel all: You can cancel call barring settings and dial/receive calls normally by putting the password.    Change barring password: You can apply to the network to change the password for call barring.   ¾ Black list: You can set it as On or Off. You can use the menu to reject the number you do not want to receive. ¾ Auto redial: You can set it as On or Off. After the first automatic redial fails, at most ten times can be available to connect a phone number.   ¾ Speed Dial: You can set whether to activate this function and edit the related speed dialing numbers. If this function is “Active”, then you dial any of the corresponding individual keys (2-9) on the standby interface to dial the number specified for this key.   ¾ More: ■  Call time display: You can set whether to display call duration during call conversation.   ■  Call time reminder: You can set one alert tone or periodic alert tone for several round minutes during call conversation so that you can understand call time. You can also turn off the alert tone.   ■    Auto quick end: You can set call duration. After the set time expires, the mobile phone will automatically end the call.  Line switching: You can chose line1 or line 2 for your phone.  Closed user group: You can closed the user group which you selected.   38  Note: Some settings need network support. For example, call barring can not be used unless the local network and SIM card open it.   Network Setup ¾ Network selection: You can search the network again. Select your favorite network and choose to register the network automatically or manually.   ¾ Preferred network: You can set the preferred registered network for SIM card. ¾ GPRS connection:You can set the status of GPRS connecti-on(when need or always)by this function. Security Setup ¾ Security setup: By this function, you can set the SIM lock, Phone lock,Auto keypad lock,Fixed dial, Barred dial and Change password.  SIM Lock: You can set SIM lock (PIN code) as on/off. When this option is chosen, it is necessary to input PIN code when you power on the phone.  Phone Lock: You can set it as On or Off. It is a password of 4-8 digits and the defaulted one is 1122. You can change it.    Auto keypad lock: You can set it as On or Off. The mobile phone has keypad lock function. When it lasts certain time, the keypad will be locked, including such options as Off, 5s, 30s, 60s and 5min.    Fixed dial: This function needs the support of the SIM card and the network operator. When it is activated, you can only dial the phone numbers saved in host fixed dial list. To activate it, you need to input PIN2 code.    Change Password: You can change the defaulted PIN, PIN2,Phone password. Restore Factory Settings You can restore the factory settings of the mobile phone. The restore factory setting password is 1122.
 39   [Organizer] Calendar With this function, you can set the alarm clock to remind you of your schedule and record your schedule. Roll the rectangle block to the desired date. If the date is set with memo function, then this date will be highlighted in yellow. To view all memos of one day, press OK to see the schedule. You can have the following operations:    View tasks: You can view the task of the date where the cursor is on and set the time, date, content and whether to activate alarm on this schedule. When editing the task, you can choose the alarm defaulted time with the left and right direction keys. In addition, you can have such operations as Add, Delete, Delete all and Send vCalendar.    Add task: You can select task type and then edit it. The task types are as following: Reminder, Meeting, Course, Date, Call, Anniversary.  Jump to date: You can move to the calendar of the specified date.  Go to weekly view: You can view the whole tasks in one week. The next time you can view the whole tasks in one month by choosing Go to monthly view.   To Do     You can have such operations as View, Add, Edit, Delete, Delete all and Send vCalendar.   If you have set alarm for the memo, when the set time is reached, the mobile phone will ring and display the memo content.   Alarm  The time format for the alarm clock is identical to that of clock. When the mobile phone is off, the alarm clock can still work provided the battery is sufficient. The system has set 5 alarm clock options and the defaulted is off. You can activate one option or all options according to the actual demand. Every alarm clock option can set  40  independent time and date. When the time is reached, the mobile phone will give out alert tone and flicker the current time and date on the screen. Press Stop to stop alarm clock; press Sleep, then the mobile phone will pause ringing and continue after 4min.   If alarm time is reached but the mobile phone is switched off, then the mobile phone will be switch on automatically and ring. If Stop is pressed, then the mobile phone will ask you whether to switch on the mobile phone. Press “No” to switch off the mobile phone and “Yes” to register at the network and switch on the mobile phone.   You can edit alarm as following functions: On/Off, Time, repeat(once, everyday, days),alarm tone(tone,radio),snooze(default, 1-10mins),alert type(ring only, vibration only, vib and ring). Calculator  The up navigation key for “+” and the down navigation key for “-”, the left navigation key for "×" and the right navigation key for "÷";    Press the clear key to clear the latest inputs or results digit by digit; press the clear key long to clear all content or result;    Press “OK” key to obtain the result.     Note: The precision of this calculator is limited and can be used for simple calculation. Currence converter    First input the rate and local,press OK,then get the result. World Clock Press the left and right direction keys to view the current time of every country corresponding to every time zone. If you set up the daylight saving time for foreign city, the current time of the city except the defaulted city will be ahead a hour. Stopwatch   It include typical watch,nway watch. E-book reader   You can read the words which you saved in the phone or in the
 41  memory card.   [Call center] Call history includes missed calls, dialed calls, received calls, Delete call logs, call timers, call cost, SMS counter and GPRS counter. In missed calls, received calls and dialed calls function list, you can see the date and time of the call, edit or delete the phone number in the list, save the number to phonebook or send SMS and MMS to the number, or redial this number etc.   Note: The missed calls, received calls and dialed calls contains respectively 20 entries. Choose any entry from missed calls, received calls and dialed calls, press the Send key to dial the number directly.   Call timers  Last Call: With this function, you can view the last call time.  Dialed calls: With function, you can view the duration of all dialed calls.   Received calls: With the function, you can view the duration of all received calls.  Reset all time: With this function, you can clear all duration records of calls after inputting the password which is supported by Intex. Note: The actual call duration and service time in the bill of the service provider may be different from them, which depends on the network functions, accounting rounding and tax etc.   Call cost This needs the support of the network service provider.  Last call cost: With this function, you can view the fees of the last call.   Total cost: With this function, you can view the fees of all calls.  Reset cost: With this function, you can clear all fee records. PIN2 code must be input to set call cost.      42   Max cost: With this function, you can limit call fees in the specified pricing unit or currency unit. PIN2 code must be input to set call cost.    Price per unit: This function needs network support. For more details, please consult the network operator.   SMS counter With this function, you can see and reset the number of sent messages and received messages .   GPRS counter  Last sent: You can view the sending traffic of last link.    Last received: You can view the reception traffic of last link.  All sent: You can view the sending traffic of all links.  All received: You can view the reception traffic of all links.  Reset counter: You can clear all link traffic.   7.English Editor Operation   The mobile phone provides multiple convenient input modes, which can support the use of other functions. Basic letter input   After “Smart ABC /Smart abc/Multitap ABC/Multitap abc is chosen, input your desired letters with the standard keypad.   Number input   This mode is mainly used to input phone numbers etc. After “number” is chosen, you can input digit into the place where the cursor is flickering.   Symbol input   In any of the above input modes, you are provided with symbol input. If you can’t see symbols, press “*” key to see them. If you want one symbol, press the up/down/left/right key to choose.
 43  8.Use USB   Notices before use   ¾ Always connect and stop USB device correctly.   ¾ Never use Windows formatting command to format the mobile disk of the mobile phone; otherwise, it will be damaged severely.  ¾ USB work environment:    Windows2000 / XP.    For other operation systems, the connection between PC and the mobile phone cannot be conducted unless USB driver is installed.   9.Appendix 1 Troubleshooting  Phenomena   Possible Causes Unable to switch on  1. Does the battery have power? 2. Is the battery placed correctly?SIM failed 1. The SIM card is dirty. Clean it.2. Reinstall the SIM card. 3. The SIM card is damaged. Replace it. Poor signals Check the signal strength icon on the screen. If the icon contains 3 bars, it indicates the signal is the strongest; if below 1 bars, it indicates the signal is very poor.      44  Unable to dial out 1. Maybe you have set Hide My Caller ID but your network operator does not provide this service for you.   2. Strong interference exists around you.   3. Maybe you have activated the call restriction function.   4. Maybe you have activated Line 2 but your network operator does not provide this service for you. Unable to charge the battery 1. The battery may discharge too much; so it cannot be charged until it is connected for certain time.  2.  Its  performance  has worsened.  Unable to register to the network 1. Too weak signals or strong interference. 2. SIM card installed properly? Bad contact or SIM card damaged? If the SIM card is broken, please contact the network operator to replace it. Photos taken are too dark 1. Check if the too low photo brightness is set. 2. Check if ambient ray is too dark.
 45  Photos taken are too unclear 1. Check if the object taken is moving. 2. Check if the mobile phone shivers slightly while you press shutter. Photos taken is distorted The object taken may be too close to camera lens. Unable to access service menus. Maybe the SIM card does not support service function. Only part of the photo set as standby photo can be seen.   The size of the photo may be too big. The recommended size is 128*160.    10.Appendix 2 Abbreviations and Definitions SMS  Short Message Service SIM  Subscriber Identity Module GSM  Global System for Mobile Communication PIN Personal Identity Number PUK PIN Unblocking Key IMEI International Mobile Equipment Identity  CB Cell Broadcast  GPRS  General Packet Radio Service MMS Multimedia Message service  46  11. Appendix 3 Notices for the use of accessories   Battery   More than 12h charging is needed for the new battery or that idle for long.    Other batteries other than the original one can damage your mobile phone and cause risk! The short in any form can lead to explosion, fire or personal injury!  For your security and environment protection, do not throw the battery freely but put it into the specified recovery place.   Charger   Do not plug the charger into the mobile phone and charge without battery so as to prevent the phone being damaged.   Always use the charger in dry place indoor; never let the charger touch any liquid during use so as to prevent damaging the phone or even causing explosion, fire or personal injury!    Always use the charger by the original manufacturer so as to prevent damaging the phone or even causing fire or personal injury etc! USB  Please insert USB in switch-off status or choose the first option “Memory unit” in switch-on status, then the mobile phone can be used as a memory body.    Never insert the USB reversely, because doing so can make the I/O port short.  Never use any other USB except that from the original manufacturer; otherwise, the mobile phone and the USB port
 47  may be damaged.   T-Flash card    It is recommended to use eligible T-Flash card, because the use of ineligible products may damage the T-Flash memory card slot.   12. Appendix 4 FCC RF Exposure Information and Statement  The SAR limit of USA (FCC) is 1.6 W/kg averaged over one gram of tissue. Device types T300A (FCC ID: XD6T300A) has also been tested against this SAR limit. The highest SAR value reported under this standard during product certification for use at the ear is 1.117W/kg and when properly worn on the body is 1.196W/kg. This device was tested for typical body-worn operations with the back of the handset kept 1.5cm from the body. To maintain compliance with FCC RF exposure requirements, use accessories that maintain a 1.5cm separation distance between the user's body and the back of the handset. The use of belt clips, holsters and similar accessories should not contain metallic components in its assembly. The use of accessories that do not satisfy these requirements may not comply with FCC RF exposure requirements, and should be avoided.  This device complies with part 15 of the FCC rules. Operation is subject to the following two conditions: (1) this device may not cause harmful interference, and (2) this device must accept any interference received, including interference that may cause undesired operation.   48  NOTE: The manufacturer is not responsible for any radio or TV interference caused by unauthorized modifications to this equipment. Such modifications could void the user’s authority to operate the equipment.  NOTE: This equipment has been tested and found to comply with the limits for a Class B digital device, pursuant to part 15 of the FCC Rules.   These limits are designed to provide reasonable protection against harmful interference in a residential installation.  This equipment generates uses and can radiate radio frequency energy and, if not installed and used in accordance with the instructions, may cause harmful interference to radio communications.    However, there is no guarantee that interference will not occur in a particular installation.  If this equipment does cause harmful interference to radio or television reception, which can be determined by turning the equipment off and on, the user is encouraged to try to correct the interference by one or more of the following measures: - Reorient or relocate the receiving antenna. - Increase the separation between the equipment and receiver. -Connect the equipment into an outlet on a circuit different from that to which the receiver is connected. -Consult the dealer or an experienced radio/TV technician for help

Navigation menu