True Systems MSAMINI Smart Beauty Analyzer User Manual
True Systems Co., Ltd. Smart Beauty Analyzer Users Manual
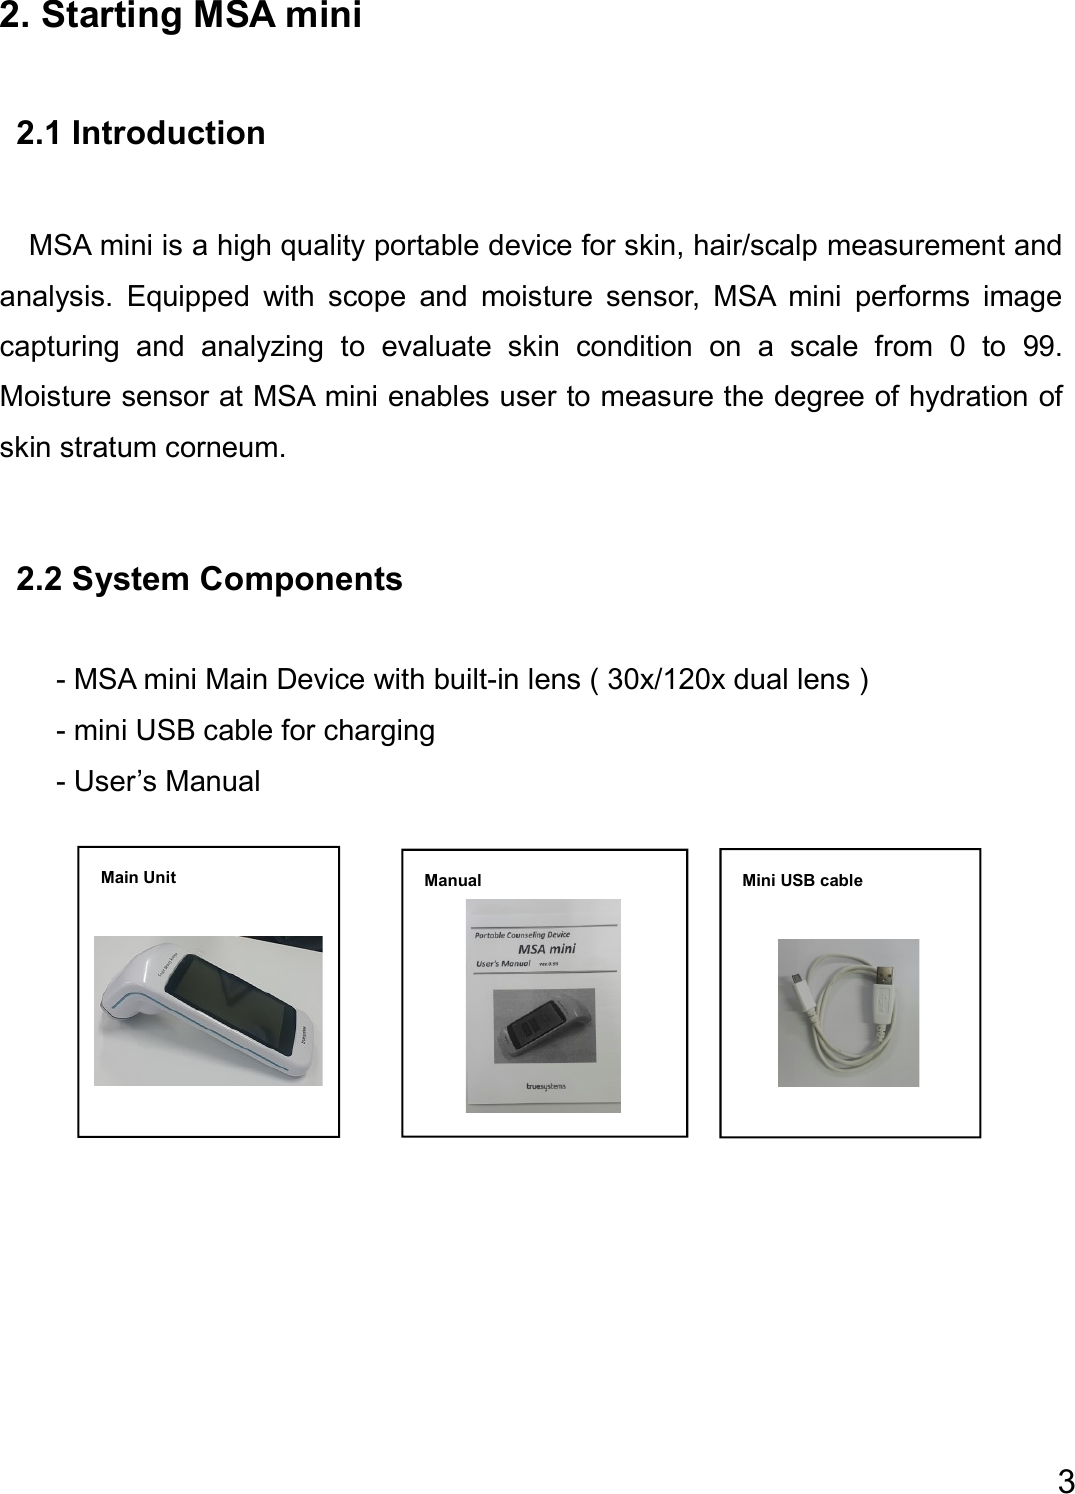
UserManual.wiki
>
True Systems
>
MSAMINI User Manual
Users Manual
Navigation menu
Upload a User Manual
Namespaces
Wiki Guide
HTML
PDF
Info
Views
User Manual
Discussion / Help
Navigation
![8 4.3 Start Measurement : Customer Information By choosing [SKIN CARE] or [SCALP/HAIR] in the Main screen, “CUSTOMER INFORMATION” screen will be displayed as below. User needs to check the gender and age and press ‘START’ to start the measurement.](https://usermanual.wiki/True-Systems/MSAMINI/User-Guide-3830862-Page-10.png)
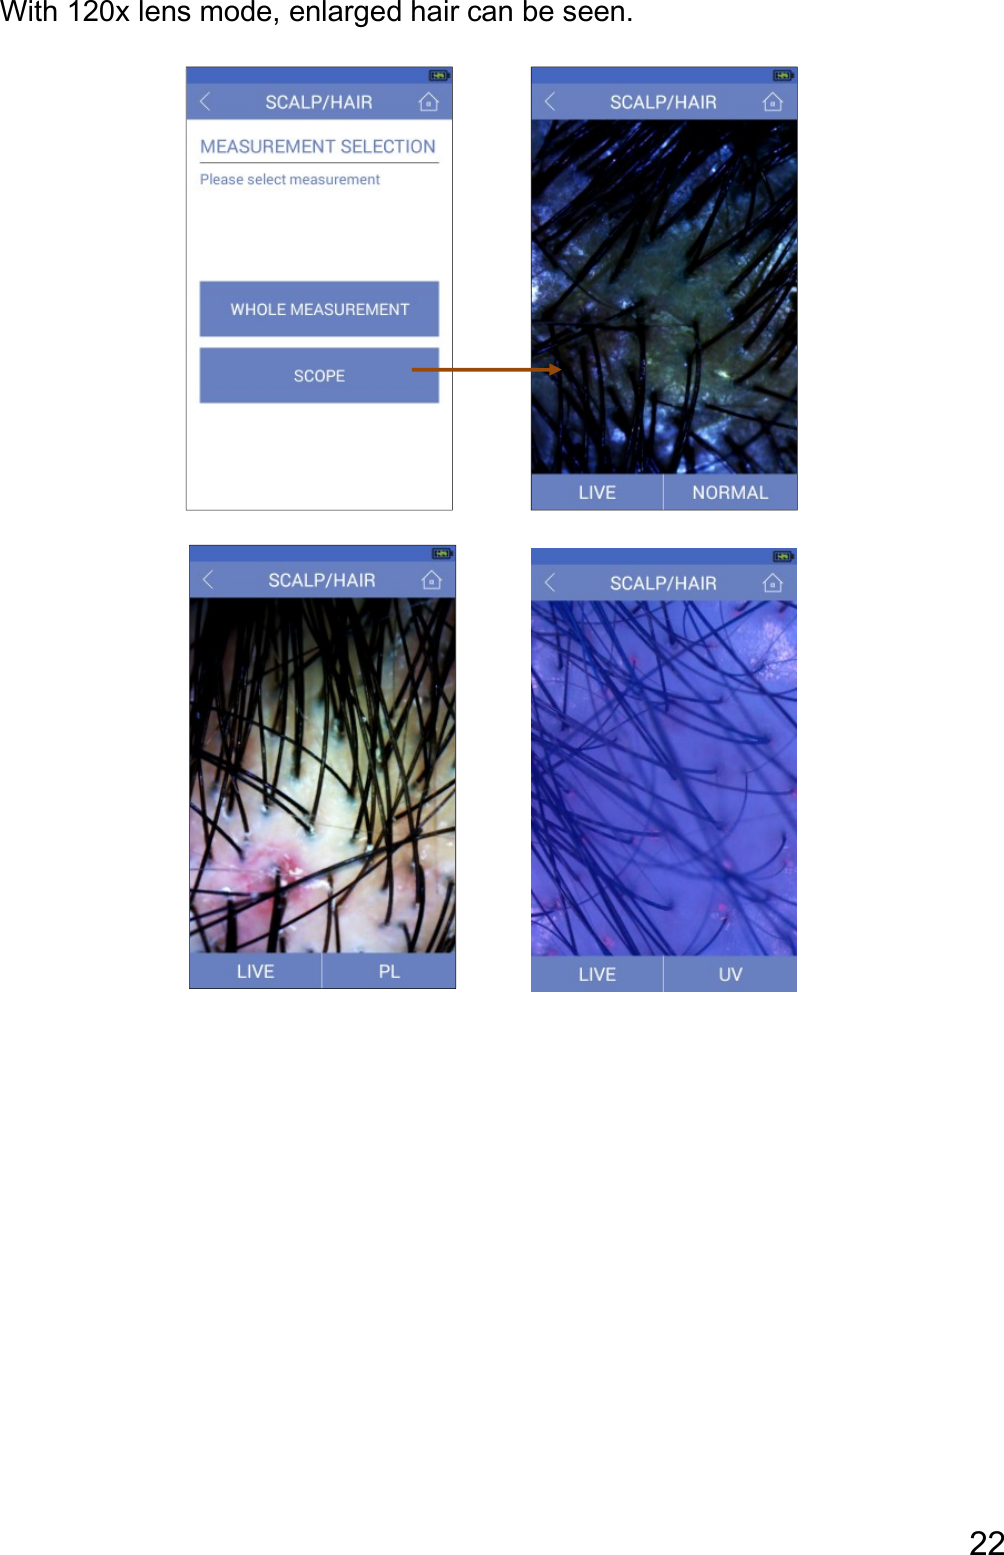
![9 5. Measurement Procedure 5.1 Measurement Item Selection User can choose individual measurement item for counseling. The [SKIN CARE] measurement items include Whole Measurement : to analyze whole items Basic : to measure skin texture, sebum and moisture Color : to measure skin color and pigmentation Functional : to measure sebum, pore and elasticity Eye Wrinkle : to compare the eye wrinkle with standard sample image Scope : to see the image depending on each lighting mode ( Normal, PL, UV mode ) Sensor : to measure moisture on skin 1) Select any measurement menu and put the MSA mini on cheek or eye wrinkle to be measured. And wait for a second or press the ‘Analysis’ button 2) All measurements will be done by predefined step automatically, so just put the scope on skin for some seconds. And [SCALP/HAIR] measurement items include Whole Measurement : to analyze Sebum, Keratin, Sensitivity and Density on scalp Scope : to see the image depending on each lighting mode ( Normal, PL, UV mode, 120x mode ) 1) Select ‘Whole Measurement ‘to start analysis or ‘Scope’ menu to see the live image 2) Put the MSA mini on scalp and wait for a second or press the ‘Measure’ button 3) Measurements will be done by predefined step automatically, so just put the scope on scalp for some seconds.](https://usermanual.wiki/True-Systems/MSAMINI/User-Guide-3830862-Page-11.png)
![10 5.2 Scope mode In the Scope mode of SKIN CARE, lighting mode can be changed, Normal, PL or UV lighting. And in the Scope mode of SCALP/HAIR, lighting mode can be changed to Normal, PL, UV lighting and 120x mode. [Measurement items and the tools for each measurement] Parameter Lighting Mode Measurement Target Skin Texture Normal Skin Pigmentation PL Skin Porphyrin on Pore UV Skin, Scalp Hair condition 120x Normal Hair Live image can be frozen by [FREEZE] button and released by [LIVE]. Lighting mode can be changed by sliding up menu. [ Lighting mode ] NORMAL : texture mode lighting PL : pigmentation mode lighting UV : UV mode lighting FREEZE : to stop the live image LIVE : to release the frozen image](https://usermanual.wiki/True-Systems/MSAMINI/User-Guide-3830862-Page-12.png)
![11 Step 1: Position Place the scope on target. For [Skin texture], [Pigmentation], [Skin Color], [Pore], [Eye Wrinkle], skin should be a direct target for measurement. Meanwhile, for [Sebum], [Keratin], skin indicators (sebum and keratin tapes) should be the target. To get the best image, press lens slightly to skin and change the pressure until get clean image. If the captured image is blurry, adjust focus of lens by rotating the knob. ⋇ When captured image is blurry; - Apply only slight pressure to MSA mini during the lens contacts on skin. Strong pressure will reduce image quality - Adjust focus of lens by rotating knob - No make-up is recommended in the clients’ skin. Any make-up may cause inaccurate measurements Step 2: Freeze, Analysis By pressing “Freeze” button, live images will be changed to frozen image. 5.3 Moisture Measurement When user selects [SENSOR] in the menu, MSA mini prepares moisture measurement. LCD Screen will look like the picture below. Step 1: Preparation Put the MSA mini on skin for the sensor pins to touch the skin equally and press the sensor surface with same pressure and press [MEASURE] button.](https://usermanual.wiki/True-Systems/MSAMINI/User-Guide-3830862-Page-13.png)
![12 Step 2: Moisture Sensor Ready Press [MEASURE] button to start the moisture measurement. A beep sound should be heard. When moisture sensor is ready to measure on skin, press the [MEASURE] button and will show the result with beep sound.](https://usermanual.wiki/True-Systems/MSAMINI/User-Guide-3830862-Page-14.png)
![13 5.4 Counseling Procedure in SKIN CARE In [SKIN CARE] measurement screen, different measurement course can be selected. 1. WHOLE MEASUREMENT Select the [WHOLE MEASUREMENT] button and MSA mini will be ready to measure the skin. Put the MSA mini on face skin as in the picture and wait for camera mode for some seconds or press [MEASURE] to start the measurement and wait until beep sounds. Whole measurement will take images and analyze skin texture, pigmentation, skin tone, pore, elasticity, keratin, sebum and moisture at one time measurement. Elasticity is calculated based on roughness of skin by image. Keratin and sebum are also calculated by image, which are related to color and shining etc. ( These may not accurate comparing to use tapes ) After measurement, the result will be shown as following result screen.](https://usermanual.wiki/True-Systems/MSAMINI/User-Guide-3830862-Page-15.png)
![14 Skin Texture [+] Pigmentation [+] Porphyrin [+] Summary of skin condition with skin level between 1 ~ 5 levels. Result bar graph. Higher number means better condition. To go to SKIN CARE menu To see the detail image, press [+] button in each result screen](https://usermanual.wiki/True-Systems/MSAMINI/User-Guide-3830862-Page-16.png)
![15 Moisture [+] 2. BASIC Select [BASIC] button and MSA mini will be ready to measure skin texture, sebum and moisture. Place the MSA mini on cheek and press the [MEASURE] button to start the imaging and analysis. And the result will be shown as](https://usermanual.wiki/True-Systems/MSAMINI/User-Guide-3830862-Page-17.png)
![16 3. COLOR In COLOR measurement, MSA mini will measure skin color and pigmentation. Place the MSA mini on cheek and press the [MEASURE] button to start the imaging and analysis. Summary of skin condition Result score between 1 ~ 5. Higher number means better condition.](https://usermanual.wiki/True-Systems/MSAMINI/User-Guide-3830862-Page-18.png)
![17 4. FUNCTIONAL [FUNCTIONAL] will measure the sebum, pore and elasticity. 5. EYE WRINKLE [EYE WRINKLE] will take image of eye wrinkle and compare the image with standard sample image Select [EYE WRINKLE] and place the MSA mini on eye rim and wait for](https://usermanual.wiki/True-Systems/MSAMINI/User-Guide-3830862-Page-19.png)
![18 camera be ready. Freeze the eye wrinkle image to be compared and open the standard sample images as in the picture. In case you want to image the eye wrinkle again, press the [LIVE] or [MY SKIN] button. 6. SCOPE In [SKIN CARE], three different lighting mode can be selected as Normal, PL or UV mode to see the skin texture, pigmentation or porphyrin on pore. Normal mode PL mode UV mode 7. SENSOR To measure the moisture on skin, select the [SENSOR] and put the MSA mini on skin to be measured and press the [MEASURE] button to start the sensor measurement. To measure the moisture again, MSA mini should be detached from skin once to get accurate measurement.](https://usermanual.wiki/True-Systems/MSAMINI/User-Guide-3830862-Page-20.png)
![19 5.5 Counseling Procedure in SCALP/HAIR In [SCALP/HAIR] measurement screen, there are two measurement courses. 1. WHOLE MEASUREMENT Select the [WHOLE MEASUREMENT] button and MSA mini will be ready to measure the scalp/hair, such as sebum, keratin, sensitivity on scalp and density of hair.](https://usermanual.wiki/True-Systems/MSAMINI/User-Guide-3830862-Page-21.png)
![20 Place the MSA mini on scalp to be measured and press [MEASURE] button to start the measurement. MSA mini will automatically take pictures in different lighting conditions. After a few seconds, your images for sebum and keratin will be show to be compared and selected with reference images. Others such as porphyrin and sensitivity on scalp and hair density will be calculated automatically and shown in result screen. To see the images t aken and compared, press [+] button in each graph.](https://usermanual.wiki/True-Systems/MSAMINI/User-Guide-3830862-Page-22.png)
![21 Sensitivity[+] Density[+] Keratin[+] Porpyrin[+] Sebum[+] 2. SCOPE Same as in Skin, the [SCOPE] function views scalp or hair according to different lighting condition, Normal, PL, UV or 120x magnification.](https://usermanual.wiki/True-Systems/MSAMINI/User-Guide-3830862-Page-23.png)
![23 5.6 Analysis of Results 1. Grading and interpretation 1) Analysis steps 2) Look-up Table for grades [Example] [Image] Grade Age Group <= 19 20 - 29 30 - 39 40 - 49 50 - 59 >=60 1 0 – 20 0 – 19 0 - 18 0 - 17 0 - 16 0 - 15 2 21 – 40 20 – 39 19 - 38 18 - 37 17 - 36 16 – 35 3 41 – 60 40 – 59 39 - 58 38 - 57 37 - 56 36 - 55 4 61 – 80 60 -79 59 - 78 58 - 77 57 - 76 56 – 75 5 81 - 99 80 - 99 79 - 99 78 - 99 77 - 99 76 – 99 1. Capture of skin image •Normal lighting mode•Polarized lighting mode 2. Image Processing•Conversion to black and white image3. Analysis of b/w image•calculate white in % of black area4. Normalize to score• all calculated values will be normalized to values between 0 ... 1005. Categorize by Look-up Table• A, B or C](https://usermanual.wiki/True-Systems/MSAMINI/User-Guide-3830862-Page-25.png)