Whirlpool Europe S r l COMBOEMS00 BUILT-IN MICROWAVE OVEN User Manual 8300669
Whirlpool Europe S.r.l. BUILT-IN MICROWAVE OVEN 8300669
UserManual.wiki
>
Whirlpool Europe S r l
>
COMBOEMS00 User Manual
>
Users Manual V
Contents
1.
Users Manual I
2.
Users Manual III
3.
Users Manual II
4.
Users Manual IV
5.
Users Manual V
6.
Users Manual VI
7.
Users Manual VII
8.
Users Manual VIII
9.
Users Manual IX
10.
Users Manual X
11.
Users Manual XI
Users Manual V
Navigation menu
Upload a User Manual
Namespaces
Wiki Guide
HTML
PDF
Info
Views
User Manual
Discussion / Help
Navigation

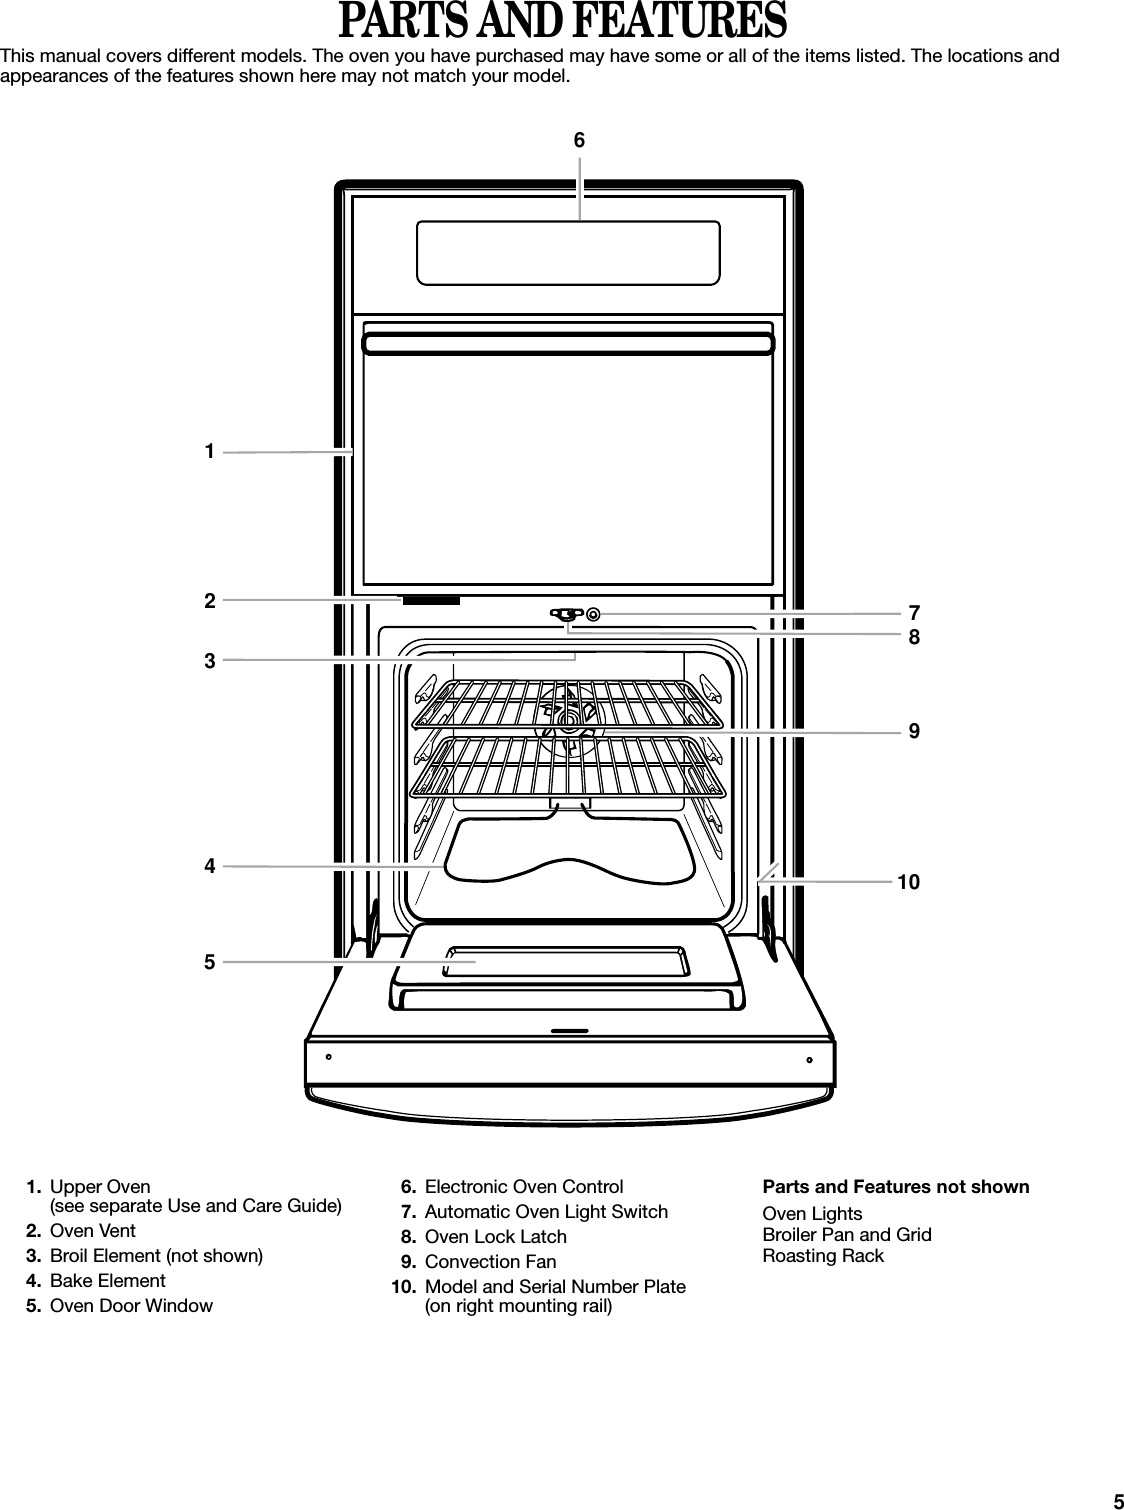
![6ELECTRONIC OVEN CONTROLDisplaysWhen power is first supplied to the appliance, everything on both displays will light up for 5 seconds. Then, “PF id = 27” or “PF id = 30” will appear on the lower oven display. Press OFF/CANCEL to clear display.Any other time “PF id = 27” or “PF id = 30” appears, a power failure occurred. Press OFF/CANCEL and reset the clock if needed.Lower Oven DisplayWhen the lower oven is in use, this display shows the lower oven temperature, heat source(s) and start time.During lower oven Timed Cooking, this display also shows a vertical bar and minute time countdown and the stop time (if entered).If “Err” appears on the display, an invalid pad was pressed.Press OFF/CANCEL and retry your entry.When the lower oven is not in use, this display is blank.Upper Oven DisplayWhen the upper oven is in use, this display shows the upper oven heat source(s), cooking power, quantities, weights and/or help prompts.If “RETRY” flashes on the display for one second, an invalid pad was pressed. Retry your entry.When the upper oven is not in use, this display shows the time of day or Timer countdown.Start/EnterThe lower oven START/ENTER pad begins any lower oven function except the Timer. If not pressed within 5 seconds after pressing a pad, “START?” will appear on the lower oven display as a reminder. If not pressed within 5 minutes after pressing a pad, the oven display will return to inactive mode (blank) and the programmed function will be cancelled.Off/CancelThe lower oven OFF/CANCEL pad stops any lower oven function except for the Clock, Timer and Control Lock.The cooling fan may continue to operate even after the lower oven OFF/CANCEL is pressed depending on the oven temperature.ClockThis is a 12 hour clock and does not show a.m. or p.m.To Set:Before setting, make sure the ovens, Timer and Timed Cooking are off.1. Press CLOCK.2. Press the number pads to set the time of day.3. Press CLOCK, START/ENTER or ADD MINUTE START.To remove the time of day from the display: Press and hold CLOCK for 5 seconds.To return the time of day to the display: Press CLOCK. The time should not have to be reset.TonesTones are audible signals, indicating the following:One tone■Valid pad press■Oven is preheated■Function has been enteredThree tones■Invalid pad pressFour tones■End-of-cycle■Reminder, repeating each minute after the end-of-cycle tones1. Lower Oven Display2. Number Pads3. Upper Oven Display4. Clock5. Timer6. Lower Oven Selectors7. Timed Cooking8. Lower Oven Start/Enter [Control Lock] and Lower Oven Off/Cancel9. Oven Light10. Upper Oven Control(see separate Use and Care Guide)1 2 3 4 56 7 108 9](https://usermanual.wiki/Whirlpool-Europe-S-r-l/COMBOEMS00.Users-Manual-V/User-Guide-760688-Page-6.png)


![12Timed CookingTimed Cooking allows the oven to be set to turn on at a certain time of day, cook for a set length of time, and/or shut off automatically. Delay start should not be used for food such as breads and cakes because they may not bake properly.To Set a Cook Time:1. Press BAKE or CONV BAKE.Press the number pads to enter a temperature other than the one displayed.2. Press COOK TIME.3. Press the number pads to enter the length of time to cook.4. Press START/ENTER.The start time, stop time, vertical bar countdown and minute time countdown will appear on the lower oven display.When the stop time is reached, the lower oven will shut off automatically and “End” will appear on the lower oven display.If enabled, end-of-cycle tones will sound, then reminder tones will sound every minute.5. Press lower oven OFF/CANCEL or open the lower oven door to clear the display and/or stop reminder tones.To Set a Cook Time and Stop Time [Delay Start]:Before setting, make sure the clock is set to the correct time of day. See “Clock” section.1. Press BAKE or CONV BAKE.Press the number pads to enter a temperature other than the one displayed.2. Press COOK TIME.3. Press the number pads to enter the length of time to cook.4. Press STOP TIME.5. Press the number pads to enter the time of day to stop.6. Press START/ENTER.The start time is automatically calculated and displayed.“DELAY” and the stop time will also appear on the lower oven display.When the start time is reached, the oven will automatically turn on. The vertical bar countdown and minute time countdown will appear on the lower oven display.When the stop time is reached, the lower oven will shut off automatically and “End” will appear on the lower oven display.If enabled, end-of-cycle tones will sound, then reminder tones will sound every minute.7. Press lower oven OFF/CANCEL or open the lower oven door to clear the display and/or stop reminder tones.OVEN CARESelf-Cleaning Cycle(on some models)IMPORTANT: The health of some birds is extremely sensitive to the fumes given off during the Self-Cleaning cycle. Exposure to the fumes may result in death to certain birds. Always move birds to another closed and well ventilated room.Self-clean the oven before it becomes heavily soiled. Heavy soil results in longer cleaning and more smoke.Keep the kitchen well-ventilated during the Self-Cleaning cycle to help get rid of heat, odors, and smoke.Do not block the oven vent(s) during the Self-Cleaning cycle. Air must be able to move freely. See “Oven Vent(s)” section.Do not clean, rub, damage or move the oven door gasket. The door gasket is essential for a good seal.Prepare Oven:■Remove the broiler pan, grid, cookware and bakeware and, on some models, the temperature probe from the oven.■Remove any foil from the oven because it may burn or melt, damaging the oven.■Remove oven racks to keep them shiny and easy to slide. See “General Cleaning” section for more information.■Hand clean inside door edge and the 1½ in. (3.8 cm) area around the inside oven cavity frame, being careful not to move or bend the gasket. This area does not get hot enough during self-cleaning to remove soil. Do not let water, cleaner, etc. enter slots on door frame. Use a damp cloth to clean this area.■Wipe out any loose soil to reduce smoke and avoid damage. At high temperatures, foods react with porcelain. Staining, etching, pitting or faint white spots can result. This will not affect cooking performance.WARNINGFood Poisoning HazardDo not let food sit in oven more than one hour before or after cooking.Doing so can result in food poisoning or sickness.WARNINGBurn HazardDo not touch the oven during the Self-Cleaning cycle.Keep children away from oven during Self-Cleaning cycle.Failure to follow these instructions can result in burns.](https://usermanual.wiki/Whirlpool-Europe-S-r-l/COMBOEMS00.Users-Manual-V/User-Guide-760688-Page-12.png)