Whirlpool Europe S r l COMBOEMS00 BUILT-IN MICROWAVE OVEN User Manual X
Whirlpool Europe S.r.l. BUILT-IN MICROWAVE OVEN Users Manual X
UserManual.wiki
>
Whirlpool Europe S r l
>
COMBOEMS00 User Manual
>
Users Manual X
Contents
1.
Users Manual I
2.
Users Manual III
3.
Users Manual II
4.
Users Manual IV
5.
Users Manual V
6.
Users Manual VI
7.
Users Manual VII
8.
Users Manual VIII
9.
Users Manual IX
10.
Users Manual X
11.
Users Manual XI
Users Manual X
Navigation menu
Upload a User Manual
Namespaces
Wiki Guide
HTML
PDF
Info
Views
User Manual
Discussion / Help
Navigation
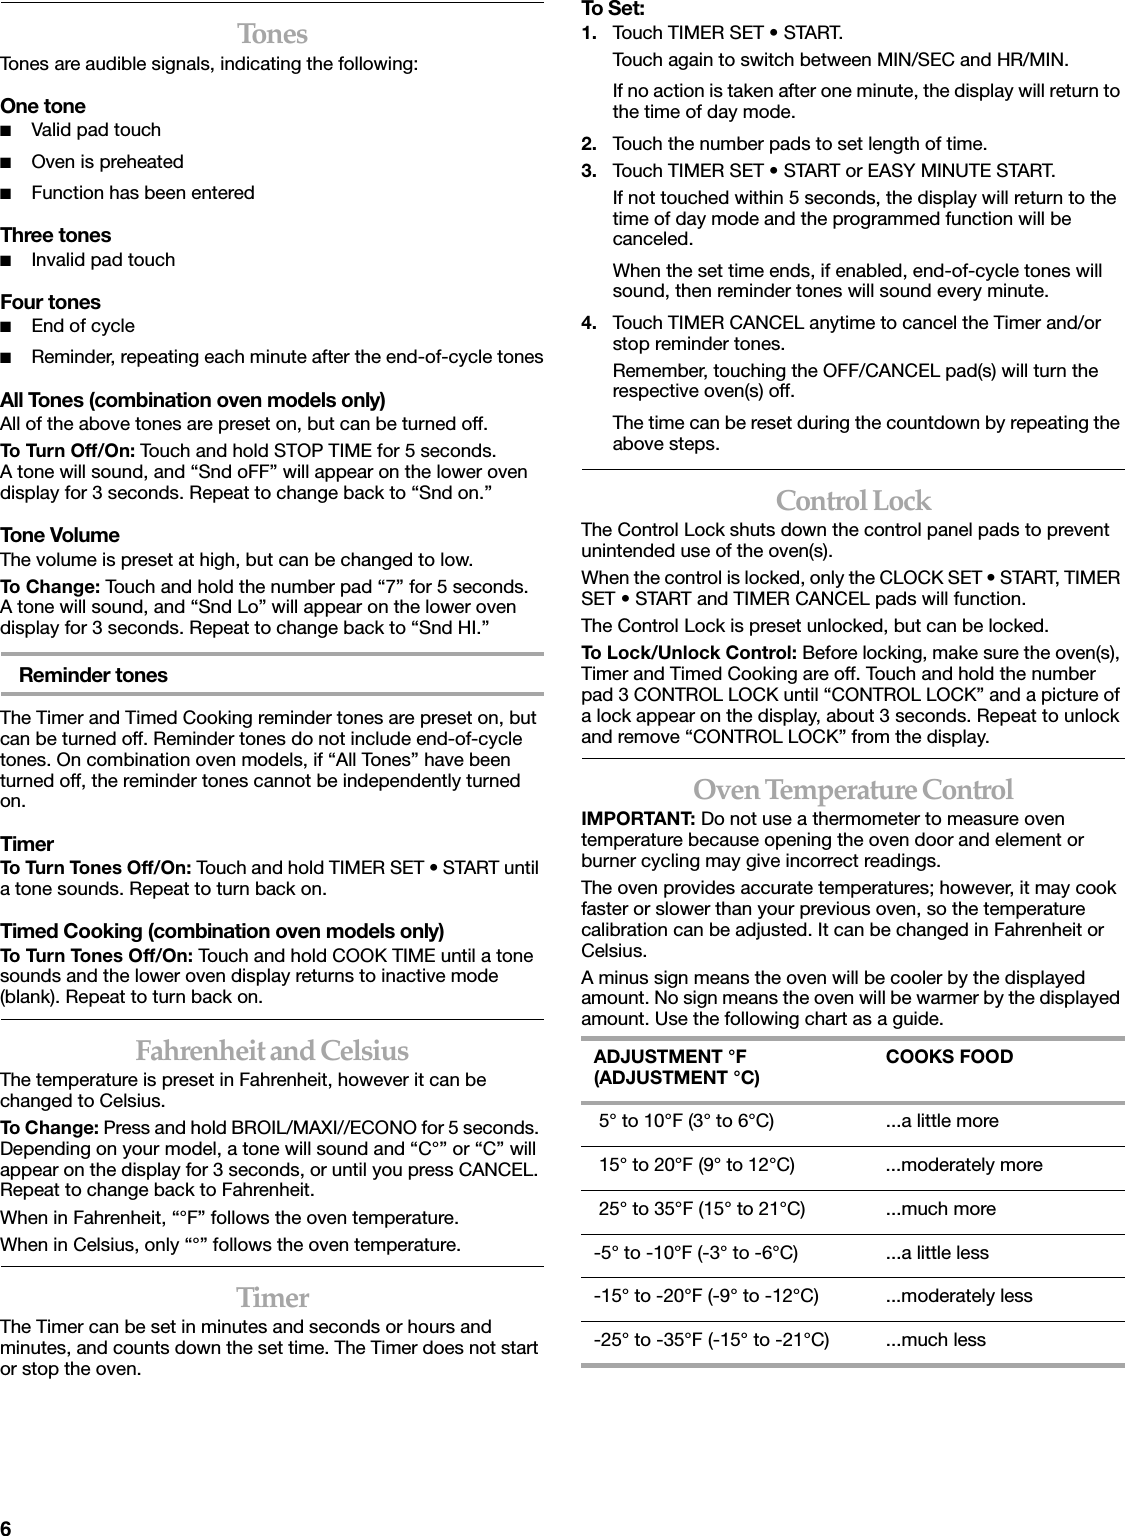
![11CONVECTION ROASTING CHARTConvection Broil(on some models)During convection broiling, the broil elements will cycle on and off in intervals to maintain oven temperature, while the fan constantly circulates the hot air.The temperature is preset at 450°F (232°C), but can be changed to a different temperature. Cooking times will vary depending on the rack position and temperature and may need to be adjusted.If the oven door is opened during convection broiling, the broil elements and fan will turn off immediately. They will come back on once the door is closed.To Convection Broil:Before convection broiling, see “Broil Maxi/Econo” section for general broiling guidelines. Position rack.Allow the oven to preheat for 5 minutes. Position food on the unheated grid on the broiler pan, then place it in the center of the oven rack with the longest side parallel to the door.Close the door.1. Press CONVECTION BROIL.Press the number pads to enter a temperature other than 450°F (232°C). The convection broil range can be set between 170°F and 500°F (77°C and 260°C).2. Press START.The set oven temperature will appear on the oven display until oven is turned off.3. Press CANCEL OFF when finished cooking.FOOD/RACK POSITIONCOOK TIME (min. per 1 lb [454 g])OVEN TEMP. INTERNAL FOOD TEMP.Beef, Rack Position 2Rib Roastraremediumwell-doneRib Roast (boneless)raremediumwell-doneRump, Sirloin Tip Roastraremediumwell-doneMeat Loaf20-2525-3030-3522-2527-3032-3520-2525-3030-3520-25300°F (149°C)300°F (149°C)300°F (149°C)325°F (163°C)140°F (60°C)160°F (71°C)170°F (77°C)140°F (60°C)160°F (71°C)170°F (77°C)140°F (60°C)160°F (71°C)170°F (77°C)165°F (74°C)Veal, Rack Position 2Loin, Rib, Rump Roastmediumwell-done 25-3530-40 325°F (163°C) 160°F (71°C)170°F (77°C)Pork, Rack Position 2Loin Roast (boneless)Shoulder Roast30-4035-40325°F (163°C)325°F (163°C)160°F-170°F (71°C-77°C)160°F-170°F (71°C-77°C)Ham, Rack Position 2Fresh (uncooked)Fully Cooked25-3515-20300°F (149°C)300°F (149°C)160°F (71°C)160°F (71°C)Lamb, Rack Position 2Leg, Shoulder Roastmediumwell-done 25-3030-35 300°F (149°C) 160°F (71°C)170°F (77°C)Chicken*, Rack Position 2Whole3-5 lbs(1.5-2.2 kg)5-7 lbs(2.2-3.1 kg)20-2515-20325°F (163°C)325°F (163°C)180°F (82°C)180°F (82°C)Turkey*, Rack Positions 1 or 213 lbs and under(5.85 kg)Over 13 lbs(5.85 kg)10-1510-12300°F (149°C)300°F (149°C)180°F (82°C)180°F (82°C)Cornish Game Hens*, Rack Position 2 or 31-1.5 lbs(0.5-0.7 kg) 50-60 325°F (163°C) 180°F (82°C)*Do not stuff poultry when convection roasting.A. Broil heatB. Convection fanFOOD/RACK POSITIONCOOK TIME (min. per 1 lb [454 g])OVEN TEMP. INTERNAL FOOD TEMP.BA](https://usermanual.wiki/Whirlpool-Europe-S-r-l/COMBOEMS00.Users-Manual-X/User-Guide-760706-Page-11.png)
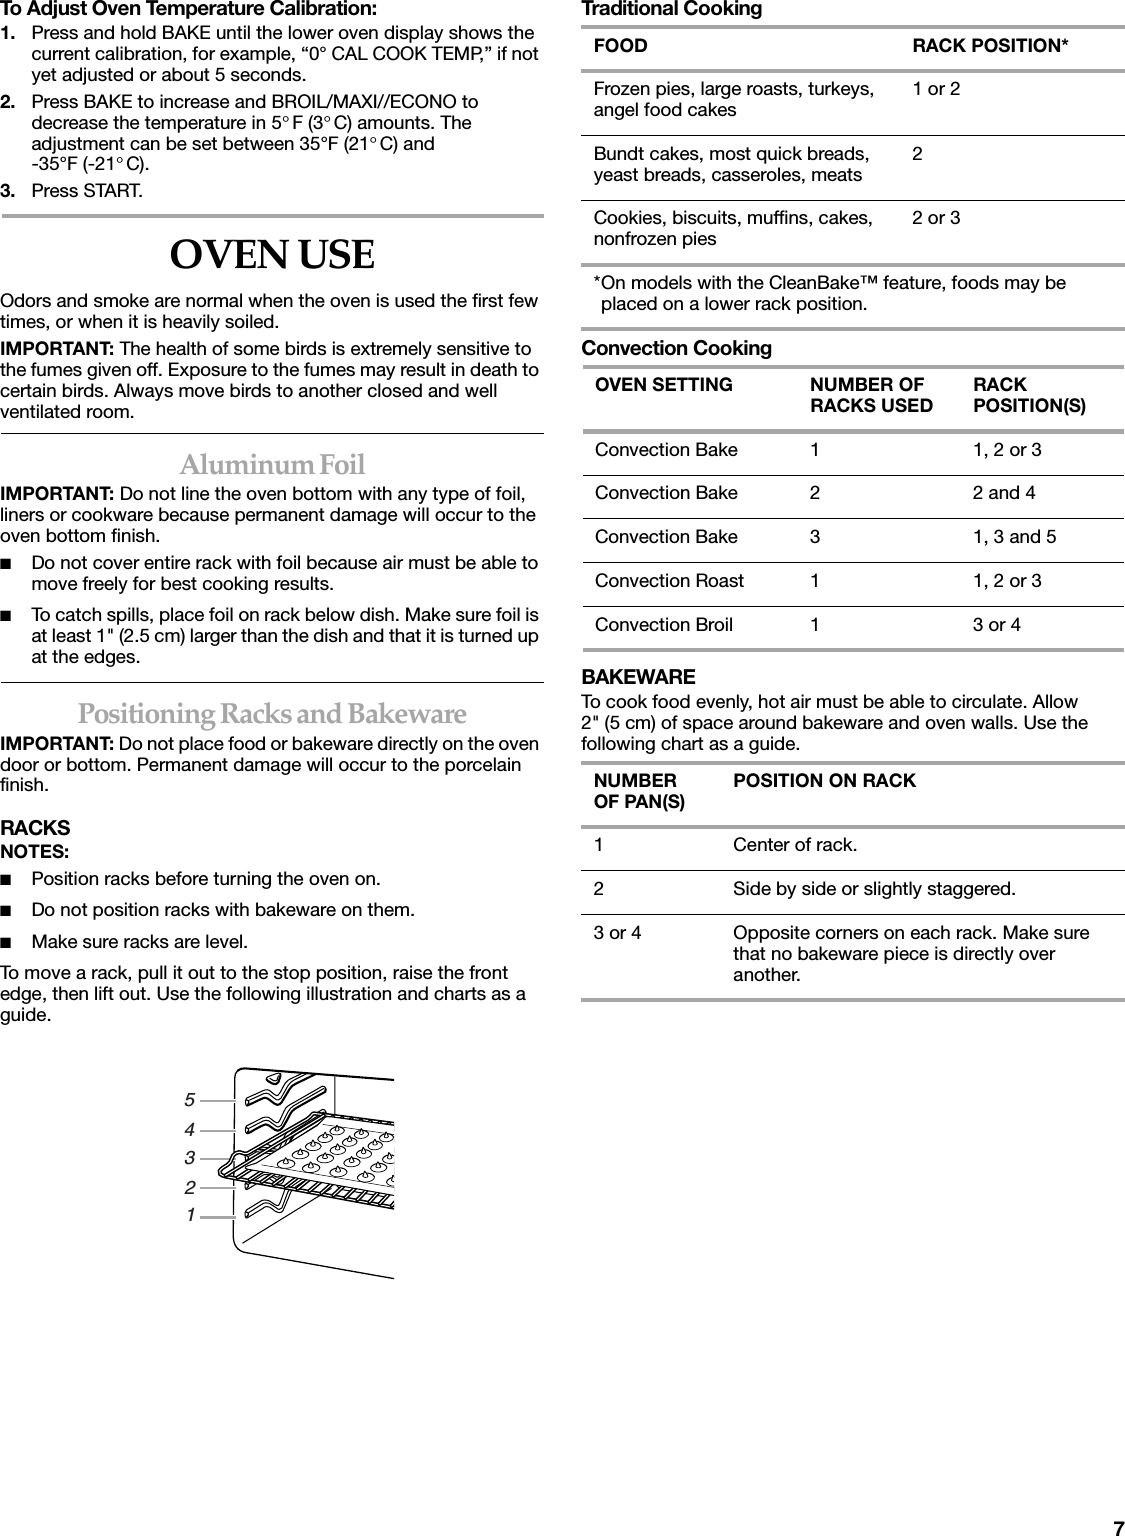
![12Convect Full Meal(on some models)Convect Full Meal lets you choose from 11 preset cooking cycles. A single pad includes an oven setting, an oven temperature, and a cook time or probe temperature. One pad is changeable to allow you to set your own cycle and save it for future use. Use the following chart as a guide.■All food should be at refrigerator or room temperature before placing in the oven. These settings and times are not for frozen foods.■Always check for doneness of meats and poultry with a meat thermometer. Test other foods for doneness by checking color and texture.To Use:Before using Convect Full Meal, place food in oven. If temperature probe is required, insert probe into food and plug probe into jack. See “Temperature Probe” section for diagram.1. Press CONVECT FULL MEAL.2. Press pad from chart.For example, number pads 1 to 0 or CONVECT FULL MEAL.3. Press START.The start time, stop time, vertical bar countdown and minute time countdown will appear on the oven display. The stop time will not appear if not set in the changeable cycle.When the cycle ends, “End” will appear in the oven display. If enabled, end-of-cycle tones will sound, then reminder tones will sound every minute.4. Press CANCEL OFF or open the oven door when finished cooking to clear the display.To Set Cycle:Before setting a cycle, start with the meat or main dish temperature and cook time. Choose baked goods with an oven temperature similar to those of the meat or main dish. Temperatures ranging from plus or minus 25°F to 50°F (14°C to 28°C) and cook times ranging from plus or minus 10 to 15 minutes are acceptable. Choose vegetables and fruits last.Press CONVECT FULL MEAL.1. Press any oven setting pad, for example BAKE.2. Press number pads to enter oven temperature.3. Press COOK TIME.4. Press number pads to enter length of time to cook in hours and minutesorPress 0 to do untimed cooking.5. Press CONVECT FULL MEAL to saveorPress START to save and immediately begin cycle.PAD/ OVEN SETTING OVEN TEMP. COOK TIME or PROBE TEMP.FOOD or MEAL1 Convection Bake325°F (163°C) 1 hr. Meat Loaf, Baked Potatoes, Pineapple Upside Down Cake2 Convection Roast325°F (163°C) 1 hr. 30 min. Turkey Breast, Stuffing Casserole, Peach Crisp3 Convection Roast350°F (177°C) 40 min. Stuffed Pork Chops, Baked Winter Squash, Bread Pudding4 Convection Bake375°F (191°C) 45 min. Oven Fried Chicken Pieces, Scalloped Potatoes, Cherry Pie5 Convection Bake425°F (218°C) 20 min. Baked Salmon Steaks, Roasted Vegetable Wedges, Biscuits6 Convection Roast325°F (163°C) 140°F (60°C) Beef, rare7 Convection Roast325°F (163°C) 155°F (68°C) Beef, mediumor Pork8 Convection Roast325°F (163°C) 165°F (74°C) Beef, well-done9 Convection Roast300°F (149°C) 135°F (56°C) Pot Roast(3 lbs [1.4 kg]) with vegetables0 Convection Bake325°F (163°C) 160°F (71°C) Casseroles](https://usermanual.wiki/Whirlpool-Europe-S-r-l/COMBOEMS00.Users-Manual-X/User-Guide-760706-Page-12.png)

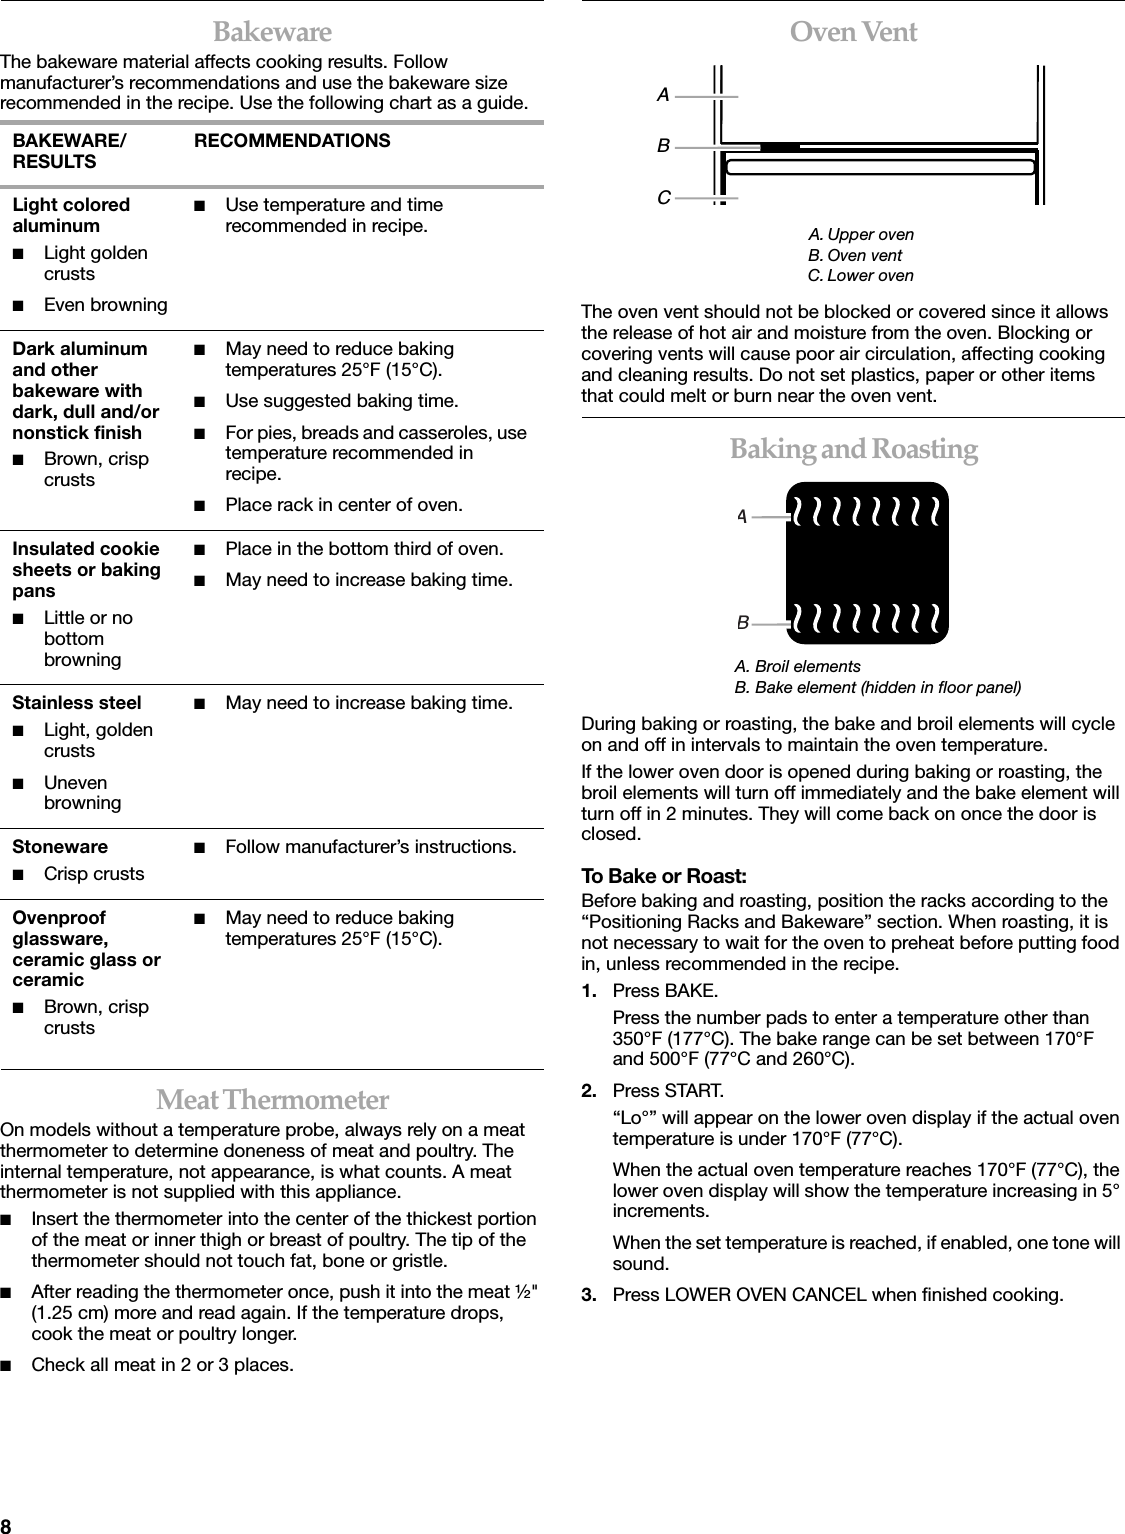
![15To Change Probe Temperature, Oven Setting:1. Unplug the probe, plug it back in, then close the oven door.2. Press the number pads to enter a probe temperature other than 160°F (71°C). The probe range can be set between 130°F and 190°F (54°C and 88°C).3. Press BAKE, CONVECTION BAKE or CONVECTION ROAST.Press the number pads to enter a temperature other than the one displayed.4. Press START.The set oven temperature will appear on the lower oven display throughout cooking.“Lo°” will appear as the probe temperature until the internal temperature of the food reaches 130°F (54°C). Then the display will show the probe temperature increasing in 5° increments.When the set probe temperature is reached, the lower oven will shut off automatically and “End” will appear on the lower oven display.If enabled, end-of-cycle tones will sound, then reminder tones will sound every minute.5. Press LOWER OVEN CANCEL or open the lower oven door to clear the display and/or stop reminder tones.Timed CookingTimed Cooking allows the oven to be set to turn on at a certain time of day, cook for a set length of time, and/or shut off automatically. Delay start should not be used for food such as breads and cakes because they may not bake properly.To Set a Cook Time:1. Press BAKE, CONVECTION BAKE or CONVECTION ROAST.Press the number pads to enter a temperature other than the one displayed.2. Press COOK TIME.3. Press number pads to enter the length of time to cook.4. Press START.The start time, stop time, vertical bar countdown and minute time countdown will appear on the lower oven display.When the stop time is reached, the lower oven will shut off automatically and “End” will appear on the lower oven display.If enabled, end-of-cycle tones will sound, then reminder tones will sound every minute.5. Press LOWER OVEN CANCEL or open the lower oven door to clear the display and/or stop reminder tones.To Set a Cook Time and Stop Time [Delay Start]:Before setting, make sure the clock is set to the correct time of day. See “Clock” section.1. Press BAKE, CONVECTION BAKE or CONVECTION ROAST.Press the number pads to enter a temperature other than the one displayed.2. Press COOK TIME.3. Press the number pads to enter the length of time to cook.4. Press STOP TIME.5. Press the number pads to enter the time of day to stop.6. Press START.The start time is automatically calculated and displayed.“DELAY” and the stop time will also appear on the lower oven display.When the start time is reached, the oven will automatically turn on. The vertical bar countdown and minute time countdown will appear on the lower oven display.When the stop time is reached, the lower oven will shut off automatically and “End” will appear on the lower oven display.If enabled, end-of-cycle tones will sound, then reminder tones will sound every minute.7. Press LOWER OVEN CANCEL or open the lower oven door to clear the display and/or stop reminder tones.OVEN CARESelf-Cleaning Cycle(on some models)IMPORTANT: The health of some birds is extremely sensitive to the fumes given off during the Self-Cleaning cycle. Exposure to the fumes may result in death to certain birds. Always move birds to another closed and well ventilated room.Self-clean the oven before it becomes heavily soiled. Heavy soil results in longer cleaning and more smoke.Keep the kitchen well-ventilated during the Self-Cleaning cycle to help get rid of heat, odors, and smoke.WARNINGFood Poisoning HazardDo not let food sit in oven more than one hour before or after cooking.Doing so can result in food poisoning or sickness. WARNINGBurn HazardDo not touch the oven during the Self-Cleaning cycle.Keep children away from oven during Self-Cleaning cycle.Failure to follow these instructions can result in burns.](https://usermanual.wiki/Whirlpool-Europe-S-r-l/COMBOEMS00.Users-Manual-X/User-Guide-760706-Page-15.png)